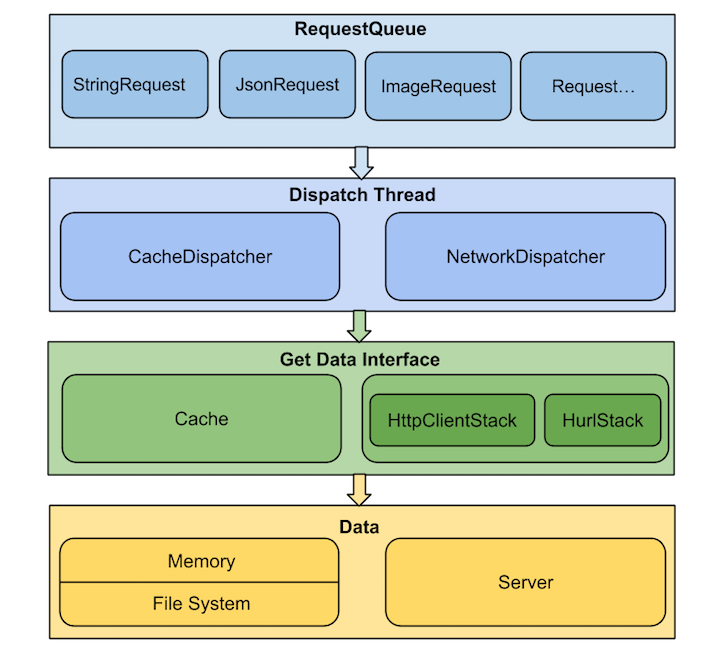
一、Volley工作流程圖:
NetworkResponse networkResponse = mNetwork.performRequest(request);
/** The network interface for processing requests. */private final Network mNetwork;
NetworkDispatcher networkDispatcher = new NetworkDispatcher(mNetworkQueue, mNetwork,mCache, mDelivery);
public RequestQueue(Cache cache, Network network, int threadPoolSize,ResponseDelivery delivery) {mCache = cache;mNetwork = network;mDispatchers = new NetworkDispatcher[threadPoolSize];mDelivery = delivery;}
//創建以stack為參數的Network對象Network network = new BasicNetwork(stack);//創建RequestQueue對象RequestQueue queue = new RequestQueue(new DiskBasedCache(cacheDir), network);queue.start();//繼續向下分析的入口HttpStack處理請求,并將結果轉換為可被ResponseDelivery處理的NetworkResponse。 @Overridepublic NetworkResponse performRequest(Request<?> request) throws VolleyError {long requestStart = SystemClock.elapsedRealtime();while (true) {HttpResponse httpResponse = null;byte[] responseContents = null;Map<String, String> responseHeaders = new HashMap<String, String>();try {/** 忽略網絡處理的細節*/// Gather headers.Map<String, String> headers = new HashMap<String, String>();addCacheHeaders(headers, request.getCacheEntry());/**運行網絡請求* 這里調用了HttpStack.performRequest。并得到一個HttpResponse返回結果*/httpResponse = mHttpStack.performRequest(request, headers);StatusLine statusLine = httpResponse.getStatusLine();int statusCode = statusLine.getStatusCode();responseHeaders = convertHeaders(httpResponse.getAllHeaders());/**新奇度驗證:* 304 Not Modified:client有緩沖的文件并發出了一個條件性的請求* (通常是提供If-Modified-Since頭表示客戶僅僅想比指定日期更新的文檔)。* server告訴客戶。原來緩沖的文檔還能夠繼續使用。*/if (statusCode == HttpStatus.SC_NOT_MODIFIED) {/** 解析成NetworkResponse,返回*/return new NetworkResponse(HttpStatus.SC_NOT_MODIFIED,request.getCacheEntry().data, responseHeaders, true);}// 推斷responses是否有實體信息,一些響應如204,并不包括content。所以須要驗證if (httpResponse.getEntity() != null) {//實體信息轉化成byte[]responseContents = entityToBytes(httpResponse.getEntity());} else {// 無實體信息情況responseContents = new byte[0];}// 超時情況處理.long requestLifetime = SystemClock.elapsedRealtime() - requestStart;logSlowRequests(requestLifetime, request, responseContents, statusLine);if (statusCode < 200 || statusCode > 299) {throw new IOException();}return new NetworkResponse(statusCode, responseContents, responseHeaders, false);} catch (SocketTimeoutException e) {attemptRetryOnException("socket", request, new TimeoutError());} catch (ConnectTimeoutException e) {attemptRetryOnException("connection", request, new TimeoutError());} catch (MalformedURLException e) {throw new RuntimeException("Bad URL " + request.getUrl(), e);} catch (IOException e) {...}}}?總結一下Network.performRequest所做的工作:
1、由傳入的HttpStack對象運行網絡請求:mHttpStack.performRequest()
2、解析響應結果,將HttpResponse解析成NetworkResponse;
3、對返回結果進行新奇度驗證(304)
4、將response的實體信息轉化為byte數組
5、超時情況處理,假設發生超時,認證失敗等錯誤。進行重試操作(attemptRetryOnException)。直到成功、拋出異常(不滿足重試策略等)結束。
attemptRetryOnException()是依據重試策略進行請求重試操作:
/*** Attempts to prepare the request for a retry. If there are no more attempts remaining in the* request's retry policy, a timeout exception is thrown.*/private static void attemptRetryOnException(String logPrefix, Request<?> request, VolleyError exception) throws VolleyError { RetryPolicy retryPolicy = request.getRetryPolicy(); int oldTimeout = request.getTimeoutMs(); try { retryPolicy.retry(exception); } catch (VolleyError e) { request.addMarker( String.format("%s-timeout-giveup [timeout=%s]", logPrefix, oldTimeout)); throw e; } request.addMarker(String.format("%s-retry [timeout=%s]", logPrefix, oldTimeout)); }
前面已經分析過。Android2.3之前使用?HttpClientStack,之后使用HurlStack。
public interface HttpStack {/*** Performs an HTTP request with the given parameters.* <p>A GET request is sent if request.getPostBody() == null. A POST request is sent otherwise,* and the Content-Type header is set to request.getPostBodyContentType().</p>* @param request the request to perform* @param 發起請求之前,加入額外的請求 Headers {@link Request#getHeaders()}*/public HttpResponse performRequest(Request<?> request, Map<String, String> additionalHeaders) throws IOException, AuthFailureError; }
2、HttpClientStack(使用HttpClient來實現)
@Overridepublic HttpResponse performRequest(Request<?> request, Map<String, String> additionalHeaders) throws IOException, AuthFailureError { HttpUriRequest httpRequest = createHttpRequest(request, additionalHeaders);//見附一 addHeaders(httpRequest, additionalHeaders); addHeaders(httpRequest, request.getHeaders()); onPrepareRequest(httpRequest);// Nothing.空函數,用于重寫;該函數在request被excute之前被調用 //一些網絡設置 HttpParams httpParams = httpRequest.getParams(); int timeoutMs = request.getTimeoutMs(); // TODO: Reevaluate this connection timeout based on more wide-scale // data collection and possibly different for wifi vs. 3G. HttpConnectionParams.setConnectionTimeout(httpParams, 5000); HttpConnectionParams.setSoTimeout(httpParams, timeoutMs); return mClient.execute(httpRequest); }
附一:createHttpRequest函數:
/*** 依據傳進來的request來構造合適的HttpUriRequest*/static HttpUriRequest createHttpRequest(Request<?> request,Map<String, String> additionalHeaders) throws AuthFailureError {switch (request.getMethod()) {case Method.DEPRECATED_GET_OR_POST: {// This is the deprecated way that needs to be handled for backwards compatibility.// If the request's post body is null, then the assumption is that the request is// GET. Otherwise, it is assumed that the request is a POST.byte[] postBody = request.getPostBody();if (postBody != null) {HttpPost postRequest = new HttpPost(request.getUrl());postRequest.addHeader(HEADER_CONTENT_TYPE, request.getPostBodyContentType());HttpEntity entity;entity = new ByteArrayEntity(postBody);postRequest.setEntity(entity);return postRequest;} else {return new HttpGet(request.getUrl());}}/***********一般較多使用的是POST與GET。其等同于HttpClient的一般使用流程***************/case Method.GET:return new HttpGet(request.getUrl());case Method.DELETE:return new HttpDelete(request.getUrl());case Method.POST: {HttpPost postRequest = new HttpPost(request.getUrl());//這里就看到了前面實現Request時,重寫getBodyContentType()函數的意義postRequest.addHeader(HEADER_CONTENT_TYPE, request.getBodyContentType());setEntityIfNonEmptyBody(postRequest, request);return postRequest;}case Method.PUT: {HttpPut putRequest = new HttpPut(request.getUrl());putRequest.addHeader(HEADER_CONTENT_TYPE, request.getBodyContentType());setEntityIfNonEmptyBody(putRequest, request);return putRequest;}default:throw new IllegalStateException("Unknown request method.");}} @Overridepublic HttpResponse performRequest(Request<?> request, Map<String, String> additionalHeaders)throws IOException, AuthFailureError {String url = request.getUrl();HashMap<String, String> map = new HashMap<String, String>();map.putAll(request.getHeaders());map.putAll(additionalHeaders);//UrlRewriter見附一if (mUrlRewriter != null) {String rewritten = mUrlRewriter.rewriteUrl(url);if (rewritten == null) {thrownew IOException("URL blocked by rewriter: " + url);}url = rewritten;}/**************HttpURLConnection的一般使用流程*******************/URL parsedUrl = new URL(url);HttpURLConnection connection = openConnection(parsedUrl, request);for (String headerName : map.keySet()) {connection.addRequestProperty(headerName, map.get(headerName));}setConnectionParametersForRequest(connection, request);// Initialize HttpResponse with data from the HttpURLConnection.ProtocolVersion protocolVersion = new ProtocolVersion("HTTP", 1, 1);int responseCode = connection.getResponseCode();if (responseCode == -1) {// -1 is returned by getResponseCode() if the response code could not be retrieved.// Signal to the caller that something was wrong with the connection.thrownew IOException("Could not retrieve response code from HttpUrlConnection.");}StatusLine responseStatus = new BasicStatusLine(protocolVersion,connection.getResponseCode(), connection.getResponseMessage());BasicHttpResponse response = new BasicHttpResponse(responseStatus);response.setEntity(entityFromConnection(connection));for (Entry<String, List<String>> header : connection.getHeaderFields().entrySet()) {if (header.getKey() != null) {Header h = new BasicHeader(header.getKey(), header.getValue().get(0));response.addHeader(h);}}return response;}
/** 對URLs在使用前進行重寫轉換*/public interface UrlRewriter {/*** Returns a URL to use instead of the provided one, or null to indicate* this URL should not be used at all.*/public String rewriteUrl(String originalUrl);} public HurlStack(UrlRewriter urlRewriter, SSLSocketFactory sslSocketFactory) {mUrlRewriter = urlRewriter;mSslSocketFactory = sslSocketFactory;}????NetworkResponse?networkResponse?= mNetwork.performRequest(request);
int statusCode?Http 響應狀態碼byte[] data?Body 數據Map<String, String> headers?響應 Headersboolean notModified?表示是否為 304 響應long networkTimeMs?請求耗時
public NetworkResponse(int statusCode, byte[] data, Map<String, String> headers,boolean notModified) {this.statusCode = statusCode;this.data = data;this.headers = headers;this.notModified = notModified;}public NetworkResponse(byte[] data) {this(HttpStatus.SC_OK, data, Collections.<String, String>emptyMap(), false);}public NetworkResponse(byte[] data, Map<String, String> headers) {this(HttpStatus.SC_OK, data, headers, false);}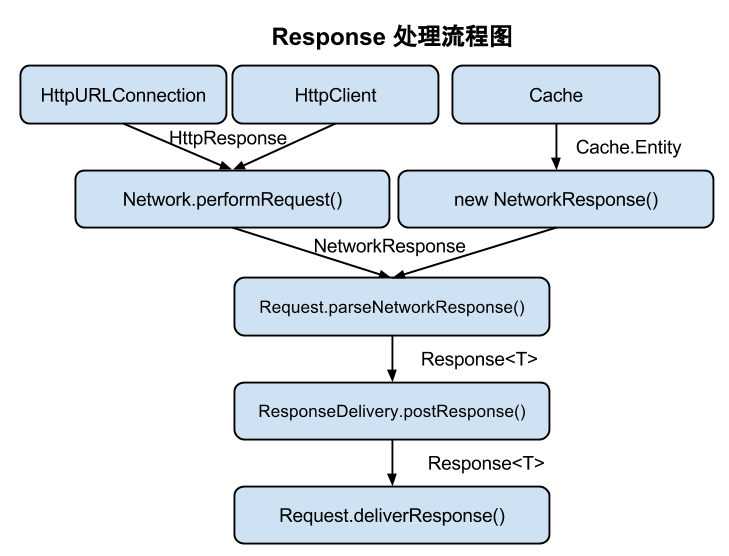
public RequestQueue(Cache cache, Network network, int threadPoolSize) {this(cache, network, threadPoolSize,new ExecutorDelivery(new Handler(Looper.getMainLooper())));
}
public ExecutorDelivery(final Handler handler) {// Make an Executor that just wraps the handler.mResponsePoster = new Executor() {@Overridepublic void execute(Runnable command) {handler.post(command);}};}比方:
@Override
public void postResponse(Request<?> request, Response<?> response, Runnable runnable) {request.markDelivered();request.addMarker("post-response");mResponsePoster.execute(new ResponseDeliveryRunnable(request, response, runnable));
}
private class ResponseDeliveryRunnable implements Runnable {private final Request mRequest;private final Response mResponse;private final Runnable mRunnable;public ResponseDeliveryRunnable(Request request, Response response, Runnable runnable) {mRequest = request;mResponse = response;mRunnable = runnable;}@SuppressWarnings("unchecked")@Overridepublic void run() {// If this request has canceled, finish it and don't deliver.if (mRequest.isCanceled()) {mRequest.finish("canceled-at-delivery");return;}// Deliver a normal response or error, depending.if (mResponse.isSuccess()) {mRequest.deliverResponse(mResponse.result);} else {mRequest.deliverError(mResponse.error);}// If this is an intermediate response, add a marker, otherwise we're done// and the request can be finished.if (mResponse.intermediate) {mRequest.addMarker("intermediate-response");} else {mRequest.finish("done");}// If we have been provided a post-delivery runnable, run it.if (mRunnable != null) {mRunnable.run();}}}以StringRequest為例,來看這個函數:
@Override
protected void deliverResponse(String response) {if (mListener != null) {mListener.onResponse(response);}
}//創建ImageLoader
imageLoader = new ImageLoader(httpUtils.getRequestQueue(), imageCache);
public ImageLoader(RequestQueue queue, ImageCache imageCache) {mRequestQueue = queue;mCache = imageCache;}// 獲取最大內存緩存大小
int maxMemory = (int) (Runtime.getRuntime().maxMemory() / 1024);
MAX_CACHE_SIZE = maxMemory / 8; // 定義為應用最大緩存的1/8mImageLruCache = new LruCache<String, Bitmap>(MAX_CACHE_SIZE){@Overrideprotected int sizeOf(String url, Bitmap bitmap){return bitmap.getRowBytes() * bitmap.getHeight() / 1024;}};// 創建ImageCache
imageCache = new ImageLoader.ImageCache() {@Overridepublic void putBitmap(String url, Bitmap bitmap) {mImageLruCache.put(url, bitmap);}@Overridepublic Bitmap getBitmap(String url) {return mImageLruCache.get(url);}
};public interface ImageCache {public Bitmap getBitmap(String url);public void putBitmap(String url, Bitmap bitmap);
}imageListener = ImageLoader.getImageListener(myImageView, default_pg, failed_pg);
imageLoader.get(imageUrl, imageListener);public ImageContainer get(String requestUrl, final ImageListener listener) {return get(requestUrl, listener, 0, 0);}public ImageContainer get(String requestUrl, ImageListener imageListener,int maxWidth, int maxHeight) {return get(requestUrl, imageListener, maxWidth, maxHeight, ImageView.ScaleType.CENTER_INSIDE);}public ImageContainer get(String requestUrl, ImageListener imageListener,int maxWidth, int maxHeight, ImageView.ScaleType scaleType) {// 假設操作不是在主線程,則直接拋出異常throwIfNotOnMainThread();// 為圖片的URL創建一個特定的cacheKey,注意這個cache還和圖片的大小及scaleType相關final String cacheKey = getCacheKey(requestUrl, maxWidth, maxHeight, scaleType);// 這里會使用自己定義的LruCache去獲取一個Bitmap實例Bitmap cachedBitmap = mCache.getBitmap(cacheKey);// 假設緩存中已經存在。則直接返回if (cachedBitmap != null) {// Return the cached bitmap.ImageContainer container = new ImageContainer(cachedBitmap, requestUrl, null, null);imageListener.onResponse(container, true);return container;}// 假設緩存中不存在,則進行獲取ImageContainer imageContainer =new ImageContainer(null, requestUrl, cacheKey, imageListener);// 通知Observer這時能夠使用默認的圖片imageListener.onResponse(imageContainer, true);// 推斷是否已經有了一個同樣的請求在等待BatchedImageRequest request = mInFlightRequests.get(cacheKey);if (request != null) {// If it is, add this request to the list of listeners.request.addContainer(imageContainer);return imageContainer;}// 創建一個Request,反復之前的流程Request<Bitmap> newRequest = makeImageRequest(requestUrl, maxWidth, maxHeight, scaleType,cacheKey);mRequestQueue.add(newRequest);mInFlightRequests.put(cacheKey,new BatchedImageRequest(newRequest, imageContainer));return imageContainer;
}先來看Request<Bitmap>:
protected Request<Bitmap> makeImageRequest(String requestUrl, int maxWidth, int maxHeight,ScaleType scaleType, final String cacheKey) {return new ImageRequest(requestUrl, new Listener<Bitmap>() {@Overridepublic void onResponse(Bitmap response) {onGetImageSuccess(cacheKey, response);}}, maxWidth, maxHeight, scaleType, Config.RGB_565, new ErrorListener() {@Overridepublic void onErrorResponse(VolleyError error) {onGetImageError(cacheKey, error);}});
}protected void onGetImageSuccess(String cacheKey, Bitmap response) {// 把獲取到的圖片存儲到緩存中mCache.putBitmap(cacheKey, response);// 能夠看到假設是多個同樣請求在等待,則能夠同一時候進行更新處理BatchedImageRequest request = mInFlightRequests.remove(cacheKey);if (request != null) {// Update the response bitmap.request.mResponseBitmap = response;// Send the batched responsebatchResponse(cacheKey, request);}
}@Override
protected void deliverResponse(Bitmap response) {mListener.onResponse(response);
}public static ImageListener getImageListener(final ImageView view,final int defaultImageResId, final int errorImageResId) {return new ImageListener() {@Overridepublic void onErrorResponse(VolleyError error) {if (errorImageResId != 0) {view.setImageResource(errorImageResId);}}@Overridepublic void onResponse(ImageContainer response, boolean isImmediate) {if (response.getBitmap() != null) {view.setImageBitmap(response.getBitmap());} else if (defaultImageResId != 0) {view.setImageResource(defaultImageResId);}}};
}能夠看到這里終于給View空間設置了圖片,以上就是Volley實現圖片載入的流程。


)


)
(二))


