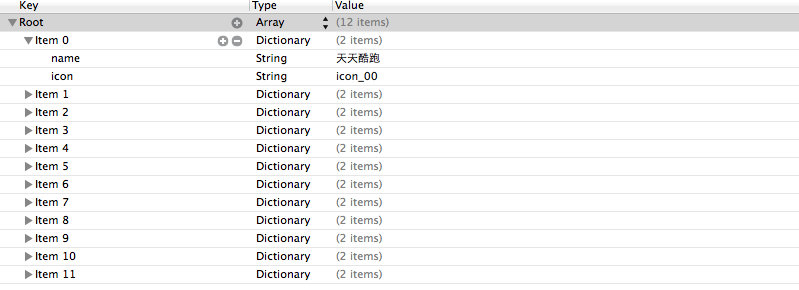
一、能完成功能的“問題代碼”
1.從plist中加載的數據
2.實現的代碼
 1 //
 2 //  LFViewController.m
 3 //  03-應用管理
 4 //
 5 //  Created by apple on 14-5-22.
 6 //  Copyright (c) 2014年 heima. All rights reserved.
 7 //
 8
 9 #import "LFViewController.h"
10
11 @interface LFViewController ()
12 @property (nonatomic, strong) NSArray *appList;
13 @end
14
15 @implementation LFViewController
16
17 - (NSArray *)appList
18 {
19     if (!_appList) {
20
21         // 1. 從mainBundle加載
22         NSBundle *bundle = [NSBundle mainBundle];
23         NSString *path = [bundle pathForResource:@"app.plist" ofType:nil];
24         _appList = [NSArray arrayWithContentsOfFile:path];
25
26         NSLog(@"%@", _appList);
27     }
28     return _appList;
29 }
30
31 - (void)viewDidLoad
32 {
33     [super viewDidLoad];
34
35     // 總共有3列
36     int totalCol = 3;
37     CGFloat viewW = 80;
38     CGFloat viewH = 90;
39
40     CGFloat marginX = (self.view.bounds.size.width - totalCol * viewW) / (totalCol + 1);
41     CGFloat marginY = 10;
42     CGFloat startY = 20;
43
44     for (int i = 0; i < self.appList.count; i++) {
45
46         int row = i / totalCol;
47         int col = i % totalCol;
48
49         CGFloat x = marginX + (viewW + marginX) * col;
50         CGFloat y = startY + marginY + (viewH + marginY) * row;
51
52         UIView *appView = [[UIView alloc] initWithFrame:CGRectMake(x, y, viewW, viewH)];
53
54         [self.view addSubview:appView];
55
56         // 創建appView內部的細節
57         // 0> 讀取數組中的字典
58         NSDictionary *dict = self.appList[i];
59
60         // 1> UIImageView
61         UIImageView *imageView = [[UIImageView alloc] initWithFrame:CGRectMake(0, 0, viewW, 50)];
62         imageView.image = [UIImage imageNamed:dict[@"icon"]];
63         imageView.contentMode = UIViewContentModeScaleAspectFit;
64         [appView addSubview:imageView];
65
66         // 2> UILabel
67         UILabel *label = [[UILabel alloc] initWithFrame:CGRectMake(0, imageView.bounds.size.height, viewW, 20)];
68         // 設置文字
69         label.text = dict[@"name"];
70         label.font = [UIFont systemFontOfSize:12.0];
71         label.textAlignment = NSTextAlignmentCenter;
72
73         [appView addSubview:label];
74
75         // 3> UIButton
76         // UIButtonTypeCustom和[[UIButton alloc] init]是等價的
77         UIButton *button = [UIButton buttonWithType:UIButtonTypeCustom];
78         button.frame = CGRectMake(15, 70, viewW - 30, 20);
79
80         [button setTitle:@"下載" forState:UIControlStateNormal];
81         // *** 不能使用如下代碼直接設置title
82 //        button.titleLabel.text = @"下載";
83         // @property中readonly表示不允許修改對象的指針地址,但是可以修改對象的屬性
84         button.titleLabel.font= [UIFont systemFontOfSize:14.0];
85
86         [button setBackgroundImage:[UIImage imageNamed:@"buttongreen"] forState:UIControlStateNormal];
87         [button setBackgroundImage:[UIImage imageNamed:@"buttongreen_highlighted"] forState:UIControlStateHighlighted];
88
89         [appView addSubview:button];
90     }
91 }
92
93 @end
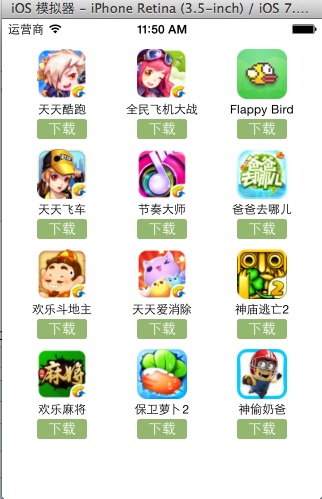
3.實現效果
4.代碼問題
在上述代碼的第62,69行,我們是直接通過字典的鍵名獲取plist中的數據信息,在viewController中需要直接和數據打交道,如果需要多次使用可能會因為不小心把鍵名寫錯,而程序并不報錯。鑒于此,可以考慮把字典數據轉換成一個模型,把數據封裝到一個模型中去,讓viewController不再直接和數據打交道,而是和模型交互。
一般情況下,設置數據和取出數據都使用“字符串類型的key”,編寫這些key時,編輯器沒有智能提示,需要手敲。如:
dict[@"name"] =?@"Jack";
NSString?*name = dict[@"name"];
手敲字符串key,key容易寫錯
Key如果寫錯了,編譯器不會有任何警告和報錯,造成設錯數據或者取錯數據
二、字典轉模型
1.字典轉模型介紹
示意圖:
?
字典轉模型的好處:
(1)降低代碼的耦合度
(2)所有字典轉模型部分的代碼統一集中在一處處理,降低代碼出錯的幾率
(3)在程序中直接使用模型的屬性操作,提高編碼效率?
(4)調用方不用關心模型內部的任何處理細節
字典轉模型的注意點:
模型應該提供一個可以傳入字典參數的構造方法
- (instancetype)initWithDict:(NSDictionary *)dict;
+ (instancetype)xxxWithDict:(NSDictionary *)dict;
提示:在模型中合理地使用只讀屬性,可以進一步降低代碼的耦合度。
?
?2.代碼示例(一)
新建一個類,用來作為數據模型
viewController.m文件代碼(字典轉模型)
#import "LFViewController.h"
#import "LFAppInfo.h"@interface LFViewController ()
@property (nonatomic, strong) NSArray *appList;
@end@implementation LFViewController// 字典轉模型
- (NSArray *)appList
{if (!_appList) {// 1. 從mainBundle加載NSBundle *bundle = [NSBundle mainBundle];NSString *path = [bundle pathForResource:@"app.plist" ofType:nil];
//        _appList = [NSArray arrayWithContentsOfFile:path];
        NSArray *array = [NSArray arrayWithContentsOfFile:path];// 將數組轉換成模型,意味著self.appList中存儲的是LFAppInfo對象// 1. 遍歷數組,將數組中的字典依次轉換成AppInfo對象,添加到一個臨時數組// 2. self.appList = 臨時數組
NSMutableArray *arrayM = [NSMutableArray array];for (NSDictionary *dict in array) {//用字典來實例化對象的工廠方法
            [arrayM addObject:[LFAppInfo appInfoWithDict:dict]];}_appList = arrayM;}return _appList;
}- (void)viewDidLoad
{[super viewDidLoad];// 總共有3列int totalCol = 3;CGFloat viewW = 80;CGFloat viewH = 90;CGFloat marginX = (self.view.bounds.size.width - totalCol * viewW) / (totalCol + 1);CGFloat marginY = 10;CGFloat startY = 20;for (int i = 0; i < self.appList.count; i++) {int row = i / totalCol;int col = i % totalCol;CGFloat x = marginX + (viewW + marginX) * col;CGFloat y = startY + marginY + (viewH + marginY) * row;UIView *appView = [[UIView alloc] initWithFrame:CGRectMake(x, y, viewW, viewH)];[self.view addSubview:appView];// 創建appView內部的細節// 0> 讀取數組中的AppInfo
//        NSDictionary *dict = self.appList[i];LFAppInfo *appInfo = self.appList[i];// 1> UIImageViewUIImageView *imageView = [[UIImageView alloc] initWithFrame:CGRectMake(0, 0, viewW, 50)];imageView.image = appInfo.image;imageView.contentMode = UIViewContentModeScaleAspectFit;[appView addSubview:imageView];// 2> UILabelUILabel *label = [[UILabel alloc] initWithFrame:CGRectMake(0, imageView.bounds.size.height, viewW, 20)];// 設置文字label.text = appInfo.name;label.font = [UIFont systemFontOfSize:12.0];label.textAlignment = NSTextAlignmentCenter;[appView addSubview:label];// 3> UIButton// UIButtonTypeCustom和[[UIButton alloc] init]是等價的UIButton *button = [UIButton buttonWithType:UIButtonTypeCustom];button.frame = CGRectMake(15, 70, viewW - 30, 20);[button setTitle:@"下載" forState:UIControlStateNormal];button.titleLabel.font= [UIFont systemFontOfSize:14.0];[button setBackgroundImage:[UIImage imageNamed:@"buttongreen"] forState:UIControlStateNormal];[button setBackgroundImage:[UIImage imageNamed:@"buttongreen_highlighted"] forState:UIControlStateHighlighted];[appView addSubview:button];button.tag = i;[button addTarget:self action:@selector(downloadClick:) forControlEvents:UIControlEventTouchUpInside];}
}- (void)downloadClick:(UIButton *)button
{NSLog(@"%d", button.tag);// 實例化一個UILabel顯示在視圖上,提示用戶下載完成UILabel *label = [[UILabel alloc] initWithFrame:CGRectMake(80, 400, 160, 40)];label.textAlignment = NSTextAlignmentCenter;label.backgroundColor = [UIColor lightGrayColor];LFAppInfo *appInfo = self.appList[button.tag];label.text = [NSString stringWithFormat:@"下載%@完成", appInfo.name];label.font = [UIFont systemFontOfSize:13.0];label.alpha = 1.0;[self.view addSubview:label];// 動畫效果// 動畫效果完成之后,將Label從視圖中刪除// 首尾式動畫,只能做動畫,要處理完成后的操作不方便
//    [UIView beginAnimations:nil context:nil];
//    [UIView setAnimationDuration:1.0];
//    label.alpha = 1.0;
//    [UIView commitAnimations];// block動畫比首尾式動畫簡單,而且能夠控制動畫結束后的操作// 在iOS中,基本都使用首尾式動畫[UIView animateWithDuration:2.0 animations:^{label.alpha = 0.0;} completion:^(BOOL finished) {// 刪除label
        [label removeFromSuperview];}];
}@end
模型.h文件代碼
#import <Foundation/Foundation.h>@interface LFAppInfo : NSObject// 應用程序名稱
@property (nonatomic, copy) NSString *name;
// 應用程序圖標名稱
@property (nonatomic, copy) NSString *icon;// 圖像
// 定義屬性時,會生成getter&setter方法,還會生成一個帶下劃線的成員變量
// 如果是readonly屬性,只會生成getter方法,同時沒有成員變量
@property (nonatomic, strong, readonly) UIImage *image;// instancetype會讓編譯器檢查實例化對象的準確類型
// instancetype只能用于返回類型,不能當做參數使用- (instancetype)initWithDict:(NSDictionary *)dict;
/** 工廠方法 */
+ (instancetype)appInfoWithDict:(NSDictionary *)dict;@end
模型.m文件數據處理代碼
 1 #import "LFAppInfo.h"
 2
 3 @interface LFAppInfo()
 4 {
 5     UIImage *_imageABC;
 6 }
 7 @end
 8
 9 @implementation LFAppInfo
10
11 - (instancetype)initWithDict:(NSDictionary *)dict
12 {
13     self = [super init];
14     if (self) {
15         self.name = dict[@"name"];
16         self.icon = dict[@"icon"];
17     }
18     return self;
19 }
20
21 + (instancetype)appInfoWithDict:(NSDictionary *)dict
22 {
23     return [[self alloc] initWithDict:dict];
24 }
25
26 - (UIImage *)image
27 {
28     if (!_imageABC) {
29         _imageABC = [UIImage imageNamed:self.icon];
30     }
31     return _imageABC;
32 }
33
34 @end
3.代碼示例(二)
數據信息:plist文件
?

字典轉模型(初步)
模型.h文件
 1 #import <Foundation/Foundation.h>
 2
 3 @interface LFQuestion : NSObject
 4
 5 @property (nonatomic, copy) NSString *answer;
 6 @property (nonatomic, copy) NSString *title;
 7 @property (nonatomic, copy) NSString *icon;
 8 @property (nonatomic, strong) NSArray *options;
 9
10 @property (nonatomic, strong) UIImage *image;
11
12 /** 用字典實例化對象的成員方法 */
13 - (instancetype)initWithDict:(NSDictionary *)dict;
14 /** 用字典實例化對象的類方法,又稱工廠方法 */
15 + (instancetype)questionWithDict:(NSDictionary *)dict;
16 @end
模型.m文件
 1 #import "LFQuestion.h"
 2
 3 @implementation LFQuestion
 4
 5 + (instancetype)questionWithDict:(NSDictionary *)dict
 6 {
 7     return [[self alloc] initWithDict:dict];
 8 }
 9
10 - (instancetype)initWithDict:(NSDictionary *)dict
11 {
12     self = [super init];
13     if (self) {
14         self.answer = dict[@"answer"];
15         self.icon = dict[@"icon"];
16         self.title = dict[@"title"];
17         self.options = dict[@"options"];
18
19         [self setValuesForKeysWithDictionary:dict];
20     }
21     return self;
22 }
viewController.m文件中的數據處理
 1 - (NSArray *)questions
 2 {
 3     if (!_questions) {
 4
 5         NSArray *array = [NSArray arrayWithContentsOfFile:[[NSBundle mainBundle] pathForResource:@"questions.plist" ofType:nil]];
 6
 7         NSMutableArray *arrayM = [NSMutableArray array];
 8
 9         for (NSDictionary *dict in array) {
10             [arrayM addObject:[LFQuestion questionWithDict:dict]];
11         }
12         _questions=arrayM;
13     }
14     return _questions;
15 }
字典轉模型(優化)
上面代碼可以做進一步的優化,從plist文件中讀取數據是可以交給模型去處理的,優化后代碼如下:
模型.h文件
#import <Foundation/Foundation.h>@interface LFQuestion : NSObject@property (nonatomic, copy) NSString *answer;
@property (nonatomic, copy) NSString *title;
@property (nonatomic, copy) NSString *icon;
@property (nonatomic, strong) NSArray *options;@property (nonatomic, strong) UIImage *image;/** 用字典實例化對象的成員方法 */
- (instancetype)initWithDict:(NSDictionary *)dict;
/** 用字典實例化對象的類方法,又稱工廠方法 */
+ (instancetype)questionWithDict:(NSDictionary *)dict;/** 從plist加載對象數組 */
+ (NSArray *)questions;@end
模型.m文件
 1 #import "LFQuestion.h"
 2
 3 @implementation LFQuestion
 4
 5 + (instancetype)questionWithDict:(NSDictionary *)dict
 6 {
 7     return [[self alloc] initWithDict:dict];
 8 }
 9
10 - (instancetype)initWithDict:(NSDictionary *)dict
11 {
12     self = [super init];
13     if (self) {
14         self.answer = dict[@"answer"];
15         self.icon = dict[@"icon"];
16         self.title = dict[@"title"];
17         self.options = dict[@"options"];
18
19         [self setValuesForKeysWithDictionary:dict];
20     }
21     return self;
22 }
23
24
25 + (NSArray *)questions
26 {
27     NSArray *array = [NSArray arrayWithContentsOfFile:[[NSBundle mainBundle] pathForResource:@"questions.plist" ofType:nil]];
28
29     NSMutableArray *arrayM = [NSMutableArray array];
30
31     for (NSDictionary *dict in array) {
32         [arrayM addObject:[LFQuestion questionWithDict:dict]];
33     }
34
35     return arrayM;
36 }
37 @end
viewController.m文件中的數據處理代碼部分
1 - (NSArray *)questions
2 {
3     if (!_questions) {
4         _questions = [LFQuestion questions];
5     }
6     return _questions;
7 }
補充內容:(KVC)的使用
(1)在模型內部的數據處理部分,可以使用鍵值編碼來進行處理
- (instancetype)initWithDict:(NSDictionary *)dict
{self = [super init];if (self) {
//        self.answer = dict[@"answer"];
//        self.icon = dict[@"icon"];
//        self.title = dict[@"title"];
//        self.options = dict[@"options"];// KVC (key value coding)鍵值編碼// cocoa 的大招,允許間接修改對象的屬性值// 第一個參數是字典的數值// 第二個參數是類的屬性[self setValue:dict[@"answer"] forKeyPath:@"answer"];[self setValue:dict[@"icon"] forKeyPath:@"icon"];[self setValue:dict[@"title"] forKeyPath:@"title"];[self setValue:dict[@"options"] forKeyPath:@"options"];}return self;
}
(2)setValuesForKeys的使用
上述數據操作細節,可以直接通過setValuesForKeys方法來完成。
- (instancetype)initWithDict:(NSDictionary *)dict
{self = [super init];if (self) {// 使用setValuesForKeys要求類的屬性必須在字典中存在,可以比字典中的鍵值多,但是不能少。
        [self setValuesForKeysWithDictionary:dict];}return self;
}
三、補充說明
1.readonly屬性
?(1)@property中readonly表示不允許修改對象的指針地址,但是可以修改對象的屬性。
?(2)通常使用@property關鍵字定義屬性時,會生成getter&setter方法,還會生成一個帶下劃線的成員變量。
?(3)如果是readonly屬性,只會生成getter方法,不會生成帶下劃線的成員變量.
2.instancetype類型
(1)instancetype會讓編譯器檢查實例化對象的準確類型?
(2)instancetype只能用于返回類型,不能當做參數使用
3.instancetype & id的比較
(1) instancetype在類型表示上,跟id一樣,可以表示任何對象類型
(2) instancetype只能用在返回值類型上,不能像id一樣用在參數類型上
(3) instancetype比id多一個好處:編譯器會檢測instancetype的真實類型


)

![[轉] sql server 跨數據庫調用存儲過程](http://pic.xiahunao.cn/[轉] sql server 跨數據庫調用存儲過程)


機電設備有限公司)


