OpenCV學習日記5
2017-05-27 10:44:35?1000sprites?閱讀數 2339更多
分類專欄:?計算機視覺
版權聲明:本文為博主原創文章,遵循?CC 4.0 BY-SA?版權協議,轉載請附上原文出處鏈接和本聲明。
本文鏈接:https://blog.csdn.net/shengshengwang/article/details/72779289
1. solvePnP,cvPOSIT(過時),solvePnPRansac [1][2]
解析:給定物體3D點集與對應的圖像2D點集,以及攝像頭內參數的情況下計算物體的3D姿態。solvePnP和cvPOSIT
的輸出都是旋轉矩陣和位移向量,不過solvePnP是精確解,cvPOSIT是近似解。因為solvePnP調用的是
cvFindExtrinsicCameraParams2,通過已知的內參進行未知外參求解;而cvPOSIT是用仿射投影模型近似透視投影模
型,不斷迭代計算出估計值(在物體深度變化相對于物體到攝像機的距離比較大時,該算法可能不收斂)。
solvePnP和solvePnPRansac函數原型,如下所示:
(1)cv2.solvePnP(objectPoints, imagePoints, cameraMatrix, distCoeffs[, rvec[, tvec[, useExtrinsicGuess[, flags]]]])?
→?retval, rvec, tvec
(2)cv2.solvePnPRansac(objectPoints, imagePoints, cameraMatrix, distCoeffs[, rvec[, tvec[, useExtrinsicGuess[,?
iterationsCount[, reprojectionError[, minInliersCount[, inliers[, flags]]]]]]]]) → rvec, tvec, inliers
?
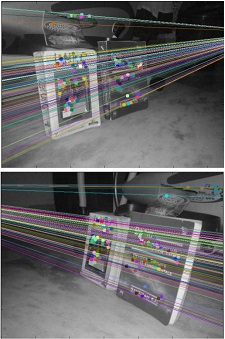
2. 對極幾何(Epipolar Geometry)


解析:
在雙目立體視覺系統中,有兩個攝像機在不同角度拍攝物理空間中的同一實體點,在兩副圖像上分別有兩個成像點。
立體匹配就是已知其中的一個成像點,在另一副圖像上找出該成像點的對應點。極線幾何約束是一種常用的匹配約束
技術,它是一種點對直線的約束,將對應點匹配從整幅圖像尋找壓縮到在一條直線上尋找。
-
import cv2 -
import numpy as np -
from matplotlib import pyplot as plt - ?
-
img1 = cv2.imread('myleft.jpg',0) #queryimage # left image -
img2 = cv2.imread('myright.jpg',0) #trainimage # right image - ?
-
sift = cv2.SIFT() -
# find the keypoints and descriptors with SIFT -
kp1, des1 = sift.detectAndCompute(img1,None) -
kp2, des2 = sift.detectAndCompute(img2,None) - ?
-
# FLANN parameters -
FLANN_INDEX_KDTREE = 0 -
index_params = dict(algorithm=FLANN_INDEX_KDTREE,trees=5) -
search_params = dict(checks=50) -
flann = cv2.FlannBasedMatcher(index_params,search_params) -
matches = flann.knnMatch(des1,des2,k=2) - ?
-
good = [] -
pts1 = [] -
pts2 = [] - ?
-
# ratio test as per Lowe's paper -
for i,(m,n) in enumerate(matches): -
if m.distance < 0.8*n.distance: -
good.append(m) -
pts2.append(kp2[m.trainIdx].pt) -
pts1.append(kp1[m.queryIdx].pt) - ?
-
pts1 = np.float32(pts1) -
pts2 = np.float32(pts2) -
F, mask = cv2.findFundamentalMat(pts1,pts2,cv2.FM_LMEDS) - ?
-
# we select only inlier points -
pts1 = pts1[mask.ravel()==1] -
pts2 = pts2[mask.ravel()==1] - ?
-
def drawlines(img1,img2,lines,pts1,pts2): -
''' img1 - image on which we draw the epilines for the points in img2 -
lines - corresponding epilines -
''' -
r,c = img1.shape -
img1 = cv2.cvtColor(img1,cv2.COLOR_GRAY2BGR) -
img2 = cv2.cvtColor(img2,cv2.COLOR_GRAY2BGR) -
for r,pt1,pt2 in zip(lines,pts1,pts2): -
color = tuple(np.random.randint(0,255,3).tolist()) -
x0,y0 = map(int, [0,-r[2]/r[1]]) -
x1,y1 = map(int, [c,-(r[2]+r[0]*c)/r[1]]) -
img1 = cv2.line(img1, (x0,y0), (x1,y1), color, 1) -
img1 = cv2.circle(img1,tuple(pt1),5,color,-1) -
img2 = cv2.circle(img2,tuple(pt2),5,color,-1) -
return img1,img2 - ?
-
# find epilines corresponding to points in right image (second image) and -
# drawing its lines on left image -
lines1 = cv2.computeCorrespondEpilines(pts2.reshape(-1,1,2), 2,F) -
lines1 = lines1.reshape(-1,3) -
img5,img6 = drawlines(img1,img2,lines1,pts1,pts2) - ?
-
# find epilines corresponding to points in left image (first image) and -
# drawing its lines on right image -
lines2 = cv2.computeCorrespondEpilines(pts1.reshape(-1,1,2), 1,F) -
lines2 = lines2.reshape(-1,3) -
img3,img4 = drawlines(img2,img1,lines2,pts2,pts1) - ?
-
plt.subplot(121),plt.imshow(img5) -
plt.subplot(122),plt.imshow(img3) -
plt.show()
結果輸出,如下所示:
說明:findFundamentalMat和computeCorrespondEpilines函數原型,如下所示:
(1)cv2.findFundamentalMat(points1, points2[, method[, param1[, param2[,?mask]]]]) →?retval, mask
(2)cv2.computeCorrespondEpilines(points, whichImage, F[, lines]) →?lines
?
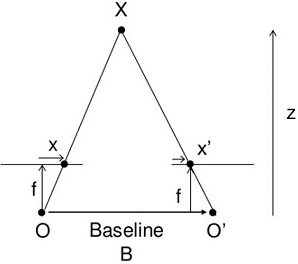
3. 立體圖像中的深度地圖
解析:如果同一場景有兩幅圖像,那么就可以獲得圖像的深度信息。如下所示:
構建立體圖像中的深度地圖過程,如下所示:
-
import cv2 -
from matplotlib import pyplot as plt - ?
-
imgL = cv2.imread('tsukuba_l.png',0) -
imgR = cv2.imread('tsukuba_r.png',0) -
stereo = cv2.createStereoBM(numDisparities=16, blockSize=15) -
disparity = stereo.compute(imgL,imgR) -
plt.imshow(disparity,'gray') -
plt.show()
結果輸出,如下所示:
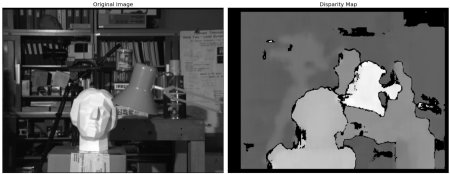
說明:左側為原始圖像,右側為深度圖像。結果中的噪音可以通過調整numDisparities和blockSize得到更好的結果。
createStereoBM函數原型為cv2.createStereoBM([numDisparities[, blockSize]]) → retval。
?
4. BRIEF算子詳解 [4]
解析:BRIEF(Binary Robust Independent Elementary Features)是一種對特征點描述子計算和匹配的快速方法,
但它不提供查找特征的方法,原始文獻推薦使用CenSurE特征檢測器。同時它不具備旋轉不變性和尺度不變性而且對
噪聲敏感。如下所示:
-
import cv2 - ?
-
img = cv2.imread('simple.jpg',0) -
# initiate STAR detector -
star = cv2.FeatureDetector_create("STAR") -
# initiate BRIEF extractor -
brief = cv2.DescriptorExtractor_create("BRIEF") -
# find the keypoints with STAR -
kp = star.detect(img,None) -
# compute the descriptors with BRIEF -
kp, des = brief.compute(img, kp) -
print brief.getInt('bytes') -
print des.shape
說明:在OpenCV中CenSurE檢測器叫做STAR檢測器。
?
5.opencv-4.0.0和Windows 7:ImportError: ERROR: recursion is detected during loading of "cv2" binary extensions. Check OpenCV installation
解析:
(1)將D:\opencv-4.0.0\build\python\cv2\python-3.6\cv2.cp36-win_amd64.pyd修改為cv2.pyd,然后拷貝到D:\Anaconda3\Lib\site-packages目錄。
(2)將D:\opencv-4.0.0\build\x64\vc15\bin目錄下的.dll文件拷貝到D:\Anaconda3\Library\bin目錄。
?
參考文獻:
[1]?Camera Calibration and 3D Reconstruction:
http://docs.opencv.org/2.4/modules/calib3d/doc/camera_calibration_and_3d_reconstruction.html
[2] 三維姿態:關于solvePnP與cvPOSIT:http://blog.csdn.net/abc20002929/article/details/8520063
[3]?極線約束(epipolar constraint):http://blog.csdn.net/tianwaifeimao/article/details/19544861
[4] createStereoBM:http://docs.opencv.org/3.0-
beta/modules/calib3d/doc/camera_calibration_and_3d_reconstruction.html#cv2.createStereoBM
[5] 特征工程BRIEF:http://dnntool.com/2017/03/27/brief/


![Java基礎教程:面向對象編程[2]](http://pic.xiahunao.cn/Java基礎教程:面向對象編程[2])

全過程)


)


