- 參考
- 包含: 1.層級的計算、2.訓練的整體流程、3.tensorboard畫圖、4.保存/使用模型、5.總體代碼(含詳細注釋)
1. 層級的計算
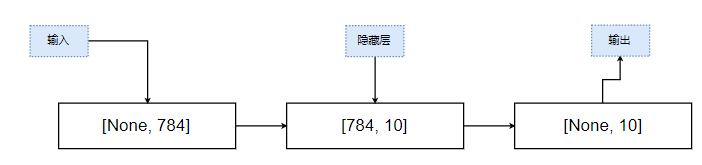
如上圖,mnist手寫數字識別的訓練集提供的圖片是 28 * 28 * 1的手寫圖像,初始識別的時候,并不知道一次要訓練多少個數據,因此輸入的規模為 [None, 784]. 由于最終的標簽輸出的是10個數據,因此輸出的規模為[None, 10], 中間采取一個簡單的全連接層作為隱藏層,規模為[784, 10]
2. 訓練的整體流程

- 1.首先定義占位符:
# 訓練集數據
x = tf.placehodler(tf.float32,	[None, 784])
# 訓練集標簽
y_true = tf.placeholder(rf.int32, [None, 10])
- 2.建立模型
# 隨機生成權重矩陣和偏置
# 權重
weight = tf.Variable(tf.random_normal([784, 10], mean =0.0, stddev=1.0), name="weight")
# 偏置
bias = tf.Variable(tf.constant(0.0, shape=[10]))
# 預測
y_predict = tf.matmul(x, weight) + bias
- 3.計算平均損失
loss = tf.reduce_mean(tf.nn.softmax_cross_entropy_with_logits(labels=y_true, logits=y_predict))
- 4.優化方案(梯度下降)
train_op = tf.train.GradientDescentOptimizer(0.1).minimize(loss)
- 5.計算損失率
equal_list = tf.equal(tf.argmax(y_true, 1), tf.argmax(y_predict, 1))
accuracy = tf.reduce_mean(tf.cast(equal_list, tf.float32))
3. tensorboard使用
# 按作用域命名
with tf.variable_scope("data"):passwith tf.variable_scope("full_layer"):pass
# 收集變量(單維度)
tf.summary.scalar("losses", loss)
tf.summary.scalar("acc", accuracy)# 收集變量(多維度)
tf.summary.histogram("weightes", weight)
tf.summary.histogram("biases", bias)# 將訓練的每一步寫入
with tf.Session() as sess:# 建立events文件,然后寫入filewriter = tf.summary.FileWriter("./tmp/", graph=sess.graph)for i in range(5000):# 寫入每步訓練的值summary = sess.run(merged, feed_dict={x: mnist_x, y_true: mnist_y})filewriter.add_summary(summary, i)
- 4.模型的保存/使用
# 模型的初始化(一般寫在Session上面)
saver = tf.train.Saver()# Session中為模型保存分配資源
with tf.Session() as sess:# 保存模型saver.save(sess, "./tmp/ckpt/fc_model")# 加載模型saver.restore(sess, "./tmp/ckpt/fc_model")# 預測for i in range(100):x, y = mnist.test.next_batch(1)predict = tf.argmax(sess.run(y_predict, feed_dict={x: x_test, y_true: y_test}), 1).eval()
5.總體代碼
import tensorflow as tf
from tensorflow.examples.tutorials.mnist import input_dataFLAGS = tf.app.flags.FLAGStf.app.flags.DEFINE_integer("is_train", 1, "0: 預測, 1: 訓練")"""單層(全連接層)實現手寫數字識別特征值[None, 784]  目標值[None, 10]1、 定義數據占位符特征值[None, 784]  目標值[None, 10]2、 建立模型隨機初始化權重和偏置w[784, 10]  by_predict = tf.matmul(x, w) + b3、 計算損失loss: 平均樣本的損失  4、 梯度下降優化5、 準確率計算:equal_list = tf.equal(tf.argmax(y, 1), tf.argmax(y_label, 1))    accuracy = tf.reduce_mean(tf.cast(equal_list, tf.float32))
"""def ful_connected():# 讀取數據mnist = input_data.read_data_sets("./data/mnist/input_data/", one_hot=True)# 1、 建立數據的占位符 x [None, 784]  y_true  [None, 10]with tf.variable_scope("data"):x = tf.placeholder(tf.float32, [None, 784])y_true = tf.placeholder(tf.int32, [None, 10])# 2、 建立一個全連接層的神經網絡 w [784, 10]  b [10]with tf.variable_scope("full_layer"):# 隨機初始化權重和偏置weight = tf.Variable(tf.random_normal([784, 10], mean=0.0, stddev=1.0), name="weight")bias = tf.Variable(tf.constant(0.0, shape=[10]))# 預測None個樣本的輸出結果  [None, 784] * [784, 10]  + [10] = [None, 10]y_predict = tf.matmul(x, weight) + bias# 3、 求出所有樣本的損失,然后求平均值with tf.variable_scope("softmax"):# 求平均交叉熵損失loss = tf.reduce_mean(tf.nn.softmax_cross_entropy_with_logits(labels=y_true, logits=y_predict))# 4、 梯度下降求出損失with tf.variable_scope("optimizer"):train_op = tf.train.GradientDescentOptimizer(0.1).minimize(loss)# 5、 計算準確率with tf.variable_scope("count_acc"):equal_list = tf.equal(tf.argmax(y_true, 1), tf.argmax(y_predict, 1))# equal_list  None個樣本  [1, 0, 1, 0, 1, 1, ....]accuracy = tf.reduce_mean(tf.cast(equal_list, tf.float32))# 收集變量(單維度)tf.summary.scalar("losses", loss)tf.summary.scalar("acc", accuracy)# 收集變量(高維度)tf.summary.histogram("weightes", weight)tf.summary.histogram("biases", bias)# 定義一個初始化變量的opinit_op = tf.global_variables_initializer()# 定義合并變量merged = tf.summary.merge_all()# 保存模型saver = tf.train.Saver()# 開啟會話訓練with tf.Session() as sess:# 初始化變量sess.run(init_op)# 建立events文件,然后寫入filewriter = tf.summary.FileWriter("./tmp/", graph=sess.graph)if FLAGS.is_train == 0:# 迭代步驟去訓練,更新參數預測for i in range(5000):# 取出真實存在的特征值 和 目標值mnist_x, mnist_y = mnist.train.next_batch(50)# 運行train_op訓練sess.run(train_op, feed_dict={x: mnist_x, y_true: mnist_y})# 寫入每步訓練的值summary = sess.run(merged, feed_dict={x: mnist_x, y_true: mnist_y})filewriter.add_summary(summary, i)# 打印損失print("訓練第%d步,準確率為:%f" % (i, sess.run(accuracy, feed_dict={x: mnist_x, y_true: mnist_y})))# 保存模型saver.save(sess, "./tmp/ckpt/fc_model")else:# 加載模型saver.restore(sess, "./tmp/ckpt/fc_model")# 預測for i in range(100):# 每次測試一張圖片x_test, y_test = mnist.test.next_batch(1)print("第%d張圖片是: %d,預測結果是:%d" % (i,tf.argmax(y_test, 1).eval(),tf.argmax(sess.run(y_predict, feed_dict={x: x_test, y_true: y_test}), 1).eval()))return Noneif __name__ == "__main__":ful_connected()
6. cnn版本的mnist
import tensorflow as  tf
from tensorflow.examples.tutorials.mnist import input_data"""使用卷積神經網絡實現 mnist的手寫數據集識別
""""""input: [None, 784]output: [784, 10]進入卷積時,首先需要改變圖片的形狀 [None, 784] --> [None, 28, 28, 1]卷積網絡設計:· 第一層卷積層: 32 * core(5*5)、strides(1)、padding="SAME"· 此時大小為: [None, 28, 28, 32]· 激活· 池化: 2*2、 strides(2)、 padding="SAME"· 此時大小為: [None, 14, 14, 32]· 第二層卷積層: 64 * core(5*5)、 strides(1)、 padding="SAME"· 此時大小為: [None, 14, 14, 64]· 激活· 池化: 2*2、 strides(2)、 padding="SAME"· 此時大小為: [None, 7, 7, 64]· 全連接層: [None, 7*7*64] * [7*7*64, 10] + bias = [None, 10]
"""# 定義個初始化權重的函數
def weight_variable(shape):w = tf.Variable(tf.random_normal(shape=shape, mean=0.0, stddev=1.0))return w# 定義一個初始化偏置的函數
def bias_variables(shape):b = tf.Variable(tf.constant(0.0, shape=shape))return bdef model():"""自定義的卷積模型:return:"""# 1、準備數據的占位符 x [None, 784] 、 y_true [None, 10]with tf.variable_scope("data"):x = tf.placeholder(tf.float32, [None, 784])y_true = tf.placeholder(tf.int32, [None, 10])# 2、一卷積層 卷積: 5*5*1, 32個, strides = 1 、激活、池化with tf.variable_scope("conv1"):# 隨機初始化權重,偏置[32]w_conv1 = weight_variable([5, 5, 1, 32])b_conv1 = bias_variables([32])# 對x進行形狀的改變 [None, 784] -> [None, 28, 28, 1]x_reshape = tf.reshape(x, [-1, 28, 28, 1])# [None, 28, 28, 1] -> [None, 28, 28, 32]x_relu1 = tf.nn.relu(tf.nn.conv2d(x_reshape, w_conv1, strides=[1, 1, 1, 1], padding="SAME") + b_conv1)# 池化 2*2, strides2 [None, 28, 28, 32] -> [None, 14, 14, 32]x_pool1 = tf.nn.max_pool(x_relu1, ksize=[1, 2, 2, 1], strides=[1, 2, 2, 1], padding="SAME")# 3、二卷積層  5*5*32, 64個filter, strides= 1with tf.variable_scope("conv2"):w_conv2 = weight_variable([5, 5, 32, 64])b_conv2 = bias_variables([64])# 卷積、激活、池化計算# [None, 14, 14, 32] -> [None, 14, 14, 64]x_relu2 = tf.nn.relu(tf.nn.conv2d(x_pool1, w_conv2, strides=[1, 1, 1, 1], padding="SAME") + b_conv2)# 池化 2*2, strides2 [None, 14, 14, 64] -> [None, 7, 7, 64]x_pool2 = tf.nn.max_pool(x_relu2, ksize=[1, 2, 2, 1], strides=[1, 2, 2, 1], padding="SAME")# 4、全連接層 [None, 7, 7, 64] --> [None, 7*7*64] * [7*7*64, 10] + [10] = [None, 10]# 隨機初始化權重和偏置w_fc = weight_variable([7 * 7 * 64, 10])b_fc = bias_variables([10])# 修改形狀: [None, 7, 7, 64] -> [None, 7*7*64]x_fc_reshape = tf.reshape(x_pool2, [-1, 7 * 7 * 64])# 矩陣運算,得出每個樣本的10個結果y_predict = tf.matmul(x_fc_reshape, w_fc) + b_fcreturn x, y_true, y_predictdef conf_fc():# 1、 讀取數據mnist = input_data.read_data_sets("./data/mnist/input_data/", one_hot=True)# 2、 定義模型,得出輸出x, y_true, y_predict = model()# 3、 求出所有的損失,然后求平均值with tf.variable_scope("soft_cross"):# 求平均交叉熵損失loss = tf.reduce_mean(tf.nn.softmax_cross_entropy_with_logits(labels=y_true, logits=y_predict))# 4、 梯度下降求出損失with tf.variable_scope("optimizer"):train_op = tf.train.GradientDescentOptimizer(0.00005).minimize(loss)# 5、 計算準確率with tf.variable_scope("acc"):equal_list = tf.equal(tf.argmax(y_true, 1), tf.argmax(y_predict, 1))accuracy = tf.reduce_mean(tf.cast(equal_list, tf.float32))# 定義一個初始變量opinit_op = tf.global_variables_initializer()# 開啟會話運行with tf.Session() as sess:sess.run(init_op)# 循環去訓練for i in range(1000):# 取出真實存在的特征值和目標值mnist_x, mnist_y = mnist.train.next_batch(50)# 運行train_op訓練sess.run(train_op, feed_dict={x: mnist_x, y_true: mnist_y})# 打印損失print("訓練第%d步,準確率為:%f" % (i, sess.run(accuracy, feed_dict={x: mnist_x, y_true: mnist_y})))return Noneif __name__ == "__main__":conf_fc()
)
![[mmdetection] - win10配置mmdetection(1.1和2.0) + 訓練網絡(faster-rcnn、mask-rcnn)](http://pic.xiahunao.cn/[mmdetection] - win10配置mmdetection(1.1和2.0) + 訓練網絡(faster-rcnn、mask-rcnn))

![[pytorch、學習] - 3.5 圖像分類數據集](http://pic.xiahunao.cn/[pytorch、學習] - 3.5 圖像分類數據集)


![[pytorch、學習] - 3.6 softmax回歸的從零開始實現](http://pic.xiahunao.cn/[pytorch、學習] - 3.6 softmax回歸的從零開始實現)

)
![[pytorch、學習] - 3.7 softmax回歸的簡潔實現](http://pic.xiahunao.cn/[pytorch、學習] - 3.7 softmax回歸的簡潔實現)


![[pytorch、學習] - 3.9 多重感知機的從零開始實現](http://pic.xiahunao.cn/[pytorch、學習] - 3.9 多重感知機的從零開始實現)


,視圖定義、創建視圖、修改視圖)
![[pytorch、學習] - 3.10 多重感知機的簡潔實現](http://pic.xiahunao.cn/[pytorch、學習] - 3.10 多重感知機的簡潔實現)

