一?首先實現內網穿透,公眾號需要連接我們的服務器,內外無法訪問,所以先實現自己的內網可以測試時連接外網,下載natapp,選擇windows,順便下載config,ini 配置文件。注冊好購買免費的隧道 然后將token寫入配置文件中,操作很簡單,windows中需要加入環境變量,因為我直接放到D盤的natapp文件夾中,所以路勁為D:\natapp即可,雙擊.exe 就能啟動
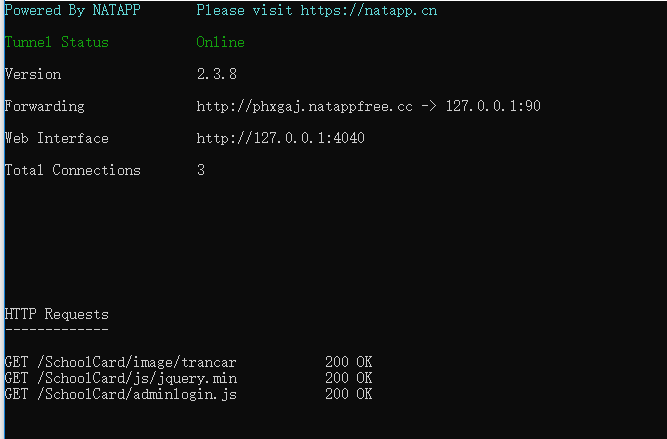 ???http://phxgaj.natappfree.cc -> 127.0.0.1:90? 通過前面的網址phxgaj.natappfree.cc 訪問就能連接我們自己的內網環境了。
二?自然是注冊微信公眾號了,注冊的時候要瞪大眼睛了,微信公眾平臺 微信開發平臺 服務號訂閱號小程序一定要分清楚,一個郵箱只能注冊一個功能,所以要慎重選,我注冊的是 微信公眾平臺的 服務號,適合公司使用
三 公眾號接入,在開發者配置中,寫進這個方法,我用的是springmvc,所以要寫到這個指定的路徑
?
import java.io.IOException;5 import java.io.UnsupportedEncodingException;6 import java.security.MessageDigest;7 import java.security.NoSuchAlgorithmException;8 import java.util.Arrays;9 import java.util.Map; 10 11 import javax.servlet.http.HttpServletRequest; 12 import javax.servlet.http.HttpServletResponse; 13 14 import org.slf4j.Logger; 15 import org.slf4j.LoggerFactory; 16 import org.springframework.beans.BeansException; 17 import org.springframework.context.ApplicationContext; 18 import org.springframework.context.ApplicationContextAware; 19 import org.springframework.stereotype.Component; 20 import org.springframework.stereotype.Controller; 21 import org.springframework.web.bind.annotation.RequestMapping; 22 import org.springframework.web.bind.annotation.RequestMethod; 23 24 import com.alibaba.fastjson.JSON; 25 import com.alibaba.fastjson.JSONObject; 26 import com.fuyin.mp.entity.AccessToken; 27 import com.fuyin.mp.utils.GetMenuJson; 28 import com.fuyin.mp.utils.MessageHandlerUtil; 29 import com.fuyin.mp.utils.NetWorkHelper; 30 import com.fuyin.mp.utils.WxaApi; 31 @Controller 32 @RequestMapping("wxconnect.action") 33 public class WxBase { 34 private static final Logger logger = LoggerFactory.getLogger(WxBase.class); 35 /* 36 * 自定義token, 用作生成簽名,從而驗證安全性 37 * */ 38 private final String TOKEN = WxaApi.TOKEN; 39 /** 40 * 檢驗簽名 41 * @param req 42 * @param res 43 */ 44 @RequestMapping(method = RequestMethod.GET) 45 public void wxconnect(HttpServletRequest req,HttpServletResponse res){ 46 logger.debug("-----開始校驗簽名-----"); 47 /** 48 * 接收微信服務器發送請求時傳遞過來的參數 49 */ 50 String signature = req.getParameter("signature"); 51 String timestamp = req.getParameter("timestamp"); 52 String nonce = req.getParameter("nonce"); //隨機數 53 String echostr = req.getParameter("echostr");//隨機字符串 54 55 /** 56 * 將token、timestamp、nonce三個參數進行字典序排序 57 * 并拼接為一個字符串 58 */ 59 String sortStr = sort(TOKEN,timestamp,nonce); 60 /** 61 * 字符串進行shal加密 62 */ 63 String mySignature = shal(sortStr); 64 /** 65 * 校驗微信服務器傳遞過來的簽名 和 加密后的字符串是否一致, 若一致則簽名通過 66 */ 67 if(!"".equals(signature) && !"".equals(mySignature) && signature.equals(mySignature)){ 68 try { 69 logger.debug("-----簽名校驗通過-----"); 70 res.getWriter().write(echostr); 71 } catch (IOException e) { 72 // TODO Auto-generated catch block 73 e.printStackTrace(); 74 } 75 }else { 76 logger.debug("-----校驗簽名失敗-----"); 77 } 78 } 79 @RequestMapping(method = RequestMethod.POST) 80 protected void doPost(HttpServletRequest request, HttpServletResponse response) { 81 // TODO 接收、處理、響應由微信服務器轉發的用戶發送給公眾帳號的消息 82 // 將請求、響應的編碼均設置為UTF-8(防止中文亂碼) 83 try { 84 request.setCharacterEncoding("UTF-8"); 85 response.setCharacterEncoding("UTF-8"); 86 System.out.println("請求進入"); 87 String result = ""; 88 try { 89 Map<String,String> map = MessageHandlerUtil.parseXml(request); 90 System.out.println("開始構造消息"); 91 result = MessageHandlerUtil.buildResponseMessage(map, "你好"); 92 System.out.println(result); 93 if(result.equals("")){ 94 result = "未正確響應"; 95 } 96 } catch (Exception e) { 97 e.printStackTrace(); 98 System.out.println("發生異常:"+ e.getMessage()); 99 } 100 response.getWriter().write(result); 101 } catch (UnsupportedEncodingException e) { 102 // TODO Auto-generated catch block 103 e.printStackTrace(); 104 } catch (IOException e) { 105 // TODO Auto-generated catch block 106 e.printStackTrace(); 107 } 108 } 109 110 /** 111 * 參數排序 112 * @param token 113 * @param timestamp 114 * @param nonce 115 * @return 116 */ 117 public String sort(String token, String timestamp, String nonce) { 118 String[] strArray = {token, timestamp, nonce}; 119 Arrays.sort(strArray); 120 StringBuilder sb = new StringBuilder(); 121 for (String str : strArray) { 122 sb.append(str); 123 } 124 return sb.toString(); 125 } 126 127 /** 128 * 字符串進行shal加密 129 * @param str 130 * @return 131 */ 132 public String shal(String str){ 133 try { 134 MessageDigest digest = MessageDigest.getInstance("SHA-1"); 135 digest.update(str.getBytes()); 136 byte messageDigest[] = digest.digest(); 137 138 StringBuffer hexString = new StringBuffer(); 139 // 字節數組轉換為 十六進制 數 140 for (int i = 0; i < messageDigest.length; i++) { 141 String shaHex = Integer.toHexString(messageDigest[i] & 0xFF); 142 if (shaHex.length() < 2) { 143 hexString.append(0); 144 } 145 hexString.append(shaHex); 146 } 147 return hexString.toString(); 148 149 } catch (NoSuchAlgorithmException e) { 150 e.printStackTrace(); 151 } 152 return ""; 153 } 154 } ?
WxApi 這個是工具類,因為測試用的穿透所以一直要改Ip,干脆提取出來修改方便,上面代碼是接入微信服務。
import javax.annotation.PostConstruct;
import javax.servlet.http.HttpServletRequest;
import javax.servlet.http.HttpServletResponse;import org.slf4j.Logger;
import org.slf4j.LoggerFactory;
import org.springframework.beans.BeansException; import org.springframework.beans.factory.InitializingBean; import org.springframework.context.ApplicationContext; import org.springframework.context.ApplicationContextAware; import org.springframework.context.ApplicationEvent; import org.springframework.context.ApplicationListener; import org.springframework.context.event.ContextRefreshedEvent; import org.springframework.context.support.AbstractApplicationContext; import org.springframework.stereotype.Component; import org.springframework.stereotype.Controller; import org.springframework.web.bind.annotation.RequestMapping; import com.alibaba.fastjson.JSON; import com.alibaba.fastjson.JSONObject; import com.fuyin.mp.entity.AccessToken; import com.fuyin.mp.utils.GetMenuJson; import com.fuyin.mp.utils.NetWorkHelper; import com.fuyin.mp.utils.WxaApi; /** * 線程 自動獲得token * @author Administrator * */ @Controller public class AccessTokenInit implements ApplicationContextAware{ private static final Logger logger = LoggerFactory.getLogger(AccessTokenInit.class); @Override public void setApplicationContext(ApplicationContext arg0) throws BeansException { new Thread(new Runnable() { @Override public void run() { while (true) { try { //獲取accessToken System.out.println("開始獲取TOKEN"); WxaApi.accessToken = getAccessToken(WxaApi.appID, WxaApi.appsecret); //獲取成功 if ( WxaApi.accessToken== null) { //獲取失敗 Thread.sleep(1000 * 3); //獲取的access_token為空 休眠3秒 } else { //獲取到access_token 休眠7000秒,大約2個小時左右 Thread.sleep(7000 * 1000); //Thread.sleep(10 * 1000);//10秒鐘獲取一次  } } catch (Exception e) { System.out.println("發生異常:" + e.getMessage()); e.printStackTrace(); try { Thread.sleep(1000 * 10); //發生異常休眠1秒 } catch (Exception e1) { } } } } }).start(); } /** * 獲取access_token * * @return AccessToken */ private AccessToken getAccessToken(String appId, String appSecret) { NetWorkHelper netHelper = new NetWorkHelper(); String Url=WxaApi.GetTokenApi.replace("APPID", appId).replaceAll("APPSECRET", appSecret);; //此請求為https的get請求,返回的數據格式為{"access_token":"ACCESS_TOKEN","expires_in":7200} String result = netHelper.getHttpsResponse(Url, "",null); System.out.println("獲取到的access_token="+result); //使用FastJson將Json字符串解析成Json對象 JSONObject json = JSON.parseObject(result); AccessToken token = new AccessToken(); token.setAccessToken(json.getString("access_token")); token.setExpiresin(json.getInteger("expires_in")); return token; } }
這是一個springmvc啟動以后就會啟動的線程,用來自動獲取token
工具類 用來發送https請求
1 import javax.net.ssl.*;2 import java.io.BufferedReader;3 import java.io.InputStream;4 import java.io.InputStreamReader;5 import java.io.OutputStream;6 import java.io.UnsupportedEncodingException; 7 import java.net.URL; 8 import java.net.URLEncoder; 9 import java.security.cert.CertificateException; 10 import java.security.cert.X509Certificate; 11 12 /** 13 * 訪問網絡用到的工具類 14 */ 15 public class NetWorkHelper { 16 17 /** 18 * 發起Https請求 19 * @param reqUrl 請求的URL地址 20 * @param requestMethod 21 * @return 響應后的字符串 22 */ 23 public String getHttpsResponse(String reqUrl, String requestMethod,String outputStr) { 24 URL url; 25 InputStream is; 26 String resultData = ""; 27 try { 28 url = new URL(reqUrl); 29 HttpsURLConnection con = (HttpsURLConnection) url.openConnection(); 30 TrustManager[] tm = {xtm}; 31 32 SSLContext ctx = SSLContext.getInstance("TLS"); 33 ctx.init(null, tm, null); 34 con.setSSLSocketFactory(ctx.getSocketFactory()); 35 con.setHostnameVerifier(new HostnameVerifier() { 36 @Override 37 public boolean verify(String arg0, SSLSession arg1) { 38 return true; 39 } 40 }); 41 42 43 con.setDoInput(true); //允許輸入流,即允許下載 44 45 //在android中必須將此項設置為false 46 con.setDoOutput(true); //允許輸出流,即允許上傳 47 con.setUseCaches(false); //不使用緩沖 48 if (null != requestMethod && !requestMethod.equals("")) { 49 con.setRequestMethod(requestMethod); //使用指定的方式 50 } else { 51 con.setRequestMethod("GET"); //使用get請求 52 } 53 con.setRequestProperty("content-type", 54 "application/x-www-form-urlencoded"); 55 // 當outputStr不為null時向輸出流寫數據 56 if (null != outputStr) { 57 OutputStream outputStream = con.getOutputStream(); 58 // 注意編碼格式 59 outputStream.write(outputStr.getBytes("UTF-8")); 60 outputStream.close(); 61 } 62 is = con.getInputStream(); //獲取輸入流,此時才真正建立鏈接 63 InputStreamReader isr = new InputStreamReader(is); 64 BufferedReader bufferReader = new BufferedReader(isr); 65 String inputLine; 66 while ((inputLine = bufferReader.readLine()) != null) { 67 resultData += inputLine + "\n"; 68 } 69 // System.out.println(resultData); 70 71 } catch (Exception e) { 72 e.printStackTrace(); 73 } 74 return resultData; 75 } 76 77 X509TrustManager xtm = new X509TrustManager() { 78 @Override 79 public X509Certificate[] getAcceptedIssuers() { 80 return null; 81 } 82 83 @Override 84 public void checkServerTrusted(X509Certificate[] arg0, String arg1) 85 throws CertificateException { 86 87 } 88 89 @Override 90 public void checkClientTrusted(X509Certificate[] arg0, String arg1) 91 throws CertificateException { 92 93 } 94 }; 95 /** 96 * 對URL地址進行EnCode處理 97 * @param url 98 * @return 99 */ 100 public static String urlEnCode(String url) 101 { 102 String enCodedUrl = ""; 103 104 try 105 { 106 enCodedUrl = URLEncoder.encode(url, "utf-8"); 107 } 108 catch (UnsupportedEncodingException e) 109 { 110 // TODO Auto-generated catch block 111 e.printStackTrace(); 112 System.out.println("轉碼失敗!"); 113 } 114 115 return enCodedUrl; 116 } 117 } ?
?
線程啟動可能會獲取兩次token是因為springmvc把項目的Bean掃描了兩次,可以把applicationContext.xml配置成只掃描mapper,其他不掃,由springmvc.xml去掃面serveice 和controller,因為我這樣還是失敗了,所以把線程的類也定義成controller,這樣用前面的方法只會掃描一次
?


負載均衡器Ribbon)


)


 線性回歸)
