前言
前端時間,同學在做項目過程中遇到關于藍牙方面的問題,今天我就給大家進行詳細的進行講解下藍牙在iOS開發中的具體實現.在介紹藍牙前,大家要搞清楚什么是藍牙?
什么是藍牙?
隨著藍牙低功耗技術BLE(Bluetooth Low Energy)的發展,藍牙技術正在一步步成熟,如今的大部分移動設備都配備有藍牙4.0,相比之前的藍牙技術耗電量大大降低。從iOS的發展史也不難看出蘋果目前對藍牙技術也是越來越關注,例如蘋果于2013年9月發布的iOS7就配備了iBeacon技術,這項技術完全基于藍牙傳輸。但是眾所周知蘋果的設備對于權限要求也是比較高的,因此在iOS中并不能像Android一樣隨意使用藍牙進行文件傳輸(除非你已經越獄)。知道什么是藍牙之后,那么在iOS中進行藍牙傳輸應用開發常用的框架有哪幾種呢?
藍牙在開發中的框架有哪些?
- GameKit.framework:iOS7之前的藍牙通訊框架,從iOS7開始過期,但是目前多數應用還是基于此框架。
- MultipeerConnectivity.framework:iOS7開始引入的新的藍牙通訊開發框架,用于取代GameKit。
- CoreBluetooth.framework:功能強大的藍牙開發框架,要求設備必須支持藍牙4.0。
藍牙在開發中的框架優缺點?
現在就給大家來總結下這三種框架的優缺點.?
前兩個框架使用起來比較簡單,但是缺點也比較明顯:僅僅支持iOS設備,傳輸內容僅限于沙盒或者照片庫中用戶選擇的文件,并且第一個框架只能在同一個應用之間進行傳輸(一個iOS設備安裝應用A,另一個iOS設備上安裝應用B是無法傳輸的)。當然CoreBluetooth就擺脫了這些束縛,它不再局限于iOS設備之間進行傳輸,你可以通過iOS設備向Android、Windows Phone以及其他安裝有藍牙4.0芯片的智能設備傳輸,因此也是目前智能家居、無線支付等熱門智能設備所推崇的技術。
藍牙框架之GameKit框架
其實從名稱來看這個框架并不是專門為了支持藍牙傳輸而設計的,它是為游戲設計的。而很多游戲中會用到基于藍牙的點對點信息傳輸,因此這個框架中集成了藍牙傳輸模塊。前面也說了這個框架本身有很多限制,但是在iOS7之前的很多藍牙傳輸都是基于此框架的,所以有必要對它進行了解。GameKit中的藍牙使用設計很簡單,并沒有給開發者留有太多的復雜接口,而多數連接細節開發者是不需要關注的。GameKit中提供了兩個關鍵類來操作藍牙連接:
GKPeerPickerController:藍牙查找、連接用的視圖控制器,通常情況下應用程序A打開后會調用此控制器的show方法來展示一個藍牙查找的視圖,一旦發現了另一個同樣在查找藍牙連接的客戶客戶端B就會出現在視圖列表中,此時如果用戶點擊連接B,B客戶端就會詢問用戶是否允許A連接B,如果允許后A和B之間建立一個藍牙連接。
GKSession:連接會話,主要用于發送和接受傳輸數據。一旦A和B建立連接GKPeerPickerController的代理方法會將A、B兩者建立的會話(GKSession)對象傳遞給開發人員,開發人員拿到此對象可以發送和接收數據。
其實理解了上面兩個類之后,使用起來就比較簡單了,下面就以一個圖片發送程序來演示GameKit中藍牙的使用。此程序一個客戶端運行在模擬器上作為客戶端A,另一個運行在iPhone真機上作為客戶端B(注意A、B必須運行同一個程序,GameKit藍牙開發是不支持兩個不同的應用傳輸數據的)。兩個程序運行之后均調用GKPeerPickerController來發現周圍藍牙設備,一旦A發現了B之后就開始連接B,然后iOS會詢問用戶是否接受連接,一旦接受之后就會調用GKPeerPickerController的-(void)peerPickerController:(GKPeerPickerController?)picker didConnectPeer:(NSString?)peerID toSession:(GKSession *)session代理方法,在此方法中可以獲得連接的設備id(peerID)和連接會話(session);此時可以設置會話的數據接收句柄(相當于一個代理)并保存會話以便發送數據時使用;一旦一端(假設是A)調用會話的sendDataToAllPeers: withDataMode: error:方法發送數據,此時另一端(假設是B)就會調用句柄的?
- (void) receiveData:(NSData?)data fromPeer:(NSString?)peer inSession: (GKSession?)session context:(void?)context方法,在此方法可以獲得發送數據并處理。下面是程序代碼:
#import "ViewController.h"
#import <GameKit/GameKit.h>@interface ViewController ()<GKPeerPickerControllerDelegate,UIImagePickerControllerDelegate,UINavigationBarDelegate>@property (weak, nonatomic) IBOutlet UIImageView *imageView;
@property (strong,nonatomic) GKSession *session;@end@implementation ViewController#pragma mark - 控制器視圖方法
- (void)viewDidLoad {[super viewDidLoad];GKPeerPickerController *pearPickerController=[[GKPeerPickerController alloc]init];pearPickerController.delegate=self;[pearPickerController show];
}#pragma mark - UI事件
- (IBAction)selectClick:(UIBarButtonItem *)sender {UIImagePickerController *imagePickerController=[[UIImagePickerController alloc]init];imagePickerController.delegate=self;[self presentViewController:imagePickerController animated:YES completion:nil];
}- (IBAction)sendClick:(UIBarButtonItem *)sender {NSData *data=UIImagePNGRepresentation(self.imageView.image);NSError *error=nil;[self.session sendDataToAllPeers:data withDataMode:GKSendDataReliable error:&error];if (error) {NSLog(@"發送圖片過程中發生錯誤,錯誤信息:%@",error.localizedDescription);}
}#pragma mark - GKPeerPickerController代理方法
-(void)peerPickerController:(GKPeerPickerController *)picker didConnectPeer:(NSString *)peerID toSession:(GKSession *)session{self.session=session;NSLog(@"已連接客戶端設備:%@.",peerID);[self.session setDataReceiveHandler:self withContext:nil];[picker dismiss];
}#pragma mark - 藍牙數據接收方法
- (void) receiveData:(NSData *)data fromPeer:(NSString *)peer inSession: (GKSession *)session context:(void *)context{UIImage *image=[UIImage imageWithData:data];self.imageView.image=image;UIImageWriteToSavedPhotosAlbum(image, nil, nil, nil);NSLog(@"數據發送成功!");
}
#pragma mark - UIImagePickerController代理方法
-(void)imagePickerController:(UIImagePickerController *)picker didFinishPickingMediaWithInfo:(NSDictionary *)info{self.imageView.image=[info objectForKey:UIImagePickerControllerOriginalImage];[self dismissViewControllerAnimated:YES completion:nil];
}-(void)imagePickerControllerDidCancel:(UIImagePickerController *)picker{[self dismissViewControllerAnimated:YES completion:nil];
}
@end
- 1
- 2
- 3
- 4
- 5
- 6
- 7
- 8
- 9
- 10
- 11
- 12
- 13
- 14
- 15
- 16
- 17
- 18
- 19
- 20
- 21
- 22
- 23
- 24
- 25
- 26
- 27
- 28
- 29
- 30
- 31
- 32
- 33
- 34
- 35
- 36
- 37
- 38
- 39
- 40
- 41
- 42
- 43
- 44
- 45
- 46
- 47
- 48
- 49
- 50
- 51
- 52
- 53
- 54
- 55
- 56
- 57
- 58
- 59
- 60
- 61
- 62
- 63
- 64
- 65
- 66
- 67
- 68
- 69
- 70
- 71
- 72
- 73
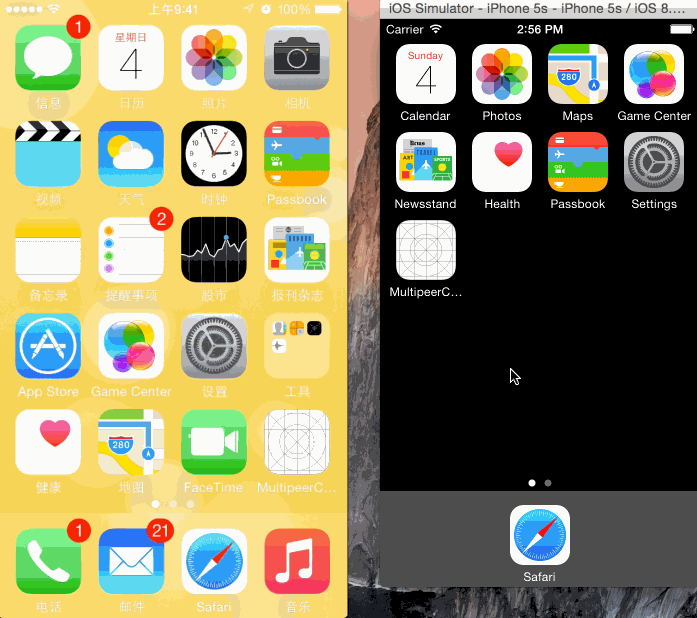
運行效果(左側是真機,右側是模擬器,程序演示了兩個客戶端互發圖片的場景:首先是模擬器發送圖片給真機,然后真機發送圖片給模擬器)?

藍牙框架之MultipeerConnectivity框架
前面已經說了GameKit相關的藍牙操作類從iOS7已經全部過期,蘋果官方推薦使用MultipeerConnectivity代替。但是應該了解,MultipeerConnectivity.framework并不僅僅支持藍牙連接,準確的說它是一種支持Wi-Fi網絡、P2P Wi-Fi已經藍牙個人局域網的通信框架,它屏蔽了具體的連接技術,讓開發人員有統一的接口編程方法。通過MultipeerConnectivity連接的節點之間可以安全的傳遞信息、流或者其他文件資源而不必通過網絡服務。此外使用MultipeerConnectivity進行近場通信也不再局限于同一個應用之間傳輸,而是可以在不同的應用之間進行數據傳輸(當然如果有必要的話你仍然可以選擇在一個應用程序之間傳輸)。
要了解MultipeerConnectivity的使用必須要清楚一個概念:廣播(Advertisting)和發現(Disconvering),這很類似于一種Client-Server模式。假設有兩臺設備A、B,B作為廣播去發送自身服務,A作為發現的客戶端。一旦A發現了B就試圖建立連接,經過B同意二者建立連接就可以相互發送數據。在使用GameKit框架時,A和B既作為廣播又作為發現,當然這種情況在MultipeerConnectivity中也很常見。
A.廣播
無論是作為服務器端去廣播還是作為客戶端去發現廣播服務,那么兩個(或更多)不同的設備之間必須要有區分,通常情況下使用MCPeerID對象來區分一臺設備,在這個設備中可以指定顯示給對方查看的名稱(display name)。另外不管是哪一方,還必須建立一個會話MCSession用于發送和接受數據。通常情況下會在會話的-(void)session:(MCSession?)session peer:(MCPeerID?)peerID didChangeState:(MCSessionState)state代理方法中跟蹤會話狀態(已連接、正在連接、未連接);在會話的-(void)session:(MCSession?)session didReceiveData:(NSData?)data fromPeer:(MCPeerID *)peerID代理方法中接收數據;同時還會調用會話的-(void)sendData: toPeers:withMode: error:方法去發送數據。
廣播作為一個服務器去發布自身服務,供周邊設備發現連接。在MultipeerConnectivity中使用MCAdvertiserAssistant來表示一個廣播,通常創建廣播時指定一個會話MCSession對象將廣播服務和會話關聯起來。一旦調用廣播的start方法周邊的設備就可以發現該廣播并可以連接到此服務。在MCSession的代理方法中可以隨時更新連接狀態,一旦建立了連接之后就可以通過MCSession的connectedPeers獲得已經連接的設備。
B.發現
前面已經說過作為發現的客戶端同樣需要一個MCPeerID來標志一個客戶端,同時會擁有一個MCSession來監聽連接狀態并發送、接受數據。除此之外,要發現廣播服務,客戶端就必須要隨時查找服務來連接,在MultipeerConnectivity中提供了一個控制器MCBrowserViewController來展示可連接和已連接的設備(這類似于GameKit中的GKPeerPickerController),當然如果想要自己定制一個界面來展示設備連接的情況你可以選擇自己開發一套UI界面。一旦通過MCBroserViewController選擇一個節點去連接,那么作為廣播的節點就會收到通知,詢問用戶是否允許連接。由于初始化MCBrowserViewController的過程已經指定了會話MCSession,所以連接過程中會隨時更新會話狀態,一旦建立了連接,就可以通過會話的connected屬性獲得已連接設備并且可以使用會話發送、接受數據。
下面用兩個不同的應用程序來演示使用MultipeerConnectivity的使用過程,其中一個應用運行在模擬器中作為廣播節點,另一個運行在iPhone真機上作為發現節點,并且實現兩個節點的圖片互傳。
首先看一下作為廣播節點的程序:
界面:?
 ?
?
點擊“開始廣播”來發布服務,一旦有節點連接此服務就可以使用“選擇照片”來從照片庫中選取一張圖片并發送到所有已連接節點。?
程序:
#import "ViewController.h"
#import <MultipeerConnectivity/MultipeerConnectivity.h>@interface ViewController ()<MCSessionDelegate,MCAdvertiserAssistantDelegate, UIImagePickerControllerDelegate,UINavigationControllerDelegate>
@property (strong,nonatomic) MCSession *session;
@property (strong,nonatomic) MCAdvertiserAssistant *advertiserAssistant;
@property (strong,nonatomic) UIImagePickerController *imagePickerController;@property (weak, nonatomic) IBOutlet UIImageView *photo;@end@implementation ViewController#pragma mark - 控制器視圖事件
- (void)viewDidLoad {[super viewDidLoad];MCPeerID *peerID=[[MCPeerID alloc]initWithDisplayName:@"KenshinCui_Advertiser"];_session=[[MCSession alloc]initWithPeer:peerID];_session.delegate=self;_advertiserAssistant=[[MCAdvertiserAssistant alloc]initWithServiceType:@"cmj-stream" discoveryInfo:nil session:_session];_advertiserAssistant.delegate=self;}#pragma mark - UI事件
- (IBAction)advertiserClick:(UIBarButtonItem *)sender {[self.advertiserAssistant start];
}
- (IBAction)selectClick:(UIBarButtonItem *)sender {_imagePickerController=[[UIImagePickerController alloc]init];_imagePickerController.delegate=self;[self presentViewController:_imagePickerController animated:YES completion:nil];
}#pragma mark - MCSession代理方法
-(void)session:(MCSession *)session peer:(MCPeerID *)peerID didChangeState:(MCSessionState)state{NSLog(@"didChangeState");switch (state) {case MCSessionStateConnected:NSLog(@"連接成功.");break;case MCSessionStateConnecting:NSLog(@"正在連接...");break;default:NSLog(@"連接失敗.");break;}
}
-(void)session:(MCSession *)session didReceiveData:(NSData *)data fromPeer:(MCPeerID *)peerID{NSLog(@"開始接收數據...");UIImage *image=[UIImage imageWithData:data];[self.photo setImage:image];UIImageWriteToSavedPhotosAlbum(image, nil, nil, nil);}
#pragma mark - MCAdvertiserAssistant代理方法#pragma mark - UIImagePickerController代理方法
-(void)imagePickerController:(UIImagePickerController *)picker didFinishPickingMediaWithInfo:(NSDictionary *)info{UIImage *image=[info objectForKey:UIImagePickerControllerOriginalImage];[self.photo setImage:image];NSError *error=nil;[self.session sendData:UIImagePNGRepresentation(image) toPeers:[self.session connectedPeers] withMode:MCSessionSendDataUnreliable error:&error];NSLog(@"開始發送數據...");if (error) {NSLog(@"發送數據過程中發生錯誤,錯誤信息:%@",error.localizedDescription);}[self.imagePickerController dismissViewControllerAnimated:YES completion:nil];
}
-(void)imagePickerControllerDidCancel:(UIImagePickerController *)picker{[self.imagePickerController dismissViewControllerAnimated:YES completion:nil];
}
@end
- 1
- 2
- 3
- 4
- 5
- 6
- 7
- 8
- 9
- 10
- 11
- 12
- 13
- 14
- 15
- 16
- 17
- 18
- 19
- 20
- 21
- 22
- 23
- 24
- 25
- 26
- 27
- 28
- 29
- 30
- 31
- 32
- 33
- 34
- 35
- 36
- 37
- 38
- 39
- 40
- 41
- 42
- 43
- 44
- 45
- 46
- 47
- 48
- 49
- 50
- 51
- 52
- 53
- 54
- 55
- 56
- 57
- 58
- 59
- 60
- 61
- 62
- 63
- 64
- 65
- 66
- 67
- 68
- 69
- 70
- 71
- 72
- 73
- 74
- 75
- 76
- 77
- 78
- 79
- 80
- 81
- 82
再看一下作為發現節點的程序:
界面:
 ?
?
點擊“查找設備”瀏覽可用服務,點擊服務建立連接;一旦建立了連接之后就可以點擊“選擇照片”會從照片庫中選擇一張圖片并發送給已連接的節點。
程序:
#import "ViewController.h"
#import <MultipeerConnectivity/MultipeerConnectivity.h>@interface ViewController ()<MCSessionDelegate,MCBrowserViewControllerDelegate,UIImagePickerControllerDelegate,UINavigationControllerDelegate>
@property (strong,nonatomic) MCSession *session;
@property (strong,nonatomic) MCBrowserViewController *browserController;
@property (strong,nonatomic) UIImagePickerController *imagePickerController;@property (weak, nonatomic) IBOutlet UIImageView *photo;
@end@implementation ViewController#pragma mark - 控制器視圖事件
- (void)viewDidLoad {[super viewDidLoad];MCPeerID *peerID=[[MCPeerID alloc]initWithDisplayName:@"KenshinCui"];_session=[[MCSession alloc]initWithPeer:peerID];_session.delegate=self;}
#pragma mark- UI事件
- (IBAction)browserClick:(UIBarButtonItem *)sender {_browserController=[[MCBrowserViewController alloc]initWithServiceType:@"cmj-stream" session:self.session];_browserController.delegate=self;[self presentViewController:_browserController animated:YES completion:nil];
}
- (IBAction)selectClick:(UIBarButtonItem *)sender {_imagePickerController=[[UIImagePickerController alloc]init];_imagePickerController.delegate=self;[self presentViewController:_imagePickerController animated:YES completion:nil];
}#pragma mark - MCBrowserViewController代理方法
-(void)browserViewControllerDidFinish:(MCBrowserViewController *)browserViewController{NSLog(@"已選擇");[self.browserController dismissViewControllerAnimated:YES completion:nil];
}
-(void)browserViewControllerWasCancelled:(MCBrowserViewController *)browserViewController{NSLog(@"取消瀏覽.");[self.browserController dismissViewControllerAnimated:YES completion:nil];
}#pragma mark - MCSession代理方法
-(void)session:(MCSession *)session peer:(MCPeerID *)peerID didChangeState:(MCSessionState)state{NSLog(@"didChangeState");switch (state) {case MCSessionStateConnected:NSLog(@"連接成功.");[self.browserController dismissViewControllerAnimated:YES completion:nil];break;case MCSessionStateConnecting:NSLog(@"正在連接...");break;default:NSLog(@"連接失敗.");break;}
}
-(void)session:(MCSession *)session didReceiveData:(NSData *)data fromPeer:(MCPeerID *)peerID{NSLog(@"開始接收數據...");UIImage *image=[UIImage imageWithData:data];[self.photo setImage:image];UIImageWriteToSavedPhotosAlbum(image, nil, nil, nil);}
#pragma mark - UIImagePickerController代理方法
-(void)imagePickerController:(UIImagePickerController *)picker didFinishPickingMediaWithInfo:(NSDictionary *)info{UIImage *image=[info objectForKey:UIImagePickerControllerOriginalImage];[self.photo setImage:image];NSError *error=nil;[self.session sendData:UIImagePNGRepresentation(image) toPeers:[self.session connectedPeers] withMode:MCSessionSendDataUnreliable error:&error];NSLog(@"開始發送數據...");if (error) {NSLog(@"發送數據過程中發生錯誤,錯誤信息:%@",error.localizedDescription);}[self.imagePickerController dismissViewControllerAnimated:YES completion:nil];
}
-(void)imagePickerControllerDidCancel:(UIImagePickerController *)picker{[self.imagePickerController dismissViewControllerAnimated:YES completion:nil];
}
@end
- 1
- 2
- 3
- 4
- 5
- 6
- 7
- 8
- 9
- 10
- 11
- 12
- 13
- 14
- 15
- 16
- 17
- 18
- 19
- 20
- 21
- 22
- 23
- 24
- 25
- 26
- 27
- 28
- 29
- 30
- 31
- 32
- 33
- 34
- 35
- 36
- 37
- 38
- 39
- 40
- 41
- 42
- 43
- 44
- 45
- 46
- 47
- 48
- 49
- 50
- 51
- 52
- 53
- 54
- 55
- 56
- 57
- 58
- 59
- 60
- 61
- 62
- 63
- 64
- 65
- 66
- 67
- 68
- 69
- 70
- 71
- 72
- 73
- 74
- 75
- 76
- 77
- 78
- 79
- 80
- 81
- 82
- 83
- 84
- 85
- 86
- 87
- 88
- 89
- 90
在兩個程序中無論是MCBrowserViewController還是MCAdvertiserAssistant在初始化的時候都指定了一個服務類型“cmj-photo”,這是唯一標識一個服務類型的標記,可以按照官方的要求命名,應該盡可能表達服務的作用。需要特別指出的是,如果廣播命名為“cmj-photo”那么發現節點只有在MCBrowserViewController中指定為“cmj-photo”才能發現此服務。
運行效果:?
藍牙框架之CoreBluetooth框架
無論是GameKit還是MultipeerConnectivity,都只能在iOS設備之間進行數據傳輸,這就大大降低了藍牙的使用范圍,于是從iOS6開始蘋果推出了CoreBluetooth.framework,這個框架最大的特點就是完全基于BLE4.0標準并且支持非iOS設備。當前BLE應用相當廣泛,不再僅僅是兩個設備之間的數據傳輸,它還有很多其他應用市場,例如室內定位、無線支付、智能家居等等,這也使得CoreBluetooth成為當前最熱門的藍牙技術。
CoreBluetooth設計同樣也是類似于客戶端-服務器端的設計,作為服務器端的設備稱為外圍設備(Peripheral),作為客戶端的設備叫做中央設備(Central),CoreBlueTooth整個框架就是基于這兩個概念來設計的。
 ?
?
外圍設備和中央設備在CoreBluetooth中使用CBPeripheralManager和CBCentralManager表示。
CBPeripheralManager:外圍設備通常用于發布服務、生成數據、保存數據。外圍設備發布并廣播服務,告訴周圍的中央設備它的可用服務和特征。
CBCentralManager:中央設備使用外圍設備的數據。中央設備掃描到外圍設備后會就會試圖建立連接,一旦連接成功就可以使用這些服務和特征。
外圍設備和中央設備之間交互的橋梁是服務(CBService)和特征(CBCharacteristic),二者都有一個唯一的標識UUID(CBUUID類型)來唯一確定一個服務或者特征,每個服務可以擁有多個特征,下面是他們之間的關系:?
 ?
?
一臺iOS設備(注意iPhone4以下設備不支持BLE,另外iOS7.0、8.0模擬器也無法模擬BLE)既可以作為外圍設備又可以作為中央設備,但是不能同時即是外圍設備又是中央設備,同時注意建立連接的過程不需要用戶手動選擇允許,這一點和前面兩個框架是不同的,這主要是因為BLE應用場景不再局限于兩臺設備之間資源共享了。?
A.外圍設備
創建一個外圍設備通常分為以下幾個步驟:?
1. 創建外圍設備CBPeripheralManager對象并指定代理。?
2. 創建特征CBCharacteristic、服務CBSerivce并添加到外圍設備?
3. 外圍設備開始廣播服務(startAdvertisting:)。?
4. 和中央設備CBCentral進行交互。?
下面是簡單的程序示例,程序有兩個按鈕“啟動”和“更新”,點擊啟動按鈕則創建外圍設備、添加服務和特征并開始廣播,一旦發現有中央設備連接并訂閱了此服務的特征則通過更新按鈕更新特征數據,此時已訂閱的中央設備就會收到更新數據。?

#import "ViewController.h"
#import <CoreBluetooth/CoreBluetooth.h>
#define kPeripheralName @"Kenshin Cui's Device" //外圍設備名稱
#define kServiceUUID @"C4FB2349-72FE-4CA2-94D6-1F3CB16331EE" //服務的UUID
#define kCharacteristicUUID @"6A3E4B28-522D-4B3B-82A9-D5E2004534FC" //特征的UUID@interface ViewController ()<CBPeripheralManagerDelegate>@property (strong,nonatomic) CBPeripheralManager *peripheralManager;@property (strong,nonatomic) NSMutableArray *centralM;@property (strong,nonatomic) CBMutableCharacteristic *characteristicM;
@property (weak, nonatomic) IBOutlet UITextView *log; @end@implementation ViewController
#pragma mark - 視圖控制器方法
- (void)viewDidLoad {[super viewDidLoad];
}#pragma mark - UI事件
- (IBAction)startClick:(UIBarButtonItem *)sender {_peripheralManager=[[CBPeripheralManager alloc]initWithDelegate:self queue:nil];
}
- (IBAction)transferClick:(UIBarButtonItem *)sender {[self updateCharacteristicValue];
}#pragma mark - CBPeripheralManager代理方法
-(void)peripheralManagerDidUpdateState:(CBPeripheralManager *)peripheral{switch (peripheral.state) {case CBPeripheralManagerStatePoweredOn:NSLog(@"BLE已打開.");[self writeToLog:@"BLE已打開."];[self setupService];break;default:NSLog(@"此設備不支持BLE或未打開藍牙功能,無法作為外圍設備.");[self writeToLog:@"此設備不支持BLE或未打開藍牙功能,無法作為外圍設備."];break;}
}
-(void)peripheralManager:(CBPeripheralManager *)peripheral didAddService:(CBService *)service error:(NSError *)error{if (error) {NSLog(@"向外圍設備添加服務失敗,錯誤詳情:%@",error.localizedDescription);[self writeToLog:[NSString stringWithFormat:@"向外圍設備添加服務失敗,錯誤詳情:%@",error.localizedDescription]];return;}NSDictionary *dic=@{CBAdvertisementDataLocalNameKey:kPeripheralName};[self.peripheralManager startAdvertising:dic];NSLog(@"向外圍設備添加了服務并開始廣播...");[self writeToLog:@"向外圍設備添加了服務并開始廣播..."];
}
-(void)peripheralManagerDidStartAdvertising:(CBPeripheralManager *)peripheral error:(NSError *)error{if (error) {NSLog(@"啟動廣播過程中發生錯誤,錯誤信息:%@",error.localizedDescription);[self writeToLog:[NSString stringWithFormat:@"啟動廣播過程中發生錯誤,錯誤信息:%@",error.localizedDescription]];return;}NSLog(@"啟動廣播...");[self writeToLog:@"啟動廣播..."];
}
-(void)peripheralManager:(CBPeripheralManager *)peripheral central:(CBCentral *)central didSubscribeToCharacteristic:(CBCharacteristic *)characteristic{NSLog(@"中心設備:%@ 已訂閱特征:%@.",central,characteristic);[self writeToLog:[NSString stringWithFormat:@"中心設備:%@ 已訂閱特征:%@.",central.identifier.UUIDString,characteristic.UUID]];if (![self.centralM containsObject:central]) {[self.centralM addObject:central];}
}
-(void)peripheralManager:(CBPeripheralManager *)peripheral central:(CBCentral *)central didUnsubscribeFromCharacteristic:(CBCharacteristic *)characteristic{NSLog(@"didUnsubscribeFromCharacteristic");
}
-(void)peripheralManager:(CBPeripheralManager *)peripheral didReceiveWriteRequests:(CBATTRequest *)request{NSLog(@"didReceiveWriteRequests");
}
-(void)peripheralManager:(CBPeripheralManager *)peripheral willRestoreState:(NSDictionary *)dict{NSLog(@"willRestoreState");
}
#pragma mark -屬性
-(NSMutableArray *)centralM{if (!_centralM) {_centralM=[NSMutableArray array];}return _centralM;
}#pragma mark - 私有方法
-(void)setupService{CBUUID *characteristicUUID=[CBUUID UUIDWithString:kCharacteristicUUID];
CBMutableCharacteristic *characteristicM=[[CBMutableCharacteristic alloc]initWithType:characteristicUUID properties:CBCharacteristicPropertyNotify value:nil permissions:CBAttributePermissionsReadable];self.characteristicM=characteristicM;
CBUUID *serviceUUID=[CBUUID UUIDWithString:kServiceUUID];CBMutableService *serviceM=[[CBMutableService alloc]initWithType:serviceUUID primary:YES];[serviceM setCharacteristics:@[characteristicM]];[self.peripheralManager addService:serviceM];
}
-(void)updateCharacteristicValue{NSString *valueStr=[NSString stringWithFormat:@"%@ --%@",kPeripheralName,[NSDate date]];NSData *value=[valueStr dataUsingEncoding:NSUTF8StringEncoding];[self.peripheralManager updateValue:value forCharacteristic:self.characteristicM onSubscribedCentrals:nil];[self writeToLog:[NSString stringWithFormat:@"更新特征值:%@",valueStr]];
}
-(void)writeToLog:(NSString *)info{self.log.text=[NSString stringWithFormat:@"%@\r\n%@",self.log.text,info];
}
@end
- 1
- 2
- 3
- 4
- 5
- 6
- 7
- 8
- 9
- 10
- 11
- 12
- 13
- 14
- 15
- 16
- 17
- 18
- 19
- 20
- 21
- 22
- 23
- 24
- 25
- 26
- 27
- 28
- 29
- 30
- 31
- 32
- 33
- 34
- 35
- 36
- 37
- 38
- 39
- 40
- 41
- 42
- 43
- 44
- 45
- 46
- 47
- 48
- 49
- 50
- 51
- 52
- 53
- 54
- 55
- 56
- 57
- 58
- 59
- 60
- 61
- 62
- 63
- 64
- 65
- 66
- 67
- 68
- 69
- 70
- 71
- 72
- 73
- 74
- 75
- 76
- 77
- 78
- 79
- 80
- 81
- 82
- 83
- 84
- 85
- 86
- 87
- 88
- 89
- 90
- 91
- 92
- 93
- 94
- 95
- 96
- 97
- 98
- 99
- 100
- 101
- 102
- 103
- 104
- 105
- 106
- 107
- 108
- 109
- 110
- 111
- 112
- 113
- 114
- 115
- 116
- 117
- 118
- 119
- 120
- 121
- 122
- 123
- 124
- 125
- 126
- 127
- 128
- 129
- 130
- 131
- 132
- 133
- 134
- 135
- 136
- 137
- 138
- 139
- 140
- 141
- 142
- 143
- 144
- 145
- 146
- 147
- 148
- 149
- 150
- 151
- 152
- 153
- 154
- 155
- 156
流程如下(圖中藍色代表外圍設備操作,綠色部分表示中央設備操作):?

B.中央設備
中央設備的創建一般可以分為如下幾個步驟:
- 創建中央設備管理對象CBCentralManager并指定代理。
- 掃描外圍設備,一般發現可用外圍設備則連接并保存外圍設備。
- 查找外圍設備服務和特征,查找到可用特征則讀取特征數據。?
下面是一個簡單的中央服務器端實現,點擊“啟動”按鈕則開始掃描周圍的外圍設備,一旦發現了可用的外圍設備則建立連接并設置外圍設備的代理,之后開始查找其服務和特征。一旦外圍設備的特征值做了更新,則可以在代理方法中讀取更新后的特征值。?

#import "ViewController.h"
#import <CoreBluetooth/CoreBluetooth.h>
#define kServiceUUID @"C4FB2349-72FE-4CA2-94D6-1F3CB16331EE" //服務的UUID
#define kCharacteristicUUID @"6A3E4B28-522D-4B3B-82A9-D5E2004534FC" //特征的UUID@interface ViewController ()<CBCentralManagerDelegate,CBPeripheralDelegate>@property (strong,nonatomic) CBCentralManager *centralManager;
@property (strong,nonatomic) NSMutableArray *peripherals;
@property (weak, nonatomic) IBOutlet UITextView *log;@end@implementation ViewController
#pragma mark - 控制器視圖事件
- (void)viewDidLoad {[super viewDidLoad];
}#pragma mark - UI事件
- (IBAction)startClick:(UIBarButtonItem *)sender {_centralManager=[[CBCentralManager alloc]initWithDelegate:self queue:nil];
}#pragma mark - CBCentralManager代理方法
-(void)centralManagerDidUpdateState:(CBCentralManager *)central{switch (central.state) {case CBPeripheralManagerStatePoweredOn:NSLog(@"BLE已打開.");[self writeToLog:@"BLE已打開."];
[central scanForPeripheralsWithServices:nil options:@{CBCentralManagerScanOptionAllowDuplicatesKey:@YES}];break;default:NSLog(@"此設備不支持BLE或未打開藍牙功能,無法作為外圍設備.");[self writeToLog:@"此設備不支持BLE或未打開藍牙功能,無法作為外圍設備."];break;}
}
-(void)centralManager:(CBCentralManager *)central didDiscoverPeripheral:(CBPeripheral *)peripheral advertisementData:(NSDictionary *)advertisementData RSSI:(NSNumber *)RSSI{NSLog(@"發現外圍設備...");[self writeToLog:@"發現外圍設備..."];[self.centralManager stopScan];if (peripheral) {if(![self.peripherals containsObject:peripheral]){[self.peripherals addObject:peripheral];}NSLog(@"開始連接外圍設備...");[self writeToLog:@"開始連接外圍設備..."];[self.centralManager connectPeripheral:peripheral options:nil];}}
-(void)centralManager:(CBCentralManager *)central didConnectPeripheral:(CBPeripheral *)peripheral{NSLog(@"連接外圍設備成功!");[self writeToLog:@"連接外圍設備成功!"];peripheral.delegate=self;[peripheral discoverServices:@[[CBUUID UUIDWithString:kServiceUUID]]];
}
-(void)centralManager:(CBCentralManager *)central didFailToConnectPeripheral:(CBPeripheral *)peripheral error:(NSError *)error{NSLog(@"連接外圍設備失敗!");[self writeToLog:@"連接外圍設備失敗!"];
}#pragma mark - CBPeripheral 代理方法
-(void)peripheral:(CBPeripheral *)peripheral didDiscoverServices:(NSError *)error{NSLog(@"已發現可用服務...");[self writeToLog:@"已發現可用服務..."];if(error){NSLog(@"外圍設備尋找服務過程中發生錯誤,錯誤信息:%@",error.localizedDescription);[self writeToLog:[NSString stringWithFormat:@"外圍設備尋找服務過程中發生錯誤,錯誤信息:%@",error.localizedDescription]];}CBUUID *serviceUUID=[CBUUID UUIDWithString:kServiceUUID];CBUUID *characteristicUUID=[CBUUID UUIDWithString:kCharacteristicUUID];for (CBService *service in peripheral.services) {if([service.UUID isEqual:serviceUUID]){[peripheral discoverCharacteristics:@[characteristicUUID] forService:service];}}
}
-(void)peripheral:(CBPeripheral *)peripheral didDiscoverCharacteristicsForService:(CBService *)service error:(NSError *)error{NSLog(@"已發現可用特征...");[self writeToLog:@"已發現可用特征..."];if (error) {NSLog(@"外圍設備尋找特征過程中發生錯誤,錯誤信息:%@",error.localizedDescription);[self writeToLog:[NSString stringWithFormat:@"外圍設備尋找特征過程中發生錯誤,錯誤信息:%@",error.localizedDescription]];}CBUUID *serviceUUID=[CBUUID UUIDWithString:kServiceUUID];CBUUID *characteristicUUID=[CBUUID UUIDWithString:kCharacteristicUUID];if ([service.UUID isEqual:serviceUUID]) {for (CBCharacteristic *characteristic in service.characteristics) {if ([characteristic.UUID isEqual:characteristicUUID]) {[peripheral setNotifyValue:YES forCharacteristic:characteristic];
}}}
}
-(void)peripheral:(CBPeripheral *)peripheral didUpdateNotificationStateForCharacteristic:(CBCharacteristic *)characteristic error:(NSError *)error{NSLog(@"收到特征更新通知...");[self writeToLog:@"收到特征更新通知..."];if (error) {NSLog(@"更新通知狀態時發生錯誤,錯誤信息:%@",error.localizedDescription);}CBUUID *characteristicUUID=[CBUUID UUIDWithString:kCharacteristicUUID];if ([characteristic.UUID isEqual:characteristicUUID]) {if (characteristic.isNotifying) {if (characteristic.properties==CBCharacteristicPropertyNotify) {NSLog(@"已訂閱特征通知.");[self writeToLog:@"已訂閱特征通知."];return;}else if (characteristic.properties ==CBCharacteristicPropertyRead) {[peripheral readValueForCharacteristic:characteristic];}}else{NSLog(@"停止已停止.");[self writeToLog:@"停止已停止."];[self.centralManager cancelPeripheralConnection:peripheral];}}
}
-(void)peripheral:(CBPeripheral *)peripheral didUpdateValueForCharacteristic:(CBCharacteristic *)characteristic error:(NSError *)error{if (error) {NSLog(@"更新特征值時發生錯誤,錯誤信息:%@",error.localizedDescription);[self writeToLog:[NSString stringWithFormat:@"更新特征值時發生錯誤,錯誤信息:%@",error.localizedDescription]];return;}if (characteristic.value) {NSString *value=[[NSString alloc]initWithData:characteristic.value encoding:NSUTF8StringEncoding];NSLog(@"讀取到特征值:%@",value);[self writeToLog:[NSString stringWithFormat:@"讀取到特征值:%@",value]];}else{NSLog(@"未發現特征值.");[self writeToLog:@"未發現特征值."];}
}#pragma mark - 屬性
-(NSMutableArray *)peripherals{if(!_peripherals){_peripherals=[NSMutableArray array];}return _peripherals;
}#pragma mark - 私有方法
-(void)writeToLog:(NSString *)info{self.log.text=[NSString stringWithFormat:@"%@\r\n%@",self.log.text,info];
}@end
- 1
- 2
- 3
- 4
- 5
- 6
- 7
- 8
- 9
- 10
- 11
- 12
- 13
- 14
- 15
- 16
- 17
- 18
- 19
- 20
- 21
- 22
- 23
- 24
- 25
- 26
- 27
- 28
- 29
- 30
- 31
- 32
- 33
- 34
- 35
- 36
- 37
- 38
- 39
- 40
- 41
- 42
- 43
- 44
- 45
- 46
- 47
- 48
- 49
- 50
- 51
- 52
- 53
- 54
- 55
- 56
- 57
- 58
- 59
- 60
- 61
- 62
- 63
- 64
- 65
- 66
- 67
- 68
- 69
- 70
- 71
- 72
- 73
- 74
- 75
- 76
- 77
- 78
- 79
- 80
- 81
- 82
- 83
- 84
- 85
- 86
- 87
- 88
- 89
- 90
- 91
- 92
- 93
- 94
- 95
- 96
- 97
- 98
- 99
- 100
- 101
- 102
- 103
- 104
- 105
- 106
- 107
- 108
- 109
- 110
- 111
- 112
- 113
- 114
- 115
- 116
- 117
- 118
- 119
- 120
- 121
- 122
- 123
- 124
- 125
- 126
- 127
- 128
- 129
- 130
- 131
- 132
- 133
- 134
- 135
- 136
- 137
- 138
- 139
- 140
- 141
- 142
- 143
- 144
- 145
- 146
- 147
- 148
- 149
- 150
- 151
- 152
- 153
- 154
- 155
- 156
- 157
- 158
- 159
- 160
- 161
- 162
- 163
- 164
- 165
- 166
- 167
- 168
- 169
- 170
- 171
- 172
- 173
- 174
- 175
- 176
- 177
- 178
- 179
- 180
- 181
- 182
- 183
- 184
- 185
- 186
- 187
- 188
- 189
- 190
- 191
- 192
- 193
- 194
- 195
- 196
上面程序運行的流程圖如下:?
 ?
?
有了上面兩個程序就可以分別運行在兩臺支持BLE的iOS設備上,當兩個應用建立連接后,一旦外圍設備更新特征之后,中央設備就可以立即獲取到更新后的值。需要強調的是使用CoreBluetooth開發的應用不僅僅可以和其他iOS設備進行藍牙通信,還可以同其他第三方遵循BLE規范的設備進行藍牙通訊,這里就不再贅述。
總結
源碼下載網址:?
http://download.csdn.net/detail/baihuaxiu123/9507802?
請關注:http://blog.csdn.net/baihuaxiu123/article/details/51289499
)


