Service四層代理
- 一、Service概念原理
- 1.1、為什么要有Service
- 1.2、Service概述
- 1.3、工作原理
- 1.4、三類IP地址
- 【1】Node Network(節點網絡)
- 【2】Pod network(pod 網絡)
- 【3】Cluster Network(服務網絡)
- 二、Service資源創建
- 2.1、service資源字段
- 2.2、service的spec字段定義
- 2.3、Service端口
- 2.4、Service類型
- 【1】ClusterIP類型
- 【2】NodePort類型
- 【3】ExternalName類型
- 三、k8s最佳實踐:映射外部服務案例分享
- 四、Service服務發現:coredns組件詳解
- 4.1、DNS是什么?
- 4.2、CoreDNS是什么?
- 4.3、驗證CoreDNS
一、Service概念原理
1.1、為什么要有Service
在kubernetes中,Pod是有生命周期的,如果Pod重啟它的IP很有可能會發生變化。如果我們的服務都是將Pod的IP地址寫死,Pod掛掉或者重啟,和剛才重啟的pod相關聯的其他服務將會找不到它所關聯的Pod.
為了解決這個問題,在kubernetes中定義了service資源對象,Service 定義了一個服務訪問的入口,客戶端通過這個入口即可訪問服務背后的應用集群實例,service是一組Pod的邏輯集合,這一組Pod能夠被Service訪問到,通常是通過Label Selector實現的。
- pod ip經常變化,service是pod的代理,我們客戶端訪問,只需要訪問service,就會把請求代理到Pod
- pod ip在k8s集群之外無法訪問,所以需要創建service,這個service可以在k8s集群外訪問的。
1.2、Service概述
- service是一個固定接入層,客戶端可以通過訪問service的ip和端口訪問到service關聯的后端pod。
- 這個service工作依賴于在kubernetes集群之上部署的一個附件,就是kubernetes的dns服務(不同kubernetes版本的dns默認使用的也是不一樣的,1.11之前的版本使用的是kubeDNs,較新的版本使用的是coredns)
- service的名稱解析是依賴于dns附件的,因此在部署完k8s之后需要再部署dns附件,kubernetes要想給客戶端提供網絡功能,需要依賴第三方的網絡插件(flannel,calico等)。
- 每個K8s節點上都有一個組件叫做kube-proxy,
kube-proxy這個組件將始終監視著apiserver中有關service資源的變動信息,需要跟master之上的apiserver交互,隨時連接到apiserver上獲取任何一個與service資源相關的資源變動狀態 - 這種是通過kubernetes中固有的一種請求方法watch(監視)來實現的,一旦有service資源的內容發生變動(如創建,刪除),kube-proxy都會將它轉化成當前節點之上的能夠實現service資源調度,把我們請求調度到后端特定的pod資源之上的規則,這個規則可能是iptables,也可能是ipvs,取決于service的實現方式。
1.3、工作原理
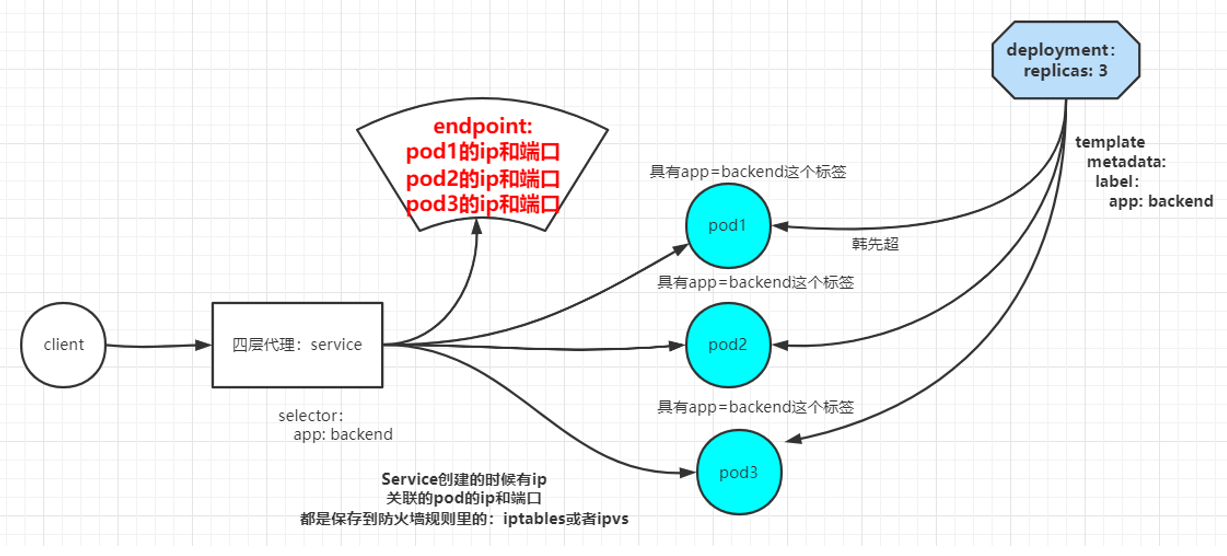
k8s在創建Service時,會根據標簽選擇器selector(lable selector)來查找Pod,據此創建與Service同名的endpoint對象,當Pod 地址發生變化時,endpoint也會隨之發生變化,service接收前端client請求的時候,就會通過endpoint,找到轉發到哪個Pod進行訪問的地址。(至于轉發到哪個節點的Pod,由負載均衡kube-proxy決定)
1.4、三類IP地址
【1】Node Network(節點網絡)
物理節點或者虛擬節點的網絡,如ens33接口上的網路地址
[root@master ~]# ip a
1: lo: <LOOPBACK,UP,LOWER_UP> mtu 65536 qdisc noqueue state UNKNOWN group default qlen 1000link/loopback 00:00:00:00:00:00 brd 00:00:00:00:00:00inet 127.0.0.1/8 scope host lovalid_lft forever preferred_lft foreverinet6 ::1/128 scope hostvalid_lft forever preferred_lft forever
2: ens32: <BROADCAST,MULTICAST,UP,LOWER_UP> mtu 1500 qdisc pfifo_fast state UP group default qlen 1000link/ether 00:0c:29:9d:0d:9f brd ff:ff:ff:ff:ff:ffinet 10.32.1.147/24 brd 10.32.1.255 scope global noprefixroute ens32valid_lft forever preferred_lft foreverinet6 fe80::bdc4:94e0:2ba5:e504/64 scope link noprefixroutevalid_lft forever preferred_lft forever
【2】Pod network(pod 網絡)
創建的Pod具有的IP地址
[root@master ~]# kubectl get pods -A  -o wide
NAMESPACE     NAME                                       READY   STATUS    RESTARTS      AGE   IP               NODE     NOMINATED NODE   READINESS GATES
kube-system   calico-kube-controllers-6744f6b6d5-4vnx4   1/1     Running   0             27h   10.244.196.129   node01   <none>           <none>
kube-system   calico-node-c7hdk                          1/1     Running   0             27h   10.32.1.147      master   <none>           <none>
kube-system   calico-node-v8lg8                          1/1     Running   0             27h   10.32.1.148      node01   <none>           <none>
kube-system   calico-node-w8tkz                          1/1     Running   0             27h   10.32.1.149      node02   <none>           <none>
Node Network和Pod network這兩種網絡地址是我們實實在在配置的,其中節點網絡地址是配置在節點接口之上,而pod網絡地址是配置在pod資源之上的,因此這些地址都是配置在某些設備之上的,這些設備可能是硬件,也可能是軟件模擬的
【3】Cluster Network(服務網絡)
集群地址,也稱為service network
這個地址是虛擬的地址(virtual ip),沒有配置在某個接口上,只是出現在service的規則當中。
[root@master ~]# kubectl get svc
NAME         TYPE        CLUSTER-IP   EXTERNAL-IP   PORT(S)   AGE
kubernetes   ClusterIP   10.96.0.1    <none>        443/TCP   28h
二、Service資源創建
2.1、service資源字段
[root@master1 ~]# kubectl explain service
KIND:     Service
VERSION:  v1
DESCRIPTION:Service is a named abstraction of software service (for example, mysql)consisting of local port (for example 3306) that the proxy listens on, andthe selector that determines which pods will answer requests sent throughthe proxy.
FIELDS:apiVersion	<string>   # service資源使用的api組kind	<string>           # 創建的資源類型metadata	<Object>       # 定義元數據spec	<Object>
2.2、service的spec字段定義
[root@xianchaomaster1 ~]# kubectl explain service.spec
KIND:     Service
VERSION:  v1
RESOURCE: spec <Object>
DESCRIPTION:Spec defines the behavior of a service.https://git.k8s.io/community/contributors/devel/sig-architecture/api-conventions.md#spec-and-statusServiceSpec describes the attributes that a user creates on a service.
FIELDS:allocateLoadBalancerNodePorts	<boolean>clusterIP	<string>   # 動態分配的地址,也可以自己在創建的時候指定,創建之后就改不了了clusterIPs	<[]string> externalIPs	<[]string>externalName	<string>externalTrafficPolicy	<string>healthCheckNodePort	<integer>ipFamilies	<[]string>ipFamilyPolicy	<string>loadBalancerIP	<string>loadBalancerSourceRanges	<[]string>ports	<[]Object>  # 定義service端口,用來和后端pod建立聯系publishNotReadyAddresses	<boolean>selector	<map[string]string> # 通過標簽選擇器選擇關聯的pod有哪些sessionAffinity	<string>sessionAffinityConfig	<Object>
# service在實現負載均衡的時候還支持sessionAffinity?
# sessionAffinity什么意思?
# 會話聯系,默認是none,隨機調度的(基于iptables規則調度的);如果我們定義sessionAffinity的client ip,那就表示把來自同一客戶端的IP請求調度到同一個pod上topologyKeys	<[]string>type	<string>  #定義service的類型
2.3、Service端口
kubectl explain service.spec.ports 可以查看端口相關內容
nodePort : service在物理機映射的端口,默認在 30000-32767 之間
port: service的端口,這個是k8s集群內部服務可訪問的端口
targetPort: targetPort是pod上的端口,從port和nodePort上來的流量,經過kube-proxy流入到后端pod的targetPort上,最后進入容器。
2.4、Service類型
kubectl explain service.spec.type可以查看service有那幾種類型
【1】ClusterIP類型
[root@master 9]# cat pod_test.yaml
apiVersion: apps/v1
kind: Deployment
metadata:name: my-nginx
spec:selector:matchLabels:run: my-nginxreplicas: 2template:metadata:labels:run: my-nginxspec:containers:- name: my-nginximage: nginximagePullPolicy: IfNotPresentports:- containerPort: 80  #pod中的容器需要暴露的端口startupProbe:periodSeconds: 5initialDelaySeconds: 60timeoutSeconds: 10httpGet:scheme: HTTPport: 80path: /livenessProbe:periodSeconds: 5initialDelaySeconds: 60timeoutSeconds: 10httpGet:scheme: HTTPport: 80path: /readinessProbe:periodSeconds: 5initialDelaySeconds: 60timeoutSeconds: 10httpGet:scheme: HTTPport: 80path: /
# 更新資源清單文件
[root@master 9]# kubectl apply -f pod_test.yaml
# 查看pod ip
[root@master 9]# kubectl get pods -l run=my-nginx -o wide
NAME                       READY   STATUS    RESTARTS   AGE     IP               NODE     NOMINATED NODE   READINESS GATES
my-nginx-fc8c7b6c4-7j6hx   1/1     Running   0          2m12s   10.244.196.136   node01   <none>           <none>
my-nginx-fc8c7b6c4-h7xg6   1/1     Running   0          2m12s   10.244.140.79    node02   <none>           <none>
# curl <ip> 可以訪問對應的pod
以上pod如果被刪除,就會重新生成pod,pod ip也會變化,所以需要在pod前端加一個固定接入層。接下來創建Service:
# 查看pod標簽
[root@master ~]# kubectl get pods --show-labels
NAME                       READY   STATUS    RESTARTS   AGE     LABELS
my-nginx-fc8c7b6c4-7j6hx   1/1     Running   0          4h53m   pod-template-hash=fc8c7b6c4,run=my-nginx
my-nginx-fc8c7b6c4-h7xg6   1/1     Running   0          4h53m   pod-template-hash=fc8c7b6c4,run=my-nginx
# 創建Service
[root@master 9]# cat service_test.yaml
apiVersion: v1
kind: Service
metadata:name: my-nginxlabels:run: my-nginx
spec:type: ClusterIPports:- port: 80   #service的端口,暴露給k8s集群內部服務訪問protocol: TCPtargetPort: 80    #pod容器中定義的端口selector:run: my-nginx  #選擇擁有run=my-nginx標簽的pod
上述yaml文件將創建一個 Service,具有標簽run=my-nginx的Pod,目標TCP端口 80,并且在一個抽象的Service端口(targetPort:容器接收流量的端口;port:抽象的 Service 端口,可以使任何其它 Pod訪問該 Service 的端口)上暴露。
[root@master 9]# kubectl apply -f service_test.yaml
service/my-nginx created
[root@master 9]# kubectl get svc -l run=my-nginx
NAME       TYPE        CLUSTER-IP      EXTERNAL-IP   PORT(S)   AGE
my-nginx   ClusterIP   10.102.168.76   <none>        80/TCP    10s
# 在k8s控制節點訪問service的ip:端口就可以把請求代理到后端pod
[root@master 9]# curl 10.102.168.76:80
通過上面可以看到請求service IP:port跟直接訪問pod ip:port看到的結果一樣,這就說明service可以把請求代理到它所關聯的后端pod
注意:上面的10.102.168.76:80地址只能是在k8s集群內部可以訪問,在外部無法訪問,比方說我們想要通過瀏覽器訪問,那么是訪問不通的,如果想要在k8s集群之外訪問,是需要把service type類型改成nodePort的。
[root@master ~]# kubectl describe svc my-nginx
Name:              my-nginx
Namespace:         default
Labels:            run=my-nginx
Annotations:       <none>
Selector:          run=my-nginx
Type:              ClusterIP
IP Family Policy:  SingleStack
IP Families:       IPv4
IP:                10.102.168.76
IPs:               10.102.168.76
Port:              <unset>  80/TCP
TargetPort:        80/TCP
Endpoints:         10.244.140.79:80,10.244.196.136:80
Session Affinity:  None
Events:            <none>
[root@master ~]#  kubectl get ep my-nginx
NAME       ENDPOINTS                            AGE
my-nginx   10.244.140.79:80,10.244.196.136:80   22m
service可以對外提供統一固定的ip地址,并將請求重定向至集群中的pod。其中“將請求重定向至集群中的pod”就是通過endpoint與selector協同工作實現。
selector是用于選擇pod,由selector選擇出來的pod的ip地址和端口號,將會被記錄在endpoint中。endpoint便記錄了所有pod的ip地址和端口號。當一個請求訪問到service的ip地址時,就會從endpoint中選擇出一個ip地址和端口號,然后將請求重定向至pod中。具體把請求代理到哪個pod,需要的就是kube-proxy的輪詢實現的。service不會直接到pod,service是直接到endpoint資源,就是地址加端口,再由endpoint再關聯到pod。
service只要創建完成,我們就可以直接解析它的服務名,每一個服務創建完成后都會在集群dns中動態添加一個資源記錄,添加完成后我們就可以解析了,資源記錄格式是:
SVC_NAME.NS_NAME.DOMAIN.LTD.
服務名.命名空間.域名后綴
集群默認的域名后綴是svc.cluster.local.
就像我們上面創建的my-nginx這個服務,它的完整名稱解析就是
my-nginx.default.svc.cluster.local
[root@master ~]# kubectl exec -it my-nginx-fc8c7b6c4-7j6hx /bin/bash
kubectl exec [POD] [COMMAND] is DEPRECATED and will be removed in a future version. Use kubectl exec [POD] -- [COMMAND] instead.
root@my-nginx-fc8c7b6c4-7j6hx:/# curl my-nginx.default.svc.cluster.local
<!DOCTYPE html>
<html>
<head>
<title>Welcome to nginx!</title>
<style>
html { color-scheme: light dark; }
body { width: 35em; margin: 0 auto;
font-family: Tahoma, Verdana, Arial, sans-serif; }
</style>
</head>
<body>
<h1>Welcome to nginx!</h1>
<p>If you see this page, the nginx web server is successfully installed and
working. Further configuration is required.</p><p>For online documentation and support please refer to
<a href="http://nginx.org/">nginx.org</a>.<br/>
Commercial support is available at
<a href="http://nginx.com/">nginx.com</a>.</p><p><em>Thank you for using nginx.</em></p>
</body>
</html>
【2】NodePort類型
[root@master 9]# cat pod_nodeport.yaml
apiVersion: apps/v1
kind: Deployment
metadata:name: my-nginx-nodeport
spec:selector:matchLabels:run: my-nginx-nodeportreplicas: 2template:metadata:labels:run: my-nginx-nodeportspec:containers:- name: my-nginx-nodeport-containerimage: nginximagePullPolicy: IfNotPresentports:- containerPort: 80
[root@master 9]# kubectl apply -f pod_nodeport.yaml
deployment.apps/my-nginx-nodeport created
[root@master 9]#  kubectl get pods -l run=my-nginx-nodeport -owide
NAME                                 READY   STATUS    RESTARTS   AGE   IP               NODE     NOMINATED NODE   READINESS GATES
my-nginx-nodeport-7776f84758-5nxmb   1/1     Running   0          22s   10.244.196.137   node01   <none>           <none>
my-nginx-nodeport-7776f84758-qlr5z 1/1 Running 0 22s 10.244.140.80 node02 <none> <none>[root@master 9]# cat service_nodeport.yaml
apiVersion: v1
kind: Service
metadata:name: my-nginx-nodeportlabels:run: my-nginx-nodeport
spec:type: NodePortports:- port: 80protocol: TCPtargetPort: 80nodePort: 30380selector:run: my-nginx-nodeport
[root@master 9]# kubectl apply -f service_nodeport.yaml
service/my-nginx-nodeport created
[root@master 9]# kubectl get svc -l run=my-nginx-nodeport
NAME TYPE CLUSTER-IP EXTERNAL-IP PORT(S) AGE
my-nginx-nodeport NodePort 10.107.198.159 <none> 80:30380/TCP 6s
[root@master 9]# curl 10.107.198.159
<!DOCTYPE html>
<html>
<head>
<title>Welcome to nginx!</title>
<style>
html { color-scheme: light dark; }
body { width: 35em; margin: 0 auto;
font-family: Tahoma, Verdana, Arial, sans-serif; }
</style>
</head>
<body>
<h1>Welcome to nginx!</h1>
......
注意: 10.107.198.159是k8s集群內部的service ip地址,只能在k8s集群內部訪問,在集群外無法訪問。
在集群外訪問service:curl 10.107.198.159:30380
數據轉發流程:
客戶端請求http://10.32.1.147:30380 ->docker0虛擬網卡:172.17.0.1:30380 ->10.244.140.80:80,10.244.196.137:80
[root@master 9]# ipvsadm -Ln
IP Virtual Server version 1.2.1 (size=4096)
Prot LocalAddress:Port Scheduler Flags-> RemoteAddress:Port           Forward Weight ActiveConn InActConn
TCP  172.17.0.1:30380 rr  # 172.17.0.1是docker0 網卡地址-> 10.244.140.80:80     # pod1 ip        Masq    1      0          0-> 10.244.196.137:80    # pod2 ip        Masq    1      0          0
TCP  10.32.1.147:30380 rr-> 10.244.140.80:80             Masq    1      0          0-> 10.244.196.137:80            Masq    1      0          0
......
【3】ExternalName類型
應用場景:跨名稱空間訪問
需求:default名稱空間下的client 服務想要訪問nginx-ns名稱空間下的nginx-svc服務
步驟:
1、創建名為nginx的pod (指定命名空間nginx-ns )
# 在線拉取鏡像(node節點上要操作)
[root@node01 ~]# ctr images pull docker.io/library/busybox:latest
[root@node01 ~]# ctr image ls|grep busy
docker.io/library/busybox:latest                     application/vnd.docker.distribution.manifest.list.v2+json sha256:1ceb872bcc68a8fcd34c97952658b58086affdcb604c90c1dee2735bde5edc2f 2.1 MiB  linux/386,linux/amd64,linux/arm/v5,linux/arm/v6,linux/arm/v7,linux/arm64/v8,linux/mips64le,linux/ppc64le,linux/riscv64,linux/s390x -
You have new mail in /var/spool/mail/root[root@master 9]# kubectl create ns nginx-ns
namespace/nginx-ns created
[root@master 9]# cat server_nginx.yaml
apiVersion: apps/v1
kind: Deployment
metadata:name: nginxnamespace: nginx-ns
spec:replicas: 1selector:matchLabels:app: nginxtemplate:metadata:labels:app: nginxspec:containers:- name: nginximage: nginximagePullPolicy: IfNotPresent
[root@master 9]# kubectl apply -f server_nginx.yaml
deployment.apps/nginx created
[root@master 9]# kubectl get pods -n nginx-ns
NAME                     READY   STATUS    RESTARTS   AGE
nginx-6fb6c59b65-56sxx   1/1     Running   0          4s
2、創建名為nginx-svc的svc(指定命名空間nginx-ns )
# 創建名為nginx-svc的svc
[root@master 9]# cat nginx_svc.yaml
apiVersion: v1
kind: Service
metadata:name: nginx-svcnamespace: nginx-ns
spec:selector:app: nginxports:- name: httpprotocol: TCPport: 80targetPort: 80
[root@master 9]# kubectl apply -f nginx_svc.yaml
service/nginx-svc created
[root@master 9]# kubectl get svc -n nginx-ns
NAME        TYPE        CLUSTER-IP       EXTERNAL-IP   PORT(S)   AGE
nginx-svc   ClusterIP   10.104.157.106   <none>        80/TCP    24s
3、創建名為client的pod
[root@master 9]# cat client.yaml
apiVersion: apps/v1
kind: Deployment
metadata:name: client
spec:replicas: 1selector:matchLabels:app: busyboxtemplate:metadata:labels:app: busyboxspec:containers:- name: busyboximage: busyboximagePullPolicy: IfNotPresentcommand: ["/bin/sh","-c","sleep 36000"]
[root@master 9]# kubectl apply -f client.yaml
4、創建名為client-svc的svc
# 創建名為client-svc的svc
[root@master 9]# cat client_svc.yaml
apiVersion: v1
kind: Service
metadata:name: client-svc
spec:type: ExternalName# 這里使用到了nginx-svc 的軟鏈,讓使用者感覺就好像調用自己命名空間的服務一樣。externalName: nginx-svc.nginx-ns.svc.cluster.localports:- name: httpport: 80targetPort: 80
[root@master 9]# kubectl apply -f client_svc.yaml
service/client-svc created
[root@master 9]# kubectl get svc
NAME                TYPE           CLUSTER-IP       EXTERNAL-IP                            PORT(S)        AGE
client-svc          ExternalName   <none>           nginx-svc.nginx-ns.svc.cluster.local   80/TCP         5h4m
kubernetes          ClusterIP      10.96.0.1        <none>                                 443/TCP        2d5h
my-nginx            ClusterIP      10.102.168.76    <none>                                 80/TCP         18h
my-nginx-nodeport   NodePort       10.107.198.159   <none>                                 80:30380/TCP   17h
5、登錄client pod
[root@master 9]# kubectl exec -it client-568955849b-vglmj /bin/sh
kubectl exec [POD] [COMMAND] is DEPRECATED and will be removed in a future version. Use kubectl exec [POD] -- [COMMAND] instead.
/ #
/ # wget -q -O - client-svc.default.svc.cluster.local
<!DOCTYPE html>
<html>
<head>
<title>Welcome to nginx!</title>
......
/ # wget -q -O - nginx-svc.nginx-ns.svc.cluster.local
<!DOCTYPE html>
<html>
<head>
<title>Welcome to nginx!</title>
......
# 上面兩個請求的結果一樣
三、k8s最佳實踐:映射外部服務案例分享
k8s集群引用外部的mysql數據庫
在node02節點上安裝mysql數據庫
[root@node02 ~]# yum install mariadb-server.x86_64 -y
[root@node02 ~]# systemctl start mariadb
[root@master 9]# cat mysql_service.yaml
apiVersion: v1
kind: Service
metadata:name: mysql
spec:   # 這里沒有標簽選擇器,是不會關聯到任何pod的type: ClusterIPports:- port: 3306
[root@master 9]# kubectl apply -f mysql_service.yaml
service/mysql created
[root@master 9]# kubectl get svc | grep mysql
mysql               ClusterIP      10.104.34.181    <none>                                 3306/TCP       6s
[root@master 9]# kubectl describe svc mysql
Name:              mysql
Namespace:         default
Labels:            <none>
Annotations:       <none>
Selector:          <none>
Type:              ClusterIP
IP Family Policy:  SingleStack
IP Families:       IPv4
IP:                10.104.34.181
IPs:               10.104.34.181
Port:              <unset>  3306/TCP
TargetPort:        3306/TCP
Endpoints:         <none> # 沒有endpoint
Session Affinity:  None
Events:            <none>
接下來,我想做的是,創建endpoint,通過訪問maysql的域名或ip能代理node2節點上的mysql
# 創建endpoint資源
[root@master 9]# cat mysql_endpoint.yaml
apiVersion: v1
kind: Endpoints
metadata:name: mysql  # 名字必須和要關聯的svc名字一致
subsets: # subsets是一個對象列表,所有后面的子內容要加 -
- addresses:- ip: 10.32.1.149ports:- port: 3306
[root@master 9]# kubectl apply -f mysql_endpoint.yaml
endpoints/mysql created
[root@master 9]# kubectl get ep
NAME                ENDPOINTS                            AGE
kubernetes          10.32.1.147:6443                     4d1h
my-nginx            10.244.140.79:80,10.244.196.136:80   2d14h
my-nginx-nodeport   10.244.140.80:80,10.244.196.137:80   2d13h
mysql               10.32.1.149:3306                     43h
[root@master 9]# kubectl describe svc mysql
Name:              mysql
Namespace:         default
Labels:            <none>
Annotations:       <none>
Selector:          <none>
Type:              ClusterIP
IP Family Policy:  SingleStack
IP Families:       IPv4
IP:                10.104.34.181
IPs:               10.104.34.181
Port:              <unset>  3306/TCP
TargetPort:        3306/TCP
Endpoints:         10.32.1.149:3306 # 這個就是定義的外部數據庫
Session Affinity:  None
Events:            <none>
上面配置就是將外部IP地址和服務引入到k8s集群內部,由service作為一個代理來達到能夠訪問外部服務的目的。
四、Service服務發現:coredns組件詳解
4.1、DNS是什么?
DNS全稱是Domain Name System:域名系統,是整個互聯網的電話簿,它能夠將可被人理解的域名翻譯成可被機器理解IP地址,使得互聯網的使用者不再需要直接接觸很難閱讀和理解的IP地址。
域名系統在現在的互聯網中非常重要,因為服務器的 IP 地址可能會經常變動,如果沒有了 DNS,那么可能 IP 地址一旦發生了更改,當前服務器的客戶端就沒有辦法連接到目標的服務器了,如果我們為 IP 地址提供一個『別名』并在其發生變動時修改別名和 IP 地址的關系,那么我們就可以保證集群對外提供的服務能夠相對穩定地被其他客戶端訪問。
DNS 其實就是一個分布式的樹狀命名系統,它就像一個去中心化的分布式數據庫,存儲著從域名到 IP 地址的映射。
4.2、CoreDNS是什么?
CoreDNS 其實就是一個 DNS 服務,而 DNS 作為一種常見的服務發現手段,所以很多開源項目以及工程師都會使用 CoreDNS 為集群提供服務發現的功能,Kubernetes 就在集群中使用 CoreDNS 解決服務發現的問題。 作為一個加入 CNCF(Cloud Native Computing Foundation)的服務, CoreDNS 的實現非常簡單。
4.3、驗證CoreDNS
Service完整的名稱組成:
<servicename>.<namespace>.svc.cluster.local
那么k8s集群內部的服務就可以通過FQDN訪問
[root@master 9]# kubectl get svc
NAME                TYPE           CLUSTER-IP       EXTERNAL-IP                            PORT(S)        AGE
client-svc          ExternalName   <none>           nginx-svc.nginx-ns.svc.cluster.local   80/TCP         2d1h
kubernetes          ClusterIP      10.96.0.1        <none>                                 443/TCP        4d2h
my-nginx            ClusterIP      10.102.168.76    <none>                                 80/TCP         2d14h
my-nginx-nodeport   NodePort       10.107.198.159   <none>                                 80:30380/TCP   2d14h
mysql               ClusterIP      10.104.34.181    <none>
# 比如這里的client
# 完整的FQDN     : client-svc.default.svc.class.local
【1】導入鏡像,運行pod
# 把dig.tar.gz上傳到xianchaonode2和xianchaonode1機器上,手動解壓:
[root@node01 ~]# ctr -n=k8s.io images import  dig.tar.gz
[root@node02 ~]# ctr -n=k8s.io images import  dig.tar.gz
[root@master 9]# cat dig.yaml
apiVersion: v1
kind: Pod
metadata:name: dignamespace: default
spec:containers:- name: digimage:  xianchao/dig:latest  # 這個鏡像其實就提供了一個命令imagePullPolicy: IfnotPresentcommand:- sleep- "3600"imagePullPolicy: IfNotPresentrestartPolicy: Always
[root@master 9]# kubectl apply -f dig.yaml
【2】dns解析
# 查看默認名稱空間的kubernetes服務
[root@master 9]#  kubectl get svc | grep kubernetes
kubernetes          ClusterIP      10.96.0.1        <none>                                 443/TCP        4d2h
# 查看默認名稱空間的client服務
[root@master 9]#  kubectl get svc | grep client
client-svc          ExternalName   <none>           nginx-svc.nginx-ns.svc.cluster.local   80/TCP         2d2h# 解析dns,如有以下返回說明dns安裝成功
[root@master 9]# kubectl exec -it dig -- nslookup kubernetes
Server:         10.96.0.10      # kube-dns這個svc的ip
Address:        10.96.0.10#53   # 說明用的是對應cordns的pod進行域名解析Name:   kubernetes.default.svc.cluster.local  # 域名
Address: 10.96.0.1                            # ip[root@master 9]# kubectl exec -it dig -- nslookup client-svc
Server:         10.96.0.10
Address:        10.96.0.10#53client-svc.default.svc.cluster.local    canonical name = nginx-svc.nginx-ns.svc.cluster.local.
Name:   nginx-svc.nginx-ns.svc.cluster.local  # 域名
Address: 10.104.157.106                       # ip

)

)


![[NAND Flash 2.1] NAND Flash 閃存改變了現代生活](http://pic.xiahunao.cn/[NAND Flash 2.1] NAND Flash 閃存改變了現代生活)


)

——Seaborn)
