Python實現GUI圖片瀏覽程序
下面程序需要pillow庫。pillow是 Python 的第三方圖像處理庫,需要安裝才能實用。pillow是PIL( Python Imaging Library)基礎上發展起來的,需要注意的是pillow庫安裝用pip install pillow,導包時要用PIL來導入。更多情況可見https://blog.csdn.net/cnds123/article/details/126141838
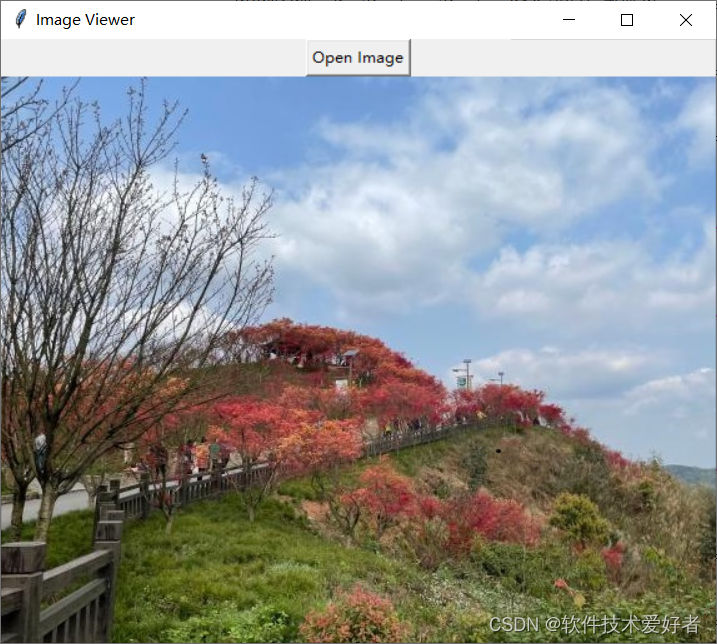
一、簡單的圖片查看程序
功能,使用了tkinter庫來創建一個窗口,用戶可以通過該窗口選擇一張圖片并在窗口中顯示。能調整窗口大小以適應圖片。效果圖如下:
源碼如下:
import tkinter as tk
from tkinter import filedialog
from PIL import Image, ImageTk# 創建一個Tkinter窗口
root = tk.Tk()
root.geometry("400x300")  # 設置寬度為400像素,高度為300像素
root.title("Image Viewer")# 添加一個按鈕來選擇圖片
def open_image():try:file_path = filedialog.askopenfilename()if file_path:image = Image.open(file_path)photo = ImageTk.PhotoImage(image)# 清除舊圖片for widget in root.winfo_children():if isinstance(widget, tk.Label):widget.destroy()label = tk.Label(root, image=photo)label.image = photolabel.pack()# 調整窗口大小以適應圖片root.geometry("{}x{}".format(image.width, image.height))except AttributeError:print("No image selected.")button = tk.Button(root, text="Open Image", command=open_image)
button.pack()# 運行窗口
root.mainloop()
此程序,創建一個tkinter窗口,設置窗口的大小為400x300像素,并設置窗口標題為"Image Viewer"。
添加一個按鈕,當用戶點擊該按鈕時,會彈出文件選擇對話框,用戶可以選擇一張圖片文件。
選擇圖片后,程序會使用PIL庫中的Image.open方法打開所選的圖片文件,并將其顯示在窗口中。
程序會在窗口中顯示所選的圖片,并在用戶選擇新圖片時清除舊圖片。
示例中,使用try-except塊來捕獲FileNotFoundError,該錯誤會在用戶取消選擇圖片時觸發。當用戶取消選擇圖片時,會打印一條消息提示用戶沒有選擇圖片。這樣就可以避免因為取消選擇圖片而導致的報錯。
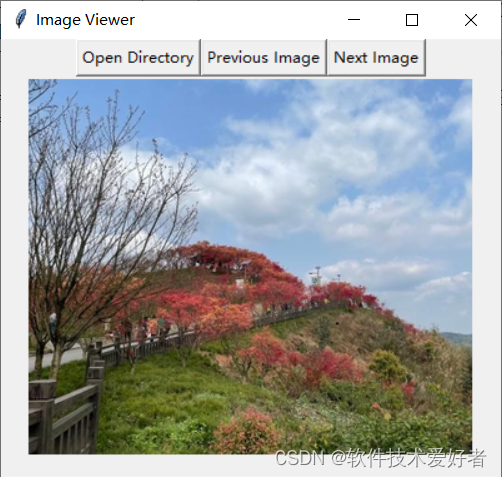
二、圖片查看程序1
“Open Directory”按鈕用于指定一個目錄,窗體上再添加兩個按鈕:“Previous Image” 和“Next Image”,單擊這兩個按鈕實現切換顯示指定目錄中的圖片。這三個按鈕水平排列在頂部,在下方顯示圖片。如果所選圖片的尺寸超過了窗口的大小,程序會將圖片縮放到合適的尺寸以適應窗口。效果圖如下:
源碼如下:
import tkinter as tk
from tkinter import filedialog
from PIL import Image, ImageTk
import osclass ImageViewer:def __init__(self, root):self.root = rootself.root.geometry("400x350")self.root.title("Image Viewer")self.image_dir = ""self.image_files = []self.current_index = 0# 創建頂部按鈕框架self.button_frame = tk.Frame(self.root)self.button_frame.pack(side="top")# 創建打開目錄按鈕self.open_button = tk.Button(self.button_frame, text="Open Directory", command=self.open_directory)self.open_button.pack(side="left")# 創建上一張圖片按鈕self.prev_button = tk.Button(self.button_frame, text="Previous Image", command=self.show_previous_image)self.prev_button.pack(side="left")# 創建下一張圖片按鈕self.next_button = tk.Button(self.button_frame, text="Next Image", command=self.show_next_image)self.next_button.pack(side="left")# 創建圖片顯示區域self.image_label = tk.Label(self.root)self.image_label.pack()def open_directory(self):try:self.image_dir = filedialog.askdirectory()if self.image_dir:self.image_files = [f for f in os.listdir(self.image_dir) if f.endswith(".jpg") or f.endswith(".png") or f.endswith(".jfif")]self.current_index = 0self.show_image()except tk.TclError:print("No directory selected.")def show_image(self):if self.image_files:image_path = os.path.join(self.image_dir, self.image_files[self.current_index])image = Image.open(image_path)image.thumbnail((400, 300), Image.ANTIALIAS)photo = ImageTk.PhotoImage(image)self.image_label.config(image=photo)self.image_label.image = photodef show_previous_image(self):if self.image_dir:if self.image_files:self.current_index = (self.current_index - 1) % len(self.image_files)self.show_image()else:print("Please open a directory first.")else:print("Please open a directory first.")def show_next_image(self):if self.image_dir:if self.image_files:self.current_index = (self.current_index + 1) % len(self.image_files)self.show_image()else:print("Please open a directory first.")else:print("Please open a directory first.")root = tk.Tk()
app = ImageViewer(root)
root.mainloop()
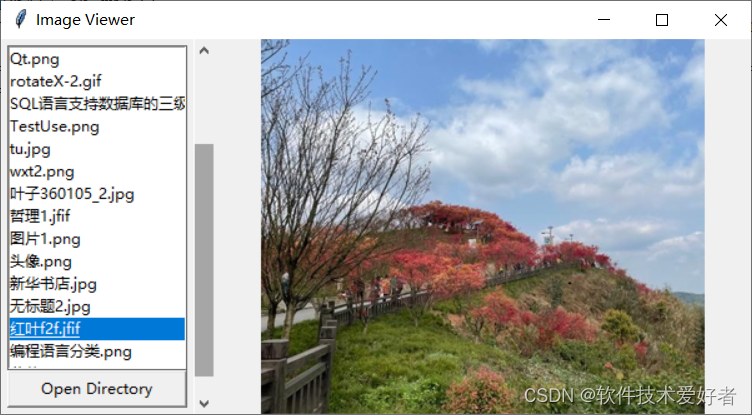
三、圖片查看程序2
窗體上有3個控件,列表框和按鈕和在窗體上左側上下放置,右側區域顯示圖片, “Open Directory”按鈕用于指定目錄中,列表用于放置指定目錄中的所有圖片文件名,點擊列表中的圖片文件名,圖片在右側不變形縮放顯示到窗體上(圖片縮放到合適的尺寸以適應窗口),效果圖如下:
源碼如下:
import tkinter as tk
from tkinter import filedialog
from PIL import Image, ImageTk
import os# 創建主窗口
root = tk.Tk()
root.geometry("600x300")
root.title("Image Viewer")# 創建一個Frame來包含按鈕和列表框
left_frame = tk.Frame(root)
left_frame.pack(side=tk.LEFT, fill=tk.BOTH, padx=5, pady=5)# 創建一個Frame來包含圖片顯示區域
right_frame = tk.Frame(root)
right_frame.pack(side=tk.RIGHT, fill=tk.BOTH, expand=True)# 創建一個列表框來顯示文件名
listbox = tk.Listbox(left_frame)
listbox.pack(fill=tk.BOTH, expand=True)# 創建一個滾動條并將其與列表框關聯
scrollbar = tk.Scrollbar(root, orient=tk.VERTICAL)
scrollbar.pack(side=tk.RIGHT, fill=tk.Y)
scrollbar.config(command=listbox.yview)
listbox.config(yscrollcommand=scrollbar.set)# 創建一個標簽來顯示圖片
image_label = tk.Label(right_frame)
image_label.pack(fill=tk.BOTH, expand=True)# 函數:打開目錄并列出圖片文件
def open_directory():directory = filedialog.askdirectory()if directory:# 清空列表框listbox.delete(0, tk.END)# 列出目錄中的所有圖片文件for file in os.listdir(directory):if file.lower().endswith(('.jpg', '.jpeg', '.png', '.gif','.jfif')):listbox.insert(tk.END, file)# 保存當前目錄open_directory.current_directory = directory# 函數:在右側顯示選中的圖片
def show_selected_image(event):if not hasattr(open_directory, 'current_directory'):return# 獲取選中的文件名selected_file = listbox.get(listbox.curselection())# 構建完整的文件路徑file_path = os.path.join(open_directory.current_directory, selected_file)# 打開圖片并進行縮放image = Image.open(file_path)image.thumbnail((right_frame.winfo_width(), right_frame.winfo_height()), Image.ANTIALIAS)# 用PIL的PhotoImage顯示圖片photo = ImageTk.PhotoImage(image)image_label.config(image=photo)image_label.image = photo  # 保存引用,防止被垃圾回收# 創建“Open Directory”按鈕
open_button = tk.Button(left_frame, text="Open Directory", command=open_directory)
open_button.pack(fill=tk.X)# 綁定列表框選擇事件
listbox.bind('<<ListboxSelect>>', show_selected_image)# 運行主循環
root.mainloop()
OK!
注意力模塊的小麥病害檢測系統)


)


