SpringBoot3核心原理
事件和監聽器
生命周期監聽
場景:監聽應用的生命周期
可以通過下面步驟自定義SpringApplicationRunListener來監聽事件。
①、編寫SpringApplicationRunListener實現類
②、在META-INF/spring.factories中配置org.springframework.boot.SpringApplicationRunListener=自己的Listener,還可以指定一個有參構造器,接收兩個參數SpringApplication application, String[] args
③、springboot在spring-boot.jar中配置了默認的Listener,如下:
org.springframework.boot.SpringApplicationRunListener=
org.springframework.boot.context.event.EventPublishingRunListener

場景實現
創建監聽器
MyApplicationListener
package com.louis.listener;import org.springframework.boot.ConfigurableBootstrapContext;
import org.springframework.boot.SpringApplicationRunListener;
import org.springframework.context.ConfigurableApplicationContext;
import org.springframework.core.env.ConfigurableEnvironment;import java.time.Duration;/*** springboot應用生命周期監聽* @author XRY* @date 2023年07月14日14:51*/
public class MyApplicationListener implements SpringApplicationRunListener {@Overridepublic void starting(ConfigurableBootstrapContext bootstrapContext) {System.out.println("===========starting==========正在啟動=======");}@Overridepublic void environmentPrepared(ConfigurableBootstrapContext bootstrapContext, ConfigurableEnvironment environment) {System.out.println("===========environmentPrepared==========環境準備完成=======");}@Overridepublic void contextPrepared(ConfigurableApplicationContext context) {//相當與IOC容器System.out.println("===========contextPrepared==========ioc容器準備完成=======");}@Overridepublic void contextLoaded(ConfigurableApplicationContext context) {System.out.println("===========contextLoaded==========ioc容器加載完成=======");}@Overridepublic void started(ConfigurableApplicationContext context, Duration timeTaken) {System.out.println("===========started==========啟動完成=======");}@Overridepublic void ready(ConfigurableApplicationContext context, Duration timeTaken) {System.out.println("===========ready==========準備就緒=======");}@Overridepublic void failed(ConfigurableApplicationContext context, Throwable exception) {System.out.println("===========failed==========應用啟動失敗=======");}
}
提示:
想要讓配置的監聽器生效,需要在根目錄下創建一個META-INF文件夾并添加文件spring.factories(它是一個key,value寫法:key為接口全類名, value為我們創建類的全類名)
org.springframework.boot.SpringApplicationRunListener=com.louis.listener.MyApplicationListener
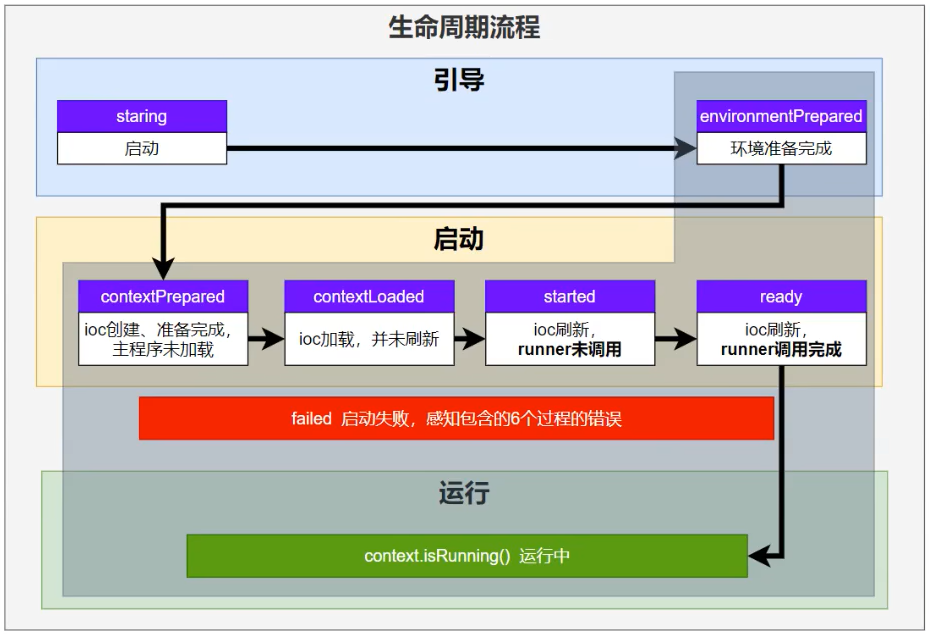
springboot應用生命周期監聽
Listener先要從BootStrapContext引導整個項目啟動,主要分為下面的幾個步驟:
-
引導:利用BootstrapContext引導整個項目啟動
starting:應用開始,調用SpringApplication的run方法,只要有了BootStrapContext就執行 environmentPrepared:環境準備好(把啟動參數等綁定到環境變量中),但是ioc容器還沒有創建。(調一次) -
啟動:
contextPrepared: ioc容器創建并準備好,但是sources(主配置類)沒加載,并關閉上下文,組件還沒有創建(調一次)
contextLoaded: ioc容器加載。著配置類加載進去,但是ioc容器還沒有刷新。(Bean都沒創建)
started: ioc容器刷新了(容器中加入了Bean),但是runner沒調用。
ready: ioc容器刷新了(容器中加入了Bean),所有runner調用完。 -
運行
以前的步驟都正確執行,代表容器running
事件觸發時機
1、各種回調監聽器介紹
| 監聽器 | 監聽階段 | 作用 | 使用場景 |
|---|---|---|---|
| BootstrapRegistryInitializer | 感知特定階段 | 感知引導初始化META-INF/spring.factories 創建引導上下文bootstrapContext的時候觸發可以在主程序調用:application.add.BootstrapRegistryInitializer() | 進行密鑰校對授權 |
| ApplicationContextInitializer | 感知特定階段 | 感知ioc容器初始化META-INF/spring.factories | |
| ApplicationListener | 感知全階段 | 基于事件機制,感知事件。@Bean或EventListener、SpringApplication.addListeners(…)或SpringApplicationBuilder.listeners(…)、META-INF/spring.factories | |
| SpringApplicationRunListener | 感知全階段生命周期+各種階段 | 自定義操作META-INF/spring.factories | |
| ApplicationRunner | 感知特定階段 | 感知應用就緒Ready的@Bean | |
| CommandLineRunner | 感知特定階段 | 感知應用就緒Ready的@Bean |
總結:
如果項目啟動前做事:BootstrapRegistryInitializer和ApplicationContextInitializer
如果想要在項目啟動完成后做事:ApplicationRunner和CommandLineRunner
如果想要干涉生命周期:SpringApplicationRunListener
如果想要用事件機制:ApplicationListener
2、事件完整觸發流程(9種事件)
- ApplicationStartingEvent:應用啟動但未做任何事情,
- ApplicationEnvironmentPreparedEvent:Environment準備好,但context未創建
- ApplicationContextInitializedEvent:ApplicationContext準備好,ApplicationContextInitializers調用,到那時任何bean未加載
- ApplicationPreparedEvent:容器刷新之前,bean定義信息加載
- ApplicationStartedEvent:容器刷新完成,runner未調用
- AvailabilityChangeEvent:LivenessState.CORRECT應用存活,存活探針
- ApplicationReadyEvent:任何runner被調用
- AvailabilityChangeEvent:ReadinessState.ACCEPTING_TRAFFIC應用就緒,可以接收請求,就緒探針
- ApplicationFailedEvent:啟動出錯
事件發送順序

**兩個探針的作用是感知應用是否存貨和就緒。 **
3、SpringBoot事件驅動開發
應用啟動過程生命周期事件感知(9大事件)、應用運行中事件感知(無數種)
- 事件發布:ApplicationEventPublisherAware或注入:ApplicationEventMulticaser
- 事件監聽:組件 + @EventListener
示例

創建service
AccountService
@Service
public class AccountService {public void addAccountScore(String username){System.out.println(username + "加了1分");}
}
CouponService
@Service
public class CouponService {public void sendCoupon(String username){System.out.println(username + "隨機得到了一張優惠券");}
}
SystemService
@Service
public class SystemService {public void recordLog(String username, String password){System.out.println(username + "  ,密碼為" + password + "登錄信息已被記錄");}
}
不使用事件
LoginController
@RestController
public class LoginController {@AutowiredAccountService accountService;@AutowiredCouponService couponService;@AutowiredSystemService systemService;@GetMapping("login")public String login(@RequestParam String username,@RequestParam String password){//業務處理登錄System.out.println("業務處理登錄完成.........");//1、賬戶服務自動簽到加積分accountService.addAccountScore(username);//2、優惠服務隨機發放優惠券couponService.sendCoupon(username);//3、系統服務登記用戶登錄信息systemService.recordLog(username, password);return username + "登錄成功";}
}


使用事件機制
創建實體類UserEntity
@Data
@NoArgsConstructor
@AllArgsConstructor
public class UserEntity {private String username;private String password;
}
創建事件LoginSuccessEvent,繼承ApplicationEvent
package com.louis.event;import com.louis.entity.UserEntity;
import org.springframework.context.ApplicationEvent;import java.awt.desktop.AppEvent;/*** @author XRY   登錄成功事件, 所有事件都推薦繼承ApplicationEvent* @date 2023年07月14日19:19*///登錄成功事件
public class LoginSuccessEvent extends ApplicationEvent {/*** @param source 代表誰登錄成功了*/public LoginSuccessEvent(UserEntity source) {super(source);}
}
創建事件發送類 EventPublisher
package com.louis.event;import org.springframework.context.ApplicationEvent;
import org.springframework.context.ApplicationEventPublisher;
import org.springframework.context.ApplicationEventPublisherAware;
import org.springframework.stereotype.Service;/*** @author XRY* @date 2023年07月14日19:18*/
@Service
public class EventPublisher implements ApplicationEventPublisherAware {/*** 底層發送事件的組件,SpringBoot會通過ApplicationEventPublisherAware接口自動注入給我們*/ApplicationEventPublisher applicationEventPublisher;/*** 所有事件都可以發* @param event*/public void sendEvent(ApplicationEvent event){//用底層API發送事件applicationEventPublisher.publishEvent(event);}/*** 會被自動調用,把真正發事件的底層組件注入進來* @param applicationEventPublisher*/@Overridepublic void setApplicationEventPublisher(ApplicationEventPublisher applicationEventPublisher) {this.applicationEventPublisher = applicationEventPublisher;}
}
控制器LoginController
@RestController
public class LoginController {//事件@AutowiredEventPublisher eventPublisher;@GetMapping("login")public String login(@RequestParam String username,@RequestParam String password){//業務處理登錄System.out.println("業務處理登錄完成.........");//發送事件//1、創建事件信息LoginSuccessEvent event = new LoginSuccessEvent(new UserEntity(username, password));//2、發送事件eventPublisher.sendEvent(event);return username + "登錄成功";}
}


自動配置原理
入門理解
應用關注的三大核心:場景、配置、組件
1、 自動配置流程
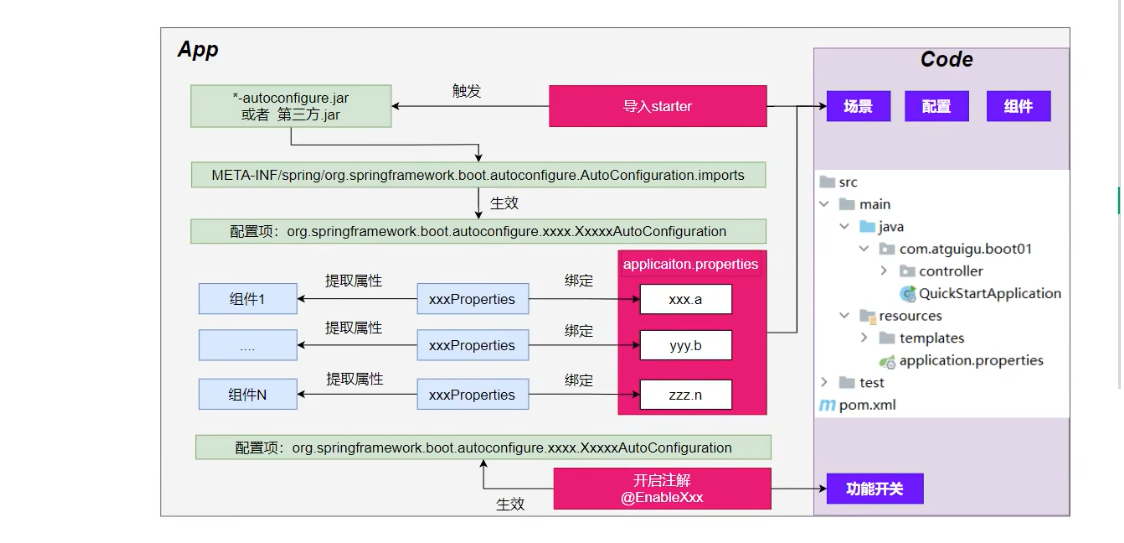
①、導入starter
②、依賴導入autoconfigure
③、尋找類路徑下META-INF/spring/org.springframework.boot.autoconfigure.AutoConfiguration.import文件
④、啟動,加載所有自動配置類-xxxAutoConfiguration
i、給容器種配置功能組件
ii、組件參數綁定到屬性類中。xxxProperties
iii、屬性類和配置文件前綴項綁定
iV、@Conditional派生的條件注解進行判斷是否組件生效
⑤、效果:
i、修改配置文件、修改底層參數
ii、所有場景自動配置好直接使用
iii、可以注入SpringBoot配置好的組件隨時使用。
2、SPI機制
SPI 全稱是 Service Provider Interface,是一種 JDK 內置的動態加載實現擴展點的機制,通過 SPI 技術我們可以動態獲取接口的實現類,不用自己來創建。這個不是什么特別的技術,只是 一種設計理念。它實際上是基于接口的編程+策略模式+配置文件組合實現的動態加載機制。

系統設計的各個抽象,往往有很多不同的實現方案,在面向對象的設計里,一般推薦模塊之間基于接口編程,模塊之間不對實現類進行硬編碼。一旦代碼里涉及具體的實現類,就違反了可拔插的原則,如果需要替換一種實現,就需要修改代碼。為了實現在模塊裝配的時候能不在程序里動態指明,這就需要一種服務發現機制。Java SPI就是提供這樣的一個機制:為某個接口尋找服務實現的機制。有點類似IOC的思想,就是將裝配的控制權移到程序之外,在模塊化設計中這個機制尤其重要。所以SPI的核心思想就是解耦。
3、功能開關
-
自動配置:全部都配置好,什么都不用管,自動批量導入。
項目啟動,spi文件中指定的所有都加載
-
@Enablexxx:手動控制哪些功能的開啟,手動導入。
開啟xxx功能,都是利用@Import把此功能要用的組件導入進去。
進階理解
@SpringBootApplication是以下三個注解的復合注解:
①、@SpringBootConfiguration:就是@Configuration,容器中的組件,配置類。Spring ioc啟動就會加載創建這個類對象。
②、@EnableAutoConfiguration:開啟自動配置,由如下兩注解復合:
- @AutoConfigurationPackage
掃描主程序包。利用@Import(AutoConfigurationPackages.Registrar.class)加載自己想要給容器中導入的組件。把主程序所在包的所有組件導入進來。即只掃描主程序及主程序所在的包及其子包。
- @Import(AutoConfigurationImportSelector.class)
加載所有自動配置類,加載starter導入組件List configurations = ImportCandidates.load(AutoConfiguration.class,getBeanClassLoader()).getCandidates();
掃描SPI文件:“META-INF/spring/org.springframework.boot.autoconfigure.Autoconfiguration.imports”
③、@ComponentScan
組件掃描,排除一些組件,排除前面已經掃描進來的配置類和自動配置類。
自定義starter
場景:抽取聊天機器人場景,它可以打招呼。
效果:任何項目導入此starter都具有打招呼功能,并且問候語中的人名需要可以在配置文件中修改。
實現步驟
①、創建自定義starter項目,引入spring-boot-starter基礎依賴
②、編寫模塊功能,引入模塊所有需要的依賴,編寫xxxAutoConfiguration自動配置類
③、編寫配置文件META-INF/spring/org.springframework.boot.autoconfigure.AutoConfiguration.imports指定啟動需要加載的自動配置。
④、其他下項目引入即可使用。
通用業務代碼
小技巧:可以導入如下依賴重啟項目,再寫配置文件會有提示。
<!--導入配置處理器,自定義的properties配置文件會有提示-->
<dependency><groupId>org.springframework.boot</groupId><artifactId>spring-boot-configuration-processor</artifactId><optional>true</optional>
</dependency>
配置類
@ConfigurationProperties(prefix = "robot")
@Component
@Data
public class RobotProperties {private String name;private String email;private Integer age;
}
配置文件
robot.name=張三
robot.age=23
robot.email=louis@qq.com
通用功能
@Service
public class RobotService {@AutowiredRobotProperties robotProperties;public String sayHello(){return "你好:" + robotProperties.getName() + "   ;年齡:" + robotProperties.getAge();}
}
控制器
@RestController
public class RobotController {@AutowiredRobotService robotService;@GetMapping("/robot/hello")public String sayHello(){return robotService.sayHello();}
}

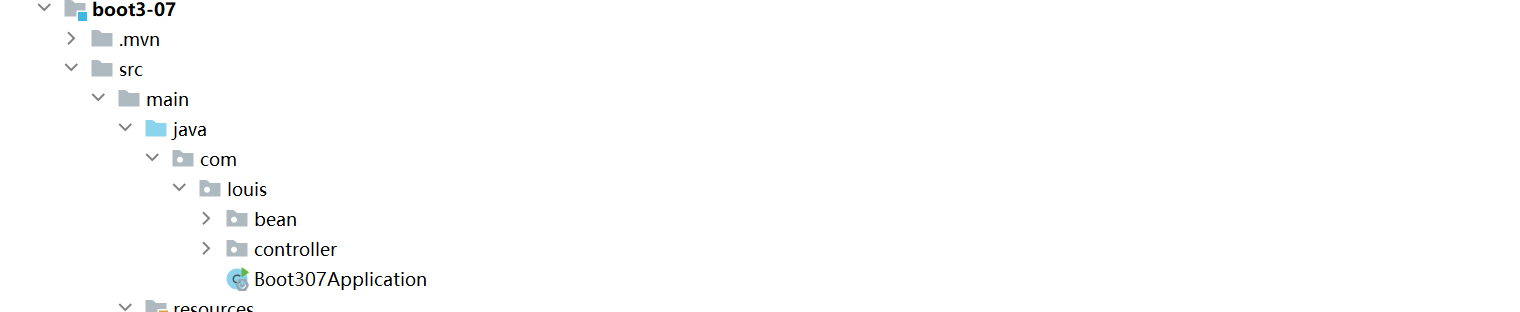
基本抽取(新建模塊)
新建模塊時不需要選擇任何場景。
復制公共功能

根據公共功能,添加場景
<dependency><groupId>org.springframework.boot</groupId><artifactId>spring-boot-starter-web</artifactId>
</dependency>
<dependency><groupId>org.projectlombok</groupId><artifactId>lombok</artifactId><optional>true</optional>
</dependency>
<!--導入配置處理器,自定義的properties配置文件會有提示-->
<dependency><groupId>org.springframework.boot</groupId><artifactId>spring-boot-configuration-processor</artifactId><optional>true</optional>
</dependency>
刪除主類

在需要引用項目下導入該starter
<!--自定義的starter-->
<dependency><groupId>com.louis</groupId><artifactId>boot3-robot-starter</artifactId><version>0.0.1-SNAPSHOT</version>
</dependency>
在starter下編寫配置類
原因:SpringBoot項目只能掃描主程序以及主程序所在的子包,當導入自定義的starter時,不屬于這一層級。
@Configuration
@Import({RobotController.class, RobotService.class, RobotProperties.class})
public class RobotAutoConfiguration {}
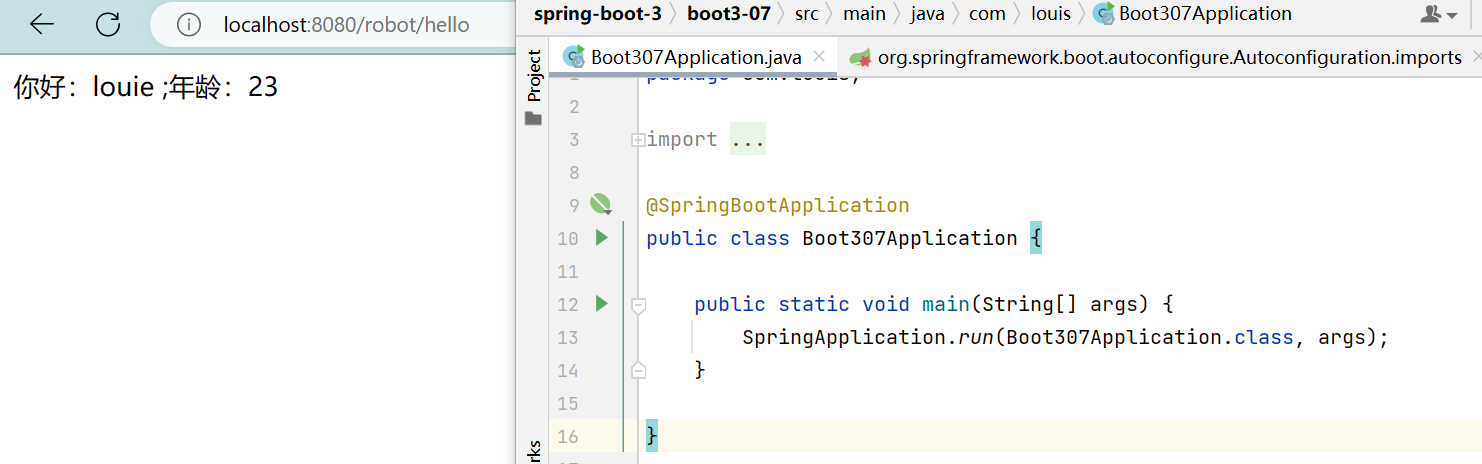
在主程序導入配置類
@SpringBootApplication
@Import(RobotAutoConfiguration.class)
public class Boot307Application {public static void main(String[] args) {SpringApplication.run(Boot307Application.class, args);}}
引入starter不會讀取starter本身的配置。
編寫application.properties
robot.name=louie
robot.age=23
robot.email=louis@qq.com
測試

總結:
a、創建starter,將公共代碼所需的所有依賴導入
b、將公共代碼復制到starter
c、自己寫一個RobotAutoConfiguration,該容器中導入需要組件(主程序掃描規則)
d、測試功能
使用Enable機制
原因:在導入starter的時候,使用者可能不知道需要導入哪些相關的文件。
在我們的starter編寫注解
@Target({ElementType.TYPE})
@Retention(RetentionPolicy.RUNTIME)
@Documented
@Import({RobotAutoConfiguration.class})
public @interface EnableRobot {
}在主程序中使用@EnableRobot注解
@SpringBootApplication
@EnableRobot
public class Boot307Application {public static void main(String[] args) {SpringApplication.run(Boot307Application.class, args);}}
測試

總結:
別人引入starter需要使用@EnableRobot開啟功能
完全自動
依賴SpringBoot的SPI機制"META-INF/spring/org.springframework.boot.autoconfigure.Autoconfiguration.imports"在其中放置RobotAutoConfiguration配置類的全類名。如:com.louis.starter.robot.config.RobotAutoConfiguration
 只需要導入starter,不用加任何注解。
測試
2003-2022年)
)
)


)


)

中使用echarts)


 -- D 補題記錄)
