文章目錄
- 概述
- 端云調用流程
- 端側集成AGC SDK
- 端側省市地區聯動的地址選擇器組件開發
- 創建省市數據模型
- 創建省市地區視圖UI子組件
- 創建頁面UI視圖Page文件
- 打包測試
- 總結
概述
我們在前面的課程,對云開發的入門做了介紹,以及使用一個省市地區聯動的地址選擇器示例,為大家演示了如何創建云開發工程,以及云數據庫、云函數的開發實戰。如果有讀者還沒看過前面的這兩篇文章,那在讀這篇文章之前,建議先看下以下這兩篇文章,之后再來閱讀本篇文章,會更好理解云開發這塊的內容。
《【鴻蒙應用ArkTS開發系列】- 云開發入門簡介》
《【鴻蒙應用ArkTS開發系列】- 云開發入門實戰二 實現省市地區三級聯動地址選擇器組件(上)》
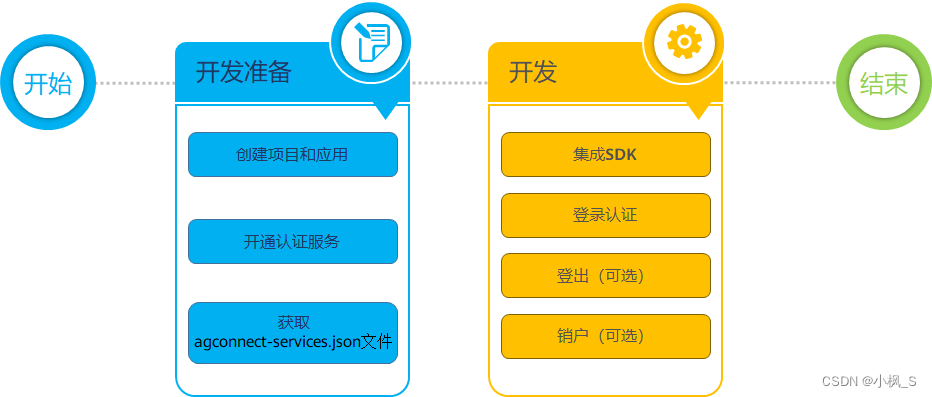
那我們現在正式開始今天的課程,本次課程是 《【鴻蒙應用ArkTS開發系列】- 云開發入門實戰二 實現省市地區三級聯動地址選擇器組件(上)》 的下篇,上篇我們完成了省市地區聯動的地址選擇器云工程的云數據、云函數的開發跟部署,這次的課程,我們將開發一個鴻蒙客戶端,來調用云服務的API,獲取地址信息數據進行展示。
通過本次課程,我們將學習到以下內容:
- 鴻蒙客戶端如何集成AGC SDK;
- 鴻蒙客戶端如何調用云函數獲取數據;
- 實現省市地區聯動的地址選擇器組件;
- ArkUI @Provide、@Consume、@Watch等狀態管理裝飾器的使用
那下面我們直接進入本次課程的學習。按照慣例,這里先上成品效果圖:
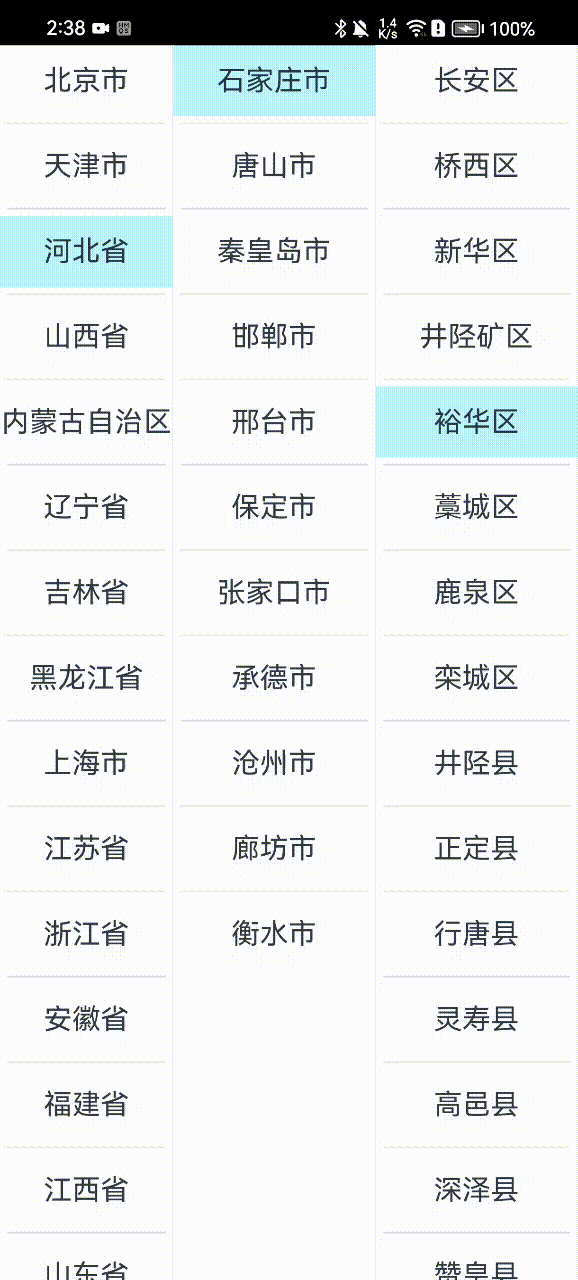
上面由于是用的云端地址位置數據,因此會有一個加載的過程,實際開發時,我們也可以將地址數據內置到客戶端中,或者網絡數據做一個緩存處理,這樣用戶體驗會更好一些。
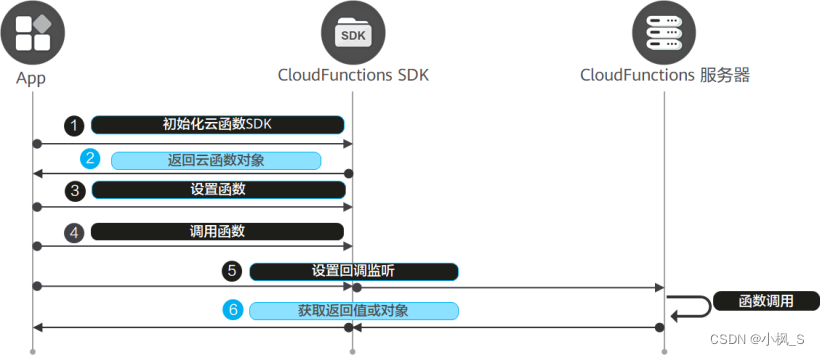
端云調用流程
下面我們先看下客戶端跟云服務之間的一個交互流程圖:
端側集成AGC SDK
客戶端工程應該怎么集成AGC SDK呢,這一步,我建議還是跟《【鴻蒙應用ArkTS開發系列】- 云開發入門簡介》 中提到的,使用端云一體化開發目標來創建工程,這樣 DevEco Studio會為端側工程自動集成AGC相關云服務最新版本SDK。
- “entry/src/main/resources/rawfile/agconnect-services.json”:AGC
SDK配置文件,內含client_secret和api_key,請妥善保管。
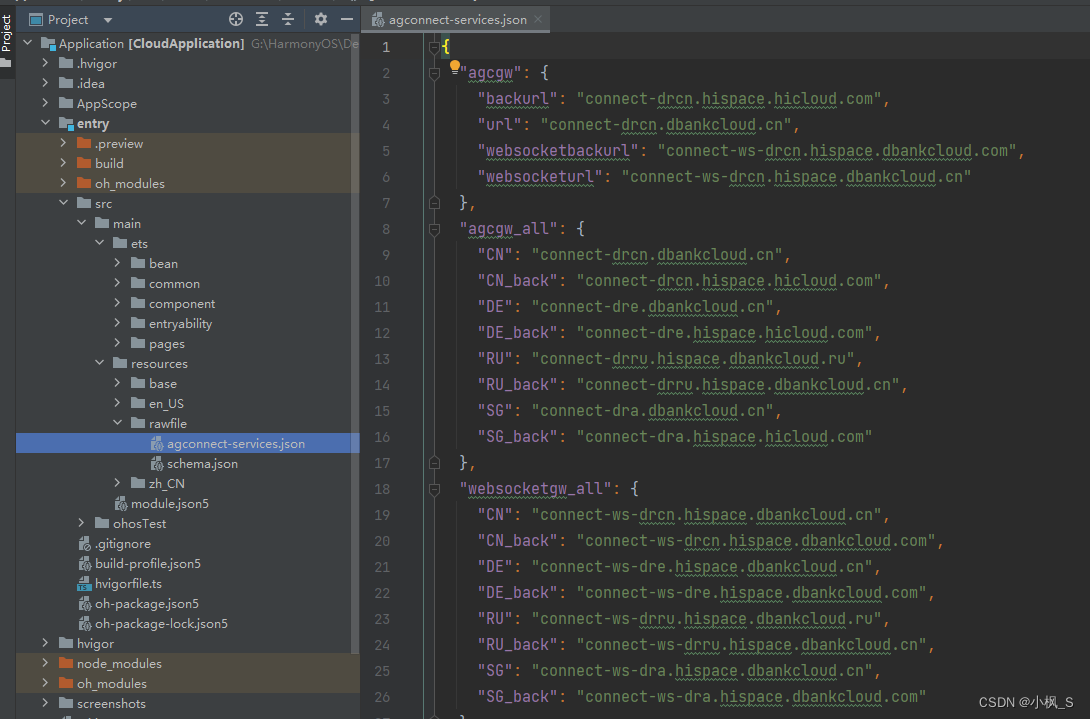
- “entry/oh-package.json5”:自動引入了AGC相關云服務(認證服務、云函數、云存儲)最新版本SDK,同時會自動集成端云一體化登錄組件的最新SDK。
工程同步成功后可以看到當前從ohpm倉獲取的最新版本。
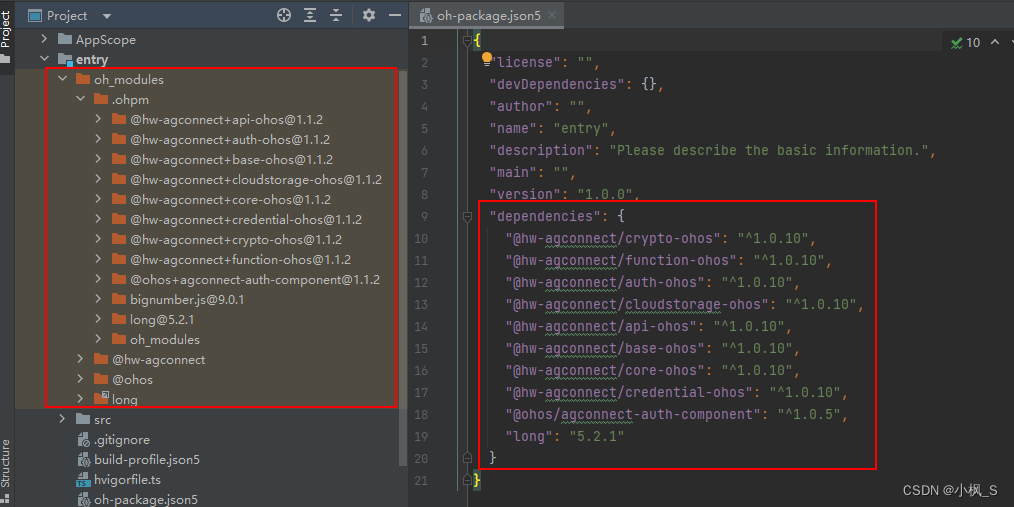
上圖是之前創建的,現在的版本的已經有所更新,大家根據IDE實際創建的版本來。我目前工程集成的SDK是下面這樣的

如果是已經存在的端側工程,那需要按照官網的AGC SDK 集成方式集成,包括從AppGallery-Connect 中下載項目agconnect-services.json文件導入到端側工程,以及對應的AGC SDK庫進行 ohpm依賴安裝。
 官網 HarmonyOS使用入門(ArkTS API9及以上) 對鴻蒙集成AGC服務 講解的很詳細,這里就不過多贅述,大家直接看官方文檔即可。
做完前期工作,那我們開始進入本篇課程的重點內容,開發一個省市地區聯動的地址選擇器組件。
端側省市地區聯動的地址選擇器組件開發
創建省市數據模型
打開DevEco Studio,在"Application-> entry -> src -> main -> ets 下創建一個bean目錄,用于存放省市數據的數據模型類,在目錄中創建ProvinceBean(省)、CityBean(市)、DistrictBean(區縣),

完成代碼如下:
ProvinceBean.ts
/*** 省份信息*/
export class ProvinceBean {public id: number;public code: string;public label: string;
}
CityBean.ts
/*** 城市信息*/
export class CityBean {public id: number;public province_code: string;public code: string;public label: string;
}
DistrictBean.ts
/*** 區縣信息*/
export class DistrictBean {public id: number;public city_code: string;public code: string;public label: string;
}
創建省市地區視圖UI子組件
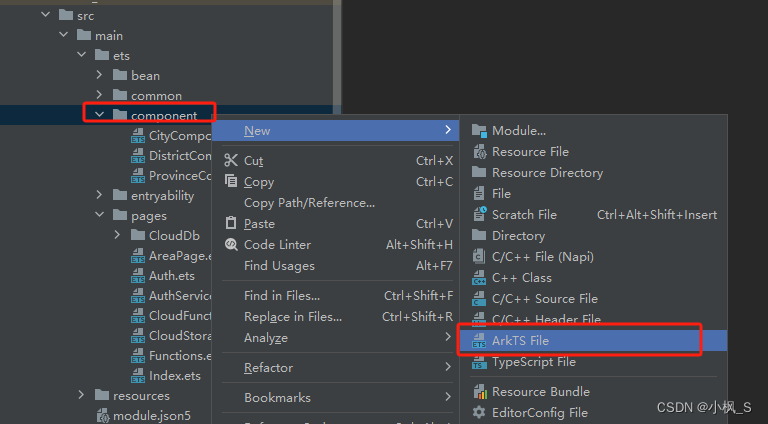
打開DevEco Studio,在"Application-> entry -> src -> main -> ets "目錄下新建一個"component"文件夾來存放省份UI子組件、城市UI子組件、區縣UI子組件。
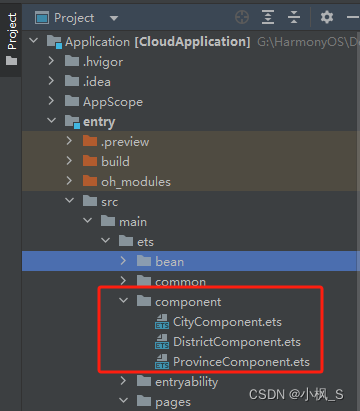
在component目錄上右鍵,點擊New ->ArkTS File 菜單, 創建三個UI子組件(ProvinceComponent、CityComponent、DistrictComponent)
完整代碼如下:
ProvinceComponent.ets
import agconnect from '@hw-agconnect/api-ohos';
import "@hw-agconnect/function-ohos";import { ProvinceBean } from '../bean/ProvinceBean'
import { Log } from '../common/Log';@Component
export struct ProvinceComponent {@State mProvinceData: ProvinceBean[] = [];@Consume currentProvince: ProvinceBean;aboutToAppear() {this.callFunction();}build() {Column() {Text('省份').width('100%').height(50).fontSize(20).fontWeight(500).textAlign(TextAlign.Center).border({color: '#e2e2e2',width: { bottom: 1 }})Column() {if (this.mProvinceData.length === 0) {Text('加載中').fontSize(20)} else {List({ space: 10, initialIndex: 0 }) {ForEach(this.mProvinceData, (item: ProvinceBean) => {ListItem() {Text(item.label).width('100%').height(50).fontSize(20).textAlign(TextAlign.Center)}.backgroundColor(this.currentProvince?.code === item.code ? '#c8aaf4fc' : Color.Transparent).onClick(() => {this.currentProvince = item;})}, item => JSON.stringify(item))}.width('100%').height('100%').divider({ strokeWidth: 1, color: "#e2e2e2", startMargin: 5, endMargin: 5 })}}.backgroundColor(Color.White).border({color: '#e2e2e2',width: { right: 0.5 }}).width('100%').layoutWeight(1).justifyContent(FlexAlign.Center)}.height('100%')}callFunction() {agconnect.instance().init(getContext(this));let functionCallable = agconnect.function().wrap("province-query-$latest");let params = {};functionCallable.call(params).then((ret: any) => {Log.info("Functions", "Cloud Function Called, Returned Value: " + JSON.stringify(ret.getValue()));this.mProvinceData = ret.getValue().result;if (this.mProvinceData.length > 0) {this.currentProvince = this.mProvinceData[0];}}).catch((error: any) => {Log.error("Functions", "Error - could not obtain cloud function result. Error Detail: " + JSON.stringify(error));});}
}
CityComponent.ets
import agconnect from '@hw-agconnect/api-ohos';
import { CityBean } from '../bean/CityBean';
import { ProvinceBean } from '../bean/ProvinceBean';
import { Log } from '../common/Log';@Component
export struct CityComponent {@State mTip: string = ''@State mCityData: CityBean[] = [];@Consume @Watch('onProvinceChange') currentProvince: ProvinceBean;@Consume currentCity: CityBean;build() {Column() {Text('城市').width('100%').height(50).fontSize(20).fontWeight(500).textAlign(TextAlign.Center).border({color: '#e2e2e2',width: { bottom: 1 }})Column() {if (this.mCityData.length === 0) {Text(this.mTip).fontSize(20)} else {List({ space: 10, initialIndex: 0 }) {ForEach(this.mCityData, (item: CityBean) => {ListItem() {Text(item.label).width('100%').height(50).fontSize(20).textAlign(TextAlign.Center)}.backgroundColor(this.currentCity?.code === item.code ? '#c8aaf4fc' : Color.Transparent).onClick(() => {this.currentCity = item;})}, item => JSON.stringify(item))}.width('100%').height('100%').divider({ strokeWidth: 1, color: "#e2e2e2", startMargin: 5, endMargin: 5 })}}.backgroundColor(Color.White).border({color: '#e2e2e2',width: { right: 0.5 }}).width('100%').layoutWeight(1).justifyContent(FlexAlign.Center)}.height('100%')}onProvinceChange() {Log.info("Functions", "onProvinceChange");this.mCityData.splice(0, this.mCityData.length);if (this.currentProvince) {this.mTip = '加載中';this.callFunction(this.currentProvince.code);}}callFunction(provinceCode: string) {agconnect.instance().init(getContext(this));let functionCallable = agconnect.function().wrap("city-query-$latest");let params = { "code": provinceCode };Log.info("Functions", "Cloud Function Called, body: " + JSON.stringify(params));functionCallable.call(params).then((ret: any) => {Log.info("Functions", "Cloud Function Called, Returned Value: " + JSON.stringify(ret.getValue()));this.mCityData = ret.getValue().result;if (this.mCityData.length > 0) {this.currentCity = this.mCityData[0];}}).catch((error: any) => {Log.error("Functions", "Error - could not obtain cloud function result. Error Detail: " + JSON.stringify(error));});}
}
DistrictComponent.ets
import agconnect from '@hw-agconnect/api-ohos';
import { CityBean } from '../bean/CityBean';
import { DistrictBean } from '../bean/DistrictBean';
import { Log } from '../common/Log';
import { ProvinceBean } from '../bean/ProvinceBean';@Component
export struct DistrictComponent {@State mTip: string = ''@State mDistrictData: DistrictBean[] = [];@Consume @Watch('onProvinceChange') currentProvince: ProvinceBean;@Consume @Watch('onCityChange') currentCity: CityBean;@Consume currentDistrict: DistrictBean;build() {Column() {Text('區縣').width('100%').height(50).fontSize(20).fontWeight(500).textAlign(TextAlign.Center).border({color: '#e2e2e2',width: { bottom: 1 }})Column() {if (this.mDistrictData.length === 0) {Text(this.mTip).fontSize(20)} else {List({ space: 10, initialIndex: 0 }) {ForEach(this.mDistrictData, (item: DistrictBean) => {ListItem() {Text(item.label).width('100%').height(50).fontSize(20).textAlign(TextAlign.Center)}.backgroundColor(this.currentDistrict?.code === item.code ? '#c8aaf4fc' : Color.Transparent).onClick(() => {this.currentDistrict = item;})}, item => JSON.stringify(item))}.width('100%').height('100%').divider({ strokeWidth: 1, color: "#e2e2e2", startMargin: 5, endMargin: 5 })}}.backgroundColor(Color.White).border({color: '#e2e2e2',width: { right: 0.5 }}).width('100%').layoutWeight(1).justifyContent(FlexAlign.Center)}.height('100%')}onProvinceChange() {this.mDistrictData.splice(0, this.mDistrictData.length);}onCityChange() {Log.info("Functions", "onCityChange");this.mDistrictData.splice(0, this.mDistrictData.length);if (this.currentCity) {this.mTip = '加載中';this.callFunction(this.currentCity.code);}}callFunction(cityCode: string) {agconnect.instance().init(getContext(this));let functionCallable = agconnect.function().wrap("districts-query-$latest");let params = { "code": cityCode };Log.info("Functions", "Cloud Function Called, body: " + JSON.stringify(params));functionCallable.call(params).then((ret: any) => {Log.info("Functions", "Cloud Function Called, Returned Value: " + JSON.stringify(ret.getValue()));this.mDistrictData = ret.getValue().result;if (this.mDistrictData.length > 0) {this.currentDistrict = this.mDistrictData[0];}}).catch((error: any) => {Log.error("Functions", "Error - could not obtain cloud function result. Error Detail: " + JSON.stringify(error));});}
}
三個UI子組件的UI樣式基本一致,功能也是基本一致,大家也可以進行代碼封裝重構,基于通用模型抽取成一個模板組件,這里只演示功能,就不過多贅述。在這里我們就拿城市列表視圖 CityComponent.ets來進行代碼的講解。
1、首先我們定義了四個狀態變量。
@State mTip: string = ''@State mCityData: CityBean[] = [];@Consume @Watch('onProvinceChange') currentProvince: ProvinceBean;@Consume currentCity: CityBean;
- mTip 用于顯示加載中提示語
- mCityData 是城市列表的數據源
- currentProvince 是當前選中的省份信息對象(我們基于該對象的省份編碼來查詢城市列表)。
- currentCity 是記錄當前選中的城市。
這里currentProvince 、currentCity 使用**@Consume裝飾**,用于跟頁面中 @Provide裝飾 的狀態變量(currentProvince 、currentCity)做雙向狀態同步,這樣Page頁面可以拿到當前選中的省份、選中的城市的數據,其他的子組件之間也可以進行數據共享。
currentProvince 同時還用了 @Watch(‘onProvinceChange’)裝飾,因為城市列表視圖 CityComponent需要實時監聽切換省份的事件,來動態調用云函數接口獲取對應省份的城市數據,因此這里使用@Watch對currentProvince數據進行觀察,如果省份視圖子組件中選中的省份有所改變,onProvinceChange方法將會接收到回調。
2、build 方法
UI視圖繪制這里,我們根據城市數據源的數據情況,如果是沒數據,就顯示mTip ,如果mCityData 有數據,就使用一個列表進行數據展示
2、onProvinceChange方法
onProvinceChange() {Log.info("Functions", "onProvinceChange");this.mCityData.splice(0, this.mCityData.length);if (this.currentProvince) {this.mTip = '加載中';this.callFunction(this.currentProvince.code);}}
當選中的省份數據有變動時,onProvinceChange會被觸發,我們在該方法中將mCityData 數據源清空,給mTip 設置一個等待提示語,然后調用callFunction 方法請求云函數根據省份編碼查詢城市列表數據。因為currentProvince 是跟Page頁面和省份子組件是進行數據雙向同步的,因此onProvinceChange觸發的時候this.currentProvince.code 也是能拿到最新的切換后的省份編碼。
3、callFunction方法
這里我們重點講下這個方法,這關系到云函數的調用。
callFunction(provinceCode: string) {agconnect.instance().init(getContext(this));let functionCallable = agconnect.function().wrap("city-query-$latest");let params = { "code": provinceCode };Log.info("Functions", "Cloud Function Called, body: " + JSON.stringify(params));functionCallable.call(params).then((ret: any) => {Log.info("Functions", "Cloud Function Called, Returned Value: " + JSON.stringify(ret.getValue()));this.mCityData = ret.getValue().result;if (this.mCityData.length > 0) {this.currentCity = this.mCityData[0];}}).catch((error: any) => {Log.error("Functions", "Error - could not obtain cloud function result. Error Detail: " + JSON.stringify(error));});}
- 拿到agconnect實例并進行初始化
- 通過 agconnect.function().wrap(“city-query-$latest”) 拿到云函數對象控制器,這里具體要調用哪一個云函數,在wrap方法中采用“云函數名稱-版本號” 定義,latest 是最新版本。
- 使用functionCallable.call(params)觸發請求,params是body,數據類型是JSON對象
- 使用then異步獲取返回的數據,通過ret.getValue()獲取數據
- 使用catch處理異常錯誤情況
三個UI視圖子組件開發完畢,下面我們創建個Page頁面將三個子組件整合起來顯示。
創建頁面UI視圖Page文件
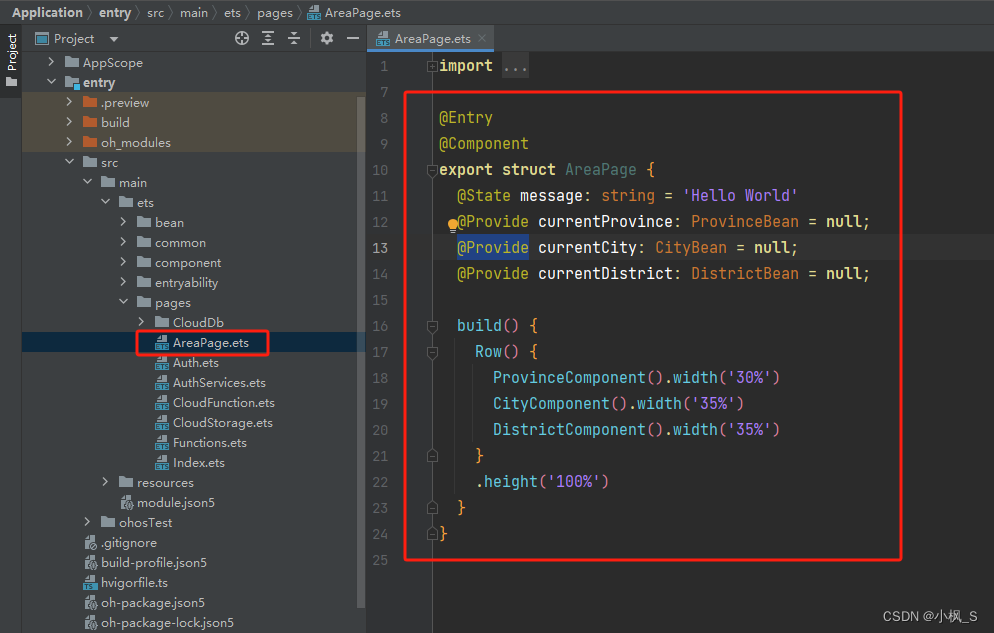
1、打開DevEco Studio,在"Application-> entry -> src -> main -> ets -> pages"目錄下新建一個"AreaPage.ets"文件來實現省市地區聯動地址選擇器功能的頁面。
2、配置頁面路由
由于模板已經創建了一個main_pages.json文件進行統一的頁面管理,所以我們需要將新建的頁面注冊在"Application-> entry -> src -> main -> resources -> base ->profile -> main_pages.json"文件中。
3、 在EntryAbility.ts 類中onWindowStageCreate 方法中, 將
windowStage.loadContent('pages/Index', (err, data) => {})
中的第一個參數,修改為’pages/AreaPage’
windowStage.loadContent('pages/AreaPage', (err, data) => {})
4、在AreaPage界面放三個控件:一個省份視圖子組件顯示省份列表,一個城市視圖子組件顯示城市列表,并與選擇的省份進行數據聯動,一個區縣視圖子組件顯示區縣列表,并與選擇的城市進行數據聯動,完整示例代碼如下。
import { CityBean } from '../bean/CityBean'
import { DistrictBean } from '../bean/DistrictBean'
import { ProvinceBean } from '../bean/ProvinceBean'
import { CityComponent } from '../component/CityComponent'
import { DistrictComponent } from '../component/DistrictComponent'
import { ProvinceComponent } from '../component/ProvinceComponent'@Entry
@Component
export struct AreaPage {@Provide currentProvince: ProvinceBean = null;@Provide currentCity: CityBean = null;@Provide currentDistrict: DistrictBean = null;build() {Row() {ProvinceComponent().width('30%')CityComponent().width('35%')DistrictComponent().width('35%')}.height('100%')}
}
這里我們定義了三個狀態變量,存儲當前選擇的省份、選擇的城市、選擇的區縣這三個對象,并使用@Provide裝飾器,這樣@Provide裝飾的狀態變量與子組件的@Consume裝飾器裝飾的同名狀態變量,會實現一個數據狀態雙向綁定。具體如下圖:
AreaPage-currentProvince分別與ProvinceComponent-currentProvince 、 CityComponent-currentProvince 直接建立數據狀態雙向綁定,ProvinceComponent-currentProvince 與CityComponent-currentProvince 間接建立數據狀態雙向綁定。

這樣,我們這個省市區縣聯動的地址選擇器功能就完成了。
打包測試
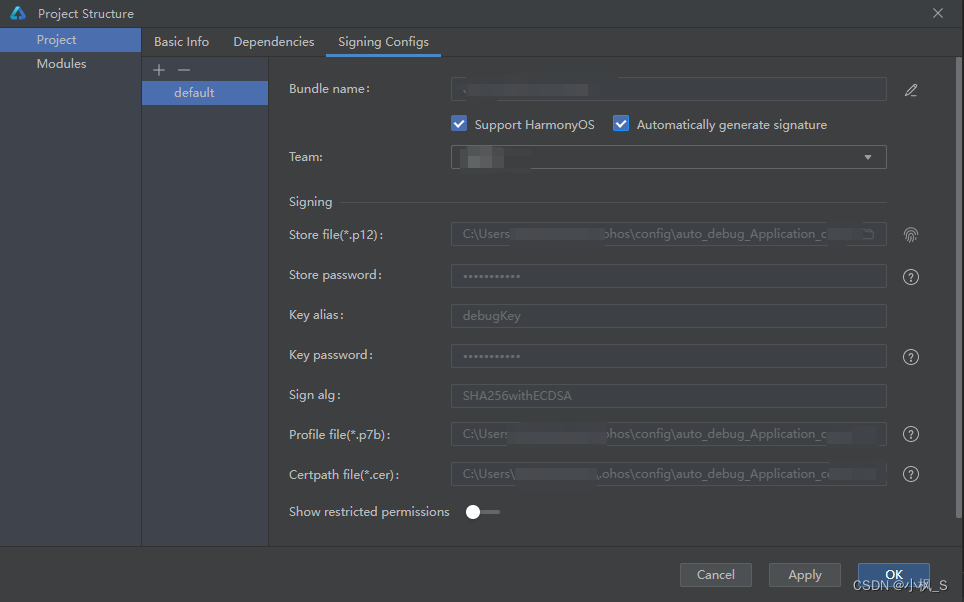
1.DevEco Studio菜單選擇“File -> Project Structure”,在“Project Structure”界面導航選擇“Project”,選擇“Signing Configs”頁簽。
2.勾選“Automatically generate signature” ,自動簽名完成后點擊“OK”。
3.將應用服務推送到支持API 9及以上版本的手機。
4.顯示效果如下:
5.控制臺日志如下:

總結
通過《【鴻蒙應用ArkTS開發系列】- 云開發入門實戰三 實現省市地區三級聯動地址選擇器組件》上下篇這兩篇文章, 你應該已經成功地掌握使用HarmonyOS云開發能力開發了一個應用,學會如何使用云數據庫、云函數,實現端、云的交互。
感謝閱讀,后續有疑問或者其他問題,可以在評論區留言交流。

)
真題解析#中國電子學會#全國青少年軟件編程等級考試)


)


