💗推薦閱讀文章💗
- 🌸JavaSE系列🌸👉1??《JavaSE系列教程》
- 🌺MySQL系列🌺👉2??《MySQL系列教程》
- 🍀JavaWeb系列🍀👉3??《JavaWeb系列教程》
- 🌻SSM框架系列🌻👉4??《SSM框架系列教程》
🎉本博客知識點收錄于🎉👉🚀《SpringBoot系列教程》🚀—>??01【SpringBoot快速入門、yml語法、自動配置、整合框架】??
文章目錄
- 四、SpringBoot原理
- 4.1 起步依賴原理
- 4.1.1 版本鎖定
- 4.1.2 起步依賴
- 4.2 自動配置原理
- 4.2.1 @SpringBootApplication源碼
- 4.2.2 @SpringBootConfiguration源碼
- 4.2.3 @EnableAutoConfiguration源碼
- 1)Registrar導入器
- 2)AutoConfigurationImportSelector導入器
- 4.2.4 [@ComponentScan ](/ComponentScan )
- 1)AutoConfigurationExcludeFilter
- 2)TypeExcludeFilter
- 3)自定義排除器
- 4.3 自動配置類
- 4.3.1 自動配置類說明
- 4.3.2 @Conditional派生注解
- 4.3.3 自定義自動配置類
- 4.4 屬性配置類
- 4.4.1 屬性配置類說明
- 4.4.2 自定義屬性配置類
- 4.5 自定義場景啟動器
- 4.5.1 場景啟動器包含內容
- 4.5.2 搭建自動配置工程
- 4.5.2.1 依賴
- 4.5.2.2 自動配置類
- 4.5.2.3 屬性配置類
- 4.5.2.4 具體配置的類
- 4.5.2.5 spring.factories
- 4.5.3 搭建測試工程
- 4.5.3.1 依賴
- 4.5.2.2 Controller
- 4.5.2.3 application.yml
- 4.5.2.4 引導類
四、SpringBoot原理
4.1 起步依賴原理
4.1.1 版本鎖定
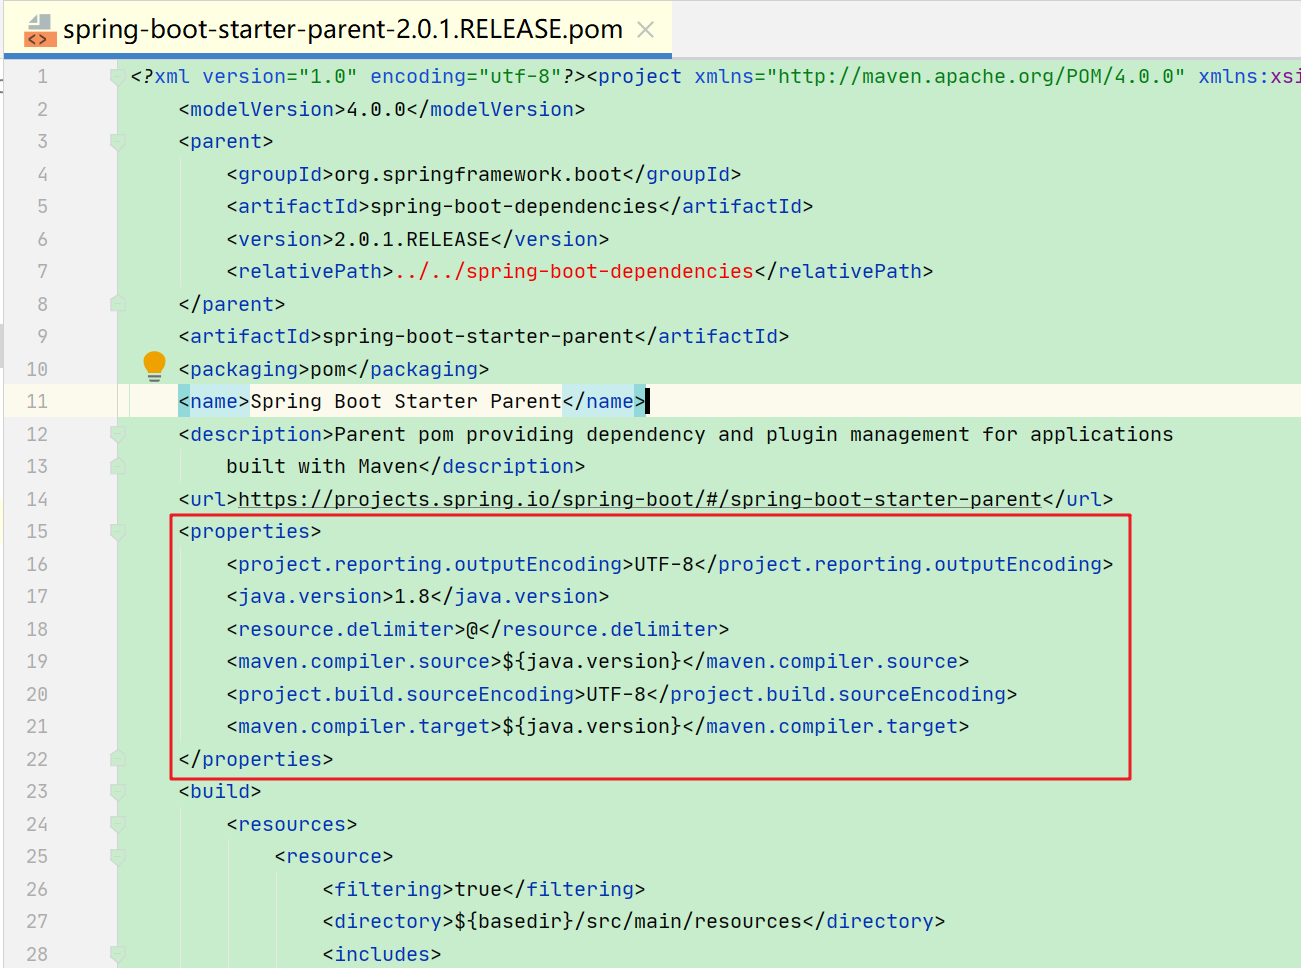
SpringBoot項目都是繼承于spring-boot-starter-parent工程的,我們點進去看看這個工程中配置了什么?
<parent><groupId>org.springframework.boot</groupId><artifactId>spring-boot-dependencies</artifactId><version>2.0.1.RELEASE</version><relativePath>../../spring-boot-dependencies</relativePath>
</parent>...
<properties><project.reporting.outputEncoding>UTF-8</project.reporting.outputEncoding><java.version>1.8</java.version><resource.delimiter>@</resource.delimiter><maven.compiler.source>${java.version}</maven.compiler.source><project.build.sourceEncoding>UTF-8</project.build.sourceEncoding><maven.compiler.target>${java.version}</maven.compiler.target>
</properties><pluginManagement><plugins><plugin><groupId>org.jetbrains.kotlin</groupId><artifactId>kotlin-maven-plugin</artifactId><version>${kotlin.version}</version></plugin>...</plugins>
</pluginManagement>
我們發現spring-boot-starter-parent工程是繼承于spring-boot-dependencies工程,在spring-boot-starter-parent工程中鎖定了部分插件使用的版本:
我們繼續點進spring-boot-dependencies工程:
<properties><activemq.version>5.15.3</activemq.version><antlr2.version>2.7.7</antlr2.version><appengine-sdk.version>1.9.63</appengine-sdk.version><artemis.version>2.4.0</artemis.version><aspectj.version>1.8.13</aspectj.version><assertj.version>3.9.1</assertj.version><atomikos.version>4.0.6</atomikos.version><bitronix.version>2.1.4</bitronix.version>.....
</properties><dependencyManagement><dependencies><dependency><groupId>org.springframework.boot</groupId><artifactId>spring-boot</artifactId><version>2.0.1.RELEASE</version></dependency><dependency><groupId>org.springframework.boot</groupId><artifactId>spring-boot-test</artifactId><version>2.0.1.RELEASE</version></dependency><dependency><groupId>org.springframework.boot</groupId><artifactId>spring-boot-test-autoconfigure</artifactId><version>2.0.1.RELEASE</version></dependency><dependency><groupId>org.springframework.boot</groupId><artifactId>spring-boot-actuator</artifactId><version>2.0.1.RELEASE</version></dependency>....</dependencies>
</dependencyManagement>
從上面的spring-boot-starter-dependencies的pom.xml中我們可以發現,一部分坐標的版本、依賴管理、插件管理已經定義好,所以我們的SpringBoot工程繼承spring-boot-starter-parent后已經具備版本鎖定等配置了(解決了版本沖突問題)。
這些版本的搭配經過了SpringBoot官方團隊的測試,我們在使用過程中,采用SpringBoot搭配的版本匹配,就避免了版本沖突、不穩定等因素;
4.1.2 起步依賴
在繼承的父工程中我們并沒有看到依賴的引入(只是版本的鎖定),真正的依賴是在我們引入場景啟動器時引入的,我們點擊spring-boot-starter-web場景啟動器查看:
<dependencies><dependency><groupId>org.springframework.boot</groupId><artifactId>spring-boot-starter</artifactId><version>2.0.1.RELEASE</version><scope>compile</scope></dependency><dependency><groupId>org.springframework.boot</groupId><artifactId>spring-boot-starter-json</artifactId><version>2.0.1.RELEASE</version><scope>compile</scope></dependency><dependency><groupId>org.springframework.boot</groupId><artifactId>spring-boot-starter-tomcat</artifactId><version>2.0.1.RELEASE</version><scope>compile</scope></dependency><dependency><groupId>org.hibernate.validator</groupId><artifactId>hibernate-validator</artifactId><version>6.0.9.Final</version><scope>compile</scope></dependency><dependency><groupId>org.springframework</groupId><artifactId>spring-web</artifactId><version>5.0.5.RELEASE</version><scope>compile</scope></dependency><dependency><groupId>org.springframework</groupId><artifactId>spring-webmvc</artifactId><version>5.0.5.RELEASE</version><scope>compile</scope></dependency>
</dependencies>
我們發現在spring-boot-starter-web依賴中引入了大量web場景需要的依賴,如Spring-web、Spring-webmvc、json轉換、tomcat等,SpringBoot中的場景啟動器(starter)對場景的依賴進行"打包",這樣以后我們的項目只需要引入對應場景的starter即可;
4.2 自動配置原理
我們在前面說到過,SpringBoot所有的配置基于約定理念,并不是不需要配置,而是SpringBoot在項目啟動時幫我們配置了,所有的配置基于約定的參數已經配置好了;那么SpringBoot是如何做到"自動配置"的呢?
我們點擊標注在引導類上的@SpringBootApplication注解:
@SpringBootApplication          // 標注這是一個引導類
public class HelloApplication {public static void main(String[] args) {SpringApplication.run(HelloApplication.class);}
}
4.2.1 @SpringBootApplication源碼
@Target({ElementType.TYPE})
@Retention(RetentionPolicy.RUNTIME)
@Documented
@Inherited
@SpringBootConfiguration
@EnableAutoConfiguration
@ComponentScan(excludeFilters = {@Filter(type = FilterType.CUSTOM,classes = {TypeExcludeFilter.class}
), @Filter(type = FilterType.CUSTOM,classes = {AutoConfigurationExcludeFilter.class}
)}
)
public @interface SpringBootApplication {...}
- 1)@Target({ElementType.TYPE}):元注解,標注這個注解只能在類上使用
- 2)@Retention(RetentionPolicy.RUNTIME):元注解,標注這個注解的生命周期是RUNTIME,可以在運行時解析到這個注解
- 3)@Documented :元注解,表明這個注解應該被 javadoc工具記錄
- 4)**@Inherited **** **:元注解,注解在類上面時,子類會自動繼承此注解
4.2.2 @SpringBootConfiguration源碼
@Target({ElementType.TYPE})
@Retention(RetentionPolicy.RUNTIME)
@Documented
@Configuration
public @interface SpringBootConfiguration {
}
上面三個都是元注解
**@Configuration **** **:Spring提供的注解,表示這是一個配置類
也就是說標注了@SpringBootApplication、@SpringBootConfiguration等注解的類都可以當做一個配置類使用
4.2.3 @EnableAutoConfiguration源碼
@EnableAutoConfiguration是SpringBoot自動配置的核心;
@Target({ElementType.TYPE})
@Retention(RetentionPolicy.RUNTIME)
@Documented
@Inherited
@AutoConfigurationPackage
@Import({AutoConfigurationImportSelector.class})
public @interface EnableAutoConfiguration {String ENABLED_OVERRIDE_PROPERTY = "spring.boot.enableautoconfiguration";Class<?>[] exclude() default {};String[] excludeName() default {};
}
標注了兩個注解:**@AutoConfigurationPackage**、**@Import({AutoConfigurationImportSelector.class})**
1)Registrar導入器
- 1)@AutoConfigurationPackage:在該注解上標注了@Import注解,導入了一個Registrar導入器,開啟包的自動導入配置,自動導入標注了該注解的類的同級(包括子級、孫級)包下的所有的Bean;
@Target(ElementType.TYPE)
@Retention(RetentionPolicy.RUNTIME)
@Documented
@Inherited
@Import(AutoConfigurationPackages.Registrar.class)
public @interface AutoConfigurationPackage {
}
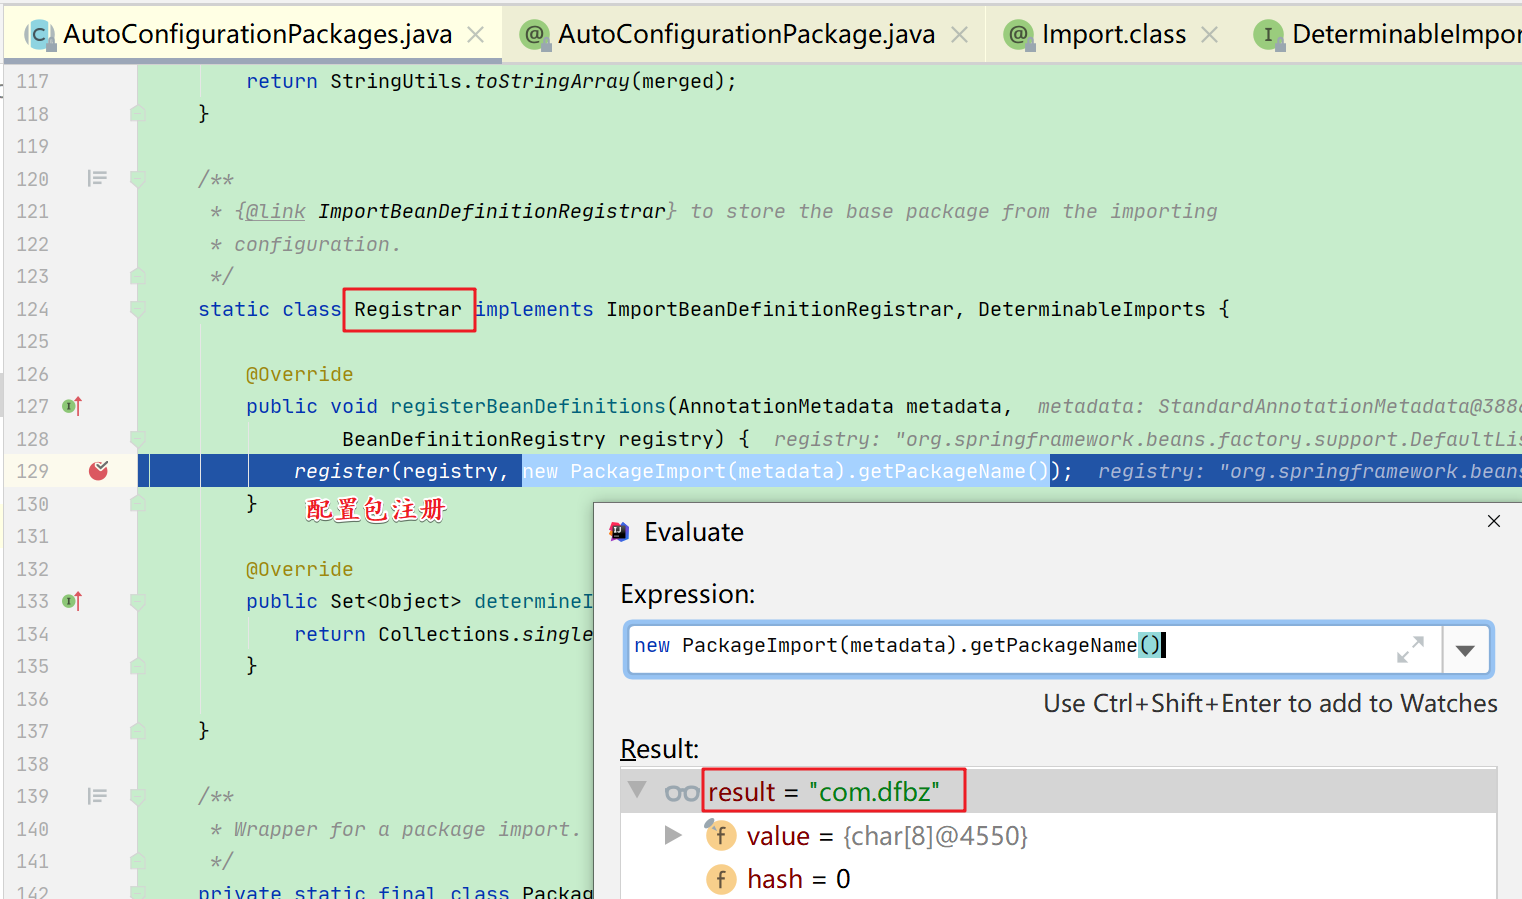
往容器中注冊了一個Registrar,查看Registrar:
static class Registrar implements ImportBeanDefinitionRegistrar, DeterminableImports {@Overridepublic void registerBeanDefinitions(AnnotationMetadata metadata,BeanDefinitionRegistry registry) {// 配置包注冊(注冊標注了AutoConfigurationPackage注解的類所在的全路徑下面的所有類)register(registry, new PackageImport(metadata).getPackageName());}@Overridepublic Set<Object> determineImports(AnnotationMetadata metadata) {return Collections.singleton(new PackageImport(metadata));}}
2)AutoConfigurationImportSelector導入器
在@EnableAutoConfiguration還標注了一個@Import(AutoConfigurationImportSelector.class),導入了一個AutoConfigurationImportSelector類;
查看繼承體系:
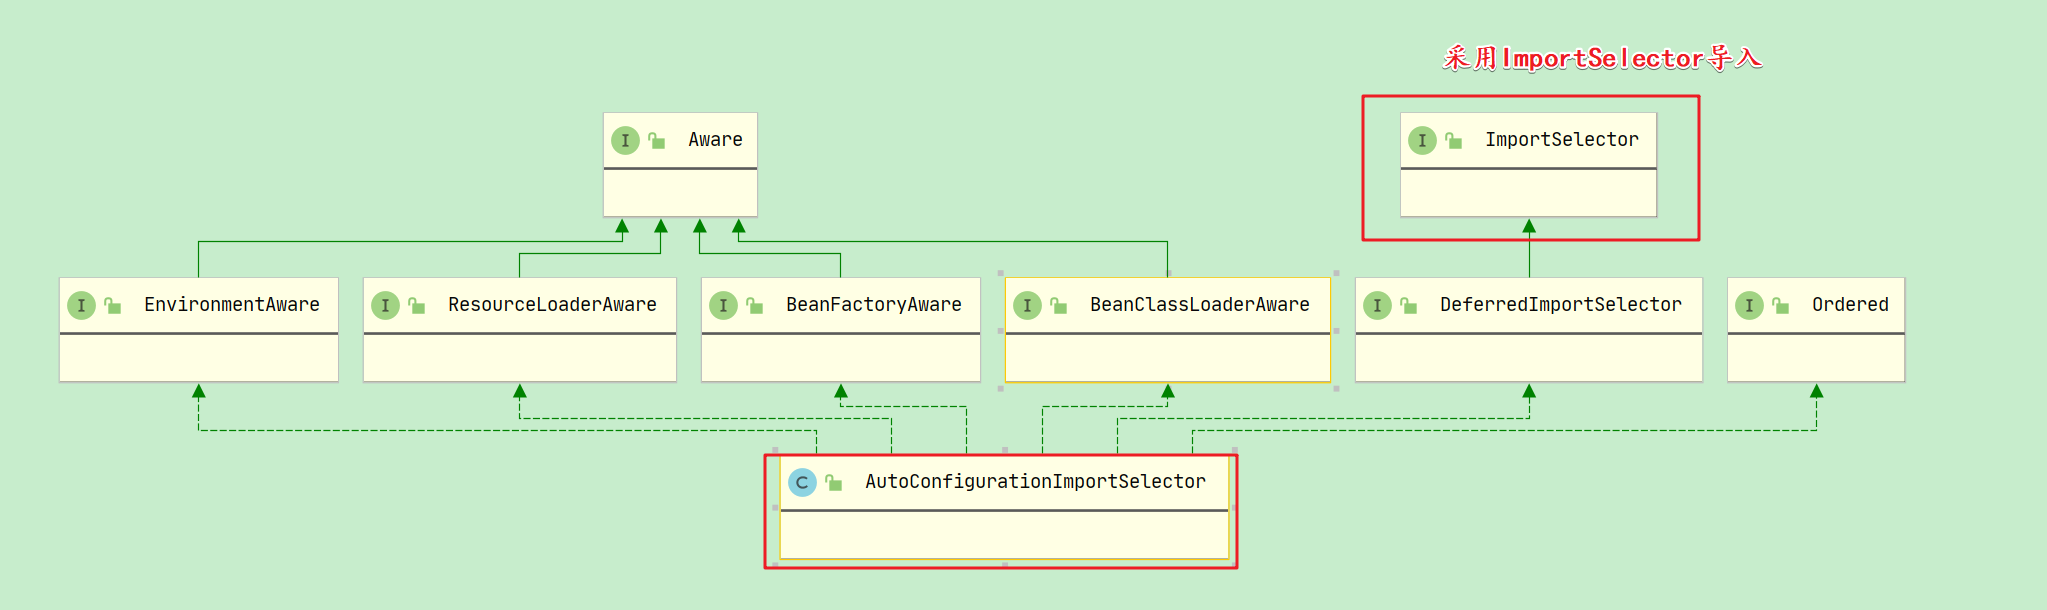
發現AutoConfigurationImportSelector實現接口ImportSelector,在導入時,一定會調用**selectImports**進行Bean配置;
@Override
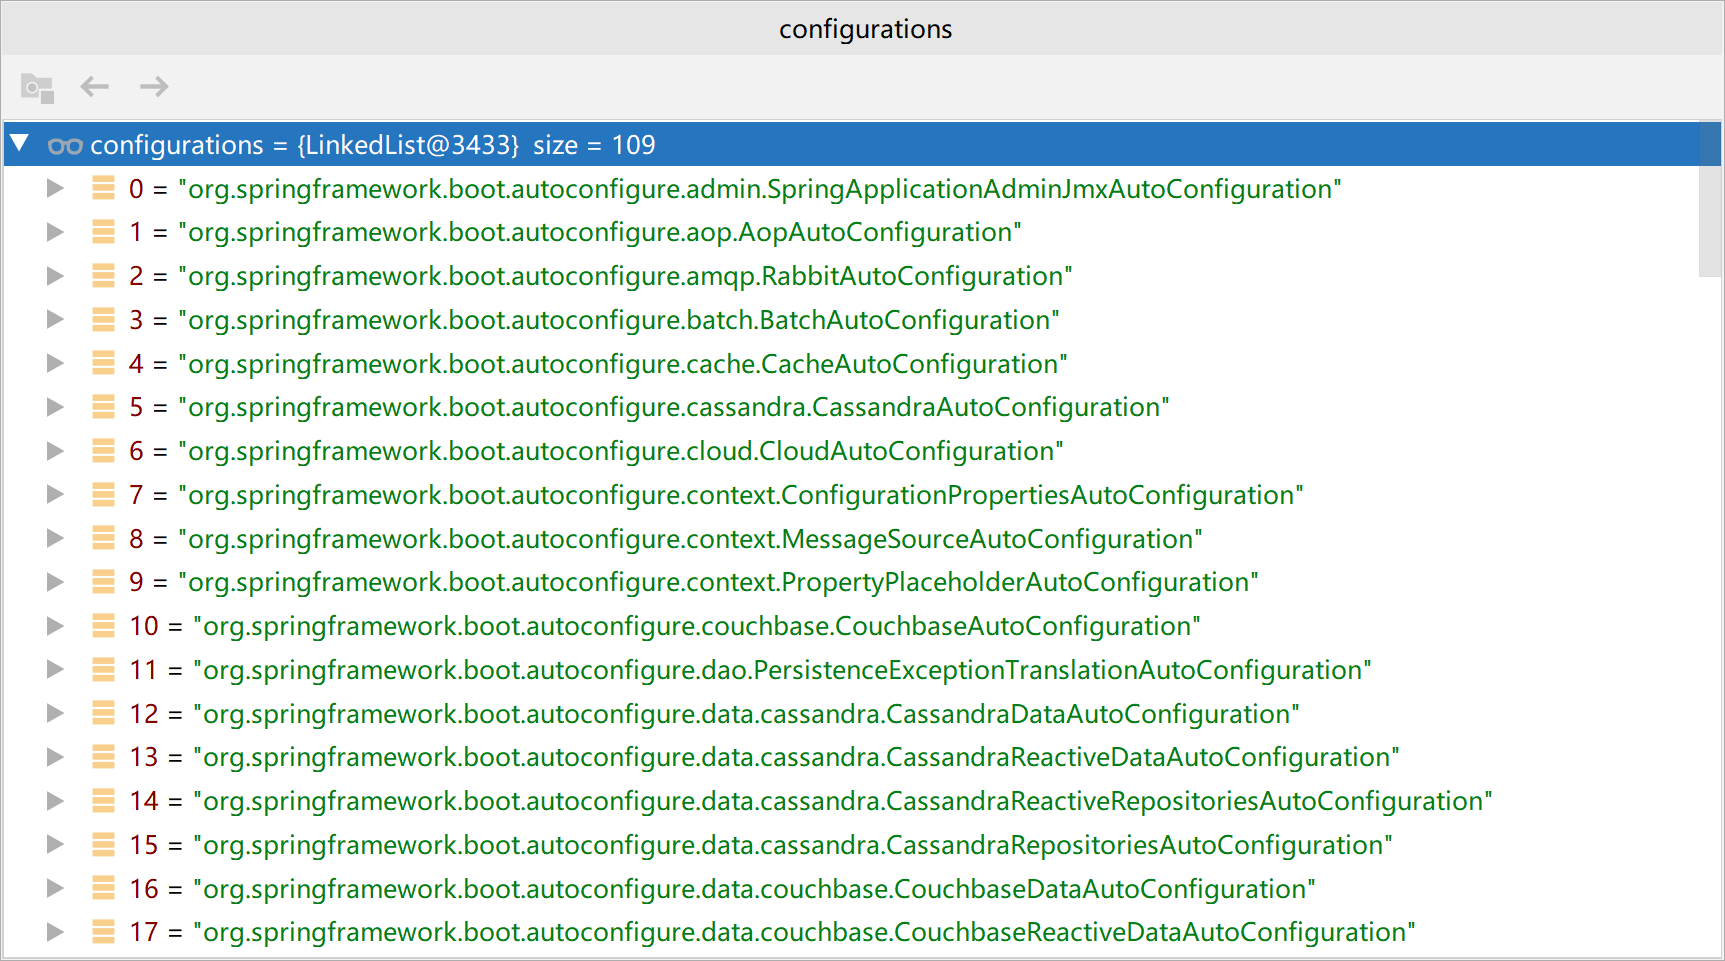
public String[] selectImports(AnnotationMetadata annotationMetadata) {if (!isEnabled(annotationMetadata)) {return NO_IMPORTS;}AutoConfigurationMetadata autoConfigurationMetadata = AutoConfigurationMetadataLoader.loadMetadata(this.beanClassLoader);AnnotationAttributes attributes = getAttributes(annotationMetadata);// 給容器中導入一批組件(xxxAutoConfiguration)List<String> configurations = getCandidateConfigurations(annotationMetadata,attributes);configurations = removeDuplicates(configurations);Set<String> exclusions = getExclusions(annotationMetadata, attributes);checkExcludedClasses(configurations, exclusions);configurations.removeAll(exclusions);// 過濾掉一些不生效的組件configurations = filter(configurations, autoConfigurationMetadata);fireAutoConfigurationImportEvents(configurations, exclusions);// 其他全部導入到IOC容器給中return StringUtils.toStringArray(configurations);
}protected List<String> getCandidateConfigurations(AnnotationMetadata metadata,AnnotationAttributes attributes) {List<String> configurations = SpringFactoriesLoader.loadFactoryNames(getSpringFactoriesLoaderFactoryClass(), getBeanClassLoader());Assert.notEmpty(configurations,"No auto configuration classes found in META-INF/spring.factories. If you "+ "are using a custom packaging, make sure that file is correct.");return configurations;
}
configurations值:
- SpringFactoriesLoader源碼:
public static List<String> loadFactoryNames(Class<?> factoryClass, @Nullable ClassLoader classLoader) {String factoryClassName = factoryClass.getName();return loadSpringFactories(classLoader).getOrDefault(factoryClassName, Collections.emptyList());
}private static Map<String, List<String>> loadSpringFactories(@Nullable ClassLoader classLoader) {MultiValueMap<String, String> result = cache.get(classLoader);if (result != null) {return result;}try {Enumeration<URL> urls = (classLoader != null ?// META-INF/spring.factoriesclassLoader.getResources(FACTORIES_RESOURCE_LOCATION) :ClassLoader.getSystemResources(FACTORIES_RESOURCE_LOCATION));result = new LinkedMultiValueMap<>();while (urls.hasMoreElements()) {URL url = urls.nextElement();UrlResource resource = new UrlResource(url);Properties properties = PropertiesLoaderUtils.loadProperties(resource);for (Map.Entry<?, ?> entry : properties.entrySet()) {List<String> factoryClassNames = Arrays.asList(StringUtils.commaDelimitedListToStringArray((String) entry.getValue()));result.addAll((String) entry.getKey(), factoryClassNames);}}cache.put(classLoader, result);return result;}catch (IOException ex) {throw new IllegalArgumentException("Unable to load factories from location [" +FACTORIES_RESOURCE_LOCATION + "]", ex);}
}

4.2.4 @ComponentScan
@SpringBootApplication注解上除了標注了上面兩個注解外,還標注了一個@ComponentScan注解,其內容如下:
@ComponentScan(excludeFilters = {@Filter(type = FilterType.CUSTOM, classes = TypeExcludeFilter.class),@Filter(type = FilterType.CUSTOM, classes = AutoConfigurationExcludeFilter.class) })
添加了兩個排除過濾器,分別是TypeExcludeFilter和AutoConfigurationExcludeFilter;兩個排除過濾器都繼承與TypeFilter接口,并且是一個函數式接口;IOC容器啟動時,會將被掃描的Bean的元數據信息傳遞到該match,由該方法的返回值來決定是否要排除這個Bean;
@FunctionalInterface
public interface TypeFilter {/*** 根據match方法的返回值來決定當前Bean是否要注冊到IOC容器* @param metadataReader: 這個注解標注的目標類的元數據讀取器* @param metadataReaderFactory: 獲取元數據讀取器的工廠*/boolean match(MetadataReader metadataReader, MetadataReaderFactory metadataReaderFactory)throws IOException;}
1)AutoConfigurationExcludeFilter
AutoConfigurationExcludeFilter:
package org.springframework.boot.autoconfigure;import java.io.IOException;
import java.util.List;import org.springframework.beans.factory.BeanClassLoaderAware;
import org.springframework.context.annotation.Configuration;
import org.springframework.core.io.support.SpringFactoriesLoader;
import org.springframework.core.type.classreading.MetadataReader;
import org.springframework.core.type.classreading.MetadataReaderFactory;
import org.springframework.core.type.filter.TypeFilter;/*** A {@link TypeFilter} implementation that matches registered auto-configuration classes.** @author Stephane Nicoll* @since 1.5.0*/
public class AutoConfigurationExcludeFilter implements TypeFilter, BeanClassLoaderAware {private ClassLoader beanClassLoader;private volatile List<String> autoConfigurations;@Overridepublic void setBeanClassLoader(ClassLoader beanClassLoader) {this.beanClassLoader = beanClassLoader;}// 作用: 當前這個類不能是一個配置類 并且 也不能是一個自動配置類(不能寫在META-INF/spring.factroies文件中)@Overridepublic boolean match(MetadataReader metadataReader,MetadataReaderFactory metadataReaderFactory) throws IOException {return isConfiguration(metadataReader) && isAutoConfiguration(metadataReader);}// 當前這個類上是否標注了Configuration注解private boolean isConfiguration(MetadataReader metadataReader) {return metadataReader.getAnnotationMetadata().isAnnotated(Configuration.class.getName());}// 當前這個類是否是一個自動配置類private boolean isAutoConfiguration(MetadataReader metadataReader) {return getAutoConfigurations().contains(metadataReader.getClassMetadata().getClassName());}protected List<String> getAutoConfigurations() {if (this.autoConfigurations == null) {this.autoConfigurations = SpringFactoriesLoader.loadFactoryNames(EnableAutoConfiguration.class, this.beanClassLoader);}return this.autoConfigurations;}
}
說明:因為自動配置類是SpringBoot規定的加載規則,默認規則為加載每個jar包下的**/META-INF/spring.factories**文件中的**org.springframework.boot.autoconfigure.EnableAutoConfiguration**指定的自動配置類;
如果我們自己想要自定義自動配置類讓其生效,有兩種方法:
- 1)在類上只標注一個
@Configuration注解,沒有寫在/META-INF/spring.factories文件中,不會被排除,但也被默認的規則掃描到了(Registrar導入器); - 2)在類上只標注一個
@Configuration注解,寫在/META-INF/spring.factories文件中,被排除(但被SpringBoot掃描到了),這是SpringBoot推薦的寫法,標準的自動配置類
Tips:自動配置類和普通的配置類的作用都是一模一樣的,只不過自動配置類一般用于加載某些場景,而且是寫在
/META-INF/spring.factories中的;
2)TypeExcludeFilter
TypeExcludeFilter:
package org.springframework.boot.context;import java.io.IOException;
import java.util.Collection;import org.springframework.beans.BeansException;
import org.springframework.beans.factory.BeanFactory;
import org.springframework.beans.factory.BeanFactoryAware;
import org.springframework.beans.factory.ListableBeanFactory;
import org.springframework.core.type.classreading.MetadataReader;
import org.springframework.core.type.classreading.MetadataReaderFactory;
import org.springframework.core.type.filter.TypeFilter;public class TypeExcludeFilter implements TypeFilter, BeanFactoryAware {private BeanFactory beanFactory;@Overridepublic void setBeanFactory(BeanFactory beanFactory) throws BeansException {this.beanFactory = beanFactory;}// 作用: 獲取IOC容器中,所有有關于TypeExcludeFilter的后代類,然后執行這些后代類的match方法@Overridepublic boolean match(MetadataReader metadataReader,MetadataReaderFactory metadataReaderFactory) throws IOException {if (this.beanFactory instanceof ListableBeanFactory&& getClass() == TypeExcludeFilter.class) {// 從IOC容器中獲取有關于TypeExcludeFilter的所有Bean(包括后代類)Collection<TypeExcludeFilter> delegates = ((ListableBeanFactory) this.beanFactory).getBeansOfType(TypeExcludeFilter.class).values();for (TypeExcludeFilter delegate : delegates) {// 調用TypeExcludeFilter后代類的所有match方法if (delegate.match(metadataReader, metadataReaderFactory)) {return true;}}}return false;}@Overridepublic boolean equals(Object obj) {throw new IllegalStateException("TypeExcludeFilter " + getClass() + " has not implemented equals");}@Overridepublic int hashCode() {throw new IllegalStateException("TypeExcludeFilter " + getClass() + " has not implemented hashCode");}
}
TypeExcludeFilter過濾器是SpringBoot提供給我們用的排除過濾器,我們可以根據一些條件來決定是否要過濾某些Bean;
3)自定義排除器
- 自定義排除器:
package com.dfbz;import com.dfbz.controller.HelloController;
import org.springframework.boot.context.TypeExcludeFilter;
import org.springframework.core.type.classreading.MetadataReader;
import org.springframework.core.type.classreading.MetadataReaderFactory;import java.io.IOException;/*** @author lscl* @version 1.0* @intro:*/
//@Component          // 不能用這種方式注冊到IOC容器,因為排除器在容器掃描時生效,這個時候連都還沒加載
public class MyTypeExcludeFilter extends TypeExcludeFilter {@Overridepublic boolean match(MetadataReader metadataReader, MetadataReaderFactory metadataReaderFactory) throws IOException {// 排除HelloControllerreturn metadataReader.getClassMetadata().getClassName().equals(HelloController.class.getName());}
}
排除器(MyTypeExcludeFilter)需要注冊到IOC容器中才會生效,但不能使用**@Component **** 注冊,因為排除器是在掃描組件時生效,這個時候可能連排除器上標注的@Componen注解還未掃描; **
- 編寫初始化器:
package com.dfbz;import org.springframework.context.ApplicationContextInitializer;
import org.springframework.context.ConfigurableApplicationContext;/*** @author lscl* @version 1.0* @intro:*/
public class MyApplicationContextInitializer implements ApplicationContextInitializer {@Overridepublic void initialize(ConfigurableApplicationContext applicationContext) {// 往IOC容器中注冊一個單例Bean(在IOC容器初始化后,@ComponentScan組件掃描之前執行)applicationContext.getBeanFactory().registerSingleton("myTypeExcludeFilter",new MyTypeExcludeFilter());}
}
- 讓初始化器生效:
在resources目錄下編寫META-INF/spring.factories,內容如下:
# Initializers
org.springframework.context.ApplicationContextInitializer=\
com.dfbz.MyApplicationContextInitializer
4.3 自動配置類
4.3.1 自動配置類說明
通過剛剛的自動配置原理我們發現,SpringBoot在啟動時,就加載了非常多的一些配置類(xxxAutoConfiguration),這些配置類中配置了非常多的信息,包括根據條件導入一些Bean、配置一些屬性、綁定一些配置;
我們之所以能夠啟動SpringBoot環境就配置好了大量的環境(SpringMVC環境/MyBatis環境/JPA環境等)都是因為這些自動配置類在SpringBoot啟動時幫我們在IOC容器里注冊了大量的Bean;
Tips:配置類的地址在
**META-INF/spring.factories**文件中**org.springframework.boot.autoconfigure.EnableAutoConfiguration**key所指定的內容;
以DispatcherServletAutoConfiguration配置類舉例:
// 配置順序(數字越小,越優先加載,負數也可以)
@AutoConfigureOrder(Ordered.HIGHEST_PRECEDENCE)	// 標注這是一個配置類
@Configuration// 如果是web環境才配置此類
@ConditionalOnWebApplication(type = Type.SERVLET)// 如果系統中有DispatcherServlet類才配置此類(導入了這個依賴就配置這個類)
@ConditionalOnClass(DispatcherServlet.class)// 在ServletWebServerFactoryAutoConfiguration類加載之后再加載此類
@AutoConfigureAfter(ServletWebServerFactoryAutoConfiguration.class)
// 開啟屬性配置
@EnableConfigurationProperties(ServerProperties.class)
public class DispatcherServletAutoConfiguration {public static final String DEFAULT_DISPATCHER_SERVLET_BEAN_NAME = "dispatcherServlet";public static final String DEFAULT_DISPATCHER_SERVLET_REGISTRATION_BEAN_NAME = "dispatcherServletRegistration";// 標注這是一個配置類@Configuration// 滿足DefaultDispatcherServletCondition的matches方法時配置該類@Conditional(DefaultDispatcherServletCondition.class)// 容器中有ServletRegistration類時配置該類@ConditionalOnClass(ServletRegistration.class)// 開啟配置屬性@EnableConfigurationProperties(WebMvcProperties.class)protected static class DispatcherServletConfiguration {private final WebMvcProperties webMvcProperties;public DispatcherServletConfiguration(WebMvcProperties webMvcProperties) {this.webMvcProperties = webMvcProperties;}// 往IOC容器中配置一個DispatcherServlet類@Bean(name = DEFAULT_DISPATCHER_SERVLET_BEAN_NAME)public DispatcherServlet dispatcherServlet() {DispatcherServlet dispatcherServlet = new DispatcherServlet();dispatcherServlet.setDispatchOptionsRequest(this.webMvcProperties.isDispatchOptionsRequest());dispatcherServlet.setDispatchTraceRequest(this.webMvcProperties.isDispatchTraceRequest());dispatcherServlet.setThrowExceptionIfNoHandlerFound(this.webMvcProperties.isThrowExceptionIfNoHandlerFound());return dispatcherServlet;}@Bean@ConditionalOnBean(MultipartResolver.class)@ConditionalOnMissingBean(name = DispatcherServlet.MULTIPART_RESOLVER_BEAN_NAME)public MultipartResolver multipartResolver(MultipartResolver resolver) {// Detect if the user has created a MultipartResolver but named it incorrectlyreturn resolver;}}@Configuration@Conditional(DispatcherServletRegistrationCondition.class)@ConditionalOnClass(ServletRegistration.class)@EnableConfigurationProperties(WebMvcProperties.class)@Import(DispatcherServletConfiguration.class)protected static class DispatcherServletRegistrationConfiguration {private final ServerProperties serverProperties;private final WebMvcProperties webMvcProperties;private final MultipartConfigElement multipartConfig;public DispatcherServletRegistrationConfiguration(ServerProperties serverProperties, WebMvcProperties webMvcProperties,ObjectProvider<MultipartConfigElement> multipartConfigProvider) {this.serverProperties = serverProperties;this.webMvcProperties = webMvcProperties;this.multipartConfig = multipartConfigProvider.getIfAvailable();}@Bean(name = DEFAULT_DISPATCHER_SERVLET_REGISTRATION_BEAN_NAME)@ConditionalOnBean(value = DispatcherServlet.class, name = DEFAULT_DISPATCHER_SERVLET_BEAN_NAME)public ServletRegistrationBean<DispatcherServlet> dispatcherServletRegistration(DispatcherServlet dispatcherServlet) {ServletRegistrationBean<DispatcherServlet> registration = new ServletRegistrationBean<>(dispatcherServlet,this.serverProperties.getServlet().getServletMapping());registration.setName(DEFAULT_DISPATCHER_SERVLET_BEAN_NAME);registration.setLoadOnStartup(this.webMvcProperties.getServlet().getLoadOnStartup());if (this.multipartConfig != null) {registration.setMultipartConfig(this.multipartConfig);}return registration;}}
}
4.3.2 @Conditional派生注解
我們已經知道了自動配置類的加載規則,只要配置在META-INF/spring.factories文件的org.springframework.boot.autoconfigure.EnableAutoConfigurationkey中的全類名,該配置類即可被加載,但有些時候我們并不希望這些配置類能夠被立即加載,而是需要符合某些條件時這些配置類才會被加載;
SpringBoot內置了非常多的條件判斷注解,這些注解可以幫助我們在符合條件的清空下,該配置類/方法才會生效;這些注解我們統一稱為派生注解;為@ConditionalXxx;
- @Conditional表格:
| @Conditional擴展注解 | 作用(判斷是否滿足當前指定條件) |
|---|---|
| @ConditionalOnJava | 系統的java版本是否符合要求 |
| @ConditionalOnBean | 容器中存在指定Bean; |
| @ConditionalOnMissingBean | 容器中不存在指定Bean; |
| @ConditionalOnExpression | 滿足SpEL表達式指定 |
| @ConditionalOnClass | 系統中有指定的類 |
| @ConditionalOnMissingClass | 系統中沒有指定的類 |
| @ConditionalOnSingleCandidate | 容器中只有一個指定的Bean,或者這個Bean是首選Bean |
| @ConditionalOnProperty | 系統中指定的屬性是否有指定的值 |
| @ConditionalOnResource | 類路徑下是否存在指定資源文件 |
| @ConditionalOnWebApplication | 當前是web環境 |
| @ConditionalOnNotWebApplication | 當前不是web環境 |
| @ConditionalOnJndi | JNDI存在指定項 |
4.3.3 自定義自動配置類
- 自動配置類的加載說明:
- 1)必須是一個配置類
- 2)必須配置在
META-INF/spring.factories中的org.springframework.boot.autoconfigure.EnableAutoConfigurationkey中; - 3)可能還會包含一些派生注解(@ConditionalXxx)
package com.dfbz.config;import com.dfbz.controller.HelloController;
import com.dfbz.entity.City;
import org.springframework.boot.autoconfigure.condition.ConditionalOnBean;
import org.springframework.boot.autoconfigure.condition.ConditionalOnJava;
import org.springframework.boot.autoconfigure.condition.ConditionalOnResource;
import org.springframework.boot.system.JavaVersion;
import org.springframework.context.annotation.Bean;
import org.springframework.context.annotation.Configuration;/*** @author lscl* @version 1.0* @intro:*/
@Configuration
@ConditionalOnJava(JavaVersion.EIGHT)           // Java版本必須是1.8
@ConditionalOnBean(HelloController.class)       // IOC容器中必須存在HelloController這個對象
@ConditionalOnResource(resources = "application.properties")        // 類路徑下必須存在application.properties
public class MyAutoConfiguration {@Beanpublic City city() {return new City();}
}
4.4 屬性配置類
4.4.1 屬性配置類說明
自動配置類中通常會綁定(通過EnableConfigurationProperties開啟)一些屬性配置類(xxxProperties.class),這些屬性配置類通過**@ConfigurationProperties**注解標識;
在自動配置類中根據條件配置了大量的Bean,而這些Bean上面大都開啟(@EnableConfigurationProperties)了屬性配置類(xxxProperties.class),這些屬性配置類是SpringBoot"基于約定配置"的保障;
查看ServerProperties:
- @ConfigurationProperties:與application.yml/properties配置文件進行綁定;
// 與配置文件進行綁定
@ConfigurationProperties(prefix = "server", ignoreUnknownFields = true)
public class ServerProperties {private Integer port;private InetAddress address;@NestedConfigurationPropertyprivate final ErrorProperties error = new ErrorProperties();private Boolean useForwardHeaders;private String serverHeader;}
4.4.2 自定義屬性配置類
- 自定義屬性配置類:
package com.dfbz.entity;import lombok.AllArgsConstructor;
import lombok.Data;
import lombok.NoArgsConstructor;
import org.springframework.boot.context.properties.ConfigurationProperties;
import org.springframework.stereotype.Component;/*** @author lscl* @version 1.0* @intro:*/
@Data                       // 提供get/set/toString...
@AllArgsConstructor         // 有參構造
@NoArgsConstructor          // 無參構造@Component                              // 必須要放入IOC容器才能使用@ConfigurationProperties注解
@ConfigurationProperties(prefix = "com.dfbz.book")          // 綁定的前綴為: com.dfbz.book
public class Book {private String name;private Double price;
}
- application.yml:
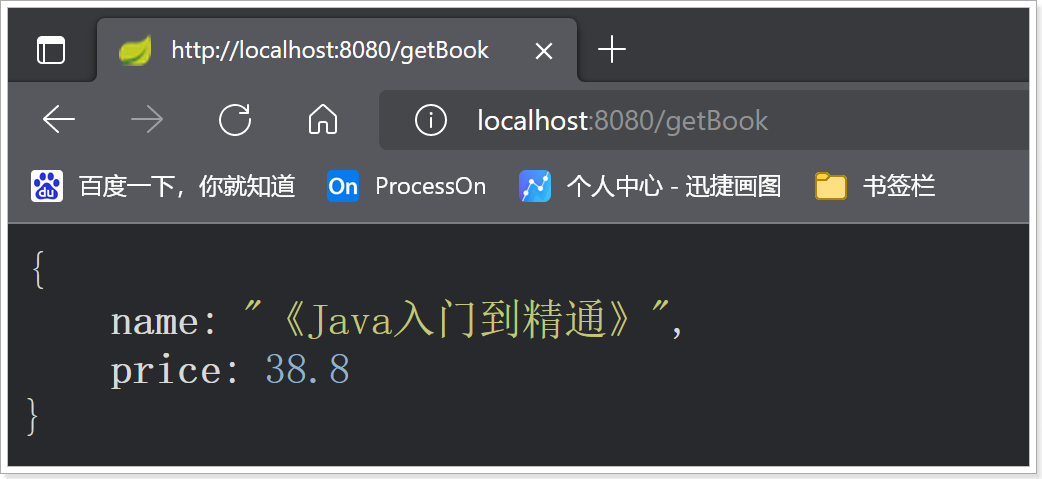
com:dfbz:book:name: 《Java入門到精通》price: 38.8
- DemoController:
package com.dfbz.controller;import com.dfbz.entity.Book;
import org.springframework.beans.factory.annotation.Autowired;
import org.springframework.web.bind.annotation.GetMapping;
import org.springframework.web.bind.annotation.ResponseBody;
import org.springframework.web.bind.annotation.RestController;/*** @author lscl* @version 1.0* @intro:*/
@RestController
public class DemoController {@Autowiredprivate Book book;@GetMapping("/getBook")@ResponseBodypublic Book getBook() {return book;}
}
訪問:http://localhost:8080/getBook:
也可以使用@EnableConfigurationProperties注解來指定要開啟某個類上面的屬性配置;這樣這個類就不需要被放入IOC容器也依舊能與配置文件進行綁定;
package com.dfbz;import com.dfbz.entity.Book;
import org.springframework.boot.SpringApplication;
import org.springframework.boot.autoconfigure.SpringBootApplication;
import org.springframework.boot.context.properties.EnableConfigurationProperties;/*** @author lscl* @version 1.0* @intro:*/
@SpringBootApplication
@EnableConfigurationProperties(Book.class)          // 開啟Book類的屬性配置功能
public class HelloApplication {public static void main(String[] args) {SpringApplication.run(HelloApplication.class);}
}
注釋Book類中的@Component注解;
重啟服務器,再次訪問:http://localhost:8080/getBook發現配置依舊可以;
4.5 自定義場景啟動器
4.5.1 場景啟動器包含內容
1)自動配置類;
xxxAutoConfiguration
2)開啟屬性配置,并綁定屬性配置類;
xxxProperties
3)加入到META-INF/spring.factories中;
4.5.2 搭建自動配置工程
自動配置場景啟動器名稱規范:{name}-springboot-starter-autoconfigurer
4.5.2.1 依賴
<?xml version="1.0" encoding="UTF-8"?>
<project xmlns="http://maven.apache.org/POM/4.0.0"xmlns:xsi="http://www.w3.org/2001/XMLSchema-instance"xsi:schemaLocation="http://maven.apache.org/POM/4.0.0 http://maven.apache.org/xsd/maven-4.0.0.xsd"><modelVersion>4.0.0</modelVersion><groupId>com.dfbz</groupId><artifactId>02-mystarter-springboot-starter-autoconfigurer</artifactId><version>1.0-SNAPSHOT</version><parent><groupId>org.springframework.boot</groupId><artifactId>spring-boot-starter-parent</artifactId><version>2.0.1.RELEASE</version><relativePath/> <!-- lookup parent from repository --></parent><dependencies><!--springboot的啟動器,包含所有starter的基本配置--><dependency><groupId>org.springframework.boot</groupId><artifactId>spring-boot-starter</artifactId></dependency></dependencies></project>
4.5.2.2 自動配置類
package com.mystarter.autoconfig;import com.mystarter.service.HelloService;
import org.springframework.boot.autoconfigure.condition.ConditionalOnWebApplication;
import org.springframework.boot.autoconfigure.web.ServerProperties;
import org.springframework.boot.context.properties.EnableConfigurationProperties;
import org.springframework.context.annotation.Bean;
import org.springframework.context.annotation.Configuration;/*** @author lscl* @version 1.0* @intro: 自動配置類*/
// 標注這是一個配置類
@Configuration
// 如果是web環境才配置此類
@ConditionalOnWebApplication
// 開啟配置屬性
@EnableConfigurationProperties(MyStarterProperties.class)
public class MyStarterAutoConfiguration {@Beanpublic HelloService helloService(){return new HelloService();}
}
4.5.2.3 屬性配置類
package com.mystarter.properties;import org.springframework.boot.context.properties.ConfigurationProperties;/*** @author lscl* @version 1.0* @intro: 屬性配置類,綁定配置文件,指定前綴*/
@ConfigurationProperties(prefix = "mystarter")
public class MyStarterProperties {private String text;public String getText() {return text;}public void setText(String text) {this.text = text;}
}
4.5.2.4 具體配置的類
package com.mystarter.service;import org.springframework.beans.factory.annotation.Value;/*** @author lscl* @version 1.0* @intro:*/
public class HelloService {@Autowiredprivate MyStarterProperties properties;public String sayHello() {return properties.getText();}
}
4.5.2.5 spring.factories
在/MATA-INF/目錄下新建spring.factories文件;
org.springframework.boot.autoconfigure.EnableAutoConfiguration=\com.mystarter.autoconfig.MyStarterAutoConfiguration
4.5.3 搭建測試工程
4.5.3.1 依賴
<?xml version="1.0" encoding="UTF-8"?>
<project xmlns="http://maven.apache.org/POM/4.0.0"xmlns:xsi="http://www.w3.org/2001/XMLSchema-instance"xsi:schemaLocation="http://maven.apache.org/POM/4.0.0 http://maven.apache.org/xsd/maven-4.0.0.xsd"><modelVersion>4.0.0</modelVersion><groupId>org.example</groupId><artifactId>03-MyStarterTest</artifactId><version>1.0-SNAPSHOT</version><parent><groupId>org.springframework.boot</groupId><artifactId>spring-boot-starter-parent</artifactId><version>2.0.1.RELEASE</version></parent><dependencies><!--導入我們自定義的starter--><dependency><groupId>com.dfbz</groupId><artifactId>02-mystarter-springboot-starter-autoconfigurer</artifactId><version>1.0-SNAPSHOT</version></dependency><!--web場景的starter--><dependency><groupId>org.springframework.boot</groupId><artifactId>spring-boot-starter-web</artifactId></dependency></dependencies></project>
4.5.2.2 Controller
package com.dfbz.controller;import com.mystarter.service.HelloService;
import org.springframework.beans.factory.annotation.Autowired;
import org.springframework.stereotype.Controller;
import org.springframework.web.bind.annotation.GetMapping;
import org.springframework.web.bind.annotation.ResponseBody;/*** @author lscl* @version 1.0* @intro:*/
@Controller
public class HelloController {@Autowiredprivate HelloService helloService;@GetMapping("/hello")@ResponseBodypublic String hello() {return helloService.sayHello();}
}
4.5.2.3 application.yml
mystarter:text: hello~
4.5.2.4 引導類
package com.dfbz;import org.springframework.boot.SpringApplication;
import org.springframework.boot.autoconfigure.SpringBootApplication;/*** @author lscl* @version 1.0* @intro:*/
@SpringBootApplication
public class Application {public static void main(String[] args) {SpringApplication.run(Application.class);}
}


——3. OpenCV的數據類型)


)

,一行代碼解決顯示對齊問題!)

生成驗證碼)
:模塊緩存清理工具)

![[補題記錄] Complete the Permutation(貪心、set)](http://pic.xiahunao.cn/[補題記錄] Complete the Permutation(貪心、set))


