文章目錄
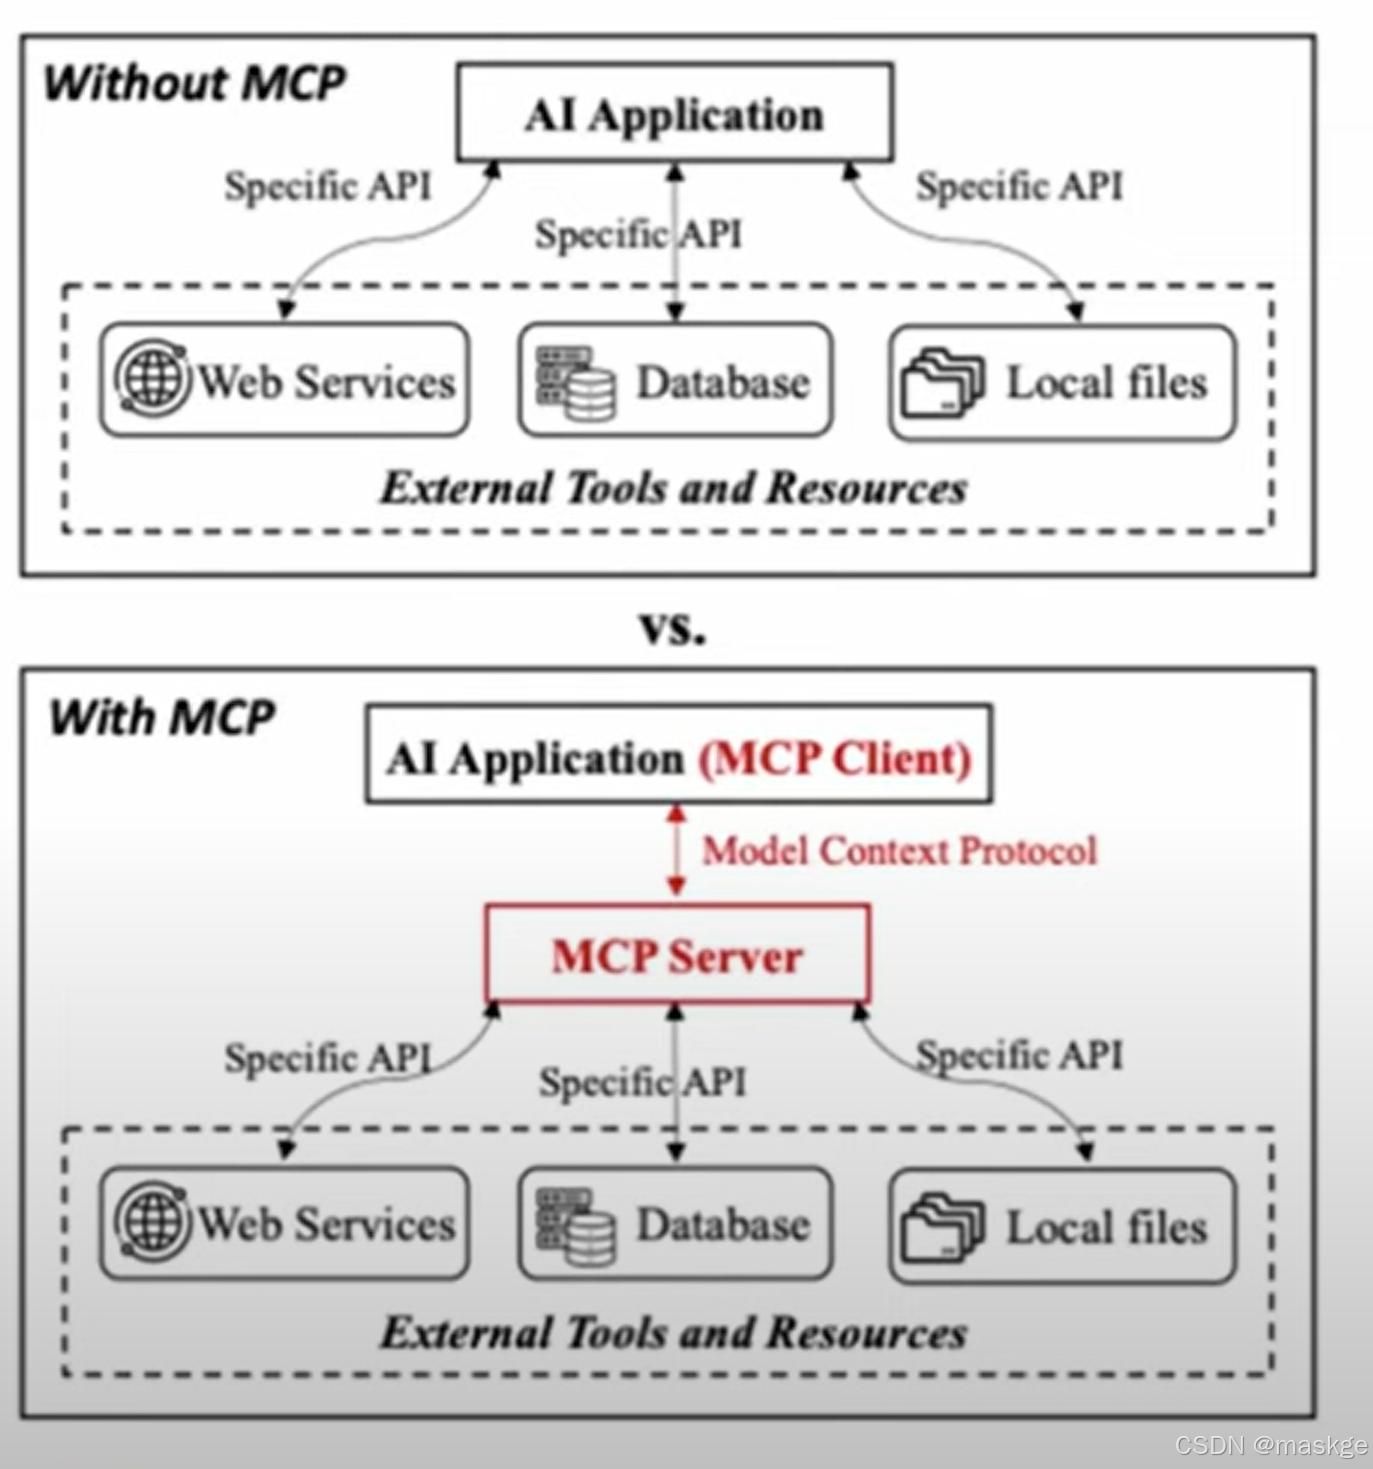
- 1.MCP概念
- 2.MCP服務端主要能力
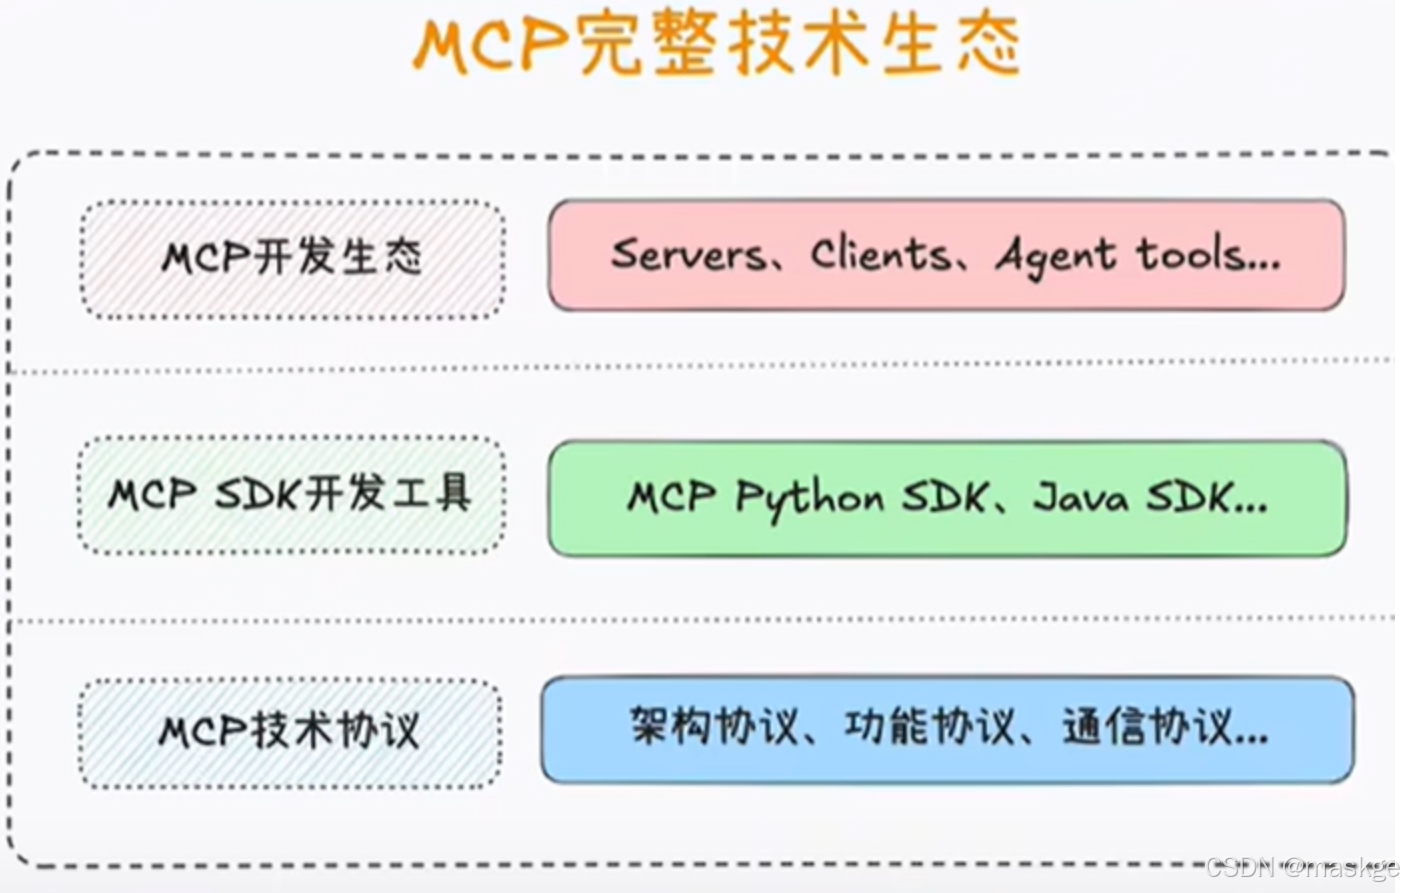
- 3.MCP技術生態
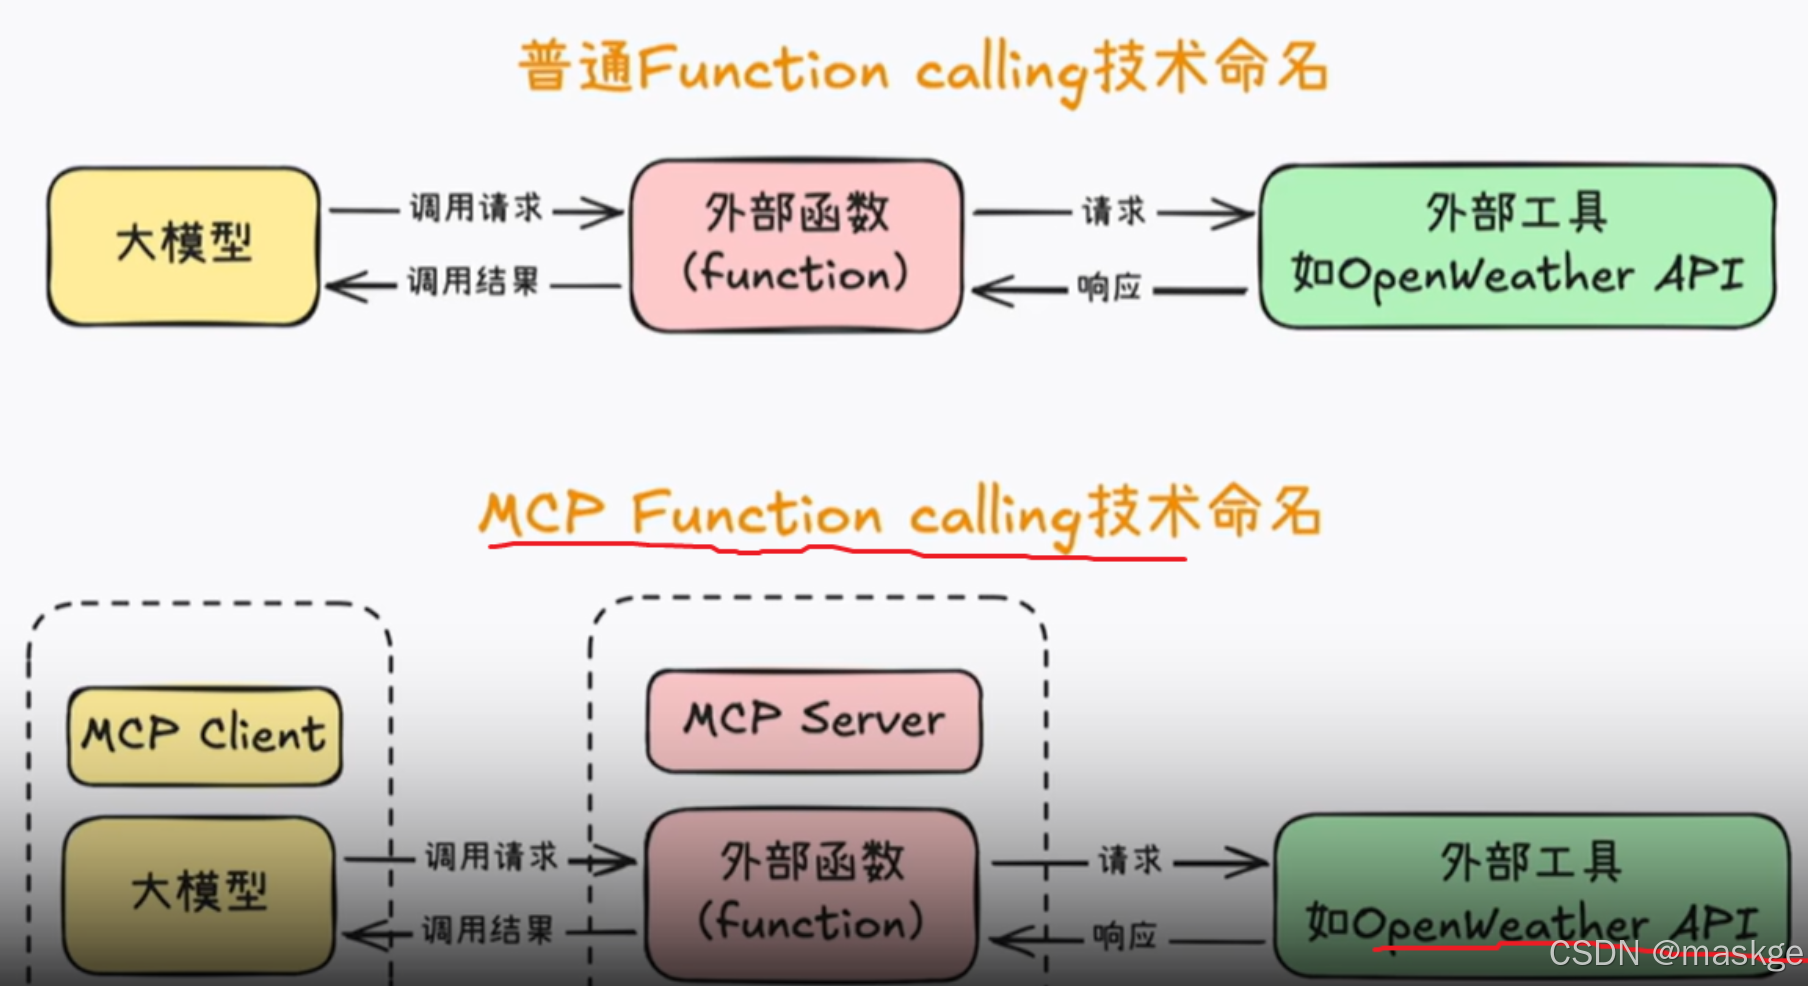
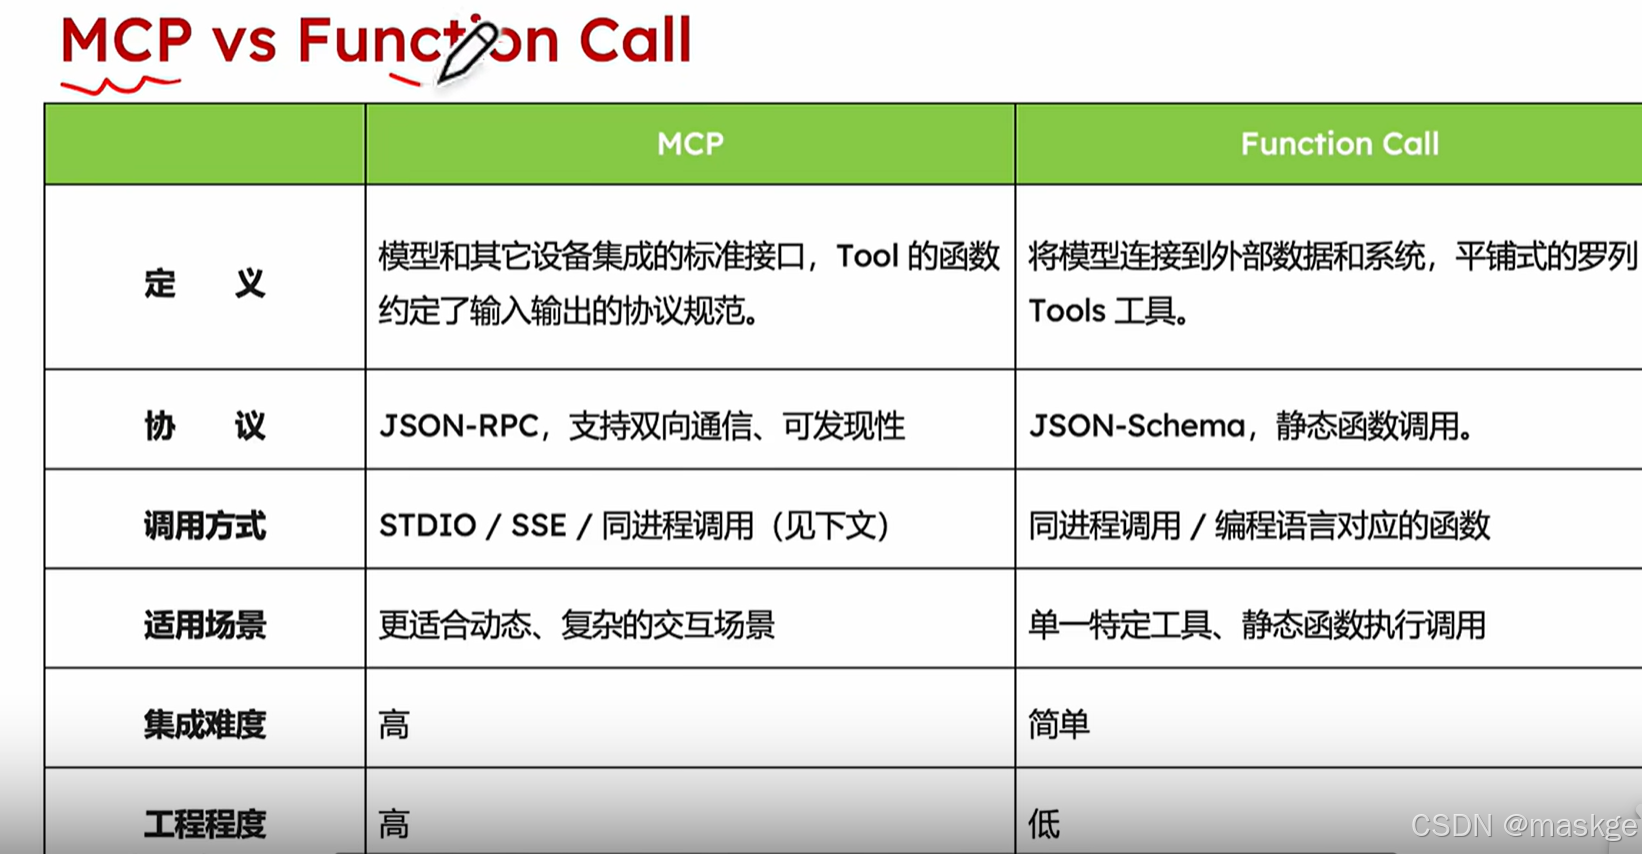
- 4.MCP與Function call區別
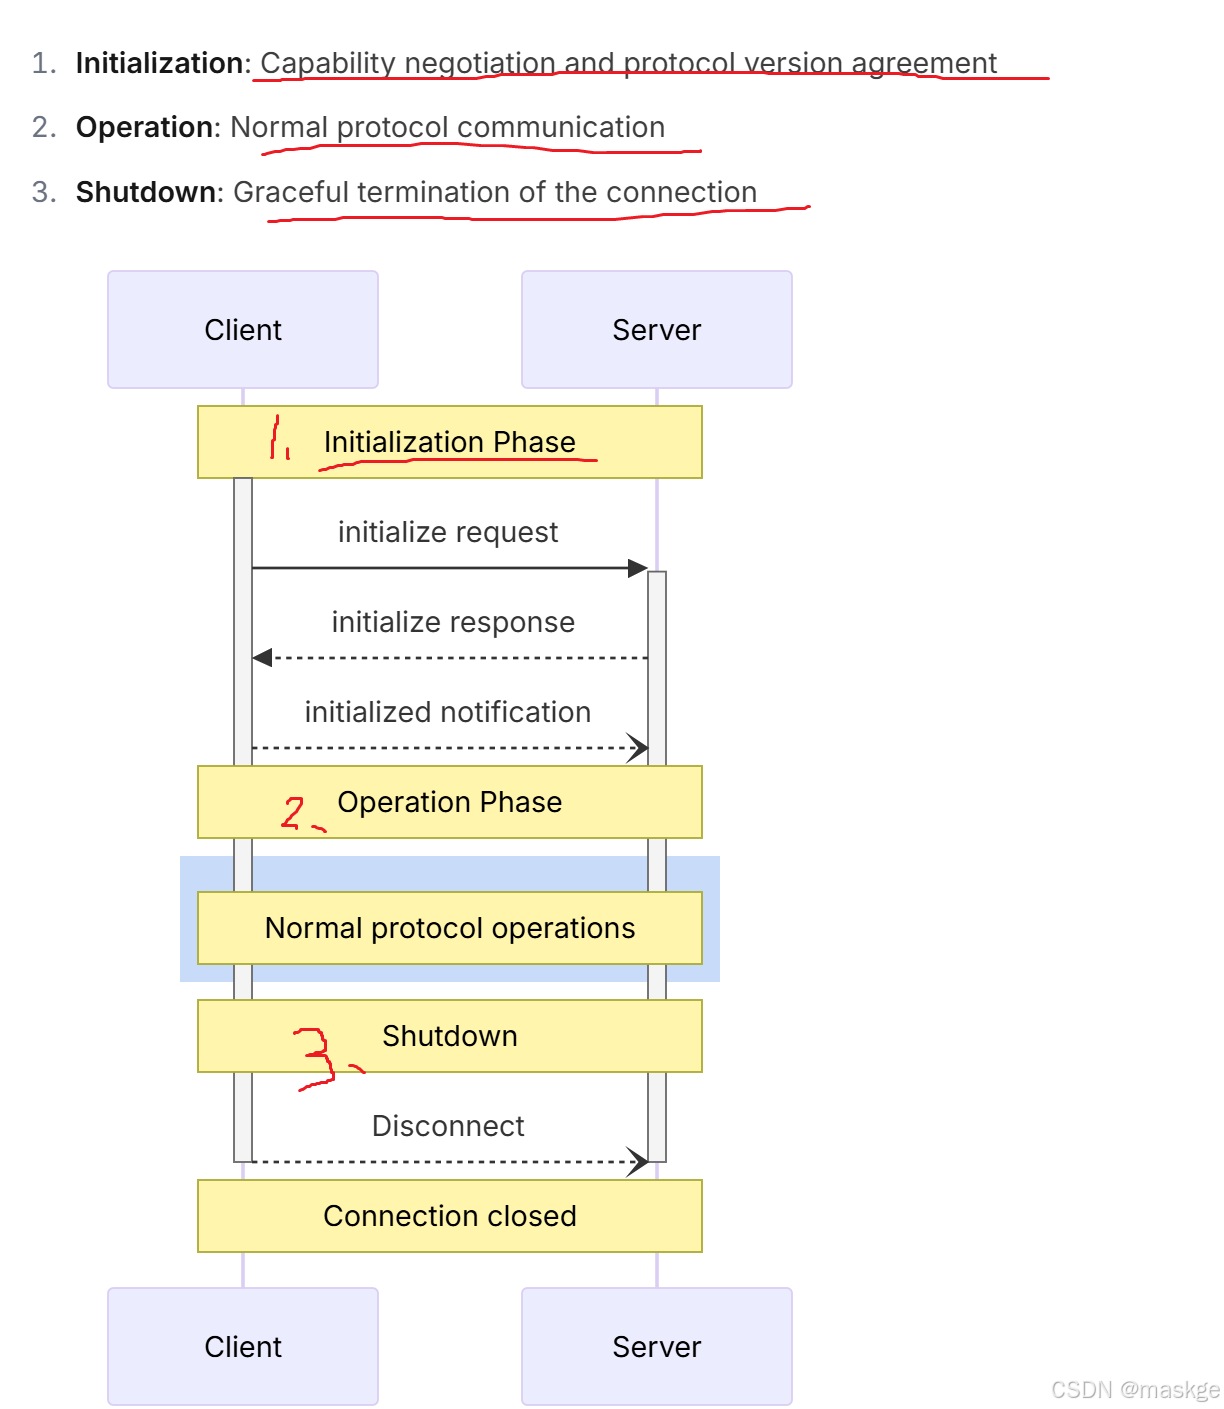
- 5.MCP生命周期
- 6.MCP java SDK
- 7.MCP應用場景
- 8.基于springAI+ollma+阿里qianwen+mcp設計私有AIAgent應用實現
- 9.AI java項目落地技術選型
- 10.構建AI Agent四大模塊
- 11.LLM(大模型)與MCP之間關系
- 12.A2A、MCP、Kafka、Flink協同工作方法
- 13.事件驅動多智能體
- 14.flink+kafka+MCP+LLM(gemini Ai ) 應用架構demo:使用Gemini AI Agent進行實時數據處理
1.MCP概念
-
MCP(模型上下文協議):
-
mcpserver
-
mcp client
-
tools
-
Communication&tools
-
-
提供標準方式的連接AI模型
2.MCP服務端主要能力
- Resources: 可被客戶端讀取的類文件數據(如 API 響應或文件內容)
- Tools: 大語言模型(需獲得用戶許可)可調用的函數
- Prompts: 有助于用戶完成特定任務的預寫模板
3.MCP技術生態
4.MCP與Function call區別
5.MCP生命周期
6.MCP java SDK
https://github.com/modelcontextprotocol/java-sdk
支持以下功能:
- Creating MCP servers that expose tools, resources, and prompts
- Building MCP clients that can connect to any MCP server
- Local and Remote transport protocols
- Protocol compliance with type safety
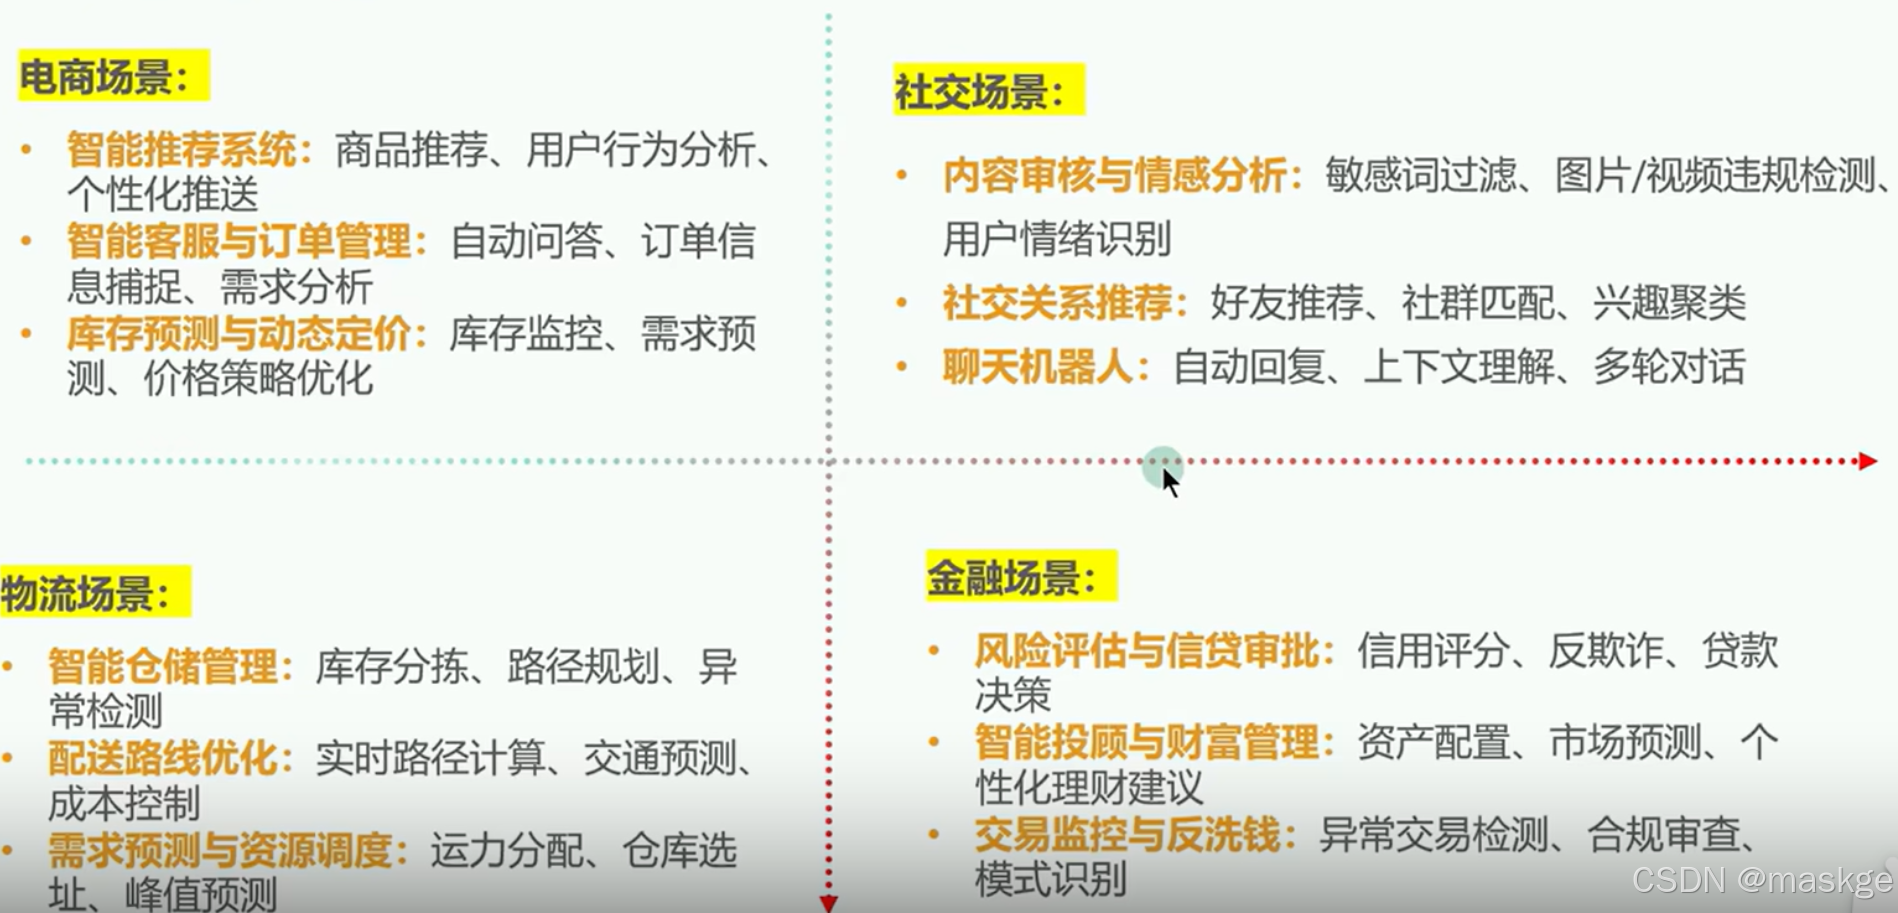
7.MCP應用場景
- 自動預約
- 更新客戶記錄
- 接入database
- 發送文件
- 處理在線支付
- 處理郵件
8.基于springAI+ollma+阿里qianwen+mcp設計私有AIAgent應用實現
1.安裝本地ollama,基于ollma拉取qianwen大模型,詳見關于利用ollama 與deepseek r1大模型搭建本地知識庫
2.搭建mcp客戶端與服務端
mcp服務端代碼實現:
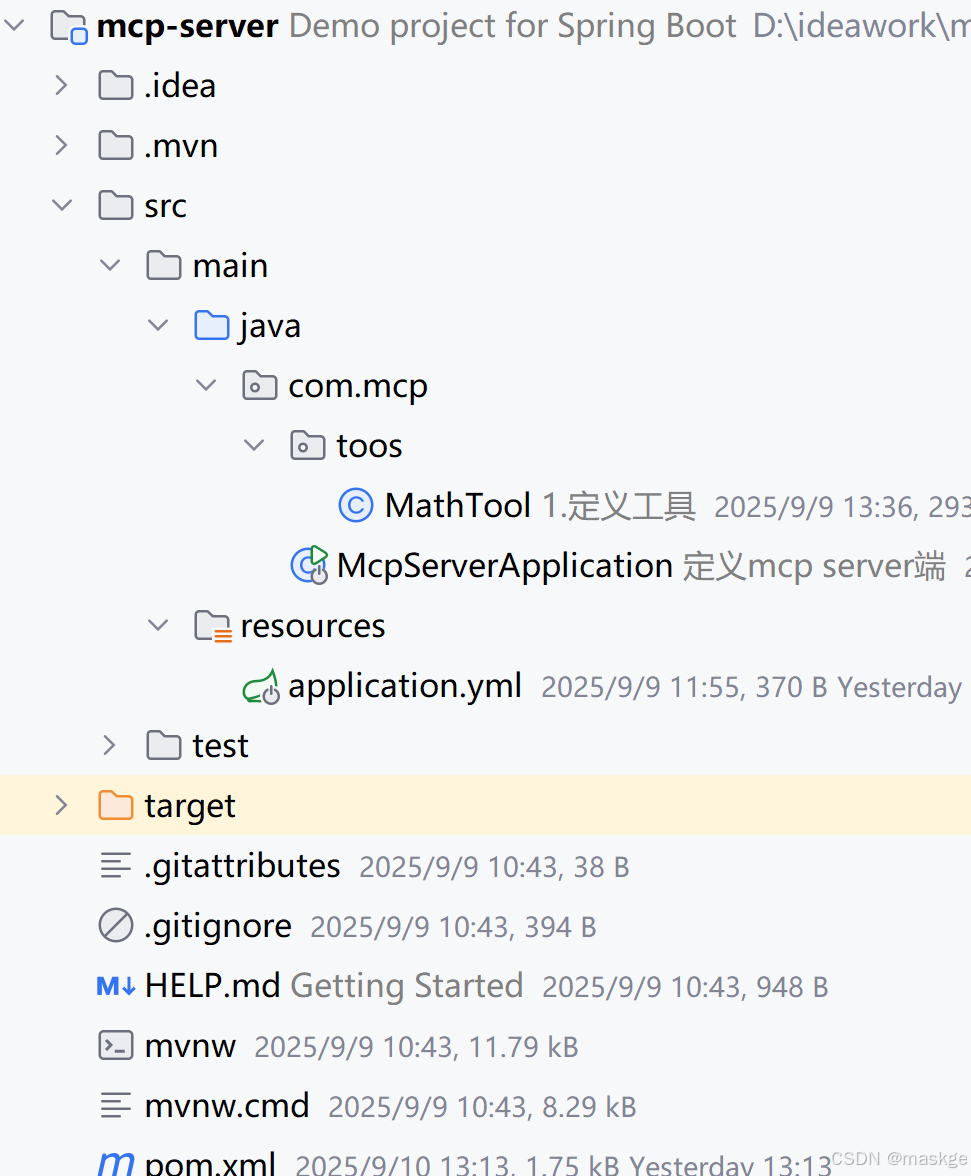
server端pom.xml配置如下:
<?xml version="1.0" encoding="UTF-8"?>
<project xmlns="http://maven.apache.org/POM/4.0.0" xmlns:xsi="http://www.w3.org/2001/XMLSchema-instance"xsi:schemaLocation="http://maven.apache.org/POM/4.0.0 https://maven.apache.org/xsd/maven-4.0.0.xsd"><modelVersion>4.0.0</modelVersion><parent><groupId>org.springframework.boot</groupId><artifactId>spring-boot-starter-parent</artifactId><version>3.5.5</version><relativePath/> <!-- lookup parent from repository --></parent><groupId>com.mcp</groupId><artifactId>mcp-server</artifactId><version>0.0.1-SNAPSHOT</version><name>mcp-server</name><description>Demo project for Spring Boot</description><url/><licenses><license/></licenses><developers><developer/></developers><scm><connection/><developerConnection/><tag/><url/></scm><properties><java.version>17</java.version><spring-ai.version>1.0.1</spring-ai.version></properties><dependencies><!--配置springAI mcpserver--><dependency><groupId>org.springframework.ai</groupId><artifactId>spring-ai-starter-mcp-server-webmvc</artifactId></dependency><dependency><groupId>org.springframework.boot</groupId><artifactId>spring-boot-starter-test</artifactId><scope>test</scope></dependency></dependencies><dependencyManagement><dependencies><dependency><groupId>org.springframework.ai</groupId><artifactId>spring-ai-bom</artifactId><version>${spring-ai.version}</version><type>pom</type><scope>import</scope></dependency></dependencies></dependencyManagement><build><plugins><plugin><groupId>org.springframework.boot</groupId><artifactId>spring-boot-maven-plugin</artifactId></plugin></plugins></build></project>
java代碼實現如下:
package com.mcp.toos;import org.springframework.ai.tool.annotation.Tool;/*** 1.定義工具*/public class MathTool {@Tool(name = "數字計算工具", description = "兩個數字相加")public  Integer add(Integer a,Integer b){return  a+b;}
}package com.mcp;import com.mcp.toos.MathTool;
import org.springframework.ai.tool.ToolCallbackProvider;
import org.springframework.ai.tool.method.MethodToolCallbackProvider;
import org.springframework.boot.SpringApplication;
import org.springframework.boot.autoconfigure.SpringBootApplication;
import org.springframework.context.annotation.Bean;/*** 定義mcp server端*/
@SpringBootApplication
public class McpServerApplication {public static void main(String[] args) {SpringApplication.run(McpServerApplication.class, args);}/*** 2.注冊MathTool到spring容器中* @return*/@Beanpublic ToolCallbackProvider mathTool(){return MethodToolCallbackProvider.builder().toolObjects(new MathTool()).build();}}
application.yml
spring:application:name: mcp-serverai:mcp:server:enabled: truename: mcp-serverversion: 1.0.0sse-endpoint: /api/v1/ssesse-message-endpoint: /api/v1/mcpcapabilities:tool: true
logging:level:io.modelcontextprotocol: TRACEorg.springframework.ai.mcp: TRACE
mcp客戶端代碼實現如下:
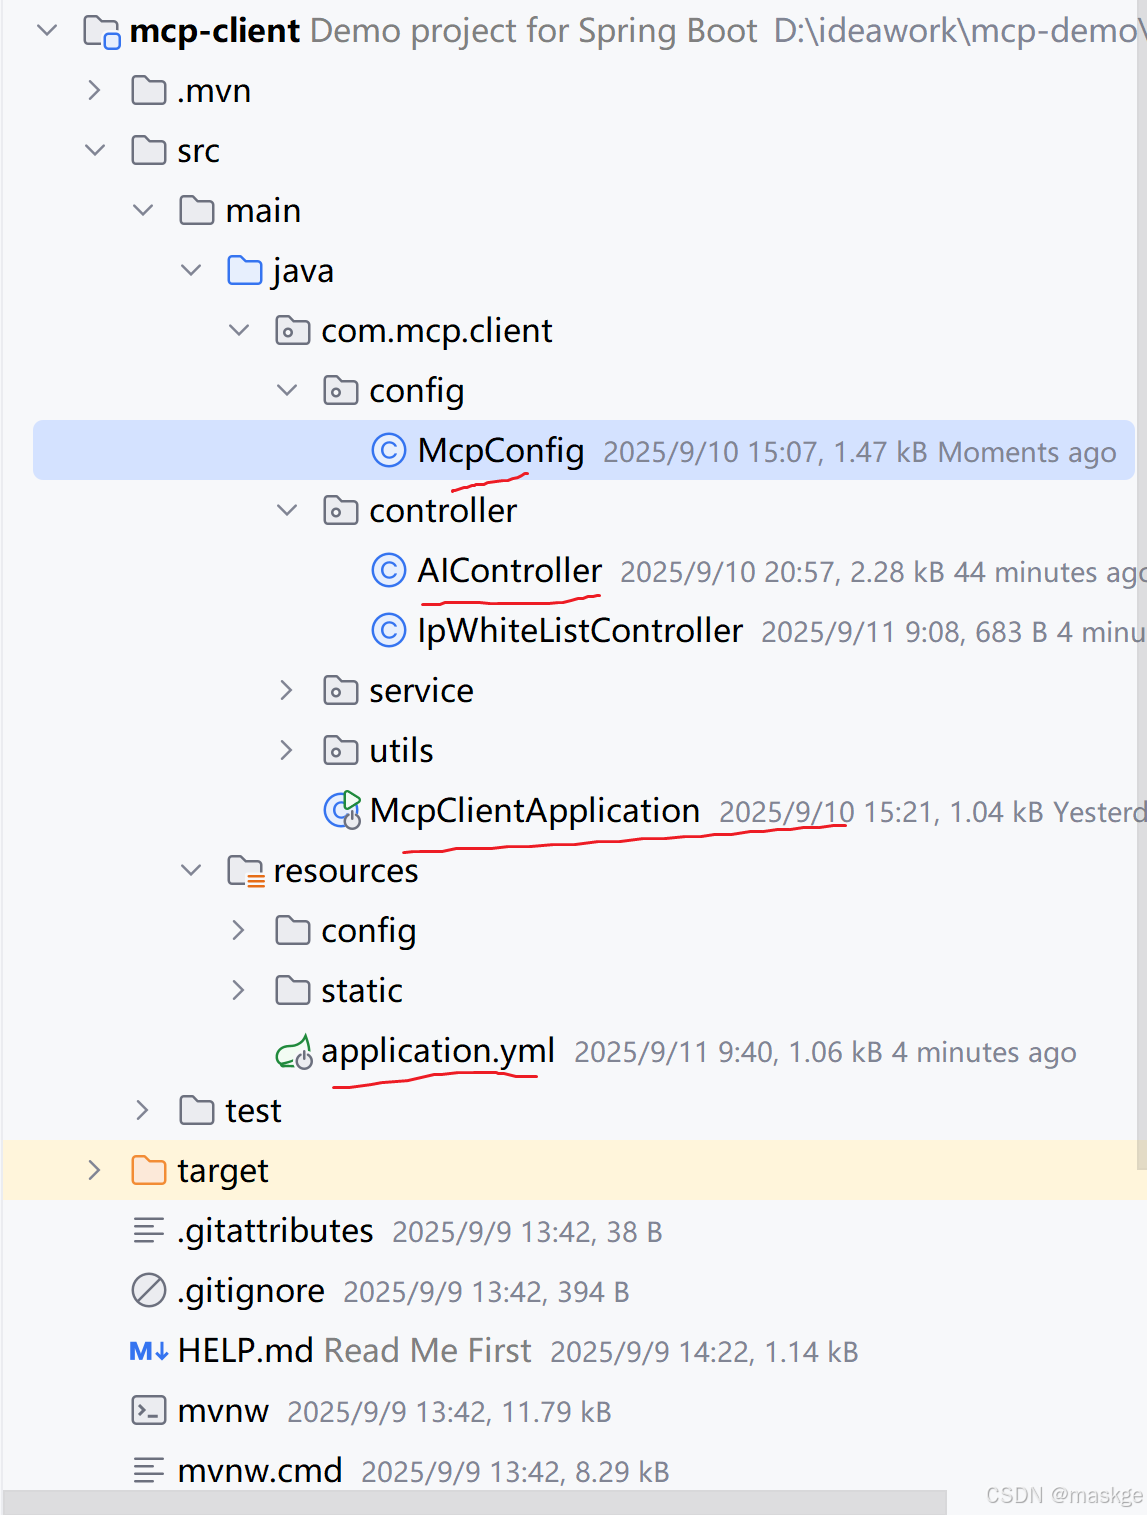
客戶端pom.xml配置如下:
<?xml version="1.0" encoding="UTF-8"?>
<project xmlns="http://maven.apache.org/POM/4.0.0" xmlns:xsi="http://www.w3.org/2001/XMLSchema-instance"xsi:schemaLocation="http://maven.apache.org/POM/4.0.0 https://maven.apache.org/xsd/maven-4.0.0.xsd"><modelVersion>4.0.0</modelVersion><parent><groupId>org.springframework.boot</groupId><artifactId>spring-boot-starter-parent</artifactId><version>3.4.5</version><relativePath/> <!-- lookup parent from repository --></parent><groupId>com.mcp</groupId><artifactId>mcp-client</artifactId><version>0.0.1-SNAPSHOT</version><name>mcp-client</name><description>Demo project for Spring Boot</description><url/><licenses><license/></licenses><developers><developer/></developers><scm><connection/><developerConnection/><tag/><url/></scm><properties><java.version>17</java.version><spring-ai.version>1.0.0-M6</spring-ai.version></properties><dependencies><!-- spring-web --><dependency><groupId>org.springframework.boot</groupId><artifactId>spring-boot-starter-web</artifactId></dependency><dependency><groupId>org.springframework.boot</groupId><artifactId>spring-boot-starter-actuator</artifactId></dependency><dependency><groupId>org.springframework.ai</groupId><artifactId>spring-ai-spring-boot-autoconfigure</artifactId></dependency><!-- 如果需要集成OpenAI,還需添加對應依賴 -->
<!--		<dependency>-->
<!--			<groupId>org.springframework.ai</groupId>-->
<!--			<artifactId>spring-ai-openai-spring-boot-starter</artifactId>-->
<!--		</dependency>--><!--mcp client--><dependency><groupId>org.springframework.ai</groupId><artifactId>spring-ai-starter-mcp-client</artifactId><version>1.0.1</version></dependency><dependency><groupId>io.modelcontextprotocol.sdk</groupId><artifactId>mcp</artifactId><version>0.10.0</version></dependency><!--本地部署調用--><dependency><groupId>org.springframework.ai</groupId><artifactId>spring-ai-ollama-spring-boot-starter</artifactId></dependency><dependency><groupId>org.lionsoul</groupId><artifactId>ip2region</artifactId><version>2.7.0</version></dependency><dependency><groupId>org.springframework.boot</groupId><artifactId>spring-boot-devtools</artifactId><optional>true</optional></dependency><dependency><groupId>org.springframework.boot</groupId><artifactId>spring-boot-starter-thymeleaf</artifactId></dependency><!-- lombok --><dependency><groupId>org.projectlombok</groupId><artifactId>lombok</artifactId><optional>true</optional></dependency><dependency><groupId>org.springframework.boot</groupId><artifactId>spring-boot-starter-test</artifactId><scope>test</scope></dependency></dependencies><dependencyManagement><dependencies><dependency><groupId>org.springframework.ai</groupId><artifactId>spring-ai-bom</artifactId><version>${spring-ai.version}</version><type>pom</type><scope>import</scope></dependency></dependencies></dependencyManagement><build><plugins><plugin><groupId>org.springframework.boot</groupId><artifactId>spring-boot-maven-plugin</artifactId></plugin><plugin><artifactId>maven-resources-plugin</artifactId><configuration><nonFilteredFileExtensions><nonFilteredFileExtension>db</nonFilteredFileExtension></nonFilteredFileExtensions></configuration></plugin></plugins></build><repositories><repository><id>public</id><url>https://maven.aliyun.com/repository/public</url><releases><enabled>true</enabled></releases><snapshots><enabled>true</enabled></snapshots></repository><repository><id>central</id><url>https://maven.aliyun.com/repository/central</url><releases><enabled>true</enabled></releases><snapshots><enabled>true</enabled></snapshots></repository><repository><id>spring-snapshots</id><name>Spring Snapshots</name><url>https://repo.spring.io/snapshot</url><releases><enabled>false</enabled></releases></repository><repository><name>Central Portal Snapshots</name><id>central-portal-snapshots</id><url>https://central.sonatype.com/repository/maven-snapshots/</url><releases><enabled>false</enabled></releases><snapshots><enabled>true</enabled></snapshots></repository><repository><id>maven-central</id><url>https://repo.maven.apache.org/maven2/</url><snapshots><enabled>false</enabled></snapshots><releases><enabled>true</enabled></releases></repository></repositories></project>
java代碼實現如下:
package com.mcp.client.config;import org.springframework.ai.autoconfigure.chat.client.ChatClientBuilderConfigurer;
import org.springframework.ai.chat.client.ChatClient;
import org.springframework.ai.chat.client.advisor.MessageChatMemoryAdvisor;
import org.springframework.ai.chat.client.advisor.SimpleLoggerAdvisor;
import org.springframework.ai.chat.memory.ChatMemory;
import org.springframework.ai.chat.memory.InMemoryChatMemory;
import org.springframework.ai.tool.ToolCallbackProvider;
import org.springframework.context.annotation.Bean;
import org.springframework.context.annotation.Configuration;
/*** 2.配置chatCleint*/@Configuration
public class McpConfig {@Beanpublic ChatMemory chatMemory() {return new InMemoryChatMemory();//使用內存記憶策略}@Beanpublic ChatClient chatClient(ChatClient.Builder builder, ChatMemory chatMemory, ToolCallbackProvider tools){return builder.defaultSystem("hi,我這個agent可以進行數字計算!").defaultTools(tools).defaultAdvisors(new SimpleLoggerAdvisor(),//打印日志new MessageChatMemoryAdvisor(chatMemory)//會話記憶).build();}// 手動注冊 ChatClientBuilderConfigurer Bean@Beanpublic ChatClientBuilderConfigurer chatClientBuilderConfigurer() {return new ChatClientBuilderConfigurer();}}package com.mcp.client.controller;import lombok.extern.slf4j.Slf4j;
import org.springframework.ai.chat.client.ChatClient;
import org.springframework.web.bind.annotation.GetMapping;
import org.springframework.web.bind.annotation.RestController;
/*** 3.實現Ai聊天agent api*/
@Slf4j
@RestController
public class AIController {private final ChatClient chatClient;public AIController(ChatClient chatClient) {this.chatClient = chatClient;}/*** 處理聊天請求,使用AI和MCP工具進行響應*/@GetMapping("/api/v1/caculate")public String caculate() {// 使用ChatClient與LLM交互
//        String message = "8+9等于多少?";String message = "mcp數字計算都有哪些功能?";// 使用API調用聊天
//        String content = chatClient.prompt(message)
//                .call()
//                .content();String content=chatClient.prompt().user(message).call().content();System.out.println(">>> 問題: " + message);System.out.println(">>> 回答:" + content);return content;}}package com.mcp.client;import org.springframework.ai.chat.client.ChatClient;
import org.springframework.ai.tool.ToolCallbackProvider;
import org.springframework.boot.CommandLineRunner;
import org.springframework.boot.SpringApplication;
import org.springframework.boot.autoconfigure.SpringBootApplication;
import org.springframework.context.annotation.Bean;/*** 1.定義mcp客戶端*/
@SpringBootApplication
public class McpClientApplication {public static void main(String[] args) {SpringApplication.run(McpClientApplication.class, args);}@Beanpublic CommandLineRunner predefinedQuestions(ChatClient.Builder chatClientBuilder,ToolCallbackProvider tools) {return args -> {// 構建ChatClient并注入MCP工具var chatClient = chatClientBuilder.defaultTools(tools).build();// 使用ChatClient與LLM交互String userInput = "8+9等于多少?";System.out.println("\n>>> QUESTION: " + userInput);System.out.println("\n>>> ASSISTANT: " + chatClient.prompt(userInput).call().content());};}}
application.yml配置如下:
server:port: 8081servlet:encoding:charset: utf-8enabled: trueforce: truespring:application:name: mcp-clientmain:allow-bean-definition-overriding: trueweb-application-type: servletai:ollama:base-url: http://localhost:11434chat:model: qwen2.5:7bmcp:client:enabled: truename: mcp-clientversion: 1.0.0request-timeout: 30stype: syncsse:connections:server1:url: http://localhost:8080sse-endpoint: /api/v1/ssetoolcallback:enabled: trueroot-change-notification: truechat:client:observations:log-prompt: falsemandatory-file-encoding: UTF-8logging:level:io:modelcontextprotocol:client: DEBUGspec: DEBUGorg.springframework.ai.model.tool: DEBUG# IP 白名單相關配置
ip-white-list:enabled: trueips: 127.0.0.1,192.168.1.100# 其他相關配置項
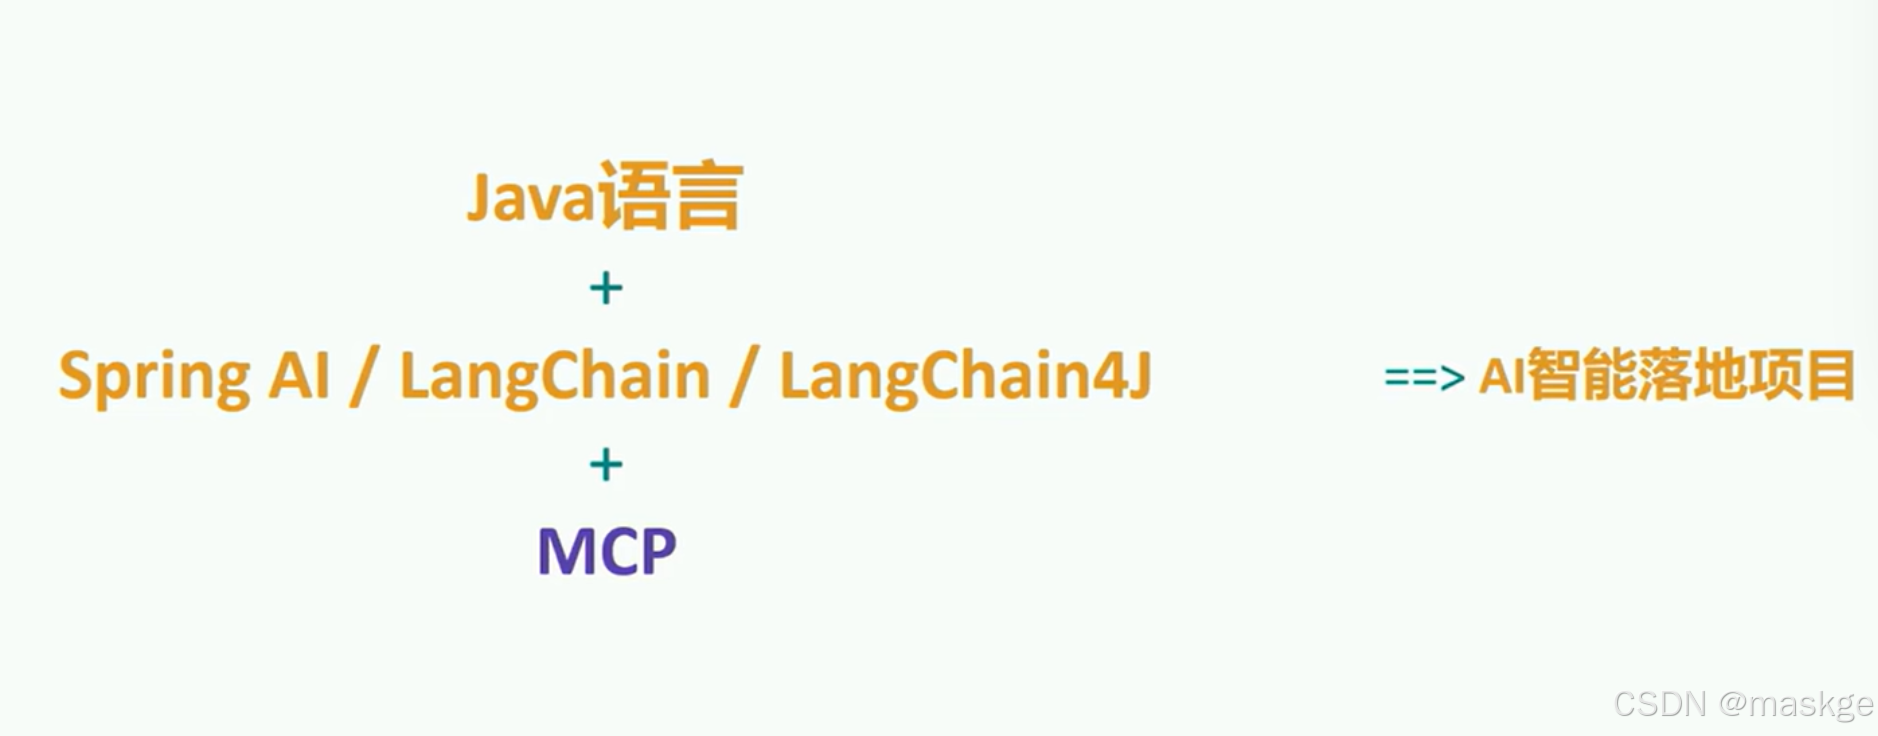
9.AI java項目落地技術選型
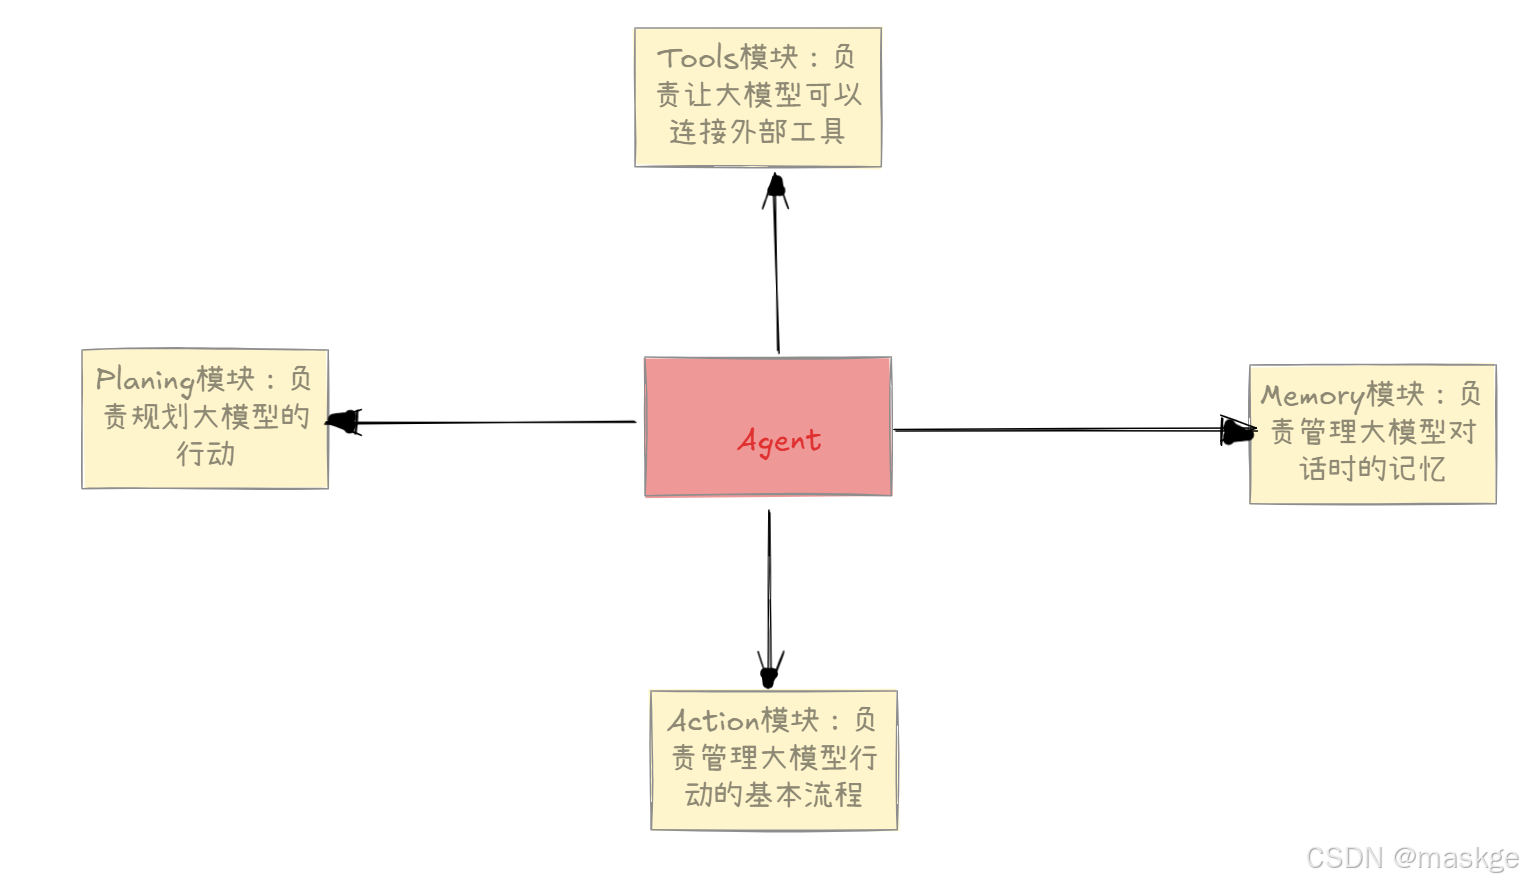
10.構建AI Agent四大模塊
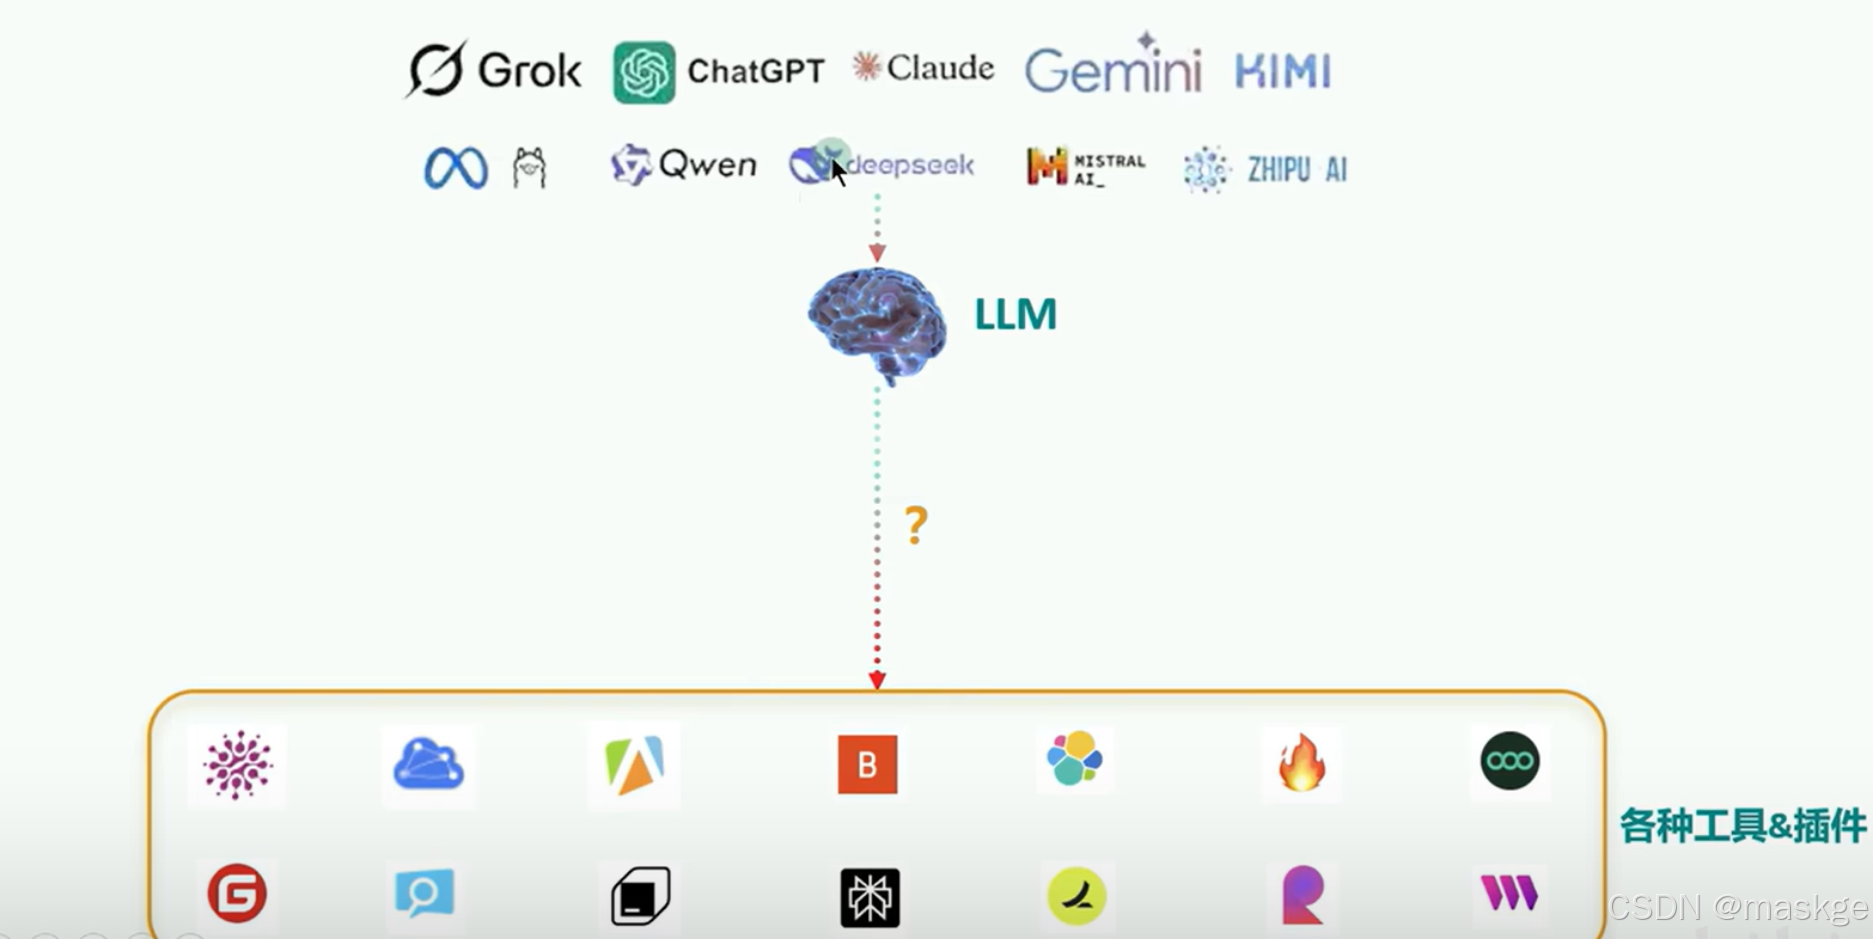
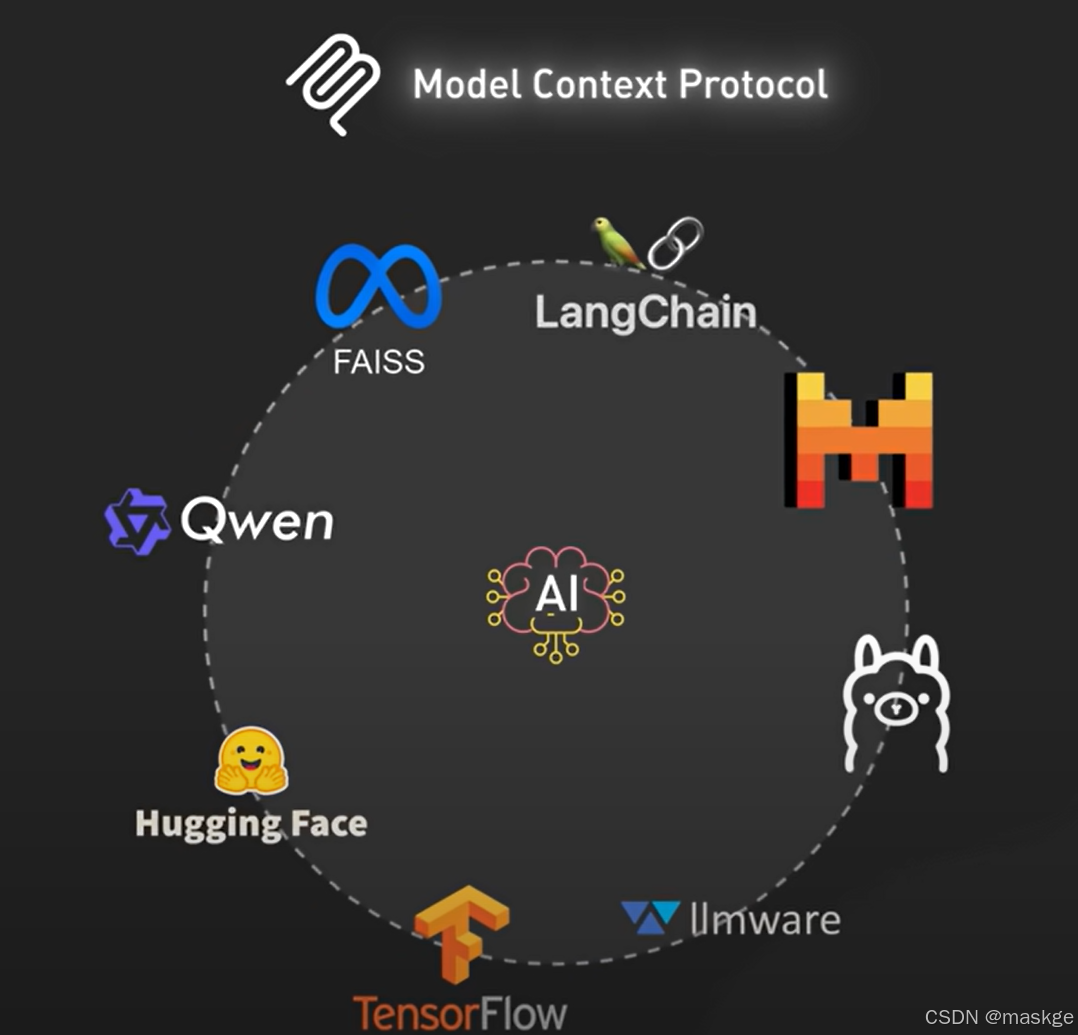
11.LLM(大模型)與MCP之間關系
12.A2A、MCP、Kafka、Flink協同工作方法
Kafka負責數據的流動,而 Flink 負責在數據流經系統時對其進行轉換、豐富、監控和編排。
Kafka和Flink構成了事件驅動的基礎,可以支持可擴展的agent通信和計算。它們解決了直接的點對點通信無法解決的問題:
- 解耦:使用Kafka,agent不需要知道誰將消費它們的輸出。它們將事件(例如,
"TaskCompleted","InsightGenerated")發布到主題;任何感興趣的agent或系統都可以訂閱。 - 可觀測性和可重放性:Kafka維護每個事件的持久、按時間排序的日志,使agent行為完全可追溯、可審計和可重放。
- 實時決策:Flink使agent 能夠實時響應事件流,根據動態條件過濾、豐富、連接或觸發操作。
- 彈性和擴展:Flink作業可以獨立擴展、從故障中恢復并在長時間運行的工作流中保持狀態。這對于執行復雜的多步驟任務的agent至關重要。
- 流原生協調:agen可以通過事件流進行協調,發布更新、訂閱工作流并協同推進狀態,而不是等待同步響應。
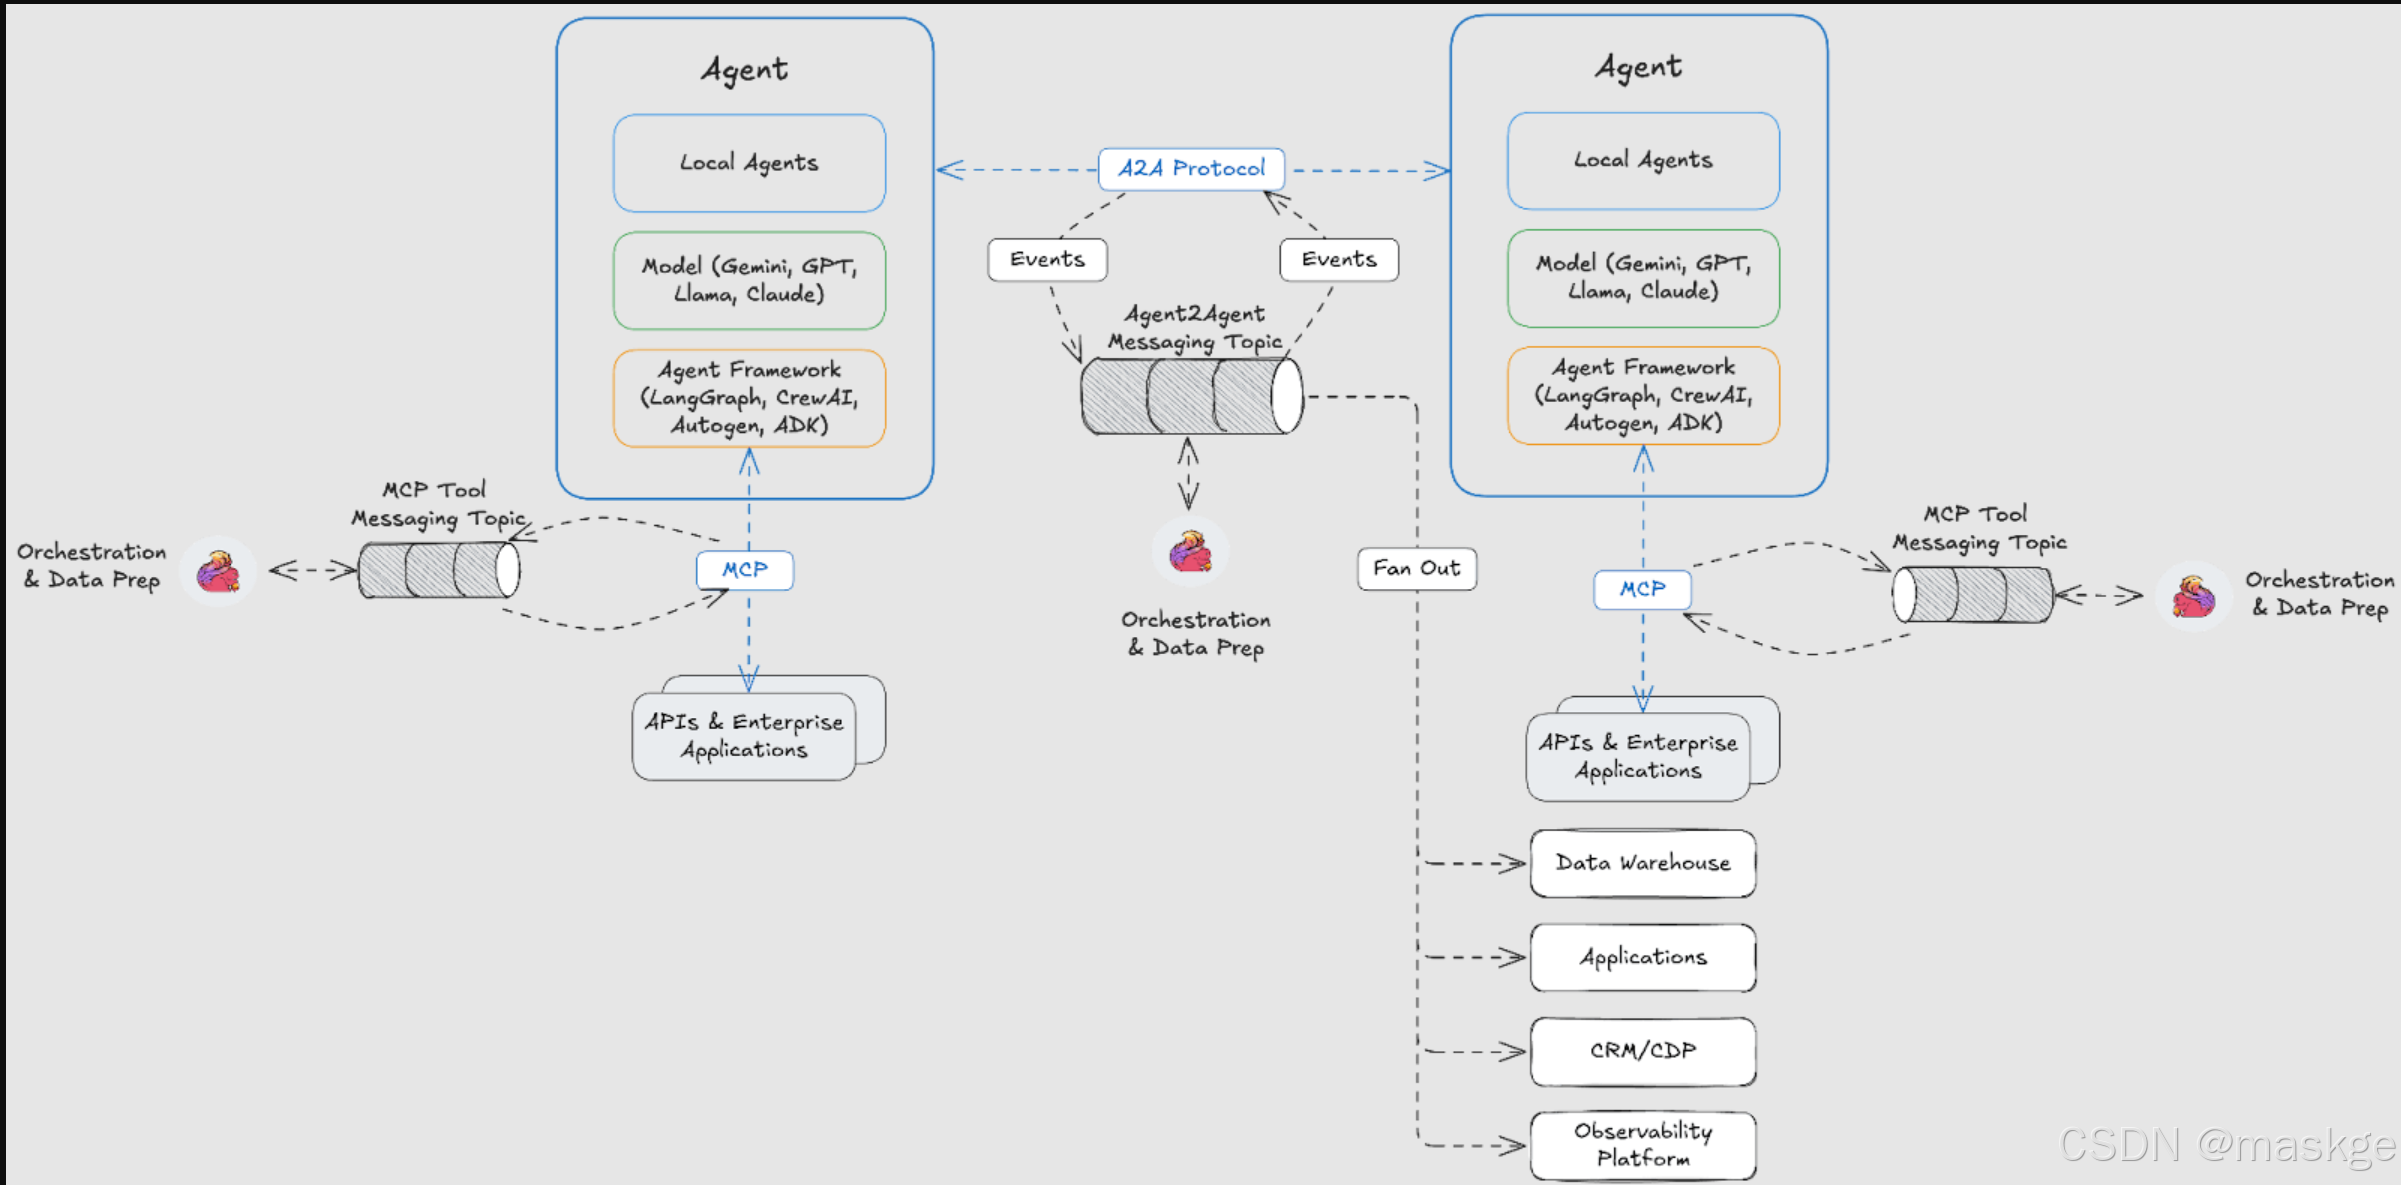
A2A、MCP、Kafka、Flink 、mongodb協同工作方法:
為了充分實現企業級、可互操作的AI agent的愿景,需要四個層次:
- 協議:A2A(實現AI代理之間的無縫通信和協作,打破agent鼓搗、促進互操性), MCP(讓LLM能夠訪問數據和工具) – 定義什么
- 框架:LangGraph, CrewAI, ADK(智能體開發套件) – 定義如何
- 消息傳遞基礎設施:Apache Kafka – 支持流動
- 實時計算:Apache Flink – 支持思考
13.事件驅動多智能體
使用Apache Flink和 Apache Kafka為多智能體系統構建一個事件驅動的編排器,利用Flink來解析和路由消息,同時將Kafka用作系統的短期共享內存。
任何多智能體系統的核心都在于智能體如何進行通信。
請求/響應模型雖然在概念上很簡單,但當系統需要演進、適應新信息或在不可預測的環境中運行時,往往會失效。這就是為什么由 Apache Kafka 和Apache Flink等技術支持的事件驅動消息傳遞通常是企業應用程序的更佳模型。
事件驅動智能體
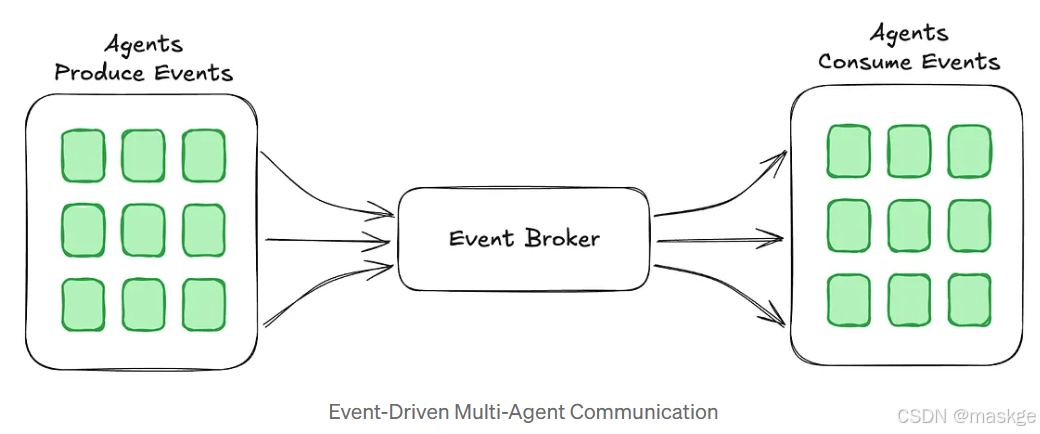
事件驅動架構允許智能體動態通信,無需嚴格的依賴關系,這使它們更具自主性和韌性。智能體不再硬編碼關系,而是對事件做出反應,從而實現了更高的靈活性、并行性和容錯能力。
就像事件驅動架構為微服務和團隊提供解耦一樣,它們在構建多智能體系統時也能帶來同樣的優勢。智能體本質上是一個帶有 “大腦”的有狀態微服務,因此,許多用于構建可靠分布式系統的模式同樣適用于智能體。
此外,流治理能夠驗證消息結構,防止格式錯誤的數據干擾系統。這一點在當今現有的多智能體框架中往往缺失,這使得事件驅動架構更具吸引力。
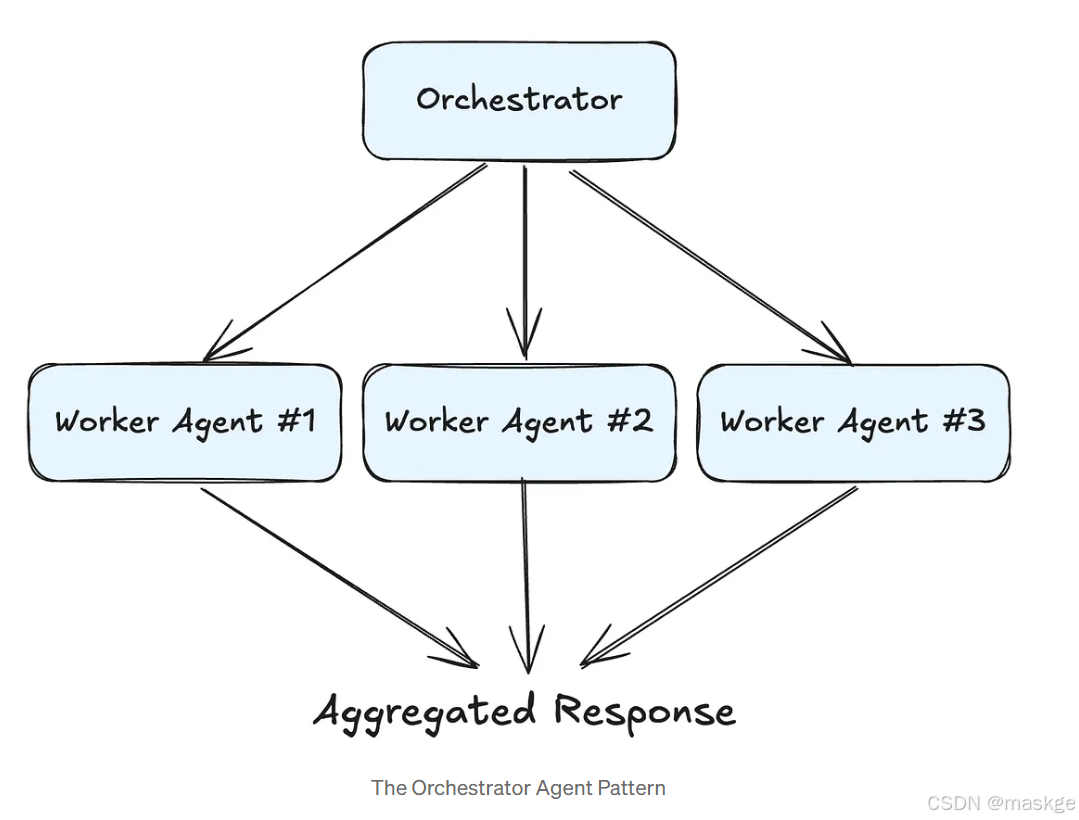
編排:協調智能體工作流
? 現實世界中的應用需要多個智能體協作,承擔不同的職責,同時共享上下文。這帶來了任務依賴、故障恢復和通信效率方面的挑戰。
編排器模式通過引入一個主導智能體(即編排器)來解決這些問題,該智能體指導其他智能體進行問題解決。與傳統微服務那樣的靜態工作流不同,智能體生成動態執行計劃,分解任務并實時調整。
靈活性帶來的挑戰:
- 任務激增 —— 智能體可能會生成數量不受限制的任務,這就需要進行資源管理。
- 監控與恢復 —— 智能體需要一種方法來跟蹤進度、發現故障并重新規劃。
- 可擴展性 —— 系統必須能夠處理不斷增加的智能體交互,且不會出現瓶頸。
事件驅動架構比較擅長處理上面這些問題。
借助流式處理的核心架構,智能體能夠立即對新數據做出反應,高效追蹤依賴關系,并從容地從故障中恢復,所有這些都不會出現集中式瓶頸。
智能體系統本質上是動態的、有狀態的和自適應的 —— 這意味著事件驅動架構是一種天然的契合。
事件驅動的多智能體系統的參考架構**,使用 Apache Flink 和Apache Kafka實現編排器模式**,為大規模的實時智能體決策提供支持。
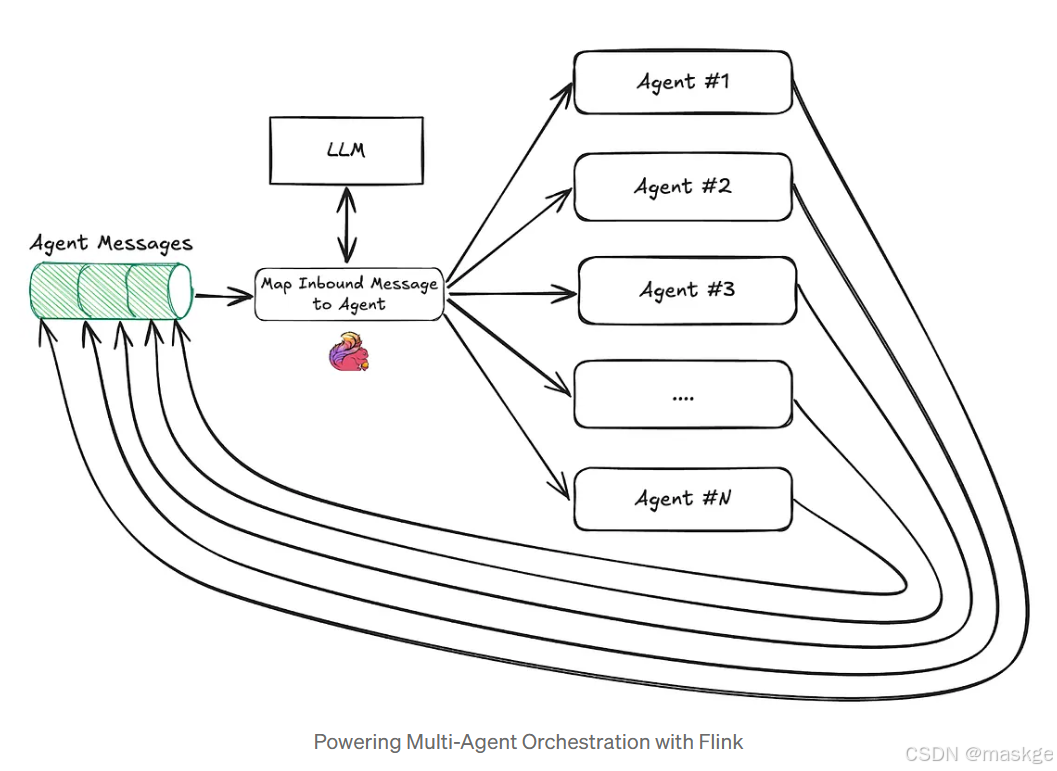
使用flink進行多智能體編排
? 構建可擴展的多智能體系統需要實時決策以及智能體之間消息的動態路由。這是Apache Flink發揮關鍵作用的地方
Apache Flink是一個流處理引擎,旨在對無界數據流進行有狀態計算。與批處理框架不同,Flink 能夠實時處理事件,使其成為編排多智能體交互的理想工具。
編排器模式(Orchestrator Pattern)
多智能體系統需要一個協調器來決定哪個智能體應該處理給定的任務。不同于智能體做出臨時決定,協調器會接收消息,使用大語言模型(LLM)對其進行解讀,然后將消息路由到合適的智能體。
為了在 Flink中支持這種編排模式,Kafka被用作消息骨干,而Flink則作為處理引擎:
- 消息生成:
- 代理向Kafka主題生成消息
- 每條消息都包含與某個代理相關的原始上下文數據
- Flink Processing & Routing:
- Flink job 監聽kafka中新消息
- 新消息被傳遞給一個大語言模型(LLM),該模型會確定處理這條信息的最合適的代理。
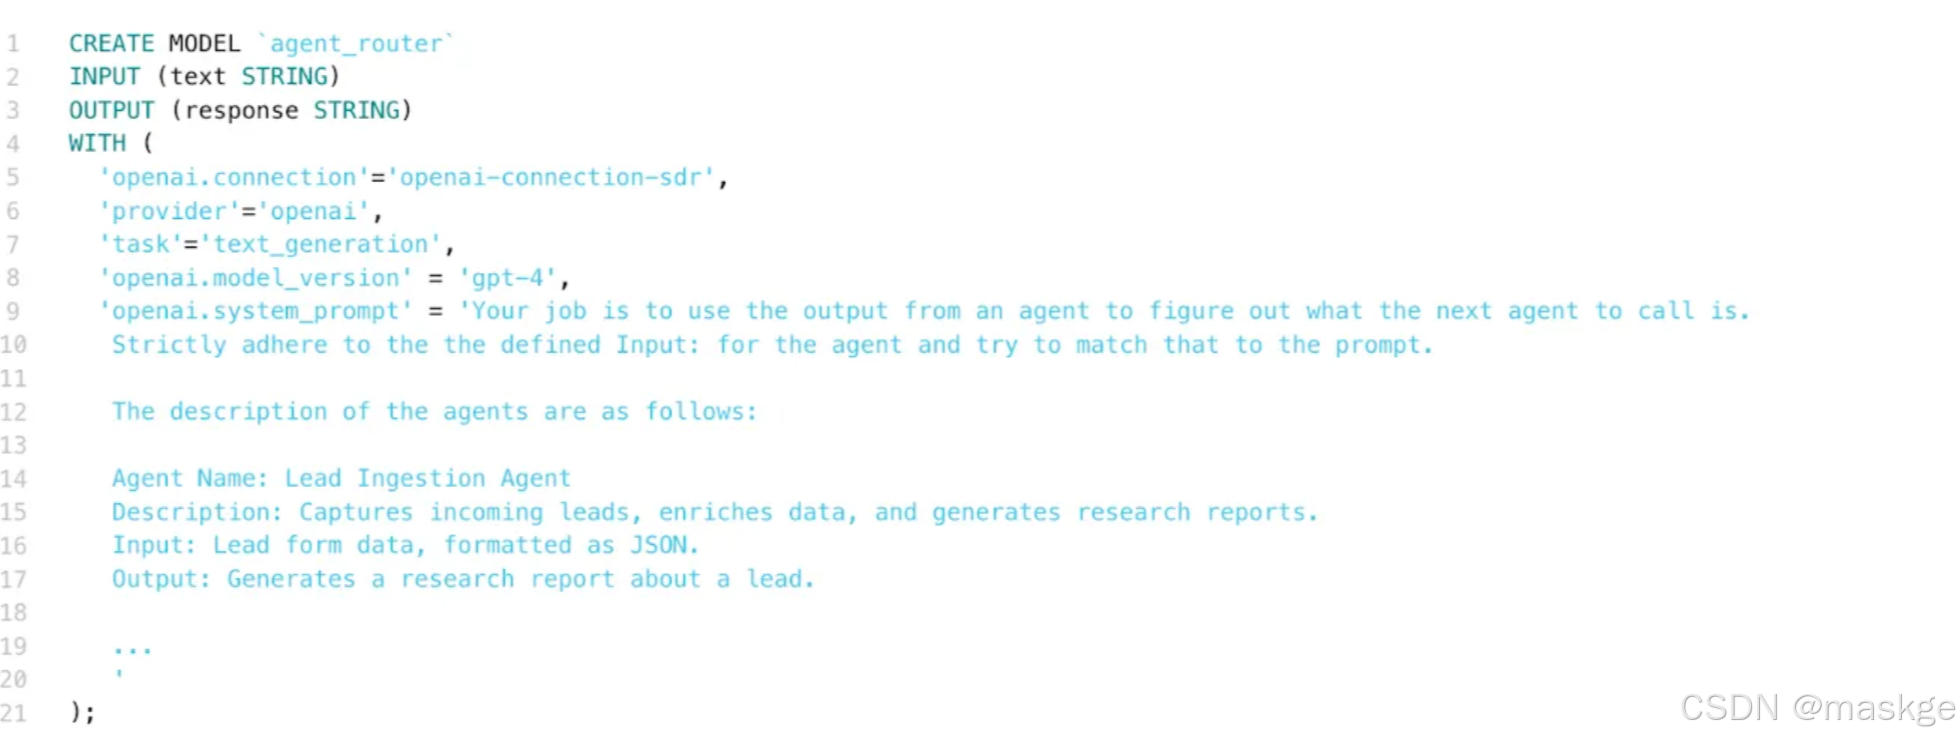
- 大語言模型(LLM的)決策基于結構化的智能體定義,該定義包括
– Agent Name — 代理的唯一標識符
– Description — 代理主要功能.
– Input — 由數據契約強制規定的智能體處理的預期數據格式
– Output — 智能體生成的結果
-
決策輸出與路由
一旦大語言模型LLM選擇了合適的代理,Flink就會將消息發布到與已識別代理相關聯的HTTP 端點。
-
代理執行與繼續
- 代理處理該消息,并將更新寫回代理消息主題
- Flink job會檢測到這些更新,重新評估是否需要額外處理,并繼續路由消息,直到代理工作流完成
閉環
這種事件驅動的反饋循環使多智能體系統能夠自主且高效地運行,確保:
- 實時決策,無需硬編碼工作流。
- 具有去中心化智能體交互的可擴展執行。
- 對新輸入和系統變化的無縫適應性。
實現構建一個事件驅動的多智能體系統:銷售開發代表(SDR:sales development representative)系統,它能夠自主管理銷售線索。
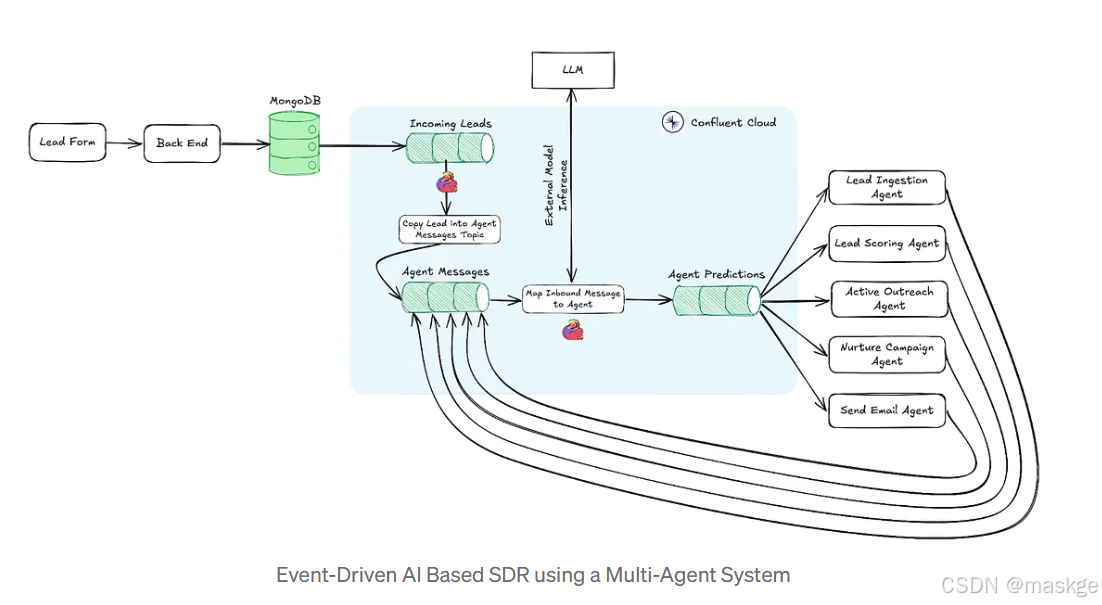
AI銷售開發代表多智能體系統
? 該系統由多個專門的代理組成,這些代理負責潛在客戶資格認定和參與流程的不同階段。每個代理都有明確的角色,并在事件驅動的流程中獨立運作。
? AI SDR系統中的代理:
- Lead Ingestion Agent(潛在客戶攝入代理): 捕獲原始的潛在客戶數據,通過額外研究對其進行充實,并生成潛在客戶檔案。
- Lead Scoring Agent(銷售線索評分代理): 分析潛在客戶數據,以分配優先級分數并確定最佳的參與策略。
- Active Outreach Agent: 利用潛在客戶的詳細信息和評分生成個性化的外展信息.
- Nurture Campaign Agent(培育活動代理): 根據潛在客戶的來源地及其興趣動態創建一系列電子郵件。
- Send Email Agent: 接收電子郵件并設置營銷活動以發送這些郵件。
? 這些代理之間沒有明確的依賴關系。它們只是獨立地生成和消費事件
?
? Flink SQL中編排工作的方法:
? 1. 創建模型
? 用于設置模型的Flink SQL語句如下所示,其中包含用于執行映射操作的提示詞的簡化版本。
2.創建Flink job使用模型去處理接入的消息并且分配他們正確的代理:
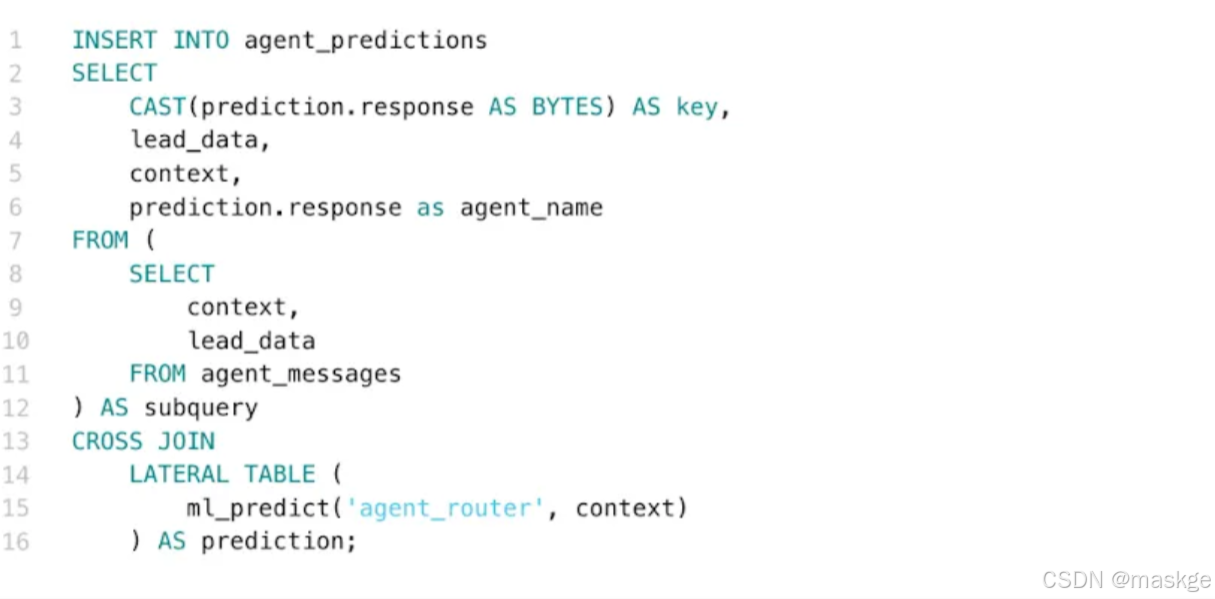
Executing the Orchestrator as a Flink Job
這會自動將消息路由到相應的代理,確保實現無縫、智能的工作流程。每個代理處理其任務,并將更新寫回 Kafka,以便流程中的下一個代理采取行動。
? 總結:事件驅動型多智能體系統的未來
? AI SDR 系統展示了事件驅動架構如何使多智能體系統高效運行,無需僵化的工作流程即可做出實時決策。通過利用 Flink進行消息處理和路由,以及Kafka 作為短期共享內存,實現了一個可擴展、自主的編排框架,使智能體能夠動態協作。
關鍵要點是:智能體本質上是帶有 “大腦” 的有狀態微服務,而那些使微服務得以擴展的事件驅動原則同樣適用于多智能體系統。不再采用靜態的、預定義的工作流程,而是讓系統和團隊實現解耦,能夠動態適應,在新數據到來時做出反應。
雖然本篇博客文章重點討論了編排器模式,但值得注意的是,其他模式也可以得到支持。在某些情況下,智能體之間需要更明確的依賴關系,以確保可靠性、一致性或滿足特定領域的約束。例如,某些工作流程可能需要智能體嚴格按順序執行,以保證事務完整性或合規性。關鍵在于根據應用需求在靈活性和控制力之間找到恰當的平衡。
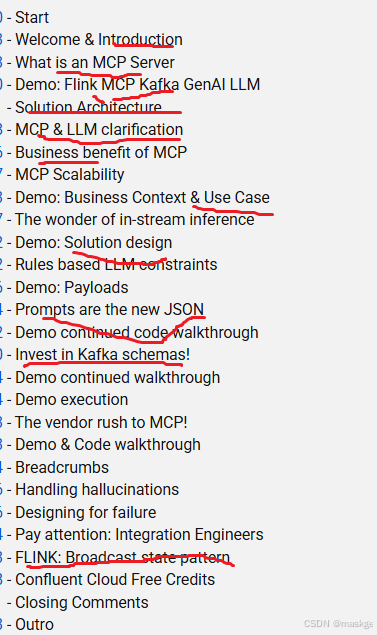
14.flink+kafka+MCP+LLM(gemini Ai ) 應用架構demo:使用Gemini AI Agent進行實時數據處理
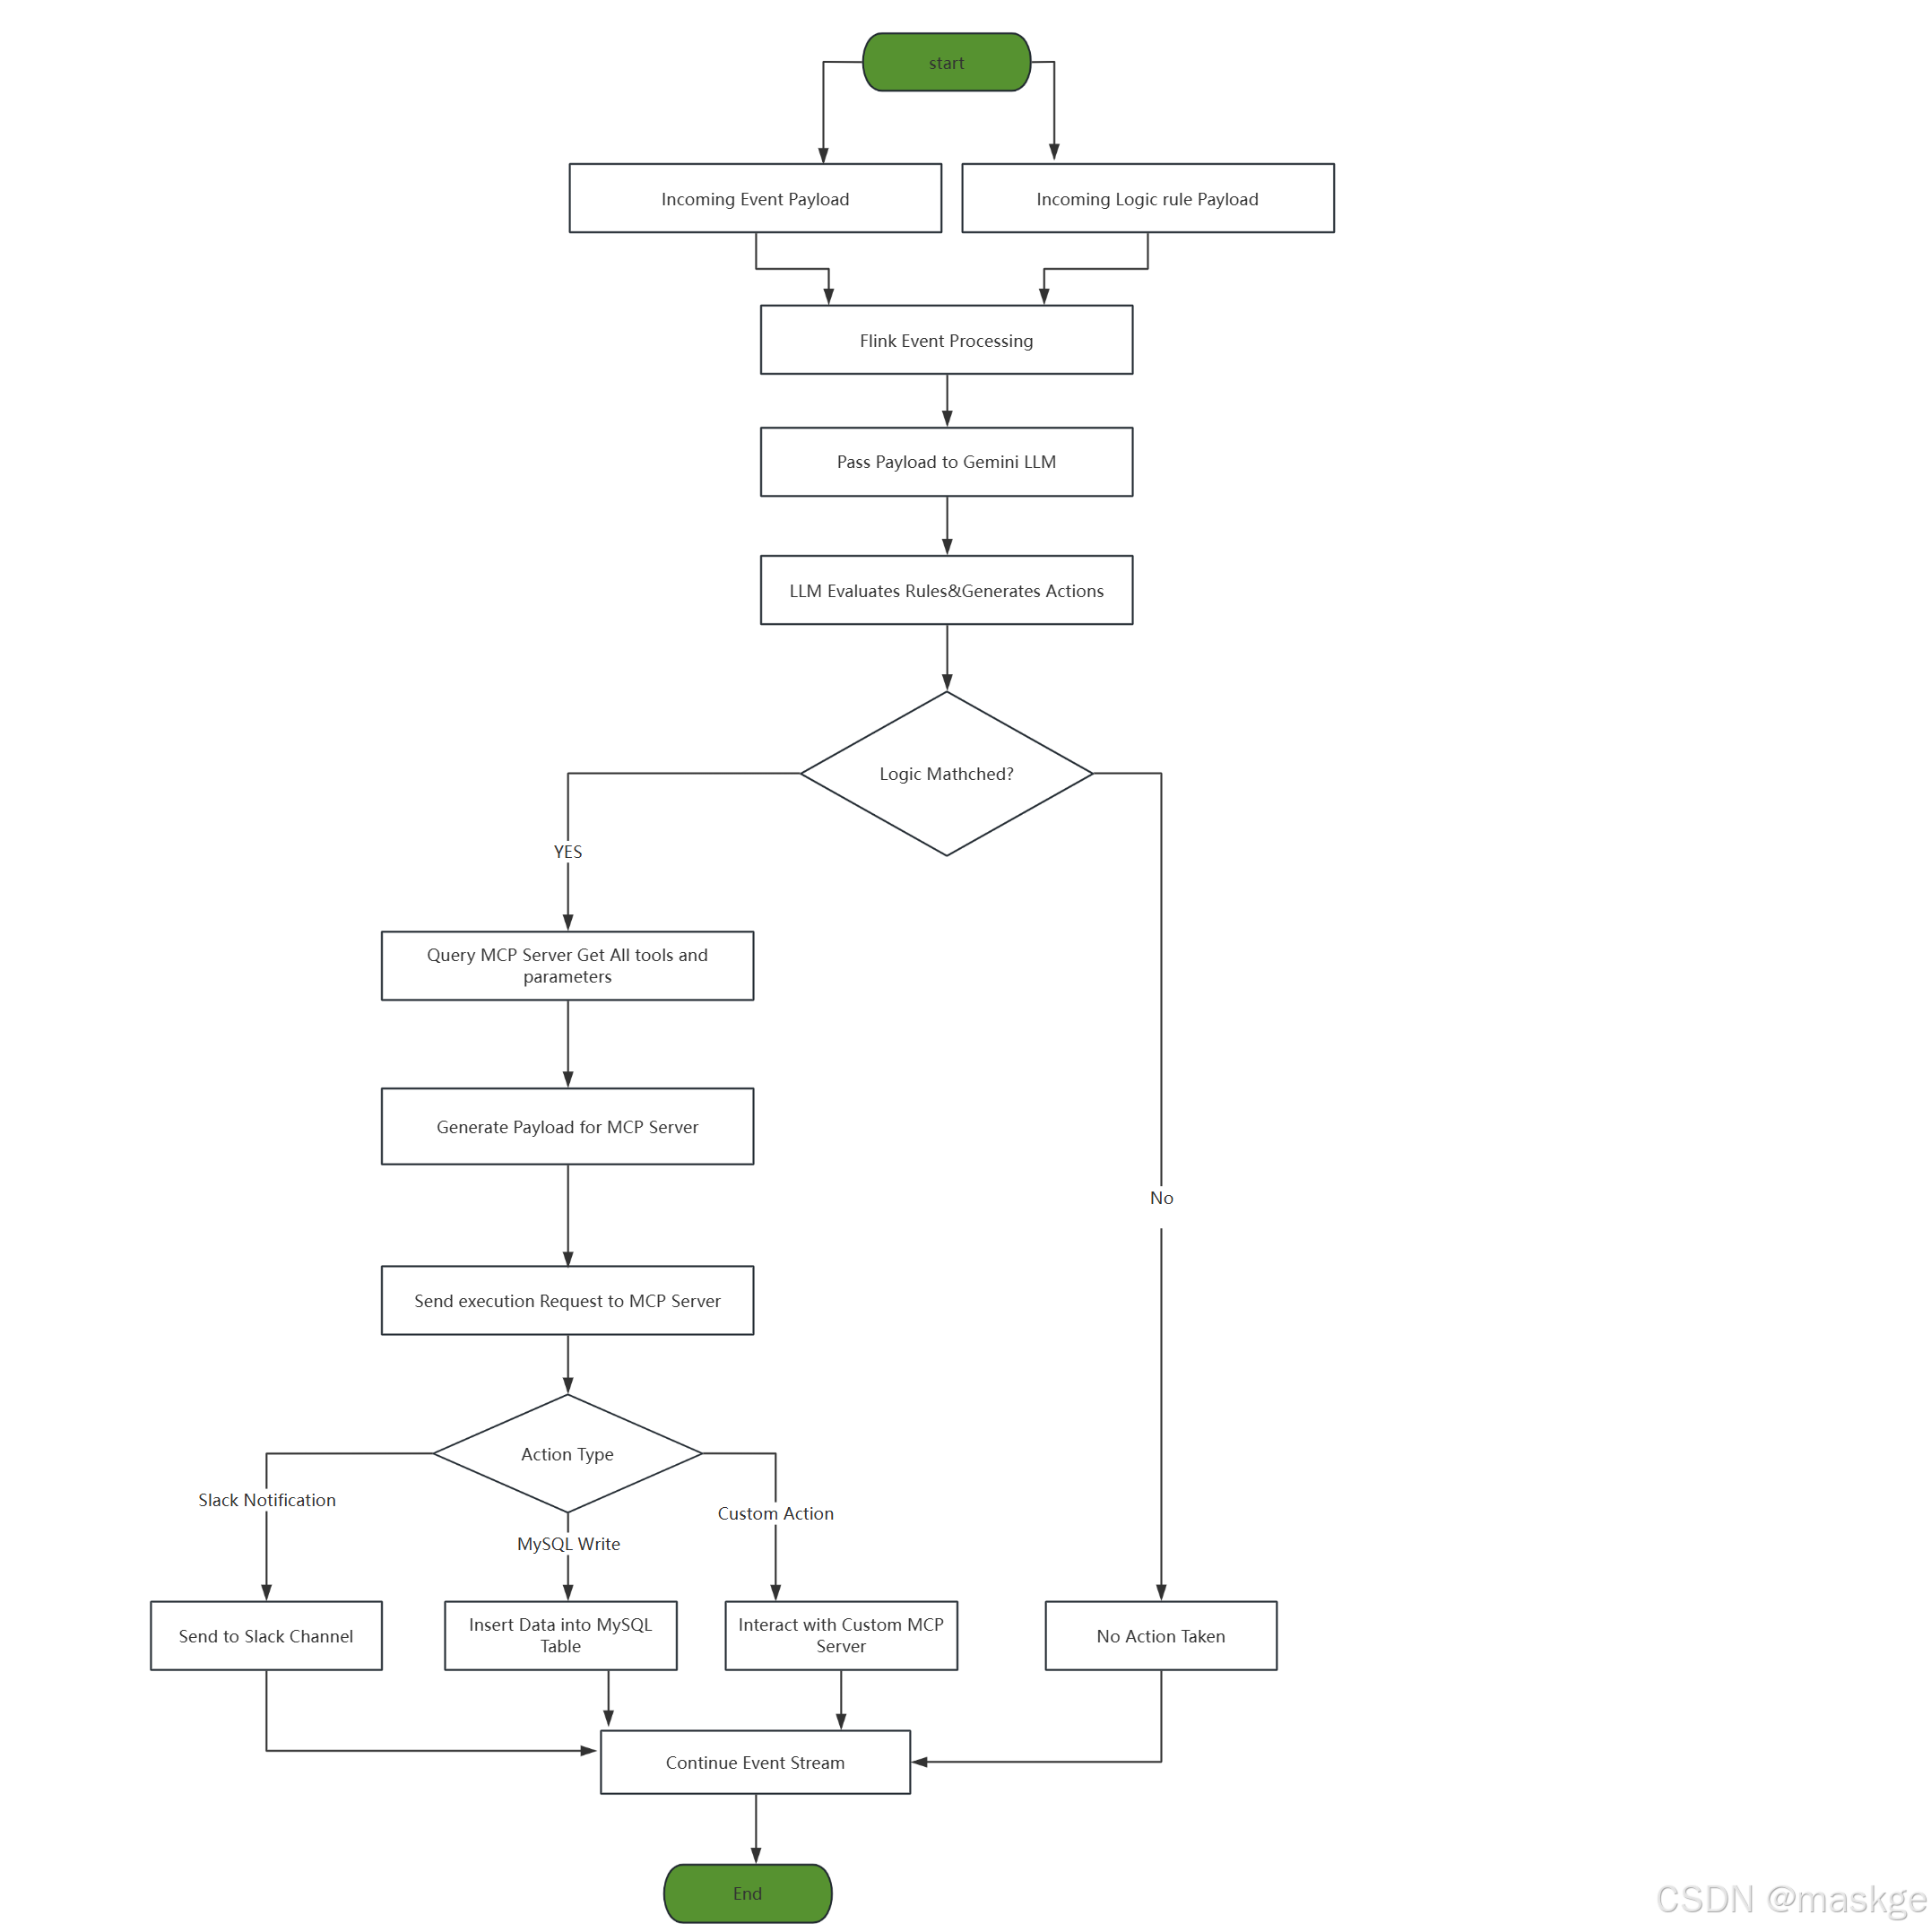
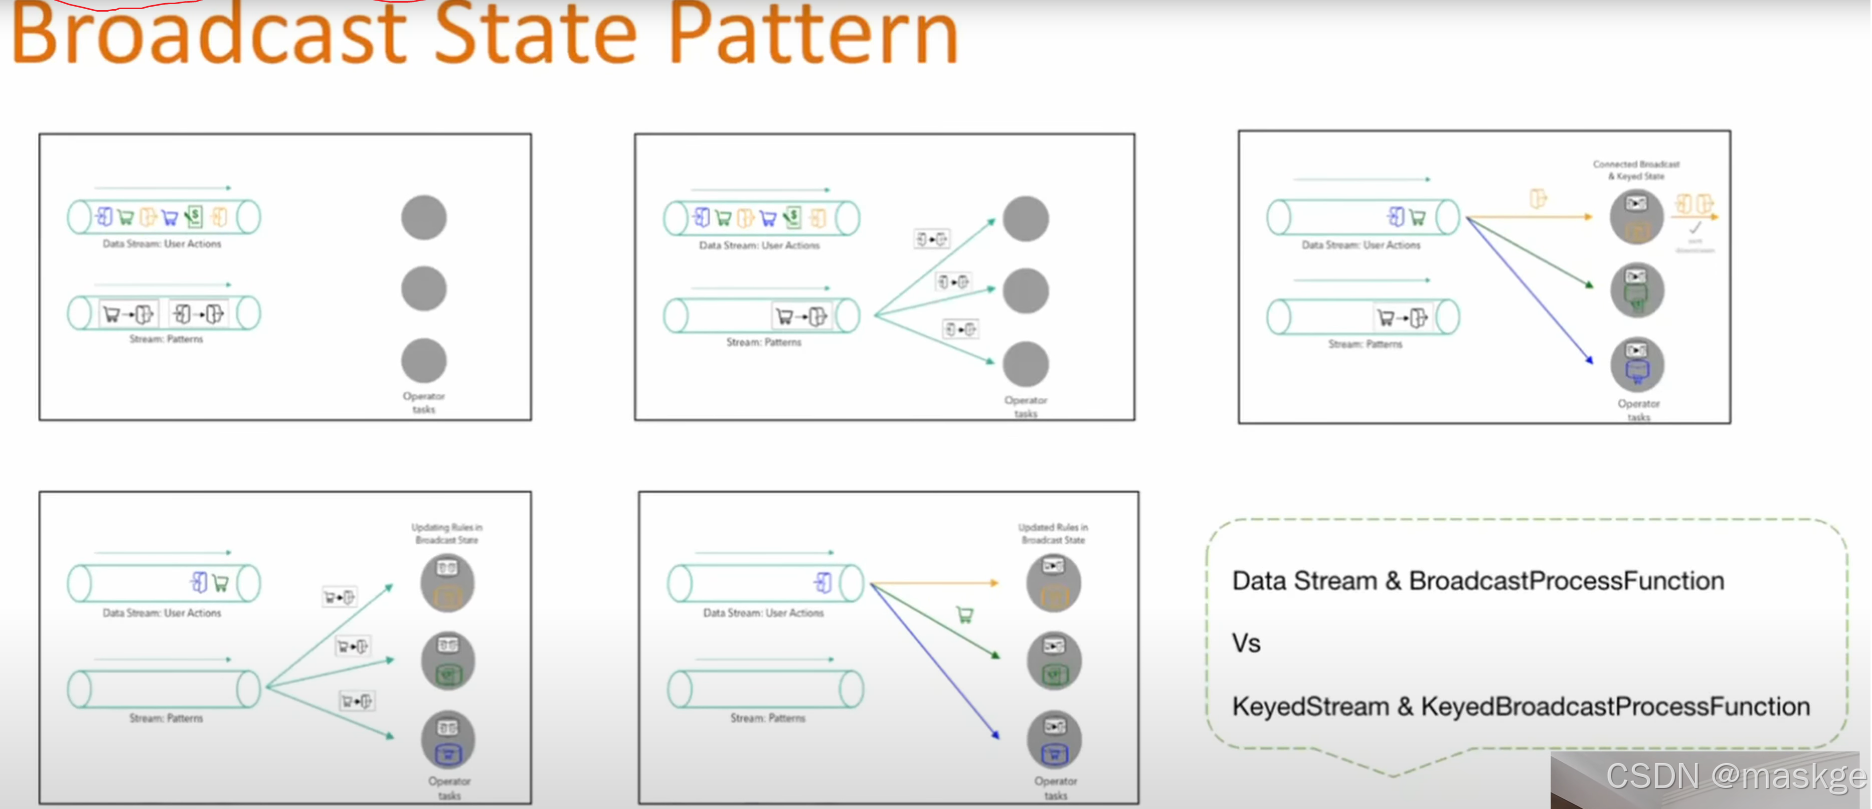
提示詞 payload 是json格式,通過kafka發送schema (json),然后交由flink進行處理
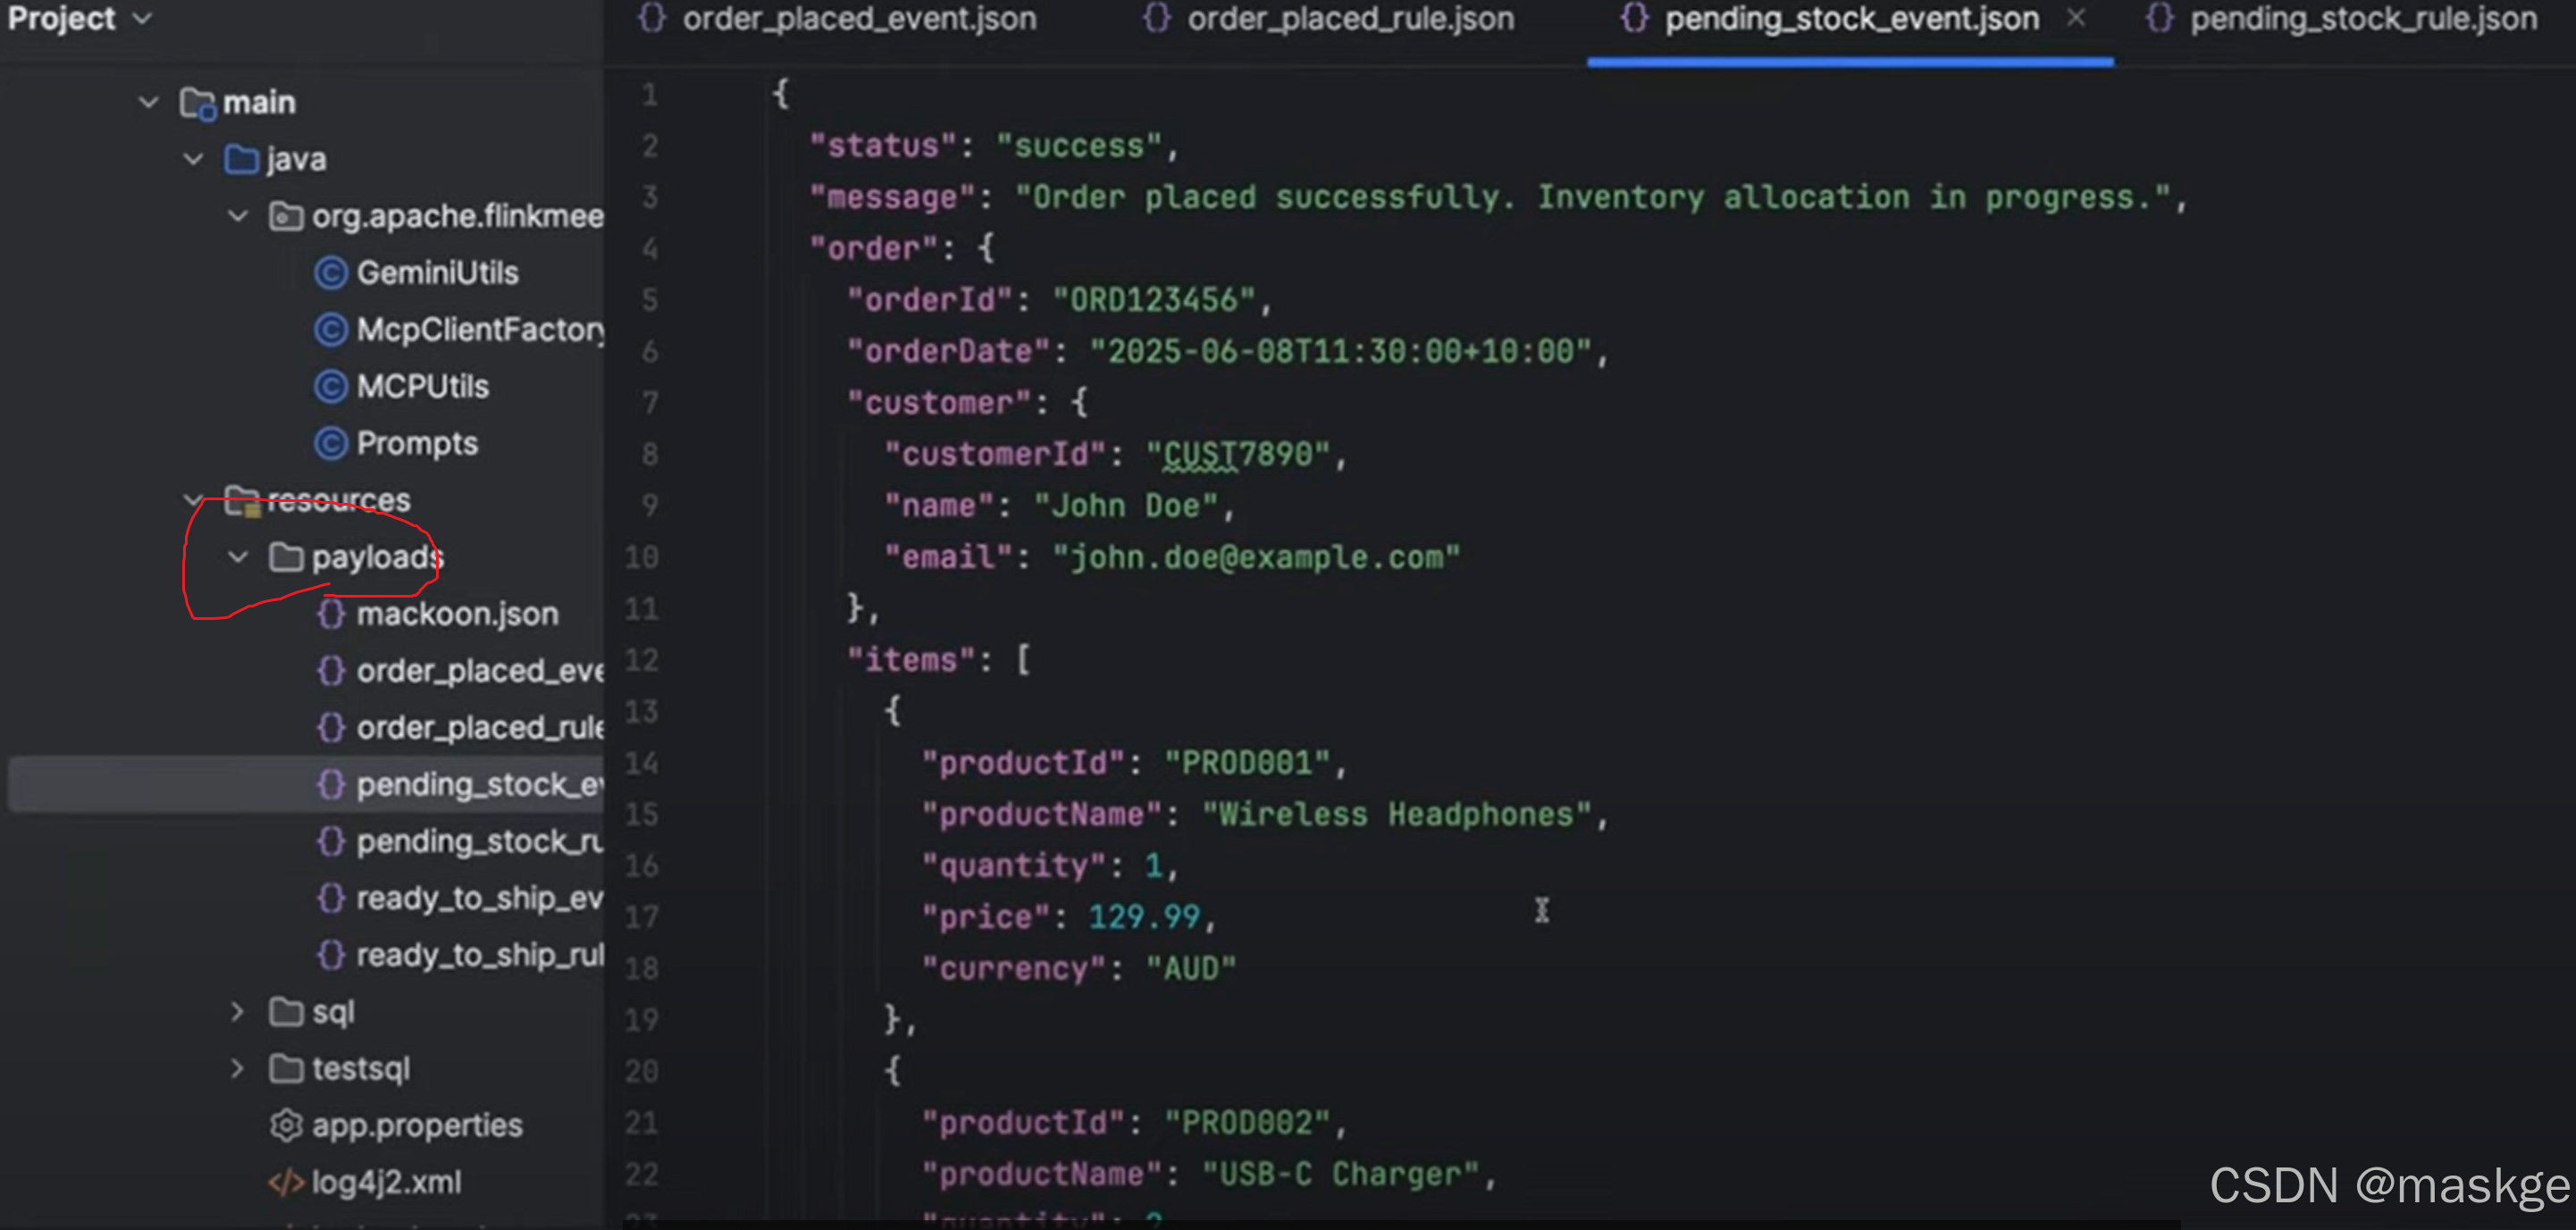

通過AI發布json消息到kafka topic,可用的topics如下:
- kafka
- rule
- event
- agg-transactions
AI Agent架構過程


)


)
)
)


