背景介紹
這是一個 簡單的人臉識別項目,用 FastApi 在本地實現,使用預訓練模型,直接可用。
新方案比之前的FaceNet強太多了,甚至不用數據增強等操作,就可以識別戴眼鏡、不戴眼鏡、歪著的人臉等。
充分證明了選型的重要性,選對了模型方案,效果直線上升。
細節說明
1、model.py 的 align_face 方法使用的是 仿射變換,不可以換成 透視變換哦,尤其是 ArcFace 這種場景,仿射變換更合適,原因如下:
①ArcFace 訓練是基于仿射對齊后的人臉圖像(五點坐標 + 仿射對齊 +輸出112x112),改變對齊方式容易導致提取的 embedding 無法匹配;
②人臉在拍攝中的角度變化通常較小,仿射變換可以很好地處理這類剛性變換(左右偏轉,微小仰頭低頭,輕微比例失衡等);
③透視變換自由度太高,容易引入圖像畸變,對 ArcFace 這種要求人臉標準姿態輸入的模型來說可能導致 向量化的不穩定;
可改善
1、可增加活體檢測功能;
項目結構
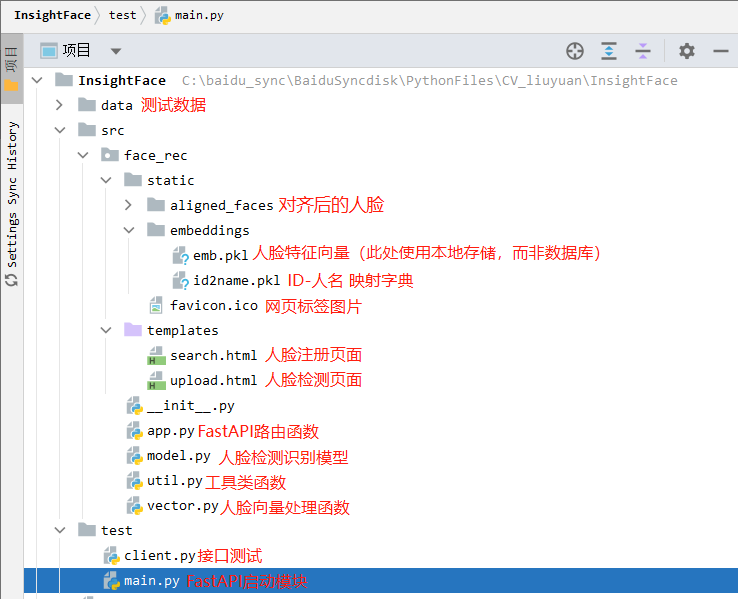
核心代碼都放下面了
src/face_rec/model.py
# src/face_rec/model.py
# RetinaFace + ArcFace + 五點對齊;使用cpuimport cv2, os
import numpy as np
from PIL import Image
from datetime import datetime# insightface 庫:arcface 和 retinaface
from insightface.app import FaceAnalysisclass FaceRecModel:def __init__(self, root_dir):"""初始化 RetinaFace 檢測器 + ArcFace 特征提取器"""self.root_dir = root_dir# FaceAnalysis集成了 人臉檢測器(RetinaFace)、人臉識別器(ArcFace)、關鍵點提取器(5點、106點)# providers:這是 onnxruntime 的后端執行器選擇,代表你想使用什么設備運行模型self.app = FaceAnalysis(providers=['CPUExecutionProvider'])  # 也可以用 GPUExecutionProvider、TensorrtExecutionProvider# prepare是對 FaceAnalysis 進行初始化配置,必須調用,否則模型無法運行。# det_size=(320, 320):會影響 檢測速度和檢測精度,太小-快但容易漏檢小人臉;太大-準但慢,資源消耗大;# 實測 det_size=(320, 320) 比較好用self.app.prepare(ctx_id=-1, det_size=(320, 320))  # ctx_id=-1是CPU,0是GPU,det_size是檢測尺寸(寬,高)# 如果你輸入的圖像尺寸不是 (320, 320),會怎么樣?# insightface 會自動 resize 成指定的 det_size(保持長寬比)來檢測。原圖尺寸不會影響使用,只是檢測過程會先縮放成這個尺寸,然后再還原人臉框到原圖坐標。def get_image_face_vector(self, pil_img, name=None):"""檢測人臉,返回對齊后的最大人臉圖像及其特征向量。:param pil_img: PIL.Image RGB 圖像:param name: 用戶名(保存圖片時使用):return: 對齊后的 PIL.Image(或None),對齊人臉保存路徑(或None),特征向量(或None)"""# 將 PIL 圖像轉成 numpy RGB 數組np_img = np.array(pil_img)# faces 是一個人臉列表,每個元素是一個 insightface.Face 對象(可以理解為一個人臉的“數據包”),包含了檢測框、關鍵點、embedding 特征等信息。# app.get() 方法會執行人臉檢測、特征提取。faces = self.app.get(np_img)if len(faces) == 0:print("[INFO] 未在圖像中檢測到人臉,無法進行對齊和特征提取。")return None, None, None# 選擇最大面積人臉face = max(faces, key=lambda x: x.bbox[2] * x.bbox[3])  # W*H=人臉框面積# 五點關鍵點坐標 (5,2) numpy數組kps = face.kps.astype(np.float32)  # 左眼,右眼,鼻子,左嘴角,右嘴角# 仿射對齊人臉,輸出 112x112 RGB 圖像aligned_face_np = self.align_face(np_img, kps)  # align_face 是自定義函數,返回 numpy 數組# 將對齊后的 numpy 圖像轉回 PIL 圖像aligned_pil = Image.fromarray(aligned_face_np)# 保存對齊后圖像save_dir = os.path.join(self.root_dir, 'aligned_faces')os.makedirs(save_dir, exist_ok=True)# 命名方式:name_時間戳.jpg 或 timestamp.jpgtimestamp = datetime.now().strftime("%Y%m%d_%H%M%S")filename = f"{name}_{timestamp}_insert.jpg" if name else f"face_{timestamp}_search.jpg"save_path = os.path.join(save_dir, filename)aligned_pil.save(save_path)print(f"[INFO] 已保存對齊人臉: {save_path}")# --- 在這里整合特征提取邏輯 ---# 優先使用 app.get() 已經提取的 embedding,因為它是在檢測階段就完成了。并且通常是針對原始圖像的更魯棒的特征。# 如果 face.embedding 存在且不為 None,就直接使用它。if hasattr(face, 'embedding') and face.embedding is not None:embedding = face.embedding.astype(np.float32)print("[INFO] 已成功提取人臉特征。", embedding.mean())else:# 如果 face 對象中沒有 embedding,說明 app.get() 未能成功提取特征。# 這可能是由于識別模型加載失敗、圖像質量問題或其他內部原因。print("[ERROR] FaceAnalysis.get() 未能為檢測到的人臉提取特征。")print("請檢查 FaceAnalysis 的初始化配置和輸入圖像質量。")embedding = None # 無法獲取特征,返回 Nonereturn aligned_pil, save_path, embeddingdef align_face(self, np_img, landmark5):"""使用五點關鍵點仿射變換對齊人臉,輸出 112x112 RGB 圖像(ArcFace標準輸入):param np_img: numpy RGB 圖像:param landmark5: numpy array (5,2) 左眼,右眼,鼻子,左嘴角,右嘴角:return: 對齊后 112x112 RGB numpy 圖像"""# ArcFace標準5點模板坐標,單位像素src = np.array([[38.2946, 51.6963],[73.5318, 51.5014],[56.0252, 71.7366],[41.5493, 92.3655],[70.7299, 92.2041]], dtype=np.float32)dst = landmark5.astype(np.float32)# 計算仿射變換矩陣: 計算 從 dst(檢測的人臉五點) 到 src(ArcFace標準模板五點) 的 仿射變換矩陣(2x3)# 使用 LMEDS(最小中值平方)方法計算仿射矩陣,比普通最小二乘法更穩健(可以抵抗部分錯誤點)。tform = cv2.estimateAffinePartial2D(dst, src, method=cv2.LMEDS)[0]# 使用仿射矩陣 tform 對整張人臉圖像做變換(對齊),輸出大小為 (112, 112) 的人臉圖像# borderValue=0:如果變換后圖像邊界有空白部分,用黑色像素(值為0)填充。aligned = cv2.warpAffine(np_img, tform, (112, 112), borderValue=0)return aligned
src/face_rec/vector.py
# src/face_rec/vector.py
# 使用 FAISS + cosine 相似度做人臉特征向量的存儲與檢索import os
import pickle
import numpy as np
import faiss  # Facebook AI 相似度搜索庫,適合處理大規模向量比對class VectorService:def __init__(self, root_dir):# 保存向量的目錄self.root_dir = os.path.join(root_dir, "embeddings")if not os.path.exists(self.root_dir):os.makedirs(self.root_dir)self.dims = 512  # ArcFace 輸出是 512 維向量# 特征向量文件(以 pickle 存儲)self.embedding_file = os.path.join(self.root_dir, "emb.pkl")if os.path.exists(self.embedding_file):# 如果文件存在就加載已有向量self.embeddings = np.asarray(self.load_pickle_data(self.embedding_file)).astype('float32')else:# 否則初始化為一個全0向量(避免空索引時報錯)self.embeddings = np.zeros((1, self.dims), dtype='float32')# 初始化 FAISS 索引:使用 HNSW(圖結構)+ cosine 相似度(歸一化后使用內積)# HNSW:Hierarchical Navigable Small World 一種高效的圖結構索引算法,適合大規模、近似最近鄰查找(Approximate Nearest Neighbor, ANN)# faiss.METRIC_INNER_PRODUCT:表示使用 內積(dot product) 作為距離度量方式。但這并不是歐氏距離,而是為了計算 cosine 相似度self.face_index = faiss.index_factory(self.dims, 'HNSW16', faiss.METRIC_INNER_PRODUCT)# 如果已有向量,歸一化后加入索引中if self.embeddings.shape[0] > 0:faiss.normalize_L2(self.embeddings)  # L2歸一化后,求內積就是cosine 余弦相似度self.face_index.add(self.embeddings)# ID 到用戶姓名的映射表self.idx_2_name_file = os.path.join(self.root_dir, 'id2name.pkl')if os.path.exists(self.idx_2_name_file):self.idx_2_name = self.load_pickle_data(self.idx_2_name_file)else:self.idx_2_name = {}# 當前用戶索引起始值(從已有數量+1開始)self.user_idx = len(self.idx_2_name) + 1def add_embedding(self, vector, name):"""添加一個人臉向量及其對應用戶名"""vector = np.asarray(vector, dtype='float32').reshape((1, self.dims))faiss.normalize_L2(vector)  # cosine相似度必須先歸一化# 更新內存中的向量數組self.embeddings = np.concatenate([self.embeddings, vector], axis=0)self.face_index.add(vector)  # 加入FAISS索引# 保存向量到文件self.save_pickle_data(self.embedding_file, self.embeddings)# 記錄用戶索引與名字的對應關系self.idx_2_name[self.user_idx] = nameself.user_idx += 1self.save_pickle_data(self.idx_2_name_file, self.idx_2_name)def search(self, vector, thred=0.4):"""給定一個向量,返回最相似的用戶名(如果相似度超過閾值):param vector: 512維特征向量:param thred: 相似度閾值,越高越嚴格(默認0.4):return: 最相似用戶名 或 None"""vector = np.asarray(vector, dtype='float32').reshape((1, self.dims))faiss.normalize_L2(vector)# 搜索與該向量最接近的索引。np.ndarray prob.shape=(1, 1), np.ndarray idx.shape=(1, 1)prob, idx = self.face_index.search(vector, 1)  # 返回前1個最相似結果prob = prob[0, 0]  # 相似度(cosine)idx = idx[0, 0]    # 對應索引值print(f"最大相似度:{prob}(判定閾值:{thred})")if prob < thred:return Nonereturn self.idx_2_name.get(idx, None)@staticmethoddef load_pickle_data(path):"""從指定路徑加載pickle對象"""# 因為 pickle 模塊在保存/讀取 Python 對象時,是按二進制格式編碼的,不是普通文本。with open(path, 'rb') as r:  # 以“二進制”的方式打開一個文件,只讀return pickle.load(r)@staticmethoddef save_pickle_data(path, data):"""將對象保存到pickle文件"""# 因為 pickle 模塊在保存/讀取 Python 對象時,是按二進制格式編碼的,不是普通文本。with open(path, 'wb') as w:  # 以“二進制”的方式打開一個文件,可寫pickle.dump(data, w)
src/face_rec/util.py
# src/face_rec/util.py
# 對齊仍使用五點關鍵點,圖像增強接口保留,增強亮度、對比度、銳度,確保模型識別效果更穩定import numpy as np
from PIL import ImageEnhancedef preprocess_image(pil_image):'''圖像預處理函數(可選):增強亮度、對比度、銳度image (PIL.Image.Image): 輸入的 PIL 圖像對象:np.ndarray: 增強后的圖像,格式為 NumPy 數組,可用于 OpenCV 或模型輸入'''# 亮度增強:增強到原始亮度的 1.3 倍enhancer = ImageEnhance.Brightness(pil_image)image_bright = enhancer.enhance(1.3)# 對比度增強:增強到原始對比度的 1.2 倍enhancer_contrast = ImageEnhance.Contrast(image_bright)image_contrast = enhancer_contrast.enhance(1.2)# 銳度增強:增強到原始銳度的 2.0 倍enhancer_sharp = ImageEnhance.Sharpness(image_contrast)image_sharpened = enhancer_sharp.enhance(2.0)# 將 PIL 圖像轉換為 NumPy 格式(OpenCV 可用)image_sharpened = np.array(image_sharpened)return image_sharpened
src/face_rec/app.py
# src/face_rec/app.pyimport os
import io
import base64
from fastapi import FastAPI, File, Form, UploadFile, Request
from fastapi.responses import HTMLResponse, JSONResponse, FileResponse
from fastapi.templating import Jinja2Templates
from PIL import Image, ImageOpsfrom .model import FaceRecModel                # 引入人臉識別模型封裝
from .vector import VectorService              # 引入向量搜索服務
from .util import preprocess_image             # 可選:圖像預處理(增強)# 獲取靜態資源目錄(如 模型文件、向量文件等) C:\baidu_sync\BaiduSyncdisk\PythonFiles\CV_liuyuan\InsightFace\src\face_rec\static
__static_dir_path__ = os.path.join(os.path.dirname(os.path.abspath(__file__)), "static")# 創建 FastAPI 應用
app = FastAPI()# 指定 FastAPI 中 Jinja2 模板文件目錄(用于返回 HTML 頁面) C:\baidu_sync\BaiduSyncdisk\PythonFiles\CV_liuyuan\InsightFace\src\face_rec\templates
# FastAPI 使用 Jinja2 來支持 HTML 模板渲染(跟 Flask 類似)
templates = Jinja2Templates(directory=os.path.join(os.path.dirname(__file__), "templates"))# 實例化加載人臉識別模型與向量庫
model = FaceRecModel(root_dir=__static_dir_path__)
vector = VectorService(root_dir=__static_dir_path__)# 網頁標簽圖片
@app.get("/favicon.ico")
async def favicon():return FileResponse(os.path.join(__static_dir_path__, "favicon.ico"))# 首頁:GET / 或 /index,返回歡迎信息
@app.get("/", response_class=HTMLResponse)
@app.get("/index", response_class=HTMLResponse)
# 異步的處理函數(協程)
async def index(request: Request):return HTMLResponse("歡迎使用簡易人臉檢索系統!")# GET 上傳頁面:返回上傳圖片的 HTML 頁面
@app.get("/face/image/upload", response_class=HTMLResponse)
async def upload_get(request: Request):return templates.TemplateResponse("upload.html", {"request": request})# POST 上傳接口:上傳用戶圖像并提取特征,存入向量庫
@app.post("/face/image/upload")
async def upload_post(name: str = Form(...),          # 表單中提供的人名(作為身份標簽)file: UploadFile = File(...)    # 上傳的圖片文件 (此時 file 是一個 UploadFile 對象,它是一個 異步文件類,用于處理客戶端上傳的文件)
):                                  # HTML 表單的 name 名稱和后端參數名一致;后端用 Form(...) 處理文本、用 File(...) 處理文件# 讀取上傳文件內容并轉為 PIL 圖像# await 表示“等待它完成”并獲取返回值,必須在 async def 里使用contents = await file.read()  # file.read() 是一個異步操作(coroutine),會從上傳的文件中讀取所有字節內容(返回 bytes)img = Image.open(io.BytesIO(contents)).convert("RGB")# 處理圖片方向信息(EXIF)img = ImageOps.exif_transpose(img)# 可選預處理(增強亮度/對比度/銳度)# img = preprocess_image(img)# 檢測并裁剪人臉圖像,保存文件,提取人臉特征向量img, save_path, embedding = model.get_image_face_vector(img, name)if img is None:return templates.TemplateResponse("upload.html", {"request": {}, "msg": "未檢測到人臉區域!"})if embedding is None:return templates.TemplateResponse("upload.html", {"request": {}, "msg": "人臉特征提取失敗!"})# 將特征向量存入數據庫vector.add_embedding(embedding, name)return JSONResponse({"code": 0, "msg": "人臉添加成功!"})# GET 檢索頁面:返回搜索頁面的 HTML 頁面
@app.get("/face/image/search", response_class=HTMLResponse)
async def search_get(request: Request):return templates.TemplateResponse("search.html", {"request": request})# POST 檢索接口:上傳圖像 -> 提取特征 -> 搜索庫中最相似用戶
@app.post("/face/image/search")
async def search_post(file: UploadFile = File(...)):contents = await file.read()img = Image.open(io.BytesIO(contents)).convert("RGB")# 處理圖片方向信息(EXIF)img = ImageOps.exif_transpose(img)# 可選預處理(增強亮度/對比度/銳度)# img = preprocess_image(img)# 檢測并裁剪人臉圖像,保存文件,提取人臉特征向量img, save_path, embedding = model.get_image_face_vector(img)if img is None:return templates.TemplateResponse("search.html", {"request": {}, "msg": "未檢測到人臉區域!"})if embedding is None:return templates.TemplateResponse("search.html", {"request": {}, "msg": "人臉特征提取失敗!"})# 在向量庫中進行相似度匹配name = vector.search(embedding)if name is None:return templates.TemplateResponse("search.html", {"request": {}, "msg": "人臉未匹配到用戶!"})return JSONResponse({"code": 0, "msg": "search success!", "name": name})# POST 檢測接口(用于 API 接口)接收 base64 圖像,輸出識別結果
@app.post('/face/image/detect')
async def detect_post(request: Request):data = await request.json()img_b64 = data.get('img')if img_b64 is None:return JSONResponse({'code': 202, 'msg': '必須提供 img 參數!'})# 解碼 base64 圖像并轉換為 PIL 圖像img_data = base64.b64decode(img_b64)img = Image.open(io.BytesIO(img_data)).convert("RGB")# 處理圖片方向信息(EXIF)img = ImageOps.exif_transpose(img)# 可選預處理(增強亮度/對比度/銳度)# img = preprocess_image(img)# 檢測并裁剪人臉圖像,保存文件,提取人臉特征向量img, save_path, embedding = model.get_image_face_vector(img)if img is None:return JSONResponse({'code': 203, 'msg': '未檢測到人臉區域!'})if embedding is None:return JSONResponse({'code': 204, 'msg': '人臉特征提取失敗!'})name = vector.search(embedding)if name is None:return JSONResponse({'code': 205, 'msg': '人臉未匹配到用戶!'})return JSONResponse({'code': 200, 'msg': 'search success!', 'name': name})
test/main.py
# test/main.py
# 項目入口文件,用于啟動 FastAPI 服務(人臉識別 Web 接口)import warnings
warnings.filterwarnings('ignore')  # 忽略所有警告信息,保持輸出干凈import os
import sys
import uvicorn  # 用于運行 FastAPI 的 ASGI 服務器
# ASGI(Asynchronous Server Gateway Interface)是 Python 的一種 Web 應用服務器接口規范,是 WSGI 的升級版,用于支持異步編程。
# ASGI 是連接 Web 框架(如 FastAPI)和底層服務器(如 Uvicorn)的橋梁接口標準,支持異步請求處理。# 避免 OpenMP 多線程庫沖突(常用于 PyTorch 或 NumPy 內部),防止報錯
os.environ["KMP_DUPLICATE_LIB_OK"] = "TRUE"# 將 src 目錄添加到模塊導入路徑,確保可以導入 src 下的自定義模塊
# 例如:C:\baidu_sync\BaiduSyncdisk\PythonFiles\CV_liuyuan\InsightFace\src
sys.path.append(os.path.join(os.path.dirname(__file__), "..", "src"))# 導入 FastAPI 應用實例(app)供 uvicorn 啟動
from src.face_rec.app import app# 運行服務
if __name__ == "__main__":# 啟動 FastAPI 應用,監聽所有 IP,端口為 9999,日志級別為 infouvicorn.run(app, host="0.0.0.0", port=9999, log_level="info")  # 正常啟動# uvicorn.run(app, host="0.0.0.0", port=9999, log_level="info", reload=False)  # 調試啟動(debug)
test/client.py
# test/client.py
"""客戶端測試代碼:向 FastAPI 服務端發送 base64 編碼的人臉圖像,接收識別結果"""import base64
from typing import Optional
import requests
import cv2
import numpy as np
from io import BytesIO
from pathlib import Path
from PIL import Image
from datetime import datetimedef fetch_person_name(img: np.ndarray) -> Optional[str]:"""給定一張圖像(OpenCV格式 BGR),向服務端發送請求,返回識別結果:param img: OpenCV 格式圖像(BGR):return: 返回識別出的姓名字符串,或 None"""# 轉換 OpenCV (BGR) -> PIL (RGB)pil_img = Image.fromarray(cv2.cvtColor(img, cv2.COLOR_BGR2RGB))# 將圖像保存為 PNG 到內存buffer = BytesIO()pil_img.save(buffer, format='PNG')img_bytes = buffer.getvalue()# 編碼成 base64 字符串img_b64 = base64.b64encode(img_bytes).decode('utf-8')# 構造 JSON 請求體payload = {'img': img_b64}headers = {'Content-Type': 'application/json'}try:# 向本地服務發送 POST 請求(FastAPI)response = requests.post('http://127.0.0.1:9999/face/image/detect', json=payload, headers=headers)if response.status_code == 200:result = response.json()if result.get('code') == 200:return result.get('name')else:print(f"[服務返回] 識別失敗: {result}")else:print(f"[HTTP錯誤] 狀態碼: {response.status_code}")except Exception as e:print(f"[異常] 請求失敗: {e}")return Noneif __name__ == '__main__':# 加載測試圖像img_path = Path('..') / 'data' / 'img0.jpeg'img = cv2.imread(str(img_path))if img is None:print(f"圖像讀取失敗: {img_path}")exit(1)  # 程序異常退出,錯誤碼為 1# 獲取識別結果name = fetch_person_name(img)print(f"識別結果: {name}")# 畫圖、顯示(如有識別結果,在圖像上繪制姓名)if name:cv2.putText(img, name, (10, 50), cv2.FONT_HERSHEY_SIMPLEX, 1.2, (0, 0, 255), 2)  # BGR,紅色255else:cv2.putText(img, "No Match", (10, 50), cv2.FONT_HERSHEY_SIMPLEX, 1.2, (0, 255, 255), 2)cv2.imshow('Face Recognition Result', img)cv2.waitKey(0)  # 等待任意鍵cv2.destroyAllWindows()# The function is not implemented
# OpenCV 安裝缺少圖形界面后端支持,默認安裝的是一個輕量級的版本,
# 不包含 GUI (圖形用戶界面) 功能,例如 cv2.imshow()、cv2.waitKey() 等。這在服務器環境或不需要顯示圖像的場景下是常見的。
src/face_rec/templates/upload.html
<!-- upload.html 人臉圖像錄入表單頁的模板 --><!DOCTYPE html>
<html lang="zh-CN">  <!-- 設置頁面語言為中文(簡體) --><head><meta charset="UTF-8">  <!-- 設置網頁的字符編碼為 UTF-8,支持中文 --><title>人臉錄入</title>  <!-- 網頁標題:瀏覽器標簽頁上顯示 -->
</head><body><h1>員工人臉打卡系統(人臉錄入)</h1><!-- 若后端傳遞了 msg(通常是錯誤或提示信息),則顯示為紅色加粗字體 -->{% if msg %}<strong style="color:red">{{msg}}</strong>{% endif %}<!-- 上傳表單 --><!-- method="POST" 表示表單提交方式為 POST --><!-- action="/face/image/upload" 表示提交到后端對應的 Flask 路由 --><!-- enctype="multipart/form-data" 表示表單中包含文件上傳字段(如圖像) --><form method="POST" action="/face/image/upload" enctype="multipart/form-data"><!-- 文本輸入框:輸入姓名 -->姓名:<input type="text" name="name"/> <br/><br/><!-- 文件選擇框:上傳圖像文件 -->圖像:<input type="file" name="file"/> <br/><br/><!-- 提交按鈕 --><input type="submit" name="submit" value="錄入"/></form>
</body>
</html>
src/face_rec/templates/search.html
<!--人臉圖像檢索表單頁的模板-->
<!DOCTYPE html>
<html lang="zh-CN">  <!-- 設置頁面語言為中文(簡體) --><head><meta charset="UTF-8">  <!-- 設置網頁的字符編碼為 UTF-8,支持中文 --><title>人臉檢索</title>  <!-- 網頁標題:瀏覽器標簽頁上顯示 -->
</head><body><h1>員工人臉打卡系統(人臉檢索)</h1><!-- 若后端傳遞了 msg(通常是錯誤或提示信息),則顯示為紅色加粗字體 -->{% if msg %}<strong style="color:red">{{msg}}</strong>{% endif %}<!-- 上傳表單 --><!-- method="POST" 表示表單提交方式為 POST --><!-- action="/face/image/search" 表示提交到后端對應的 Flask 路由 --><!-- enctype="multipart/form-data" 表示表單中包含文件上傳字段(如圖像) --><form method="POST" action="/face/image/search" enctype="multipart/form-data"><!-- 文件選擇框:上傳圖像文件 -->圖像:<input type="file" name="file"/> <br/><br/><!-- 提交按鈕 --><input type="submit" name="submit" value="檢索"/></form>
</body>
</html>

)


![[spring6: @EnableWebMvc]-源碼分析](http://pic.xiahunao.cn/[spring6: @EnableWebMvc]-源碼分析)
前置處理器詳解)


: 不斷調整盤手交易規則)


訓練自己的數據集)
 視頻教程 - 微博輿情分析實現)

