RabbitMQ簡述
RabbitMQ 是一個開源的 消息代理(Message Broker) 軟件,實現了 高級消息隊列協議(AMQP),用于在分布式系統中存儲、轉發消息,支持異步通信、解耦服務、負載均衡和消息緩沖。
核心概念
Producer(生產者):發送消息的應用。
Consumer(消費者):接收消息的應用。
Queue(隊列):存儲消息的緩沖區,遵循 FIFO(先進先出)。
Exchange(交換機):接收生產者消息并路由到隊列(根據規則)。
Binding(綁定):定義交換機和隊列之間的關聯規則。
Message(消息):包含有效載荷(數據)和元數據(如路由鍵、頭信息)。
交換機類型(Routing Strategies)
直連交換機(Direct Exchange)
Direct:精確匹配路由鍵(如點對點通信)。
- 根據消息的routing key精確匹配隊列
- 常用于單播(unicast)消息路由
- 典型應用場景:訂單處理(不同訂單類型路由到不同隊列)
扇形交換機(Fanout Exchange)
Fanout:廣播到所有綁定的隊列(發布/訂閱模式)。
- 將消息廣播到所有綁定的隊列
- 忽略routing key
- 典型應用場景:廣播通知、事件發布
主題交換機(Topic Exchange)
Topic:基于通配符匹配路由鍵(靈活的路由)。
- 根據通配符匹配routing key
- 支持*(匹配一個單詞)和#(匹配零個或多個單詞)
- 典型應用場景:基于多維度路由(如日志級別.應用名稱)
頭交換機(Headers Exchange)
Headers:通過消息頭屬性路由(而非路由鍵)。
- 根據消息頭(header)屬性匹配
- 忽略routing key
- 支持x-match參數(all需全部匹配,any只需匹配一個)
交換機屬性
創建交換機時可設置以下主要屬性:
Name:交換機名稱
Type:交換機類型(direct, fanout, topic, headers)
Durability:是否持久化(重啟后是否保留)
Auto-delete:當所有隊列都解除綁定后是否自動刪除
Arguments:額外參數(如alternate-exchange等)
模式
| 模式 | 交換機類型 | 核心機制 | 典型應用場景 |
|---|---|---|---|
| 簡單模式 | 默認交換機 | 直接隊列綁定 | 單任務異步處理 |
| 工作隊列 | 默認交換機 | 多消費者競爭 | 并行任務處理 |
| 發布/訂閱 | Fanout | 廣播到所有隊列 | 事件通知 |
| 路由模式 | Direct | 精確匹配路由鍵 | 選擇性日志分發 |
| 主題模式 | Topic | 通配符匹配路由鍵 | 多維度消息分類 |
| RPC | 默認交換機 | 回調隊列+關聯ID | 同步遠程調用 |
| 頭部交換機 | Headers | 鍵值對匹配 | 復雜條件路由 |
| 死信隊列 | 任意類型(DLX) | TTL/拒絕觸發 | 異常消息處理 |
| 延遲隊列 | Delayed Message插件 | 延遲投遞 | 定時任務/超時控制 |
簡單模式
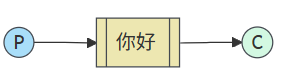
簡單隊列不介紹,直接看工作隊列
工作隊列
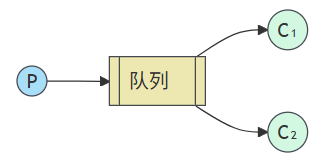
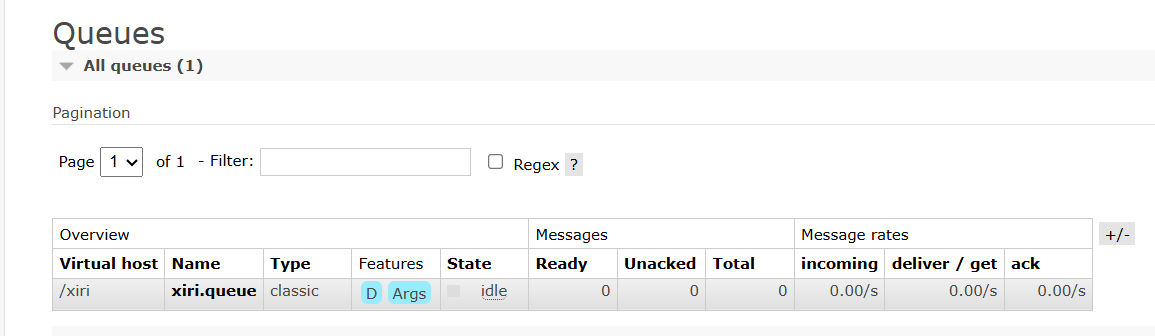
創建隊列
創建一個名為xiri.queue的隊列
消費者代碼
模擬2個消費者互相搶消息
@Component
public class SpringRabbitListener
{@RabbitListener(queues = {"xiri.queue"})public void listener1(String mes){System.out.println("消費者1接受消息:"+mes);}@RabbitListener(queues = {"xiri.queue"})public void listener2(String mes){System.out.println("消費者2接受消息:"+mes);}
}
生產者代碼
模擬50條消息
@SpringBootTest
public class ProducerTest
{@AutowiredRabbitTemplate rabbitTemplate;@Testvoid WorkQueueSent(){//隊列名稱String queueName = "xiri.queue";for (int i = 1; i <= 50; i++) {//發送消息rabbitTemplate.convertAndSend(queueName,"消息-"+i);	}}
}
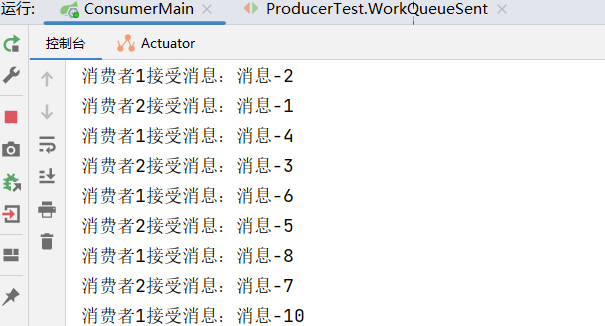
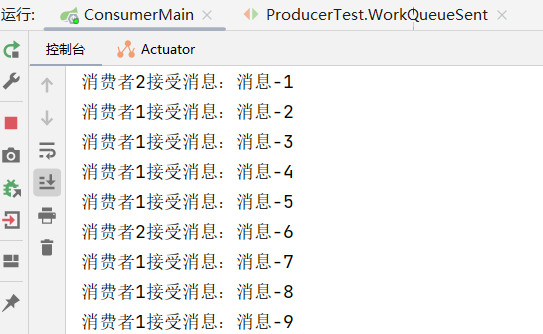
運行結果
由此發現默認情況下,是輪詢投遞消息,并沒有考慮到消費者已經處理完了消息,造成消息堆積
消息堆積處理方案(能者多勞)
設置每次只能給消費者投遞1次消息,處理完成后才能獲取下一個消息
- 修改yml配置文件
spring:rabbitmq:host: 127.0.0.1 #ipport: 5672 #端口virtual-host: /xiri #虛擬主機username: xiri #賬號password: 123 #密碼listener:simple:prefetch: 1 #每次只能獲取一條消息,處理完成才能獲取下一個消息
- 修改消費者代碼
給代碼加上等待時間進行模擬測試
@Component
public class SpringRabbitListener
{@RabbitListener(queues = {"xiri.queue"})public void listener1(String mes) throws InterruptedException {System.out.println("消費者1接受消息:"+mes);Thread.sleep(20);}@RabbitListener(queues = {"xiri.queue"})public void listener2(String mes) throws InterruptedException {System.out.println("消費者2接受消息:"+mes);Thread.sleep(100);}
}
- 測試結果
消費者1處理消息快,處理消息多,實現能者多勞
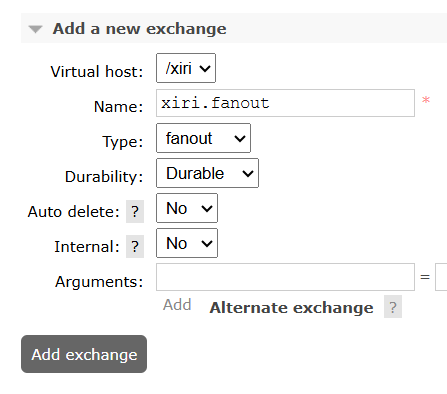
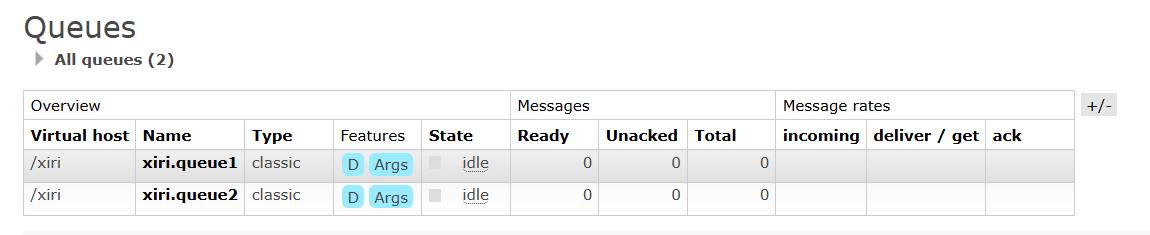
發布/訂閱
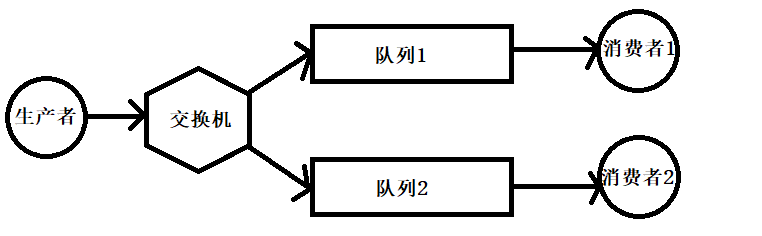
控制臺設置
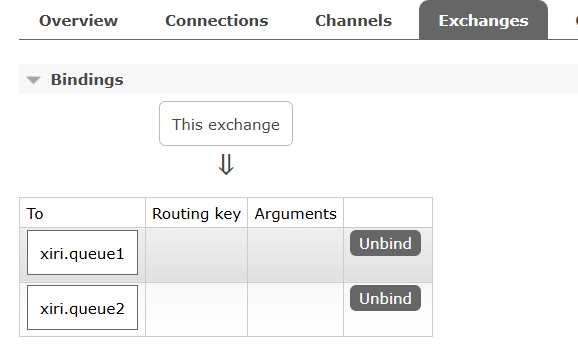
設置一個fanout交換機
設置兩個隊列
綁定2個隊列
消費者
在消費者服務寫兩個消費者方法模擬,分別監聽隊列1和隊列2
@Component
public class SpringRabbitListener
{@RabbitListener(queues = {"xiri.queue1"})public void listener1(String mes) throws InterruptedException {System.out.println("消費者1接受消息:"+mes);}@RabbitListener(queues = {"xiri.queue2"})public void listener2(String mes) throws InterruptedException {System.out.println("消費者2接受消息:"+mes);}
}
生產者
生產者向交換機發送消息
@SpringBootTest
public class ProducerTest
{@AutowiredRabbitTemplate rabbitTemplate;@Testvoid sent(){//隊列名稱String exchange = "xiri.fanout";//發送消息rabbitTemplate.convertAndSend(exchange,null,"消息");//routingKey沒有設置,可以為空}
}
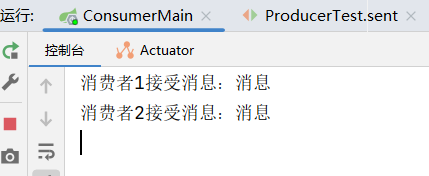
運行結果
路由模式
直連交換機(Direct Exchange)會根據規則路由到指定的隊列
控制臺設置
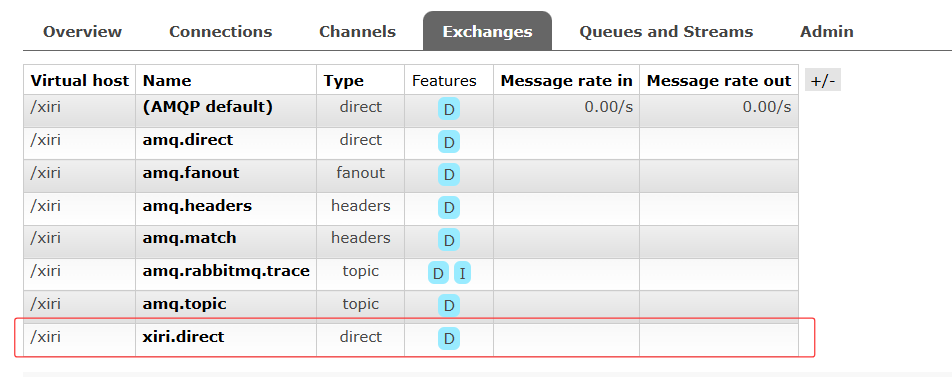
創建類型為direct,名稱為xiri.direct交換機
創建2個隊列,名字分別為direct.queue1、direct.queue2

進行綁定
direct.queue1綁定key1
direct.queue2綁定key2

消費者
@Component
public class SpringRabbitListener
{@RabbitListener(queues = {"direct.queue1"})public void listener1(String mes) throws InterruptedException {System.out.println("消費者1接受消息:"+mes);}@RabbitListener(queues = {"direct.queue2"})public void listener2(String mes) throws InterruptedException {System.out.println("消費者2接受消息:"+mes);}
}
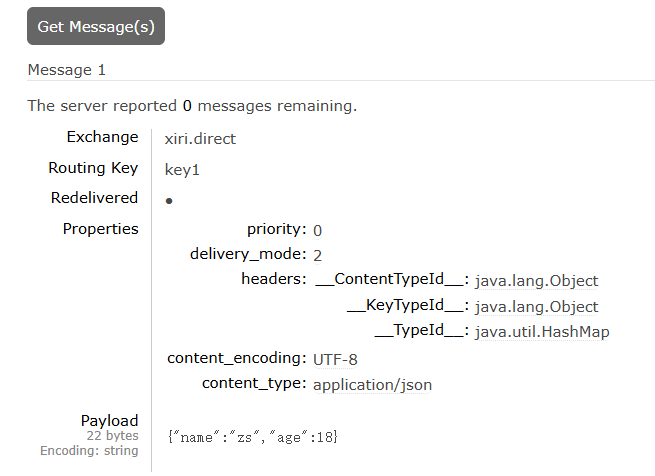
生產者
@SpringBootTest
public class ProducerTest
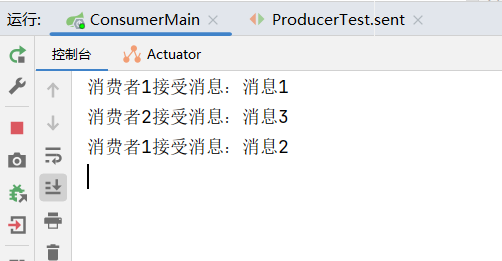
{@AutowiredRabbitTemplate rabbitTemplate;@Testvoid sent(){//隊列名稱String exchange = "xiri.direct";//發送消息rabbitTemplate.convertAndSend(exchange,"key1","消息1");rabbitTemplate.convertAndSend(exchange,"key1","消息2");rabbitTemplate.convertAndSend(exchange,"key2","消息3");}
}
運行結果
主題模式
直連交換機(Direct Exchange) 和 主題交換機(Topic Exchange)類似,區別在于Routing key可以是多個單詞列表以 .(點) 分割
控制臺設置
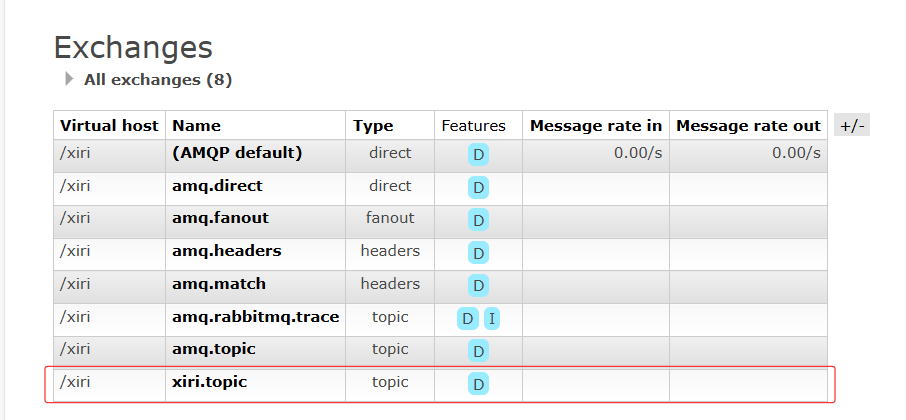
創建類型為topic,名為xiri.topic的交換機
創建隊列

交換機綁定隊列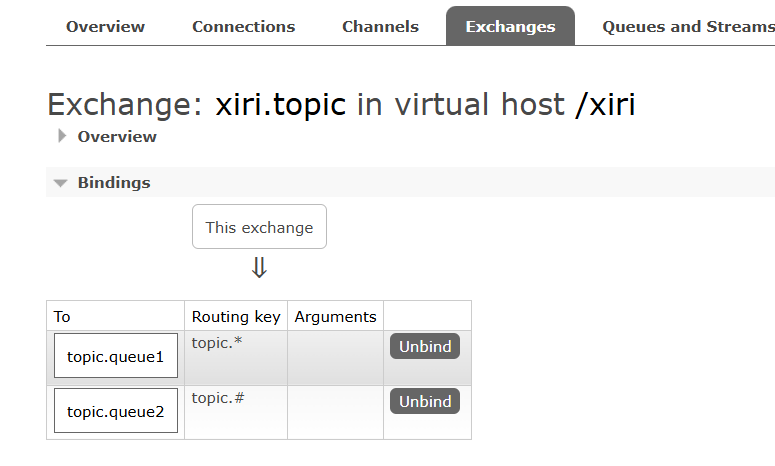
消費者
@Component
public class SpringRabbitListener
{@RabbitListener(queues = {"topic.queue1"})public void listener1(String mes) throws InterruptedException {System.out.println("消費者1接受消息:"+mes);}@RabbitListener(queues = {"topic.queue2"})public void listener2(String mes) throws InterruptedException {System.out.println("消費者2接受消息:"+mes);}
}
生產者
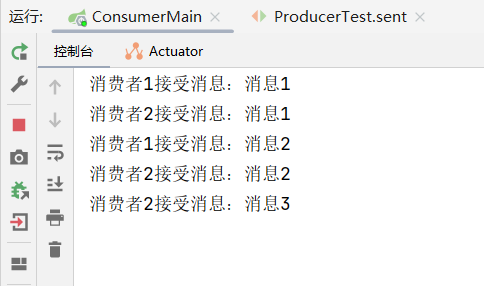
@SpringBootTest
public class ProducerTest
{@AutowiredRabbitTemplate rabbitTemplate;@Testvoid sent(){//隊列名稱String exchange = "xiri.topic";//發送消息rabbitTemplate.convertAndSend(exchange,"topic.key1","消息1");rabbitTemplate.convertAndSend(exchange,"topic.key2","消息2");rabbitTemplate.convertAndSend(exchange,"topic.key.node1","消息3");}
}
運行結果
根據通配符發到消費者
注解聲明隊列和交換機
在消費者端,通過 @RabbitListener 注解自動聲明隊列并綁定到交換機
@Component
public class SpringRabbitListener
{//基于注解來聲明隊列和交換機,并且綁定@RabbitListener(bindings = {@QueueBinding(value = @Queue(value = "direct.queue1", durable = "true"),	//設置隊列,并且持久化exchange = @Exchange(value = "xiri.direct",type = ExchangeTypes.DIRECT),	//設置交換機和類型key = {"key1"}	//設置路由)})public void listener1(String mes) throws InterruptedException {System.out.println("消費者1接受消息:"+mes);}
}
消息轉換器
轉換成json格式傳輸
消費者和生產者都需要創建bean
創建Bean
import org.springframework.amqp.support.converter.Jackson2JsonMessageConverter;
import org.springframework.amqp.support.converter.MessageConverter;
import org.springframework.context.annotation.Bean;
import org.springframework.context.annotation.Configuration;@Configuration
public class RabbitConverter
{@Beanpublic MessageConverter messageConverter(){return new Jackson2JsonMessageConverter();}
}
這樣數據就是以JSON格式傳輸的
獲取消息
消息丟失問題
生產者發送消息丟失
生產者發送消息到 RabbitMQ 服務器時,由于網絡問題或 RabbitMQ 服務崩潰,消息未到達交換機
解決方案
1. 生產者重試機制
通過配置重試機制,但是SpringAMQP是阻塞的,如果對性能有要求不能使用,這個只是對連接進行的重試,而不是消息失敗的重試
spring:rabbitmq:host: 127.0.0.1 #ipport: 5672 #端口virtual-host: /xiri #虛擬主機username: xiri #賬號password: 123 #密碼connection-timeout: 1s #超時時間template:retry:enabled: true #開啟超時重試機制initial-interval: 1000ms #失敗后初始等待時間multiplier: 1 #失敗后下次等待時長倍數=initial-interval*multipliermax-attempts: 3 #最大重試次數
測試效果,故意將網絡故障,造成超時重試3次

2. 生產者確認
RabbitMQ 提供 ConfirmCallback 機制,確認消息是否成功到達交換機。
如果對消息可靠性要求不高,不需要開啟確認機制,因為會影響性能
生產者yml文件配置
spring:rabbitmq:host: 127.0.0.1 #ipport: 5672 #端口virtual-host: /xiri #虛擬主機username: xiri #賬號password: 123 #密碼connection-timeout: 1s #超時時間template:retry:enabled: true #開啟超時重試機制initial-interval: 1000ms #失敗后初始等待時間multiplier: 1 #失敗后下次等待時長倍數=initial-interval*multipliermax-attempts: 3 #最大重試次數publisher-confirm-type: correlated # 開啟異步確認publisher-returns: true # 開啟路由失敗回調
以下為以上內容中關鍵的配置信息
publisher-confirm-type: correlated  # 開啟異步確認
publisher-returns: true # 開啟路由失敗回調
生產者代碼配置
// Spring AMQP 配置
@Bean
public RabbitTemplate rabbitTemplate(ConnectionFactory connectionFactory)
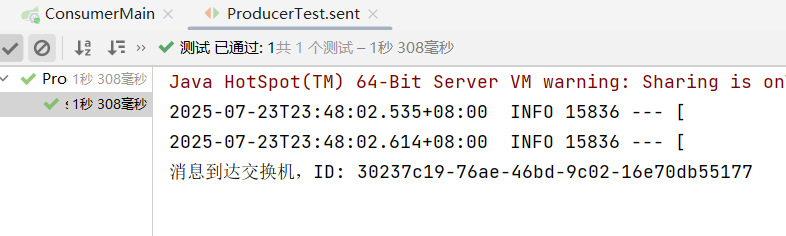
{RabbitTemplate rabbitTemplate = new RabbitTemplate(connectionFactory);rabbitTemplate.setMandatory(true); // 開啟強制回調// 設置 ConfirmCallbackrabbitTemplate.setConfirmCallback((correlationData, ack, cause) -> {if (ack) {System.out.println("消息到達交換機,ID: " + correlationData.getId());} else {System.err.println("消息未到達交換機,原因: " + cause);}});// 設置 ReturnsCallbackrabbitTemplate.setReturnsCallback(returned -> {System.err.println("消息未路由到隊列: " + returned.getMessage());});return rabbitTemplate;
}
生產者測試
@SpringBootTest
public class ProducerTest
{@AutowiredRabbitTemplate rabbitTemplate;@Testvoid sent(){//隊列名稱String exchange = "xiri.direct";//設置消息唯一編號CorrelationData id = new CorrelationData(UUID.randomUUID().toString());//發送消息rabbitTemplate.convertAndSend(exchange,"key","消息",id);}
}
消息結果
3. 數據持久化
RabbitMQ默認將數據保存在內存當中,如果宕機了,消息就會丟失,還會造成內存積壓,引發阻塞問題
實現數據持久化三個方面:交換機持久化、隊列持久化、消息持久化
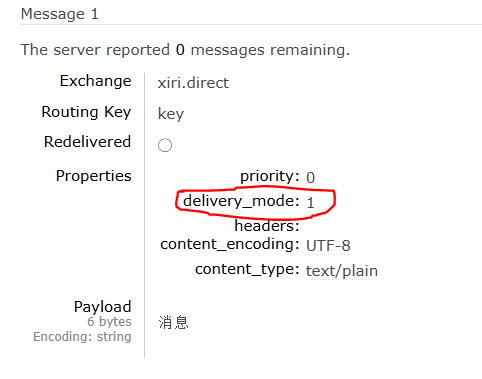
spring發送消息默認就是持久的
設置非持久化
@SpringBootTest
public class ProducerTest
{@AutowiredRabbitTemplate rabbitTemplate;@Testvoid sent() {//隊列名稱String exchange = "xiri.direct";//設置消息唯一編號CorrelationData id = new CorrelationData(UUID.randomUUID().toString());//發送消息rabbitTemplate.convertAndSend(exchange, "key", "消息", new MessagePostProcessor() {@Overridepublic Message postProcessMessage(Message message) {message.getMessageProperties().setDeliveryMode(MessageDeliveryMode.NON_PERSISTENT);//發送持久化消息return message;}});}
}
以下已經設置為1,表示非持久化模式
4. lazy queue
Lazy Queue 是 RabbitMQ 的一種特殊隊列模式,它會盡可能將消息存儲在磁盤,而不是內存中,從而減少內存使用,適合處理大量消息且消費較慢的場景
3.6.0(初始引入)
首次支持 Lazy Queue,允許消息直接存儲到磁盤,減少內存占用。
3.12.0(默認模式)
從該版本開始,Lazy Queue 成為所有隊列的默認模式,官方推薦升級到該版本或手動啟用 Lazy 模式1。
消費者消息丟失問題
解決方案
1.確認機制
SpringAMQP消息確認機制有三種處理方式:
- none 不處理
- manual 手動處理,需要在業務代碼中調用api
- auto 自動處理,利用aop處理,對代碼沒有破壞性
當業務出現異常時,會自動返回nack
如果是消息處理或校驗異常,自動返回reject
開啟消費者確認機制為auto,有spring確認消息處理完成后返回ack,異常返回nack
spring:rabbitmq:listener:simple:acknowledge-mode: auto #none:關閉ack,manual:手動ack,auto:自動ack
2.重試機制
在 Spring AMQP 的 RabbitMQ 配置中,stateless 是消費者重試機制(retry)的一個參數,用于控制重試時的狀態管理方式
stateless=true(默認)
- 每次重試都是無狀態的,即不保留前一次嘗試的上下文(如數據庫事務、Spring Session 等)。
- 適用場景:普通消息處理,無需依賴前一次重試的狀態。
- 性能更好:因為不需要維護狀態。
stateless=false
- 重試時會保留狀態(如事務、Session 等),確保多次重試在同一個上下文中執行。
- 適用場景:需要事務一致性的操作(如支付處理)。
- 性能較低:因為需要維護狀態。
開啟重試機制
spring:rabbitmq:listener:simple:prefetch: 1 #每次只能獲取一條消息,處理完成才能獲取下一個消息retry:enabled: true #開啟消費者重試機制initial-interval: 1000ms #失敗后初始等待時間multiplier: 1 #失敗后下次等待時長倍數=initial-interval*multipliermax-attempts: 3 #最大重試次數stateless: true #true為無狀態,false為有狀態。決定重試時是否保持消費者狀態(如事務、Session等)
重試多次依然失敗處理策略
在開啟重試模式后,重試次數耗盡依然失敗,則需要有MessageRecoverer接口來處理,它有三種實現:
| 實現類 | 行為 | 適用場景 |
|---|---|---|
| RejectAndDontRequeueRecoverer(默認) | 直接拒絕消息(reject),且不重新入隊,消息可能丟失或進入死信隊列(若配置)13 | 非關鍵消息,允許丟棄 |
| ImmediateRequeueMessageRecoverer | 立即將消息重新放回隊列(nack + requeue=true),可能導致無限循環 | 臨時性錯誤(如網絡抖動) |
| RepublishMessageRecoverer(推薦) | 將消息重新發布到指定的異常交換機和隊列,供人工或后續處理 | 關鍵業務,需 |
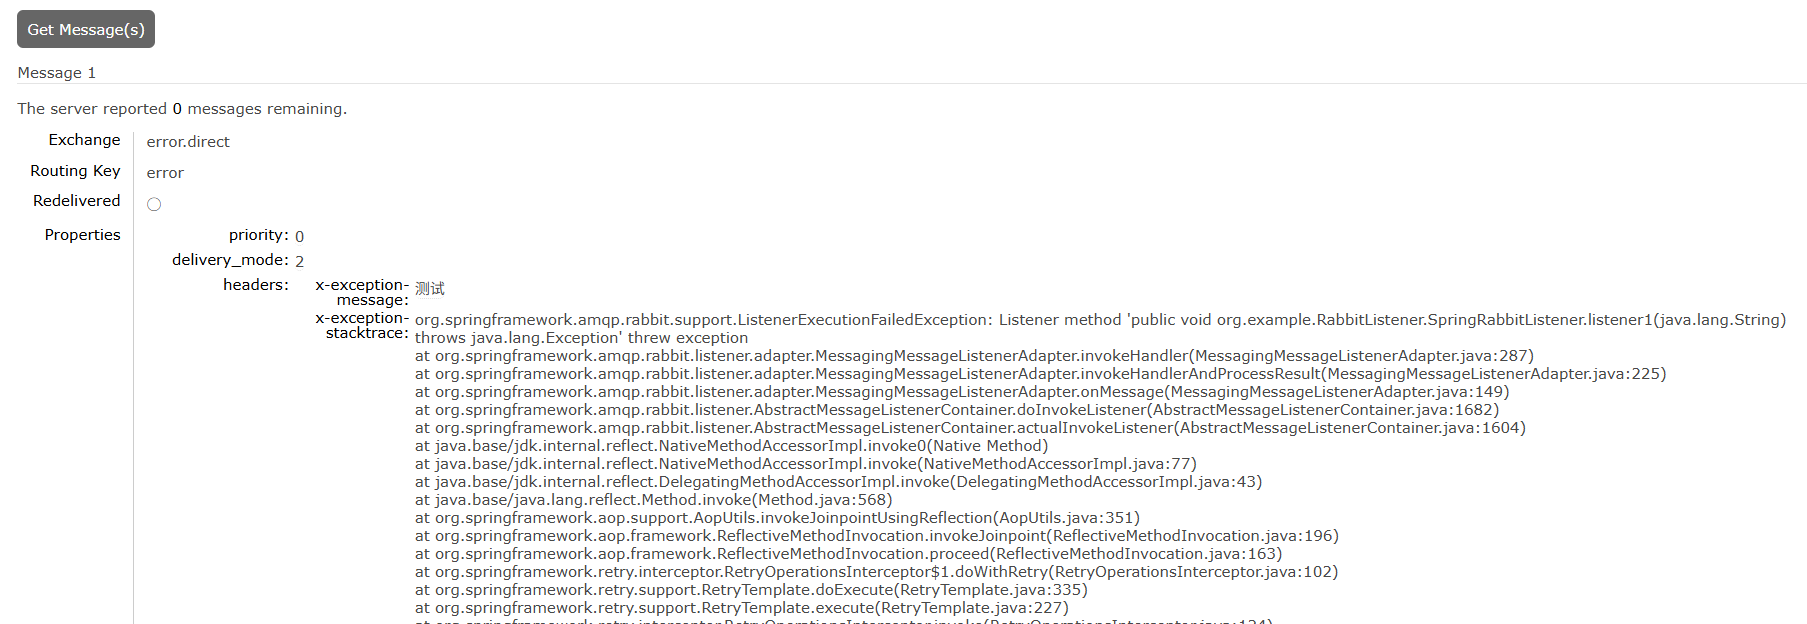
使用第三種方式演示
開啟消費者失敗重試機制,并設置MessageRecoverer,多次重試無效后將消息投遞到異常交換機,交由人工處理問題
消費者ymy配置
spring:rabbitmq:listener:simple:retry:enabled: true #開啟消費者重試機制
消費者配置
import org.springframework.amqp.core.Binding;
import org.springframework.amqp.core.BindingBuilder;
import org.springframework.amqp.core.DirectExchange;
import org.springframework.amqp.core.Queue;
import org.springframework.amqp.rabbit.core.RabbitTemplate;
import org.springframework.amqp.rabbit.retry.MessageRecoverer;
import org.springframework.amqp.rabbit.retry.RepublishMessageRecoverer;
import org.springframework.boot.autoconfigure.condition.ConditionalOnProperty;
import org.springframework.context.annotation.Bean;
import org.springframework.context.annotation.Configuration;@Configuration
//這個配置需要開啟重試機制才會開啟
@ConditionalOnProperty(prefix = "spring.rabbitmq.listener.simple.retry",name="enabled",havingValue = "true")
public class ErrorConfig
{@Beanpublic DirectExchange errorExchange(){return new DirectExchange("error.direct");}@Beanpublic Queue errorQueue(){return new Queue("error.queue");}@Beanpublic Binding errorBinding(DirectExchange errorExchange,Queue errorQueue){//隊列綁定交換機return BindingBuilder.bind(errorQueue).to(errorExchange).with("error");}@Beanpublic MessageRecoverer messageRecoverer(RabbitTemplate rabbitTemplate){return new RepublishMessageRecoverer(rabbitTemplate,"error.direct","error");}
}
效果
將異常信息和消息全部轉到了error.queue
業務層冪等設計
- 數據庫唯一約束
- 例如訂單表對 order_id 設置唯一索引,重復插入會報錯。
Redis 原子操作 - 用 SETNX 或分布式鎖標記已處理的消息。
- 消息去重
- 生產者生成唯一 ID,發送消息時攜帶 correlationId,消費者記錄已處理的 ID。
- 消費者記錄消息 ID,用 Redis 或數據庫存儲已處理的消息 ID。
延遲消息
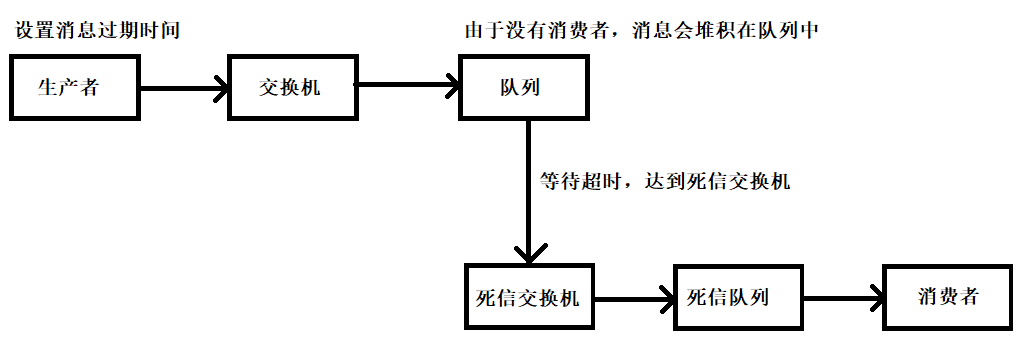
1.死信交換機
利用死信隊列(DLX)+ TTL 實現延遲消息
死信隊列(DLX):死信會被路由到指定的死信交換機(DLX),再進入死信隊列,由消費者處理
消息設置 TTL(Time To Live):消息或隊列可以設置過期時間(TTL),到期后消息會變成“死信”
消費者
聲明隊列
import org.springframework.amqp.core.*;
import org.springframework.context.annotation.Bean;
import org.springframework.context.annotation.Configuration;@Configuration
public class DlxConfig
{@Beanpublic DirectExchange xiriExchange(){return new DirectExchange("xiri.direct",true,false);}@Beanpublic Queue xiriQueue(){return QueueBuilder.durable("xiri.queue").withArgument("x-dead-letter-exchange", "dlx.direct").withArgument("x-dead-letter-routing-key","dlx.key").build();}@Beanpublic Binding xiriBinding() {return BindingBuilder.bind(xiriQueue()).to(xiriExchange()).with("xiri.key");}
}
消費
import org.springframework.amqp.core.ExchangeTypes;
import org.springframework.amqp.rabbit.annotation.*;
import org.springframework.stereotype.Component;import java.time.LocalDateTime;@Component
public class SpringRabbitListener
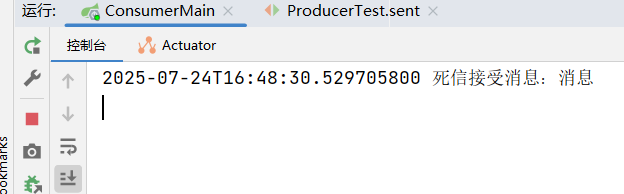
{@RabbitListener(bindings = @QueueBinding(value = @Queue(name = "dlx.queue", durable = "true"),exchange = @Exchange(name = "dlx.direct", type = ExchangeTypes.DIRECT),key = "dlx.key" // 死信路由鍵))public void listener(String mes) throws InterruptedException {System.out.println(LocalDateTime.now() +" 死信接受消息:"+mes);}
}
生產者
import org.junit.jupiter.api.Test;
import org.springframework.amqp.AmqpException;
import org.springframework.amqp.core.Message;
import org.springframework.amqp.core.MessagePostProcessor;
import org.springframework.amqp.rabbit.core.RabbitTemplate;
import org.springframework.beans.factory.annotation.Autowired;
import org.springframework.boot.test.context.SpringBootTest;import java.time.LocalDateTime;@SpringBootTest
public class ProducerTest
{@AutowiredRabbitTemplate rabbitTemplate;@Testvoid sent(){//隊列名稱String exchange = "xiri.direct";//發送消息rabbitTemplate.convertAndSend(exchange, "xiri.key", "消息", new MessagePostProcessor() {@Overridepublic Message postProcessMessage(Message message) throws AmqpException {//設置過期時間(5秒)message.getMessageProperties().setExpiration("5000");return message;}});System.out.println(LocalDateTime.now() +" 發送消息");}
}
結果
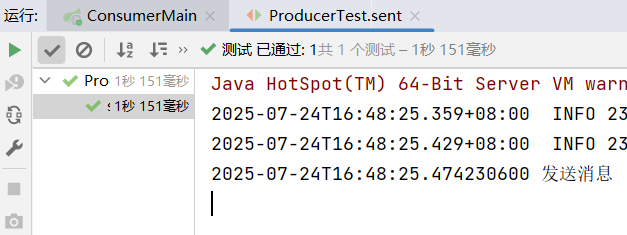
5秒后收到消息
缺點: 消息排序問題:如果隊列中有不同 TTL 的消息,RabbitMQ 只會檢查隊頭消息的 TTL,可能導致后進隊的消息先過期
2.RabbitMQ延遲插件
使用 rabbitmq-delayed-message-exchange 插件
RabbitMQ 官方提供的插件,通過 自定義交換機類型(x-delayed-message) 實現真正的延遲投遞,消息按延遲時間排序,到期后才會被路由到目標隊列
- 下載插件(需匹配 RabbitMQ 版本):
插件下載地址:https://github.com/rabbitmq/rabbitmq-delayed-message-exchange/releases - 將下載的文件放到RabbitMQ的plugins目錄里面
- 啟用插件
rabbitmq-plugins enable rabbitmq_delayed_message_exchange
- 重啟RabbitMQ
關閉
rabbitmq-service.bat stop
啟動
rabbitmq-server start
消費者
import org.springframework.amqp.core.ExchangeTypes;
import org.springframework.amqp.rabbit.annotation.Exchange;
import org.springframework.amqp.rabbit.annotation.Queue;
import org.springframework.amqp.rabbit.annotation.QueueBinding;
import org.springframework.amqp.rabbit.annotation.RabbitListener;
import org.springframework.stereotype.Component;import java.time.LocalDateTime;@Component
public class SpringRabbitListener
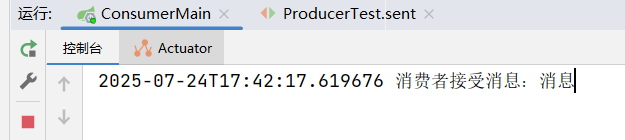
{//延遲隊列,關鍵點在交換機設置delayed屬性為true@RabbitListener(bindings = @QueueBinding(value = @Queue(name = "xiri.queue", durable = "true"),exchange = @Exchange(name = "xiri.direct", type = ExchangeTypes.DIRECT,delayed = "true"),key = "xiri.key"))public void listener1(String mes) throws InterruptedException {System.out.println(LocalDateTime.now()+" 消費者接受消息:"+mes);}
}
生產者
import org.junit.jupiter.api.Test;
import org.springframework.amqp.rabbit.core.RabbitTemplate;
import org.springframework.beans.factory.annotation.Autowired;
import org.springframework.boot.test.context.SpringBootTest;import java.time.LocalDateTime;@SpringBootTest
public class ProducerTest
{@AutowiredRabbitTemplate rabbitTemplate;@Testvoid sent(){//隊列名稱String exchange = "xiri.direct";//發送消息rabbitTemplate.convertAndSend(exchange,"xiri.key","消息",message -> {message.getMessageProperties().setDelayLong(5000L);//設置5秒過去return message;});System.out.println(LocalDateTime.now()+" 發送消息");}
}
結果


)


)


)


)
——濾波器)
