??文章的目的為了記錄使用Arkts?進行Harmony?app?開發學習的經歷。本職為嵌入式軟件開發,公司安排開發app,臨時學習,完成app的開發。開發流程和要點有些記憶模糊,趕緊記錄,防止忘記。
?相關鏈接:
開源 Arkts 鴻蒙應用 開發(一)工程文件分析-CSDN博客
開源 Arkts 鴻蒙應用 開發(二)封裝庫.har制作和應用-CSDN博客
開源 Arkts 鴻蒙應用 開發(三)Arkts的介紹-CSDN博客
開源 Arkts 鴻蒙應用 開發(四)布局和常用控件-CSDN博客
開源 Arkts 鴻蒙應用 開發(五)控件組成和復雜控件-CSDN博客
開源 Arkts 鴻蒙應用 開發(六)數據持久--文件和首選項存儲-CSDN博客
開源 Arkts 鴻蒙應用 開發(七)數據持久--sqlite關系數據庫-CSDN博客
開源 Arkts 鴻蒙應用 開發(八)多媒體--相冊和相機-CSDN博客
開源 Arkts 鴻蒙應用 開發(九)通訊--tcp客戶端-CSDN博客
開源 Arkts 鴻蒙應用 開發(十)通訊--Http數據傳輸-CSDN博客
?推薦鏈接:
開源 java android app 開發(一)開發環境的搭建-CSDN博客
開源 java android app 開發(二)工程文件結構-CSDN博客
開源 java android app 開發(三)GUI界面布局和常用組件-CSDN博客
開源 java android app 開發(四)GUI界面重要組件-CSDN博客
開源 java android app 開發(五)文件和數據庫存儲-CSDN博客
開源 java android app 開發(六)多媒體使用-CSDN博客
開源 java android app 開發(七)通訊之Tcp和Http-CSDN博客
開源 java android app 開發(八)通訊之Mqtt和Ble-CSDN博客
開源 java android app 開發(九)后臺之線程和服務-CSDN博客
開源 java android app 開發(十)廣播機制-CSDN博客
開源 java android app 開發(十一)調試、發布-CSDN博客
開源 java android app 開發(十二)封庫.aar-CSDN博客
推薦鏈接:
開源C# .net mvc 開發(一)WEB搭建_c#部署web程序-CSDN博客
開源 C# .net mvc 開發(二)網站快速搭建_c#網站開發-CSDN博客
開源 C# .net mvc 開發(三)WEB內外網訪問(VS發布、IIS配置網站、花生殼外網穿刺訪問)_c# mvc 域名下不可訪問內網,內網下可以訪問域名-CSDN博客
開源 C# .net mvc 開發(四)工程結構、頁面提交以及顯示_c#工程結構-CSDN博客
開源 C# .net mvc 開發(五)常用代碼快速開發_c# mvc開發-CSDN博客
本章內容主要是演示鴻蒙的tcp客戶端的通訊:
實現TCP客戶端功能,可以連接指定IP和端口的服務器。支持發送和接收文本消息,顯示連接狀態和通信歷史。
新建DevEco的工程,選擇Empty Ability,只需要修改module.json5,和Index.ets文件,就可以實現TCP客戶端的APP。
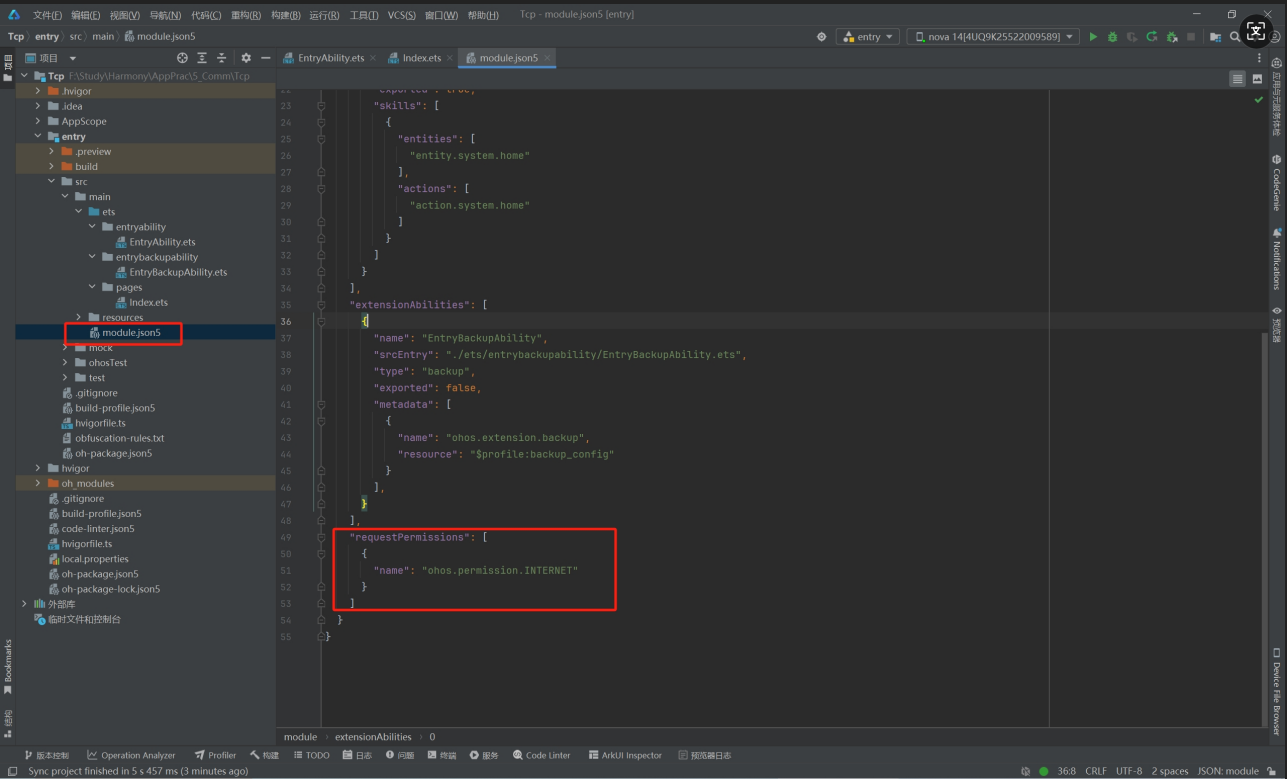
一、設置權限,修改module.json5文件。
文件位置
 ?
?
module.json5代碼
{"module": {"name": "entry","type": "entry","description": "$string:module_desc","mainElement": "EntryAbility","deviceTypes": ["phone"],"deliveryWithInstall": true,"installationFree": false,"pages": "$profile:main_pages","abilities": [{"name": "EntryAbility","srcEntry": "./ets/entryability/EntryAbility.ets","description": "$string:EntryAbility_desc","icon": "$media:layered_image","label": "$string:EntryAbility_label","startWindowIcon": "$media:startIcon","startWindowBackground": "$color:start_window_background","exported": true,"skills": [{"entities": ["entity.system.home"],"actions": ["action.system.home"]}]}],"extensionAbilities": [{"name": "EntryBackupAbility","srcEntry": "./ets/entrybackupability/EntryBackupAbility.ets","type": "backup","exported": false,"metadata": [{"name": "ohos.extension.backup","resource": "$profile:backup_config"}],}],"requestPermissions": [{"name": "ohos.permission.INTERNET"}]}
}
二、Index.ets的代碼分析
2.1??初始化
當TcpClientPage組件被加載時,首先會初始化所有@State裝飾的變量(serverIp, serverPort, message, receivedData, isConnected)
創建TCP套接字實例tcpSocket和獲取UI上下文context
aboutToAppear生命周期:
再次創建TCP套接字實例(這里重復創建了,可以優化)
設置TCP連接選項(address, port, family, timeout)
注冊三個事件監聽器:
message:接收服務器數據時觸發
close:連接關閉時觸發
error:發生錯誤時觸發
以下為代碼
// 初始化TCP套接字aboutToAppear() {this.tcpSocket = socket.constructTCPSocketInstance();// 設置TCP連接參數let tcpOptions: socket.TCPConnectOptions = {address: {address: this.serverIp,port: parseInt(this.serverPort),family: 1 // 1表示IPv4},timeout: 5000 // 連接超時時間5秒};// 監聽接收數據this.tcpSocket.on('message', (messageInfo: socket.SocketMessageInfo) => {console.info('Received message');// 從 SocketMessageInfo 中獲取 ArrayBufferconst buffer = messageInfo.message; // message 是 ArrayBuffer 類型const data = this.arrayBufferToString(buffer);this.receivedData += `[接收] ${new Date().toLocaleTimeString()}: ${data}\n`;});// 監聽連接關閉this.tcpSocket.on('close', () => {console.info('Connection closed');this.isConnected = false;promptAction.showToast({ message: '連接已關閉', duration: 2000 });});// 監聽錯誤事件this.tcpSocket.on('error', (err) => {console.error('Socket error: ' + JSON.stringify(err));promptAction.showToast({ message: '發生錯誤: ' + JSON.stringify(err), duration: 3000 });this.isConnected = false;});}2.2? UI代碼
build()方法構建了以下UI元素:
服務器IP輸入框
端口號輸入框
連接/斷開按鈕(根據連接狀態改變文字和顏色)
消息輸入框
發送按鈕
消息顯示區域(帶滾動條)
以下為代碼
build() {Column({ space: 10 }) {// 標題Text('TCP客戶端').fontSize(24).fontWeight(FontWeight.Bold).margin({ bottom: 20 })// 服務器地址輸入Row({ space: 10 }) {Text('服務器IP:').fontSize(16).width(80)TextInput({ text: this.serverIp }).width('60%').onChange((value: string) => {this.serverIp = value;})}.width('100%').justifyContent(FlexAlign.Start)// 端口號輸入Row({ space: 10 }) {Text('端口號:').fontSize(16).width(80)TextInput({ text: this.serverPort }).width('60%').onChange((value: string) => {this.serverPort = value;})}.width('100%').justifyContent(FlexAlign.Start)// 連接按鈕Button(this.isConnected ? '斷開連接' : '連接').width('80%').height(40).backgroundColor(this.isConnected ? '#ff4d4f' : '#1890ff').onClick(() => {this.toggleConnection();})// 消息輸入框TextInput({ placeholder: '輸入要發送的消息', text: this.message }).width('90%').height(60).margin({ top: 20 }).onChange((value: string) => {this.message = value;})// 發送按鈕Button('發送').width('80%').height(40).margin({ top: 10 }).onClick(() => {this.sendMessage();})// 消息顯示區域Scroll() {Text(this.receivedData).width('90%').fontSize(14).textAlign(TextAlign.Start).padding(10).backgroundColor('#f5f5f5')}.width('100%').height(200).margin({ top: 20 }).border({ width: 1, color: '#d9d9d9' })}.width('100%').height('100%').padding(20).justifyContent(FlexAlign.Start)}2.3? 建立連接和發送
調用tcpSocket.connect()建立連接
點擊"發送"按鈕:
觸發sendMessage()方法
以下為代碼
// 連接到服務器private async connect() {try {let tcpOptions: socket.TCPConnectOptions = {address: {address: this.serverIp,port: parseInt(this.serverPort),family: 1},timeout: 5000};await this.tcpSocket.connect(tcpOptions);this.isConnected = true;promptAction.showToast({ message: '連接成功', duration: 2000 });// 開始接收數據this.tcpSocket.getState().then(state => {console.info('Socket state: ' + JSON.stringify(state));});} catch (err) {console.error('Connect failed: ' + JSON.stringify(err));promptAction.showToast({ message: '連接失敗: ' + JSON.stringify(err), duration: 3000 });this.isConnected = false;}}
2.4? 所有代碼
// MainAbility.ets
import socket from '@ohos.net.socket';
import common from '@ohos.app.ability.common';
import promptAction from '@ohos.promptAction';
import { BusinessError } from '@kit.BasicServicesKit';@Entry
@Component
struct TcpClientPage {@State serverIp: string = '192.168.3.146'; // 默認服務器IP@State serverPort: string = '1000'; // 默認端口@State message: string = ''; // 要發送的消息@State receivedData: string = ''; // 接收到的數據@State isConnected: boolean = false; // 連接狀態private tcpSocket: socket.TCPSocket = socket.constructTCPSocketInstance();private context = getContext(this) as common.UIAbilityContext;// 初始化TCP套接字aboutToAppear() {this.tcpSocket = socket.constructTCPSocketInstance();// 設置TCP連接參數let tcpOptions: socket.TCPConnectOptions = {address: {address: this.serverIp,port: parseInt(this.serverPort),family: 1 // 1表示IPv4},timeout: 5000 // 連接超時時間5秒};// 監聽接收數據this.tcpSocket.on('message', (messageInfo: socket.SocketMessageInfo) => {console.info('Received message');// 從 SocketMessageInfo 中獲取 ArrayBufferconst buffer = messageInfo.message; // message 是 ArrayBuffer 類型const data = this.arrayBufferToString(buffer);this.receivedData += `[接收] ${new Date().toLocaleTimeString()}: ${data}\n`;});// 監聽連接關閉this.tcpSocket.on('close', () => {console.info('Connection closed');this.isConnected = false;promptAction.showToast({ message: '連接已關閉', duration: 2000 });});// 監聽錯誤事件this.tcpSocket.on('error', (err) => {console.error('Socket error: ' + JSON.stringify(err));promptAction.showToast({ message: '發生錯誤: ' + JSON.stringify(err), duration: 3000 });this.isConnected = false;});}private arrayBufferToString(buffer: ArrayBuffer): string {const uint8Array = new Uint8Array(buffer);let str = '';for (let i = 0; i < uint8Array.length; i++) {str += String.fromCharCode(uint8Array[i]);}return str;}// 字符串轉ArrayBufferprivate stringToArrayBuffer(str: string): ArrayBuffer {let buf = new ArrayBuffer(str.length);let bufView = new Uint8Array(buf);for (let i = 0; i < str.length; i++) {bufView[i] = str.charCodeAt(i);}return buf;}// 連接/斷開服務器private toggleConnection() {if (this.isConnected) {this.disconnect();} else {this.connect();}}// 連接到服務器private async connect() {try {let tcpOptions: socket.TCPConnectOptions = {address: {address: this.serverIp,port: parseInt(this.serverPort),family: 1},timeout: 5000};await this.tcpSocket.connect(tcpOptions);this.isConnected = true;promptAction.showToast({ message: '連接成功', duration: 2000 });// 開始接收數據this.tcpSocket.getState().then(state => {console.info('Socket state: ' + JSON.stringify(state));});} catch (err) {console.error('Connect failed: ' + JSON.stringify(err));promptAction.showToast({ message: '連接失敗: ' + JSON.stringify(err), duration: 3000 });this.isConnected = false;}}// 斷開連接private disconnect() {try {this.tcpSocket.close();this.isConnected = false;promptAction.showToast({ message: '已斷開連接', duration: 2000 });} catch (err) {console.error('Disconnect failed: ' + JSON.stringify(err));promptAction.showToast({ message: '斷開連接失敗: ' + JSON.stringify(err), duration: 3000 });}}private sendMessage() {if (!this.isConnected) {promptAction.showToast({ message: '請先連接到服務器', duration: 2000 });return;}if (!this.message.trim()) {promptAction.showToast({ message: '消息不能為空', duration: 2000 });return;}try {const buffer = this.stringToArrayBuffer(this.message);this.tcpSocket.send({ data: buffer }).then(() => {this.receivedData += `[發送] ${new Date().toLocaleTimeString()}: ${this.message}\n`;this.message = '';}).catch((err: BusinessError) => {console.error(`Send failed: code=${err.code}, message=${err.message}`);promptAction.showToast({ message: `發送失敗: ${err.message}`, duration: 3000 });});} catch (err) {console.error(`Send error: code=${err.code}, message=${err.message}`);promptAction.showToast({ message: `發送錯誤: ${err.message}`, duration: 3000 });}}build() {Column({ space: 10 }) {// 標題Text('TCP客戶端').fontSize(24).fontWeight(FontWeight.Bold).margin({ bottom: 20 })// 服務器地址輸入Row({ space: 10 }) {Text('服務器IP:').fontSize(16).width(80)TextInput({ text: this.serverIp }).width('60%').onChange((value: string) => {this.serverIp = value;})}.width('100%').justifyContent(FlexAlign.Start)// 端口號輸入Row({ space: 10 }) {Text('端口號:').fontSize(16).width(80)TextInput({ text: this.serverPort }).width('60%').onChange((value: string) => {this.serverPort = value;})}.width('100%').justifyContent(FlexAlign.Start)// 連接按鈕Button(this.isConnected ? '斷開連接' : '連接').width('80%').height(40).backgroundColor(this.isConnected ? '#ff4d4f' : '#1890ff').onClick(() => {this.toggleConnection();})// 消息輸入框TextInput({ placeholder: '輸入要發送的消息', text: this.message }).width('90%').height(60).margin({ top: 20 }).onChange((value: string) => {this.message = value;})// 發送按鈕Button('發送').width('80%').height(40).margin({ top: 10 }).onClick(() => {this.sendMessage();})// 消息顯示區域Scroll() {Text(this.receivedData).width('90%').fontSize(14).textAlign(TextAlign.Start).padding(10).backgroundColor('#f5f5f5')}.width('100%').height(200).margin({ top: 20 }).border({ width: 1, color: '#d9d9d9' })}.width('100%').height('100%').padding(20).justifyContent(FlexAlign.Start)}
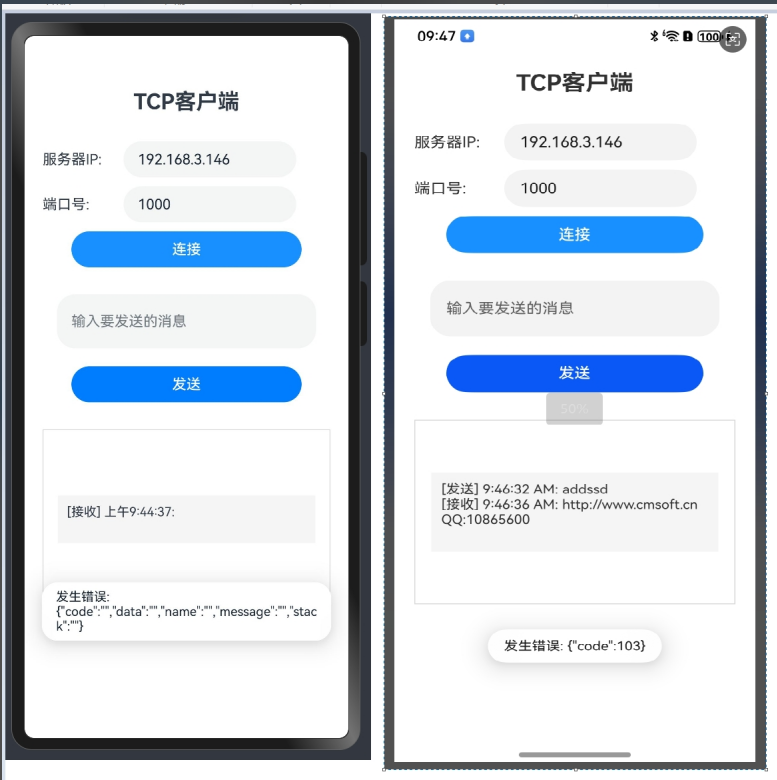
}三、效果演示
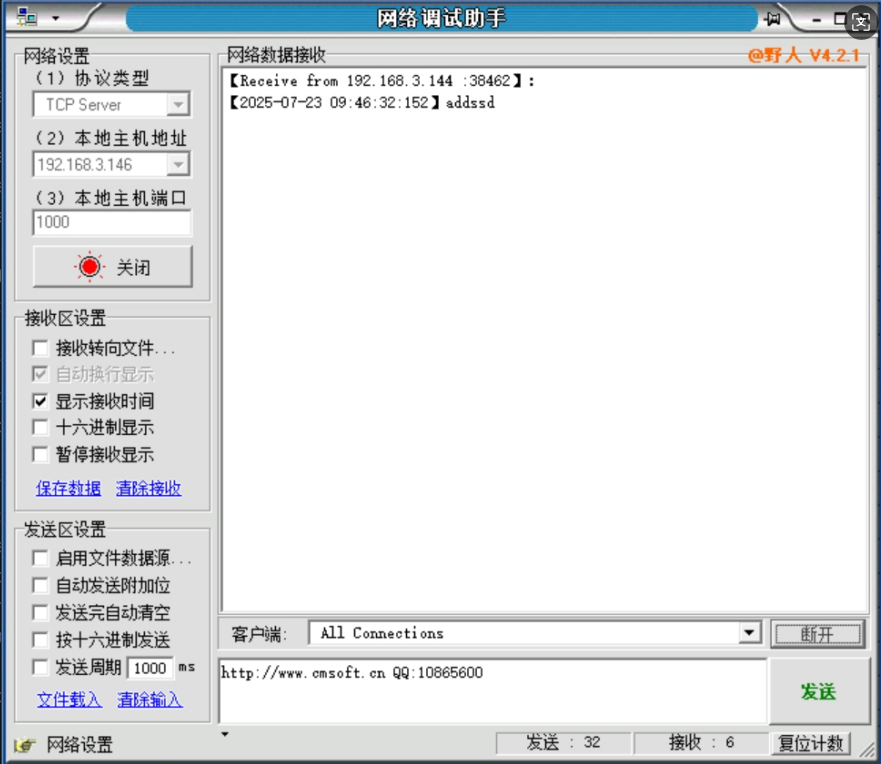
3.1? 首先搭建服務器端,這里使用了網絡調試助手,設置ip和端口號,打開。
3.2? APP的效果和設置

)


)

)
)


——光照渲染Froxelizer實現分析)


