設備:Jetson Orin nx
系統:Ubuntu 20.04
雙目視覺:zed 2
結果展示:
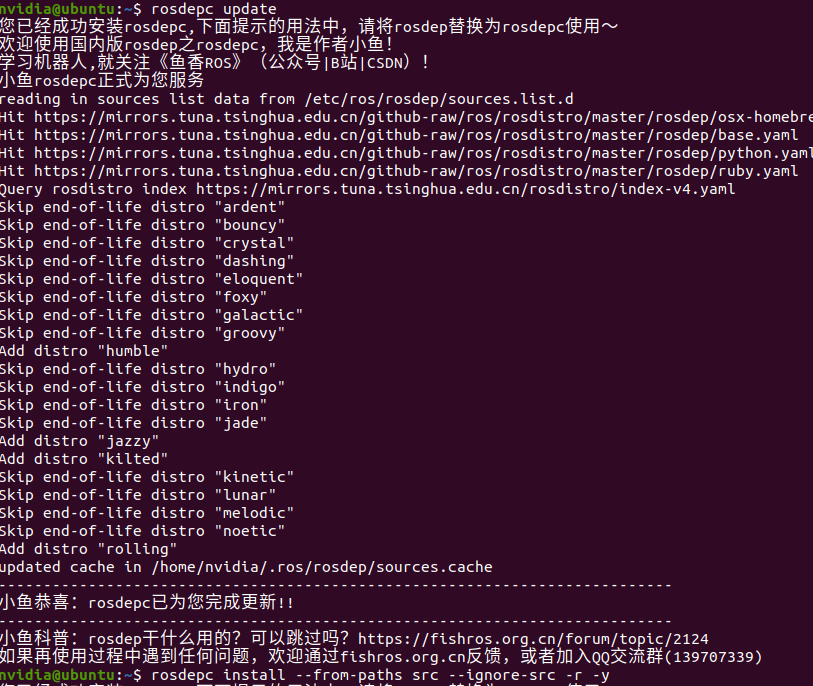
官網中的rosdep install --from-paths src --ignore-src -r -y如果連不上,可以用小魚rosdepc進行替換:
安裝標定工具:
1、使用kalibr工具標定ZED2雙目相機(時間較長,1 hr)。
2、用imu_utils標定IMU,依次安裝編譯code_utils、imu_utils (這兩個比較好裝,找github安裝即可)。
安裝kalibr:
sudo apt update
sudo apt-get install python3-setuptools python3-rosinstall ipython3 libeigen3-dev libboost-all-dev doxygen libopencv-dev ros-noetic-vision-opencv ros-noetic-image-transport-plugins ros-noetic-cmake-modules python3-software-properties software-properties-common libpoco-dev python3-matplotlib python3-scipy python3-git python3-pip libtbb-dev libblas-dev liblapack-dev libv4l-dev python3-catkin-tools python3-igraph libsuitesparse-dev
# 安裝時間較長,預計一個小時以上
pip3 install wxPython sudo pip3 install python-igraph --upgrademkdir ~/kalibr_ws/src
cd ~/kalibr_ws/src
git clone --recursive https://github.com/ori-drs/kalibrcd ~/kalibr_ws
source /opt/ros/noetic/setup.bash
catkin init
catkin config --extend /opt/ros/noetic
catkin config --merge-devel # Necessary for catkin_tools >= 0.4.
catkin config --cmake-args -DCMAKE_BUILD_TYPE=Release# 安裝時間較長,預計一個小時以上
catkin build -DCMAKE_BUILD_TYPE=Release -j4
采集雙目視覺制作標定用的bag文件:
# 打開一個終端,讀取相關zed2的話題內容
cd zed_ws
roslaunch zed_wrapper zed2.launch# 打開以下三個終端,分別設置IMU與雙目視覺的話題頻率
rosrun topic_tools throttle messages /zed2/zed_node/imu/data_raw  200 /zed2/zed_node/imu/data_raw2rosrun topic_tools throttle messages /zed2/zed_node/left/image_rect_color 20.0 /zed2/zed_node/left/image_rect_color2rosrun topic_tools throttle messages /zed2/zed_node/right/image_rect_color 20.0 /zed2/zed_node/right/image_rect_color2# 打開以下兩個終端,查看雙目視覺的頻率
rostopic hz /zed2/zed_node/left/image_rect_color2rostopic hz /zed2/zed_node/right/image_rect_color2# 打開一個終端,查看雙目視覺的可視化,以確保標定板始終在全部在視野范圍內
rosrun image_view image_view image:=/zed2/zed_node/left/image_rect_color & rosrun image_view image_view image:=/zed2/zed_node/right/image_rect_color # 打開下面一個終端進行錄包
rosbag record -O Kalib_data_vga.bag /zed2/zed_node/imu/data_raw2 /zed2/zed_node/left/image_rect_color2 /zed2/zed_node/right/image_rect_color2
雙目視覺標定代碼部分,最好用相對位置:
# 帶時間分段
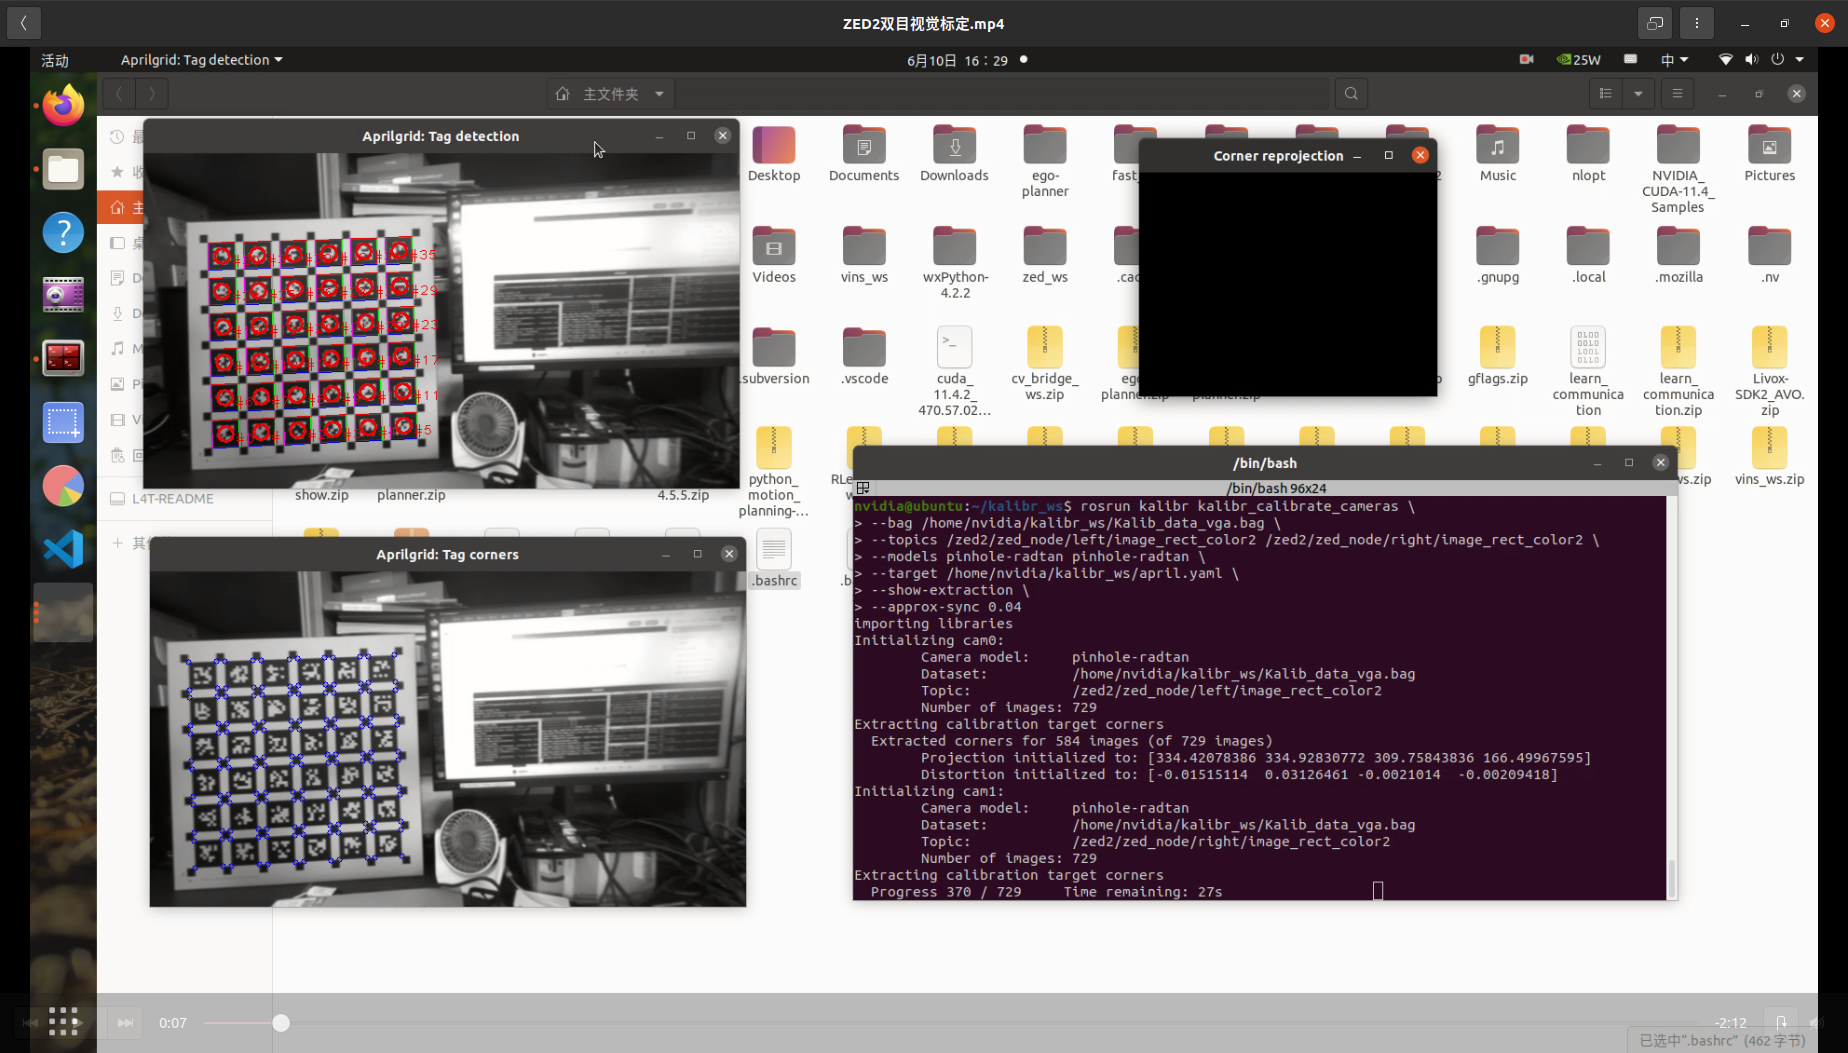
rosrun kalibr kalibr_calibrate_cameras --bag /home/nvidia/kalibr_ws/Kalib_data_vga.bag --topics /zed2/zed_node/left/image_rect_color2 /zed2/zed_node/right/image_rect_color2 --models pinhole-radtan pinhole-radtan --target /home/nvidia/kalibr_ws/april.yaml --bag-from-to 5 150 --show-extraction --approx-sync 0.04# 不帶時間分段
rosrun kalibr kalibr_calibrate_cameras --bag /home/nvidia/kalibr_ws/Kalib_data_vga.bag --topics /zed2/zed_node/left/image_rect_color2 /zed2/zed_node/right/image_rect_color2 --models pinhole-radtan pinhole-radtan --target /home/nvidia/kalibr_ws/april.yaml --show-extraction --approx-sync 0.04# 進入到kalibr_ws文件夾下,yaml和bag最好用相對位置
rosrun kalibr kalibr_calibrate_cameras --bag Kalib_data_vga.bag --topics /zed2/zed_node/left/image_rect_color2 /zed2/zed_node/right/image_rect_color2 --models pinhole-radtan pinhole-radtan --target april.yaml --bag-from-to 5 150 --show-extraction --approx-sync 0.04
?--bag-from-to 5 150 這個選項的作用是指定從一個 .bag 文件中讀取數據的時間范圍,其中的兩個數字分別表示開始時間和結束時間,單位是秒。
依賴插件安裝報錯問題:
wxpython安裝:
非常緩慢,可能需要一到兩個小時,但是確實可以裝上,只能用以下指令安裝,等就行了。
pip3 install wxpythonImportError: /usr/local/lib/python3.8/dist-packages/igraph/../igraph.libs/libgomp-d22c30c5.so.1.0.0: cannot allocate memory in static TLS block

# 檢查 igraph 使用的庫??
ldd /usr/local/lib/python3.8/dist-packages/igraph/_igraph.cpython-*.so | grep gomp
/usr/lib/gcc/aarch64-linux-gnu/10/libgomp.so (0x0000ffff81671000)
??? libgomp-d22c30c5.so.1.0.0 => /usr/local/lib/python3.8/dist-packages/igraph/../igraph.libs/libgomp-d22c30c5.so.1.0.0 (0x0000ffff8161d000)
根據ldd的輸出,igraph的模塊加載了兩個不同的libgomp版本:
- 一個是系統gcc10的
libgomp.so(路徑為/usr/lib/gcc/aarch64-linux-gnu/10/libgomp.so) - 另一個是igraph自帶的
libgomp-d22c30c5.so.1.0.0
這導致了沖突,因為兩個版本的OpenMP庫被同時加載,而靜態TLS內存不足以容納兩個庫。
刪除或重命名igraph自帶的libgomp??(這樣就不會被加載):
sudo mv /usr/local/lib/python3.8/dist-packages/igraph/../igraph.libs/libgomp-d22c30c5.so.1.0.0 /usr/local/lib/python3.8/dist-packages/igraph/../igraph.libs/libgomp-d22c30c5.so.1.0.0.bak這會使igraph無法找到自帶的庫,從而回退到系統庫?
設置LD_PRELOAD為系統庫??:
export LD_PRELOAD=/usr/lib/aarch64-linux-gnu/libgomp.so.1?運行kalibr命令??:
rosrun kalibr kalibr_calibrate_cameras \
--bag /home/nvidia/kalibr_ws/Kalib_data_vga.bag \
--topics /zed2/zed_node/left/image_rect_color2 /zed2/zed_node/right/image_rect_color2 \
--models pinhole-radtan pinhole-radtan \
--target /home/nvidia/kalibr_ws/april.yaml \
--show-extraction \
--approx-sync 0.04
標定過程出現的問題:
如果出現報錯:
[ERROR] [1749602137.037109]: [TargetViewTable]: Tried to add second view to a given cameraId & timestamp. Maybe try to reduce the approximate syncing tolerance.
這個錯誤明確指出了同步問題:在同一個時間戳上有多個圖像幀試圖映射到同一相機ID上。原因是您當前的近似同步容忍度設置過高(--approx-sync 0.04),導致不同時間點的圖像被匹配到相同時間戳。?
則降低--approx-sync 0.04的值,比如說降低到0.02或者0.01試試。
報錯:
[ERROR] [1749605435.840354]: Did not converge in maxIterations... restarting...
[ WARN] [1749605435.846113]: Optimization diverged possibly due to a bad initialization. (Do the models fit the lenses well?)
[ WARN] [1749605435.851867]: Restarting for a new attempt...
[注意]:標定板不要離開相機視野范圍,開始和結束要平穩進行,盡量使標定板出現在視野所有角落,可以打開相機視角進行查看,以保證標定板在相機的范圍內。!!!!因為一次標定時長很長,所以千萬注意數據包的有效性。
保存路徑報錯問題:
Processed 1978 images with 98 images used
Camera-system parameters:cam0 (/zed2/zed_node/left/image_rect_color2):type: <class 'aslam_cv.libaslam_cv_python.DistortedPinholeCameraGeometry'>distortion: [-0.02382763  0.01629181  0.00026011  0.00037113] +- [0.00108974 0.00094976 0.00027375 0.00033212]projection: [260.71076493 260.87946198 319.83263746 174.02627529] +- [0.78613123 0.77906412 0.43553872 0.33612348]reprojection error: [-0.000017, 0.000003] +- [0.181615, 0.159810]cam1 (/zed2/zed_node/right/image_rect_color2):type: <class 'aslam_cv.libaslam_cv_python.DistortedPinholeCameraGeometry'>distortion: [-0.03399342  0.03044787  0.00013933 -0.00001722] +- [0.00134309 0.00149905 0.00027161 0.00032987]projection: [260.94581834 261.09354315 321.15981684 173.98065983] +- [0.78872497 0.78202592 0.42413571 0.32633954]reprojection error: [0.000015, -0.000001] +- [0.147800, 0.136867]baseline T_1_0:q: [-0.00003511  0.00109749  0.00009766  0.99999939] +- [0.000853   0.00117251 0.0001395 ]t: [-0.11982954  0.00005466 -0.00037704] +- [0.00020272 0.00019293 0.0005048 ]Traceback (most recent call last):File "/home/nvidia/kalibr_ws/src/kalibr/aslam_offline_calibration/kalibr/python/kalibr_common/ConfigReader.py", line 221, in writeYamlwith open(filename, 'w') as outfile:
FileNotFoundError: [Errno 2] 沒有那個文件或目錄: 'camchain-/home/nvidia/kalibr_ws/Kalib_data_vga02.yaml'During handling of the above exception, another exception occurred:Traceback (most recent call last):File "/home/nvidia/kalibr_ws/devel/lib/kalibr/kalibr_calibrate_cameras", line 15, in <module>exec(compile(fh.read(), python_script, 'exec'), context)File "/home/nvidia/kalibr_ws/src/kalibr/aslam_offline_calibration/kalibr/python/kalibr_calibrate_cameras", line 447, in <module>main()File "/home/nvidia/kalibr_ws/src/kalibr/aslam_offline_calibration/kalibr/python/kalibr_calibrate_cameras", line 408, in mainkcc.saveChainParametersYaml(calibrator, resultFile, graph)File "/home/nvidia/kalibr_ws/src/kalibr/aslam_offline_calibration/kalibr/python/kalibr_camera_calibration/CameraCalibrator.py", line 711, in saveChainParametersYamlchain.writeYaml()File "/home/nvidia/kalibr_ws/src/kalibr/aslam_offline_calibration/kalibr/python/kalibr_common/ConfigReader.py", line 224, in writeYamlself.raiseError( "Could not write configuration to {0}".format(self.yamlFile) )File "/home/nvidia/kalibr_ws/src/kalibr/aslam_offline_calibration/kalibr/python/kalibr_common/ConfigReader.py", line 234, in raiseErrorraise RuntimeError( "{0}{1}".format(header, message) )
RuntimeError: [CameraChainParameters Reader]: Could not write configuration to camchain-/home/nvidia/kalibr_ws/Kalib_data_vga02.yaml導出文件的位置問題:這個錯誤是由于文件路徑不完整導致的。在保存標定結果時,Kalibr試圖將結果寫入到文件camchain-/home/nvidia/kalibr_ws/Kalib_data_vga02.yaml,但是路徑中多了一個斜杠。正確的路徑應該是/home/nvidia/kalibr_ws/camchain-Kalib_data_vga02.yaml。
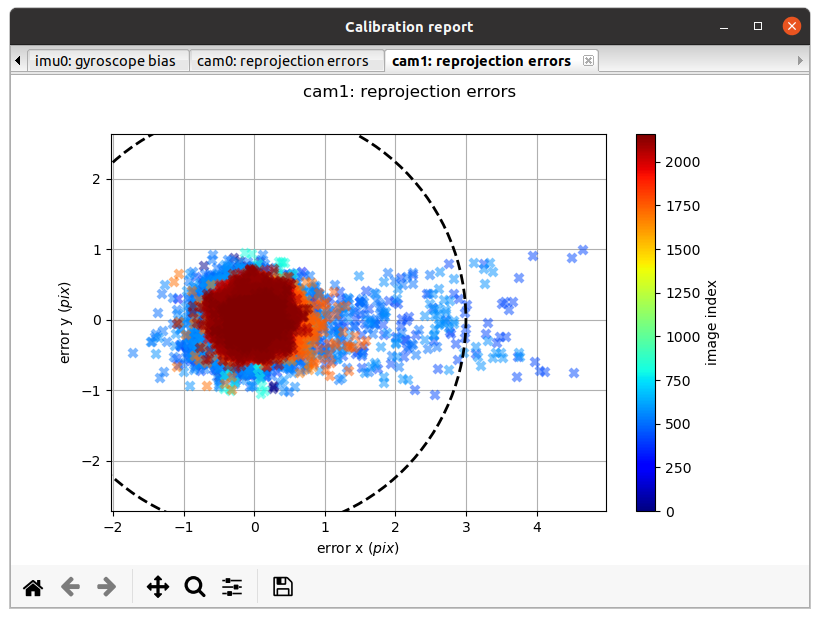
標定結果:
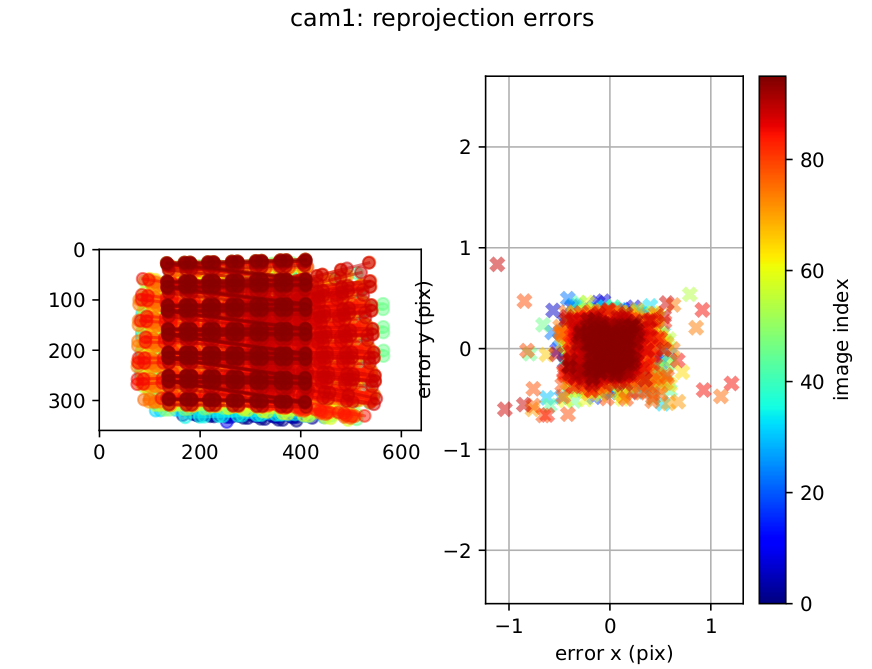 ?
?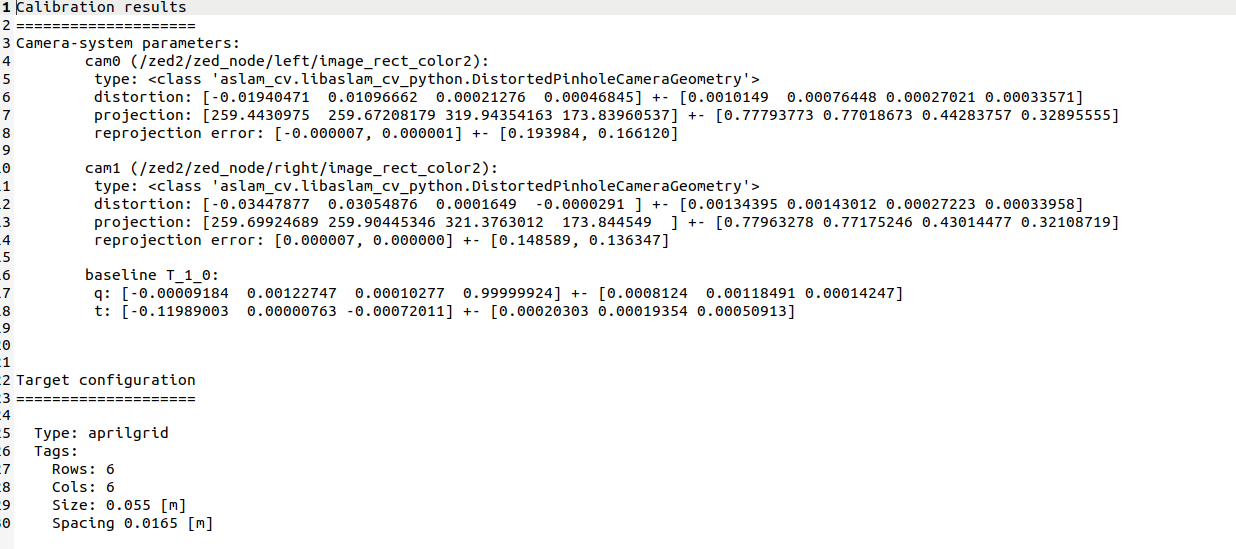
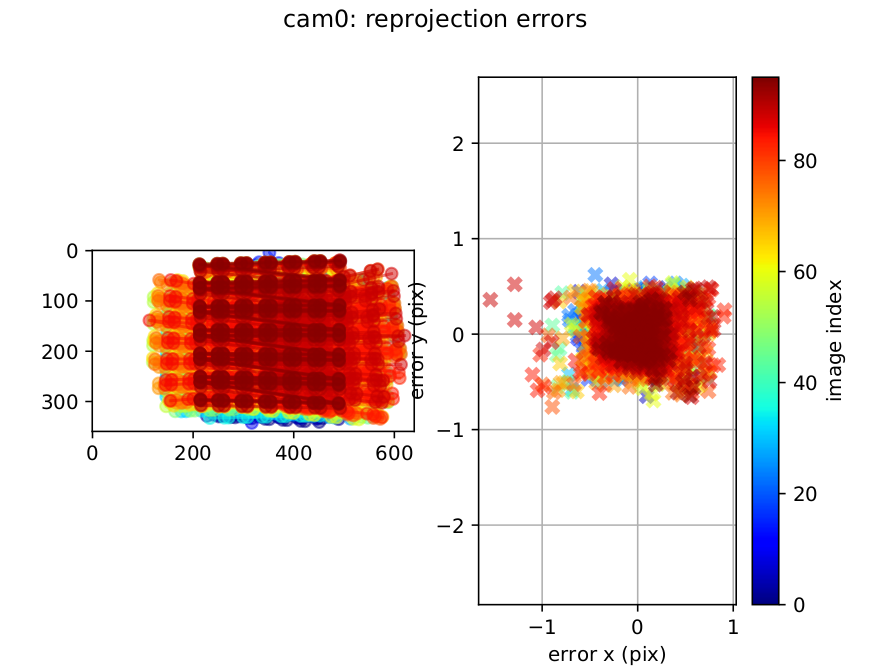
雙目視覺標定完成!!像素誤差還是能夠接受的。
IMU標定:
## 數據采集
source devel/setup.bashroslaunch zed_wrapper zed2.launch## 單獨錄制imu
rosbag record -O zed-imu-calibrate.bag /zed2/zed_node/imu/data_raw
標定結果:
運行imu標定:
source devel/setup.bashroslaunch imu_utils zed_imu.launch# 新打開一個終端 播放imu
rosbag play -r 200 /home/nvidia/imu_utils/zed_imu/zed-imu-calibrate.bag
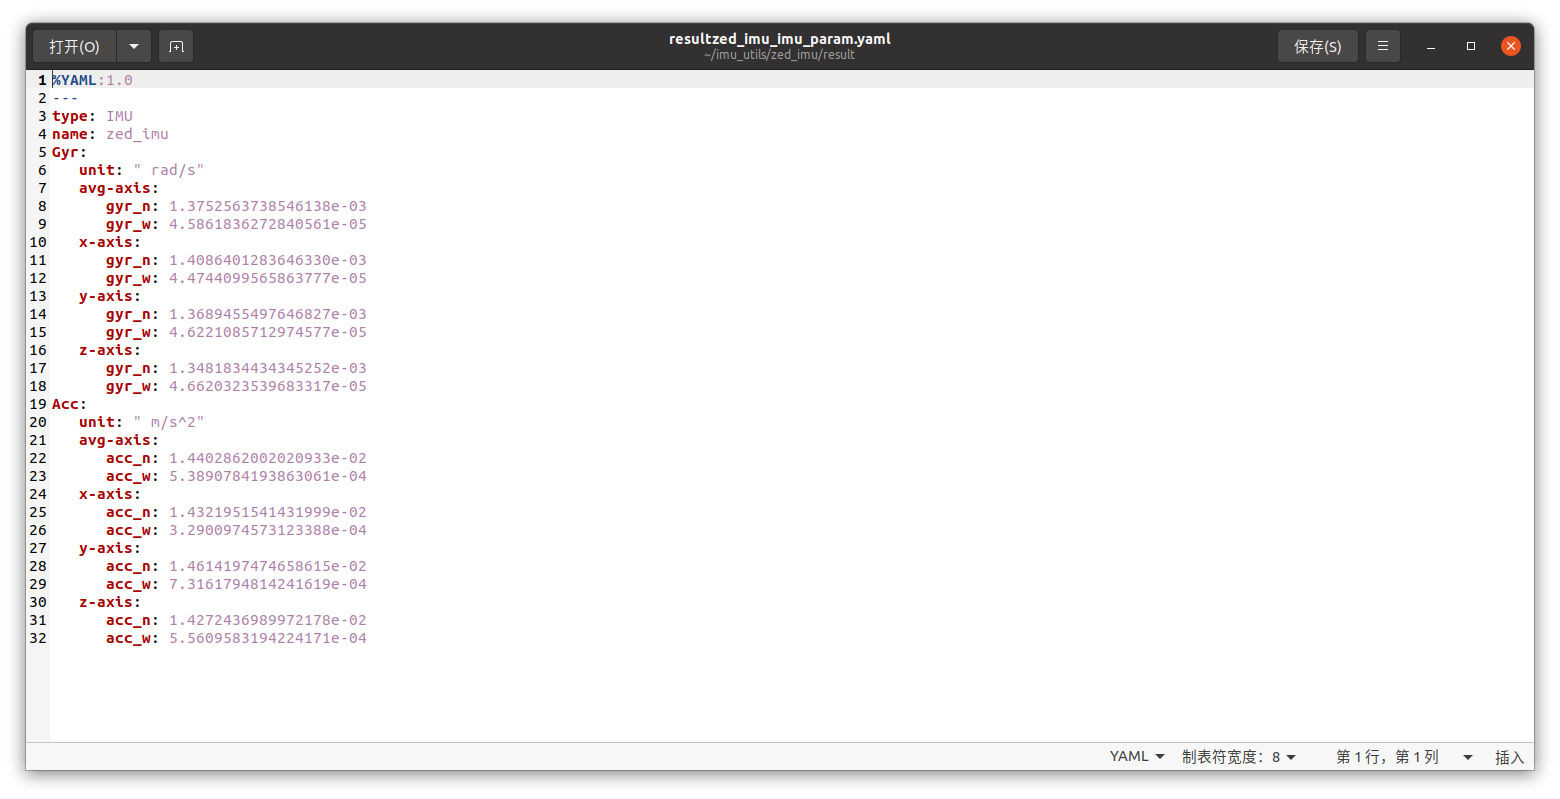
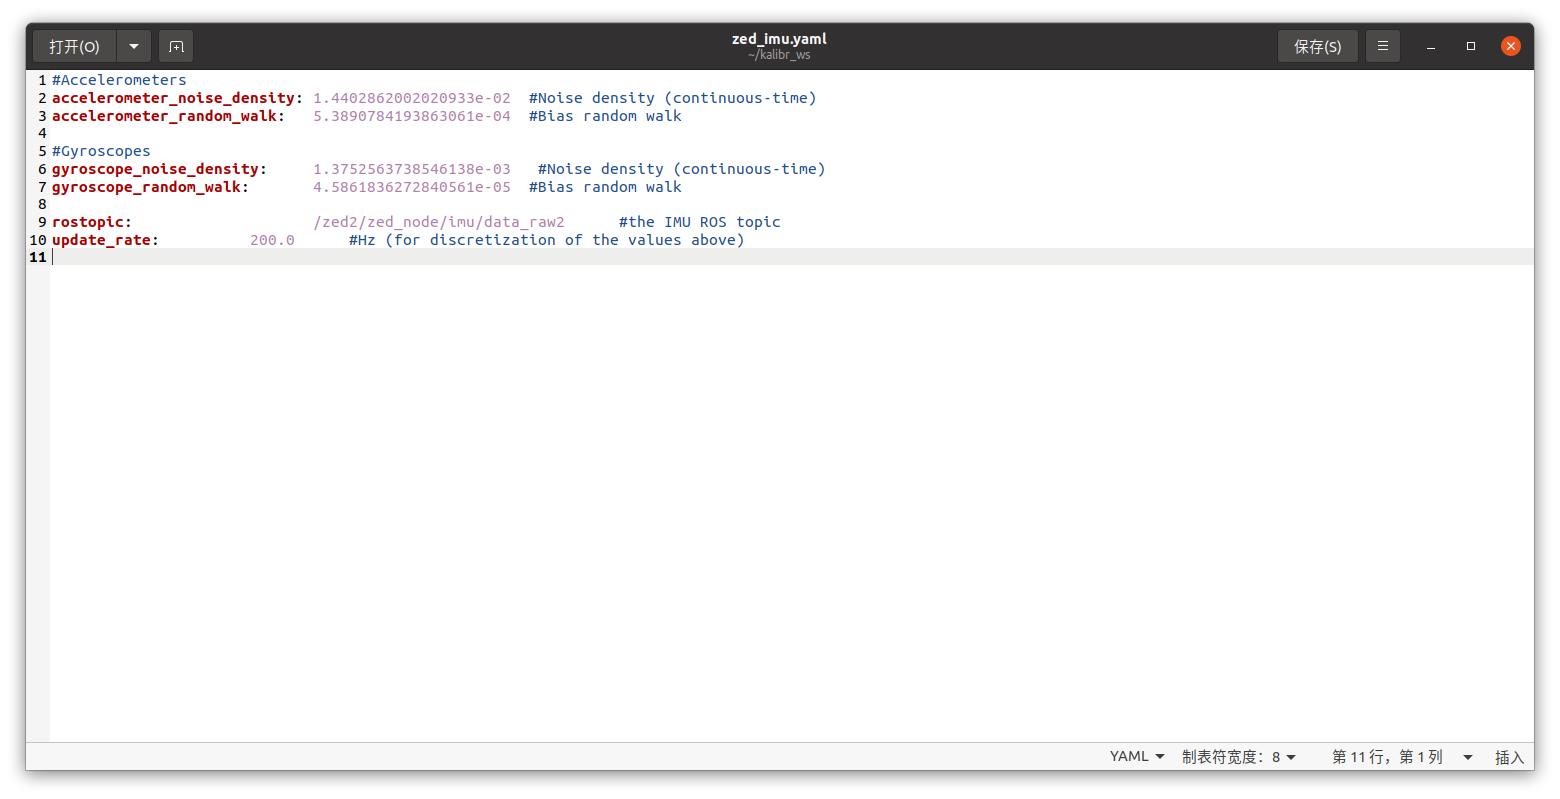
自己編輯文本imu.yaml將結果填入其中:
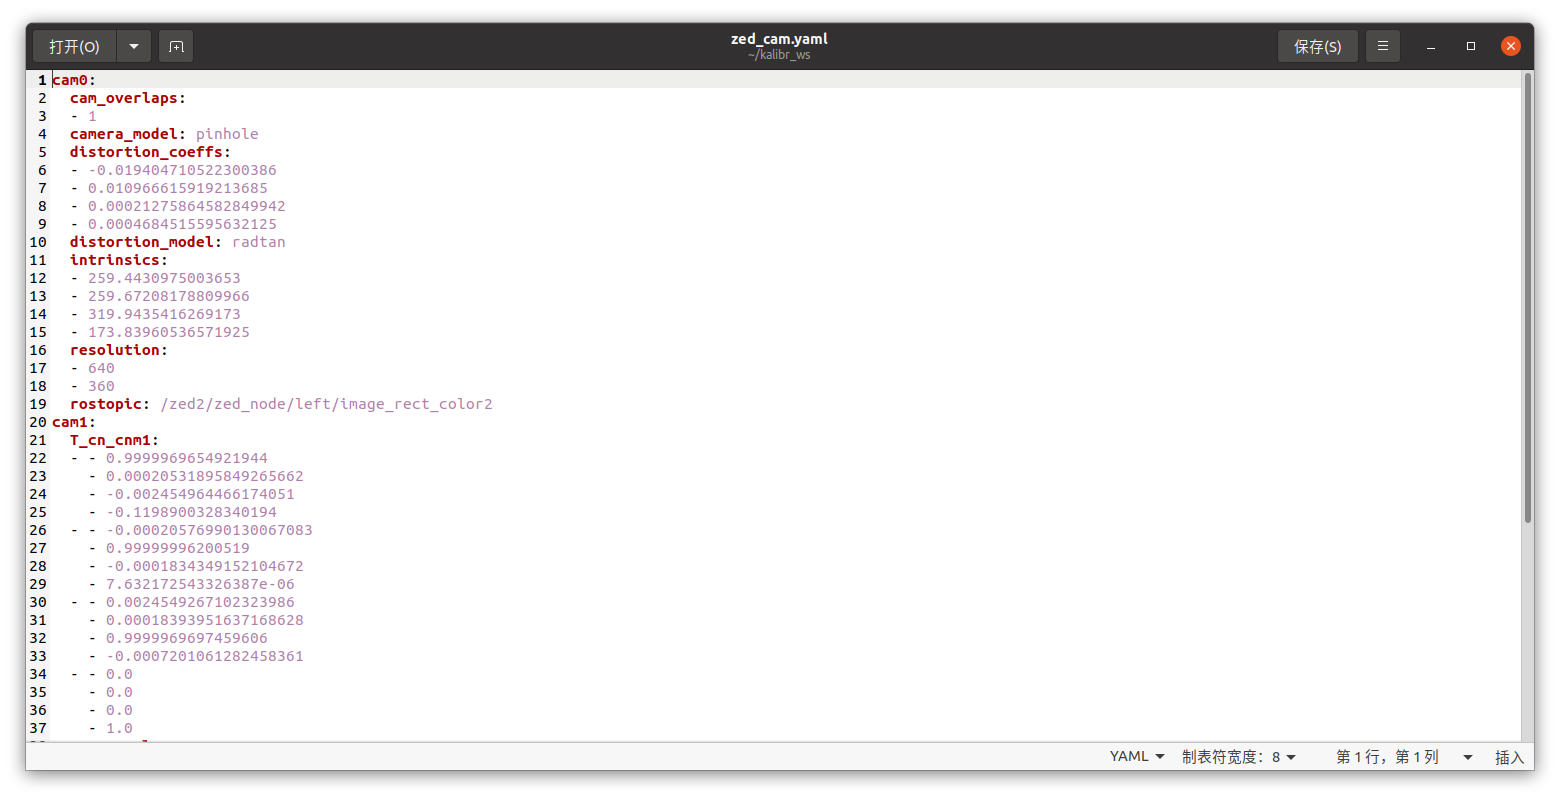
IMU+雙目視覺融合標定:
準備之前做雙目標定準備的雙目視覺的bag,以及相機標定的yaml、imu的yaml還有april二維碼的yaml。
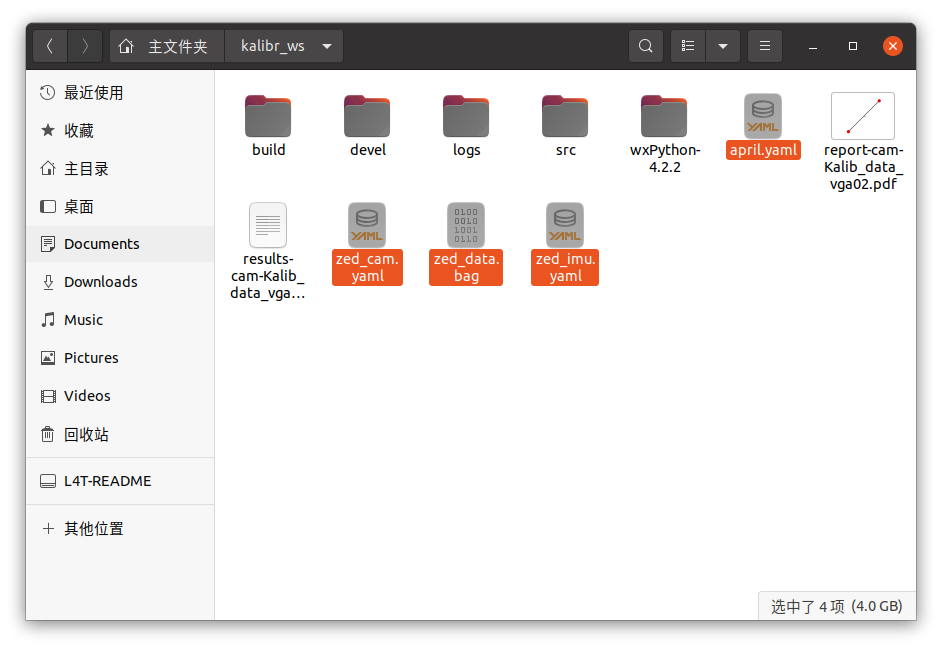
雙目視覺的bag:zed_data.bag
雙目視覺標定的yaml:zed_cam.yaml
IMU的標定的yaml:zed_imu.yaml
標定板的yaml:april.yaml
標定過程:
cd kalibr_wssource devel/setup.bash# imu+雙目
rosrun kalibr kalibr_calibrate_imu_camera --bag zed_data.bag --target april.yaml --cam zed_cam.yaml --imu zed_imu.yaml
加載時間較長,耐心等待!!!
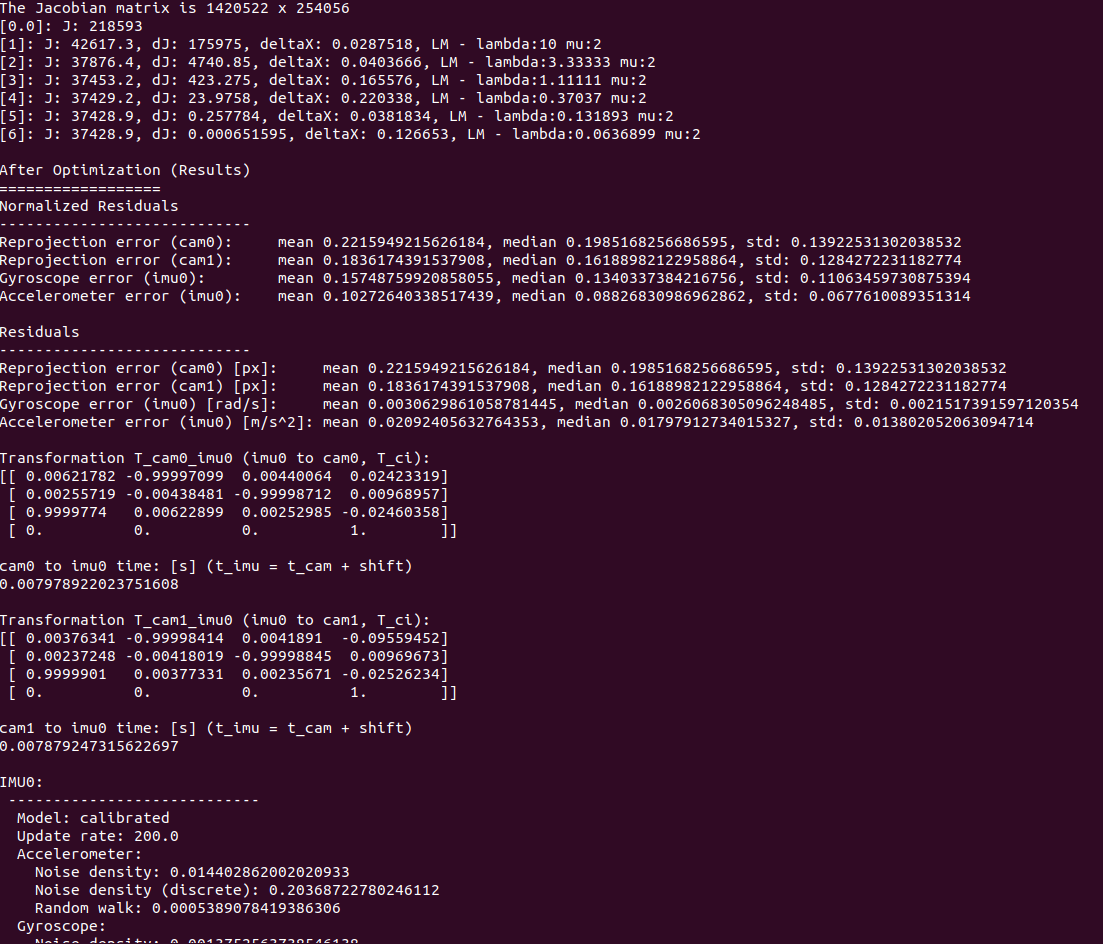
標定結果:

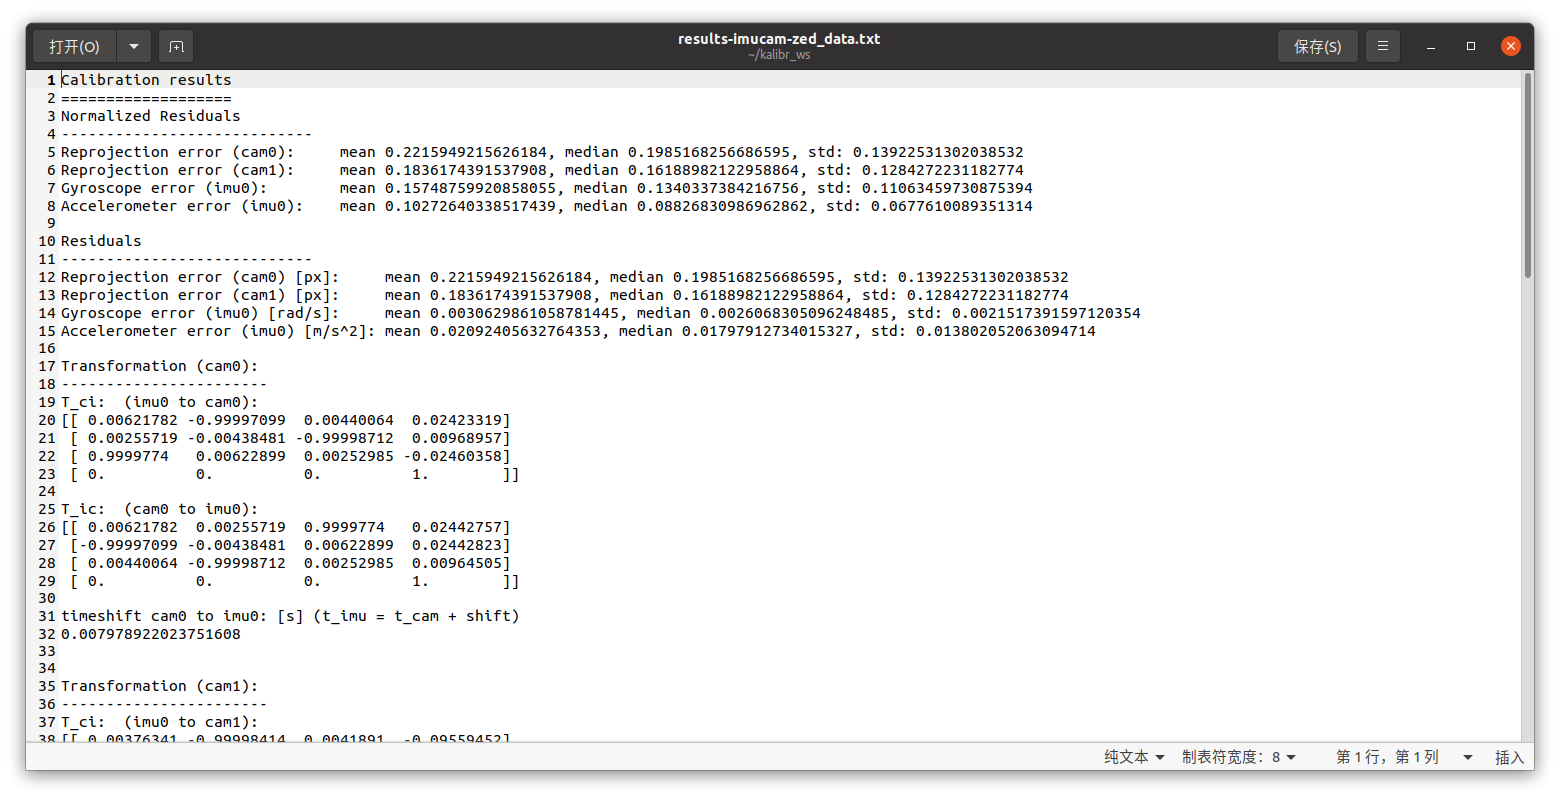
兩個相機的數值都在0.2左右稍微偏大點。
在Vins Fusion的config文件中構建用于zed相機使用的yaml:
新建一個zed文件夾,里面包括cam0.yaml,cam1.yaml,zed2_stereo_config.yaml

cam0.yaml:
%YAML:1.0
---
model_type: PINHOLE
camera_name: camera
image_width: 640
image_height: 360
distortion_parameters:k1: 0k2: 0p1: 0p2: 0
projection_parameters:fx: 259.4430975003653fy: 259.67208178809966cx: 319.9435416269173cy: 173.83960536571925
?cam1:
%YAML:1.0
---
model_type: PINHOLE
camera_name: camera
image_width: 640
image_height: 360
distortion_parameters:k1: 0k2: 0p1: 0p2: 0
projection_parameters:fx: 259.6992468904268fy: 259.9044534627534cx: 321.37630119603097cy: 173.84454900322726
其中projection_parameters中的參數來自于跑雙目標定的yaml中的參數intrinsics:
?zed2_stereo_config.yaml:
%YAML:1.0#common parameters
#support: 1 imu 1 cam; 1 imu 2 cam: 2 cam;
imu: 1
num_of_cam: 2  #實時相機
imu_topic: "/zed2/zed_node/imu/data_raw"
image0_topic: "/zed2/zed_node/left/image_rect_gray"
image1_topic: "/zed2/zed_node/right/image_rect_gray"# 錄制bag包
#imu_topic: "/zed2/zed_node/imu/data_raw2"
#image0_topic: "/zed2/zed_node/left/image_rect_color2"
#image1_topic: "/zed2/zed_node/right/image_rect_color2"
output_path: "~"cam0_calib: "cam0.yaml"
cam1_calib: "cam1.yaml"
image_width: 640
image_height: 360# Extrinsic parameter between IMU and Camera.
estimate_extrinsic: 0   # 0  Have an accurate extrinsic parameters. We will trust the following imu^R_cam, imu^T_cam, don't change it.# 1  Have an initial guess about extrinsic parameters. We will optimize around your initial guess.body_T_cam0: !!opencv-matrixrows: 4cols: 4dt: ddata: [0.00621782, 0.00255719, 0.9999774, 0.02442757,-0.99997099, -0.00438481, 0.00622899, 0.02442823,0.00440064, -0.99998712, 0.00252985, 0.00964505,0, 0, 0, 1]body_T_cam1: !!opencv-matrixrows: 4cols: 4dt: ddata: [0.00376341, 0.00237248, 0.9999901, 0.02559884,-0.99998414, -0.00418019, 0.00377331, -0.09545715,0.0041891, -0.99998845, 0.00235671, 0.01015661,0, 0, 0, 1]#Multiple thread support
multiple_thread: 0#feature traker paprameters
max_cnt: 150            # max feature number in feature tracking
min_dist: 30            # min distance between two features
freq: 10                # frequence (Hz) of publish tracking result. At least 10Hz for good estimation. If set 0, the frequence will be same as raw image
F_threshold: 1.0        # ransac threshold (pixel)
show_track: 1           # publish tracking image as topic
flow_back: 1            # perform forward and backward optical flow to improve feature tracking accuracy#optimization parameters
max_solver_time: 0.04  # max solver itration time (ms), to guarantee real time
max_num_iterations: 8   # max solver itrations, to guarantee real time
keyframe_parallax: 10.0 # keyframe selection threshold (pixel)#imu parameters       The more accurate parameters you provide, the better performance
acc_n: 1.4402862002020933e-02          # accelerometer measurement noise standard deviation.
gyr_n: 1.3752563738546138e-03         # gyroscope measurement noise standard deviation.
acc_w: 5.3890784193863061e-04        # accelerometer bias random work noise standard deviation.
gyr_w: 4.5861836272840561e-05       # gyroscope bias random work noise standard deviation.
g_norm: 9.81007     # gravity magnitude
# acc_n: 0.1          # accelerometer measurement noise standard deviation.
# gyr_n: 0.01         # gyroscope measurement noise standard deviation.
# acc_w: 0.001        # accelerometer bias random work noise standard deviation.
# gyr_w: 0.0001       # gyroscope bias random work noise standard deviation.
# g_norm: 9.81007     # gravity magnitude#unsynchronization parameters
estimate_td: 0                      # online estimate time offset between camera and imu
td: 0.0                             # initial value of time offset. unit: s. readed image clock + td = real image clock (IMU clock)#loop closure parameters
load_previous_pose_graph: 0        # load and reuse previous pose graph; load from 'pose_graph_save_path'
pose_graph_save_path: "~/output/pose_graph/" # save and load path
save_image: 1                   # save image in pose graph for visualization prupose; you can close this function by setting 0
其中兩個 相機的矩陣來自于imu與雙目視覺標定得到的從cam到imu的矩陣:
body_T_cam0: !!opencv-matrixrows: 4cols: 4dt: ddata: [0.00621782, 0.00255719, 0.9999774, 0.02442757,-0.99997099, -0.00438481, 0.00622899, 0.02442823,0.00440064, -0.99998712, 0.00252985, 0.00964505,0, 0, 0, 1]body_T_cam1: !!opencv-matrixrows: 4cols: 4dt: ddata: [0.00376341, 0.00237248, 0.9999901, 0.02559884,-0.99998414, -0.00418019, 0.00377331, -0.09545715,0.0041891, -0.99998845, 0.00235671, 0.01015661,0, 0, 0, 1]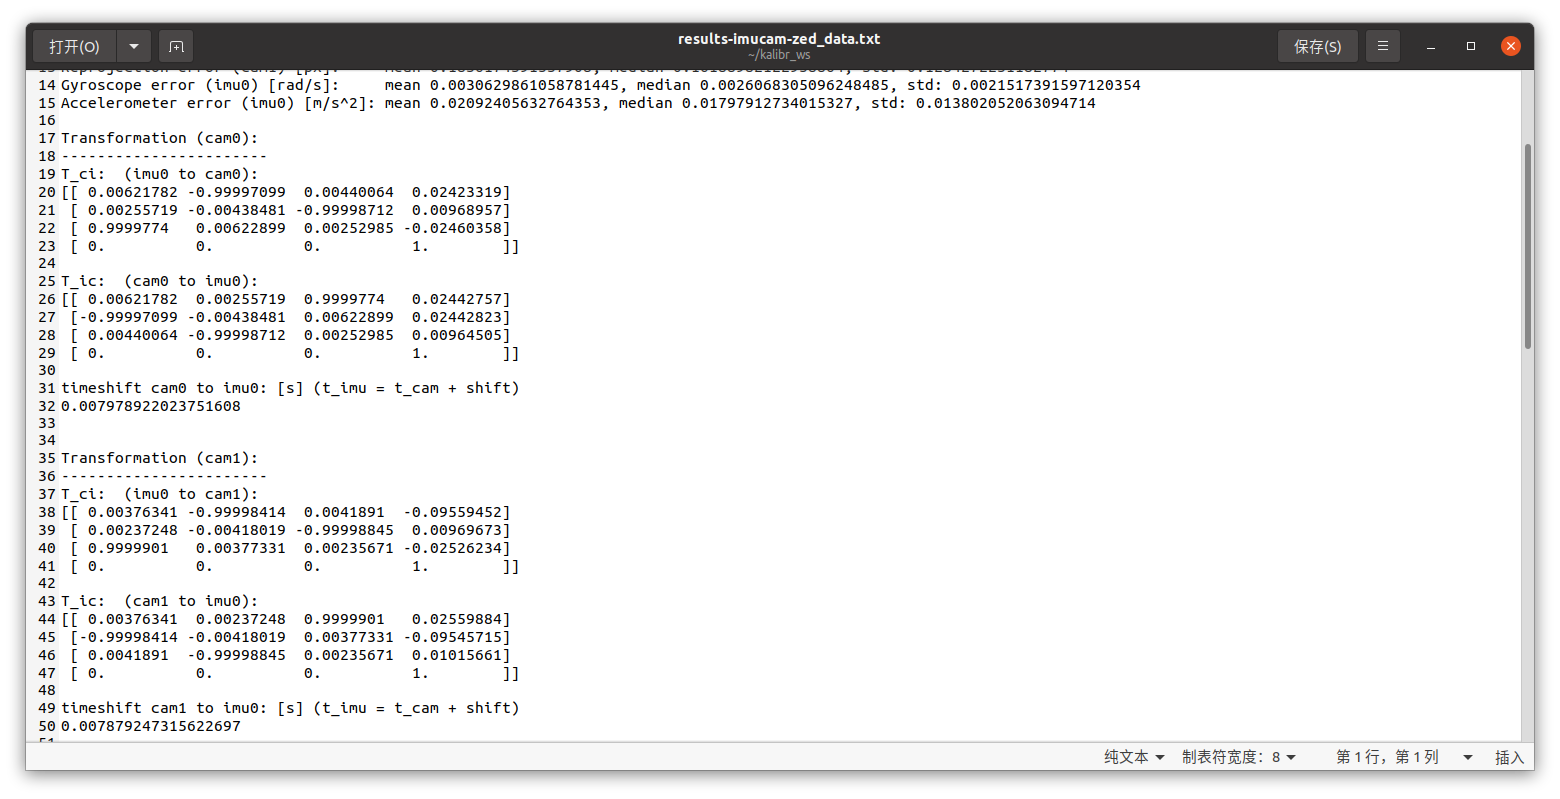 ?注意:是其中cam到imu的矩陣,即第二個矩陣。
注意:這里配置文件中的body_T_cam0: !!opencv-matrix和body_T_cam1: !!opencv-matrix是imu0 to cma0的變換矩陣,VIINS FUSION需要的是cam to imu,因此需要取逆這里也可以看生成的result-imucam.txt文件,里面直接有各個轉換矩陣,如(imu0 to cam0)就是imu到相機,以此類推,就可以不用以下的求逆代碼內容。
然后運行Vins Fusion:
通過自己寫的bash文件:
# run.sh文件#!/bin/bash# Start RViz
gnome-terminal -- bash -c "source devel/setup.bash && roslaunch vins vins_rviz.launch"# Start VINS-Fusion node
sleep 5
gnome-terminal -- bash -c "source devel/setup.bash && rosrun vins vins_node src/VINS-Fusion/config/zed/zed2_stereo_config.yaml"#回環檢測
sleep 5
gnome-terminal -- bash -c "source devel/setup.bash && rosrun loop_fusion loop_fusion_node src/config/zed/zed2_stereo_config.yaml"## 實時相機
sleep 5
gnome-terminal -- bash -c "source devel/setup.bash && source /home/nvidia/zed_ws/devel/setup.bash && roslaunch zed_wrapper zed2.launch"# Play rosbag
# sleep 5
# gnome-terminal -- bash -c "source devel/setup.bash && rosbag play /home/nvidia/data_set/MH_01_easy.bag"# Keep the terminal open until you manually close it
echo "Press Enter to close the terminals"
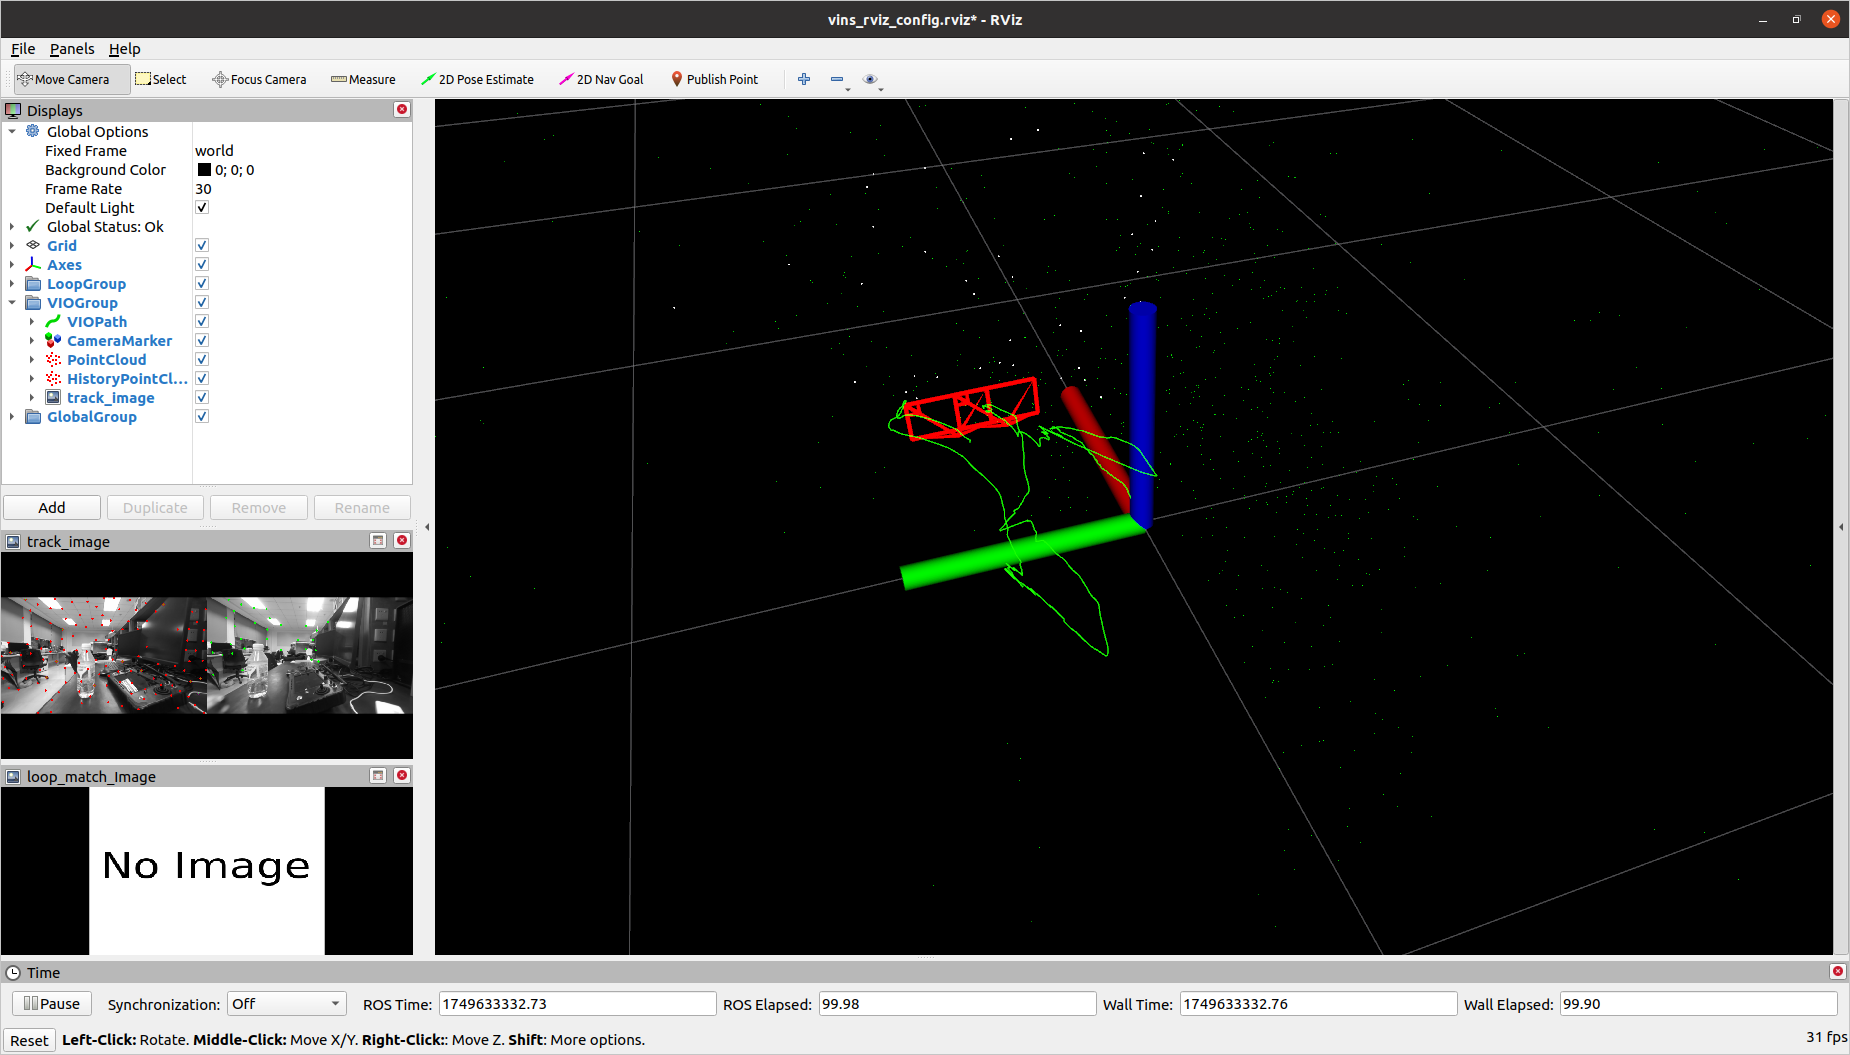
read就可以得到下面的效果了!!!
參考博客:
ZED2相機標定--雙目、IMU、聯合標定_cameras are not connected through mutual observati-CSDN博客
ZED雙目相機標定跑通vins fusion_zed相機雙目標定-CSDN博客
ZED2相機IMU聯合標定&&運行vins-mono_extending kalibr:-CSDN博客


模式與AP(Access Point)模式)


)


![P8784 [藍橋杯 2022 省 B] 積木畫](http://pic.xiahunao.cn/P8784 [藍橋杯 2022 省 B] 積木畫)
)
