GPU內存不夠,可以先運行umt5,然后再運行wanpipeline,參考FLUX.1代碼筆記,或者使用ComfyUI。
下面使用隨機數代替umt5 embedding。
import torch
from diffusers.utils import export_to_video
from diffusers import AutoencoderKLWan, WanPipeline
from diffusers.schedulers.scheduling_unipc_multistep import UniPCMultistepScheduler
# Available models: Wan-AI/Wan2.1-T2V-14B-Diffusers, Wan-AI/Wan2.1-T2V-1.3B-Diffusers
model_id = "Wan-AI/Wan2___1-T2V-1___3B-Diffusers"vae = AutoencoderKLWan.from_pretrained(model_id, subfolder="vae", torch_dtype=torch.float32)
pipe = WanPipeline.from_pretrained(model_id, tokenizer=None,text_encoder=None,vae=vae, torch_dtype=torch.bfloat16)
flow_shift = 3.0  # 5.0 for 720P, 3.0 for 480P
pipe.scheduler = UniPCMultistepScheduler.from_config(pipe.scheduler.config, flow_shift=flow_shift)
pipe.to("cuda")
prompt_embeds = torch.randn(1,226,4096).to('cuda')  #隨機數
negative_prompt_embeds = torch.randn(1,226,4096).to('cuda') #隨機數output = pipe(prompt=None,negative_prompt=None,prompt_embeds = prompt_embeds,negative_prompt_embeds = negative_prompt_embeds,num_inference_steps = 1,height=480,width=832,num_frames=81,guidance_scale=6.0,).frames[0]export_to_video(output, "output.mp4", fps=16)
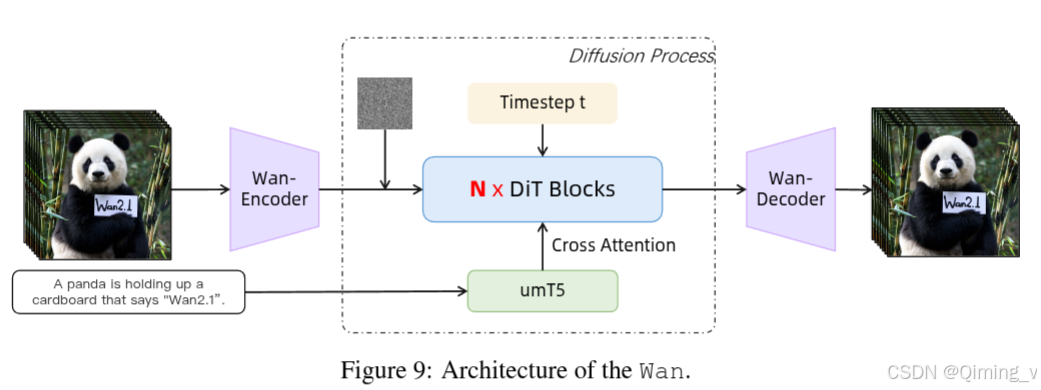
WanPipeline的步驟和文生圖的步驟基本一致。
1.檢查輸入;
2.定義參數;
3.encode prompt;
4.準備timesteps;
5.準備latent;
6.循環去噪,最后decode.
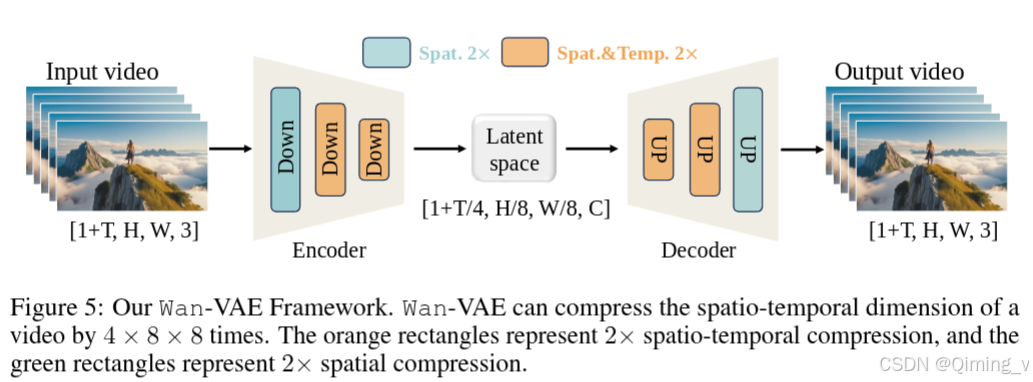
圖5,Wan-VAE 在時間維度上壓縮了4倍,空間維度上長和寬分別壓縮了8倍。
channel數為16,latent的維度就是(1,16,21,60,104)
num_latent_frames = (num_frames - 1) // self.vae_scale_factor_temporal + 1 #(81-1)/4+1shape = (batch_size, #1num_channels_latents, #16num_latent_frames,int(height) // self.vae_scale_factor_spatial, #480/8int(width) // self.vae_scale_factor_spatial, #832/8)
WanTransformer3DModel
在patchify中,WanTransformer3DModel 使用(1,2,2)的3D卷積核,將輸入的序列轉換為(B,L,D)維度,其中B為batch size,L為(1+T/4)×H/16×W/16,D為latent的維度。
self.rope = WanRotaryPosEmbed(attention_head_dim, patch_size, rope_max_seq_len)
self.patch_embedding = nn.Conv3d(in_channels, inner_dim, kernel_size=patch_size, stride=patch_size)rotary_emb = self.rope(hidden_states) #(1,1,32760,64)
hidden_states = self.patch_embedding(hidden_states) #(1,1536,21,30,52)
hidden_states = hidden_states.flatten(2).transpose(1, 2)#(1,32760,1536)temb, timestep_proj, encoder_hidden_states, encoder_hidden_states_image = self.condition_embedder(timestep, encoder_hidden_states, encoder_hidden_states_image) #(1,1536),(1,9216),(1,226,1536),None
timestep_proj = timestep_proj.unflatten(1, (6, -1))#(1,6,1536)if encoder_hidden_states_image is not None:encoder_hidden_states = torch.concat([encoder_hidden_states_image, encoder_hidden_states], dim=1)for block in self.blocks:hidden_states = block(hidden_states, encoder_hidden_states, timestep_proj, rotary_emb)# 5. Output norm, projection & unpatchify
shift, scale = (self.scale_shift_table + temb.unsqueeze(1)).chunk(2, dim=1)# Move the shift and scale tensors to the same device as hidden_states.
# When using multi-GPU inference via accelerate these will be on the
# first device rather than the last device, which hidden_states ends up
# on.
shift = shift.to(hidden_states.device)
scale = scale.to(hidden_states.device)hidden_states = (self.norm_out(hidden_states.float()) * (1 + scale) + shift).type_as(hidden_states)
hidden_states = self.proj_out(hidden_states)hidden_states = hidden_states.reshape(batch_size, post_patch_num_frames, post_patch_height, post_patch_width, p_t, p_h, p_w, -1
)
hidden_states = hidden_states.permute(0, 7, 1, 4, 2, 5, 3, 6)
output = hidden_states.flatten(6, 7).flatten(4, 5).flatten(2, 3)if USE_PEFT_BACKEND:# remove `lora_scale` from each PEFT layerunscale_lora_layers(self, lora_scale)if not return_dict:return (output,)return Transformer2DModelOutput(sample=output)
WanTransformerBlock
1.3B模型有30個WanTransformerBlock,DiT結構。30個WanTransformerBlock是共享temb參數的,在每個Block中學習一個偏差self.scale_shift_table,self.scale_shift_table = nn.Parameter(torch.randn(1, 6, dim) / dim**0.5),通過大量實驗證明,這種設計可使參數數量減少約 25%,并表明在相同參數規模下,該方法能顯著提升性能。
class WanTransformerBlock(nn.Module):def forward(self,hidden_states: torch.Tensor,encoder_hidden_states: torch.Tensor,temb: torch.Tensor,rotary_emb: torch.Tensor,) -> torch.Tensor:shift_msa, scale_msa, gate_msa, c_shift_msa, c_scale_msa, c_gate_msa = (self.scale_shift_table + temb.float()).chunk(6, dim=1)# 1. Self-attentionnorm_hidden_states = (self.norm1(hidden_states.float()) * (1 + scale_msa) + shift_msa).type_as(hidden_states)attn_output = self.attn1(hidden_states=norm_hidden_states, rotary_emb=rotary_emb)hidden_states = (hidden_states.float() + attn_output * gate_msa).type_as(hidden_states)# 2. Cross-attentionnorm_hidden_states = self.norm2(hidden_states.float()).type_as(hidden_states)attn_output = self.attn2(hidden_states=norm_hidden_states, encoder_hidden_states=encoder_hidden_states)hidden_states = hidden_states + attn_output# 3. Feed-forwardnorm_hidden_states = (self.norm3(hidden_states.float()) * (1 + c_scale_msa) + c_shift_msa).type_as(hidden_states)ff_output = self.ffn(norm_hidden_states)hidden_states = (hidden_states.float() + ff_output.float() * c_gate_msa).type_as(hidden_states)return hidden_states
vae.decode
遍歷全部的frame。
x = self.post_quant_conv(z) #(1,16,21,60,104)for i in range(num_frame): #21self._conv_idx = [0]if i == 0:out = self.decoder(x[:, :, i : i + 1, :, :], feat_cache=self._feat_map, feat_idx=self._conv_idx)else:out_ = self.decoder(x[:, :, i : i + 1, :, :], feat_cache=self._feat_map, feat_idx=self._conv_idx)out = torch.cat([out, out_], 2)out = torch.clamp(out, min=-1.0, max=1.0)self.clear_cache()
1.3B模型中,feat_cache是一個長度為33的list,在完整的decode過程中,需要用到33個Conv3d。
def _count_conv3d(model):count = 0for m in model.modules():if isinstance(m, WanCausalConv3d):count += 1return countself._conv_num = _count_conv3d(self.decoder)self._conv_idx = [0]self._feat_map = [None] * self._conv_num
class WanDecoder3d是執行Vae decode的類。根據圖5,這里要運行兩次時間維度的放大和三次空間維度的放大。
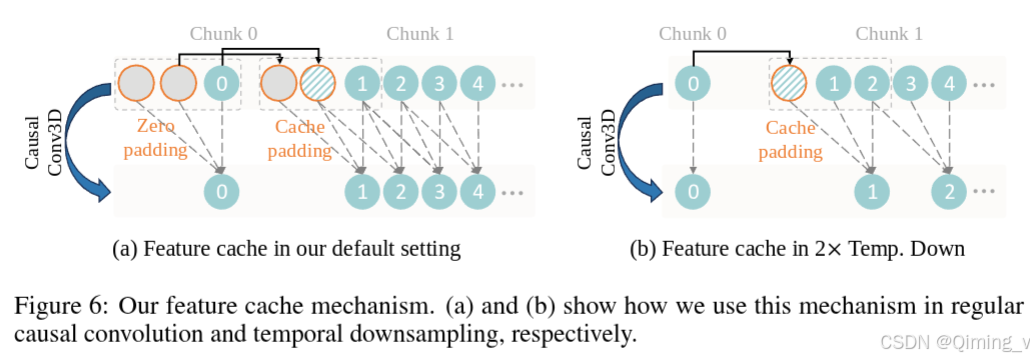
CACHE_T = 2,緩存后兩個frame的值。
緩存處理,除了前兩個frame的feat_cache要特殊處理,每個feat_cache元素都含有兩個frame,然后和當前的frame湊成3個frame進行下一步計算。同時取feat_cache元素的最后一個frame和當前的frame,更新feat_cache。如圖6
class WanDecoder3d:def forward(self, x, feat_cache=None, feat_idx=[0]):## conv1if feat_cache is not None:idx = feat_idx[0]cache_x = x[:, :, -CACHE_T:, :, :].clone()if cache_x.shape[2] < 2 and feat_cache[idx] is not None:# cache last frame of last two chunkcache_x = torch.cat([feat_cache[idx][:, :, -1, :, :].unsqueeze(2).to(cache_x.device), cache_x], dim=2)x = self.conv_in(x, feat_cache[idx]) #(1,384,1,60,104)feat_cache[idx] = cache_xfeat_idx[0] += 1else:x = self.conv_in(x)## middlex = self.mid_block(x, feat_cache, feat_idx)#(1,384,1,60,104)## upsamplesfor up_block in self.up_blocks:x = up_block(x, feat_cache, feat_idx) #(1,192,2,120,208),(1,192,4,240,416),(1,96,4,480,832),(1,96,4,480,832)## headx = self.norm_out(x)x = self.nonlinearity(x)if feat_cache is not None:idx = feat_idx[0]cache_x = x[:, :, -CACHE_T:, :, :].clone()if cache_x.shape[2] < 2 and feat_cache[idx] is not None:# cache last frame of last two chunkcache_x = torch.cat([feat_cache[idx][:, :, -1, :, :].unsqueeze(2).to(cache_x.device), cache_x], dim=2)x = self.conv_out(x, feat_cache[idx])feat_cache[idx] = cache_xfeat_idx[0] += 1else:x = self.conv_out(x)return x
WanCausalConv3d
class WanCausalConv3d(nn.Conv3d):r"""A custom 3D causal convolution layer with feature caching support.This layer extends the standard Conv3D layer by ensuring causality in the time dimension and handling featurecaching for efficient inference.Args:in_channels (int): Number of channels in the input imageout_channels (int): Number of channels produced by the convolutionkernel_size (int or tuple): Size of the convolving kernelstride (int or tuple, optional): Stride of the convolution. Default: 1padding (int or tuple, optional): Zero-padding added to all three sides of the input. Default: 0"""def __init__(self,in_channels: int,out_channels: int,kernel_size: Union[int, Tuple[int, int, int]],stride: Union[int, Tuple[int, int, int]] = 1,padding: Union[int, Tuple[int, int, int]] = 0,) -> None:super().__init__(in_channels=in_channels,out_channels=out_channels,kernel_size=kernel_size,stride=stride,padding=padding,)# Set up causal paddingself._padding = (self.padding[2], self.padding[2], self.padding[1], self.padding[1], 2 * self.padding[0], 0)self.padding = (0, 0, 0)def forward(self, x, cache_x=None):padding = list(self._padding)if cache_x is not None and self._padding[4] > 0:cache_x = cache_x.to(x.device)x = torch.cat([cache_x, x], dim=2)padding[4] -= cache_x.shape[2]x = F.pad(x, padding)return super().forward(x)
空間維度,self.resample,nn.Upsample上采樣擴大2倍,然后維度縮小1/2.
時間維度,nn.Conv3d,輸出維度擴大2倍。
if mode == "upsample2d":self.resample = nn.Sequential(WanUpsample(scale_factor=(2.0, 2.0), mode="nearest-exact"), nn.Conv2d(dim, dim // 2, 3, padding=1))elif mode == "upsample3d":self.resample = nn.Sequential(WanUpsample(scale_factor=(2.0, 2.0), mode="nearest-exact"), nn.Conv2d(dim, dim // 2, 3, padding=1))self.time_conv = WanCausalConv3d(dim, dim * 2, (3, 1, 1), padding=(1, 0, 0))class WanUpsample(nn.Upsample):def forward(self, x):return super().forward(x.float()).type_as(x)
upsample blocks
ModuleList((0): WanUpBlock((resnets): ModuleList((0-2): 3 x WanResidualBlock((nonlinearity): SiLU()(norm1): WanRMS_norm()(conv1): WanCausalConv3d(384, 384, kernel_size=(3, 3, 3), stride=(1, 1, 1))(norm2): WanRMS_norm()(dropout): Dropout(p=0.0, inplace=False)(conv2): WanCausalConv3d(384, 384, kernel_size=(3, 3, 3), stride=(1, 1, 1))(conv_shortcut): Identity()))(upsamplers): ModuleList((0): WanResample((resample): Sequential((0): WanUpsample(scale_factor=(2.0, 2.0), mode='nearest-exact')(1): Conv2d(384, 192, kernel_size=(3, 3), stride=(1, 1), padding=(1, 1)))(time_conv): WanCausalConv3d(384, 768, kernel_size=(3, 1, 1), stride=(1, 1, 1)))))(1): WanUpBlock((resnets): ModuleList((0): WanResidualBlock((nonlinearity): SiLU()(norm1): WanRMS_norm()(conv1): WanCausalConv3d(192, 384, kernel_size=(3, 3, 3), stride=(1, 1, 1))(norm2): WanRMS_norm()(dropout): Dropout(p=0.0, inplace=False)(conv2): WanCausalConv3d(384, 384, kernel_size=(3, 3, 3), stride=(1, 1, 1))(conv_shortcut): WanCausalConv3d(192, 384, kernel_size=(1, 1, 1), stride=(1, 1, 1)))(1-2): 2 x WanResidualBlock((nonlinearity): SiLU()(norm1): WanRMS_norm()(conv1): WanCausalConv3d(384, 384, kernel_size=(3, 3, 3), stride=(1, 1, 1))(norm2): WanRMS_norm()(dropout): Dropout(p=0.0, inplace=False)(conv2): WanCausalConv3d(384, 384, kernel_size=(3, 3, 3), stride=(1, 1, 1))(conv_shortcut): Identity()))(upsamplers): ModuleList((0): WanResample((resample): Sequential((0): WanUpsample(scale_factor=(2.0, 2.0), mode='nearest-exact')(1): Conv2d(384, 192, kernel_size=(3, 3), stride=(1, 1), padding=(1, 1)))(time_conv): WanCausalConv3d(384, 768, kernel_size=(3, 1, 1), stride=(1, 1, 1)))))(2): WanUpBlock((resnets): ModuleList((0-2): 3 x WanResidualBlock((nonlinearity): SiLU()(norm1): WanRMS_norm()(conv1): WanCausalConv3d(192, 192, kernel_size=(3, 3, 3), stride=(1, 1, 1))(norm2): WanRMS_norm()(dropout): Dropout(p=0.0, inplace=False)(conv2): WanCausalConv3d(192, 192, kernel_size=(3, 3, 3), stride=(1, 1, 1))(conv_shortcut): Identity()))(upsamplers): ModuleList((0): WanResample((resample): Sequential((0): WanUpsample(scale_factor=(2.0, 2.0), mode='nearest-exact')(1): Conv2d(192, 96, kernel_size=(3, 3), stride=(1, 1), padding=(1, 1))))))(3): WanUpBlock((resnets): ModuleList((0-2): 3 x WanResidualBlock((nonlinearity): SiLU()(norm1): WanRMS_norm()(conv1): WanCausalConv3d(96, 96, kernel_size=(3, 3, 3), stride=(1, 1, 1))(norm2): WanRMS_norm()(dropout): Dropout(p=0.0, inplace=False)(conv2): WanCausalConv3d(96, 96, kernel_size=(3, 3, 3), stride=(1, 1, 1))(conv_shortcut): Identity())))
)


)


