目錄
- 一、概念簡單回顧
- 二、Python的線程開發
- 2.1 Thread類
- 2.1.1 線程啟動
- 2.1.2 線程退出
- 2.1.3 線程的傳參
- 2.1.4 threading的屬性和方法
- 2.1.5 Thread實例的屬性和方法
- 2.1.6 start和run方法
- 2.2 多線程
- 2.3 線程安全
- 2.4 daemon線程
- 2.5 threading.local類
- 2.6 __slots__拓展
- 三、線程同步
- 3.1 Event
- 3.2 線程鎖Lock
- 3.3 遞歸鎖RLock
- 3.4 同步協作Condition
- 3.5 Queue的線程安全
在網絡開發中,一臺服務器在同一時間內往往需要服務成千上萬個客戶端,因此并發編程應運而生,并發是大數據運算和網絡編程必須考慮的問題。實現并發的方式有多種,如多進程、多線程、協程等,Python 支持多進程、多線程、協程技術,能夠實現在同一時間內運行多個任務。本文將介紹 Python 線程的工作機制和基本應用。
【學習重點】
- 了解什么是進程和線程
- 掌握正確創建線程的方法
- 使用線程鎖
- 熟悉線程之間的通信方式
一、概念簡單回顧
在 《100天精通Python——基礎篇 2025 第19天:并發編程啟蒙——理解CPU、線程與進程的那些事》一文中我們詳細講解了一些基礎概念,包括操作系統、CPU、進程、線程等,由本文開始正式進入編程階段,故先對其中的一些概念進行一下簡單的復習。
并發和并行區別:
- 并行,Parallelism: 同時做某些事,可以互不干擾的同一個時刻做幾件事
- 并發,Concurrency: 也是同時做某些事,但是強調,一個時段內有事情要處理。
- 舉例: 高速公路的車道,雙向4車道,所有車輛(數據)可以互不干擾的在自己的車道上奔跑(傳輸)。在同一個時刻,每條車道上可能同時有車輛在跑,是同時發生的概念,這是并行。在一段時間內,有這么多車要通過,這是并發。并行不過是使用水平擴展方式解決并發的一種手段而已。
進程和線程:
- 進程(Process)是計算機中的程序關于某數據集合上的一次運行活動,是操作系統進行資源分配和調度的基本單位,是操作系統結構的基礎。
- 進程和程序的關系:程序是源代碼編譯后的文件,而這些文件存放在磁盤上。當程序被操作系統加載到內存中,就是進程,進程中存放著指令和數據(資源)。一個程序的執行實例就是一個進程。它也是線程的容器。Linux 進程有父進程、子進程,Windows 的進程是平等關系。
- 在實現了線程的操作系統中,線程是操作系統能夠進行運算調度的最小單位。它被包含在進程之中,是進程中的實際運作單位。線程,有時被稱為輕量級進程(Lightweight Process,LWP),是程序執行流的最小單元。一個標準的線程由線程 ID,當前指令指針(PC)、寄存器集合和堆、棧組成(前面也提到過)。在許多系統中,創建一個線程比創建一個進程快
10-100倍。 - 進程、線程的理解: 現代操作系統提出進程的概念,每一個進程都認為自己獨占所有的計算機硬件資源。進程就是獨立的王國,進程間不可以隨便的共享數據。線程就是省份,同一個進程內的線程可以共享進程的資源,每一個線程擁有自己獨立的堆棧。
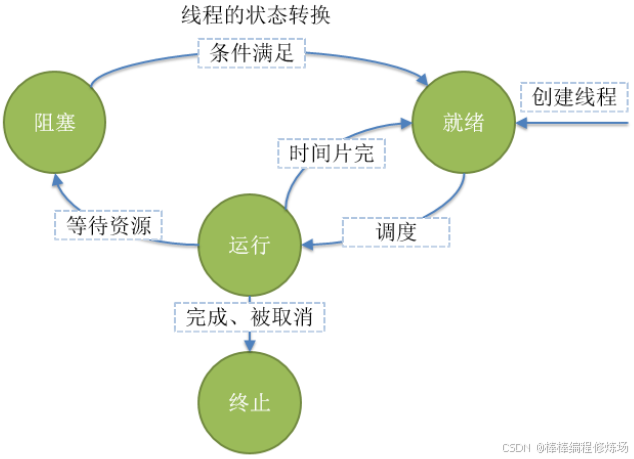
線程的狀態:
-
就緒(Ready): 線程能夠運行,但在等待被調度。可能線程剛剛創建啟動,或剛剛從阻塞中恢復,或者被其他線程搶占
-
運行(Running): 線程正在運行
-
阻塞(Blocked): 線程等待外部事件發生而無法運行,如 I/O 操作
-
終止(Terminated): 線程完成,或退出,或被取消
Python 中的進程和線程: 運行程序會啟動一個解釋器進程,線程共享一個解釋器進程。
二、Python的線程開發
Python 的線程開發使用標準庫 threading。 進程靠線程執行代碼,至少有一個主線程,其它線程是工作線程。主線程是第一個啟動的線程。父線程: 如果線程A中啟動了一個線程B,A就是B的父線程。子線程: B就是A的子線程。
2.1 Thread類
Python 中的線程是通過 threading 模塊來實現的。其核心是 Thread 類,用于創建并管理線程。
import threading
Thread 類參數詳解:
In [2]: threading.Thread?
Init signature:
threading.Thread(group=None,target=None,name=None,args=(),kwargs=None,*,daemon=None,
)
# 參數說明:
# 1.group: 保留參數,一般設置為None
# 2.target: 線程啟動后要執行的任務,即函數(寫函數名)
# 3.name: 線程名,后續可以使用線程對象.name屬性查看
# 4.args與kwargs: 傳遞給函數的參數,與正常函數傳參是一樣的,args傳給target的位置參數,kwargs傳給target的關鍵字參數
# 5.daemon: daemon是否為daemon(守護)線程,為True: 主線程結束時,子線程也會自動退出(daemon線程--守護線程),
# False: 主線程會等待子線程執行完畢,與缺省參數None效果是一樣的,后續會專門有一小節詳細講解daemon線程與non-daemon線程Docstring:
A class that represents a thread of control.This class can be safely subclassed in a limited fashion. There are two ways
to specify the activity: by passing a callable object to the constructor, or
by overriding the run() method in a subclass.
Init docstring:
This constructor should always be called with keyword arguments. Arguments are:*group* should be None; reserved for future extension when a ThreadGroup
class is implemented.*target* is the callable object to be invoked by the run()
method. Defaults to None, meaning nothing is called.*name* is the thread name. By default, a unique name is constructed of
the form "Thread-N" where N is a small decimal number.*args* is a list or tuple of arguments for the target invocation. Defaults to ().
2.1.1 線程啟動
# -*- coding: utf-8 -*-
# @Time    : 2025-05-20 10:54
# @Author  : AmoXiang
# @File    : 1.線程的啟動.py
# @Software: PyCharm
# @Blog: https://blog.csdn.net/xw1680import threading# 最簡單的線程程序
def worker():print('I"m working')print('Finished')t = threading.Thread(target=worker, name='worker')  # 線程對象
t.start()  # 啟動
通過 threading.Thread 創建一個線程對象,target 是目標函數,可以使用 name 為線程指定名稱。但是線程沒有啟動,需要調用 start 方法。線程之所以執行函數,是因為線程中就是要執行代碼的,而最簡單的代碼封裝就是函數,所以還是函數調用。函數執行完,線程也就退出了。那么,如果不讓線程退出,或者讓線程一直工作怎么辦呢?
# -*- coding: utf-8 -*-
# @Time    : 2025-05-20 10:54
# @Author  : AmoXiang
# @File    : 1.線程的啟動.py
# @Software: PyCharm
# @Blog: https://blog.csdn.net/xw1680import threading
import time# 最簡單的線程程序
def worker():# 使用while True 可以讓線程一直工作下去while True:  # for i in range(10):time.sleep(0.5)print('I"m working')print('Finished')t = threading.Thread(target=worker, name='worker')  # 線程對象
t.start()  # 啟動
print('~' * 30)  # 注意觀察這行~是什么時候打印的?
控制臺會先打印 '~',你可以這樣理解,線程啟動的一瞬間,我通知你了,你要去干 worker 的活,那通知到位之后,你怎么去處理我是不管的,我繼續執行我后續的任務,所以在這里你可能會先看到 '~',當然,如果在 worker 函數中,while True 下我們如果沒有設置延時操作,即 time.sleep(0.5),那么該函數中的 print('I"m working') 可能會與 print('~' * 30) 爭搶控制臺,所以你能先看到 I"m working 的結果也不一定。
2.1.2 線程退出
Python 沒有提供線程退出的方法,線程一般在下面情況時退出:
- 線程函數內語句執行完畢
- 線程函數中拋出未處理的異常
示例代碼:
# -*- coding: utf-8 -*-
# @Time    : 2025-05-20 11:09
# @Author  : AmoXiang
# @File    : 2.線程的退出.py
# @Software: PyCharm
# @Blog: https://blog.csdn.net/xw1680import threading
import timedef worker():for i in range(10):time.sleep(0.5)if i > 5:# break  # 終止循環# return  # 函數返回 finished 這個在打印的時候就看不到了# raise 1 / 0  # 拋異常raise RuntimeError  # 拋異常print('I am working')print('finished')t = threading.Thread(target=worker, name='worker')
t.start()
print('~' * 30)
Python 的線程沒有優先級、沒有線程組的概念,也不能被銷毀、停止、掛起,那也就沒有恢復、中斷了。
2.1.3 線程的傳參
線程傳參和函數傳參沒什么區別,本質上就是函數傳參。示例:
# -*- coding: utf-8 -*-
# @Time    : 2025-05-20 11:14
# @Author  : AmoXiang
# @File    : 3.線程的傳參.py
# @Software: PyCharm
# @Blog: https://blog.csdn.net/xw1680import threading, timedef add(x, y):print(f'{x} + {y} = {x + y}')t1 = threading.Thread(target=add, args=(1, 2))
t1.start()
time.sleep(0.5)t2 = threading.Thread(target=add, kwargs={'x': 3, 'y': 4})
t2.start()
time.sleep(0.5)# 傳參會報錯哦: TypeError: add() got multiple values for argument 'x'
# 前面的知識點,這里不再贅述
# t3 = threading.Thread(target=add, args=(6,), kwargs={'x': 5})
# t3 = threading.Thread(target=add, kwargs={'x': 5}, args=(6,))
# 正確寫法
t3 = threading.Thread(target=add, args=(6,), kwargs={'y': 5})
t3.start()
time.sleep(0.5)
2.1.4 threading的屬性和方法
下面是 Python threading 模塊中常用的一些 函數 的詳細說明:
| 函數名 | 說明 |
|---|---|
threading.active_count() | 返回當前活動線程的數量(包括主線程) |
threading.current_thread() | 返回當前調用者的控制線程的 Thread 對象 |
threading.enumerate() | 以列表形式返回當前所有存活的 Thread 對象 |
threading.get_ident() | 返回當前線程的 "線程標識符"(為一個非0整數,唯一) |
threading.get_native_id() | 返回操作系統分配的原生線程 ID(Python 3.8+) |
threading.main_thread() | 返回主 Thread 對象。一般情況下,主線程是 Python 解釋器開始時創建的線程。 |
threading.settrace(func) | 為所有 threading 模塊開始的線程設置追蹤函數。在每個線程的 run() 方法被調用前,func 會被傳遞給 sys.settrace()。-----用的較少 |
threading.setprofile(func) | 為所有 threading 模塊開始的線程設置性能測試函數。在每個線程的 run() 方法被調用前,func 會被傳遞給 sys.setprofile()。-----用的較少 |
threading.stack_size([size]) | 返回創建線程時用的堆棧大小。 |
示例1:
# -*- coding: utf-8 -*-
# @Time    : 2025-05-20 11:43
# @Author  : AmoXiang
# @File    : 4.threading的屬性和方法.py
# @Software: PyCharm
# @Blog: https://blog.csdn.net/xw1680import threading
import timedef show_thread_info():print('current thread = {}\nmain thread = {}\nactive count = {}'.format(threading.current_thread(),threading.main_thread(),threading.active_count()))def worker():show_thread_info()for i in range(5):time.sleep(1)print('i am working')print('finished')t = threading.Thread(target=worker, name='worker')  # 線程對象
show_thread_info()
time.sleep(1)
t.start()  # 啟動
print('===end===')
示例2:
# -*- coding: utf-8 -*-
# @Time    : 2025-05-20 11:49
# @Author  : AmoXiang
# @File    : 4.threading的屬性和方法2.py
# @Software: PyCharm
# @Blog: https://blog.csdn.net/xw1680import threadingdef main():print(threading.active_count())  # 活動線程數print(threading.enumerate())  # 存活的線程對象列表print(threading.get_ident())  # 返回當前線程的"線程標識符"print(threading.get_native_id())print(threading.current_thread())  # 返回當前調用的線程對象print(threading.main_thread())  # 主線程print(threading.stack_size())  # 線程的堆棧大小"""1[<_MainThread(MainThread, started 19868)>]1986819868<_MainThread(MainThread, started 19868)><_MainThread(MainThread, started 19868)>0"""if __name__ == "__main__":main()
2.1.5 Thread實例的屬性和方法
Thread 對象也包含多個實例方法,簡單說明如下:
| 屬性/方法 | 類型 | 說明 |
|---|---|---|
start() | 方法 | 啟動線程,調用后線程開始執行 |
run() | 方法 | 線程執行的具體邏輯(通常不手動調用) |
join([timeout]) | 方法 | 等待至線程中止或者指定的時間,時間由參數指定,單位為秒 |
is_alive() | 方法 | 返回線程是否處于活動的狀態 |
name | 屬性 | 線程名稱,可讀寫 |
ident | 屬性 | Python 層的線程 ID,創建后才有 |
native_id | 屬性 | 操作系統線程 ID(Python 3.8+) |
daemon | 屬性 | 是否為守護線程,必須在 start() 前設置 |
isDaemon() / setDaemon() | 方法 | 獲取/設置守護線程(已被 daemon 屬性取代) |
示例:
# -*- coding: utf-8 -*-
# @Time    : 2025-05-20 11:56
# @Author  : AmoXiang
# @File    : 5.Thread實例的屬性和方法.py
# @Software: PyCharm
# @Blog: https://blog.csdn.net/xw1680import threading
import timedef worker():for i in range(5):time.sleep(1)print('i am working')print('finished')t = threading.Thread(target=worker, name='worker')  # 線程對象
# 返回結果: # worker None None 說明此刻線程還未真正的被創建
print(t.name, t.ident, t.native_id)
time.sleep(1)
t.start()
print('=====end=====')
while True:time.sleep(1)# 控制臺輸出會爭搶 你會看到錯亂顯示,這里可以使用logging模塊替代print()函數print('{} {} {}'.format(t.name, t.ident, 'alive' if t.is_alive() else 'dead'))if not t.is_alive():print('{} restart'.format(t.name))# RuntimeError: threads can only be started oncet.start()  # 線程重啟??此處會報錯,后續會詳細講解Thread實例的start()方法與run()方法
2.1.6 start和run方法
threading.Thread 類,Thread 是 Python 提供的線程封裝類。可以通過創建 Thread 對象并傳入 target=函數 啟動線程;也可以通過繼承 Thread 并重寫 run() 方法 來定義線程行為。
# -*- coding: utf-8 -*-
# @Time    : 2025-05-20 14:28
# @Author  : AmoXiang
# @File    : 6.自定義線程類寫法.py
# @Software: PyCharm
# @Blog: https://blog.csdn.net/xw1680import threading
import timeclass SubThread(threading.Thread):def run(self):for i in range(3):time.sleep(1)msg = "子線程" + self.name + '執行,i=' + str(i)  # name屬性中保存的是當前線程的名字print(msg)if __name__ == '__main__':print('-----主線程開始-----')t1 = SubThread()  # 創建子線程t1t2 = SubThread()  # 創建子線程t2t1.start()  # 啟動子線程t1t2.start()  # 啟動子線程t2'''-----主線程開始----------主線程結束-----子線程Thread-1執行,i=0子線程Thread-2執行,i=0子線程Thread-2執行,i=1子線程Thread-1執行,i=1子線程Thread-1執行,i=2子線程Thread-2執行,i=2'''print('-----主線程結束-----')
start()方法 與 run() 方法的本質區別:
| 方法 | 作用 | 調用方式 | 是否創建新線程 |
|---|---|---|---|
start() | 真正啟動線程 | 系統自動調用 run() | ? 是(創建新線程) |
run() | 定義線程任務邏輯 | 手動調用不會新建線程 | ? 否(在主線程中運行) |
示例代碼:
# -*- coding: utf-8 -*-
# @Time    : 2025-05-20 13:28
# @Author  : AmoXiang
# @File    : 6.start和run方法.py
# @Software: PyCharm
# @Blog: https://blog.csdn.net/xw1680import threading
import timedef worker():for i in range(5):time.sleep(1)print('i am working')print('finished')class SubThread(threading.Thread):def start(self):# 線程對象調用start()方法,會走這里邏輯,我們不知道怎么去系統調用創建一個真正的線程# 所以如果什么都不做的話,那么真正的線程不會被創建,你可以自己進行測試# 想要創建真正的線程,我們就去調用父類的start()方法,讓它去系統調用創建真正的線程print('start ~~~')super(SubThread, self).start()def run(self):# run() 方法是線程真正要做的任務邏輯,可以通過傳函數(target)或者繼承重寫# 同理,如果你光打印,什么都不做,最后雖然你能看到多個線程,可是你看不到該線程干的啥活# 最簡單的方式直接調用父類的run()方法,讓它處理print('run ~~~')super().run()def main():# 測試print('-----主線程開始-----')t = SubThread(target=worker, name='worker')  # 線程對象print('before t.start,active_count==> {}'.format(threading.active_count()))# TODO 測試1.正確方式: 啟動線程,會自動在新線程中調用 run()# t.start()  # 啟動# TODO 測試2.錯誤/不推薦: 手動調用 run()t.run()  # 這不會開啟新線程,而是當前線程同步執行# TODO 測試3.第2次啟動線程# t.start()  # RuntimeError: threads can only be started once# TODO 測試4.兩次手動調用run()方法或者先啟動線程,即調用start()方法后再次調用run,也會報錯t.run()  # AttributeError: 'SubThread' object has no attribute '_target'print('after t.start,active_count==> {}'.format(threading.active_count()))print('-----主線程結束-----')if __name__ == '__main__':main()
去源碼中看看 t.start() 只能調用一次的原因,跟進到父類的 start() 方法,如下:
def start(self):"""Start the thread's activity.It must be called at most once per thread object. It arranges for theobject's run() method to be invoked in a separate thread of control.This method will raise a RuntimeError if called more than once on thesame thread object."""if not self._initialized:raise RuntimeError("thread.__init__() not called")# 根據 RuntimeError: threads can only be started once 錯誤提示,我們可以推斷到此處# 如果self._started.is_set()為False,正常執行,self._started.is_set()返回True,則拋出異常。if self._started.is_set():raise RuntimeError("threads can only be started once")with _active_limbo_lock:_limbo[self] = selftry:_start_new_thread(self._bootstrap, ())except Exception:with _active_limbo_lock:del _limbo[self]raiseself._started.wait()
我們來看看 self._started.is_set() 這玩意是啥:
# 在 Thread 類 __init__ 初始化方法中有這樣的定義
self._started = Event()
# 定位 Event,發現是一個類,類初始化方法中有下面這樣的定義
self._flag = False# 并且發現 is_set 是 Event 類中的一個方法
def is_set(self):"""Return true if and only if the internal flag is true."""return self._flag
走到這里我們可以得出,第一次進入到 start() 方法中的時候,self._started.is_set() 調用返回的是 Event 類初始化時候的值,即 False,所以不會進入到 if 語句中,就不會拋出異常,那這里我們就可以猜想,在后續的操作中,是不是有哪個地方更改了這個 _flag 值,對 self._started 要留點心思,我們接著往 start() 方法下面的邏輯往后看:
# 這個函數看名字太明顯了 開啟一個新的線程
_start_new_thread(self._bootstrap, ())# _bootstrap是一個函數,里面實際又調用的是 _bootstrap_inner
def _bootstrap(self):try:self._bootstrap_inner()except:if self._daemonic and _sys is None:returnraise# 看看: _bootstrap_inner
def _bootstrap_inner(self):try:self._set_ident()self._set_tstate_lock()if _HAVE_THREAD_NATIVE_ID:self._set_native_id()# 這里我們看到再次使用了 self._started 這個 Event 實例對象# 調用了它的set()方法,我們定位到set()方法,看它里面做了些啥self._started.set()with _active_limbo_lock:_active[self._ident] = selfdel _limbo[self]if _trace_hook:_sys.settrace(_trace_hook)if _profile_hook:_sys.setprofile(_profile_hook)try:self.run()except:self._invoke_excepthook(self)finally:self._delete()def set(self):with self._cond:# 破案了,太明顯了,這個操作,也就是說我們調用了一次start方法之后,Thread對象的屬性_started 指向的Event實例對象,# 會將其屬性_flag 置為True,再次調用start方法時,又根據這個值判斷,是否拋出異常# 那么前面我們已經講解到,為True時,拋出異常,故多次調用start()方法會拋異常就是這么來的self._flag = Trueself._cond.notify_all()
多次調用 start() 方法報錯,我們分析完畢了,接下來我們去看看多次調用 run() 方法為何報錯?這個相對來說就比較簡單了:
# 在函數_bootstrap_inner中,我們可以看到run()方法被調用
try:self.run()
except:self._invoke_excepthook(self)# run()方法定義
def run(self):try:# 實例化Thread對象時,傳入的target參數,即函數名稱# self._target ? self._target = targetif self._target is not None:self._target(*self._args, **self._kwargs)finally:del self._target, self._args, self._kwargs
run() 方法的邏輯很明顯,使用 try...finally 結構,finally 塊中的代碼是一定會執行的,其邏輯是使用 del 關鍵字刪除對象身上的 _target 屬性,即我們第一次調用 run() 方法時,對象身上的 _target 屬性被刪除,當再次調用 run() 方法時,對象身上已經沒有了 _target 屬性,而在 if 判斷語句中去取對象的 _target 屬性,故會報 AttributeError 屬性錯誤。
2.2 多線程
顧名思義,多個線程,一個進程中如果有多個線程運行,就是多線程,實現一種并發。其實在之前我們的演練過程中,就已經出現多線程,一個主線程與其他工作的線程,示例代碼:
# -*- coding: utf-8 -*-
# @Time    : 2025-05-20 15:11
# @Author  : AmoXiang
# @File    : 7.多線程.py
# @Software: PyCharm
# @Blog: https://blog.csdn.net/xw1680import threading
import time
import sysdef worker(f=sys.stdout):t = threading.current_thread()for i in range(5):time.sleep(1)print('i am working', t.name, t.ident, file=f)print('finished', file=f)t1 = threading.Thread(target=worker, name='worker1')
t2 = threading.Thread(target=worker, name='worker2', args=(sys.stderr,))
t1.start()
t2.start()
可以看到 worker1 和 worker2 交替執行。當使用 start 方法啟動線程后,進程內有多個活動的線程并行的工作,就是多線程。一個進程中至少有一個線程,并作為程序的入口,這個線程就是主線程。一個進程至少有一個主線程,其他線程稱為工作線程。
2.3 線程安全
多線程執行一段代碼,不會產生不確定的結果,那這段代碼就是線程安全的。多線程在運行過程中,由于共享同一進程中的數據,多線程并發使用同一個數據,那么數據就有可能被相互修改,從而導致某些時刻無法確定這個數據的值,最終隨著多線程運行,運行結果不可預期,這就是線程不安全。------在文章后面部分會進行詳細地講解
2.4 daemon線程
daemon 線程,有人翻譯成后臺線程,也有人翻譯成守護線程。Python 中,構造線程的時候,可以設置 daemon 屬性,這個屬性必須在 start() 方法前設置好。源碼 Thread 類的 __init__() 方法中:
if daemon is not None:if daemon and not _daemon_threads_allowed():raise RuntimeError('daemon threads are disabled in this (sub)interpreter')self._daemonic = daemon
else:self._daemonic = current_thread().daemon
線程 daemon 屬性,如果設定就是用戶的設置,否則就取當前線程的 daemon 值。主線程是 non-daemon 線程,即 daemon = False。
class _MainThread(Thread):def __init__(self):Thread.__init__(self, name="MainThread", daemon=False)self._set_tstate_lock()self._started.set()self._set_ident()if _HAVE_THREAD_NATIVE_ID:self._set_native_id()with _active_limbo_lock:_active[self._ident] = self
示例代碼:
# -*- coding: utf-8 -*-
# @Time    : 2025-05-20 16:47
# @Author  : AmoXiang
# @File    : 7.daemon線程.py
# @Software: PyCharm
# @Blog: https://blog.csdn.net/xw1680import time
import threadingdef foo():time.sleep(5)for i in range(5):print(i)# 主線程是non-daemon線程
t1 = threading.Thread(target=foo, daemon=False)
t1.start()
'''
RuntimeError: cannot set daemon status of active thread
daemon屬性: 表示線程是否是daemon線程,這個值必須在start()之前設置,否則引發RuntimeError異常==> t1.daemon = True
isDaemon(): 是否是daemon線程
setDaemon(): 設置為daemon線程,必須在start方法之前設置 已經被daemon屬性替代了
'''
print('Main Thread Exits')
發現線程 t1 依然執行,主線程已經執行完,但是一直等著線程 t1。修改為 t1 = threading.Thread(target=foo, daemon=True) 試一試,結果程序立即結束了,進程根本沒有等 daemon 線程 t1。看一個例子,看看主線程何時結束 daemon 線程:
# -*- coding: utf-8 -*-
# @Time    : 2025-05-20 16:58
# @Author  : AmoXiang
# @File    : 7.daemon線程2.py
# @Software: PyCharm
# @Blog: https://blog.csdn.net/xw1680import time
import threadingdef worker(name, timeout):time.sleep(timeout)print('{} working'.format(name))# 主線程 是non-daemon線程
'''
Main Thread Exits
t1 working
t2 working
'''
t1 = threading.Thread(target=worker, args=('t1', 2), daemon=True)
t1.start()
t2 = threading.Thread(target=worker, args=('t2', 3), daemon=False)
t2.start()
print('Main Thread Exits')
print('~' * 30)
# 調換2和3看看效果
'''
運行下面代碼的時候記得將上面的給注釋掉,調換2和3后,程序執行結果如下:
Main Thread Exits
t2 working
'''
t1 = threading.Thread(target=worker, args=('t1', 3), daemon=True)
t1.start()
t2 = threading.Thread(target=worker, args=('t2', 2), daemon=False)
t2.start()
print('Main Thread Exits')
上例說明,如果還有 non-daemon 線程在運行,進程不結束,進程也不會殺掉其它所有 daemon 線程。直到所有 non-daemon 線程全部運行結束(包括主線程),不管有沒有 daemon 線程,程序退出。總結:
- 線程具有一個 daemon 屬性,可以手動設置為 True 或 False,也可以不設置,則取默認值 None,如果不設置 daemon,就取當前線程的 daemon 來設置它
- 主線程是 non-daemon 線程,即 daemon = False
- 從主線程創建的所有線程的不設置 daemon 屬性,則默認都是 daemon = False,也就是 non-daemon 線程
- Python 程序在沒有活著的 non-daemon 線程運行時,程序退出,也就是除主線程之外剩下的只能都是 daemon 線程,主線程才能退出,否則主線程就只能等待
join() 方法,先看一個簡單的例子,看看效果:
# -*- coding: utf-8 -*-
# @Time    : 2025-05-20 17:08
# @Author  : AmoXiang
# @File    : 8.join()方法.py
# @Software: PyCharm
# @Blog: https://blog.csdn.net/xw1680import time
import threadingdef worker(name, timeout):time.sleep(timeout)print('{} working'.format(name))t1 = threading.Thread(target=worker, args=('t1', 3), daemon=True)
t1.start()
'''
t1 working
Main Thread Exits
'''
t1.join()  # 設置join,取消join對比一下
# 取消join() ==> Main Thread Exits
print('Main Thread Exits')
使用了 join() 方法后,當前線程阻塞了,daemon 線程執行完了,主線程才退出了。
# -*- coding: utf-8 -*-
# @Time    : 2025-05-20 17:08
# @Author  : AmoXiang
# @File    : 8.join()方法.py
# @Software: PyCharm
# @Blog: https://blog.csdn.net/xw1680import time
import threadingdef worker(name, timeout):time.sleep(timeout)print('{} working'.format(name))t1 = threading.Thread(target=worker, args=('t1', 10), daemon=True)
t1.start()
t1.join(2)
print('~~~~~~~~~~~')
t1.join(2)
print('~~~~~~~~~~~')
print('Main Thread Exits')
def join(self, timeout=None):
- join() 方法是線程的標準方法之一
- 一個線程中調用另一個線程的 join() 方法,調用者將被阻塞,直到被調用線程終止,或阻塞超時一個線程可以被 join 多次
- timeout 參數指定調用者等待多久,沒有設置超時,就一直等到被調用線程結束
- 調用誰的 join() 方法,就是 join() 誰,就要等誰
daemon 線程應用場景,主要應用場景有:
- 后臺任務。如發送心跳包、監控,這種場景最多
- 主線程工作才有用的線程。如主線程中維護這公共的資源,主線程已經清理了,準備退出,而工作線程使用這些資源工作也沒有意義了,一起退出最合適
- 隨時可以被終止的線程
如果主線程退出,想所有其它工作線程一起退出,就使用 daemon=True 來創建工作線程。比如,開啟一個線程定時判斷 WEB 服務是否正常工作,主線程退出,工作線程也沒有必須存在了,應該隨著主線程退出一起退出。這種 daemon 線程一旦創建,就可以忘記它了,只用關心主線程什么時候退出就行了。daemon 線程,簡化了程序員手動關閉線程的工作。
2.5 threading.local類
# -*- coding: utf-8 -*-
# @Time    : 2025-05-20 18:19
# @Author  : AmoXiang
# @File    : 9.threading.local類.py
# @Software: PyCharm
# @Blog: https://blog.csdn.net/xw1680import threading
import time
import loggingFORMAT = "%(asctime)s %(threadName)s %(thread)d %(message)s"
logging.basicConfig(format=FORMAT, level=logging.INFO)def worker():x = 0for i in range(5):time.sleep(0.2)x += 1logging.info(x)def main():for i in range(10):threading.Thread(target=worker, name='t-{}'.format(i)).start()if __name__ == '__main__':main()
上例使用多線程,每個線程完成不同的計算任務。x 是局部變量,可以看出每一個線程的 x 是獨立的,互不干擾的,為什么?因為 x 是定義在 worker() 函數內部的變量,是一個局部變量(local variable):
def worker():x = 0 # 局部變量,每個線程各有一個副本
線程啟動后,每個線程都會單獨執行一次 worker() 函數,每個線程都有自己獨立的棧空間(stack),函數內部的變量就存在于線程的私有棧中,互不干擾。能否改造成使用全局變量完成?
# -*- coding: utf-8 -*-
# @Time    : 2025-05-20 19:20
# @Author  : AmoXiang
# @File    : 9.threading.local類2.py
# @Software: PyCharm
# @Blog: https://blog.csdn.net/xw1680import threading
import time
import loggingFORMAT = "%(asctime)s %(threadName)s %(thread)d %(message)s"
logging.basicConfig(format=FORMAT, level=logging.INFO)class A:def __init__(self):self.x = 0# 全局對象
global_data = A()def worker():global_data.x = 0for i in range(10):time.sleep(0.0001)global_data.x += 1logging.info(global_data.x)def main():for i in range(10):threading.Thread(target=worker, name='t-{}'.format(i)).start()if __name__ == '__main__':main()
上例雖然使用了全局對象,但是線程之間互相干擾,導致了不期望的結果,即線程不安全。能不能既使用全局對象,還能保持每個線程使用不同的數據呢?python 提供 threading.local 類,將這個類實例化得到一個全局對象,但是不同的線程使用這個對象存儲的數據其他線程看不見。
# 將上面示例23行代碼改為下列代碼
global_data = threading.local()
執行程序,結果顯示和使用局部變量的效果一樣。再看 threading.local 的例子:
# -*- coding: utf-8 -*-
# @Time    : 2025-05-20 19:28
# @Author  : AmoXiang
# @File    : 9.threading.local類3.py
# @Software: PyCharm
# @Blog: https://blog.csdn.net/xw1680import threading
import time
import loggingFORMAT = "%(asctime)s %(threadName)s %(thread)d %(message)s"
logging.basicConfig(format=FORMAT, level=logging.INFO)# 全局對象
X = 'abc'
global_data = threading.local()
global_data.x = 100
print(global_data, global_data.x)
print('~' * 30)
time.sleep(2)def worker():logging.info(X)logging.info(global_data)logging.info(global_data.x)worker()  # 普通函數調用
print('=' * 30)
time.sleep(2)
threading.Thread(target=worker, name='worker').start()  # 啟動一個線程
從運行結果來看,另起一個線程打印 global_data.x 出錯了,如下圖所示:
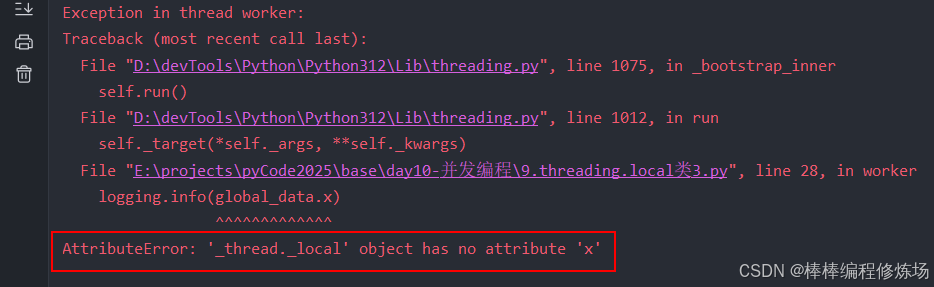
AttributeError: '_thread._local' object has no attribute 'x',但是,global_data 打印沒有出錯,說明看到 global_data,但是 global_data 中的 x 看不到,這個 x 不能跨線程。要想知道其中是怎么實現的,只能去看源碼,那我們就去看看。整個 local 類的代碼并不多,如下:
class local:# __slots__參考《2.6 __slots__拓展》小節的講解__slots__ = '_local__impl', '__dict__'def __new__(cls, /, *args, **kw):if (args or kw) and (cls.__init__ is object.__init__):raise TypeError("Initialization arguments are not supported")self = object.__new__(cls)impl = _localimpl()impl.localargs = (args, kw)impl.locallock = RLock()object.__setattr__(self, '_local__impl', impl)# We need to create the thread dict in anticipation of# __init__ being called, to make sure we don't call it# again ourselves.impl.create_dict()return selfdef __getattribute__(self, name):with _patch(self):return object.__getattribute__(self, name)def __setattr__(self, name, value):if name == '__dict__':raise AttributeError("%r object attribute '__dict__' is read-only"% self.__class__.__name__)with _patch(self):return object.__setattr__(self, name, value)def __delattr__(self, name):if name == '__dict__':raise AttributeError("%r object attribute '__dict__' is read-only"% self.__class__.__name__)with _patch(self):return object.__delattr__(self, name)
這幾個魔術方法在 《100天精通Python——基礎篇 2025 第14天:深入掌握魔術方法與元類,玩轉高級OOP技巧》我們就已經詳細學習過,我這里簡單提一下,如果有不懂的自己回去看看。在我們使用 threading.local() 時,首先會走 __new__() 方法中的邏輯,如下:
def __new__(cls, /, *args, **kw):# 判斷是否傳入參數,如果有且沒有重寫__init__()方法,就會拋出異常,因為: 默認的 object.__init__() 是不接受任何參數的if (args or kw) and (cls.__init__ is object.__init__):raise TypeError("Initialization arguments are not supported")# 調用父類的__new__()方法創建對象self = object.__new__(cls)# 跟進_localimpl,發現它是一個類,那這里相當于就是在實例化,大概掃一眼它的屬性和方法impl = _localimpl()impl.localargs = (args, kw) # 給localargs屬性賦值impl.locallock = RLock() # 給locallock屬性賦值, RLock我后面會講# 注意: 8-10行都是在操作impl實例# 調用object基類的__setattr__方法為local實例添加屬性,添加_local__impl屬性,對應值為impl,# 即上面_localimpl類實例化的實例object.__setattr__(self, '_local__impl', impl)# We need to create the thread dict in anticipation of# __init__ being called, to make sure we don't call it# again ourselves.# 調用impl實例的create_dict()方法,接下來就把實例self返回了,所以我們要重點看create_dict()方法中的邏輯impl.create_dict()return selfclass _localimpl:"""A class managing thread-local dicts"""__slots__ = 'key', 'dicts', 'localargs', 'locallock', '__weakref__'def __init__(self):# The key used in the Thread objects' attribute dicts.# We keep it a string for speed but make it unlikely to clash with# a "real" attribute.self.key = '_threading_local._localimpl.' + str(id(self))# { id(Thread) -> (ref(Thread), thread-local dict) }self.dicts = {}def get_dict(self):"""Return the dict for the current thread. Raises KeyError if nonedefined."""thread = current_thread()return self.dicts[id(thread)][1]def create_dict(self):"""Create a new dict for the current thread, and return it."""localdict = {}key = self.keythread = current_thread()idt = id(thread)def local_deleted(_, key=key):# When the localimpl is deleted, remove the thread attribute.thread = wrthread()if thread is not None:del thread.__dict__[key]def thread_deleted(_, idt=idt):# When the thread is deleted, remove the local dict.# Note that this is suboptimal if the thread object gets# caught in a reference loop. We would like to be called# as soon as the OS-level thread ends instead.local = wrlocal()if local is not None:dct = local.dicts.pop(idt)wrlocal = ref(self, local_deleted)wrthread = ref(thread, thread_deleted)thread.__dict__[key] = wrlocalself.dicts[idt] = wrthread, localdictreturn localdict
跟進 impl.create_dict(),如下:
def create_dict(self):"""Create a new dict for the current thread, and return it."""# 定義一個變量localdict,為字典類型localdict = {}# self.key = '_threading_local._localimpl.' + str(id(self))# _threading_local._localimpl.拼接上_localimpl實例的地址key = self.keythread = current_thread() # 當前線程idt = id(thread) # 當前線程地址值# 函數定義跳過def local_deleted(_, key=key):# When the localimpl is deleted, remove the thread attribute.thread = wrthread()if thread is not None:del thread.__dict__[key]# 函數定義跳過def thread_deleted(_, idt=idt):# When the thread is deleted, remove the local dict.# Note that this is suboptimal if the thread object gets# caught in a reference loop. We would like to be called# as soon as the OS-level thread ends instead.local = wrlocal()if local is not None:dct = local.dicts.pop(idt)# ref弱引用wrlocal = ref(self, local_deleted)wrthread = ref(thread, thread_deleted)# 給當前線程實例對象__dict__設置key,valuethread.__dict__[key] = wrlocal# dicts是_localimpl類初始化時所定義的一個屬性# 即impl實例屬性dicts中多了一對數據,以當前線程id為key,值為 wrthread, localdict# self.dicts = {'id(thread)': wrthread, localdict}self.dicts[idt] = wrthread, localdictreturn localdict # 返回了一個空字典
至此 impl.create_dict() 整個邏輯執行完畢,回到 __new__() 方法中,返回了當前 local 類的實例。知道大致邏輯之后,我們來分析一下這個報錯 AttributeError: '_thread._local' object has no attribute 'x'
def worker():logging.info(X)logging.info(global_data)logging.info(global_data.x)threading.Thread(target=worker, name='worker').start()
# 啟動線程,執行 worker 中的邏輯
# global_data.x 調用會走 ? __getattribute__()方法邏輯
# 即 local 類的:
def __getattribute__(self, name):with _patch(self):return object.__getattribute__(self, name)# 上下文,跟進
@contextmanager
def _patch(self):# yield 后面沒有東西 說明是在之前做增強# 調用local類實例的_local__impl屬性,即global_data的_local__impl屬性# 在之前我們的源碼分析中_local__impl屬性為impl,即_localimpl的實例# 前面已經說過,impl dicts屬性中掛著數據對:{'id(thread)': wrthread, localdict}impl = object.__getattribute__(self, '_local__impl')try:# get_dict()方法就是: self.dicts[id(thread)][1]# 即取到localdict ==> {} 大的空字典dct = impl.get_dict()except KeyError:dct = impl.create_dict()args, kw = impl.localargsself.__init__(*args, **kw)# 鎖不用管with impl.locallock:# 可以看到邏輯是調用object __setattr__()方法# self傳入的是local實例,即此處給local實例的 __dict__ 設置了一個空字典object.__setattr__(self, '__dict__', dct)yielddef get_dict(self):"""Return the dict for the current thread. Raises KeyError if nonedefined."""thread = current_thread()return self.dicts[id(thread)][1]# 上下文完成之后,回到__getattribute__,執行:
return object.__getattribute__(self, name)
# local類實例 __dict__ 為 {},那么使用基類的
# object.__getattribute__怎么能取到 x 屬性呢,這就是報錯的原因
小結: threading.local 類通過屬性 _local__impl 屬性對應的值,即 _localimpl 類的實例構建了一個大字典,存放所有線程相關的字典,即:{ id(Thread) ? (ref(Thread), thread-local dict) },每一線程實例的 id 為 key,元組為 value。value 中2部分別為線程對象引用,每個線程自己的字典。運行時,threading.local 實例處在不同的線程中,就從大字典中找到當前線程相關鍵值對中的字典,覆蓋 threading.local 實例的 __dict__,這樣就可以在不同的線程中,安全地使用線程獨有的數據,做到了線程間數據隔離,如同本地變量一樣安全。
2.6 __slots__拓展
Python 中的 __slots__ 是一個性能優化工具,常用于減少內存占用和限制類的屬性動態創建。在一些對性能敏感或者需要大量創建實例的場景中,使用 __slots__ 可以帶來明顯好處。
什么是 __slots__?默認情況下,Python 的類實例是通過一個叫做 __dict__ 的字典來存儲屬性的:
class Person:def __init__(self, name):self.name = namep = Person('棒棒編程修煉場')
print(p.__dict__)  # {'name': '棒棒編程修煉場'}
這樣雖然靈活,但會多占用內存。__slots__ 的作用是:告訴 Python 不使用 __dict__,而是使用更緊湊的內部結構來固定屬性,從而節省內存。為什么使用 __slots__?
- 節省內存:沒有
__dict__,每個實例占用的內存更少。 - 防止添加不存在的屬性:限制只能使用定義好的屬性,提升代碼健壯性。
- 訪問屬性更快(略微):屬性訪問通過更底層的數據結構,訪問速度稍有提升。
典型使用場景:
- 大量創建實例(如爬蟲、數據處理、圖節點對象)
- 屬性固定的輕量對象(如數據庫模型、配置項等)
- 嵌入式或低內存環境(如微型服務器、樹莓派)
- 對性能要求極高的系統
示例1:基本使用
# -*- coding: utf-8 -*-
# @Time    : 2025-05-24 4:57
# @Author  : bb_bcxlc
# @File    : __slots__例子1.py
# @Software: PyCharm
# @Blog: https://blog.csdn.net/xw1680class Person:__slots__ = ('name', 'age')  # 只允許這兩個屬性def __init__(self, name, age):self.name = nameself.age = agep = Person("棒棒編程修煉場", 18)
print(p.name)# 下面代碼執行會報錯: AttributeError: 'Person' object has no attribute 'gender'
p.gender = 'female'
__dict__ 聲明后,Python 不會為每個實例分配 __dict__,實例只能擁有指定的屬性(更節省內存)。
# AttributeError: 'Person' object has no attribute '__dict__'. Did you mean: '__dir__'?
print(p.__dict__)
示例2:內存占用對比
# -*- coding: utf-8 -*-
# @Time    : 2025-05-24 5:01
# @Author  : bb_bcxlc
# @File    : __slots__例子2.py
# @Software: PyCharm
# @Blog: https://blog.csdn.net/xw1680class Normal:def __init__(self, x, y):self.x = xself.y = yclass Slotted:__slots__ = ('x', 'y')def __init__(self, x, y):self.x = xself.y = yfrom pympler import asizeof# 使用 pympler 包來真實統計內存占用
# 需要使用pip命令進行安裝: pip install pympler
many_a = [Normal(1, 2) for _ in range(100000)]
many_b = [Slotted(1, 2) for _ in range(100000)]print("NoSlots total size:", asizeof.asizeof(many_a))
print("WithSlots total size:", asizeof.asizeof(many_b))
示例3:繼承限制
class A:__slots__ = ('x',)class B(A):passb = B()
b.y = 10  # 正常,子類沒有 __slots__,就會自動啟用 __dict__
要想子類也限制屬性,需要子類也聲明 __slots__:
class B(A):__slots__ = ('y',)b = B()
b.x = 10
print(b.x)  # 繼承的屬性是有的,動態添加屬性不行
# b.z = 10  # AttributeError: 'B' object has no attribute 'z'
可以顯式允許使用 __dict__(脫褲子放屁,多此一舉):
class Person:__slots__ = ('name', '__dict__')  # 允許動態添加屬性p = Person()
p.name = '棒棒編程修煉場'
p.age = 25  # 現在可以添加
# 棒棒編程修煉場 {'age': 25} __slots__限定的屬性不會出現在__dict__中
# 轉而使用一個更輕量的、固定的結構來保存屬性。這正是它節省內存的關鍵(猜想)
# 棒棒編程修煉場 {'age': 25}
print(p.name, p.__dict__)
如果你要創建大量結構固定的對象(如數據結構、節點對象),建議使用。如果你在做性能優化、節省內存,使用 __slots__ 是非常值得考慮的。
三、線程同步
概念: 線程同步是指通過某種機制,使多個線程在訪問共享數據時能夠有序進行,確保同一時刻只有一個線程能訪問或修改特定資源,從而避免數據沖突和不一致。補充點小細節(區分兩個概念):
| 概念 | 含義 |
|---|---|
| 線程同步(Synchronization) | 控制多個線程對 同一共享資源 的訪問 |
| 線程協作 / 協調(Coordination) | 讓多個線程 有邏輯順序地協作完成任務,比如:線程A等待線程B的信號 |
舉個例子:
共享資源 = 廚房
"線程 A 正在做飯" → 加了鎖
"線程 B 想用廚房" → 只能等 A 出來(解鎖)
這就是線程同步: 只有一個人能操作廚房
Python 中實現線程同步的常見技術有:
1.互斥鎖: Lock = _allocate_lock
2.可重入鎖: _RLockdef RLock(*args, **kwargs):"""Factory function that returns a new reentrant lock.A reentrant lock must be released by the thread that acquired it. Once athread has acquired a reentrant lock, the same thread may acquire it againwithout blocking; the thread must release it once for each time it hasacquired it."""# 看源碼中這個 _PyRLock 其實指向的是 _RLock類# _PyRLock = _RLockif _CRLock is None:return _PyRLock(*args, **kwargs)return _CRLock(*args, **kwargs)3.條件變量: class Condition:
4.信號量: class Semaphore:
5.事件: class Event:
6.還有一些高級封裝,如 queue.Queue 自帶線程安全
接下來一一進行講解,首先來看事件通信 Event。
3.1 Event
Event 事件,是線程間通信機制中最簡單的實現,使用一個內部的標記 flag,通過 flag 的 True 或 False 的變化來進行操作。Event 實例常用方法:
| 方法名 | 作用描述 |
|---|---|
.set() | 將事件標志設為 True,所有正在等待這個事件的線程將被喚醒。當 flag 標志為 True 時,調用 wait() 方法的線程不會被阻塞 |
.clear() | 將事件標志重設為 False,之后調用 wait() 方法的線程將會被阻塞,直到調用 set() 方法將內部標志再次設置為 True |
.is_set() | 檢查事件標志當前是否為 True ,當且僅當內部標志為 True 時返回 True |
.wait(timeout) | 如果事件標志為 False,阻塞線程直到它變成 True 或超時 |
簡單示例:
# -*- coding: utf-8 -*-
# @Time    : 2025-05-24 15:17
# @Author  : bb_bcxlc
# @File    : 11.event事件簡單例子.py
# @Software: PyCharm
# @Blog: https://blog.csdn.net/xw1680import threadingevent = threading.Event()
print(event.is_set())  # False
# event.wait()  # 阻塞住了event.set()  # 將標志置為True,無返回值
print(event.is_set())  # True
event.wait()  # 設置為True后,wait()方法不阻塞
print('end ~')
練習:老板雇傭了一個工人,讓他生產杯子,老板一直盯著這個工人,直到生產完10個杯子。下面的代碼是否能夠完成功能?
# -*- coding: utf-8 -*-
# @Time    : 2025-05-24 15:52
# @Author  : bb_bcxlc
# @File    : 11.event練習.py
# @Software: PyCharm
# @Blog: https://blog.csdn.net/xw1680import logging
import threading
import timeFormat = '%(asctime)s - %(threadName)s - %(message)s'
logging.basicConfig(level=logging.INFO, format=Format)flag = Falsedef boss():logging.info('I"m boss,watching U.')while True:time.sleep(1)if flag:breaklogging.info('Good Job~~~')def worker(count=10):global flaglogging.info('I"m working for U.')cups = []while True:time.sleep(0.5)if len(cups) >= count:flag = Truebreakcups.append(1)  # 模擬杯子logging.info('I have finished my Job. cups: {}'.format(len(cups)))w = threading.Thread(target=worker, name='worker')
b = threading.Thread(target=boss, name='boss')
b.start()
w.start()
上面代碼基本能夠完成,但上面代碼中老板一直要不停的查詢 worker 的狀態變化。使用 Event 修改代碼后如下:
# -*- coding: utf-8 -*-
# @Time    : 2025-05-24 16:53
# @Author  : bb_bcxlc
# @File    : 11.event練習-改進.py
# @Software: PyCharm
# @Blog: https://blog.csdn.net/xw1680import logging
import threading
import timeFormat = '%(asctime)s - %(threadName)s - %(message)s'
logging.basicConfig(level=logging.INFO, format=Format)event = threading.Event()  # 1:n 一個通知多個def boss(e):logging.info('I"m boss,watching U.')e.wait()  # 沒有設置時間,則等到天荒地老logging.info('Good Job~~~')def worker(e, count=10):logging.info('I"m working for U.')cups = []# while True:# e.wait如果沒有設置標志,返回值為False# 使用wait阻塞等待while not e.wait(0.5):# time.sleep(0.5)if len(cups) >= count:e.set()# break 為啥可以注釋break呢?cups.append(1)  # 模擬杯子logging.info('I have finished my Job. cups: {}'.format(len(cups)))w = threading.Thread(target=worker, name='worker', args=(event,))
b1 = threading.Thread(target=boss, name='boss1', args=(event,))
b2 = threading.Thread(target=boss, name='boss2', args=(event,))
b1.start()
b2.start()
time.sleep(5)
w.start()
總結: 需要使用同一個 Event 對象的標記 flag,誰 wait 就是等到 flag 變為 True,或等到超時返回 False,不限制等待者的個數,通知所有等待者。測試 wait() 方法:
# -*- coding: utf-8 -*-
# @Time    : 2025-05-24 17:07
# @Author  : bb_bcxlc
# @File    : 11.event測試wait.py
# @Software: PyCharm
# @Blog: https://blog.csdn.net/xw1680import threadingevent = threading.Event()print(event.is_set())
print(event.wait(3))
print(event.is_set())
print('~' * 30)
threading.Timer(3, lambda: event.set()).start()
print(event.wait(5))
print(event.is_set())
補充案例:模擬紅綠燈交通。其中標志位設置為 True,代表綠燈,直接通行;標志位被清空,代表紅燈;wait() 等待變綠燈。
# -*- coding: utf-8 -*-
# @Time    : 2025-05-24 17:15
# @Author  : bb_bcxlc
# @File    : 11.event紅綠燈.py
# @Software: PyCharm
# @Blog: https://blog.csdn.net/xw1680import threading, time  # 導入threading和time模塊event = threading.Event()  # 創建Event對象def lighter():  # 紅綠燈處理線程函數'''0<count<2為綠燈,2<count<5為紅燈,count>5重置標志'''event.set()  # 設置標志位為Truecount = 0  # 遞增變量,初始為0while True:if count > 2 and count < 5:event.clear()  # 將標志設置為Falseprint("\033[1;41m 現在是紅燈 \033[0m")elif count > 5:event.set()  # 設置標志位為Truecount = 0  # 恢復初始值else:print("\033[1;42m 現在是綠燈 \033[0m")time.sleep(1)count += 1  # 遞增變量def car(name):  # 小車處理線程函數'''紅燈停,綠燈行'''while True:if event.is_set():  # 當標志位為True時print(f"[{name}] 正在開車...")time.sleep(0.25)else:  # 當標志位為False時print(f"[{name}] 看見了紅燈,需要等幾秒")event.wait()print(f"\033[1;34;40m 綠燈亮了,[{name}]繼續開車 \033[0m")# 開啟紅綠燈
light = threading.Thread(target=lighter, )
light.start()
# 開始行駛
car = threading.Thread(target=car, args=("張三",))
car.start()
3.2 線程鎖Lock
定義一個全局變量 g_num,分別創建2個子線程對 g_num 執行不同的操作,并輸出操作后的結果。代碼如下:
from threading import Thread  # 導入線程
import timeg_num = 100  # 定義一個全局變量def plus():  # 第一個線程函數print('-------子線程1開始------')global g_num  # 定義全局變量g_num += 50  # 全局變量值加50print('plus: g_num is %d' % g_num)print('-------子線程1結束------')def minus():  # 第二個線程函數time.sleep(3)print('-------子線程2開始------')global g_num  # 定義全局變量g_num -= 50  # 全局變量值減50print('minus: g_num is %d' % g_num)print('-------子線程2結束------')if __name__ == '__main__':print('-------主線程開始------')print('main: g_num is %d' % g_num)t1 = Thread(target=plus)  # 實例化線程t1t2 = Thread(target=minus)  # 實例化線程t2t1.start()  # 開啟線程t1t2.start()  # 開啟線程t2t1.join()  # 等待t1線程結束t2.join()  # 等待t2線程結束print('-------主線程結束------')
上述代碼中,定義一個全局變量 g_num,賦值為 100,然后創建2個線程。一個線程將 g_num 增加 50,一個線程將 g_num 減少 50。如果 g_num 的最終結果為 100,則說明線程之間可以共享數據。運行結果如下圖所示:
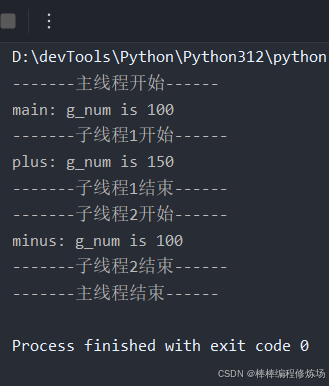
從上面的例子可以得出,在一個進程內的所有線程共享全局變量,能夠在不使用其他方式的前提下完成多線程之間的數據共享。由于線程可以對全局變量隨意修改,這就可能造成多線程之間對全局變量的混亂操作。舉個例子,訂單要求生產1000個杯子,組織10個工人生產。請忽略老板,關注工人生成杯子:
# -*- coding: utf-8 -*-
# @Time    : 2025-05-24 18:22
# @Author  : bb_bcxlc
# @File    : 12.鎖的引入.py
# @Software: PyCharm
# @Blog: https://blog.csdn.net/xw1680import threading
from threading import Thread
import time
import loggingFORMAT = "%(asctime)s %(threadName)s %(thread)d %(message)s"
logging.basicConfig(format=FORMAT, level=logging.INFO)cups = []def worker(count=1000):logging.info("I'm working")while True:if len(cups) >= count:breaktime.sleep(0.0001)  # 為了看出線程切換效果,模擬杯子制作時間cups.append(1)logging.info('I finished my job. cups = {}'.format(len(cups)))for i in range(1, 11):t = Thread(target=worker, name="w{}".format(i), args=(1000,))t.start()
從上例的運行結果看出,多線程調度,導致了判斷失效,多生產了杯子,即造成了全局變量 cups 最后的結果混亂,不準確。再以生活中的房子為例,當房子內只有一個居住者時(單線程),他可以任意時刻使用任意一個房間,如廚房、臥室和衛生間等。但是,當這個房子有多個居住者時(多線程),他就不能在任意時刻使用某些房間,如衛生間,否則就會造成混亂。如何解決這個問題呢?一個防止他人進入的簡單方法,就是門上加一把鎖。先到的人鎖上門,后到的人就在門口排隊,等鎖打開再進去。如下圖所示:

這就是互斥鎖(Mutual exclusion,縮寫 Mutex),防止多個線程同時讀寫某一塊內存區域。互斥鎖為資源引入一個狀態:鎖定和非鎖定。某個線程要更改共享數據時,先將其鎖定,此時資源的狀態為 "鎖定",其他線程不能更改;直到該線程釋放資源,將資源的狀態變成 "非鎖定" 時,其他的線程才能再次鎖定該資源。互斥鎖保證了每次只有一個線程進行寫入操作,從而保證了多線程情況下數據的正確性。Python 中的 Lock 類是 mutex 互斥鎖。一旦一個線程獲得鎖,其它試圖獲取鎖的線程將被阻塞,直到擁有鎖的線程釋放鎖。凡是存在共享資源爭搶的地方都可以使用鎖,從而保證只有一個使用者可以完全使用這個資源。
在 threading 模塊中使用 Lock 類可以方便地處理鎖定。Lock 類有2個方法:acquire() 鎖定和 release() 釋放鎖。示例用法如下:
import threadingmutex = threading.Lock()  # 創建鎖# 獲取鎖定,如果有必要,需要阻塞到鎖定釋放為止
# 1.默認阻塞,阻塞可以設置超時時間。非阻塞時,timeout禁止設置
# 2.如果提供blocking參數并將它設置為False,當無法獲取鎖定時將立即返回False;如果成功獲取鎖定則返回True
mutex.acquire(blocking=True, timeout=-1)  # 鎖定# 簡單講: 釋放鎖。可以從任何線程調用釋放,已上鎖的鎖,會被重置為unlocked,未上鎖的鎖上調用,拋 RuntimeError 異常
mutex.release()  # 釋放鎖
鎖的基本使用:
# -*- coding: utf-8 -*-
# @Time    : 2025-05-24 17:58
# @Author  : bb_bcxlc
# @File    : 12.鎖的基本使用.py
# @Software: PyCharm
# @Blog: https://blog.csdn.net/xw1680import threading
import timelock = threading.Lock()  # 互斥mutex
lock.acquire()
print('-' * 30)def worker(l):print('worker start', threading.current_thread())l.acquire()print('worker done', threading.current_thread())for i in range(10):threading.Thread(target=worker, name="w{}".format(i), args=(lock,), daemon=True).start()print('-' * 30)
while True:cmd = input(">>>")if cmd == 'r':  # 按r后枚舉所有線程看看lock.release()print('released one locker')elif cmd == 'quit':lock.release()breakelse:print(threading.enumerate())print(lock.locked())
上例可以看出不管在哪一個線程中,只要對一個已經上鎖的鎖發起阻塞地請求,該線程就會阻塞。加鎖,修改生產杯子的需求:
# -*- coding: utf-8 -*-
# @Time    : 2025-05-24 19:03
# @Author  : bb_bcxlc
# @File    : 12.生產杯子-加鎖.py
# @Software: PyCharm
# @Blog: https://blog.csdn.net/xw1680import threading
import time
import loggingFORMAT = "%(asctime)s %(threadName)s %(thread)d %(message)s"
logging.basicConfig(format=FORMAT, level=logging.INFO)cups = []
mutex = threading.Lock()def worker(lock, count=1000):logging.info("I'm working")while True:lock.acquire()  # 獲取鎖if len(cups) >= count:# lock.release()  # 鎖位置1break# lock.release()   # 鎖位置2time.sleep(0.0001)  # 為了看出線程切換效果,模擬杯子制作時間cups.append(1)# lock.release()  # 鎖位置3logging.info('I finished my job. cups = {}'.format(len(cups)))for i in range(1, 11):threading.Thread(target=worker, name="w{}".format(i), args=(mutex, 1000)).start()
鎖分析:
- 鎖位置2: 假設某一個瞬間,有一個工作線程A獲取了鎖,len(cups) 正好有 999 個,然后就釋放了鎖,可以繼續執行下面的語句,生產一個杯子,這地方不阻塞,但是正好杯子也沒有生產完。鎖釋放后,其他線程就可以獲得鎖,線程B獲得了鎖,發現 len(cups) 也是 999 個,然后釋放鎖,然后也可以去生產一個杯子。鎖釋放后,其他的線程也可能獲得鎖。就說A和B線程都認為是 999 個,都會生產一個杯子,那么實際上最后一定會超出 1000 個。假設某個瞬間一個線程獲得鎖,然后發現杯子到了 1000 個,沒有釋放鎖就直接 break 了,由于其他線程還在阻塞等待鎖釋放,這就成了死鎖了。在多任務系統下,當一個或多個線程等待系統資源,而資源又被線程本身或其他線程占用時,就形成了死鎖,如下圖所示:

- 鎖位置3分析: 獲得鎖的線程發現是 999,有資格生產杯子,生產一個,釋放鎖,看似很完美。問題在于,獲取鎖的線程發現杯子有 1000 個,直接 break,沒釋放鎖離開了,死鎖了。
- 鎖位置1分析: 如果線程獲得鎖,發現是1000,break 前釋放鎖,沒問題。問題在于,A線程獲得鎖后,發現小于1000,繼續執行,其他線程獲得鎖全部阻塞。A線程再次執行循環后,自己也阻塞了。死鎖了。
問題:究竟怎樣加鎖才正確呢?要在鎖位置1和鎖位置3同時加 release()。鎖是典型必須釋放的,Python 提供了上下文支持。查看 Lock 類的上下文方法,__enter__() 方法返回 bool 表示是否獲得鎖,__exit__() 方法中釋放鎖。由此上例可以修改為:
def worker(lock, count=1000):logging.info("I'm working")while True:with lock:if len(cups) >= count:breaktime.sleep(0.0001) # 為了看出線程切換效果,模擬杯子制作時間cups.append(1)logging.info('I finished my job. cups = {}'.format(len(cups)))
鎖的應用場景: 鎖適用于訪問和修改同一個共享資源的時候,即讀寫同一個資源的時候。如果全部都是讀取同一個共享資源需要鎖嗎?不需要。因為這時可以認為共享資源是不可變的,每一次讀取它都是一樣的值,所以不用加鎖。使用鎖的注意事項:
- 少用鎖,必要時用鎖。使用了鎖,多線程訪問被鎖的資源時,就成了串行,要么排隊執行,要么爭搶執行。舉例,高速公路上車并行跑,可是到了只開放了一個收費口,過了這個口,車輛依然可以在多車道上一起跑。過收費口的時候,如果排隊一輛輛過,加不加鎖一樣效率相當,但是一旦出現爭搶,就必須加鎖一輛輛過。注意,不管加不加鎖,只要是一輛輛過,效率就下降了。
- 加鎖時間越短越好,不需要就立即釋放鎖。一定要避免死鎖
不使用鎖,有了效率,但是結果是錯的。使用了鎖,效率低下,但是結果是對的。所以,我們是為了效率要錯誤結果呢?還是為了對的結果,讓計算機去計算吧。
3.3 遞歸鎖RLock
在 threading 模塊中,可以定義兩種類型的鎖:threading.Lock 和 threading.RLock。它們的區別是:Lock 不允許重復調用 acquire() 方法來獲取鎖,否則容易出現死鎖;而 RLock 允許在同一線程中多次調用 acquire(),不會阻塞程序,這種鎖也稱為遞歸鎖。在一個線程中,acquire 和 release 必須成對出現,即調用了n次 acquire() 方法,就必須調用n次的 release() 方法,這樣才能真正釋放所占用的鎖。
示例:
# -*- coding: utf-8 -*-
# @Time    : 2025-05-24 19:47
# @Author  : bb_bcxlc
# @File    : 12.RLock.py
# @Software: PyCharm
# @Blog: https://blog.csdn.net/xw1680import threading  # 導入threading模塊deposit = 0  # 定義變量,初始為存款余額
rlock = threading.RLock()  # 創建遞歸鎖def run_thread(n):  # 線程處理函數global deposit  # 聲明為全局變量for i in range(1000000):  # 無數次重復操作,對變量執行先存后取相同的值rlock.acquire()  # 獲取鎖rlock.acquire()  # 在同一線程內,程序不會堵塞。try:  # 執行修改deposit = deposit + ndeposit = deposit - nfinally:rlock.release()  # 釋放鎖rlock.release()  # 釋放鎖# 創建2個線程,并分別傳入不同的值
t1 = threading.Thread(target=run_thread, args=(5,))
t2 = threading.Thread(target=run_thread, args=(8,))
# 開始執行線程
t1.start()
t2.start()
# 阻塞線程
t1.join()
t2.join()
print(f'存款余額為:{deposit}')
3.4 同步協作Condition
Condition 是 threading 模塊的一個子類,用于維護多個線程之間的同步協作。一個 Condition 對象允許一個或多個線程在被其他線程通知之前進行等待。其內部使用的也是 Lock 或者 RLock,同時增加了等待池功能。Condition 對象包含以下方法:
# 1.acquire(): 請求底層鎖
# 2.release(): 釋放底層鎖
# 3.wait(self, timeout=None): 等待直到被通知發生超時
# 等待,直到條件計算為真。參數 predicate 為一個可調用對象,而且它的返回值可被解釋為一個布爾值
# 4.wait_for(self, predicate, timeout=None):
# 默認喚醒一個等待這個條件的線程。這個方法喚醒最多n個正在等待這個條件變量的線程
# 5.notify(self, n=1):
# 6.notify_all(self): # 喚醒所有正在等待這個條件的線程
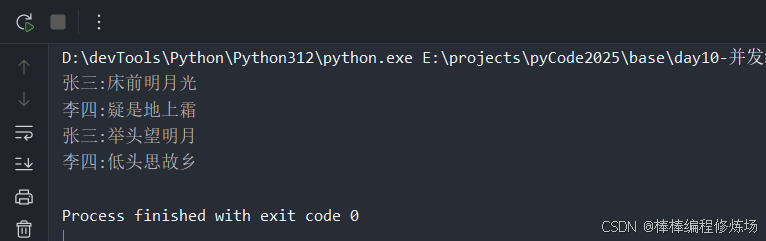
【示例】使用 Condition 來協調兩個線程之間的工作,實現兩個線程的交替說話。對話模擬效果如下:
張三: 床前明月光
李四: 疑是地上霜
張三: 舉頭望明月
李四: 低頭思故鄉
如果只有兩句,可以使用鎖機制,讓某個線程先執行,本示例有多句話交替出現,適合使用 Condition。示例完整代碼如下:
# -*- coding: utf-8 -*-
# @Time    : 2025-05-24 19:51
# @Author  : bb_bcxlc
# @File    : 13.Condition.py
# @Software: PyCharm
# @Blog: https://blog.csdn.net/xw1680import threading  # 導入threading模塊class ZSThead(threading.Thread):  # 張三線程類def __init__(self, name, cond):  # 初始化函數,接收說話人的姓名和Condition對象super(ZSThead, self).__init__()self.name = nameself.cond = conddef run(self):# 必須先調用with self.cond,才能使用wait()、notify()方法with self.cond:# 講話print("{}:床前明月光".format(self.name))# 等待李四的回應self.cond.notify()  # 通知self.cond.wait()  # 等待狀態# 講話print("{}:舉頭望明月".format(self.name))# 等待李四的回應self.cond.notify()  # 通知self.cond.wait()  # 等待狀態class LSThread(threading.Thread):  # 李四線程類def __init__(self, name, cond):super(LSThread, self).__init__()self.name = nameself.cond = conddef run(self):with self.cond:# wait()方法不僅能獲得一把鎖,并且能夠釋放cond的大鎖,# 這樣張三才能進入with self.cond中self.cond.wait()print(f"{self.name}:疑是地上霜")# notify()釋放wait()生成的鎖self.cond.notify()  # 通知self.cond.wait()  # 等待狀態print(f"{self.name}:低頭思故鄉")self.cond.notify()  # 通知c = threading.Condition()  # 創建條件對象
zs = ZSThead("張三", c)  # 實例化張三線程
ls = LSThread("李四", c)  # 實例化李四線程
ls.start()  # 李四開始說話
zs.start()  # 張三接著說話
ls.start() 和 zs.start() 的啟動順序很重要,必須先啟動李四,讓他在那里等待,因為先啟動張三時,他說了話就發出了通知,但是當時李四的線程還沒有啟動,并且 Condition 外面的大鎖也沒有釋放,李四也沒法獲取 self.cond 這把大鎖。Condition 有兩層鎖,一把底層鎖在線程調用了 wait() 方法時就會釋放,每次調用 wait() 方法后,都會創建一把鎖放進 Condition 的雙向隊列中,等待 notify() 方法的喚醒。程序運行結果如下所示:
3.5 Queue的線程安全
queue 是一個線程安全的 FIFO/LIFO/Priority 隊列模塊,可以在多個線程之間安全地傳遞數據,內部實現已經自帶了鎖機制,不需要我們再手動加鎖。模塊提供的三種隊列類型:
| 隊列類 | 描述 |
|---|---|
Queue.Queue(即 queue.Queue) | 先進先出隊列(FIFO)? 最常用 |
queue.LifoQueue | 后進先出隊列(LIFO,類似棧) |
queue.PriorityQueue | 優先級隊列,元素必須是 (priority, item) 的形式 |
常用 API 一覽:
| 方法 | 描述 |
|---|---|
put(item) | 放入一個元素,若隊列滿則阻塞(可配超時) |
get() | 獲取一個元素,若隊列空則阻塞(可配超時) |
qsize() | 當前隊列元素數量(非精確,慎用) |
empty() | 判斷隊列是否為空(不保證絕對準確) |
full() | 判斷隊列是否滿(同樣不保證絕對準確) |
put_nowait(item) | 非阻塞放入 |
get_nowait() | 非阻塞獲取 |
示例代碼:
# -*- coding: utf-8 -*-
# @Time    : 2025-05-24 21:18
# @Author  : bb_bcxlc
# @File    : 14.queue.py
# @Software: PyCharm
# @Blog: https://blog.csdn.net/xw1680import threading
import queue
import time
import randomq = queue.Queue(maxsize=5)# 生產者線程函數
def producer(name):for i in range(10):item = f"item-{i}"q.put(item)  # 會阻塞直到隊列有空位print(f"{name} 生產了 {item}")time.sleep(random.random())# 消費者線程函數
def consumer(name):while True:item = q.get()  # 會阻塞直到隊列非空print(f"{name} 消費了 {item}")time.sleep(random.random())q.task_done()# 啟動線程
t1 = threading.Thread(target=producer, args=("生產者1",))
t2 = threading.Thread(target=consumer, args=("消費者1",), daemon=True)t1.start()
t2.start()t1.join()
q.join()  # 等待隊列任務完成
print("所有任務處理完畢")
特別注意下面的代碼在多線程中使用:
import queueq = queue.Queue(8)
if q.qsize() == 7:q.put()  # 上下兩句可能被打斷if q.qsize() == 1:q.get()  # 未必會成功
如果不加鎖,是不可能獲得準確的大小的,因為你剛讀取到了一個大小,還沒有取走數據,就有可能被其他線程改了。Queue 類的 size 雖然加了鎖,但是,依然不能保證立即 get、put 就能成功,因為讀取大小和 get、put 方法是分開的。小結:
# 優點:
# 1.線程安全: 內部自帶鎖機制,避免競態
# 2.簡單高效: 使用簡潔,支持阻塞/非阻塞操作
# 3.多種模式: FIFO、LIFO、優先級隊列滿足不同需求
# 4.可用于生產者-消費者模型: 線程間數據交互的首選方式# 使用注意事項
# 1.empty() 和 full() 不可靠,只是近似值(文檔明確說明)
# 2.task_done() 必須匹配 get(),否則 join() 會一直阻塞
# 3.隊列滿/空時不建議使用非阻塞操作直接判斷,應通過 try-except 或 timeout 控制# Queue 適合使用的場景
# 1.多線程中線程安全的數據通信
# 2.實現 生產者-消費者模式
# 3.控制任務并發量
# 4.異步任務調度(搭配 ThreadPoolExecutor 等)
至此今天的學習就到此結束了,筆者在這里聲明,筆者寫文章只是為了學習交流,以及讓更多學習Python語言的讀者少走一些彎路,節省時間,并不用做其他用途,如有侵權,聯系博主刪除即可。感謝您閱讀本篇博文,希望本文能成為您編程路上的領航者。祝您閱讀愉快!

????好書不厭讀百回,熟讀課思子自知。而我想要成為全場最靚的仔,就必須堅持通過學習來獲取更多知識,用知識改變命運,用博客見證成長,用行動證明我在努力。
????如果我的博客對你有幫助、如果你喜歡我的博客內容,請點贊、評論、收藏一鍵三連哦!聽說點贊的人運氣不會太差,每一天都會元氣滿滿呦!如果實在要白嫖的話,那祝你開心每一天,歡迎常來我博客看看。
?編碼不易,大家的支持就是我堅持下去的動力。點贊后不要忘了關注我哦!

)


)


)