1. 項目展示
boost搜索引擎具體講解視頻
2. 項目背景
對于boost庫,官方是沒有提供搜索功能的,我們這個項目就是來為它添加一個站內搜索的功能。
3. 項目環境與技術棧
? 項目環境: ubuntu22.04、vscode
? 技術棧: C/C++、C++11、STL、Boost、Jsoncpp、cppjieba、cpp-httplib、html5、css、js、jQuery、Ajax
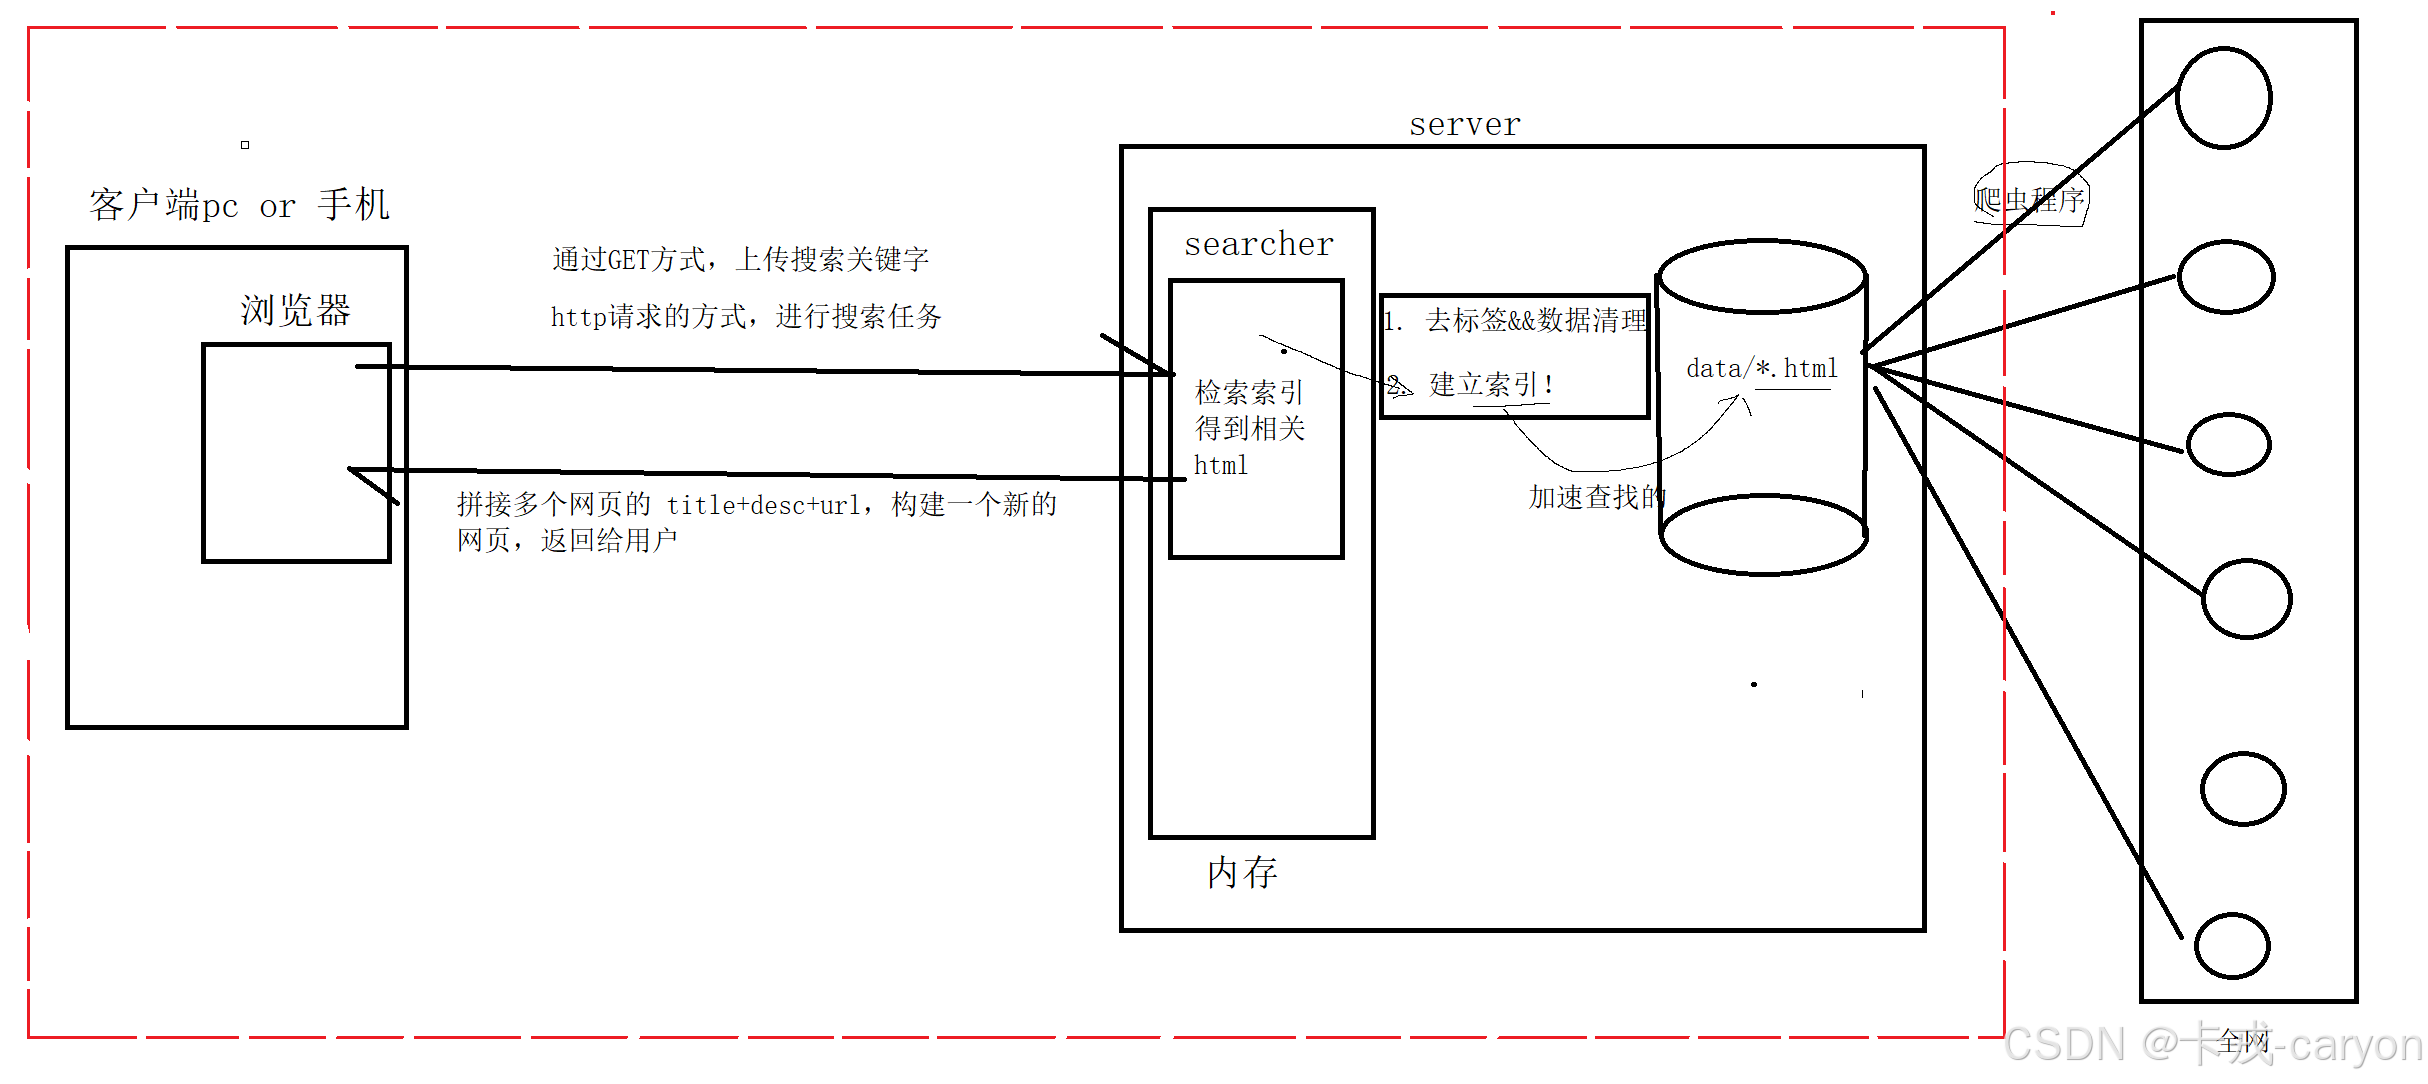
4. 搜索引擎的宏觀原理
? 后端: 首先通過爬蟲程序將全網中的數據保存到磁盤中,接下來通過去標簽和數據清洗得到我們想要的數據格式,接下來為這些數據建立好索引方便搜索引擎檢索。
? 前端: 用戶通過瀏覽器通過GET方式上傳關鍵字,通過http請求搜索引擎提供服務,搜索引擎檢索相關的數據并動態構建網頁返回用戶。
5. 數據獲取
我們這里就不采用爬蟲的方式獲取boost庫中的內容了,因為官方已經提供了下載的途徑:
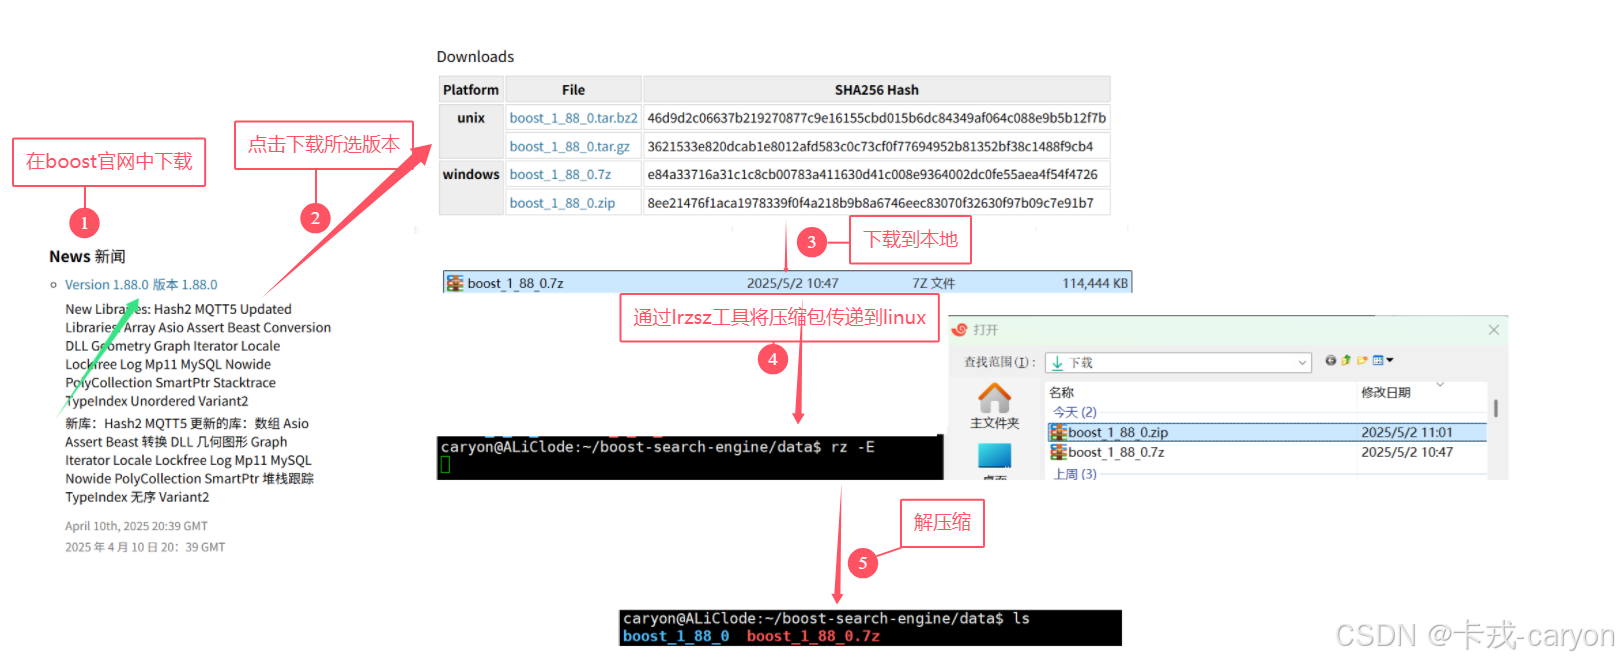
我們實際需要的只是boost_1_88_0/doc/html 這里面的內容,我們將其拷貝到我們的data/raw_input目錄中方便后續使用。
6. 去標簽與數據清洗
我們瀏覽data/raw_input其中的html文件發現其中都包含著很多的標簽:
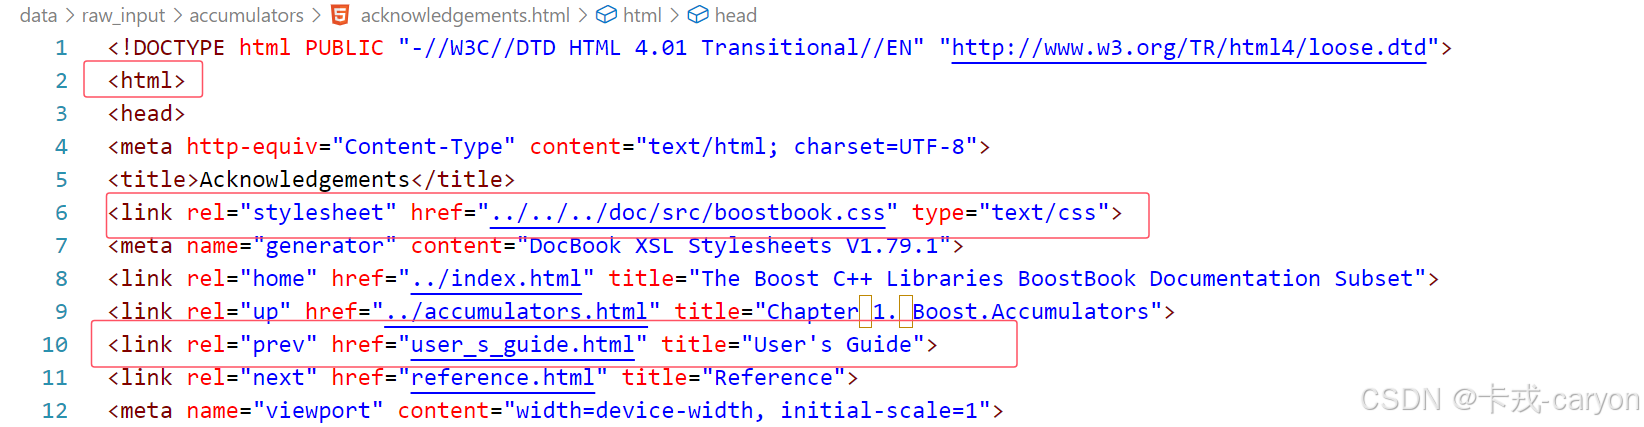
而這些標簽中的內容對于我們來說是沒有價值的,因此我們需要去除這些標簽,并把處理好的數據放在data/input中。
6.1 處理策略
在我們搜索網頁時可以看到其顯示的內容主要分為三部分:

因此我們在數據清洗時也要體現出這三部分數據:將每個html文件中的內容讀取成一行以\n結尾,每一行中分為三個部分(title、content、url)以\3分隔。
6.2 基本框架
#include <memory>
#include "Parse.hpp"using namespace ParseModule;int main()
{std::unique_ptr<Parse> parser = std::make_unique<Parse>();// 1. 枚舉所有的.html文件if(! parser->EnumFileName()){LOG(LogLevel::FATAL) << "EnumFileName Failed";exit(1);}// 2. 將所有的文件名對應的文件轉換成指定格式的數組if(!parser->ParseHtml()){LOG(LogLevel::FATAL) << "ParseHtml Failed";exit(2);}// 3. 將數組中的內容拼接成json字符串并保存到input_path中if(!parser->SaveHtml()){LOG(LogLevel::FATAL) << "SaveHtml Failed";exit(3);}LOG(LogLevel::DEBUG) << "Parse Succeed!";return 0;
}
6.3 分步實現
? 我們需要將 data/raw_input/ 下的所有 .html 文件的名字獲取得到,boost庫中為我們提供了相應的方法。因此我們需要引入boost庫,使用boost庫中的filesystem幫助我們遍歷給定路徑的文件,來幫我們篩選出.html的文件。
? 獲取得到所有的.html文件之后,需要提取出我們想要的內容(title、content、url),所以要依次遍歷所有的文件,提取出這三部分。
? 在獲取到我們想要的內容之后,我們需要將這些數據以一定的格式進行保存,這里我們采用的是每個文件的內容放在一行,行內使用'\3'進行分隔,將其存儲到data/input/input.bin中。
boost 庫的下載
sudo apt update
sudo apt install -y libboost-all-dev
具體實現
#pragma once
#include <fstream>
#include <string>
#include <vector>
#include <cstdlib>
#include <boost/filesystem.hpp>
#include "Log.hpp"namespace ParseModule
{using namespace LogModule;const static std::string raw_input_path = "../data/raw_input";const static std::string input_path = "../data/input/input.bin";struct DataInfo{std::string title;   // 標題std::string content; // 正文std::string url;     // url};using DataInfo_t = struct DataInfo;class Parse{public:Parse(){}// 枚舉所有的html文件bool EnumFileName(){boost::filesystem::path root_path(raw_input_path);// 如果節點不存在就返回 falseif (!boost::filesystem::exists(root_path))return false;// 遍歷所有的文件boost::filesystem::recursive_directory_iterator end;boost::filesystem::recursive_directory_iterator iter(root_path);for (; iter != end; iter++){// 判斷是不是常規文件if (!boost::filesystem::is_regular_file(*iter))continue;// 判斷是不是.html文件if (iter->path().extension() != std::string(".html"))continue;// 走到這里一定是一個.html文件_files_name.push_back(move(iter->path().string()));}return true;}// 對文件中的內容進行劃分bool ParseHtml(){for (auto &file_name : _files_name){// 讀取文件內容std::string message;if (!ReadFile(file_name, &message)){LOG(LogLevel::FATAL) << "ReadFile Failed";return false;}// 構建DataInfoDataInfo_t datainfo;if (!BuiltDataInfo(file_name, message, &datainfo)){LOG(LogLevel::FATAL) << "BuiltDataInfo Failed";return false;}// 將構建成功的datainfo插入datas_datas.push_back(datainfo);}return true;}// 將指定格式的數據寫入指定文件bool SaveHtml(){// 按照二進制方式進行寫入std::ofstream out(input_path, std::ios::out | std::ios::binary);if (!out.is_open()){std::cerr << "open " << input_path << " failed!" << std::endl;return false;}const static std::string sep = "\3";for (auto &data : _datas){std::string outstr;outstr += data.title + sep;outstr += data.content + sep;outstr += data.url + '\n';out.write(outstr.c_str(), outstr.size());}out.close();return true;}~Parse(){}private:bool ReadFile(const std::string &file_name, std::string *result){std::ifstream in(file_name, std::ios::in);if (!in.is_open()){LOG(LogLevel::ERROR) << "open file " << file_name << " error";return false;}std::string line;while (std::getline(in, line))*result += line;in.close();return true;}bool BuiltDataInfoTitle(std::string &message, std::string *title){size_t begin = message.find("<title>");if (begin == std::string::npos)return false;size_t end = message.find("</title>");if (end == std::string::npos)return false;begin += std::string("<title>").size();*title = message.substr(begin, end - begin);return true;}bool BuiltDataInfoContent(std::string &message, std::string *content){size_t begin = message.find("<body");if (begin == std::string::npos)return false;size_t end = message.find("</body>");if (end == std::string::npos)return false;begin += std::string("<body>").size();// 基于一個簡易的狀態機去標簽enum status{LABLE,CONTENT};enum status s = LABLE;while (begin != end){switch (s){case LABLE:if (message[begin] == '>')s = CONTENT;break;case CONTENT:if (message[begin] == '<')s = LABLE;else{// 我們不想保留原始文件中的\n,因為我們想用\n作為html解析之后文本的分隔符if (message[begin] == '\n')message[begin] = ' ';content->push_back(message[begin]);}break;default:break;}begin++;}return true;}bool BuiltDataInfoUrl(std::string &file_name, std::string *url){std::string url_head = "https://www.boost.org/doc/libs/1_88_0/doc/html";std::string url_tail = file_name.substr(raw_input_path.size());*url = url_head + url_tail;return true;}bool BuiltDataInfo(std::string &filename, std::string &message, DataInfo_t *datainfo){// 構建titleif (!BuiltDataInfoTitle(message, &datainfo->title))return false;// 構建contentif (!BuiltDataInfoContent(message, &datainfo->content))return false;// 構建urlif(!BuiltDataInfoUrl(filename,&datainfo->url))return false;return true;}private:std::vector<std::string> _files_name; // 1. 將raw中的html文件名全部保存到files_name中std::vector<DataInfo_t> _datas;       // 2. 將所有的文件名對應的文件轉換成指定格式的數組};
}
7. 建立索引
7.1 正排索引與倒排索引概述
正排索引: 從文檔ID找到文檔內容(文檔內的關鍵字)
| 文檔ID | 文檔內容 |
|---|---|
| 1 | caryon愛在CSDN寫博客 |
| 2 | CADN上有好多優質博客 |
倒排索引: 根據文檔內容對應聯系到文檔ID
| 關鍵字 | 文檔ID |
|---|---|
| caryon | 1 |
| CSDN | 1、2 |
| 寫博客 | 1 |
| 博客 | 1、2 |
| 優質博客 | 2 |
7.2 基本框架
#pragma oncenamespace IndexModule
{// 正排索引元素typedef struct ForwardElem{std::string title;   // titlestd::string content; // contentstd::string url;     // urlint data_id;         // id} ForwardElem;// 倒排索引元素typedef struct InvertedElem{int data_id;          // data_idstd::string key_word; // key_wordlong long weight;     // weight} InvertedElem;// 倒排鏈表using InvertedList = std::vector<InvertedElem>;class Index{public:Index() {}// 獲取正排索引對應的元素ForwardElem *GetForwardElem(int data_id){}// 獲取倒排索引對應的元素InvertedList *GetInvertedList(const std::string &word){}// 構建索引bool BuiltIndex(const std::string &input_path){// 構建正排索引// 構建倒排索引}~Index() {}private:Index* instance;};
}
7.3 分步實現
正排索引實際上就是對data/input/input.bin中的內容進行讀取并按照一定的格式進行創建,它的標號天然就存在了(數組下標)。倒排索引的話就需要將獲取的正排索引的元素拆分成若干詞(這個工作我們交由jieba來做),而后將這些詞與編號一一對應起來,這里有一點很重要,查閱到的文檔內容我們按照什么樣的順序進行展示呢?這里我們采用了一定的相關性進行綁定的。
至于返回正排索引和倒排索引對應的元素只需要查找一下即可。
還有一點就是,我們實際上的索引只需要建立一次就可以了,因此可以設置為單例模式。
jieba庫的下載
本次使用的jieba我們從git code獲取,我是將它保存到了libs目錄下的,需要注意的是要將dsps/limonp拷貝到include下才能正確使用,或者建立軟連接也可以。
git clone https://gitee.com/mohatarem/cppjieba.git
具體實現
#pragma once
#include <mutex>
#include <fstream>
#include <vector>
#include <string>
#include <unordered_map>
#include <boost/algorithm/string.hpp>
#include "Log.hpp"
#include "Jieba.hpp"
namespace IndexModule
{using namespace LogModule;// 正排索引元素typedef struct ForwardElem{std::string title;   // titlestd::string content; // contentstd::string url;     // urlint data_id;         // id} ForwardElem;// 倒排索引元素typedef struct InvertedElem{int data_id;          // data_idstd::string key_word; // key_wordlong long weight;     // weight// 這個函數是給search.hpp去重使用的bool operator==(const InvertedElem& e){return data_id == e.data_id && key_word == e.key_word && weight == e.weight;}} InvertedElem;// 倒排鏈表using InvertedList = std::vector<InvertedElem>;class Index{Index() {}Index(const Index&) = delete;bool operator=(const Index&) = delete;static Index* instance;static std::mutex lock;public:static Index* GetInstance(){if(instance == nullptr){std::lock_guard<std::mutex> lck (lock);if(instance == nullptr)instance = new(Index);}return instance; }// 獲取正排索引對應的元素ForwardElem *GetForwardElem(int data_id){if (data_id > ForwardIndex.size())return nullptr;return &ForwardIndex[data_id];}// 獲取倒排索引對應的元素InvertedList *GetInvertedList(const std::string &word){auto it = InvertedIndex.find(word);if (it == InvertedIndex.end())return nullptr;return &InvertedIndex[word];}// 構建索引bool BuiltIndex(const std::string &input_path){std::ifstream in(input_path, std::ios::in | std::ios::binary);if (!in.is_open()){LOG(LogLevel::FATAL) << "sorry, " << input_path << " open error";return false;}std::string line;int cnt = 0;while (getline(in, line)){// 構建正排索引ForwardElem *forward_elem = BuiltForwardIndex(line);if (forward_elem == nullptr)continue;// 構建倒排索引if (!BuiltInvertedIndex(*forward_elem))continue;cnt++;if(cnt % 50 == 0)LOG(LogLevel::DEBUG) << "已經建立連接:" << cnt ;}return true;}~Index() {}private:ForwardElem *BuiltForwardIndex(const std::string &line){// 1. 解析字符串進行切割std::vector<std::string> part_elem;const static std::string sep = "\3";boost::split(part_elem, line, boost::is_any_of(sep), boost::token_compress_on);if (part_elem.size() != 3)return nullptr;// 2. 將其填充到ForwardElem結構ForwardElem forward_elem;forward_elem.title = part_elem[0];forward_elem.content = part_elem[1];forward_elem.url = part_elem[2];forward_elem.data_id = ForwardIndex.size();// 3. 將構造好的ForwardElem結構插入ForwardIndexForwardIndex.push_back(std::move(forward_elem));return &ForwardIndex.back();}bool BuiltInvertedIndex(ForwardElem &forward_elem){// 統計詞頻,用于weight的構造struct word_cnt{int title_cnt;int content_cnt;word_cnt() : title_cnt(0), content_cnt(0) {}};// 用來暫存詞頻的映射表std::unordered_map<std::string, word_cnt> word_map;// 對title進行切分并統計std::vector<std::string> title_key_words;JiebaUtil::CutString(forward_elem.title, &title_key_words);for (auto &key_word : title_key_words){// 忽略大小寫boost::to_lower(key_word);word_map[key_word].title_cnt++;}// 對content進行切分并統計std::vector<std::string> content_key_words;JiebaUtil::CutString(forward_elem.content, &content_key_words);for (auto &key_word : content_key_words){boost::to_lower(key_word);word_map[key_word].content_cnt++;}// 將關鍵字依次插入InvertedIndexfor(auto& key_word:word_map){InvertedElem elem;elem.data_id = forward_elem.data_id;elem.key_word = key_word.first;elem.weight = 10 * key_word.second.title_cnt + key_word.second.content_cnt; // 這里的weight構造采用了硬編碼InvertedIndex[key_word.first].push_back(std::move(elem));}return true;}private:std::vector<ForwardElem> ForwardIndex;                       // 正排索引std::unordered_map<std::string, InvertedList> InvertedIndex; // 倒排索引};Index* Index::instance = nullptr;std::mutex Index::lock;
}
8. 搜索引擎
8.1 基本框架
#pragma oncenamespace SearchModule
{using namespace IndexModule;class Search{public:Search(){}// 初始化搜索引擎void InitSearch(const std::string &bin_path){}// 對查詢做出反饋std::string Searcher(std::string query) // 這里是故意寫成拷貝的{// 1. 對 query 進行切分// 2. 將所有的關鍵字構成的 InvertedElem 進行保存// 3. 按weight降序排序并去重// 4. 將所有的結果按json串的格式返回}~Search(){}private:Index *index;};
}
8.2 分步實現
搜索引擎是本博客的核心內容了,但是經過前面的處理,這里我們需要做的就只有初始化引擎和對用戶的查詢做出反饋,這里我們采用json串進行返回是為了方便后續的網絡服務。
jsoncpp的安裝
sudo apt install -y libjsoncpp-dev
具體實現
#pragma once
#include <string>
#include <algorithm>
#include <boost/algorithm/string.hpp>
#include <jsoncpp/json/json.h>
#include "Index.hpp"
#include "Jieba.hpp"
#include "Log.hpp"namespace SearchModule
{using namespace IndexModule;using namespace LogModule;class Search{public:Search(){}// 初始化搜索引擎void InitSearch(const std::string &bin_path){index = Index::GetInstance();LOG(LogLevel::INFO) << "獲取單例成功……";index->BuiltIndex(bin_path);LOG(LogLevel::INFO) << "建立索引成功";}// 對查詢做出反饋std::string Searcher(std::string query) // 這里是故意寫成拷貝的{// 忽略大小寫boost::to_lower(query);// 1. 對 query 進行切分std::vector<std::string> key_words;JiebaUtil::CutString(query, &key_words);// 2. 將所有的關鍵字構成的 InvertedElem 進行保存InvertedList invertedlist_all;for (const auto &key_word : key_words){InvertedList *invertedlist = index->GetInvertedList(key_word);if (invertedlist == nullptr)continue;invertedlist_all.insert(invertedlist_all.end(), invertedlist->begin(), invertedlist->end());}// 3. 按weight降序排序并去重std::sort(invertedlist_all.begin(), invertedlist_all.end(), [](const InvertedElem &e1, const InvertedElem &e2){ return e1.weight > e2.weight; });auto last = std::unique(invertedlist_all.begin(), invertedlist_all.end());invertedlist_all.erase(last, invertedlist_all.end());// 4. 將所有的結果按json串的格式返回Json::Value root;for (auto &invertedlist : invertedlist_all){ForwardElem *forwardelem = index->GetForwardElem(invertedlist.data_id);if (forwardelem == nullptr){continue;}Json::Value elem;elem["title"] = forwardelem->title;// content是文檔的去標簽的結果,但是不是我們想要的,我們要的是一部分elem["desc"] = GetDesc(forwardelem->content, invertedlist.key_word);elem["url"] = forwardelem->url;root.append(elem);}return Json::StyledWriter().write(root);}~Search(){}private:std::string GetDesc(const std::string &content, const std::string &key_word){// 找到word在html_content中的首次出現,然后往前找50字節(如果沒有,從begin開始),往后找100字節(如果沒有,到end就可以的)const int prev_step = 50;const int next_step = 100;// 1. 找到首次出現auto iter = std::search(content.begin(), content.end(), key_word.begin(), key_word.end(), [](int x, int y){ return (std::tolower(x) == std::tolower(y)); });if (iter == content.end()){return "None1";}int pos = std::distance(content.begin(), iter);// 2. 獲取start,end int start = 0;int end = content.size() - 1;// 如果之前有50+字符,就更新開始位置if (pos > start + prev_step)start = pos - prev_step;if (pos < end - next_step)end = pos + next_step;// 3. 截取子串,returnif (start >= end)return "None2";std::string desc = content.substr(start, end - start);desc += "...";return desc;}private:Index *index;};
}
9. 網絡服務
網絡服務這里我們采用cpp-httplib庫來實現
cpp-httplib 安裝
git clone https://gitee.com/welldonexing/cpp-httplib.git
具體實現
#pragma once
#include <memory>
#include "Search.hpp"
#include "../libs/cpp-httplib/httplib.h"namespace HttpSeverModule
{using namespace SearchModule;const std::string rootpath = "../html";class HttpSever{public:HttpSever() : _searcher(std::make_unique<Search>()){}void Start(const std::string &bin_path){_searcher->InitSearch(bin_path);_svr.set_base_dir(rootpath.c_str());_svr.Get("/s", [&](const httplib::Request &req, httplib::Response &rsp){if (!req.has_param("word")){rsp.set_content("必須要有搜索關鍵字!", "text/plain; charset=utf-8");return;}std::string word = req.get_param_value("word");LOG(LogLevel::INFO) << "用戶搜索的: " << word;std::string json_string = _searcher->Searcher(word);rsp.set_content(json_string, "application/json");});LOG(LogLevel::INFO) << "服務器啟動成功...";_svr.listen("0.0.0.0", 8888);}~HttpSever(){}private:std::unique_ptr<Search> _searcher;httplib::Server _svr;};
}
10. 前端界面
這一部分內容只要自己能夠實現一個搜索功能即可,謹放上我的代碼供大家查看
<!-- index.html -->
<!DOCTYPE html>
<html lang="en">
<head><meta charset="UTF-8"><title>Boost 搜索引擎</title><style>/* 可復用 Google 風格樣式 */body {display: flex;justify-content: center;align-items: center;flex-direction: column;height: 100vh;font-family: Arial, sans-serif;}.logo {font-size: 64px;font-weight: bold;color: #4285f4;margin-bottom: 30px;}.search {display: flex;max-width: 600px;width: 100%;border: 1px solid #ccc;border-radius: 24px;padding: 5px 10px;}.search input {flex: 1;border: none;outline: none;font-size: 16px;}.search button {border: none;background: none;font-size: 16px;color: #4285f4;cursor: pointer;}</style>
</head>
<body><div class="logo">Boost</div><div class="search"><input type="text" id="searchInput" placeholder="請輸入搜索關鍵字"><button onclick="jump()">🔍</button></div><script>function jump() {const input = document.getElementById("searchInput").value.trim();if (input !== "") {location.href = `search.html?word=${encodeURIComponent(input)}`;}}</script>
</body>
</html>
<!-- search.html -->
<!DOCTYPE html>
<html lang="en"><head><meta charset="UTF-8"><title>搜索結果 - Boost</title><script src="https://code.jquery.com/jquery-2.1.1.min.js"></script><style>body {font-family: Arial, sans-serif;background-color: #f8f9fa;margin: 0;padding: 0;}.container {max-width: 720px;margin: 0 auto;padding: 20px;}.search-bar {display: flex;margin: 20px 0;background: white;border: 1px solid #ddd;border-radius: 24px;padding: 6px 12px;box-shadow: 0 1px 2px rgba(0, 0, 0, 0.1);}.search-bar input {flex: 1;border: none;outline: none;font-size: 16px;padding: 8px;}.search-bar button {background-color: #4285f4;color: white;border: none;border-radius: 20px;padding: 8px 16px;font-size: 14px;cursor: pointer;}.result {margin-top: 20px;padding: 0 30px;}.result .item {margin-bottom: 25px;padding-bottom: 10px;border-bottom: 1px solid #eee;}.result .item a {display: block;font-size: 18px;font-weight: bold;color: #1a0dab;text-decoration: none;margin-bottom: 5px;}.result .item a:hover {text-decoration: underline;}.result .item p {font-size: 14px;line-height: 1.6;color: #4d5156;margin: 0;white-space: normal;/* 允許換行 */}</style>
</head><body><div class="container"><div class="search-bar"><input type="text" id="searchInput"><button onclick="jump()">搜索</button></div><div class="result"></div></div><script>const urlParams = new URLSearchParams(window.location.search);const query = urlParams.get('word') || '';document.getElementById("searchInput").value = query;if (query !== '') {Search(query);}function Search(q) {$.ajax({type: "GET",url: "/s?word=" + encodeURIComponent(q),success: function (data) {BuildHtml(data);}});}function BuildHtml(data) {const result_label = $(".result");result_label.empty();for (let elem of data) {let a_label = $("<a>", {text: elem.title,href: elem.url,target: "_blank"});let p_label = $("<p>", {text: elem.desc});let div_label = $("<div>", {class: "item"});a_label.appendTo(div_label);p_label.appendTo(div_label);  // 不再添加網址div_label.appendTo(result_label);}}function jump() {const input = document.getElementById("searchInput").value.trim();if (input !== "") {location.href = `search.html?word=${encodeURIComponent(input)}`;}}</script>
</body></html>

)
)


)


![[人機交互]理解界面對用戶的影響](http://pic.xiahunao.cn/[人機交互]理解界面對用戶的影響)


)


)


:如何創建一個地形)