YOLO旋轉檢測相較于目標檢測而言,其只是最后的輸出層網絡發生了改變,一個最明顯的區別便是:目標檢測的檢測框是xywh,而旋轉檢測則為xywha,其中,這個a代表angle,即旋轉角度,其余的基本相同。
pt模型推理
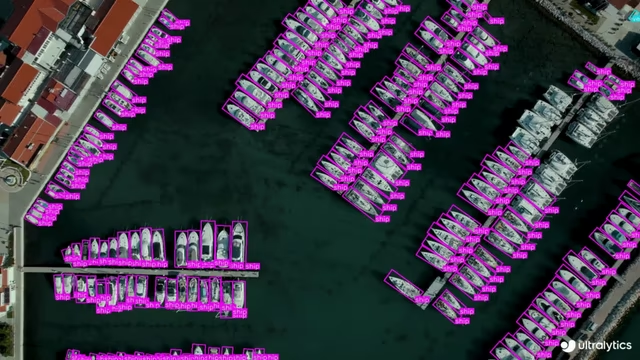
這里我們在模型訓練完成后,即可進行推理操作,這里我們首先使用默認的模型格式,即pt格式
from ultralytics import YOLO
import cv2
import numpy as np
# 加載模型
model = YOLO("best.pt")  # 加載訓練好的旋轉框檢測模型
# 預測圖像
results = model("1.jpg")  # 預測圖像
# 可視化參數配置
font = cv2.FONT_HERSHEY_SIMPLEX
font_scale = 0.6
thickness = 2
colors = [(0,255,0), (255,0,0), (0,0,255)]  # 不同類別的顏色
# 遍歷每個檢測結果
for result in results:# 獲取原始圖像并轉換為OpenCV格式img = result.orig_img.copy()# 遍歷每個旋轉框for polygon, cls, conf in zip(result.obb.xyxyxyxy, result.obb.cls, result.obb.conf):# 將坐標轉換為整數類型pts = polygon.cpu().numpy().reshape(-1, 2).astype(int)# 繪制多邊形邊界框cv2.polylines(img, [pts], isClosed=True,color=colors[int(cls)%len(colors)],thickness=thickness)# 構建標簽文本label = f"{result.names[int(cls)]} {conf:.2f}"# 計算文本位置(取第一個點上方)text_origin = (pts[0][0], pts[0][1] - 10 if pts[0][1] > 20 else pts[0][1] + 20)# 繪制文本背景(text_w, text_h), _ = cv2.getTextSize(label, font, font_scale, thickness)cv2.rectangle(img,(text_origin[0], text_origin[1] - text_h - 5),(text_origin[0] + text_w, text_origin[1] + 5),colors[int(cls)%len(colors)],-1)  # 填充矩形# 繪制文本cv2.putText(img, label,(text_origin[0], text_origin[1]),font, font_scale,(255,255,255),  # 白色文字thickness)cv2.imwrite("result.jpg", img)
從結果來看,輸出的結果的維度為(4,7)其中4代表4個結果,7則是對應的內容,根據拆分結果來看,分別是xywhr以及class_id(類別編號)以及scores(置信度),同時需要注意的是,使用pt的推理結果中,其自動執行了將xywhr轉換為xyxyxyxy的操作,這方便我們直接使用opencv中的rectangle方法進行繪圖操作。

ONNX模型推理
ultralytics中提供了將pt文件轉換為onnx,tflite等多種格式的方法,ONNX(Open Neural Network Exchange)是一種開放的文件格式,用于表示機器學習模型。它使得不同的人工智能框架能夠互相交換模型,從而提高了模型的可移植性和互操作性。通過ONNX,開發者可以在一個框架中訓練模型,然后將該模型遷移到另一個支持ONNX的框架中進行推理,而無需重新訓練或大幅修改模型。
使用ONNX模型進行推理的代碼如下:其主要包含數據預處理、模型加載、模型推理三個步驟:
def load_model(weights):"""加載ONNX模型并返回會話對象。:param weights: 模型權重文件路徑:return: ONNX運行會話對象"""session = ort.InferenceSession(weights, providers=['CPUExecutionProvider'])logging.info(f"模型加載成功: {weights}")return sessiondef run_inference(session, image_bytes, imgsz=(640, 640)):"""對輸入圖像進行預處理,然后使用ONNX模型執行推理。:param session: ONNX運行會話對象:param image_bytes: 輸入圖像的字節數據:param imgsz: 模型輸入的尺寸:return: 推理結果、縮放比例、填充尺寸"""im0 = cv2.imdecode(np.frombuffer(image_bytes, np.uint8), cv2.IMREAD_COLOR)  # 解碼圖像字節數據if im0 is None:raise ValueError("無法從image_bytes解碼圖像")img, ratio, (dw, dh) = letterbox(im0, new_shape=imgsz)  # 調整圖像尺寸img = img.transpose((2, 0, 1))[::-1]  # 調整通道順序由(640,640,3)變為(3,640,640)img = np.ascontiguousarray(img)img = img[np.newaxis, ...].astype(np.float32) / 255.0  # 歸一化處理input_name = session.get_inputs()[0].nameresult = session.run(None, {input_name: img})  # 執行模型推理return result[0], ratio, (dw, dh)def process_images_in_folder(folder_path, model_weights, output_folder, conf_threshold, iou_threshold, imgsz):"""批量處理文件夾中的圖像,執行推理、解析和可視化,保存結果。:param folder_path: 輸入圖像文件夾路徑:param model_weights: ONNX模型權重文件路徑:param output_folder: 輸出結果文件夾路徑:param conf_threshold: 置信度閾值:param iou_threshold: IoU 閾值,用于旋轉NMS:param imgsz: 模型輸入大小"""session = load_model(weights=model_weights)  # 加載ONNX模型if not os.path.exists(output_folder):os.makedirs(output_folder)  # 如果輸出文件夾不存在,則創建for filename in os.listdir(folder_path):if filename.endswith(('.jpg', '.png', '.jpeg')):  # 處理圖片文件image_path = os.path.join(folder_path, filename)with open(image_path, 'rb') as f:image_bytes = f.read()print("image_path:", image_path)raw_output, ratio, dwdh = run_inference(session=session, image_bytes=image_bytes, imgsz=imgsz)  # 執行推理# 主函數:加載參數
if __name__ == "__main__":folder_path = r"images"  # 輸入圖像文件夾路徑model_weights = r"best.onnx"  # ONNX模型路徑output_folder = "results"  # 輸出結果文件夾conf_threshold = 0.5  # 置信度閾值iou_threshold = 0.5  # IoU閾值,用于旋轉NMSimgsz = (640, 640)  # 模型輸入大小process_images_in_folder(folder_path, model_weights, output_folder, conf_threshold, iou_threshold, imgsz)  # 執行批量處理
推理出的結果如下:raw_output(1,7,8400), ratio((0.15873015873015872, 0.15873015873015872)為縮放比例, dwdh(0.0, 80.0)是填充尺度。
隨后,便是結果解析了,即后處理過程,如下:
這里需要注意的是,輸出結果為(8400,7)其中,0-3為xywh,4為scores,5為class_id,6為angle
import os
import cv2
import numpy as np
import onnxruntime as ort
import logging"""
YOLO11 旋轉目標檢測OBB
1、ONNX模型推理、可視化
2、ONNX輸出格式: x_center, y_center, width, height, class1_confidence, ..., classN_confidence, angle
3、支持不同尺寸圖片輸入、支持旋轉NMS過濾重復框、支持ProbIoU旋轉IOU計算
"""def letterbox(img, new_shape=(640, 640), color=(0, 0, 0), auto=False, scale_fill=False, scale_up=False, stride=32):"""將圖像調整為指定尺寸,同時保持長寬比,添加填充以適應目標輸入形狀。:param img: 輸入圖像:param new_shape: 目標尺寸:param color: 填充顏色:param auto: 是否自動調整填充為步幅的整數倍:param scale_fill: 是否強制縮放以完全填充目標尺寸:param scale_up: 是否允許放大圖像:param stride: 步幅,用于自動調整填充:return: 調整后的圖像、縮放比例、填充尺寸(dw, dh)"""shape = img.shape[:2]if isinstance(new_shape, int):new_shape = (new_shape, new_shape)r = min(new_shape[0] / shape[0], new_shape[1] / shape[1])  # 計算縮放比例if not scale_up:r = min(r, 1.0)ratio = r, rnew_unpad = int(round(shape[1] * r)), int(round(shape[0] * r))dw, dh = new_shape[1] - new_unpad[0], new_shape[0] - new_unpad[1]if auto:dw, dh = np.mod(dw, stride), np.mod(dh, stride)elif scale_fill:dw, dh = 0.0, 0.0new_unpad = (new_shape[1], new_shape[0])ratio = new_shape[1] / shape[1], new_shape[0] / shape[0]dw /= 2  # 填充均分dh /= 2if shape[::-1] != new_unpad:img = cv2.resize(img, new_unpad, interpolation=cv2.INTER_LINEAR)top, bottom = int(round(dh - 0.1)), int(round(dh + 0.1))left, right = int(round(dw - 0.1)), int(round(dw + 0.1))img = cv2.copyMakeBorder(img, top, bottom, left, right, cv2.BORDER_CONSTANT, value=color)return img, ratio, (dw, dh)def _get_covariance_matrix(obb):"""計算旋轉邊界框的協方差矩陣。:param obb: 旋轉邊界框 (Oriented Bounding Box),包含中心坐標、寬、高和旋轉角度:return: 協方差矩陣的三個元素 a, b, c"""widths = obb[..., 2] / 2heights = obb[..., 3] / 2angles = obb[..., 4]cos_angle = np.cos(angles)sin_angle = np.sin(angles)a = (widths * cos_angle)**2 + (heights * sin_angle)**2b = (widths * sin_angle)**2 + (heights * cos_angle)**2c = widths * cos_angle * heights * sin_anglereturn a, b, cdef batch_probiou(obb1, obb2, eps=1e-7):"""計算旋轉邊界框之間的 ProbIoU。:param obb1: 第一個旋轉邊界框集合:param obb2: 第二個旋轉邊界框集合:param eps: 防止除零的極小值:return: 兩個旋轉邊界框之間的 ProbIoU"""x1, y1 = obb1[..., 0], obb1[..., 1]x2, y2 = obb2[..., 0], obb2[..., 1]a1, b1, c1 = _get_covariance_matrix(obb1)a2, b2, c2 = _get_covariance_matrix(obb2)t1 = ((a1[:, None] + a2) * (y1[:, None] - y2)**2 + (b1[:, None] + b2) * (x1[:, None] - x2)**2) / ((a1[:, None] + a2) * (b1[:, None] + b2) - (c1[:, None] + c2)**2 + eps) * 0.25t2 = ((c1[:, None] + c2) * (x2 - x1[:, None]) * (y1[:, None] - y2)) / ((a1[:, None] + a2) * (b1[:, None] + b2) - (c1[:, None] + c2)**2 + eps) * 0.5t3 = np.log(((a1[:, None] + a2) * (b1[:, None] + b2) - (c1[:, None] + c2)**2) /(4 * np.sqrt((a1 * b1 - c1**2)[:, None] * (a2 * b2 - c2**2)) + eps) + eps) * 0.5bd = np.clip(t1 + t2 + t3, eps, 100.0)hd = np.sqrt(1.0 - np.exp(-bd) + eps)return 1 - hddef rotated_nms_with_probiou(boxes, scores, iou_threshold=0.5):"""使用 ProbIoU 執行旋轉邊界框的非極大值抑制(NMS)。:param boxes: 旋轉邊界框的集合:param scores: 每個邊界框的置信度得分:param iou_threshold: IoU 閾值,用于確定是否抑制框:return: 保留的邊界框索引列表"""order = scores.argsort()[::-1]  # 根據置信度得分降序排序keep = []while len(order) > 0:i = order[0]keep.append(i)if len(order) == 1:breakremaining_boxes = boxes[order[1:]]iou_values = batch_probiou(boxes[i:i+1], remaining_boxes).squeeze(0)mask = iou_values < iou_threshold  # 保留 IoU 小于閾值的框order = order[1:][mask]return keepdef parse_onnx_output(output, ratio, dwdh, conf_threshold=0.5, iou_threshold=0.5):"""解析ONNX模型的輸出,提取旋轉邊界框坐標、置信度和類別信息,并應用旋轉NMS。:param output: ONNX模型的輸出,包含預測的邊界框信息:param ratio: 縮放比例,用于將坐標還原到原始尺度:param dwdh: 填充的寬高,用于調整邊界框的中心點坐標:param conf_threshold: 置信度閾值,過濾低于該閾值的檢測框:param iou_threshold: IoU 閾值,用于旋轉邊界框的非極大值抑制(NMS):return: 符合條件的旋轉邊界框的檢測結果"""boxes, scores, classes, detections = [], [], [], []num_detections = output.shape[2]  # 獲取檢測的邊界框數量num_classes = output.shape[1] - 6  # 計算類別數量# 逐個解析每個檢測結果for i in range(num_detections):detection = output[0, :, i]x_center, y_center, width, height = detection[0], detection[1], detection[2], detection[3]  # 提取邊界框的中心坐標和寬高angle = detection[-1]  # 提取旋轉角度if num_classes > 0:class_confidences = detection[4:4 + num_classes]  # 獲取類別置信度if class_confidences.size == 0:continueclass_id = np.argmax(class_confidences)  # 獲取置信度最高的類別索引confidence = class_confidences[class_id]  # 獲取對應的置信度else:confidence = detection[4]  # 如果沒有類別信息,直接使用置信度值class_id = 0  # 默認類別為 0if confidence > conf_threshold:  # 過濾掉低置信度的檢測結果x_center = (x_center - dwdh[0]) / ratio[0]  # 還原中心點 x 坐標y_center = (y_center - dwdh[1]) / ratio[1]  # 還原中心點 y 坐標width /= ratio[0]  # 還原寬度height /= ratio[1]  # 還原高度boxes.append([x_center, y_center, width, height, angle])  # 將邊界框信息加入列表scores.append(confidence)  # 將置信度加入列表classes.append(class_id)  # 將類別加入列表if not boxes:return []# 轉換為 NumPy 數組boxes = np.array(boxes)scores = np.array(scores)classes = np.array(classes)# 應用旋轉 NMSkeep_indices = rotated_nms_with_probiou(boxes, scores, iou_threshold=iou_threshold)# 構建最終檢測結果for idx in keep_indices:x_center, y_center, width, height, angle = boxes[idx]  # 獲取保留的邊界框信息confidence = scores[idx]  # 獲取對應的置信度class_id = classes[idx]  # 獲取類別obb_corners = calculate_obb_corners(x_center, y_center, width, height, angle)  # 計算旋轉邊界框的四個角點detections.append({"position": obb_corners,  # 旋轉邊界框的角點坐標"confidence": float(confidence),  # 置信度"class_id": int(class_id),  # 類別 ID"angle": float(angle)  # 旋轉角度})return detectionsdef calculate_obb_corners(x_center, y_center, width, height, angle):"""根據旋轉角度計算旋轉邊界框的四個角點。:param x_center: 邊界框中心的 x 坐標:param y_center: 邊界框中心的 y 坐標:param width: 邊界框的寬度:param height: 邊界框的高度:param angle: 旋轉角度:return: 旋轉邊界框的四個角點坐標"""cos_angle = np.cos(angle)  # 計算旋轉角度的余弦值sin_angle = np.sin(angle)  # 計算旋轉角度的正弦值dx = width / 2  # 計算寬度的一半dy = height / 2  # 計算高度的一半# 計算旋轉邊界框的四個角點坐標corners = [(int(x_center + cos_angle * dx - sin_angle * dy), int(y_center + sin_angle * dx + cos_angle * dy)),(int(x_center - cos_angle * dx - sin_angle * dy), int(y_center - sin_angle * dx + cos_angle * dy)),(int(x_center - cos_angle * dx + sin_angle * dy), int(y_center - sin_angle * dx - cos_angle * dy)),(int(x_center + cos_angle * dx + sin_angle * dy), int(y_center + sin_angle * dx - cos_angle * dy)),]return corners  # 返回角點坐標def save_detections(image, detections, output_path):"""在圖像上繪制旋轉邊界框檢測結果并保存。:param image: 原始圖像:param detections: 檢測結果列表:param output_path: 保存路徑"""for det in detections:corners = det['position']  # 獲取旋轉邊界框的四個角點confidence = det['confidence']  # 獲取置信度class_id = det['class_id']  # 獲取類別ID# 繪制邊界框的四條邊for j in range(4):pt1 = corners[j]pt2 = corners[(j + 1) % 4]cv2.line(image, pt1, pt2, (0, 0, 255), 2)# 在邊界框上方顯示類別和置信度cv2.putText(image, f'Class: {class_id}, Conf: {confidence:.2f}',(corners[0][0], corners[0][1] - 10), cv2.FONT_HERSHEY_SIMPLEX, 1.0, (255, 255, 255), 3)cv2.imwrite(output_path, image)  # 保存繪制后的圖像
【附全文閱讀】)


![[創業之路-354]:農業文明到智能紀元:四次工業革命下的人類遷徙與價值重構](http://pic.xiahunao.cn/[創業之路-354]:農業文明到智能紀元:四次工業革命下的人類遷徙與價值重構)
)
深入研究(二)——消費者協調器與_consumer_offsets剖析))
!)


 OVER的用法以及使用場景)


