代碼下載
技術棧:
- React 核心庫:react、react-dom、react-router-dom
- 腳手架:create-react-app
- 數據請求:axios
- UI組件庫: antd-mobile
- 其他組件庫: react-virtualized、formik+yup、react-spring 等
- 百度地圖API
項目搭建
部署本地接口
后臺項目這里不做詳細記錄,只為輔助前端開發,這是后臺項目下載地址。
- 將后臺項目下載到本地,使用MySQLWorkbench新建名為
hkzf的數據庫,字符集選擇utf8,其他默認。 - 在MySQLWorkbench中,點擊 File -> Open SQL Script…,然后選中db文件夾中的
hkzf_db.sql文件打開,雙擊選中mydb數據庫并點擊open,點擊文檔編輯區域上方閃電圖標執行。 - 使用VSCode打開項目,執行
npm i安裝依賴庫,進入config/mysql.js文件修改module.exports中的 password 為自己的數據庫密碼。 - 執行
npm start運行后臺項目,此時可以使用 Postman 測試相應接口,也可以在瀏覽器中直接打開接口文檔地址http://localhost:8080。
初始化項目
1、初始化項目:npx create-react-app react_hkzf_mobile
2、啟動項目,在項目根目錄執行命令 npm start,主要結構說明:
| 結構 | 說明 |
|---|---|
| public | 公共資源 |
| public/index.html | 首頁(必須有) |
| public/manifest.json | PWA應用的元數據 |
| src | 項目源碼,寫項目功能代碼 |
| src/index.js | 項目入口文件(必須有) |
| src/App.js | 項目的根組件 |
| src/setupTests.js | App組件的測試文件 |
| src/reportWebVitals.js | 用來實現PWA(可選) |
3、項目中 src 目錄增加結構如下:
| 結構 | 說明 |
|---|---|
assets/ | 資源(圖片、字體圖標等) |
components/ | 公共組件 |
pages/ | 頁面 |
utils/ | 工具 |
antd-mobile 組件庫 介紹
antd-mobile 中文文檔
安裝:
npm i antd-mobile
導入要使用的組件,渲染組件:
import { Button } from 'antd-mobile';function App() {return (<div className="App"><Button>按鈕</Button></div>);}
配置基礎路由
1、安裝,在項目根目錄執行 npm i react-router-dom 或 yarn add react-router-dom
2、在 src/index.html 中導入路由組件:
import { BrowserRouter as Router, Routes, Route, Link, Navigate } from "react-router-dom";
3、在 pages 文件夾中創建 Home.js、House.js、News.js、Profile.js 和 CityList.js 五個組件
項目整體布局有兩種:
- 有TabBar的頁面: 首頁、找房、資訊、我的
- 無TabBar的頁面:城市選擇等
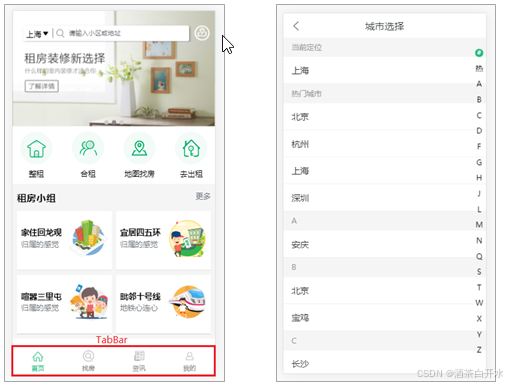
TabBar 的菜單也可以實現路由切換,也就是路由內部切換路由(嵌套路由)。用 App 組件表示父路由的內容,用 Home、House、News 和 Profile 組件表示子路由的內容。
4、在 App 組件中,添加一個Route作為子路由的出口:
function App() {return (<>App<Outlet></Outlet></>)}
5、在入口文件 index.js 中設置路由,子路由以父路由path開頭(父組件展示了,子組件才會展示),修改 pathname 為 /home,Home 組件的內容就會展示在 APP 組件中了:
<Router><Routes>{/* 父路由 */}<Route path='/' element={<App></App>}>{/* 子路由 */}<Route path='/home' element={<Home></Home>}></Route><Route path='/house' element={<House></House>}></Route><Route path='/news' element={<News></News>}></Route><Route path='/profile' element={<Profile></Profile>}></Route></Route><Route path='/cityList' element={<CityList></CityList>}></Route></Routes></Router>
外觀和樣式調整
1、修改頁面標題,在index.html里面修改:
<title>React 好客租房案例</title>
2、基礎樣式調整,在 index.css 中調整 css 樣式布局:
html, body {height: 100%;font-family: 'Microsoft YaHei';color: #333;background-color: #fff;margin: 0;padding: 0;}* {box-sizing: border-box;}
實現TabBar
打開 antd-mobile 組件庫中TabBar的組件文檔,選中配合路由使用拷貝核心代碼到 App 組件中(App是父路由組件)并調整代碼:
function App() {const tabs = [{key: '/home',title: '首頁',icon: 'icon-ind',},{key: '/house',title: '找房',icon: 'icon-findHouse',},{key: '/news',title: '資訊',icon: 'icon-infom',},{key: '/profile',title: '我的',icon: 'icon-my',},]const location = useLocation()const navigate = useNavigate()console.log('-----', location.pathname);return (<><Outlet></Outlet><TabBar activeKey={location.pathname} defaultActiveKey='home' safeArea onChange={(key) => navigate(key)}>{tabs.map(item => (<TabBar.Item key={item.key} icon={(active) => active ? <i className={`active iconfont ${item.icon}`} /> : <i className={`iconfont ${item.icon}`} />} title={(active) => active ? <span className={`active`}>{item.title}</span> : <span>{item.title}</span>} />))}</TabBar></>)}
修改 TabBar 組件 css 樣式布局:
.active {color: #21b97a;}.iconfont {font-size: 20px;}.adm-tab-bar {position: fixed;bottom: 0;width: 100%;}
設置路由重定向:
<Router><Routes>{/* 路由重定向 */}<Route path='/' element={<Navigate to='/home' replace></Navigate>}></Route>{/* 父路由 */}<Route path='/' element={<App></App>}>{/* 子路由 */}<Route path='/home' element={<Home></Home>}></Route><Route path='/house' element={<House></House>}></Route><Route path='/news' element={<News></News>}></Route><Route path='/profile' element={<Profile></Profile>}></Route></Route><Route path='/cityList' element={<CityList></CityList>}></Route></Routes></Router>
首頁模塊
輪播圖
打開 antd-mobile 組件庫的 Swiper 走馬燈 組件文檔,選擇循環拷貝核心代碼到 Home 組件中。并優化相應的結構,刪除不必要的代碼:
mport {Swiper, Toast } from 'antd-mobile'import './Home.css'const colors = ['#ace0ff', '#bcffbd', '#e4fabd', '#ffcfac']const items = colors.map((color, index) => (<Swiper.Item key={index}><divclassName='content'onClick={() => {Toast.show(`你點擊了卡片 ${index + 1}`)}}>{index + 1}</div></Swiper.Item>))export default function Home() {return (<><SwiperloopautoplayonIndexChange={i => {console.log(i, 'onIndexChange1')}}>{items}</Swiper></>)}
修改輪播圖相關 css 樣式布局:
/* 輪播圖 */.content {height: 212px;color: #ffffff;display: flex;justify-content: center;align-items: center;font-size: 48px;user-select: none;img {height: 212px;}}.adm-page-indicator {--active-dot-size: 3px;}
獲取輪播圖的數據
1、安裝 axios: npm i axios
2、新建 utils > useData.js 文件,在這里配置 axios,并自定義獲取網絡數據的 Hook:
import { useState, useEffect } from "react";import axios from "axios";// 全局配置axios.defaults.timeout = 10000 // 超時時間axios.defaults.baseURL = 'http://127.0.0.1:8080' // 域名// 響應攔截器axios.interceptors.response.use((res) => {console.log('data: ', res);return res.data}, (error) => {console.log('error: ', error);})function useNetwork(url, stringParams, type) { const [data, setData] = useState(null)const [error, setError] = useState(null)const [loading, setLoading] = useState(true)useEffect(() => {console.log('stringParams:', stringParams);let ignore = falseconst request = async () => {try {let result = nullswitch (type) {case 'GET': result = await axios.get(url, stringParams && JSON.parse(stringParams))break;case 'POST': result = await axios.post(url, stringParams && JSON.parse(stringParams))breakdefault:break;}if (!ignore && result) {setData(result)}setLoading(false)} catch (error) {if (!ignore) {setError(error)setLoading(false)}}}request()return () => { ignore = true setLoading(false)}}, [url, stringParams, type])return { data, error, loading }}function useGet(url, params) {return useNetwork(url, JSON.stringify(params), 'GET')}function usePost(url, params) {return useNetwork(url, JSON.stringify(params), 'POST')}const useData = { get: useGet, post: usePost }export default useData
說明:React Effect 使用
Object.is比較依賴項的值,如果依賴項為 對象,則比較的是是否在內存中為同一對象。自定義 Hook useNetwork 中的請求參數需要比較的是參數內容(值)是否相同,所以將參數轉化為字符串作為Effect依賴性。
3、在 Home 組件中,導入 useData 獲取數據并優化調整代碼結構:
import useData from '../utils/useData'// 渲染輪播圖function renderSwiper(data, indexChange, indexClick) {return data && <SwiperloopautoplayonIndexChange={ indexChange }>{data.body.map((item, index) => (<Swiper.Item key={index}><divclassName='content'style={{ background: 'red' }}onClick={ (e) => indexClick(index, e) }><img src={'http://127.0.0.1:8080' + item.imgSrc} style={{width: '100%'}} alt=''></img></div></Swiper.Item>))}</Swiper>}export default function Home() {const { data: swiperData } = useData.get('/home/swiper')console.log('swiperData: ', swiperData);return (<>{/* 輪播圖 */}{ renderSwiper(swiperData, i => console.log('indexChange: ', i), i => Toast.show(`你點擊了卡片 ${i + 1}`)) }</>)}
導航菜單
1、導入圖片:
// 導入所需圖片import nav1 from "../assets/images/nav-1.png";import nav2 from "../assets/images/nav-2.png";import nav3 from "../assets/images/nav-3.png";import nav4 from "../assets/images/nav-4.png";
2、構建導航菜單數據:
// 構建導航菜單數據const navData = [{id: 1,img: nav1,title: '整租',path: '/house'},{id: 2,img: nav2,title: '合租',path: '/house'},{id: 3,img: nav3,title: '地圖找房',path: '/map'},{id: 4,img: nav4,title: '去出租',path: '/rent/add'}]
3、編寫頁面內容:
// 渲染導航菜單function renderNav(data, onClick) {return (<div className='home-nav'>{data.map((item) => {return <div className='home-nav-item' key={item.id} onClick={() => onClick(item)}><img src={item.img} alt=''></img><p>{item.title}</p></div>})}</div>)}
4、調整 css 樣式布局:
/* 導航菜單 */.home-nav {display: flex;margin: 16px 0;}.home-nav-item {flex-grow: 1;text-align: center;}.home-nav-item img {width: 48px;}.home-nav-item p {font-size: 14px;margin: 0;}
5、調用渲染方法:
{/* 導航菜單 */}{ renderNavs(navData, item => navigate(item.path)) }
輪播圖的問題
由于動態加載數據,有了數據才去渲染輪播圖,輪播圖從無到有導致輪播圖下方的內容會產生一個從上被擠到下面的現象。
解決辦法就是在輪播圖的外層加一個div,給這個div設置高度:
// 渲染輪播圖function renderSwiper(data, indexChange, indexClick) {return <div className='swiper'>{data && <SwiperloopautoplayonIndexChange={ indexChange }>{data.body.map((item, index) => (<Swiper.Item key={index}><divclassName='content'onClick={ (e) => indexClick(index, e) }><img src={'http://127.0.0.1:8080' + item.imgSrc} style={{width: '100%'}} alt=''></img></div></Swiper.Item>))}</Swiper>}</div>}/* 輪播圖 css */.swiper {height: 212px;}
Sass的使用
- 打開腳手架文檔,找到添加Sass樣式
- 安裝Sass:
npm i sass或yarn add sass - 創建后綴名為.scss 或者 .sass 的樣式文件
- 在組件中導入Sass樣式
修改 Home.css 為 Home.scss 文件,一并修改 Home 組件的導入 import './Home.scss',并修改 導航菜單 為如下樣式:
/* 導航菜單 */.home-nav {display: flex;margin: 16px 0;.home-nav-item {flex-grow: 1;text-align: center;img {width: 48px;}p {font-size: 14px;margin: 0;}}}
租房小組
根據當前地理位置展示不同小組信息,需要后臺接口根據用戶找房數據,推薦用戶最感興趣的內容(正常的邏輯是我們先獲取到用戶當前定位的信息,把信息發送給后臺,后臺根據定位信息獲取對應的內容),前端只需要展示數據。
數據獲取
在 Home 組件中調用接口獲取數據:
// 獲取租房小組數據const { data: groupData } = useData.get('/home/groups', {params: {area: 'AREA%7C88cff55c-aaa4-e2e0'}})console.log('groupData: ', groupData);
頁面結構
1、打開 antd-mobile 組件庫的 Grid 組件文檔,復雜核心代碼并調整,封裝為渲染函數:
// 渲染租房小組function renderGroup(data) {return <div className='group'><div className='top'><div className='name'>租房小組</div><div className='more'>更多</div></div><Grid columns={2} gap={[32, 16]}>{data && data.body.map((item) => {return <Grid.Item key={item.id}><div className='item'><div className='left'><div className='title'>{item.title}</div><div className='desc'>{item.desc}</div></div><div className='right'><img className='picture' src={`http://127.0.0.1:8080${item.imgSrc}`} alt=''></img></div></div></Grid.Item>})}</Grid></div>}
2、css 樣式布局:
// 租房小組.group {margin: 8px 0;.top {display: flex;justify-content: space-between;margin: 16px;.name {font-size: 15px;font-weight: bold;}.more {font-size: 14px;color: #999999;}}.adm-grid {margin: 8px 16px;.adm-grid-item {height: 75px;.item {text-align: center;height: 100%;display: flex;justify-content: space-between;text-align: center;padding: 0 8px;.left {display: flex;flex-direction: column;justify-content: center;.title {font-size: 13px;font-weight: bold;margin-bottom: 4px;}.desc {font-size: 12px;color: #999999;}}.right {display: flex;flex-direction: column;justify-content: center;.picture {width: 55px;height: 53px;}}}}}}
3、在 Home 組件中調用渲染函數:
{/* 租房小組 */}{ renderGroup(groupData)}
最新資訊
略……(同租房小組)
解決內容被 TabBar 壓住的問題
1、在 App 組件中將 Outlet 路由占位包裹在一個 div 中:
<div className='app-content'><Outlet></Outlet></div>
2、調整相應樣式,設置 app 底部 49 像素的內邊距,讓 app-content 超出父元素的內容滾動顯示:
#root {height: 100%;}.app {height: 100%;padding-bottom: 49px;}.app-content {height: 100%;overflow: scroll;}
頂部搜索功能
1、相關結構:
// 渲染頂部搜索function renderHeaderSearch(cityName, onClickLoction, onClickSearch, onClickMap) {return <div className='headerSearch'><div className='search'><div className='location' onClick={onClickLoction}><span className="name">{cityName}</span><i className="iconfont icon-arrow" /></div><div className='form' onClick={onClickSearch}><i className="iconfont icon-seach" /><span className="text">請輸入小區或地址</span></div></div><div className="iconfont icon-map" onClick={onClickMap}></div></div>}
2、css 樣式布局:
// 頂部搜索.headerSearch {position: absolute;padding: 0 16px;width: 100%;height: 44px;top: 34px;display: flex;justify-content: space-between;align-items: center;.search {height: 100%;padding: 0 8px;font-size: 14px;border-radius: 3px;background-color: white;margin-right: 8px;flex-grow: 1;display: flex;align-items: center;.location {i {color: #7f7f80;font-size: 12px;margin-left: 2px;}}.form {margin-left: 24px;color: #9c9fa1;flex-grow: 1;display: flex;span {margin-left: 8px;}}}.icon-map {font-size: 25px;color: white;}}
3、在 Home 組件中調用渲染函數:
{/* 頂部搜索 */}{ renderHeaderSearch('天津', () => navigate('/cityList'), () => navigate('/search'), () => navigate('/map')) }
定位相關
H5中地理定理定位API
在 Web 應用程序中獲取地理位置(文檔)
地理位置API 允許用戶向 Web應用程序提供他們的位置,出于隱私考慮,報告地理位置前先會請求用戶許可,地理位置的API是通過 navigator.geolocation 對象提供,通過getCurrentPosition方法獲取。
獲取到的地理位置跟 GPS、IP地址、WIFI和藍牙的MAC地址、GSM/CDMS的ID有關,比如:手機優先使用GPS定位,筆記本等最準確的是定位是WIFI。
navigator.geolocation.getCurrentPosition(position => {// position對象表示當前位置信息// 常用: latitude 緯度 / longitude 經度// 知道: accuracy 經緯度的精度 / altitude 海拔高度 / altitudeAccuracy 海拔高度的精度 / heading 設備行進方向 / speed 速度})
百度地圖API
H5的地理位置API只能獲取到對應經緯度信息,在實際開發中,會使用百度地圖/高德地圖來完成地理位置的相關功能。
1、參照百度地圖文檔,注冊百度開發者賬號,申請對應的AK
2、在 index.html 中引入百度地圖 API 文件,替換自己申請好的密鑰:
<script type="text/javascript" src="https://api.map.baidu.com/api?v=1.0&type=webgl&ak=你的密鑰"></script>
3、新建 Map 組件文件,創建地圖容器等基本結構,并參照文檔創建地圖:
import { useEffect } from "react";import './Map.scss'export default function Map() {// 創建地圖useEffect(() => {var map = new window.BMapGL.Map("container"); // 創建地圖實例 var point = new window.BMapGL.Point(116.404, 39.915); // 創建點坐標 map.centerAndZoom(point, 15); // 初始化地圖,設置中心點坐標和地圖級別map.enableScrollWheelZoom(true); //開啟鼠標滾輪縮放return () => map = null}, [])return <div className="map"><div id="container"></div></div>}
4、css 樣式布局:
.map {height: 100%;#container {height: 100%;}}
5、在 index.js 中配置地圖頁面的路由:
<Route path='/map' element={<Map></Map>}></Route>
獲取頂部搜索城市信息
1、通過IP定位獲取到當前城市名稱,調用服務器的接口,換取項目中的城市信息:
// 百度地圖 IP 定位,轉換城市數據const [ city, setCity ] = useState(null);useEffect(() => {var ignore = falsevar localCity = new window.BMapGL.LocalCity();localCity.get((result) => {if (!ignore) {console.log('LocalCity:', result);axios.get('area/info?name=' + result.name).then((cityData) => {if (!ignore) {console.log('cityData:', cityData);setCity(cityData.body.label)}})}}); return () => ignore = true }, [])
2、修改頂部搜索欄渲染方法的調用,在城市信息獲取之前使用 -- 占位符:
{/* 頂部搜索 */}{ renderHeaderSearch(city ? city : '--', () => navigate('/cityList'), () => navigate('/search'), () => navigate('/map')) }
城市選擇模塊
頂部導航欄
- 打開antd-mobile 組件庫的NavBar 導航欄組件 文檔
- 從文檔中拷貝組件示例代碼到項目中,讓其正確運行
- 修改導航欄樣式和結構
1、引入 組件庫:
import { NavBar } from 'antd-mobile'import { useNavigate } from "react-router-dom";
2、拷貝并修改代碼結構:
function CityList() {const navigate = useNavigate()return (<div className='city-list'>{/* 導航欄 */}<NavBar style={{'--height': '44px','--border-bottom': '1px #eee solid','color': '#333','backgroundColor': '#f6f5f6'}} backIcon={<i className='iconfont icon-back'></i>} onBack={() => { navigate(-1)}}>城市列表</NavBar></div>)}
3、新建并導入樣式文件:
import './CityList.scss'
4、設置相應的樣式:
.city-list {padding-top: 44px;width: 100%;height: 100%;// 導航欄樣式.adm-nav-bar {margin-top: -44px;}.adm-nav-bar-title {color: #333;}}
城市列表
獲取處理數據
1、導入自定義獲取數據的 HOOK import useData from '../utils/useData',根據接口文檔提供的url進行網絡請求,獲取到相應的數據信息:
// 獲取城市列表數據const { data: cityData } = useData.get('/area/city', {params:{'level': '1'}})console.log('cityData: ', cityData);
2、需要把服務器返回的數據進行格式化處理,可以通過首字母來進行城市的定位,所以需要把格式轉換成以下格式:
// 接口返回的數據格式:[{ "label": "北京", "value": "", "pinyin": "beijing", "short": "bj" }]// 渲染城市列表的數據格式為:{ a: [{}, {}], b: [{}, ...] }// 渲染右側索引的數據格式為:['a', 'b']
3、封裝一個函數,來處理這個數據:
// 城市列表數據處理function cityDataHandle(data) {if (data && data.body && Array.isArray(data.body) && data.body.length > 0) {// 有數據// 鍵是首字母,值是一個數組:對應首字母的城市信息const cityList = {}data.body.forEach(element => {const firstL = element.short[0]if (cityList[firstL]) {cityList[firstL].push(element)} else {cityList[firstL] = [element]}});const result = { cityList, cityKeys: Object.keys(cityList).sort() }return result} else {return {}}}
4、調用函數,來格式化數據:
// 城市列表數據處理const { cityList, cityKeys } = cityDataHandle(cityData)
獲取熱門數據
導入所需 HOOK import { useEffect, useState } from "react";,獲取數據并添加到 cityList和cityKeys中,注意,對象里面的屬性是無序的,可以直接插入,但是數組是有序的需要添加到前面:
// 獲取熱門城市數據const { data: hotData } = useData.get('/area/hot')console.log('hotData: ', hotData);if (cityList && cityKeys && hotData && hotData.body && Array.isArray(hotData.body) && hotData.body.length > 0) {cityList['hot'] = hotData.bodycityKeys.unshift('hot')}
獲取當前城市信息
將獲取定位城市的代碼封裝到一個函數中,哪個頁面需要獲取定位城市,直接調用該方法即可:
- 在utils目錄中,創建一個文件,在這個文件中進行封裝
- 創建并且導出獲取定位城市的函數 getCurrentCity
- 判斷localStorage中是否有定位信息
- 如果沒有,我們通過獲取定位信息來獲取當前定位城市,獲取完了需要存到本地存儲中
- 如果有,直接使用就好
import axios from "axios";export default function requestCurrentCity() {// 獲取本地存儲中是否有const localCity = localStorage.getItem('localCity')console.log('localCity', localCity);if (localCity) {// 如果有,返回城市信息就好,返回一個成功的promis對象即可return Promise.resolve(JSON.parse(localCity))} else {return new Promise((resolve, reject) => {var localCity = new window.BMapGL.LocalCity();localCity.get(async (result) => {console.log('LocalCity:', result);try {const city = await axios.get('area/info?name=' + result.name)console.log('city: ', city);if (city.status === 200) {localStorage.setItem('localCity', JSON.stringify(city.body))resolve(city.body)} else {console.error(city.description);throw new Error(city.description);}} catch (error) {reject(error)}}); })}}
將定位的城市信息添加到 cityList和cityIndex中:
// 獲取當前城市const [currentCity, setCurrentCity] = useState(null)useEffect(() => {let ignore = falserequestCurrentCity().then((data) => {if (!ignore) {setCurrentCity(data)}})return () => ignore = true}, [])if (currentCity && cityList) {cityList['#'] = [currentCity]cityKeys.unshift('#')}console.log('cityList: ', cityList);console.log('cityKeys: ', cityKeys);
長列表性能優化
在展示大型列表和表格數據的時候(城市列表、通訊錄、微博等),會導致頁面卡頓,滾動不流暢等性能問題,這樣就會導致移動設備耗電加快,影響移動設備的電池壽命
產生性能問題的原因:大量DOM節點的重繪和重排
優化方案:懶渲染、可視區域渲染
懶加載,常見的長列表優化方案,常見于移動端:
- 原理:每次只渲染一部分,等渲染的數據即將滾動完時,再渲染下面部分
- 優點:每次渲染一部分數據,速度快
- 缺點:數據量大時,頁面中依然存在大量DOM節點,占用內存過多,降低瀏覽器渲染性能,導致頁面卡頓
- 使用場景:數據量不大的情況下
可視區渲染(React-virtualized):
- 原理:是只渲染頁面可視區域的列表項,非可視區域的數據 完全不渲染(預加載前面幾項和后面幾項) ,在滾動列表時動態更新列表項
- 使用場景: 一次性展示大量數據的情況
react-virtualized 渲染城市列表
react-virtualized 是React組件,用來高效渲染大型列表和表格數據,GitHub地址: react-virtualized
1、安裝: import i react-virtualized
2、在項目入口文件 index.js 中導入樣式文件 import "react-virtualized/styles.css";
3、打開 文檔, 點擊List組件,進入List的文檔中,拷貝示例中渲染每一行的代碼到項目中并按需求修改:
// 渲染每一行function rowRenderer({index, // 索引號isScrolling, // 當前項是否正在滾動中isVisible, // 當前項在List中是可見的key, // 渲染數組中行的唯一鍵parent, // 對父List(實例)的引用style, // 重點屬性:一定要給每一個行數添加該樣式}){let title = cityKeys[index]const citys = cityList[title]switch (title) {case '#':title = '當前定位'break;case 'hot':title = '熱門城市'breakdefault:break;}return (<div key={key} style={style} className='city'><div className='title'>{title}</div>{citys.map((item, i) => {return <div className='name' key={item.value}>{item.label}</div>})}</div>);}
4、渲染城市列表,利用 AutoSizer 組件來調整子元素的寬高
- 導入
AutoSizer、List組件import { List, AutoSizer } from "react-virtualized"; - 通過 render-props 模式,獲取到
AutoSizer組件暴露的 width 和 height 屬性 - 設置List組件的 width 和 height 屬性
{/* 城市列表 */}{ cityKeys && <AutoSizer>{ ({width, height}) => {return <Listwidth={width}height={height}rowCount={cityKeys.length}rowHeight={({index}) => {console.log('index: ', index);const key = cityKeys[index]const section = cityList[key]console.log('section: ', section);return 20 + 44*section.length}}rowRenderer={rowRenderer}/>} }</AutoSizer> }
5、為城市列表設置樣式:
// 城市列表樣式.city {.title {height: 20px;background-color: #e5e5e5;padding: 0 12px;font-size: 12px;line-height: 20px;}.name {height: 44px;padding: 0 16px;font-size: 14px;line-height: 44px;}}
渲染右側索引列表
1、添加狀態 activeIndex,用來指定當前高亮的索引:
// 高亮索引const [activeIndex, setActiveIndex] = useState(0)
2、遍歷cityIndex,渲染索引列表,將索引 hot 替換成 熱:
{/* 右側索引 */}{ cityKeys && <ul className='city-index'>{cityKeys.map((item, index) => <li className={activeIndex === index ? 'active' : ''} key={item}>{item === 'hot' ? '熱' : item}</li>)}</ul> }
3、為索引列表添加樣式:
// 城市索引列表樣式.city-index {position: absolute;right: 8px;height: 90%;list-style: none;margin: 0;padding: 5px;text-align: center;display: flex;flex-direction: column;justify-content: space-around;.active {color: #fff;background-color: #21b97a;width: 15px;height: 15px;font-size: 12px;text-align: center;line-height: 15px;border-radius: 100%;}}
4、城市索引列表高亮
給 List 組件添加onRowsRendered配置項,用于獲取當前列表渲染的行信息,在里面就會有相應信息,通過參數 startIndex 獲取到 起始行對應的索引號。判斷 startIndex 和 activeIndex 不同時候,更新狀態 activeIndex 為 startIndex:
onRowsRendered={({startIndex}) => {console.log('startIndex: ', startIndex);if (startIndex !== activeIndex) {setActiveIndex(startIndex)}}}
5、點擊索引置頂該索引城市
引入 useRef import { useRef } from "react";,并在組件頂部初始化 ref:
// 列表 refconst listRef = useRef(null)
將創建好的ref對象,添加為List組件的ref屬性,設置List組件的scrollToAlignment配置項值為start,保證點擊行出現在頁面頂部:
<List……scrollToAlignment='start'ref={listRef}/>
給索引列表綁定點擊事件,在點擊事件中。通過 index 獲取到當前項索引號通過 ref 的 current 屬性,獲取到組件實例,再調用組件的scrollToRow方法讓List組件滾動到指定行:
{/* 右側索引 */}{ cityKeys && <ul className='city-index'>{cityKeys.map((item, index) => <li className={activeIndex === index ? 'active' : ''} key={item} onClick={() => {listRef.current.measureAllRows()listRef.current.scrollToRow(index)}}>{item === 'hot' ? '熱' : item}</li>)}</ul> }
對于點擊索引無法正確定位的問題,在List組件調用 measureAllRows 方法之前調用 measureAllRows,提前計算高度來解決。
切換城市
- 給城市列表項綁定事件
- 判斷當前城市是否有房源數據,只有熱門城市有房源數據
- 如果有房源數據,則保持當前城市數據到本地緩存中,并返回上一頁
- 如果沒有房源數據,則使用
antd-mobile中的 Toast 組件提示用戶:改城市暫無房源數據,不執行任何操作
// 渲染每一行function rowRenderer({index, // 索引號isScrolling, // 當前項是否正在滾動中isVisible, // 當前項在List中是可見的key, // 渲染數組中行的唯一鍵parent, // 對父List(實例)的引用style, // 重點屬性:一定要給每一個行數添加該樣式}){let title = cityKeys[index]const citys = cityList[title]switch (title) {case '#':title = '當前定位'break;case 'hot':title = '熱門城市'breakdefault:break;}return (<div key={key} style={style} className='city'><div className='title'>{title}</div>{citys.map((item, i) => {return <div className='name' key={item.value} onClick={() => {const hotList = cityList['hot']let contain = falsefor (const i in hotList) {const v = hotList[i]if (v.label === item.label) {contain = truebreak}}if (contain) {// 熱門城市才有房源數據localStorage.setItem('localCity', JSON.stringify({'label': item.label, 'value': item.value}))navigate(-1)} else {Toast.show({ content: '該城市暫無房源數據', duration: 2000 })}}}>{item.label}</div>})}</div>);}
![線代[13]|線性代數題37道以及數學分析題3道(多圖預警)](http://pic.xiahunao.cn/線代[13]|線性代數題37道以及數學分析題3道(多圖預警))
圖像濾波-----雙邊濾波函數bilateralFilter())


大學校園網綜合項目設計)

)


框架與多目標調度優化詳解)


