親愛的開發者們,👋 在快速迭代的軟件開發周期中,接口自動化測試扮演著至關重要的角色。今天,我們將分享10個實用的Python小腳本,它們能夠顯著提升你編寫接口自動化測試的效率。無論是初學者還是資深工程師,這些技巧都將幫助你更高效、更優雅地完成工作。🌟
![]()
1. 自動化生成測試用例模板
import stringimport randomdef generate_test_case_template(test_name, endpoint):template = f"""def test_{test_name}(self):url = '{endpoint}'# Your test logic herepass"""return templateclass TestCases:# Generate and print templates for all your endpointsfor i in range(1, 11):print(generate_test_case_template(f"case_{i}", f"/api/v1/endpoint_{i}"))
2. 從CSV文件讀取測試數據
import csvdef read_test_data_from_csv(file_path):test_data = []with open(file_path, mode='r') as file:reader = csv.DictReader(file)for row in reader:test_data.append(row)return test_datadata = read_test_data_from_csv('test_data.csv')for row in data:print(row)
3. 動態構建請求頭
def build_headers(token=None, content_type="application/json"):headers = {"Content-Type": content_type}if token:headers["Authorization"] = f"Bearer {token}"return headersheaders = build_headers(token="your-token-here")print(headers)
4. 發送帶重試機制的HTTP請求
import requestsfrom tenacity import retry, stop_after_attempt, wait_fixed@retry(stop=stop_after_attempt(3), wait=wait_fixed(2))def send_request(url, method="GET", params=None, headers=None):response = requests.request(method, url, params=params, headers=headers)response.raise_for_status()return response.json()data = send_request("https://api.example.com/data", headers={"Authorization": "Bearer your-token"})print(data)
5. JSON響應驗證
import jsondef validate_response(response, expected_schema):try:assert isinstance(response, dict)for key, value in expected_schema.items():assert key in response, f"Missing key: {key}"if isinstance(value, dict):validate_response(response[key], value)else:assert isinstance(response[key], type(value)), f"Incorrect type for key: {key}"except AssertionError as e:print(e)return Falsereturn Trueschema = {"name": str, "age": int}response = {"name": "John Doe", "age": 30}validate_response(response, schema)
6. 自動化文檔注釋
def auto_docstring(func):func.__doc__ = f"""{func.__name__}:- Description: This function tests the {func.__name__} endpoint.- Endpoint: /api/{func.__name__}"""return func@auto_docstringdef test_user_login(self):pass
7. 數據隨機化
def random_email():return ''.join(random.choice(string.ascii_lowercase) for _ in range(10)) + "@example.com"print(random_email())
8. 配置管理
import yamldef load_config(file_path):with open(file_path, 'r') as file:return yaml.safe_load(file)config = load_config('config.yml')print(config)
9. 異常處理和日志記錄
import logginglogging.basicConfig(level=logging.INFO)def safe_request(url):try:response = requests.get(url)response.raise_for_status()return response.json()except requests.RequestException as e:logging.error(f"Error making request to {url}: {e}")return Nonedata = safe_request("https://api.example.com/data")if data:print(data)else:print("Request failed.")
10. 測試報告生成
import unittestfrom HTMLTestRunner import HTMLTestRunnerclass MyTestCase(unittest.TestCase):def test_something(self):self.assertEqual(True, True)if __name__ == '__main__':suite = unittest.TestLoader().loadTestsFromTestCase(MyTestCase)runner = HTMLTestRunner(output='reports', verbosity=2)runner.run(suite)
![]()
總結
這些小腳本覆蓋了從數據準備、請求發送到結果驗證和報告生成的整個接口自動化測試流程。它們不僅能夠幫助你提高測試覆蓋率,還能減少重復勞動,讓你有更多時間專注于更有價值的工作。🚀
記得在實際應用中根據項目需求調整和擴展這些腳本,以達到最佳效果。持續學習和實踐,你的自動化測試技能將不斷提升,最終實現更高質量的軟件交付。🌟
注意:以上示例代碼僅供參考,實際應用時請確保代碼的安全性和兼容性,特別是在處理敏感數據和生產環境時。此外,部分示例依賴于外部庫(如tenacity, HTMLTestRunner),需要先安裝這些庫才能運行。
如果你在實踐中遇到任何問題,或者有更高效的方法,歡迎在評論區分享交流。我們共同進步,讓代碼生活更加精彩!👩?💻👨?💻
最后感謝每一個認真閱讀我文章的人,看著粉絲一路的上漲和關注,禮尚往來總是要有的,雖然不是什么很值錢的東西,如果你用得到的話可以直接拿走!?
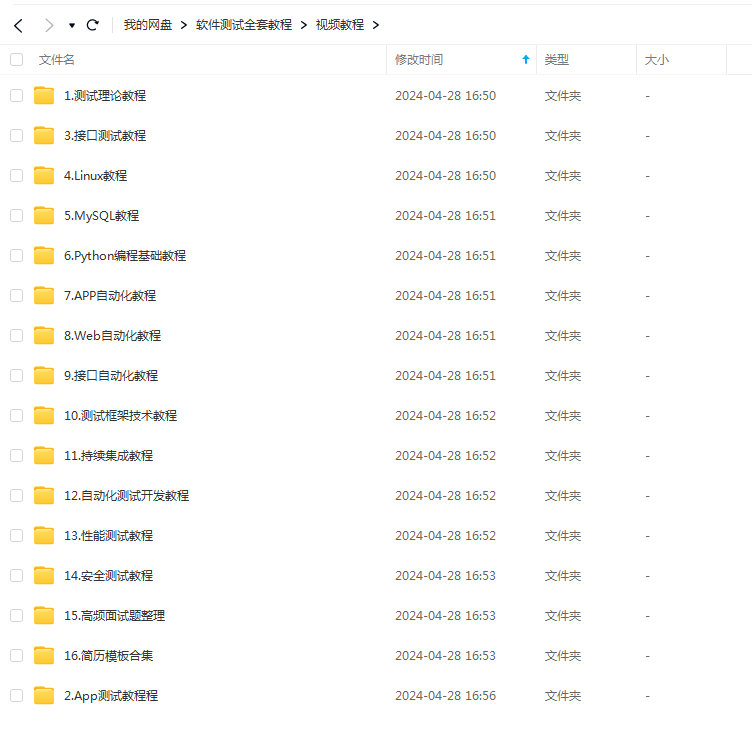
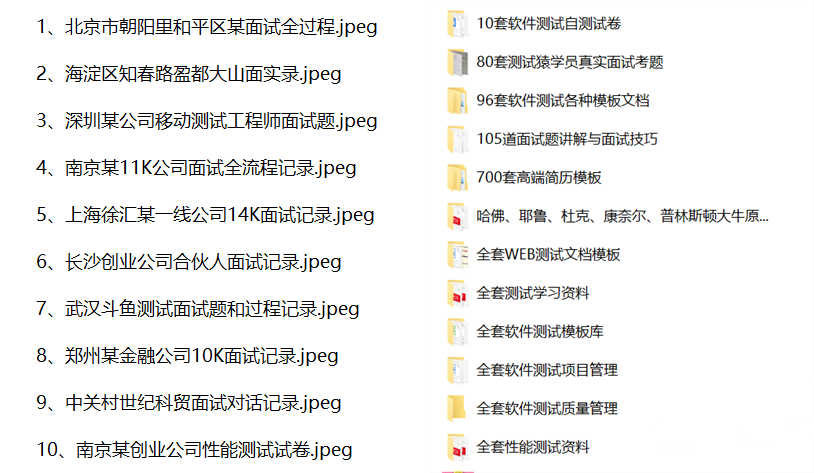
軟件測試面試文檔
我們學習必然是為了找到高薪的工作,下面這些面試題是來自阿里、騰訊、字節等一線互聯網大廠最新的面試資料,并且有字節大佬給出了權威的解答,刷完這一套面試資料相信大家都能找到滿意的工作。


)

)


:系統定義和布局)
