Zabbix 監控系統部署
Zabbix是一個企業級開源分布式監控解決方案,可監控網絡的眾多參數以及服務器、虛擬機、應用程序、服務、數據庫、網站、云等的運行狀況和完整性。 Zabbix 使用靈活的通知機制,允許用戶為幾乎任何事件配置基于電子郵件的警報。這允許對服務器問題做出快速反應。 Zabbix 基于存儲的數據提供出色的報告和數據可視化功能。這使得 Zabbix 成為容量規劃的理想選擇。

部署環境規劃
節點規劃如下:
| 節點名稱 | 節點IP | 操作系統 |
|---|---|---|
| zabbix-server | 192.168.72.50 | Ubuntu 22.04 |
| zabbix-agent | 192.168.72.51 | Ubuntu 22.04 |
其中zabbix-server節點同時部署zabbix-server、zabbix-web以及zabbix-agent三個組件,以及MySQL數據庫服務。
MySQL數據庫部署
安裝MySQL數據庫
在zabbix-server節點安裝mysql數據庫。
配置主機名
root@ubuntu:~# hostnamectl set-hostname zabbix-server
安裝mysql-server
apt update -y
apt install -y mysql-server
查看安裝版本
root@db01:~# mysqld --version
/usr/sbin/mysqld  Ver 8.0.37-0ubuntu0.22.04.3 for Linux on x86_64 ((Ubuntu))
查看數據庫服務運行狀態
root@zabbix-server:~# systemctl status mysql
● mysql.service - MySQL Community ServerLoaded: loaded (/lib/systemd/system/mysql.service; enabled; vendor preset: enabled)Active: active (running) since Thu 2024-06-27 12:27:35 CST; 3h 39min agoMain PID: 3426 (mysqld)Status: "Server is operational"Tasks: 37 (limit: 4556)Memory: 365.1MCPU: 13.084sCGroup: /system.slice/mysql.service└─3426 /usr/sbin/mysqldJun 27 12:27:34 db01 systemd[1]: Starting MySQL Community Server...
Jun 27 12:27:35 db01 systemd[1]: Started MySQL Community Server.
root@zabbix-server:~#
默認情況下,MySQL在127.0.0.1的本地地址上監聽3306端口,可以使用以下命令查看:
root@db01:~# ss -antpl | grep -i mysql
LISTEN 0      70         127.0.0.1:33060      0.0.0.0:*    users:(("mysqld",pid=3426,fd=21))
LISTEN 0      151        127.0.0.1:3306       0.0.0.0:*    users:(("mysqld",pid=3426,fd=23))
MySQL 安全加固
運行 mysql_secure_installation 腳本來啟用一些額外的安全功能,包括設置新的 MySQL root 密碼、刪除匿名用戶和禁用遠程登錄。
mysql_secure_installation
回答所有問題,如下所示:
root@db01:~# mysql_secure_installation
Securing the MySQL server deployment.Connecting to MySQL using a blank password.VALIDATE PASSWORD COMPONENT can be used to test passwords
and improve security. It checks the strength of password
and allows the users to set only those passwords which are
secure enough. Would you like to setup VALIDATE PASSWORD component?Press y|Y for Yes, any other key for No: YThere are three levels of password validation policy:LOW    Length >= 8
MEDIUM Length >= 8, numeric, mixed case, and special characters
STRONG Length >= 8, numeric, mixed case, special characters and dictionary                  filePlease enter 0 = LOW, 1 = MEDIUM and 2 = STRONG: 2
輸入 Y 并按 Enter 鍵以刪除匿名用戶。
Skipping password set for root as authentication with auth_socket is used by default.
If you would like to use password authentication instead, this can be done with the "ALTER_USER" command.
See https://dev.mysql.com/doc/refman/8.0/en/alter-user.html#alter-user-password-management for more information.By default, a MySQL installation has an anonymous user,
allowing anyone to log into MySQL without having to have
a user account created for them. This is intended only for
testing, and to make the installation go a bit smoother.
You should remove them before moving into a production
environment.Remove anonymous users? (Press y|Y for Yes, any other key for No) : Y
Success.
輸入 Y 并按 Enter 鍵以禁止遠程 root 登錄。
Normally, root should only be allowed to connect from
'localhost'. This ensures that someone cannot guess at
the root password from the network.Disallow root login remotely? (Press y|Y for Yes, any other key for No) : Y
Success.
輸入 Y 并按 Enter 鍵以刪除測試數據庫。
By default, MySQL comes with a database named 'test' that
anyone can access. This is also intended only for testing,
and should be removed before moving into a production
environment.Remove test database and access to it? (Press y|Y for Yes, any other key for No) : Y- Dropping test database...
Success.- Removing privileges on test database...
Success.
重新加載配置
Reloading the privilege tables will ensure that all changes
made so far will take effect immediately.Reload privilege tables now? (Press y|Y for Yes, any other key for No) : Y
Success.All done!
設置 MySQL root 密碼
默認情況下,未設置MySQL root 密碼。要設置它,請連接到 MySQL shell:
root@zabbix-server:~# mysql
Welcome to the MySQL monitor.  Commands end with ; or \g.
Your MySQL connection id is 10
Server version: 8.0.37-0ubuntu0.22.04.3 (Ubuntu)Copyright (c) 2000, 2024, Oracle and/or its affiliates.Oracle is a registered trademark of Oracle Corporation and/or its
affiliates. Other names may be trademarks of their respective
owners.Type 'help;' or '\h' for help. Type '\c' to clear the current input statement.mysql>
連接到 MySQL shell 后,使用以下命令設置 MySQL 密碼:
mysql> ALTER USER 'root'@'localhost' IDENTIFIED WITH mysql_native_password by 'Mysql@123456';
接下來,運行以下命令來保存更改:
mysql> FLUSH PRIVILEGES;
接下來,使用以下命令退出 MySQL shell:
mysql> EXIT;
接下來,再次登錄MySQL shell驗證root密碼:
mysql -u root -p
登錄后,您將進入 MySQL shell,如下所示:
root@zabbix-server:~# mysql -u root -p
Enter password:
Welcome to the MySQL monitor.  Commands end with ; or \g.
Your MySQL connection id is 11
Server version: 8.0.37-0ubuntu0.22.04.3 (Ubuntu)Copyright (c) 2000, 2024, Oracle and/or its affiliates.Oracle is a registered trademark of Oracle Corporation and/or its
affiliates. Other names may be trademarks of their respective
owners.Type 'help;' or '\h' for help. Type '\c' to clear the current input statement.mysql>
Zabbix-server安裝
以下操作在zabbix server節點執行。
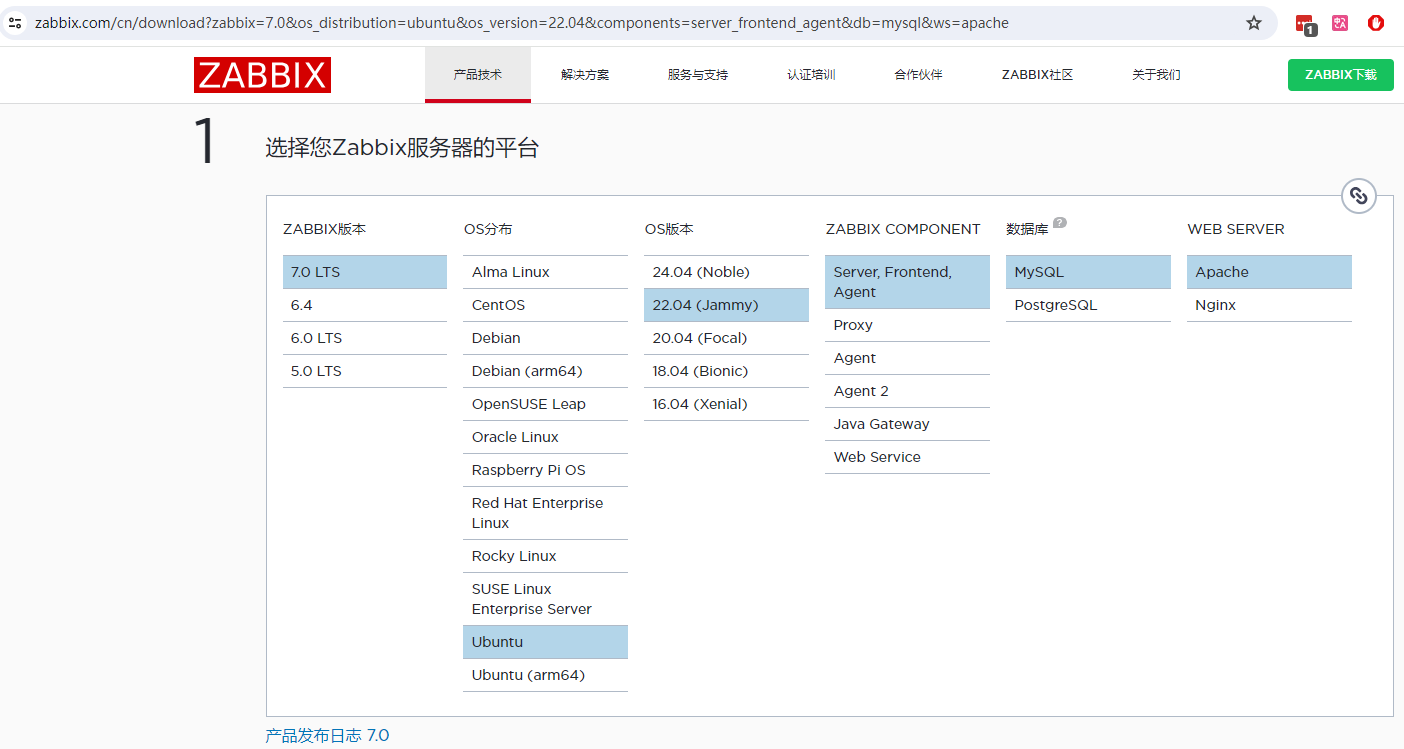
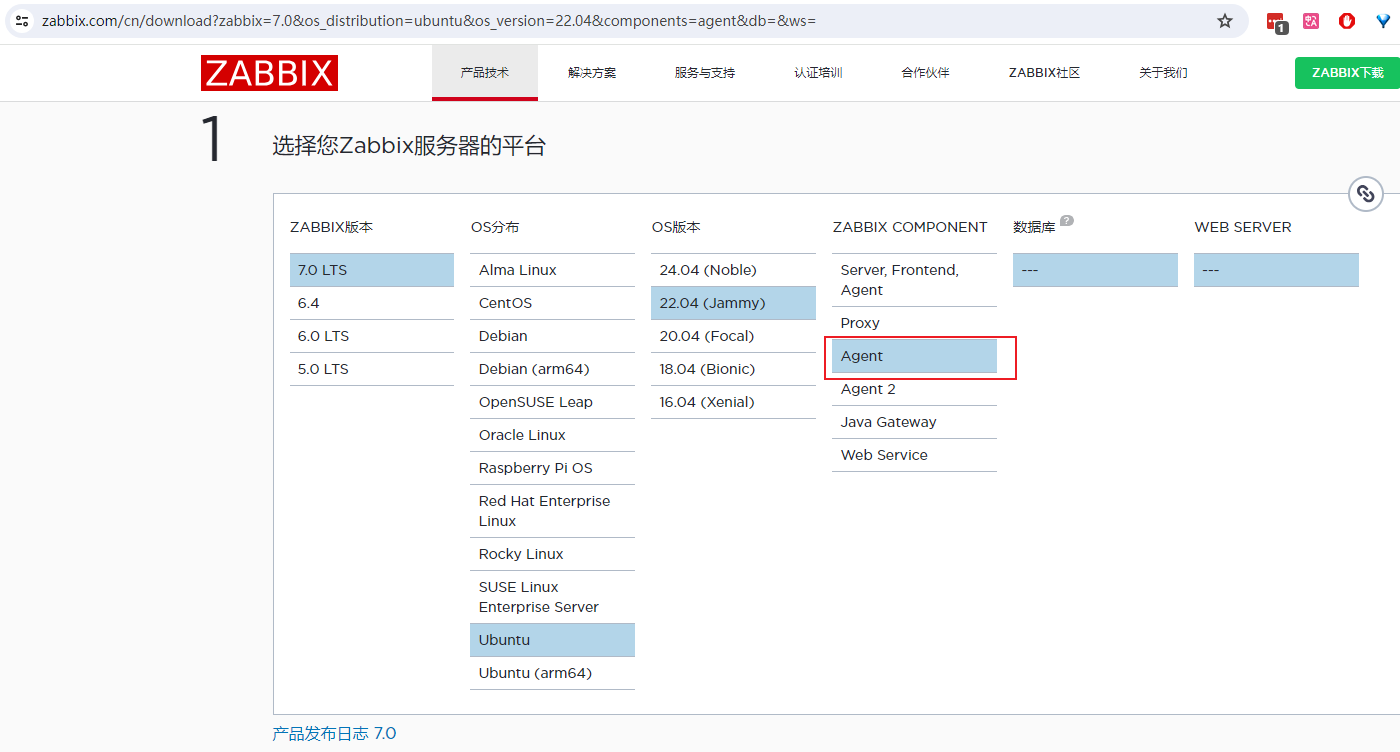
官方文檔:https://www.zabbix.com/cn/download
選擇相應平臺獲取安裝命令,這里以Zabbix 7.0 + Ubuntu + MySQL + Apache為例。
安裝 Zabbix 軟件源
wget https://repo.zabbix.com/zabbix/7.0/ubuntu/pool/main/z/zabbix-release/zabbix-release_7.0-1+ubuntu22.04_all.deb
dpkg -i zabbix-release_7.0-1+ubuntu22.04_all.deb
apt update
安裝Zabbix server,Web前端,agent
apt install -y zabbix-server-mysql zabbix-frontend-php zabbix-apache-conf \
zabbix-sql-scripts zabbix-agent
初始化zabbix數據庫。
在數據庫主機上運行以下代碼。
# mysql -uroot -p
password
mysql> create database zabbix character set utf8mb4 collate utf8mb4_bin;
mysql> create user zabbix@localhost identified by 'Zabbix@123456';
mysql> grant all privileges on zabbix.* to zabbix@localhost;
mysql> set global log_bin_trust_function_creators = 1;
mysql> quit;
導入初始架構和數據,系統將提示您輸入新創建的密碼,這里為Zabbix@123456。
zcat /usr/share/zabbix-sql-scripts/mysql/server.sql.gz | \
mysql --default-character-set=utf8mb4 -uzabbix -p zabbix
導入數據庫架構后禁用log_bin_trust_function_creators選項。
# mysql -uroot -p
password
mysql> set global log_bin_trust_function_creators = 0;
mysql> quit;
為Zabbix server配置數據庫,編輯配置文件 /etc/zabbix/zabbix\_server.conf
$ vim /etc/zabbix/zabbix_server.conf
DBHost=localhost
DBName=zabbix
DBUser=zabbix
DBPassword=Zabbix@123456
安裝中文語言包
sudo apt install -y zabbix-frontend-php language-pack-zh-hans
啟動Zabbix server和agent進程,并為它們設置開機自啟:
systemctl restart zabbix-server zabbix-agent apache2
systemctl enable zabbix-server zabbix-agent apache2
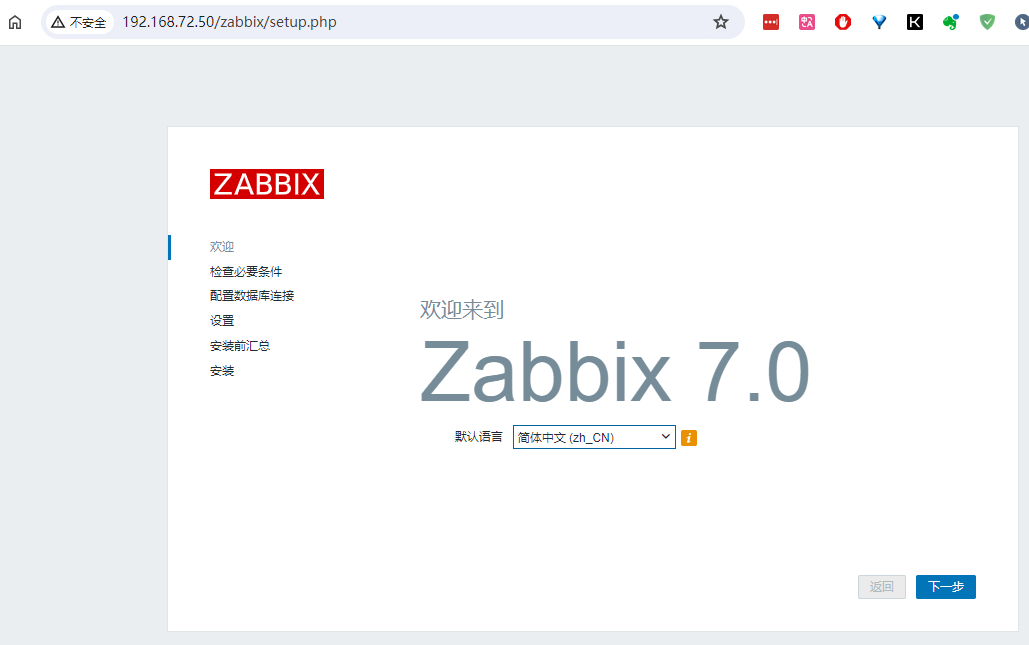
打開Zabbix UI網頁,開始使用Zabbix。使用Apache web服務器時,Zabbix UI的默認URL為http://host/zabbix:
http://192.168.72.50/zabbix
選擇默認語言
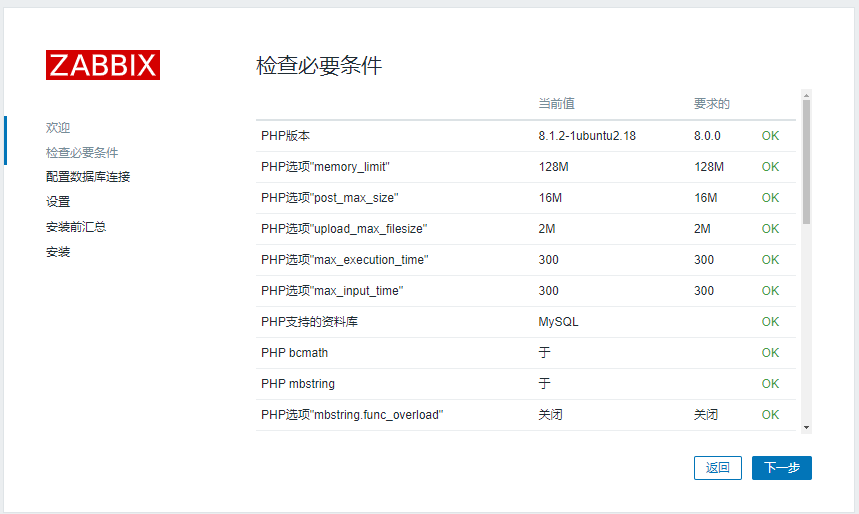
檢查必要條件
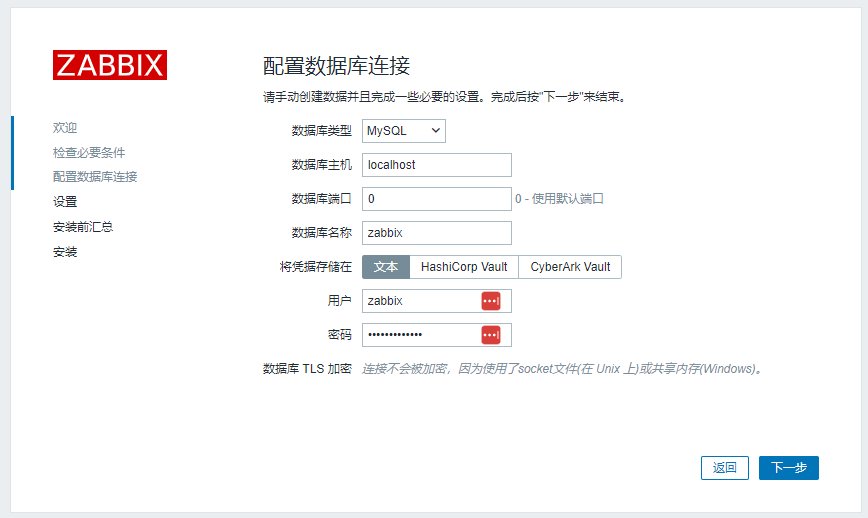
配置數據庫連接,數據庫主機配置為localhost,密碼為Zabbix@123456
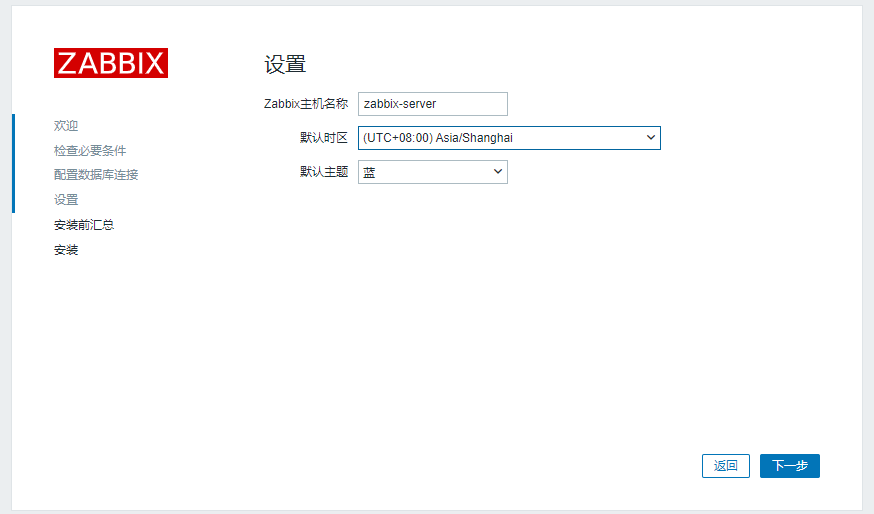
設置主機名及系統時間
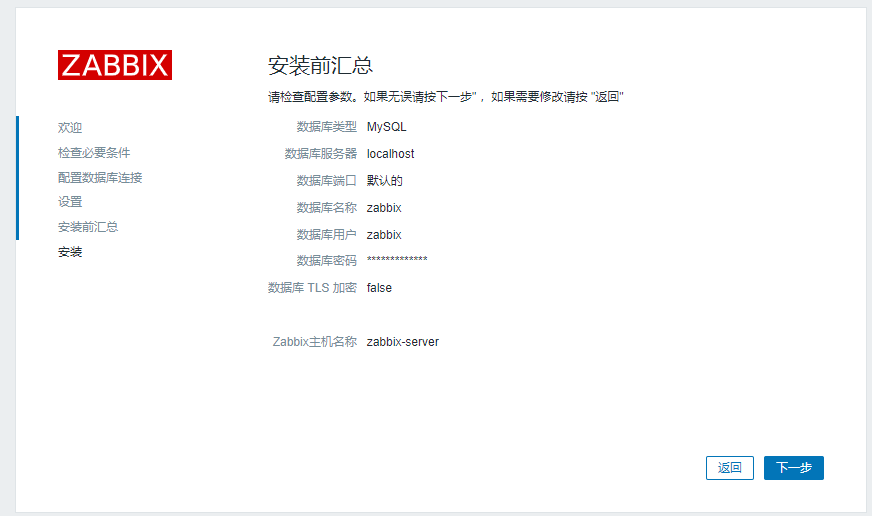
安裝前匯總
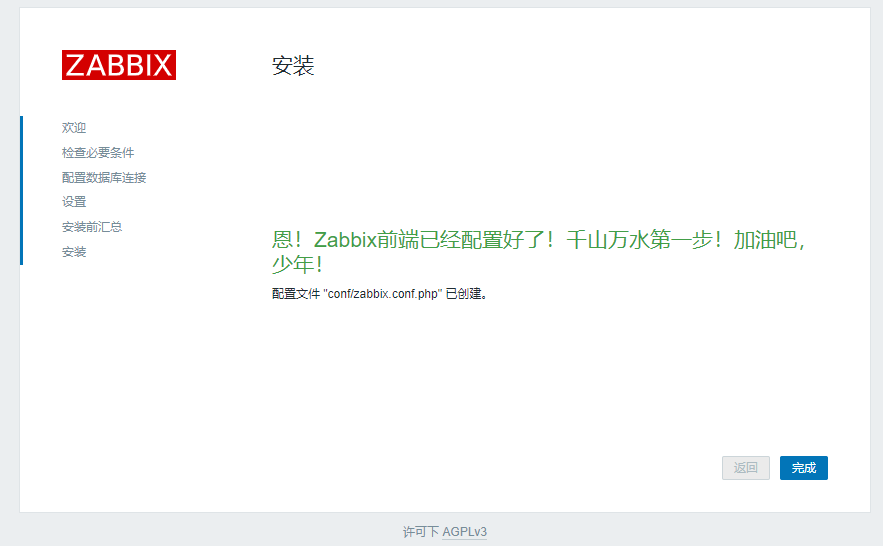
完成安裝
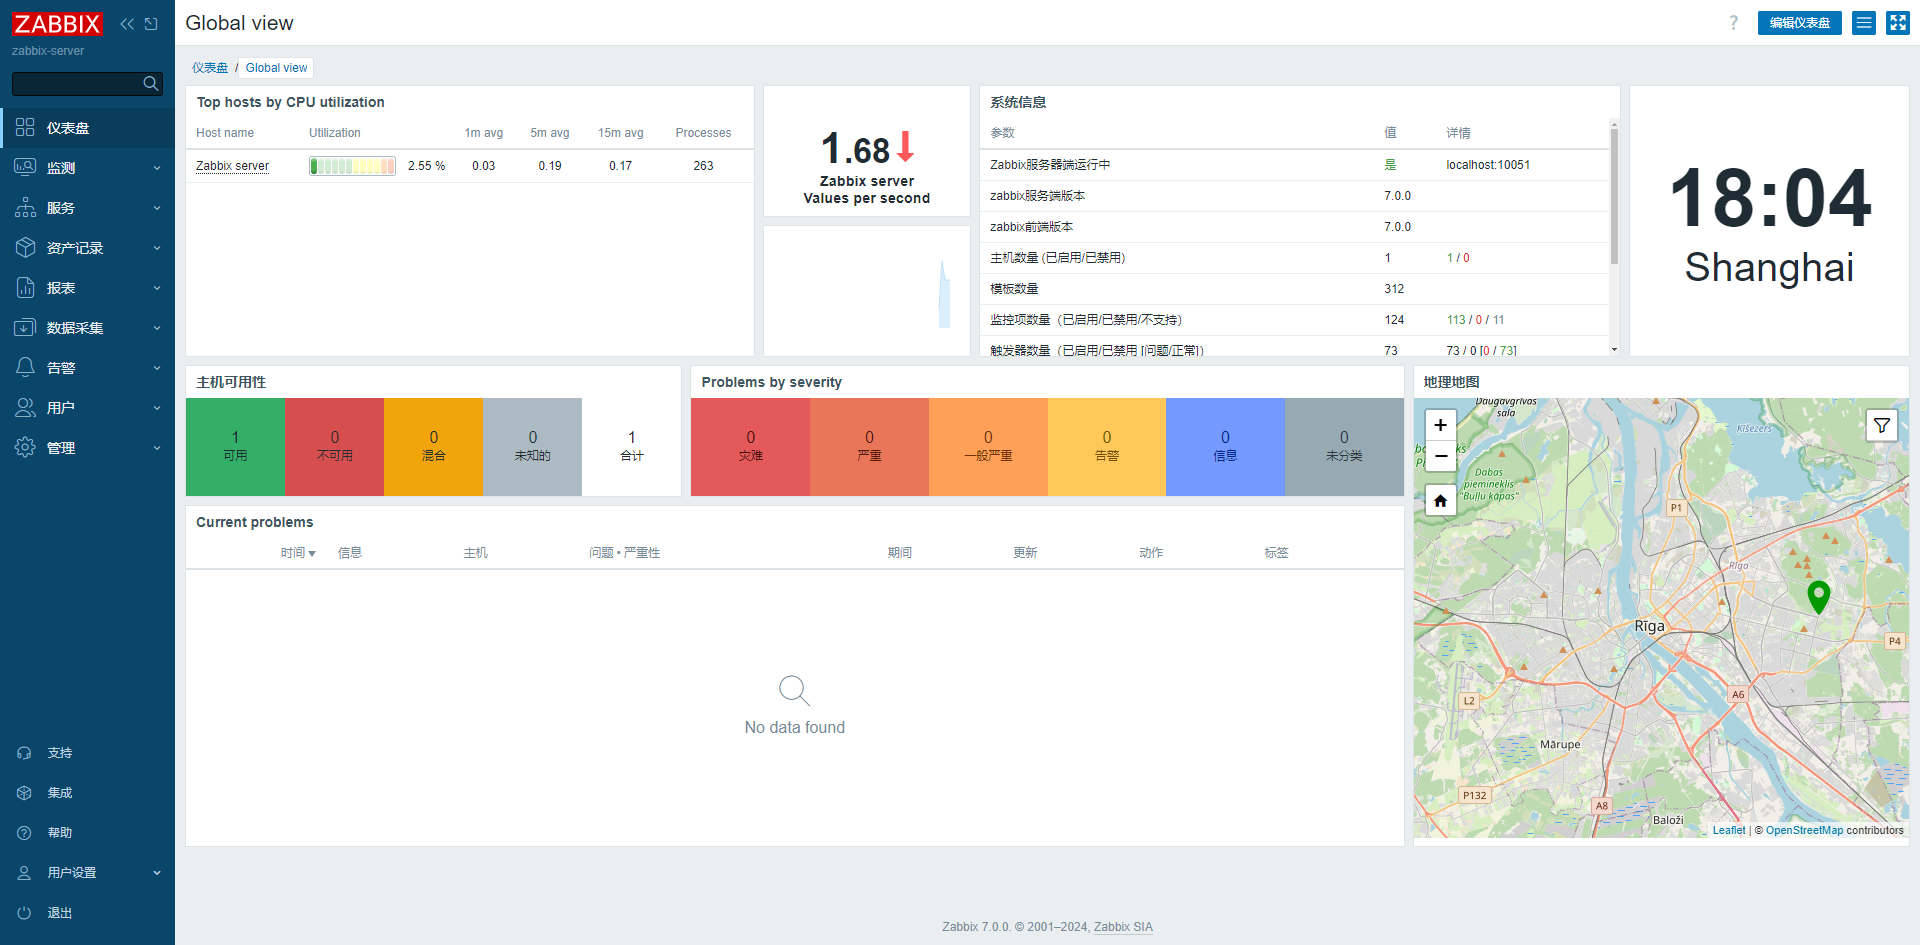
進入登錄頁面,默認賬號密碼為Admin/zabbix

登錄后如下:
Zabbix-agent 安裝
以下操作在zabbix-agent節點執行。
參考官方文檔,選擇agent組件,按照官方指引進行安裝。
配置主機名
root@ubuntu:~# hostnamectl set-hostname zabbix-agent01
安裝 Zabbix 軟件源
wget https://repo.zabbix.com/zabbix/7.0/ubuntu/pool/main/z/zabbix-release/zabbix-release_7.0-1+ubuntu22.04_all.deb
dpkg -i zabbix-release_7.0-1+ubuntu22.04_all.deb
apt update
安裝Zabbix agent組件
apt install -y zabbix-agent
修改zabbix agent配置文件
$ vim /etc/zabbix/zabbix_agentd.conf
Server=192.168.72.50		#被動模式下的Zabbix服務端地址
ListenPort=10050
ServerActive=192.168.72.50	#主動模式下的Zabbix服務端地址,若純被動模式可注釋此行
Hostname=zabbix-agent01
啟動zabbix-agent服務
systemctl restart zabbix-agent
systemctl enable zabbix-agent
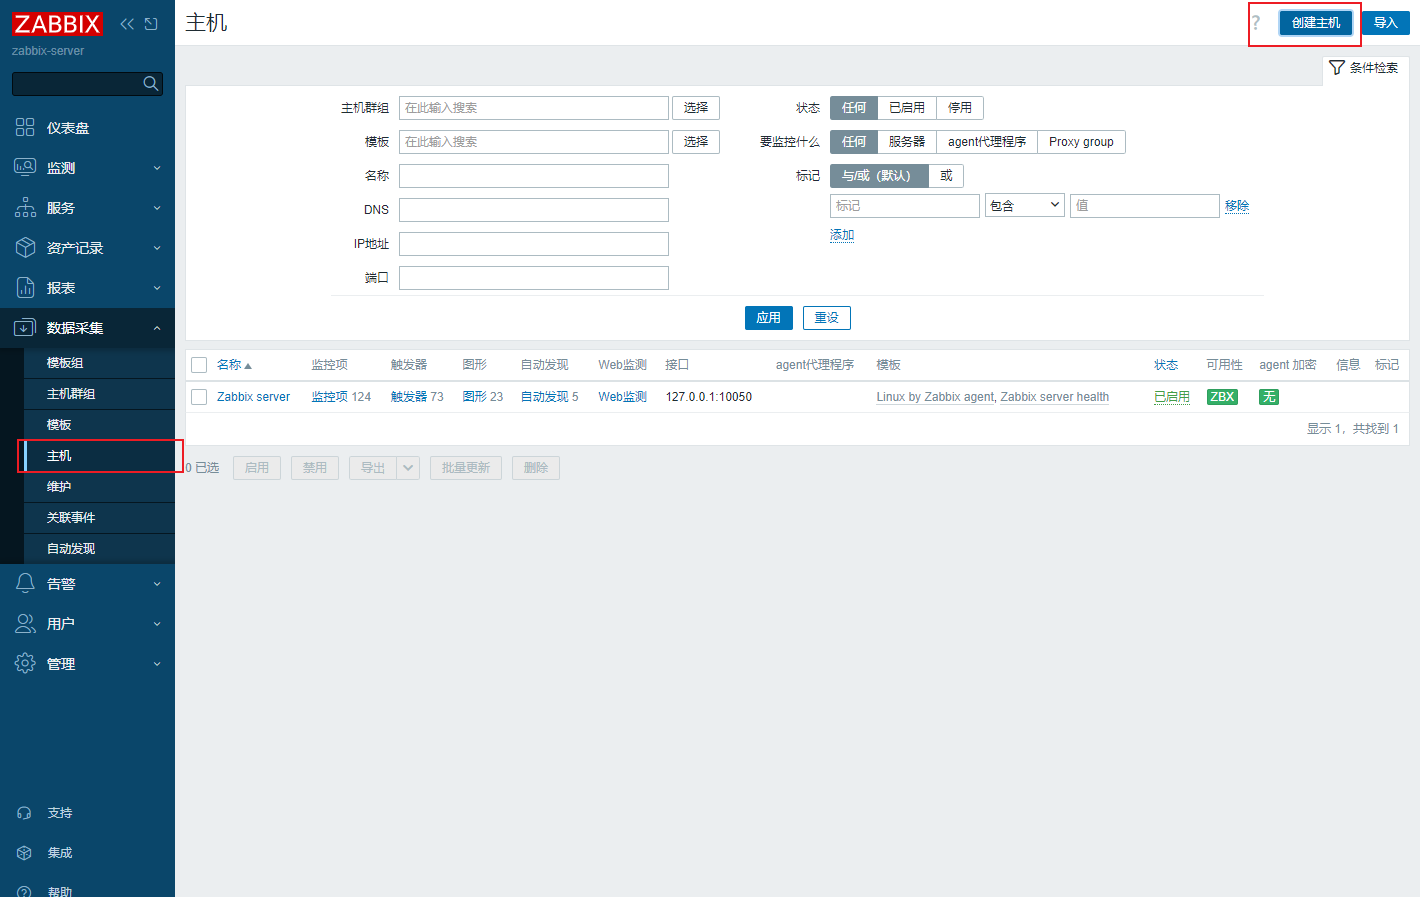
zabbix-server 添加主機
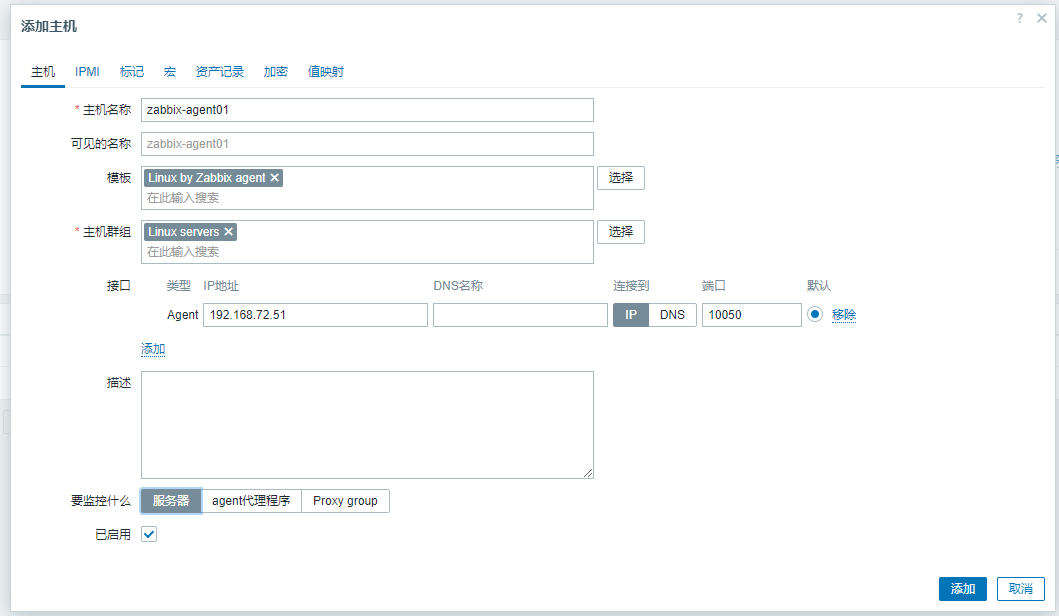
選擇數據采集–主機–創建主機
主機配置如下:
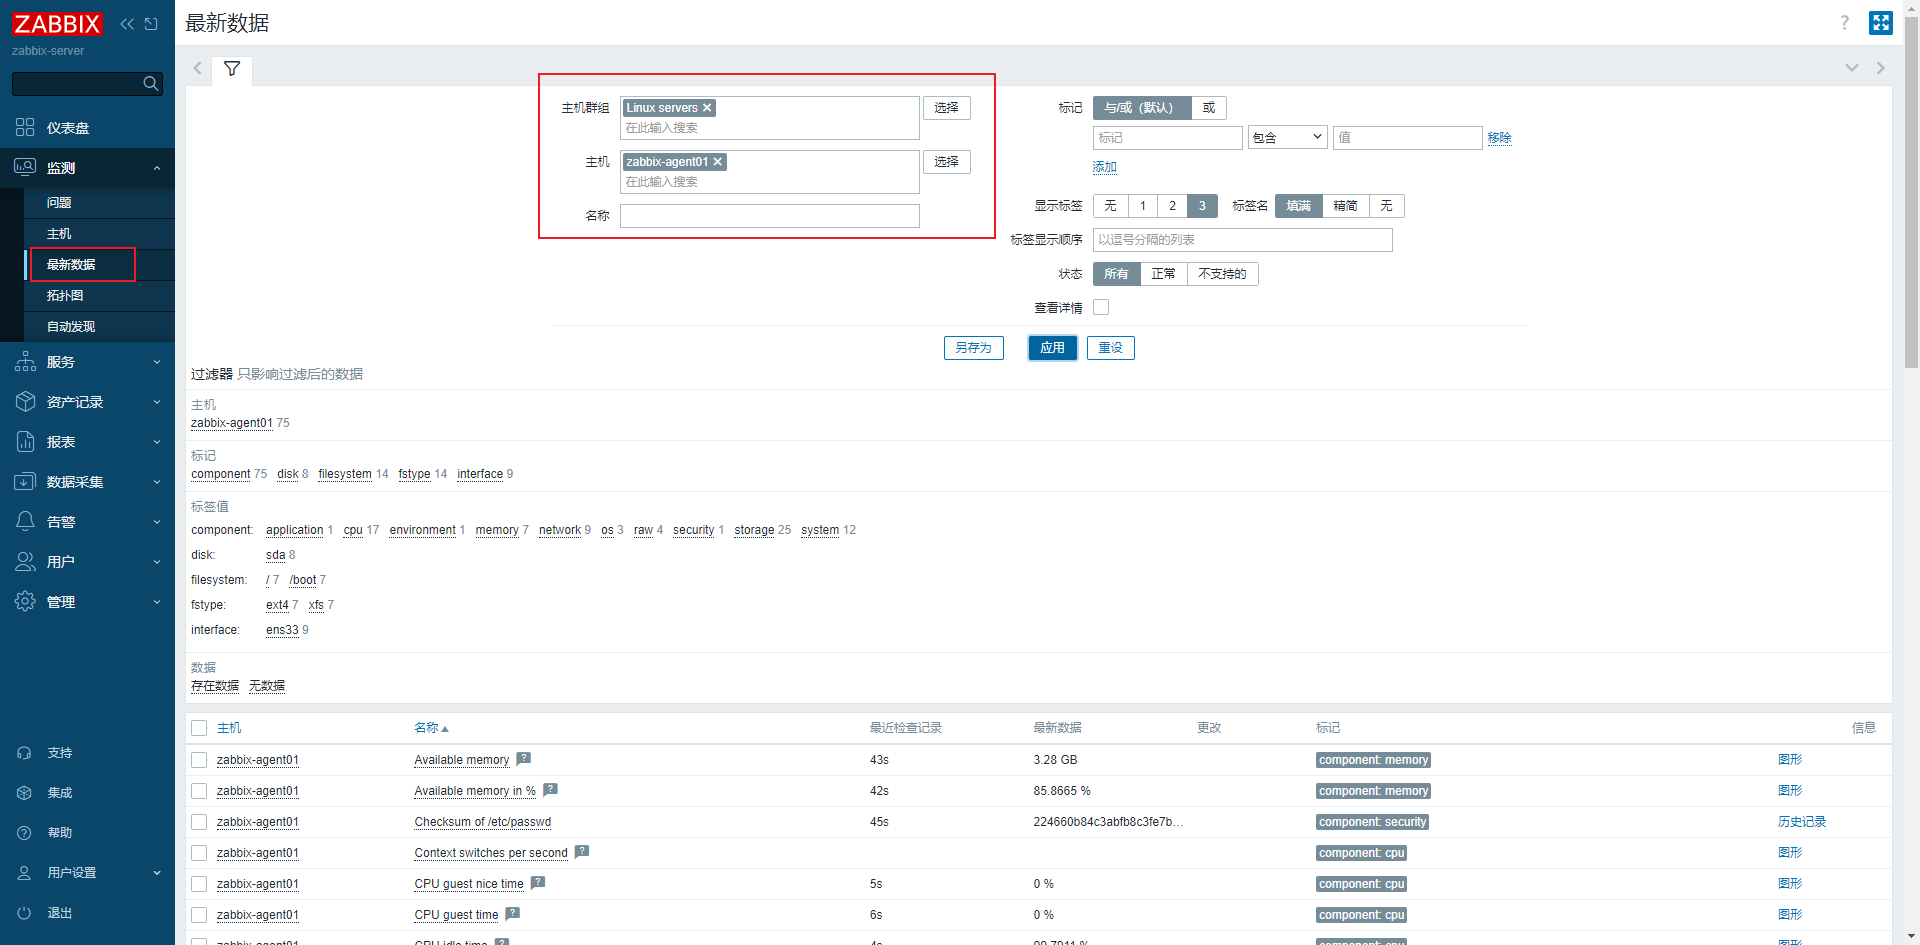
添加后確認可用性

選擇監測–最新數據,確認是否監測到最新數據:
zabbix-server 配置告警
示例場景:當zabbix-server監測到zabbix-agent01節點CPU負載過高時,發送告警到163郵箱。
設置163郵箱
登錄 https://mail.163.com/ 郵箱,設置中開啟POP3/SMTP/IMAP服務,新增并記錄下授權密碼。

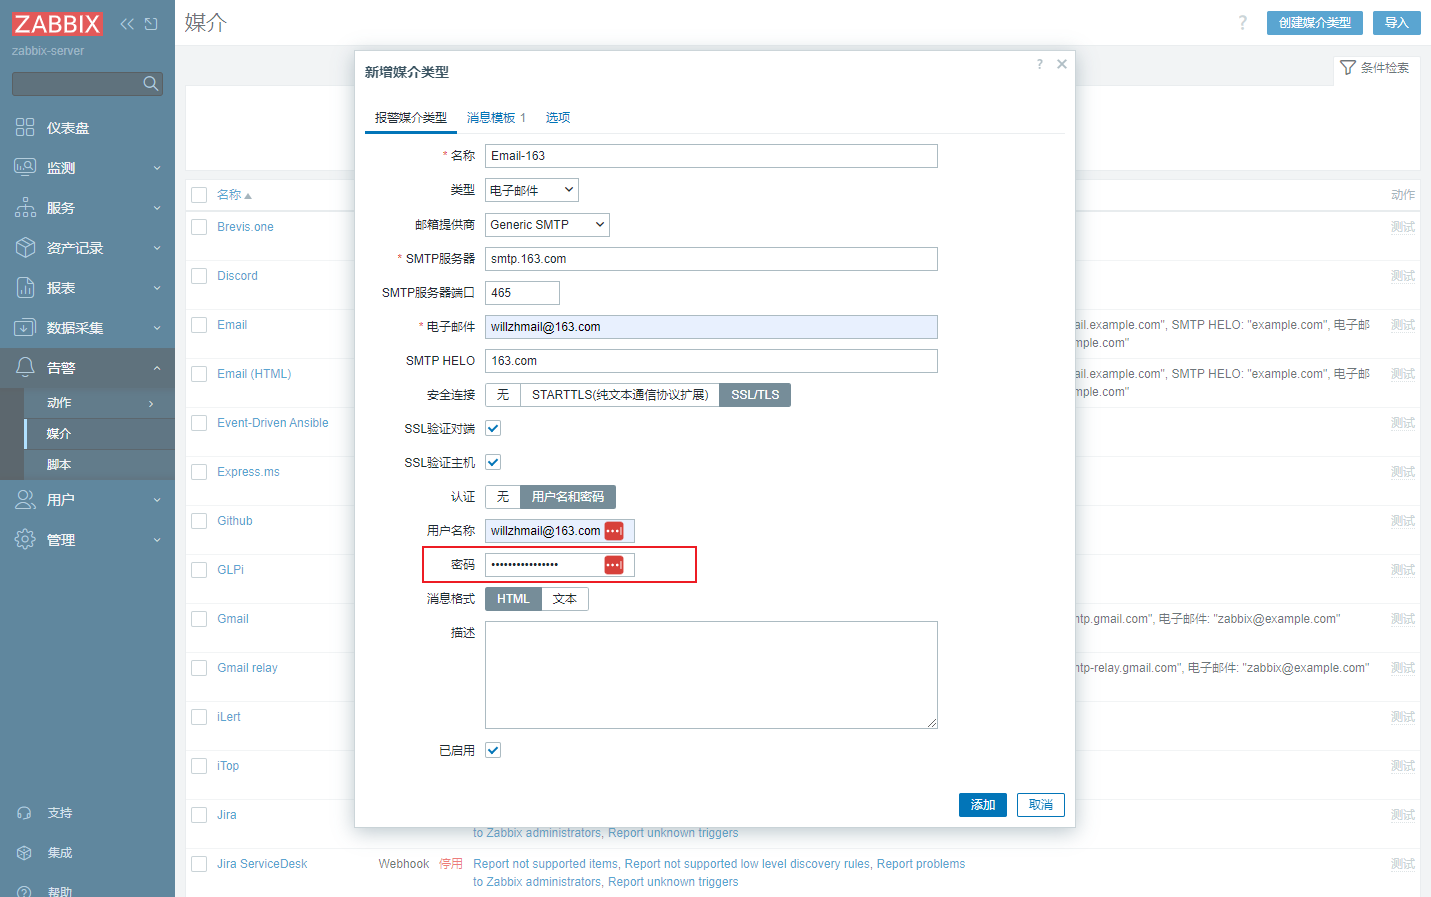
創建媒介類型
登錄zabbix控制臺,選擇告警–媒介–創建媒介類型,配置如下,注意密碼配置為授權碼密碼。
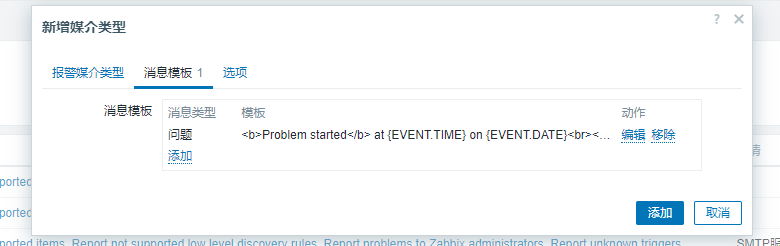
設置消息模板。
添加后點擊測試
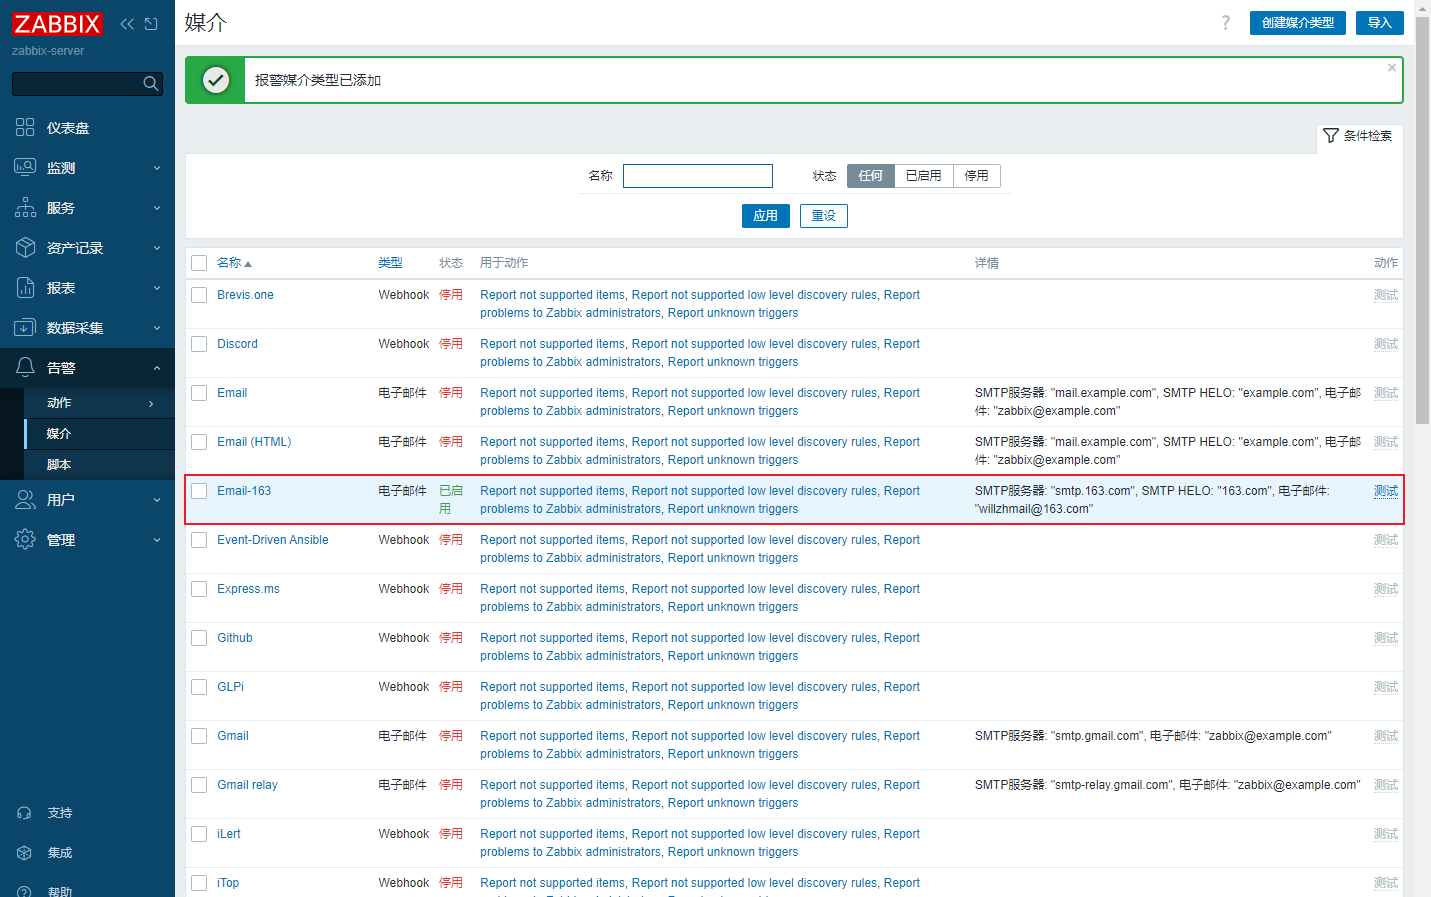
確認測試成功
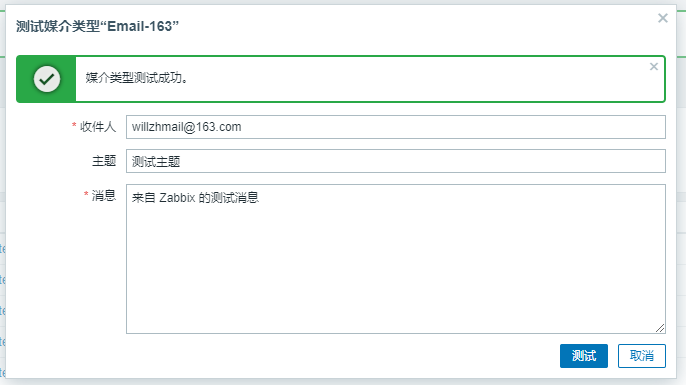
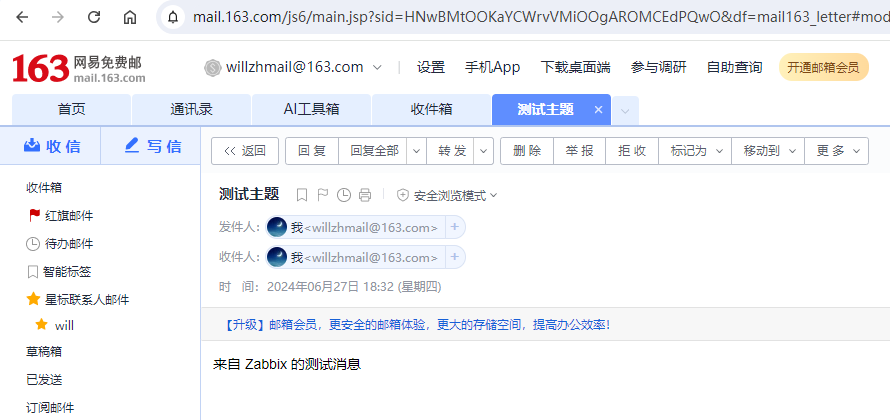
登錄163郵箱,確認收到測試郵件
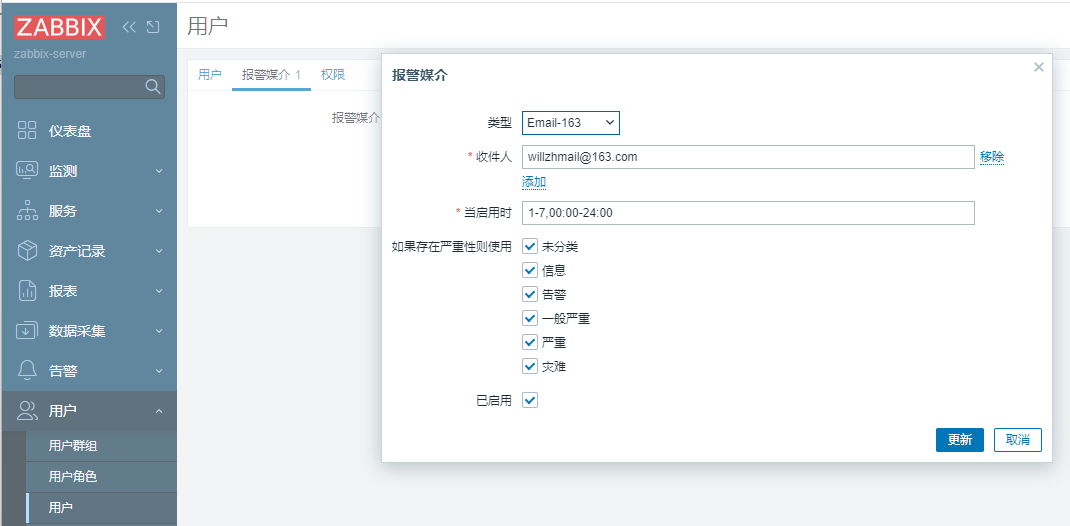
用戶添加報警媒介
選擇用戶–用戶–Admin–報警媒介–添加報警媒介
設置觸發器動作
選擇告警–動作–觸發器動作–創建動作
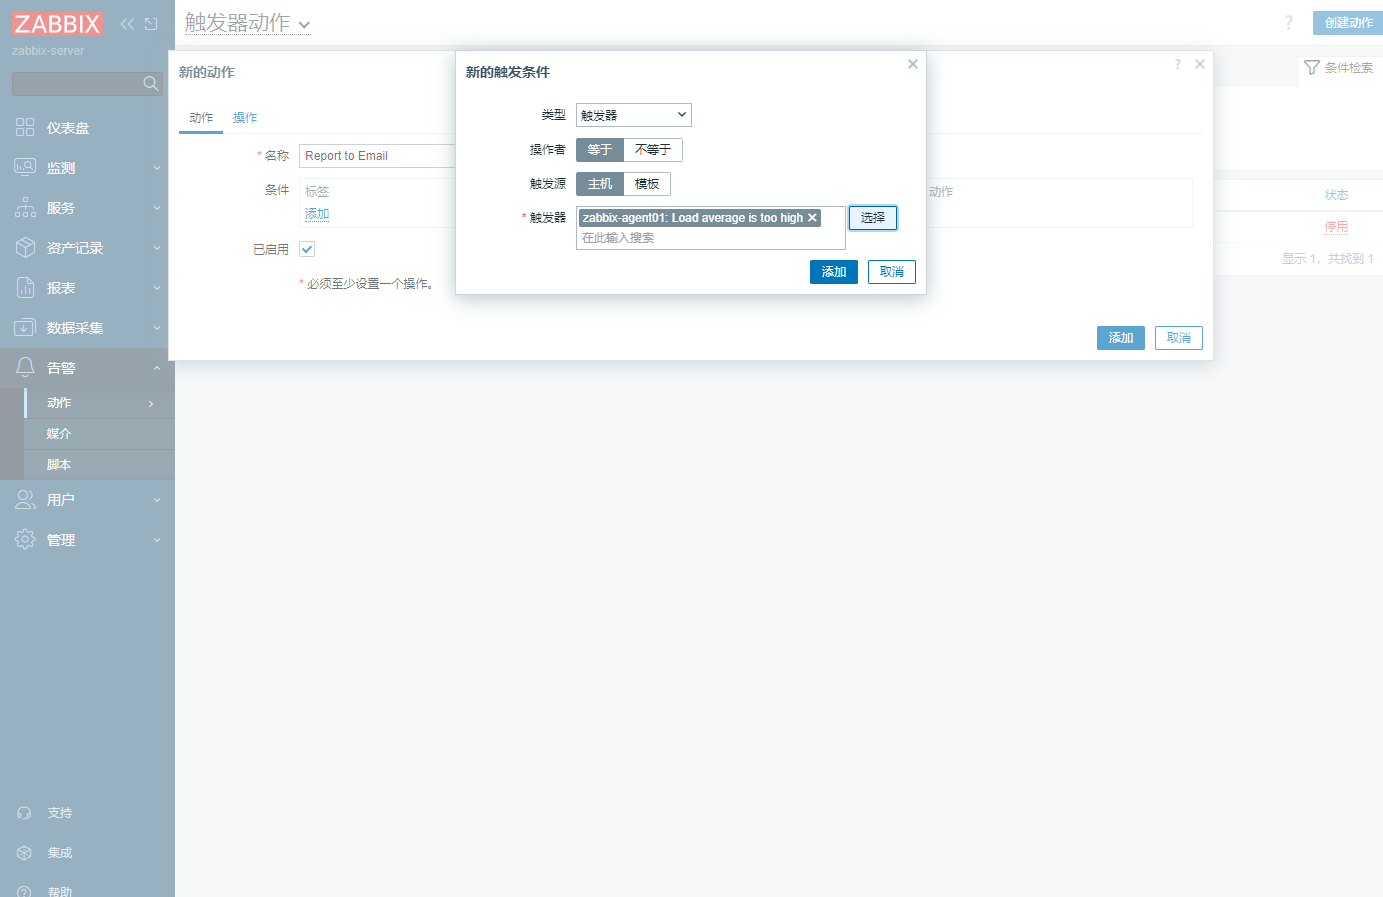
選擇操作,發送給指定用戶

觸發告警事件
在zabbix-agent01節點安裝stress-ng工具,使用stress-ng進行壓測,觸發告警負載過高事件
apt install -y stress-ng
stress-ng --cpu 8 --vm 8
等待5分鐘,在zabbix-server控制臺查看產生的告警事件,并且狀態顯示已送達。
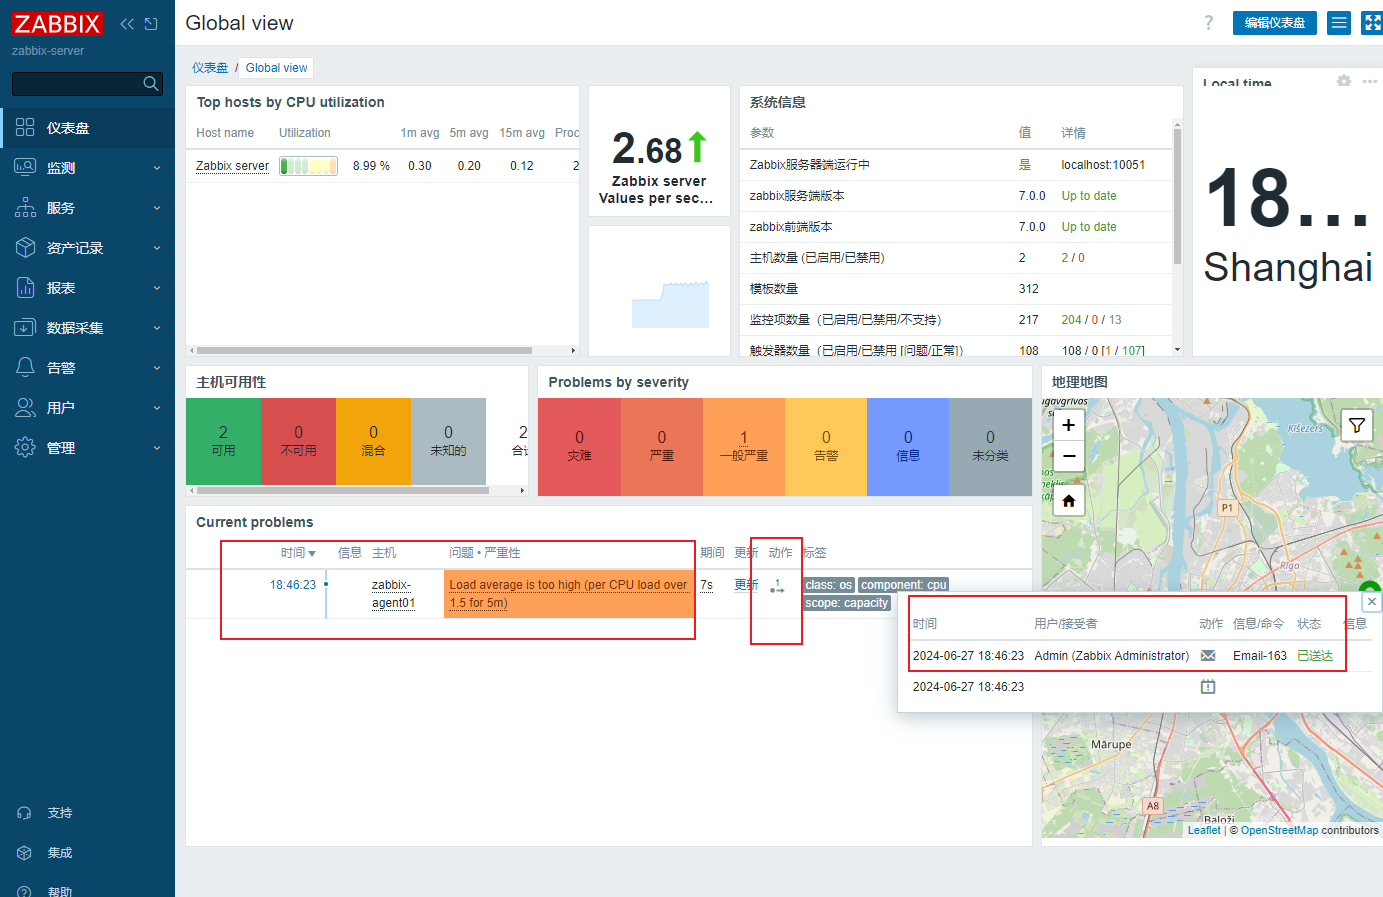
在163郵箱確認已收到告警郵件


)
)


