實驗環境:anaconda、jupyter notebook
實驗用到的包:opencv、matplotlib、numpy
注:opencv在3.4.2之后sift就不是免費的了
我用的是3.4.1.15版本
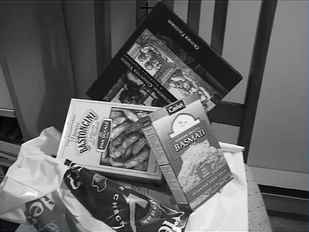
實驗使用到的圖片


一、sift函數獲取特征值
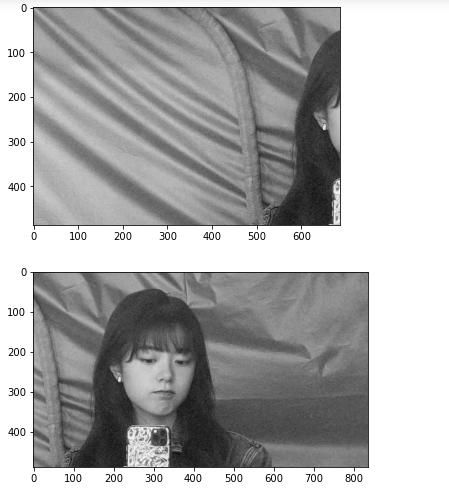
讀入圖片
book = cv2.imread('book.png', cv2.IMREAD_GRAYSCALE)
pile = cv2.imread('pile.png', cv2.IMREAD_GRAYSCALE)plt.imshow(book,'gray')
plt.show()
plt.imshow(pile,'gray')
plt.show()

獲取特征點和特征向量
# 計算特征點和特征向量
sift = cv2.xfeatures2d.SIFT_create()kp1,des1 = sift.detectAndCompute(book, None)
kp2,des2 = sift.detectAndCompute(pile, None)
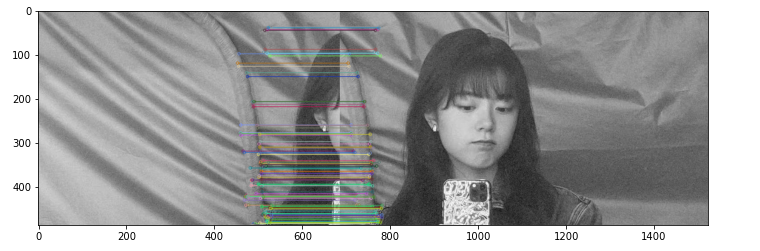
一對一匹配
# 一對一
bf = cv2.BFMatcher(crossCheck=True)matches = bf.match(des1,des2)
matches = sorted(matches, key=lambda x : x.distance)res = cv2.drawMatches(book, kp1, pile, kp2, matches[:10],None, flags=2)plt.figure(figsize=(12,8))
plt.imshow(res,'gray')
plt.show()
顯示前十個匹配

k對最佳匹配
# k對最佳匹配
bf = cv2.BFMatcher()
matches = bf.knnMatch(des1,des2, k=2)# 把距離小于閾值的記錄下來
good = []
for m,n in matches:if m.distance < 0.75 * n.distance:good.append([m])res = cv2.drawMatchesKnn(book, kp1, pile, kp2,good,None, flags=2)plt.figure(figsize=(12,8))
plt.imshow(res,'gray')
plt.show()

二、圖像拼接實驗
讀入圖片
ml = cv2.imread('ml.png')
ml_gray = cv2.cvtColor(ml, cv2.COLOR_BGR2GRAY)
mr = cv2.imread('mr.png')
mr_gray = cv2.cvtColor(mr, cv2.COLOR_BGR2GRAY)plt.imshow(ml_gray, 'gray')
plt.show()plt.imshow(mr_gray, 'gray')
plt.show()
獲取特征點和特征向量
# 獲取特征點和特征向量
sift = cv2.xfeatures2d.SIFT_create()
kpl,desl = sift.detectAndCompute(ml_gray, None)
kpl_f = np.float32([kp.pt for kp in kpl])
kpr,desr = sift.detectAndCompute(mr_gray, None)
kpr_f = np.float32([kp.pt for kp in kpr])# 匹配并顯示
bf = cv2.BFMatcher(crossCheck=True)matches = bf.match(desl,desr)
matches = sorted(matches, key=lambda x : x.distance)res = cv2.drawMatches(ml_gray, kpl, mr_gray, kpr, matches[:100],None, flags=2)plt.figure(figsize=(12,8))
plt.imshow(res,'gray')
plt.show()
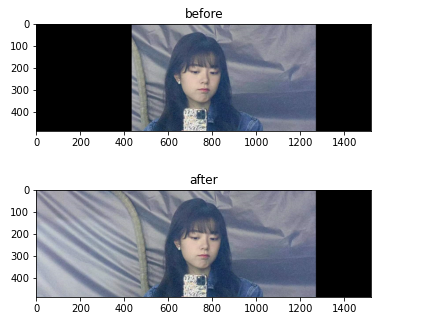
拼接圖片
拼接圖片實質上就是把一張圖片的一部分變化到匹配另一張圖片后,把另一張圖片覆蓋到變化的部分上
matcher = cv2.BFMatcher()raw_matches = matcher.knnMatch(desr, desl, 2)H = Nonematches = []
for m in raw_matches:# 保留合適的特征值if len(m) == 2 and m[0].distance < m[1].distance * 0.75 :matches.append([m[0].trainIdx, m[0].queryIdx])# 配對大于4時,計算時間變換矩陣
if len(matches) > 4:# 獲取配對的點坐標ptsl = np.float32([kpl_f[i] for (i,_) in matches])ptsr = np.float32([kpr_f[i] for (_,i) in matches])# 計算視角變換矩陣(H, status) = cv2.findHomography(ptsr, ptsl, cv2.RANSAC, 4)#對右圖進行變換
result = cv2.warpPerspective(mr,H,(mr.shape[1] + ml.shape[1],mr.shape[0]))plt.title('before')
plt.imshow(cv2.cvtColor(result, cv2.COLOR_BGR2RGB))
plt.show() # 左圖覆蓋
result[0:ml.shape[0], 0:ml.shape[1]] = mlplt.title('after')
plt.imshow(cv2.cvtColor(result, cv2.COLOR_BGR2RGB))
plt.show()


)

)


)

)

![[BJDCTF 2020]easy_md5、[HNCTF 2022 Week1]Interesting_include、[GDOUCTF 2023]泄露的偽裝](http://pic.xiahunao.cn/[BJDCTF 2020]easy_md5、[HNCTF 2022 Week1]Interesting_include、[GDOUCTF 2023]泄露的偽裝)


,超實用!)