1. 前言
April Tags 是一種視覺標簽(類似 QR 碼),用于通過相機進行定位和識別。它們通常用于計算機視覺任務中,幫助機器人識別和定位自己在物理空間中的位置,或者識別和追蹤特定對象。
前提條件
啟用 ROS 橋接:確保已經啟用了 ROS 橋接插件。
完成“相機與變換樹以及里程計”教程:已掌握相機數據、變換樹以及里程計相關知識。
安裝 apriltag-ros 包:需要安裝用于 April Tag 檢測的 ROS 包。
執行以下命令來安裝apriltag-ros:sudo apt-get install ros-$ROS_DISTRO-apriltag-ros- 確保已經完成工作空間的
source操作。?
2. 檢測 April Tags
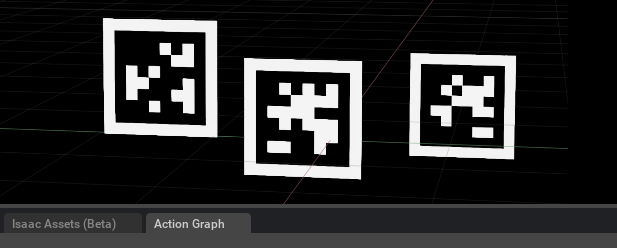
打開 April Tag 示例:在 Isaac Sim 中,進入 Isaac Examples → ROS → April Tag。這時視口中會顯示出三個 April Tags。
查看 Stage Tree 和打開 Action Graph:
打開 Stage Tree,找到場景中的相關對象。
右鍵點擊目標對象,然后選擇 Open Graph。此時,Action Graph 將打開,其中應該已自動設置 ROS 時鐘發布器、TF 發布器和相機助手節點(用于初始化
camera_info和rgb圖像發布器)。
開始仿真:點擊 Play 按鈕,開始向 ROS 發布數據。此時,April Tags 的數據會通過 ROS 被傳輸,你可以在 RViz 或其他 ROS 工具中查看檢測到的標簽。
在一個新的已 source ROS 環境的終端中,運行以下命令啟動 AprilTag 檢測節點:
roslaunch isaac_tutorials apriltag_continuous_detection.launch
這將啟動一個 ROS 節點,持續檢測場景中的 AprilTags。節點會從相機圖像中提取標簽信息并準備好進行后續處理。
在另一個已 source ROS 環境的終端中,運行以下命令來啟動 RViz,并加載 AprilTag 的配置文件,以便可視化檢測到的標簽:
rviz -d <noetic_ws>/src/isaac_tutorials/rviz/apriltag_config.rviz
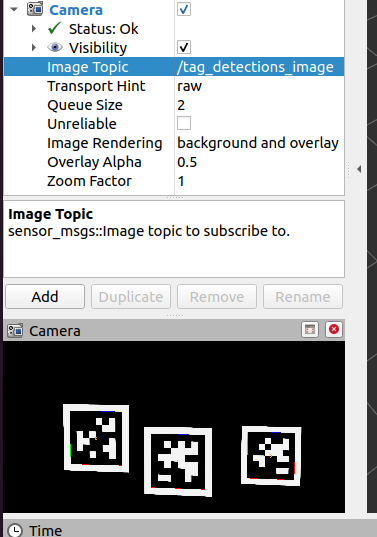
選項指定了 RViz 使用的配置文件。該配置文件包括顯示相機圖像和標記位置的設置。啟動后,你應該能在 RViz 中看到從相機捕獲的圖像,以及檢測到的 AprilTags 及其位置信息。
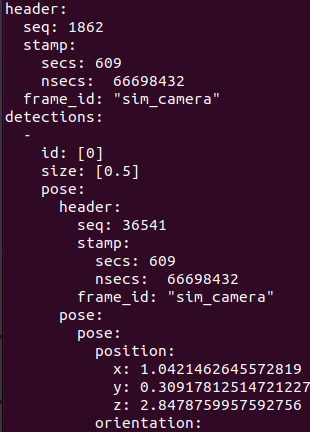
為了查看檢測到的原始標簽數據,可以運行以下命令,訂閱并打印 /tag_detections 話題:
rostopic echo /tag_detections
這將顯示檢測到的 AprilTag 數據,包括標簽的 ID、位置、姿態等信息,通常以 geometry_msgs/PoseStamped 消息格式呈現。
3.??給相機添加噪聲
學習目標
在本示例中,我們將:
簡要介紹如何為傳感器圖像添加增強(augmentation)。
發布帶有噪聲的圖像數據。
1. 在一個終端中,運行以下命令來啟動帶有噪聲增強的相機腳本:
./python.sh standalone_examples/api/omni.isaac.ros_bridge/camera_noise.py
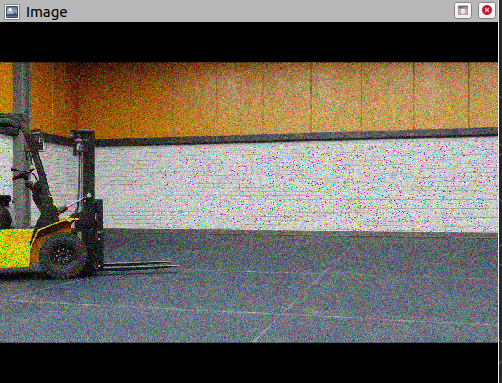
當場景加載完成后,你應該會看到視口中的一個倉庫場景,它會逆時針旋轉。
2. 啟動 RViz 并查看圖像數據
在一個新的終端中,source ROS 環境并運行 RViz:
3. 在 RViz 中添加圖像顯示窗口
在 RViz 窗口的左下角點擊 Add,打開彈出的窗口。
在 By display type 選項卡下選擇 Image,然后點擊 OK。
此時,RViz 窗口中會出現一個新的圖像顯示窗口,并且在 Display 菜單中會有一個標記為 Image 的菜單項。你可以將該圖像窗口拖動到一個合適的位置。
4.配置圖像顯示話題
展開 Image 菜單,并將 Image Topic 設置為 /rgb_augmented。這時,你應該能在 RViz 中看到 Isaac Sim 中稍微帶噪聲的圖像版本。
5. 代碼解釋
1. 設置相機路徑
首先,我們設置一個相機在我們想要捕獲數據的渲染產品上。可以使用 API 來設置視口中的相機,或者使用更底層的 API,直接操作渲染產品的 prim(這會直接影響渲染設置)。這兩種方法都可以達到相同的目的。為了演示,我們使用 set_camera_prim_path,因為我們已經在處理渲染產品的路徑。
# 獲取當前視口的渲染產品路徑
render_product_path = get_active_viewport().get_render_product_path()
# 使用渲染產品路徑設置相機路徑
set_camera_prim_path(render_product_path, CAMERA_STAGE_PATH)
2. 定義圖像增強
在傳感器中有幾種方式來定義增強(augmentation)。增強可以通過不同的方式實現,常見的有:
C++ OmniGraph 節點
Python OmniGraph 節點
omni.warp核心numpy核心
接下來,我們用 numpy 和 omni.warp 核心來定義一個簡單的噪聲函數。為了簡化,這里沒有做顏色值的越界檢查。
GPU 噪聲核心(使用 omni.warp)
# GPU 噪聲核,用于生成高斯噪聲
@wp.kernel
def image_gaussian_noise_warp(data_in: wp.array(dtype=wp.uint8, ndim=3),  # 輸入數據(圖像)data_out: wp.array(dtype=wp.uint8, ndim=3), # 輸出數據(帶噪聲的圖像)seed: int,  # 隨機種子sigma: float = 25.0,  # 噪聲強度(標準差)
):i, j = wp.tid()state = wp.rand_init(seed, wp.tid())# 為每個像素通道添加高斯噪聲data_out[i, j, 0] = wp.uint8(wp.int32(data_in[i, j, 0]) + wp.int32(sigma * wp.randn(state)))data_out[i, j, 1] = wp.uint8(wp.int32(data_in[i, j, 1]) + wp.int32(sigma * wp.randn(state)))data_out[i, j, 2] = wp.uint8(wp.int32(data_in[i, j, 2]) + wp.int32(sigma * wp.randn(state)))
CPU 噪聲核心(使用 numpy):
# CPU 噪聲核,用于生成高斯噪聲
def image_gaussian_noise_np(data_in: np.ndarray, seed: int, sigma: float = 25.0):np.random.seed(seed)# 通過 numpy 為輸入圖像添加高斯噪聲return data_in + sigma * np.random.randn(*data_in.shape)
3. 定義圖像增強操作
我們使用 rep.Augmentation.from_function() 來定義一個圖像增強操作。在這個例子中,我們增強的是圖像的輸出,將 IsaacConvertRGBAToRGB 注釋器的結果(將 RGBA 轉換為 RGB)與噪聲增強結合起來。
# 獲取 RGB 數據的渲染變量名
rv_rgb = omni.syntheticdata.SyntheticData.convert_sensor_type_to_rendervar(sd.SensorType.Rgb.name)
# 獲取 RGBA 到 RGB 的轉換注釋器
rgba_to_rgb_annotator = f"{rv_rgb}IsaacConvertRGBAToRGB"# 注冊新的增強注釋器,添加噪聲
rep.annotators.register(name="rgb_gaussian_noise",  # 增強的名稱annotator=rep.annotators.augment_compose(source_annotator=rgba_to_rgb_annotator,  # 使用已有的 RGBA 到 RGB 轉換注釋器augmentations=[rep.Augmentation.from_function(image_gaussian_noise_warp, seed=1234, sigma=25)],  # 使用噪聲增強),
)
Augmentation.from_function():
這是用來從函數創建一個增強操作的方式,
image_gaussian_noise_warp或image_gaussian_noise_np就是傳遞的增強函數。seed參數用于初始化隨機數生成器,以確保噪聲可以重復生成。它還與節點標識符結合,生成唯一的種子值。
4. 使用增強注釋器并將其附加到 ROS 發布器
最終,我們替換現有的 IsaacConvertRGBAToRGB 注釋器,使用新的帶噪聲的 rgb_gaussian_noise 注釋器。然后,我們初始化 ROS 發布器并將其附加到渲染產品路徑上,以開始捕獲并發布數據。
# 替換現有的 IsaacConvertRGBAToRGB 注釋器,使用帶噪聲的 rgb_gaussian_noise 注釋器
writer = rep.writers.get(f"{rv_rgb}" + "ROS1PublishImage")
writer.annotators[0] = "rgb_gaussian_noise"
writer.initialize(topicName="rgb_augmented", frameId="sim_camera")
writer.attach([render_product_path])  # 附加到渲染產品路徑
4. 發布相機數據
為了開始本教程,我們首先設置一個包含 omni.isaac.sensor.Camera 對象的環境。運行以下代碼會加載一個簡單的倉庫環境,并在場景中放置一個相機。
運行以下腳本:
import carb
from isaacsim import SimulationApp
import sysBACKGROUND_STAGE_PATH = "/background"
BACKGROUND_USD_PATH = "/Isaac/Environments/Simple_Warehouse/warehouse_with_forklifts.usd"CONFIG = {"renderer": "RayTracedLighting", "headless": False}simulation_app = SimulationApp(CONFIG)import omni
import numpy as np
import omni.graph.core as og
import omni.replicator.core as rep
import omni.syntheticdata._syntheticdata as sd
from omni.isaac.core import SimulationContext
from omni.isaac.core.utils import stage, extensions, nucleus
from omni.isaac.sensor import Camera
import omni.isaac.core.utils.numpy.rotations as rot_utils
from omni.isaac.core.utils.prims import is_prim_path_valid
from omni.isaac.core_nodes.scripts.utils import set_target_prims# 啟用 ROS 橋接擴展
extensions.enable_extension("omni.isaac.ros_bridge")simulation_app.update()# 檢查 rosmaster 節點是否正在運行
import rosgraphif not rosgraph.is_master_online():carb.log_error("Please run roscore before executing this script")simulation_app.close()exit()simulation_context = SimulationContext(stage_units_in_meters=1.0)# 查找 Isaac Sim 資產文件夾并加載環境和機器人場景
assets_root_path = nucleus.get_assets_root_path()if assets_root_path is None:carb.log_error("Could not find Isaac Sim assets folder")simulation_app.close()sys.exit()# 加載環境
stage.add_reference_to_stage(assets_root_path + BACKGROUND_USD_PATH, BACKGROUND_STAGE_PATH)###### 相機輔助函數 ######### 這里應該粘貼教程中的函數
def publish_camera_tf(camera: Camera):camera_prim = camera.prim_pathif not is_prim_path_valid(camera_prim):raise ValueError(f"Camera path '{camera_prim}' is invalid.")try:# Generate the camera_frame_id. OmniActionGraph will use the last part of# the full camera prim path as the frame name, so we will extract it here# and use it for the pointcloud frame_id.camera_frame_id=camera_prim.split("/")[-1]# Generate an action graph associated with camera TF publishing.ros_camera_graph_path = "/CameraTFActionGraph"# If a camera graph is not found, create a new one.if not is_prim_path_valid(ros_camera_graph_path):(ros_camera_graph, _, _, _) = og.Controller.edit({"graph_path": ros_camera_graph_path,"evaluator_name": "execution","pipeline_stage": og.GraphPipelineStage.GRAPH_PIPELINE_STAGE_SIMULATION,},{og.Controller.Keys.CREATE_NODES: [("OnTick", "omni.graph.action.OnTick"),("IsaacClock", "omni.isaac.core_nodes.IsaacReadSimulationTime"),("RosPublisher", "omni.isaac.ros_bridge.ROS1PublishClock"),],og.Controller.Keys.CONNECT: [("OnTick.outputs:tick", "RosPublisher.inputs:execIn"),("IsaacClock.outputs:simulationTime", "RosPublisher.inputs:timeStamp"),]})# Generate 2 nodes associated with each camera: TF from world to ROS camera convention, and world frame.og.Controller.edit(ros_camera_graph_path,{og.Controller.Keys.CREATE_NODES: [("PublishTF_"+camera_frame_id, "omni.isaac.ros_bridge.ROS1PublishTransformTree"),("PublishRawTF_"+camera_frame_id+"_world", "omni.isaac.ros_bridge.ROS1PublishRawTransformTree"),],og.Controller.Keys.SET_VALUES: [("PublishTF_"+camera_frame_id+".inputs:topicName", "/tf"),# Note if topic_name is changed to something else besides "/tf",# it will not be captured by the ROS tf broadcaster.("PublishRawTF_"+camera_frame_id+"_world.inputs:topicName", "/tf"),("PublishRawTF_"+camera_frame_id+"_world.inputs:parentFrameId", camera_frame_id),("PublishRawTF_"+camera_frame_id+"_world.inputs:childFrameId", camera_frame_id+"_world"),# Static transform from ROS camera convention to world (+Z up, +X forward) convention:("PublishRawTF_"+camera_frame_id+"_world.inputs:rotation", [0.5, -0.5, 0.5, 0.5]),],og.Controller.Keys.CONNECT: [(ros_camera_graph_path+"/OnTick.outputs:tick","PublishTF_"+camera_frame_id+".inputs:execIn"),(ros_camera_graph_path+"/OnTick.outputs:tick","PublishRawTF_"+camera_frame_id+"_world.inputs:execIn"),(ros_camera_graph_path+"/IsaacClock.outputs:simulationTime","PublishTF_"+camera_frame_id+".inputs:timeStamp"),(ros_camera_graph_path+"/IsaacClock.outputs:simulationTime","PublishRawTF_"+camera_frame_id+"_world.inputs:timeStamp"),],},)except Exception as e:print(e)# Add target prims for the USD pose. All other frames are static.set_target_prims(primPath=ros_camera_graph_path+"/PublishTF_"+camera_frame_id,inputName="inputs:targetPrims",targetPrimPaths=[camera_prim],)returndef publish_camera_info(camera: Camera, freq):# The following code will link the camera's render product and publish the data to the specified topic name.render_product = camera._render_product_pathstep_size = int(60/freq)topic_name = camera.name+"_camera_info"queue_size = 1node_namespace = ""frame_id = camera.prim_path.split("/")[-1] # This matches what the TF tree is publishing.stereo_offset = [0.0, 0.0]writer = rep.writers.get("ROS1PublishCameraInfo")writer.initialize(frameId=frame_id,nodeNamespace=node_namespace,queueSize=queue_size,topicName=topic_name,stereoOffset=stereo_offset,)writer.attach([render_product])gate_path = omni.syntheticdata.SyntheticData._get_node_path("PostProcessDispatch" + "IsaacSimulationGate", render_product)# Set step input of the Isaac Simulation Gate nodes upstream of ROS publishers to control their execution rateog.Controller.attribute(gate_path + ".inputs:step").set(step_size)returndef publish_pointcloud_from_depth(camera: Camera, freq):# The following code will link the camera's render product and publish the data to the specified topic name.render_product = camera._render_product_pathstep_size = int(60/freq)topic_name = camera.name+"_pointcloud" # Set topic name to the camera's namequeue_size = 1node_namespace = ""frame_id = camera.prim_path.split("/")[-1] # This matches what the TF tree is publishing.# Note, this pointcloud publisher will simply convert the Depth image to a pointcloud using the Camera intrinsics.# This pointcloud generation method does not support semantic labelled objects.rv = omni.syntheticdata.SyntheticData.convert_sensor_type_to_rendervar(sd.SensorType.DistanceToImagePlane.name)writer = rep.writers.get(rv + "ROS1PublishPointCloud")writer.initialize(frameId=frame_id,nodeNamespace=node_namespace,queueSize=queue_size,topicName=topic_name)writer.attach([render_product])# Set step input of the Isaac Simulation Gate nodes upstream of ROS publishers to control their execution rategate_path = omni.syntheticdata.SyntheticData._get_node_path(rv + "IsaacSimulationGate", render_product)og.Controller.attribute(gate_path + ".inputs:step").set(step_size)returndef publish_depth(camera: Camera, freq):# The following code will link the camera's render product and publish the data to the specified topic name.render_product = camera._render_product_pathstep_size = int(60/freq)topic_name = camera.name+"_depth"queue_size = 1node_namespace = ""frame_id = camera.prim_path.split("/")[-1] # This matches what the TF tree is publishing.rv = omni.syntheticdata.SyntheticData.convert_sensor_type_to_rendervar(sd.SensorType.DistanceToImagePlane.name)writer = rep.writers.get(rv + "ROS1PublishImage")writer.initialize(frameId=frame_id,nodeNamespace=node_namespace,queueSize=queue_size,topicName=topic_name)writer.attach([render_product])# Set step input of the Isaac Simulation Gate nodes upstream of ROS publishers to control their execution rategate_path = omni.syntheticdata.SyntheticData._get_node_path(rv + "IsaacSimulationGate", render_product)og.Controller.attribute(gate_path + ".inputs:step").set(step_size)returndef publish_rgb(camera: Camera, freq):# The following code will link the camera's render product and publish the data to the specified topic name.render_product = camera._render_product_pathstep_size = int(60/freq)topic_name = camera.name+"_rgb"queue_size = 1node_namespace = ""frame_id = camera.prim_path.split("/")[-1] # This matches what the TF tree is publishing.rv = omni.syntheticdata.SyntheticData.convert_sensor_type_to_rendervar(sd.SensorType.Rgb.name)writer = rep.writers.get(rv + "ROS1PublishImage")writer.initialize(frameId=frame_id,nodeNamespace=node_namespace,queueSize=queue_size,topicName=topic_name)writer.attach([render_product])# Set step input of the Isaac Simulation Gate nodes upstream of ROS publishers to control their execution rategate_path = omni.syntheticdata.SyntheticData._get_node_path(rv + "IsaacSimulationGate", render_product)og.Controller.attribute(gate_path + ".inputs:step").set(step_size)return#################################################################### 創建相機實例。注意,Camera 類接受位置和方向的世界軸約定。
camera = Camera(prim_path="/World/floating_camera",position=np.array([-3.11, -1.87, 1.0]),frequency=20,resolution=(256, 256),orientation=rot_utils.euler_angles_to_quats(np.array([0, 0, 0]), degrees=True),
)camera.initialize()simulation_app.update()
camera.initialize()############### 調用相機發布函數 ################ 調用發布器函數。
# 確保你已經粘貼了上面定義的輔助函數,并取消注釋以下行再運行。
approx_freq = 30publish_camera_tf(camera)
publish_camera_info(camera, approx_freq)
publish_rgb(camera, approx_freq)
publish_depth(camera, approx_freq)
publish_pointcloud_from_depth(camera, approx_freq)##################################################################### 初始化物理引擎
simulation_context.initialize_physics()# 開始仿真
simulation_context.play()while simulation_app.is_running():simulation_context.step(render=True)simulation_context.stop()
simulation_app.close()


)


——Time、Vector3、位置位移、角度、旋轉、縮放、看向)

,KL散度)


Gemini Agent 使用指南)
)