第一天:
基本內容如下:
從gitee拉取對應的基礎代碼。做好配置相關工作。測試頁面是否可以正常打開。
無問題
需要學習的內容:spring security
了解到這個框架的基礎作用大概是:管理請求路徑,管理用戶權限,用于登陸安全的保護。
第二天:
分配任務:我需要實現的是預約功能相關的代碼開發。需要分析表結構,書寫接口文檔。然后開發對應的代碼。
基本內容如下:
1.理解五張表的關系:
套餐表 ,套餐體驗組關聯表 ,體驗組表 ,體驗組體驗項關聯表? ,體驗項目表
三張表,兩張中間表。互為多對多關系。
2.編寫接口文檔:
問題:請求路徑等不明確,首次寫接口文檔不熟練。返回內容請求內容等不明確。。。
解決方式:學習看懂前端代碼,通過查看pages目錄下的對應頁面內容找到對應的請求路徑,設計了接口文檔。
3.編寫檢查項表的crud,分頁查詢。
基礎crud,問題不大。wu
小問題在于:不熟悉代碼結構。沒有仔細查看返回值pageresult類。導致分頁查詢出現問題。
sql中我們直接對queryString做模糊查詢:
<select id="findPage" resultType="com.itheima.pojo.vo.CheckItemVO" >select id,code,name,sex,age,remark from t_checkitem<where><if test="queryString!=null and queryString!=''">and (code like concat('%',#{queryString},'%') or name like concat('%',#{queryString},'%'))</if></where>
</select>
?和之前手打的蒼穹外賣代碼對比查看了一下,發現這樣寫其實挺妙的:
在傳智健康中,我們定義了下面這樣一個類用于輔助實現分頁查詢。
/*** 封裝查詢條件*/
public class QueryPageBean implements Serializable{private Integer currentPage;//頁碼private Integer pageSize;//每頁記錄數private String queryString;//查詢條件
對應的其實是蒼穹外賣中各種分頁查詢的DTO:
package com.sky.dto;import lombok.Data;import java.io.Serializable;@Data
public class DishPageQueryDTO implements Serializable {private int page;private int pageSize;private String name;//分類idprivate Integer categoryId;//狀態 0表示禁用 1表示啟用private Integer status;}
這里相當于可以少寫很多DTO,而將查詢條件直接寫在了SQL腳本當中。
<if test="queryString!=null and queryString!=''">and (code like concat('%',#{queryString},'%') or name like concat('%',#{queryString},'%'))</if>省略了很多代碼。學到了。
需要學習:前后端聯調相關知識。
第三天:
基本內容如下:
1.學習前后端聯調:前后端聯調:關鍵步驟、必要性與有效實踐-CSDN博客
總結:查看數據能否正常返回,統一請求方式請求路徑。
2.完成套餐相關和檢查組相關的基礎代碼。
注意點:需要實現阿里云oss的圖片上傳功能。
基礎配置:
package com.itheima.config;import lombok.Data;
import org.springframework.boot.context.properties.ConfigurationProperties;
import org.springframework.stereotype.Component;@Data
@Component
@ConfigurationProperties(prefix = "health.alioss")
public class AliOssProperties {private String endpoint;private String accessKeyId;private String accessKeySecret;private String bucketName;}
package com.itheima.config;import com.itheima.common.utils.AliOssUtil;
import lombok.extern.slf4j.Slf4j;
import org.springframework.boot.autoconfigure.condition.ConditionalOnMissingBean;
import org.springframework.context.annotation.Bean;
import org.springframework.context.annotation.Configuration;/*** 配置類,用于創建AliOssUtil對象*/
@Slf4j
@Configuration
public class OssConfiguration {@Bean@ConditionalOnMissingBeanpublic AliOssUtil aliOssUtil(AliOssProperties aliOssProperties){log.info("開始創建阿里云文件上傳工具類對象:{}",aliOssProperties);return new AliOssUtil(aliOssProperties.getEndpoint(),aliOssProperties.getAccessKeyId(),aliOssProperties.getAccessKeySecret(),aliOssProperties.getBucketName());}
}以及你的pom依賴,和yml文件當中的四項配置。
還有這個工具類:
import com.aliyun.oss.ClientException;
import com.aliyun.oss.OSS;
import com.aliyun.oss.OSSClientBuilder;
import com.aliyun.oss.OSSException;
import lombok.AllArgsConstructor;
import lombok.Data;
import lombok.extern.slf4j.Slf4j;import java.io.ByteArrayInputStream;@Data
@Slf4j
@AllArgsConstructor
public class AliOssUtil {private String endpoint;private String accessKeyId;private String accessKeySecret;private String bucketName;/*** 文件上傳** @param bytes* @param objectName* @return*/public String upload(byte[] bytes, String objectName) {// 創建OSSClient實例。OSS ossClient = new OSSClientBuilder().build(endpoint, accessKeyId, accessKeySecret);try {// 創建PutObject請求。ossClient.putObject(bucketName, objectName, new ByteArrayInputStream(bytes));} catch (OSSException oe) {log.error("Caught an OSSException, which means your request made it to OSS, "+ "but was rejected with an error response for some reason.");log.error("Error Message:{}", oe.getErrorMessage());log.error("Error Code:{}",oe.getErrorCode());log.error("Request ID:{}",oe.getRequestId());log.error("Host ID:{}", oe.getHostId());} catch (ClientException ce) {log.error("Caught an ClientException, which means the client encountered "+ "a serious internal problem while trying to communicate with OSS, "+ "such as not being able to access the network.");log.error("Error Message:{}",ce.getMessage());} finally {if (ossClient != null) {ossClient.shutdown();}}//文件訪問路徑規則 https://BucketName.Endpoint/ObjectNameStringBuilder stringBuilder = new StringBuilder("https://");stringBuilder.append(bucketName).append(".").append(endpoint).append("/").append(objectName);log.info("文件上傳到:{}", stringBuilder.toString());return stringBuilder.toString();}public void delete(String objectName) {OSS ossClient = new OSSClientBuilder().build(endpoint, accessKeyId,accessKeySecret);try {// 刪除文件或目錄。如果要刪除目錄,目錄必須為空。ossClient.deleteObject(bucketName, objectName);} catch (OSSException oe) {System.out.println("Caught an OSSException, which means your request made it to OSS, "+ "but was rejected with an error response for some reason.");System.out.println("Error Message:" + oe.getErrorMessage());System.out.println("Error Code:" + oe.getErrorCode());System.out.println("Request ID:" + oe.getRequestId());System.out.println("Host ID:" + oe.getHostId());} catch (ClientException ce) {System.out.println("Caught an ClientException, which means the client encountered "+ "a serious internal problem while trying to communicate with OSS, "+ "such as not being able to access the network.");System.out.println("Error Message:" + ce.getMessage());} finally {if (ossClient != null) {ossClient.shutdown();}}}
}
注意到里面相比蒼穹外賣還運用到了文件刪除的功能。
文件上傳核心代碼如下:
/*** 上傳文件* @param imgFile* @return*/@PostMapping("/upload")public Result upload(MultipartFile imgFile){log.info("上傳文件中...");//獲的原始文件的名字String originalFilename = imgFile.getOriginalFilename();//截取原始文件名-獲的擴展名String exctension = originalFilename.substring(originalFilename.lastIndexOf("."));//使用uuid構造新的文件名String newFileName = UUID.randomUUID()+ exctension;//使用阿里云工具類上傳文件try {String filePath = aliOssUtil.upload(imgFile.getBytes(), newFileName);log.info("文件上傳成功:{}",filePath);//將圖片緩存在Redis中redisTemplate.opsForSet().add(RedisConstant.SETMEAL_PIC_RESOURCES,filePath);return new Result(true,MessageConstant.PIC_UPLOAD_SUCCESS,filePath);} catch (IOException e) {log.error("文件上傳失敗{}",e.getMessage());}return new Result(false,MessageConstant.PIC_UPLOAD_FAIL);}
}
其余crud很基礎,不必細講。
需要學習的內容:redis?Redis中文網
第四天:
基本內容如下:
1.與前端工程師完成代碼的聯調,發現問題,在上傳圖片的操作過程中,點擊圖片上傳的按鈕時圖片就已經上傳成功回顯了。但是此時如果取消編輯或者新增,圖片依然存在阿里云服務器當中。會出現垃圾圖片的現象。
2.探討解決方式:
redis里面的set應該是能對比差集的,文件上傳的時候將地址保存到redis里面的一個set集合,保存數據庫成功的圖片插入到redis里面的一個set集和里面。然后再用定時任務去觸發對比,對比這兩個集合就能比較出差集了,然后去阿里云OSS里面刪除差集的內容就好了。
3.編碼解決問題:
參考文檔:
spring boot中使用redisTemplate:如何在Spring Boot中使用RedisTemplate_springboot redistemplate 使用-CSDN博客
spring boot中使用Spring Task:SpringBoot使用@Scheduled注解實現定時任務_springboot scheduled注解-CSDN博客
解決思路如下:
1.在文件上傳成功后將圖片保存到了一個redis集合中
@Overridepublic void add(List<Integer> checkGroupIds, Setmeal setmeal) {//增加套餐SetmealMapper.add(setmeal);redisTemplate.opsForSet().add(RedisConstant.SETMEAL_PIC_DB_RESOURCES,setmeal.getImg());//添加套餐和檢查組的關聯關系if(checkGroupIds!=null&&checkGroupIds.size()>0){for (Integer checkGroupId : checkGroupIds) {SetmealMapper.addCheckGroupAndSetmeal(setmeal.getId(),checkGroupId);}}}/*** 編輯套餐* @param checkGroupIds* @param setmeal*/@Transactional@Overridepublic void edit(List<Integer> checkGroupIds, Setmeal setmeal) {//修改套餐SetmealMapper.update(setmeal);redisTemplate.opsForSet().add(RedisConstant.SETMEAL_PIC_DB_RESOURCES,setmeal.getImg());log.info("圖片添加到redis緩存");//修改套餐和檢查組的關聯關系if(checkGroupIds!=null&&checkGroupIds.size()>0){//刪除套餐和檢查組的關聯關系SetmealMapper.deleteCheckGroupAndSetmeal(setmeal.getId());//添加套餐和檢查組的關聯關系for (Integer checkGroupId : checkGroupIds) {SetmealMapper.addCheckGroupAndSetmeal(setmeal.getId(),checkGroupId);}}}可以看到在添加和修改套餐時我們調用redisTemplate類,將新添加的image圖片添加到了redis當中的SETMEAL_PIC_DB_RESOURCES中。
2. 當套餐數據插入到數據庫后我們又將圖片名稱保存到另一個redis集合中
/*** 上傳文件* @param imgFile* @return*/@PostMapping("/upload")public Result upload(MultipartFile imgFile){log.info("上傳文件中...");//獲的原始文件的名字String originalFilename = imgFile.getOriginalFilename();//截取原始文件名-獲的擴展名String exctension = originalFilename.substring(originalFilename.lastIndexOf("."));//使用uuid構造新的文件名String newFileName = UUID.randomUUID()+ exctension;//使用阿里云工具類上傳文件try {String filePath = aliOssUtil.upload(imgFile.getBytes(), newFileName);log.info("文件上傳成功:{}",filePath);//將圖片緩存在Redis中redisTemplate.opsForSet().add(RedisConstant.SETMEAL_PIC_RESOURCES,filePath);return new Result(true,MessageConstant.PIC_UPLOAD_SUCCESS,filePath);} catch (IOException e) {log.error("文件上傳失敗{}",e.getMessage());}return new Result(false,MessageConstant.PIC_UPLOAD_FAIL);}
}
可以看到在上傳成功到數據庫后我們將圖片緩存到了redis的SETMEAL_PIC_RESOURCES中
3. 通過計算這兩個集合的差值就可以獲得所有垃圾圖片的名稱。
這一步可以寫在定時任務類當中
4.使用SpringTask定時任務,定時計算redis兩個集合的差值就是所有的垃圾圖片
package com.itheima.common;import com.itheima.common.constant.RedisConstant;
import com.itheima.common.utils.AliOssUtil;
import lombok.extern.slf4j.Slf4j;
import org.springframework.beans.factory.annotation.Autowired;
import org.springframework.data.redis.core.RedisTemplate;
import org.springframework.scheduling.annotation.Scheduled;
import org.springframework.stereotype.Component;import java.util.Set;@Slf4j
@Componentpublic class GarbageImageCleaner {@Autowiredprivate RedisTemplate<String,String> redisTemplate;@Autowiredprivate AliOssUtil aliOssUtil;@Scheduled(cron = "0/10 * *  * * ? ")public void cleanGarbageImages() {log.info("垃圾圖片清理任務執行了");// 獲取Redis中所有圖片的完整路徑Set<String> ossPaths = redisTemplate.opsForSet().members(RedisConstant.SETMEAL_PIC_RESOURCES);// 獲取數據庫中使用的純文件名集合Set<String> dbFileNames = redisTemplate.opsForSet().members(RedisConstant.SETMEAL_PIC_DB_RESOURCES);if (ossPaths != null && !ossPaths.isEmpty()) {for (String ossPath : ossPaths) {// 從完整路徑中提取文件名String fileName = ossPath.substring(ossPath.lastIndexOf("/") + 1);// 檢查該文件名是否在數據庫使用的集合中if (!dbFileNames.contains(fileName)) {// 文件名不在數據庫中,屬于垃圾圖片log.info("發現垃圾圖片: {}", ossPath);try {String[] split = ossPath.split("/");// 嘗試刪除OSS中的圖片aliOssUtil.delete(split[3]);log.info("成功刪除OSS圖片: {}", ossPath);// 從Redis中移除該路徑redisTemplate.opsForSet().remove(RedisConstant.SETMEAL_PIC_RESOURCES, ossPath);log.info("已從緩存中移除: {}", ossPath);} catch (Exception e) {log.error("刪除OSS圖片失敗: {}", ossPath, e);}}}}}}
可以看到這里用兩個String類型的set集合分別存儲了兩個不同常量當中所存儲的img路徑。分別是存入數據庫的和觸發過文件上傳的。
然后遍歷其中一個集合,依次對集合中圖片的完整路徑做截取,來和另一個集合比對。
如過出現了不一致的圖片路徑,則判斷為垃圾圖片,調用阿里云工具類當中的delete方法刪除,再調用remove方法移除緩存。
最后通過? @Scheduled(cron = "0/10 * * ?* * ? ")注解設置定時條件。我設置的是定時十秒鐘執行一次。
這樣就實現了垃圾圖片刪除的操作。
需要學習知識:批量導入
第五天:
基本內容如下:
分析預約管理的功能:功能很簡單,就三個,一個模板下載、一個導入預約設置、還有一個設置的每天的預約人數。
excel導入在蒼穹外賣中使用過,是用阿帕奇下的POI來實現的。資料如下。
spring boot使用POI實現導入導出:Apache POI Excel 導入、導出簡單使用_apache poi導入excel-CSDN博客
所以這次想試試新玩意,基于POI進一步實現的阿里云旗下的easyexcel
EasyExcel讀取Excel數據(含多種方式)_easyexcel讀取excel內容-CSDN博客
上文資料中主要實現了三步操作:
1.引入依賴 2.實現對excel的寫入 3.實現對excel內容的讀取。
在我分析的預約管理功能當中,并不需要實現書寫excel的過程,導入現成的excel表格實現讀取和修改數據庫就可以了。
任務如下:
1. 編寫預約設置的模板。
基礎代碼已經有了,放在resource文件當中。
2. 編寫模板下載接口,下載項目resource目錄下的excel模板。
(建議學習一下請求頭請求頭,響應頭,content-type等相關屬性的作用,參考鏈接如下
MDN:Properly Configuring Server MIME Types - 學習 Web 開發 | MDN
菜鳥教程:HTTP content-type | 菜鳥教程)
@GetMapping("/download")public ResponseEntity<Resource> downloadFile(String filename) {// 記錄下載文件的日志信息log.info("下載模板文件:{}",filename);// 通過服務方法獲取文件資源Resource resource = orderSettingService.downloadFile(filename);// 檢查獲取的文件資源是否為空if (resource != null) {try {// 如果文件資源存在,構建HTTP響應,設置響應頭、內容長度、內容類型,并將文件作為響應體返回return ResponseEntity.ok().header("Content-Disposition", "attachment;filename=" + filename).contentLength(resource.contentLength()).contentType(MediaType.APPLICATION_OCTET_STREAM).body(resource);//以application開頭的媒體格式類型:////application/xhtml+xml :XHTML格式//application/xml: XML數據格式//application/atom+xml :Atom XML聚合格式//application/json: JSON數據格式//application/pdf:pdf格式//application/msword : Word文檔格式//application/octet-stream : 二進制流數據(如常見的文件下載)} catch (IOException e) {// 捕獲IO異常,記錄文件下載失敗的錯誤信息log.error("文件下載失敗{}",e.getMessage());}}// 如果文件資源為空或下載失敗,返回404未找到的HTTP響應return ResponseEntity.notFound().build();} /*** 下載文件** @param filename*/@Overridepublic Resource downloadFile(String filename) {// 構建文件路徑String filePath = "bxg-health-backend\\src\\main\\resources\\templates\\" + filename;File file = new File(filePath);// 檢查文件是否存在if (!file.exists()) {log.error("文件不存在:{}", filePath);}// 創建文件資源對象Resource resource = new FileSystemResource(file);return resource;}代碼解析:
我調用download方法將架構中template包下的文件名為filename的包返回給controller層,
這里之所以用filename是發現前端代碼中是提供了固定的文件名稱的。我就把這個文件名稱傳下來用于文件獲取。其實挺好的,需要更改不同的文件只需要修改前端代碼就好了。只要文件都在template包下。
然后對文件構建了http響應。來讓用戶可以從網頁獲取我服務端的指定文件。
3. 編寫excel上傳接口,上傳excel文件,并將excel數據保存到MySQL
/*** 上傳文件設置預約人數* @param excelFile* @return*/@PostMapping("/upload")public Result uploadFile(MultipartFile excelFile){log.info("上傳文件中...");orderSettingService.uploadFileAndUpdate(excelFile);return new Result(true,MessageConstant.UPLOAD_SUCCESS);}/*** 上傳文件并更新預約設置*/@Overridepublic void uploadFileAndUpdate(MultipartFile excelFile) {try {// 使用EasyExcel讀取文件EasyExcel.read(excelFile.getInputStream(), null,new OrderSettingExcelListener(this)).sheet().doRead();} catch (IOException e) {throw new RuntimeException("上傳文件讀取失敗", e);}}package com.itheima.common;import com.alibaba.excel.context.AnalysisContext;
import com.alibaba.excel.event.AnalysisEventListener;
import com.itheima.pojo.OrderSetting;
import com.itheima.service.OrderSettingService;
import org.slf4j.Logger;
import org.slf4j.LoggerFactory;import java.text.ParseException;
import java.text.SimpleDateFormat;
import java.util.ArrayList;
import java.util.Date;
import java.util.List;
import java.util.Map;/*** Excel讀取監聽器,用于處理預約設置數據*/
public class OrderSettingExcelListener extends AnalysisEventListener<Map<Integer, String>> {private static final Logger log = LoggerFactory.getLogger(OrderSettingExcelListener.class);private static final int BATCH_SIZE = 20; // 每批處理的數據量private final OrderSettingService orderSettingService;private List<OrderSetting> orderSettings = new ArrayList<>();private SimpleDateFormat dateFormat = new SimpleDateFormat("yyyy-MM-dd");public OrderSettingExcelListener(OrderSettingService orderSettingService) {this.orderSettingService = orderSettingService;}/*** 逐行讀取Excel內容*/@Overridepublic void invoke(Map<Integer, String> data, AnalysisContext context) {// 跳過表頭行if (context.readRowHolder().getRowIndex() == 0) {return;}try {// 解析Excel行數據String orderDateStr = data.get(0);String numberStr = data.get(1);if (orderDateStr == null || numberStr == null) {log.warn("無效的Excel行數據,跳過: {}", data);return;}// 轉換日期格式Date orderDate = dateFormat.parse(orderDateStr);int number = Integer.parseInt(numberStr);// 創建OrderSetting對象OrderSetting orderSetting = new OrderSetting();orderSetting.setOrderDate(orderDate);orderSetting.setNumber(number);orderSettings.add(orderSetting);// 達到批處理數量時執行入庫if (orderSettings.size() >= BATCH_SIZE) {saveData();}} catch (ParseException e) {log.error("日期解析錯誤: {}", data, e);} catch (NumberFormatException e) {log.error("數量格式錯誤: {}", data, e);} catch (Exception e) {log.error("處理Excel行時發生未知錯誤: {}", data, e);}}/*** 所有數據解析完成后調用*/@Overridepublic void doAfterAllAnalysed(AnalysisContext context) {// 處理剩余數據saveData();log.info("Excel文件解析完成,共處理 {} 條數據", orderSettings.size());}/*** 保存數據到數據庫*/private void saveData() {if (!orderSettings.isEmpty()) {try {orderSettingService.addBatch(orderSettings);log.info("批量插入 {} 條預約設置數據", orderSettings.size());orderSettings.clear(); // 清空集合} catch (Exception e) {log.error("批量插入預約設置數據失敗", e);// 可添加失敗重試邏輯或事務回滾邏輯}}}
}代碼邏輯:
創建文件上傳的接口,在實現類中調用監聽器來實現讀取和保存。監聽器中方法是仿照其他人書寫的easyexcel監聽器來寫的。作用分別是逐行讀取,整理數據內容并保存數據。
/*** 批量添加預約設置*/@Overridepublic void addBatch(List<OrderSetting> orderSettings) {if (orderSettings == null || orderSettings.isEmpty()) {return;}// 優化批量插入性能// 這里采用分批處理,避免一次性處理過多數據導致內存問題// 先檢查日期是否已存在Map<String, Object> paramMap = new HashMap<>();List<Date> dates = new ArrayList<>();for (OrderSetting os : orderSettings) {dates.add(os.getOrderDate());}paramMap.put("dates", dates);// 查詢已存在的日期List<Date> existDates = orderSettingMapper.findOrderDateByDates(paramMap);// 分離需要插入和更新的數據List<OrderSetting> insertList = new ArrayList<>();List<OrderSetting> updateList = new ArrayList<>();for (OrderSetting os : orderSettings) {if (existDates.contains(os.getOrderDate())) {updateList.add(os);} else {insertList.add(os);}}// 執行批量插入和更新if (!insertList.isEmpty()) {orderSettingMapper.addBatch(insertList);}if (!updateList.isEmpty()) {orderSettingMapper.updateBatch(updateList);}}在添加數據的方法中我做了數據判斷,根據時間?將數據分為存在相同時間的數據和新數據。
存在相同時間的數據執行更新操作,新數據執行插入操作。防止同一時間存在多個數據導致的bug。
    <!-- 批量添加預約設置 --><insert id="addBatch">INSERT INTO t_ordersetting (orderDate, number, reservations)VALUES<foreach collection="list" item="item" separator=",">(#{item.orderDate}, #{item.number}, 0)</foreach></insert><!--  批量更新預約設置<update id="updateBatch"><foreach collection="list" item="item" separator=";">UPDATE t_ordersettingSET number = #{item.number}WHERE orderDate = #{item.orderDate}</foreach></update>--><!--MyBatis 會自動為每個 item 執行一次 UPDATE,雖然性能略差,但兼容性和安全性更高。--><!--<update id="updateBatch"><foreach collection="list" item="item">UPDATE t_ordersettingSET number = #{item.number}WHERE orderDate = #{item.orderDate}</foreach></update>--><!--究極解決方法,,,,,不太懂--><update id="updateBatch">UPDATE t_ordersetting<trim prefix="SET number = CASE orderDate" suffix="END"><foreach collection="list" item="item">WHEN #{item.orderDate} THEN #{item.number}</foreach></trim>WHERE orderDate IN<foreach collection="list" item="item" open="(" separator="," close=")">#{item.orderDate}</foreach></update>
</mapper>
?由于我的操作,我就需要自己寫批量新增的sql,自己沒寫明白,ai教的。
4. 編寫設置每天可預約人數功能接口
/**** 編輯預約設置* @param orderSettingDTO* @return*/@PostMapping("/editNumberByOrderDate")public Result editNumberByOrderDate(@RequestBody OrderSettingDTO orderSettingDTO) {log.info("編輯預約設置:{}", orderSettingDTO);try {orderSettingService.editNumberByOrderDate(orderSettingDTO);} catch (Exception e) {return new Result(false, MessageConstant.ORDERSETTING_FAIL);}return new Result(true, MessageConstant.ORDERSETTING_SUCCESS);}/*** 根據預約日期修改預約人數** @param orderSettingDTO*/@Overridepublic void editNumberByOrderDate(OrderSettingDTO orderSettingDTO) {OrderSetting orderSetting = new OrderSetting();BeanUtils.copyProperties(orderSettingDTO, orderSetting);//把orderSetting中的日期格式化成yyyy-MM-ddSimpleDateFormat sdf = new SimpleDateFormat("yyyy-MM-dd");String formattedDate = sdf.format(orderSetting.getOrderDate());try {//sdf.parse(formattedDate)//把格式化后的日期字符串(格式為yyyy-MM-dd)轉回java.util.Date對象。//new java.sql.Date(...)//借助時間戳創建java.sql.Date對象。這里使用的java.sql.Date是專門為 SQL 日期字段設計的,它只包含年月日信息,不包含時分秒。orderSetting.setOrderDate(new java.sql.Date(sdf.parse(formattedDate).getTime()));} catch (ParseException e) {log.info("日期格式化失敗");}orderSettingMapper.editNumberByOrderDate(orderSetting);}這段代碼中修改時間的那段感覺有些多余,不過留著也不出錯。
因為接口文檔中的時間就是yyyy-mm-dd的格式,其次我在dto中也規定了時間格式
@DateTimeFormat(pattern = "yyyy-MM-dd")private Date orderDate;//預約設置日期
5. 編寫預約設置列表查詢接口
/**** @param month* @return*/@GetMapping("/getOrderSettingByMonth")public Result getOrderSettingByMonth(String month) {log.info("根據月份獲取預約設置數據:{}", month);if (month.split("-").length == 2 && month.split("-")[1].length() == 1) {month = month.split("-")[0] + "-0" + month.split("-")[1];}List<OrderSettingVO> orderLists = orderSettingService.getOrderSettingByMonth(month);return new Result(true, MessageConstant.GET_ORDERSETTING_SUCCESS, orderLists);}/*** 根據月份獲取預約設置數據** @param month* @return*/@Overridepublic List<OrderSettingVO> getOrderSettingByMonth(String month) {log.info("根據月份獲取預約設置數據:{}", month);List<OrderSettingVO> orderLists = orderSettingMapper.getOrderSettingByMonth(month);return orderLists;}/*** 根據月份查詢預約設置* @param month* @return*/@Select("select day(orderDate) as date,number,reservations from t_ordersetting where DATE_FORMAT(orderDate, '%Y-%m') = #{month}")List<OrderSettingVO> getOrderSettingByMonth(String month);/*** 根據月份查詢預約設置* @param month* @return*/@Select("select day(orderDate) as date,number,reservations from t_ordersetting where DATE_FORMAT(orderDate, '%Y-%m') = #{month}")List<OrderSettingVO> getOrderSettingByMonth(String month);由于接口文檔中接收到的數據是個月份,就根據這個月份做了一系列的時間判斷,搞得人頭大,還好管用。
這個方法接收一個形如?yyyy-MM?的月份參數(例如:2023-6?或?2023-06),然后:
- 格式檢查:驗證月份是否為?
yyyy-M?格式(即月份部分只有 1 位數字)。 - 格式轉換:將?
yyyy-M?格式轉換為?yyyy-MM?格式(補零)。 - 業務處理:調用?
orderSettingService.getOrderSettingByMonth()?獲取該月的預約設置數據。
- 分割字符串:使用?
-?分割月份參數,例如:2023-6?→?["2023", "6"]2023-06?→?["2023", "06"]
- 條件判斷:
month.split("-").length == 2:確保參數是?yyyy-M?或?yyyy-MM?格式。month.split("-")[1].length() == 1:檢查月份部分是否只有 1 位數字(如?6)。
- 格式轉換:
- 如果是?
2023-6,則轉換為?2023-06。 - 如果已經是?
2023-06,則保持不變。
- 如果是?
最后的sql語法解析:
- 字段選擇:
day(orderDate) as date:提取日期中的 "日" 部分(如 1-31),并重命名為date。number:可預約的最大數量。reservations:已預約的數量。
- 表名:
t_ordersetting(存儲預約設置的表)。 - 條件過濾:
DATE_FORMAT(orderDate, '%Y-%m') = #{month}:將日期格式化為YYYY-MM格式后,與傳入的month參數進行比較。例如:2023-06。
這樣預約管理的代碼就算搞定了。
需要學習的知識:阿里云短信?
第六天:
基本內容如下:
1. 編寫套餐列表查詢,不需要分頁。
【注意】:頁面原型有根據性別查詢,實戰中不用。直接查詢所有列表即可
2. 根據套餐id查詢套餐詳情接口。
【注意】:(在套餐詳情頁面需要展示當前套餐的信息(包括圖片、套餐名稱、套餐介紹、適用性別、適用年齡)、此套餐包含的檢查組信息、檢查組包含的檢查項信息等。)
難點:多表聯查:?MyBatis學習之多表操作_mybatis多表-CSDN博客
代碼實現如下:
這一段就是移動端的代碼開發了。
@RestController
@RequestMapping("/setmeal")
@Slf4j
public class SetmealController {@Autowiredprivate SetmealService setmealService;/*** 查詢所有套餐* @return*/@RequestMapping("/getSetmeal")public Result findAll(){log.info("查詢所有套餐");List<Setmeal> setmeals =setmealService.findAll();return new Result(true, MessageConstant.QUERY_SETMEAL_SUCCESS,setmeals);}/*** 根據套餐id查詢套餐詳情* @param id* @return*/@PostMapping("/findById")public Result findById(Integer id){log.info("查詢套餐詳情");Setmeal setmeal = setmealService.findById(id);return new Result(true,MessageConstant.QUERY_SETMEAL_SUCCESS,setmeal);}
}
<!-- 配置映射關系--><resultMap id="SetmealResultMap" type="com.itheima.pojo.Setmeal"><id property="id" column="setmeal_id"/><result property="name" column="setmeal_name"/><result property="code" column="setmeal_code"/><result property="helpCode" column="setmeal_helpCode"/><result property="sex" column="setmeal_sex"/><result property="age" column="setmeal_age"/><result property="price" column="setmeal_price"/><result property="remark" column="setmeal_remark"/><result property="attention" column="setmeal_attention"/><result property="img" column="setmeal_img"/><collection property="checkGroups" ofType="com.itheima.pojo.CheckGroup" resultMap="CheckGroupResultMap"></collection></resultMap><resultMap id="CheckGroupResultMap" type="com.itheima.pojo.CheckGroup"><id property="id" column="checkgroup_id"/><result property="code" column="checkgroup_code"/><result property="name" column="checkgroup_name"/><result property="helpCode" column="checkgroup_helpCode"/><result property="sex" column="checkgroup_sex"/><result property="remark" column="checkgroup_remark"/><result property="attention" column="checkgroup_attention"/><collection property="checkItems" ofType="com.itheima.pojo.CheckItem" resultMap="CheckItemResultMap"></collection></resultMap><resultMap id="CheckItemResultMap" type="com.itheima.pojo.CheckItem"><id property="id" column="checkitem_id"/><result property="code" column="checkitem_code"/><result property="name" column="checkitem_name"/><result property="sex" column="checkitem_sex"/><result property="age" column="checkitem_age"/><result property="price" column="checkitem_price"/><result property="type" column="checkitem_type"/><result property="remark" column="checkitem_remark"/><result property="attention" column="checkitem_attention"/></resultMap><select id="findById" resultMap="SetmealResultMap">select sm.id AS setmeal_id,sm.name AS setmeal_name,sm.code AS setmeal_code,sm.helpCode AS setmeal_helpCode,sm.sex AS setmeal_sex,sm.age AS setmeal_age,sm.price AS setmeal_price,sm.remark AS setmeal_remark,sm.attention AS setmeal_attention,sm.img AS setmeal_img,cg.id AS checkgroup_id,cg.code AS checkgroup_code,cg.name AS checkgroup_name,cg.helpCode AS checkgroup_helpCode,cg.sex AS checkgroup_sex,cg.remark AS checkgroup_remark,cg.attention AS checkgroup_attention,ci.id AS checkitem_id,ci.code AS checkitem_code,ci.name AS checkitem_name,ci.sex AS checkitem_sex,ci.age AS checkitem_age,ci.price AS checkitem_price,ci.type AS checkitem_type,ci.remark AS checkitem_remark,ci.attention AS checkitem_attentionFROM t_setmeal smLEFT JOINt_setmeal_checkgroup smcg ON sm.id = smcg.setmeal_idLEFT JOINt_checkgroup cg ON smcg.checkgroup_id = cg.idLEFT JOINt_checkgroup_checkitem cgci ON cg.id = cgci.checkgroup_idLEFT JOINt_checkitem ci ON cgci.checkitem_id = ci.idWHERE sm.id = #{id};</select>這一段是給我寫吐了,大體代碼思路是三張表分別指定查詢字段和別名。然后用collection標簽關聯。套餐關聯檢查組,檢查組關聯檢查項。然后查詢字段中:se是套餐表別名,cg是檢查組表別名,ci是檢查項表別名。再用五個表(三個表+兩個中間表)左外連連連,實現的多表聯查。
除了這個查詢惡心其他到沒啥問題。
3.編寫用戶預約功能。
思路如下:
1. 驗證碼保存到redis,保存5分鐘,超時自動刪除。
首先,阿里云短信需要公司資質,俺沒這個條件。就隨機生成隨機數當驗證碼存儲redis替代啦。
?隨機生成驗證碼如下:
/*** 隨機生成驗證碼工具類*/
public class ValidateCodeUtils {public static final Integer CODE_NUMBER = 4;/*** 隨機生成驗證碼* @param length 長度為4位或者6位* @return*/public static Integer generateValidateCode(int length){Integer code =null;if(length == 4){code = new Random().nextInt(9999);//生成隨機數,最大為9999if(code < 1000){code = code + 1000;//保證隨機數為4位數字}}else if(length == 6){code = new Random().nextInt(999999);//生成隨機數,最大為999999if(code < 100000){code = code + 100000;//保證隨機數為6位數字}}else{throw new RuntimeException("只能生成4位或6位數字驗證碼");}return code;}/*** 隨機生成指定長度字符串驗證碼* @param length 長度* @return*/public static String generateValidateCode4String(int length){Random rdm = new Random();String hash1 = Integer.toHexString(rdm.nextInt());String capstr = hash1.substring(0, length);return capstr;}
}
實現類中將驗證碼存入redis中,并且配置有效時間。
/*** 發送驗證碼* @param telephone* @return*/@Overridepublic String getCode(String telephone) {//引用工具類中定義好的常量作為length,來生成對應位數的驗證碼String code = ValidateCodeUtils.generateValidateCode4String(ValidateCodeUtils.CODE_NUMBER);log.info("{}的驗證碼為:{}",telephone,code);//將驗證碼通過 redisTemplate.opsForValue().set() 存入 Redis,并設置過期時間為 5 分鐘。redisTemplate.opsForValue().set(telephone, code,5, TimeUnit.MINUTES);return code;}2.?校驗用戶輸入的驗證碼是否正確。
3. 預約日期的預約人數沒有設置的話不能預約。
4.?預約日期是否已經約滿,如果已經約滿則無法預約。
5. 不能重復預約(同一個用戶在同一天預約了同一個套餐)。
6.?當前用戶不是會員,需要自動完成注冊。?
7.?更新已預約人數
上述功能判斷就寫在一起咯,發現常量類中還有很多沒用到但是可以用的常量,所以這里干脆用上:
/*** 提交預約* @return*/@RequestMapping("/submitOrder")public Result submitOrder(@RequestBody OrderDTO orderDTO) {log.info("提交預約:{}", orderDTO);Integer submitInfo=orderService.submitOrder(orderDTO);if (submitInfo == -1) {return new Result(false, MessageConstant.SELECTED_DATE_CANNOT_ORDER);}else if (submitInfo == -2){return new Result(false, MessageConstant.ORDER_FULL);}else if (submitInfo == -3){return new Result(false, MessageConstant.NOT_MEMBER);}else if (submitInfo == -4){return new Result(false, MessageConstant.HAS_ORDERED);}else if (submitInfo == -5){return new Result(false, MessageConstant.VALIDATECODE_ERROR);}else if (submitInfo > 0){return new Result(true, MessageConstant.ORDER_SUCCESS, submitInfo);}return new Result(false, MessageConstant.QUERY_ORDER_FAIL);}
@Autowiredprivate OrderSettingMapper orderSettingMapper;@Autowiredprivate OrderMapper orderMapper;@Autowiredprivate MemberMapper memberMapper;@Overridepublic Integer submitOrder(OrderDTO orderDTO) {//拷貝dto屬性到pojo類中Order order = new Order();BeanUtils.copyProperties(orderDTO, order);Member member = new Member();BeanUtils.copyProperties(orderDTO, member);//因為手機號碼變量名不一樣,重新賦值member.setPhoneNumber(orderDTO.getTelephone());String redisValidateCode = redisTemplate.opsForValue().get(orderDTO.getTelephone());if (redisValidateCode != null && Objects.equals(redisValidateCode,orderDTO.getValidateCode())) {//驗證碼正確//查詢是否設置預約人數Integer number = orderSettingMapper.getOrderSettingByOrderDate(order.getOrderDate());if (number == null || number == 0) {return -1;}//判斷是否已經約滿Integer reservationsByOrderDate = orderSettingMapper.getReservationsByOrderDate(order.getOrderDate());if (number <= reservationsByOrderDate) {return -2;}//判斷是否是會員Integer memberId = memberMapper.getRemberIdByUserPhoneNumber(member.getPhoneNumber());if (memberId == null) {return -3;}//不能重復預約(同一個用戶在同一天預約了同一個套餐)Order orderInfo = orderMapper.findByMemberIdAndOrderDateAndSetmealId(memberId, order.getOrderDate(), order.getSetmealId());//判斷是否已經預約if (orderInfo != null) {return -4;}//預約成功,添加預約信息order.setOrderStatus(Order.ORDERSTATUS_NO);order.setOrderType(Order.ORDERTYPE_WEIXIN);order.setMemberId(memberId);orderMapper.add(order);//設置預約人數reservationsByOrderDate=reservationsByOrderDate+1;orderSettingMapper.setReservationsByOrderDate(reservationsByOrderDate,order.getOrderDate());return order.getId();} else {//驗證碼錯誤return -5;}}
還有個根據id查詢預約數據,沒什么好講的就不打出來了。
//查詢是否設置了預約人數@Select("select number from t_ordersetting where DATE_FORMAT(orderDate, '%Y-%m-%d') = DATE_FORMAT(#{orderDate}, '%Y-%m-%d')")Integer getOrderSettingByOrderDate(Date orderDate);//查詢預約人數@Select("select reservations from t_ordersetting where DATE_FORMAT(orderDate, '%Y-%m-%d') = DATE_FORMAT(#{orderDate}, '%Y-%m-%d')")Integer getReservationsByOrderDate(Date orderDate);//預約人數+1@Update("update t_ordersetting set reservations = #{reservationsByOrderDate} where DATE_FORMAT(orderDate, '%Y-%m-%d') = DATE_FORMAT(#{orderDate}, '%Y-%m-%d')")void setReservationsByOrderDate(Integer reservationsByOrderDate, Date orderDate);
功能到此完成!
需要學習知識:強化springsecurity
第七天:
基本內容如下:
1.實現用戶端的手機號驗證碼登錄功能:
代碼實現如下:
/*** 登錄* @param telephone* @param validateCode* @return*/@PostMapping("/login")public Result login(String telephone, String validateCode) {log.info("{}輸入的驗證碼為:{}",telephone,validateCode);String loginInfo = memberService.login(telephone, validateCode);return new Result(true, loginInfo);} /*** 實現登錄功能* @param telephone* @param validateCode*/public String login(String telephone, String validateCode) {//獲取redis中的驗證碼String redisValidateCode = redisTemplate.opsForValue().get(telephone);if (redisValidateCode != null && Objects.equals(redisValidateCode, validateCode)) {//驗證碼正確//判斷是否是會員Integer memberId = memberMapper.getRemberIdByUserPhoneNumber(telephone);if (memberId == null) {//不是會員,添加會員LocalDate registerTime = LocalDate.now();memberMapper.add(registerTime, telephone);}} else {//驗證碼錯誤return MessageConstant.VALIDATECODE_ERROR;}return MessageConstant.LOGIN_SUCCESS;}}用的還是自己瞎搞的隨機生成驗證碼。讓登錄接口也調用那個方法做驗證碼判斷。多加了一個點是判斷是否是會員,如過不是會員則自動添加會員。如果有這個點的話我昨日寫的判斷是否預約成功的代碼就要改了。不需要判斷是否是會員了。
2.完成管理端用戶登陸和授權的功能。
@Service
public class SpringSecurityUserService implements UserDetailsService {//查找服務,實現查詢數據庫@Autowiredprivate UserService userService;//根據用戶名查詢數據庫中用戶信息@Overridepublic UserDetails loadUserByUsername(String username) throws UsernameNotFoundException {// 從數據庫中查詢用戶User user = userService.loadUserByUsername(username);if (user == null) {throw new UsernameNotFoundException("用戶不存在!");}// 查詢用戶的角色List<Role> roles = userService.loadRolesByUserId(user.getId());// 把角色轉換成數組//String[] roleCodes = roles.stream().map(Role::getKeyword).collect(Collectors.toList()).toArray(new String[]{});List<String> keywordList = new ArrayList<>();for (Role role : roles) {keywordList.add(role.getKeyword());}String[] roleCodes = keywordList.toArray(new String[0]);List<GrantedAuthority> authorityList = AuthorityUtils.createAuthorityList(roleCodes);// 設置用戶的權限user.setAuthorities(authorityList);return new CustomUserDetails(user);}
}
/*** Security配置類*/@Configuration
public class SecurityConfiguration extends WebSecurityConfigurerAdapter {/*** http請求處理方法** @param http* @throws Exception*/@Overrideprotected void configure(HttpSecurity http) throws Exception {http.formLogin()// 開啟表單認證.loginPage("/backend/login.html")// 自定義登錄頁面.loginProcessingUrl("/login")// 登錄處理Url.usernameParameter("username").passwordParameter("password")// 修改自定義表單name值..defaultSuccessUrl("/backend/pages/main.html")// 登錄成功后跳轉路徑.and().authorizeRequests().antMatchers("/backend/login.html").permitAll().anyRequest().authenticated(); //所有請求都需要登錄認證才能訪問;// 關閉csrf防護http.csrf().disable();// 允許iframe加載頁面http.headers().frameOptions().sameOrigin();}@Overridepublic void configure(WebSecurity web) throws Exception {web.ignoring().antMatchers("/backend/css/**", "/backend/img/**","/backend/js/**", "/backend/plugins/**", "/favicon.ico");}@Autowiredprivate SpringSecurityUserService userService;@Beanprotected PasswordEncoder myPasswordEncoder(){return new BCryptPasswordEncoder();}@Overrideprotected void configure(AuthenticationManagerBuilder auth) throws Exception {auth.userDetailsService(userService).passwordEncoder(myPasswordEncoder());}
}?代碼解析拆解如下:
1. 創建SpringSecurityUserService類實現UserDetailsService
@Service
public class SpringSecurityUserService implements UserDetailsService {//查找服務,實現查詢數據庫@Autowiredprivate UserService userService;
2. 重寫 public UserDetails loadUserByUsername(String username)方法
@Overridepublic UserDetails loadUserByUsername(String username) throws UsernameNotFoundException {
3. 調用用戶服務獲取用戶信息
// 從數據庫中查詢用戶User user = userService.loadUserByUsername(username);if (user == null) {throw new UsernameNotFoundException("用戶不存在!");}
4. 查詢當前用戶對應的角色和權限
// 查詢用戶的角色List<Role> roles = userService.loadRolesByUserId(user.getId());// 把角色轉換成數組//String[] roleCodes = roles.stream().map(Role::getKeyword).collect(Collectors.toList()).toArray(new String[]{});List<String> keywordList = new ArrayList<>();for (Role role : roles) {keywordList.add(role.getKeyword());}String[] roleCodes = keywordList.toArray(new String[0]);List<GrantedAuthority> authorityList = AuthorityUtils.createAuthorityList(roleCodes);// 設置用戶的權限user.setAuthorities(authorityList);5. 封裝當前用戶的角色和權限
return new CustomUserDetails(user);
6. 返回帶用戶名,密碼,權限列表的user對象User(username,user.getPassword(),list)
根據前端需求定義了這個類:
public class CustomUserDetails implements UserDetails {private User user;public User getUser() {return user;}public CustomUserDetails(User user) {this.user = user;}@Overridepublic Collection<? extends GrantedAuthority> getAuthorities() {return user.getAuthorities();}@Overridepublic String getPassword() {return user.getPassword();}@Overridepublic String getUsername() {return user.getUsername();}@Overridepublic boolean isAccountNonExpired() {return true;}@Overridepublic boolean isAccountNonLocked() {return true;}@Overridepublic boolean isCredentialsNonExpired() {return true;}@Overridepublic boolean isEnabled() {return true;}
}
代碼開發完成
需要學習知識:學習一下Echarts
第八天:
基本內容如下:?
1.分析報表模塊的相關功能,并開始設計相關接口。
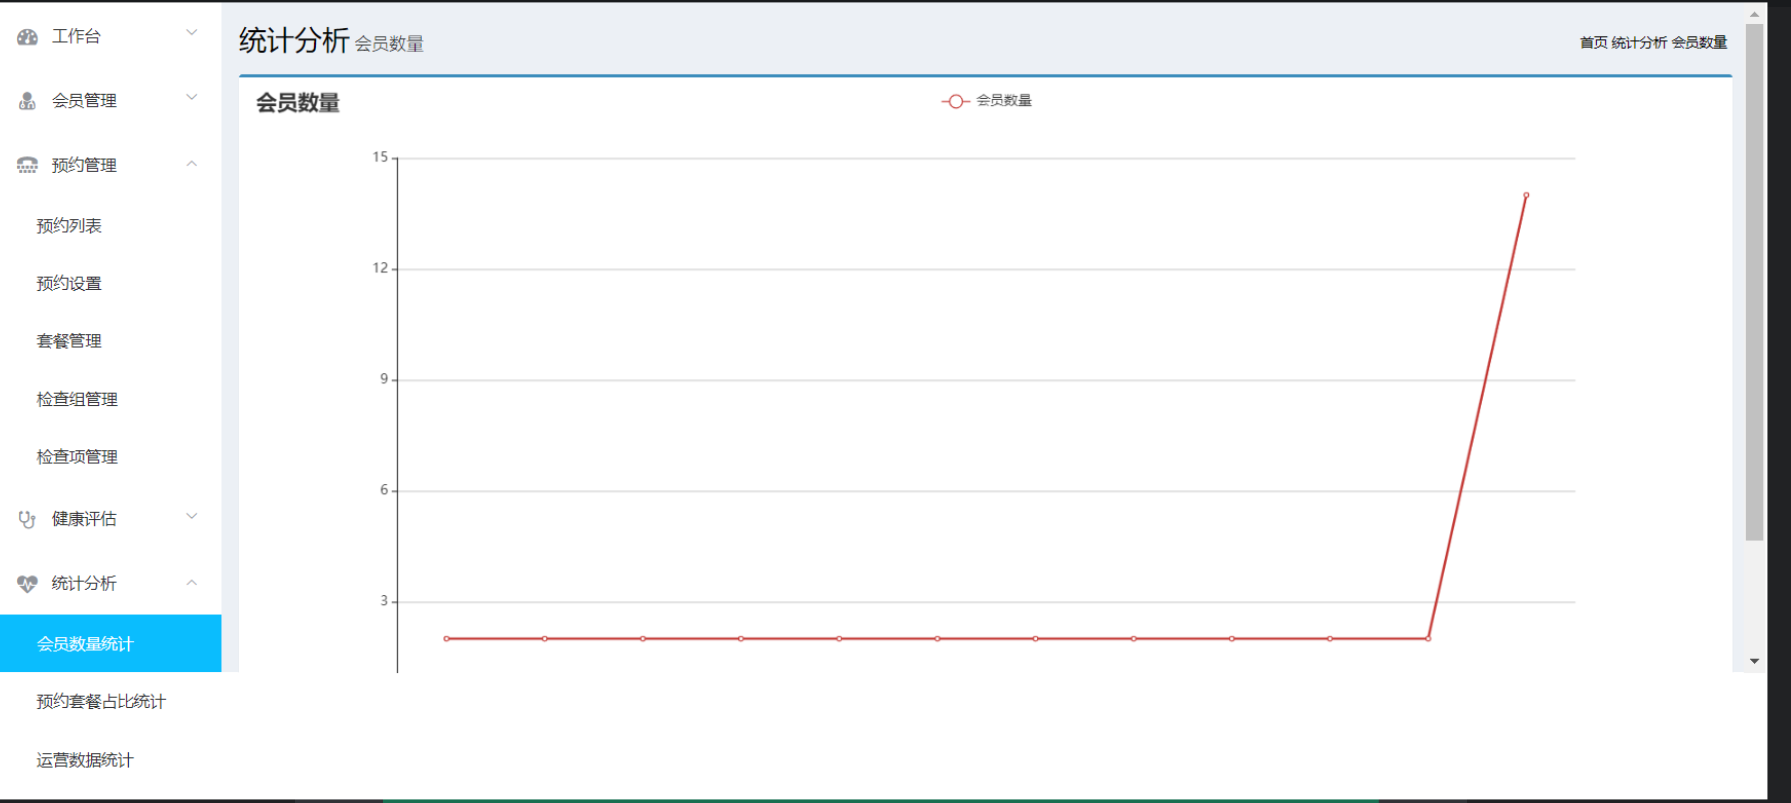
折線圖
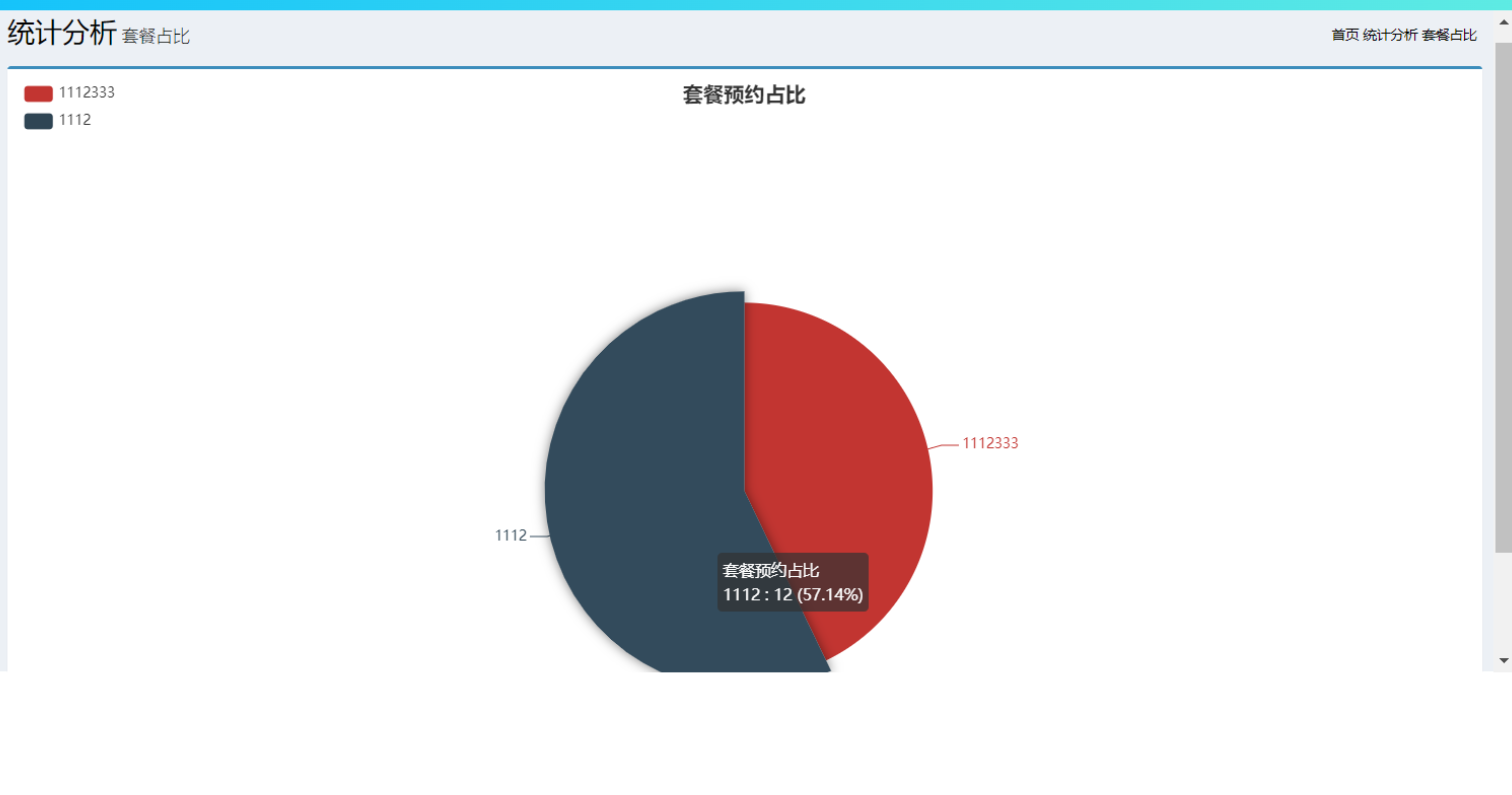
餅圖
?
各種統計數據。。。。。。。暈
?2. 編寫會員數量折線圖接口
1. 分析會員數量折線圖原型圖,確定數據格式
/*** 會員數量統計* @return*/@GetMapping("/getMemberReport")public Result getMemberReport() {log.info("會員數量統計...");MemberReportVO memberReportVO = reportService.getMemberReport();return new Result(true, MessageConstant.GET_MEMBER_NUMBER_REPORT_SUCCESS, memberReportVO);}/*** 會員數量統計* @return*/public MemberReportVO getMemberReport() {List<LocalDate> lastDays = new ArrayList<>();// 獲取當前日期LocalDate currentDate = LocalDate.now();for (int i = 0; i < 12; i++) {// 獲取當前月份的最后一天LocalDate lastDayOfMonth = currentDate.with(TemporalAdjusters.lastDayOfMonth());lastDays.add(lastDayOfMonth);// 往前推一個月currentDate = currentDate.minusMonths(1);}//統計每月的會員數量List<Integer> memberCounts = new ArrayList<>();for (LocalDate lastDay : lastDays) {// 獲取當前月份的最后一天LocalDate lastDayOfMonth = lastDay.with(TemporalAdjusters.lastDayOfMonth());// 獲取當前月份的第一天LocalDate firstDayOfMonth = lastDay.with(TemporalAdjusters.firstDayOfMonth());// 獲取當前月份的會員數量int memberCount = 0;try {memberCount = reportMapper.getMemberCountByDate(firstDayOfMonth, lastDayOfMonth);} catch (Exception e) {e.printStackTrace();}// 獲取當前月份的會員數量memberCounts.add(memberCount);}//轉行成數組String[] monthsArray = lastDays.stream().map(LocalDate::toString).toArray(String[]::new);String[] memberCountsArray = memberCounts.stream().map(String::valueOf).toArray(String[]::new);return MemberReportVO.builder().months(monthsArray).memberCounts(memberCountsArray).build();}這里面的vo全是自己爬前端代碼爬出來的。。自己設計要暈
3. 分析套餐預約占比餅形原型圖,確定數據格式
4. 編寫套餐預約占比餅形圖接口
/*** 套餐占比統計* @return*/@GetMapping("/getSetmealReport")public Result getSetmealReport(){log.info("套餐占比統計...");SetmealReportVO setmealReportVO = reportService.getSetmealReport();return new Result(true, MessageConstant.GET_SETMEAL_COUNT_REPORT_SUCCESS, setmealReportVO);}/*** 套餐數量統計* @return*/@Overridepublic SetmealReportVO getSetmealReport() {//獲取套餐namesList<String> setmealNames = reportMapper.getSetmealNames();List<SetmealCount> setmealCountsList = new ArrayList<>();for (String setmealName : setmealNames) {//獲取套餐的valueInteger setmealCount = reportMapper.getSetmealCountByName(setmealName);//封裝成SetmealCount對象SetmealCount setmealCounts = SetmealCount.builder().name(setmealName).value(setmealCount).build();//添加到集合中setmealCountsList.add(setmealCounts);}//轉換為數組String[] setmealNamesArray = setmealNames.toArray(new String[0]);SetmealCount[] setmealCountsArray = setmealCountsList.toArray(new SetmealCount[0]);return SetmealReportVO.builder().setmealNames(setmealNamesArray).setmealCounts(setmealCountsArray).build();}2.運營數據統計接口和數據導出功能。
1. 分析運營數據統計原型圖
2. 編寫運營數據統計接口
/*** 獲取運營數據* @return*/@GetMapping("/getBusinessReportData")public Result getBusinessReportData(){log.info("獲取運營數據...");BusinessReportVO businessReportVO = reportService.getBusinessReportData();return new Result(true, MessageConstant.GET_BUSINESS_REPORT_SUCCESS, businessReportVO);}/*** 運營數據統計* @return*/@Overridepublic BusinessReportVO getBusinessReportData() {//計算今日時間范圍LocalDate currentDate = LocalDate.now();LocalDateTime dayOfBeginTime = LocalDateTime.of(currentDate, LocalTime.MIN);LocalDateTime dayOfEndTime = LocalDateTime.of(currentDate, LocalTime.MAX);//計算本周時間范圍currentDate = currentDate.minusDays(currentDate.getDayOfWeek().getValue() - 1);LocalDate firstDayOfMonth = currentDate.with(TemporalAdjusters.firstDayOfMonth());LocalDateTime firstMonthsOfBeginTime = LocalDateTime.of(firstDayOfMonth, LocalTime.MIN);LocalDate lastDayOfMonth = currentDate.with(TemporalAdjusters.lastDayOfMonth());LocalDateTime lastMonthsOfEndTime = LocalDateTime.of(lastDayOfMonth, LocalTime.MAX);//計算本月時間范圍LocalDate firstDayOfWeek = currentDate.minusDays(currentDate.getDayOfWeek().getValue() - 1);LocalDateTime firstweeksOfBeginTime = LocalDateTime.of(firstDayOfWeek, LocalTime.MIN);LocalDate lastDayOfWeek = currentDate.plusDays(7 - currentDate.getDayOfWeek().getValue());LocalDateTime lastweeksOfEndTime = LocalDateTime.of(lastDayOfWeek, LocalTime.MAX);// 查詢今日訪問量Integer todayVisitsNumber = reportMapper.getVisitsNumberByDate(dayOfBeginTime, dayOfEndTime);// 查詢今日新增會員數Integer todayNewMember = reportMapper.getNewMemberCountByDate(dayOfBeginTime,dayOfEndTime);// 查詢本周訪問量Integer thisWeekVisitsNumber = reportMapper.getVisitsNumberByDate(firstweeksOfBeginTime,lastweeksOfEndTime);// 查詢本月新增會員數Integer thisMonthNewMember = reportMapper.getNewMemberCountByDate(firstMonthsOfBeginTime, lastMonthsOfEndTime);// 查詢本周新增會員數Integer thisWeekNewMember = reportMapper.getNewMemberCountByDate(firstweeksOfBeginTime, lastweeksOfEndTime);// 查詢總會員數Integer totalMember = reportMapper.getTotalMemberCount();// 查詢本月訂單數Integer thisMonthOrderNumber = reportMapper.getOrderNumberByDate(firstMonthsOfBeginTime, lastMonthsOfEndTime);// 查詢本月訪問量Integer thisMonthVisitsNumber = reportMapper.getVisitsNumberByDate(firstMonthsOfBeginTime, lastMonthsOfEndTime);// 查詢今日訂單數Integer todayOrderNumber = reportMapper.getOrderNumberByDate(dayOfBeginTime, dayOfEndTime);// 查詢本周訂單數Integer thisWeekOrderNumber = reportMapper.getOrderNumberByDate(firstweeksOfBeginTime, lastweeksOfEndTime);// 查詢熱門套餐List<HotSetmeal> hotSetmealList = reportMapper.getHotSetmeal();// 獲取所有的套餐總數Integer totalSetmealCount = reportMapper.getTotalSetmealCount();//計算每一種套餐的占比并賦值給proportionfor (HotSetmeal hotSetmeal : hotSetmealList) {// 計算占比,保留四位小數double proportion = (double) hotSetmeal.getSetmeal_count() / totalSetmealCount;// 格式化保留四位小數DecimalFormat df = new DecimalFormat("#0.0000");hotSetmeal.setProportion(Double.parseDouble(df.format(proportion)));}HotSetmeal[] hotSetmealArray = hotSetmealList.toArray(new HotSetmeal[0]);return BusinessReportVO.builder().todayVisitsNumber(todayVisitsNumber).reportDate(currentDate).todayNewMember(todayNewMember).thisWeekVisitsNumber(thisWeekVisitsNumber).hotSetmeal(hotSetmealArray).thisMonthNewMember(thisMonthNewMember).thisWeekNewMember(thisWeekNewMember).totalMember(totalMember).thisMonthOrderNumber(thisMonthOrderNumber).thisMonthVisitsNumber(thisMonthVisitsNumber).todayOrderNumber(todayOrderNumber).thisWeekOrderNumber(thisWeekOrderNumber).build();}
3. 跟據張楠提供的模板編寫運營數據統計導出功能
 /*** 導出PDF運營數據* @return*///TODO @PostMapping("/exportBusinessReport4PDF")@PostMapping("/exportBusinessReport4PDF")public Result exportBusinessReport4PDF(){log.info("導出PDF運營數據...");reportService.exportBusinessReport4PDF();return new Result(true, MessageConstant.GET_BUSINESS_REPORT_SUCCESS);}@Overridepublic void exportBusinessReport4PDF() {BusinessReportVO businessReportVo = getBusinessReportData();List<Map<String, Object>> dataList = new ArrayList<>();dataList.add(new HashMap<String, Object>() {{put("reportDate", businessReportVo.getReportDate());put("todayNewMember", businessReportVo.getTodayNewMember());put("totalMember", businessReportVo.getTotalMember());put("thisWeekNewMember", businessReportVo.getThisWeekNewMember());put("thisMonthNewMember", businessReportVo.getThisMonthNewMember());put("todayVisitsNumber", businessReportVo.getTodayVisitsNumber());put("thisWeekVisitsNumber", businessReportVo.getThisWeekVisitsNumber());put("thisMonthVisitsNumber", businessReportVo.getThisMonthVisitsNumber());put("todayOrderNumber", businessReportVo.getTodayOrderNumber());put("thisWeekOrderNumber", businessReportVo.getThisWeekOrderNumber());put("thisMonthOrderNumber", businessReportVo.getThisMonthOrderNumber());put("hotSetmeal", businessReportVo.getHotSetmeal());}});// 臨時Excel文件路徑String excelFilePath = "E:\\temp_report.xlsx";// 最終PDF文件路徑String pdfFilePath = "E:\\report_template.pdf";File templateFile = new File("bxg-health-backend\\src\\main\\resources\\templates\\report_template.xlsx");if (!templateFile.exists()) {throw new IllegalArgumentException("模板文件不存在: " + templateFile);}try {// 1. 先生成Excel文件try (ExcelWriter excelWriter = EasyExcel.write(excelFilePath).withTemplate(templateFile).build()) {WriteSheet writeSheet = EasyExcel.writerSheet(0).build();excelWriter.fill(dataList, writeSheet);}// 2. 將Excel轉換為PDFconvertExcelToPdf(excelFilePath, pdfFilePath);// 3. 刪除臨時Excel文件new File(excelFilePath).delete();} catch (Exception e) {log.error("導出PDF失敗", e);throw new RuntimeException("導出PDF失敗", e);}}/*** 將Excel文件轉換為PDF文件*/private void convertExcelToPdf(String excelPath, String pdfPath) throws Exception {// 加載Excel文件XSSFWorkbook workbook = new XSSFWorkbook(new FileInputStream(excelPath));// 創建PDF文檔PdfDocument pdfDoc = new PdfDocument(new PdfWriter(pdfPath));Document document = new Document(pdfDoc);// 遍歷Excel的每個sheetfor (int sheetIndex = 0; sheetIndex < workbook.getNumberOfSheets(); sheetIndex++) {XSSFSheet sheet = workbook.getSheetAt(sheetIndex);// 創建PDF表格int columnCount = getColumnCount(sheet);Table table = new Table(columnCount);// 遍歷Excel的每一行for (int rowIndex = 0; rowIndex <= sheet.getLastRowNum(); rowIndex++) {XSSFRow row = sheet.getRow(rowIndex);if (row == null) continue;// 遍歷Excel的每一列for (int colIndex = 0; colIndex < columnCount; colIndex++) {XSSFCell cell = row.getCell(colIndex);String cellValue = cell != null ? getCellValueAsString(cell) : "";// 添加單元格到PDF表格table.addCell(new Cell().add(new Paragraph(cellValue)));}}// 將表格添加到文檔document.add(table);// 如果不是最后一個sheet,添加分頁符if (sheetIndex < workbook.getNumberOfSheets() - 1) {document.add(new AreaBreak(AreaBreakType.NEXT_PAGE));}}// 關閉文檔document.close();workbook.close();}/*** 獲取Excel表格的列數*/private int getColumnCount(XSSFSheet sheet) {int maxColumnCount = 0;for (int i = 0; i <= sheet.getLastRowNum(); i++) {XSSFRow row = sheet.getRow(i);if (row != null && row.getLastCellNum() > maxColumnCount) {maxColumnCount = row.getLastCellNum();}}return maxColumnCount;}/*** 獲取單元格的值并轉換為字符串*/private String getCellValueAsString(XSSFCell cell) {switch (cell.getCellType()) {case STRING:return cell.getStringCellValue();case NUMERIC:if (DateUtil.isCellDateFormatted(cell)) {return cell.getDateCellValue().toString();} else {return String.valueOf(cell.getNumericCellValue());}case BOOLEAN:return String.valueOf(cell.getBooleanCellValue());case FORMULA:return cell.getCellFormula();default:return "";}}
}
?上圖的導入pdf是我自己用itextpdf搞的,原理就是先生成excel后轉成pdf
/*** 導出運營數據統計* @return*/@Overridepublic void exportBusinessReport() {BusinessReportVO businessReportVo = getBusinessReportData();List<Map<String, Object>> dataList = new ArrayList<>();dataList.add(new HashMap<String, Object>() {{put("reportDate", businessReportVo.getReportDate());put("todayNewMember", businessReportVo.getTodayNewMember());put("totalMember", businessReportVo.getTotalMember());put("thisWeekNewMember", businessReportVo.getThisWeekNewMember());put("thisMonthNewMember", businessReportVo.getThisMonthNewMember());put("todayVisitsNumber", businessReportVo.getTodayVisitsNumber());put("thisWeekVisitsNumber", businessReportVo.getThisWeekVisitsNumber());put("thisMonthVisitsNumber", businessReportVo.getThisMonthVisitsNumber());put("todayOrderNumber", businessReportVo.getTodayOrderNumber());put("thisWeekOrderNumber", businessReportVo.getThisWeekOrderNumber());put("thisMonthOrderNumber", businessReportVo.getThisMonthOrderNumber());put("hotSetmeal", businessReportVo.getHotSetmeal());}});int sheetNo = 0;File templateFile = new File("bxg-health-backend\\src\\main\\resources\\templates\\report_template.xlsx");String outputFilePath = "E:\\report_template.xlsx";if (!templateFile.exists()) {throw new IllegalArgumentException("模板文件不存在: " + templateFile);}try (ExcelWriter excelWriter = EasyExcel.write(outputFilePath).withTemplate(templateFile).build()) {WriteSheet writeSheet = EasyExcel.writerSheet(sheetNo).build();excelWriter.fill(dataList, writeSheet);}}代碼開發完成。
需要學習知識:
學習一下,并思考如何提升頁面的加載速度呢?
參考地址 :http://www.freemarker.net/
參考地址 :Freemarker學習指南-CSDN博客
第九天:
基本內容如下:
?用FreeMarker生成套餐列表和套餐詳情頁
1.修改套餐列表頁面為FreeMarker模板
2.修改套餐詳情頁面為FreeMarker模板
3. 編寫添加套餐的時候使用模板生成頁面的接口
(1)新增套餐,同時關聯檢查組
(2)完成數據庫操作后需要將圖片名稱保存到redis
(3) 新增套餐后需要重新生成靜態頁面
(4)新增套餐后需要重新生成靜態頁面
(5)生成套餐列表靜態頁面
(6)生成套餐詳情靜態頁面(多個)
框架中提供好了兩個模板,參考文檔準備好yml內的配置類,然后代碼如下補足:
//新增套餐,同時關聯檢查組public void add(Setmeal setmeal, Integer[] checkgroupIds) {//新增套餐,插入t_setmeal表,設置idSetmealMapper.add(setmeal);Integer setmealId = setmeal.getId();this.setSetmealAndCheckGroup(setmealId,checkgroupIds);//完成數據庫操作后需要將圖片名稱保存到redisString replaced = setmeal.getImg().replace("https://sky-incast-jiaxingyu.oss-cn-beijing.aliyuncs.com/", "");redisTemplate.opsForSet().add(RedisConstant.SETMEAL_PIC_DB_RESOURCES,replaced);//當添加套餐后需要重新生成靜態頁面(套餐列表頁面、套餐詳情頁面)generateMobileStaticHtml();}//生成當前方法所需的靜態頁面public void generateMobileStaticHtml(){//在生成靜態頁面之前需要查詢數據List<Setmeal> list =SetmealMapper.findAll();//需要生成套餐列表靜態頁面generateMobileSetmealListHtml(list);//需要生成套餐詳情靜態頁面generateMobileSetmealDetailHtml(list);}//生成套餐列表靜態頁面public void generateMobileSetmealListHtml(List<Setmeal> list){Map map = new HashMap();//為模板提供數據,用于生成靜態頁面map.put("setmealList",list);generteHtml("mobile_setmeal.ftl","m_setmeal.html",map);}//通用的方法,用于生成靜態頁面public void generteHtml(String templateName,String htmlPageName,Map map){Configuration configuration = freeMarkerConfigurer.getConfiguration();//獲得配置對象Writer out = null;try {Template template = configuration.getTemplate(templateName);//構造輸出流out = new FileWriter(new File(outPutPath + "/" + htmlPageName));//輸出文件template.process(map,out);out.close();} catch (Exception e) {e.printStackTrace();}}//生成套餐詳情靜態頁面(可能有多個)public void generateMobileSetmealDetailHtml(List<Setmeal> list) {for (Setmeal setmeal : list) {Map map = new HashMap();map.put("setmeal", SetmealMapper.findById4Detail(setmeal.getId()));generteHtml("mobile_setmeal_detail.ftl", "setmeal_detail_" + setmeal.getId() + ".html", map);}}//設置套餐和檢查組多對多關聯關系public void setSetmealAndCheckGroup(Integer setmealId,Integer[] checkgroupIds){if(checkgroupIds != null && checkgroupIds.length > 0){for (Integer checkgroupId : checkgroupIds) {Map<String,Integer> map = new HashMap<>();map.put("setmealId",setmealId);map.put("checkgroupId",checkgroupId);SetmealMapper.setSetmealAndCheckGroup(map);}}}
2.學習如何上線一個項目
部署常用的方式參考如下:如何在服務端部署SpringBoot項目_服務器部署springboot項目-CSDN博客
需要學習的知識:
如何寫項目總結:如何寫Java開發項目總結_java基礎項目總結從哪里寫-CSDN博客
參考案例:https://juejin.cn/post/6984755776543784968
第十天:
基本內容如下:
編寫項目總結:

完結撒花!
)


)

任意模態語義分割論文閱讀)


