?
簡述
最近接了畢業生的畢業設計題,想著幫幫忙,要使用機器視覺識別,追蹤和邏輯統計的方式來統計人流,要求是滿足下面特性
- 高精度:YOLOv8 提供高質量檢測,卡爾曼濾波平滑跟蹤。
- 高效率:兩者結合滿足實時性需求,優化后的代碼進一步提升性能。
- 穩定性:多目標跟蹤更可靠,適應復雜場景。
?
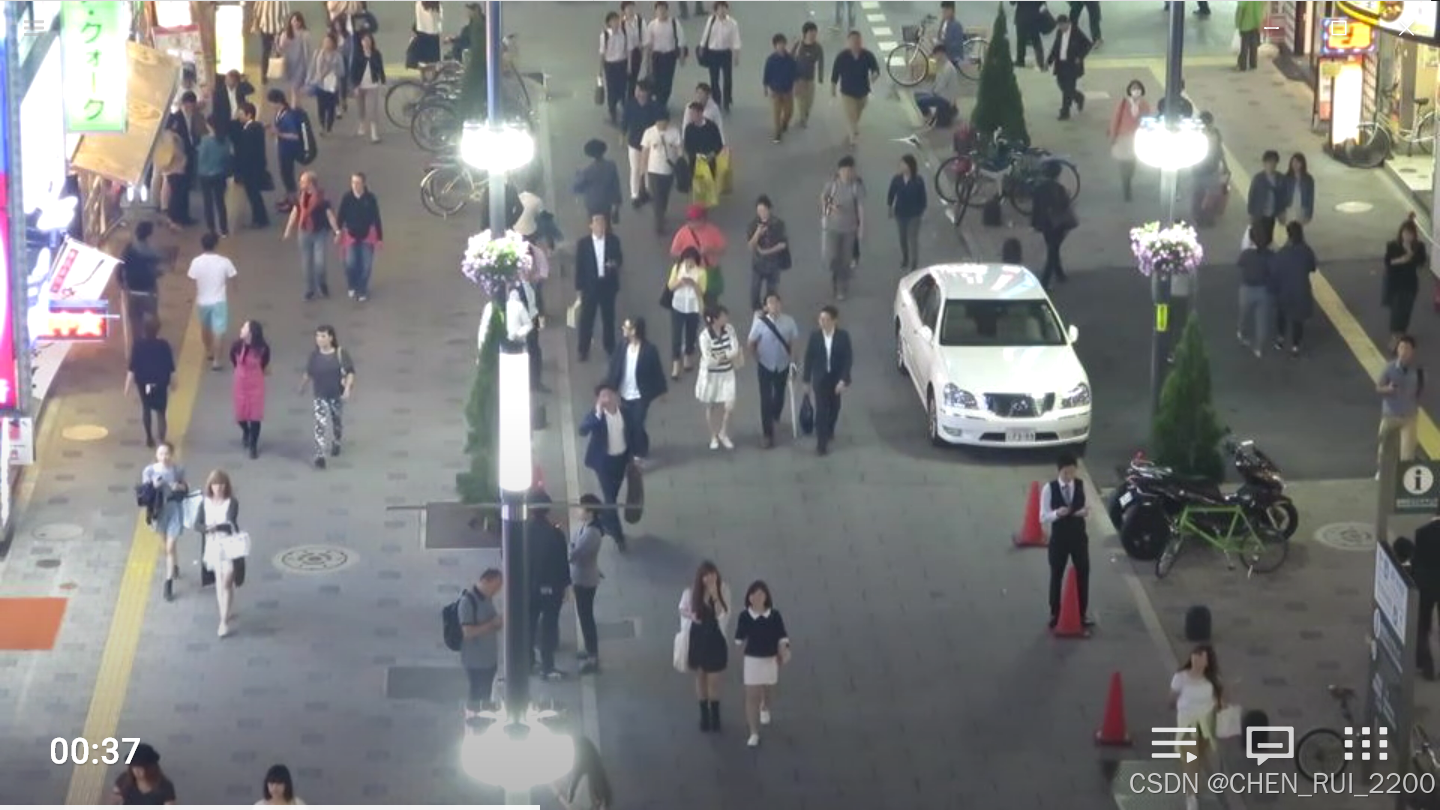
下面是一個步行街的mp4文件, 需要統計在視頻時間段內上行人流和下行人流量
我第一反應是拿出我畢業那會的做法改改,當時使用的YOLOv3 現在改用YOLOv8 是目前目標檢測領域最先進的模型之一,相較于 YOLOv3,它在精度(mAP)和速度上都有顯著提升,尤其是在小目標檢測和復雜場景下的表現。
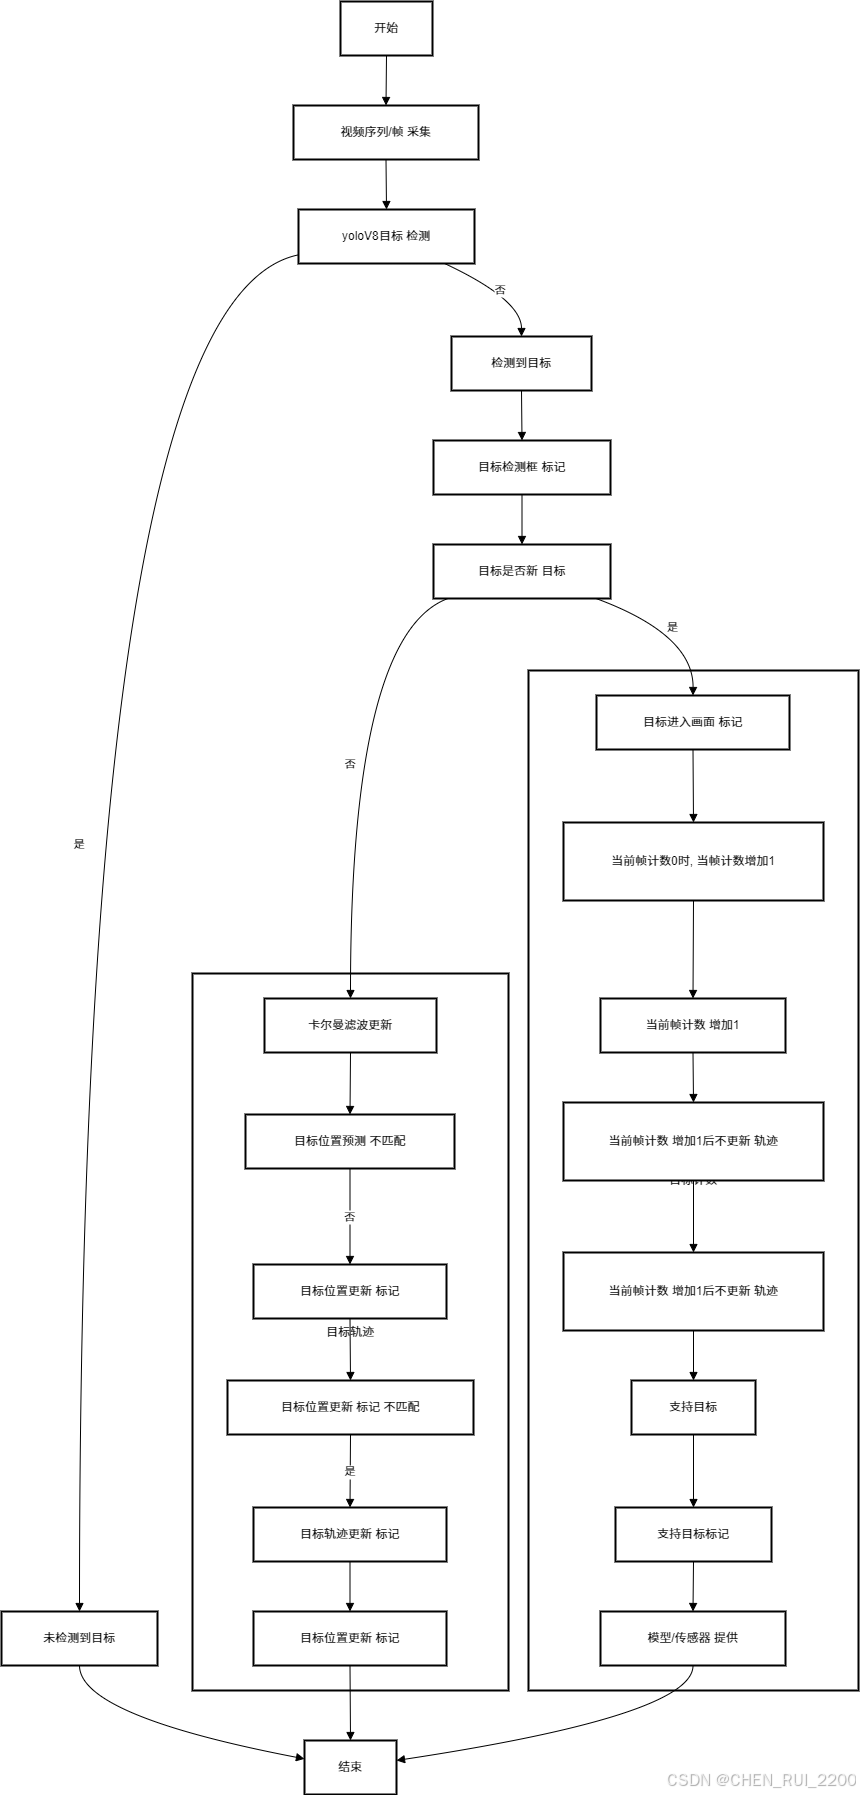
流程設計為:
- 使用yoloV8模型進行目標檢測
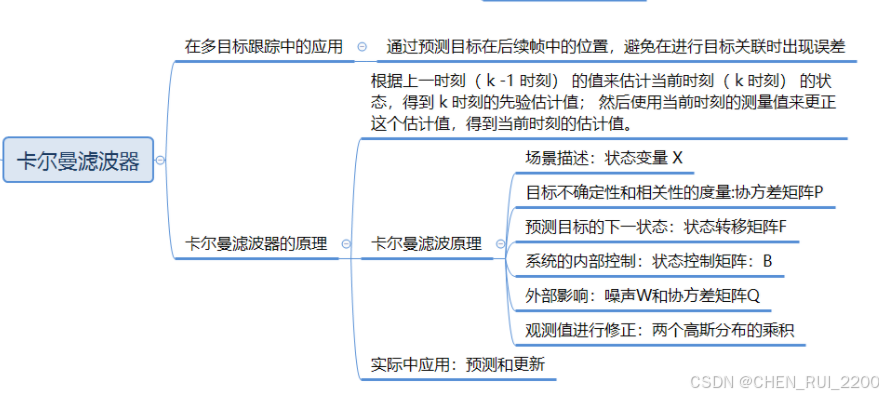
- 然后使用SORT算法進行目標追蹤,使用卡爾曼濾波器進行目標位置預測
- 再利用匈牙利算法對比目標的相似度,完成車標追蹤
YOLOv8 相較于 YOLOv3,它在精度(mAP)和速度上都有顯著提升,尤其是在小目標檢測和復雜場景下的表現。自帶強大的預訓練權重(基于 COCO 等數據集),對常見目標(如人、車)的檢測非常魯棒開箱即用。YOLOv8 提供高質量的檢測框輸入,減少了噪聲和誤檢,這為卡爾曼濾波器的狀態更新提供了更可靠的觀測數據。卡爾曼濾波器通過預測和平滑目標運動軌跡,可以彌補 YOLOv8 在某些幀中漏檢或檢測不穩定的情況,從而提高整體跟蹤的魯棒性。
卡爾曼濾波的狀態模型(位置、速度等)可以根據目標運動特性調整(如加入加速度模型)
SORT 是一種基于檢測的多目標跟蹤(Tracking-by-Detection)算法,主要用于實時跟蹤視頻中的多個目標。它結合了目標檢測(Detections)和卡爾曼濾波(Kalman Filter)來預測和更新目標軌跡,并通過 IoU 匹配來關聯檢測框和跟蹤框。SORT 算法的核心思想是:
- 利用卡爾曼濾波預測目標的運動軌跡。
- 通過 IoU 匹配將檢測框和預測的跟蹤框進行關聯。
- 根據匹配結果更新跟蹤器,處理新目標、丟失目標等情況。
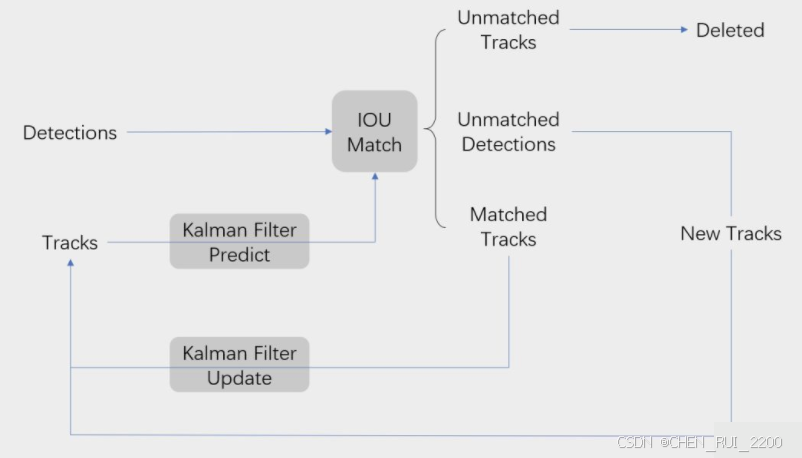
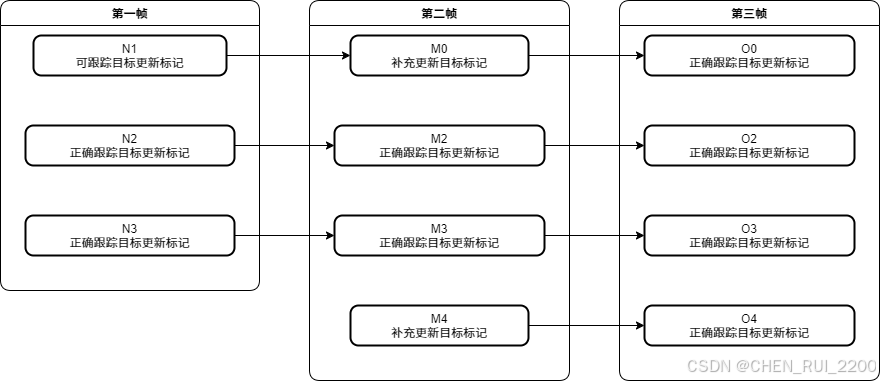
流程圖展示了 SORT 算法的完整工作流程,以下是每個步驟的詳細說明:
1. 輸入:Detections 和 Tracks
- Detections:當前幀的目標檢測框,通常由目標檢測模型(如 YOLOv8)提供,格式為 [x1, y1, x2, y2, score],其中 score 是置信度。
- 在你的代碼中,dets 是一個形狀為 (N, 5) 的 NumPy 數組,表示當前幀的 N 個檢測框。
- Tracks:前一幀的跟蹤目標(由 KalmanBoxTracker 管理),每個跟蹤目標有一個唯一的 ID 和狀態(位置、速度等)。
- 在你的代碼中,self.trackers 是一個列表,存儲了所有當前的 KalmanBoxTracker 實例。
2. Kalman Filter Predict
- 作用:對每個現有的跟蹤目標(Track)使用卡爾曼濾波進行預測,估計其在當前幀的位置。
- 細節:
- 卡爾曼濾波基于前一幀的狀態(位置、速度等)和運動模型(假設勻速運動)預測當前幀的狀態。
- 預測結果是一個邊界框,格式為 [x1, y1, x2, y2],表示目標的估計位置。
3. IoU Match
- 作用:將當前幀的檢測框(Detections)和預測的跟蹤框(Tracks)進行匹配,確定哪些檢測框對應于哪些跟蹤目標。
- 細節:
- 使用 IoU(Intersection over Union)作為匹配準則,計算每個檢測框和每個預測框之間的 IoU。
- 通過匈牙利算法(linear_sum_assignment)找到最佳匹配對,使得整體 IoU 最大。
- 設置一個 IoU 閾值(如 0.3),低于此閾值的匹配被認為是無效的。
4. Kalman Filter Update
- 作用:對于匹配成功的跟蹤目標,使用對應的檢測框更新卡爾曼濾波器的狀態。
- 細節:
- 卡爾曼濾波器根據觀測值(檢測框)和預測值進行融合,更新目標的狀態(位置、速度等)。
- 更新后,跟蹤目標的狀態更加接近實際觀測,同時保持運動的平滑性。
5 處理 Unmatched Detections
- 作用:對于未匹配的檢測框,認為是新目標,創建新的跟蹤器。
?
實時性和計算效率
- YOLOv8 的優化:
- YOLOv8 采用了更高效的網絡架構(如 CSPDarknet 的改進)和推理優化,支持 GPU/CPU 加速,甚至能在邊緣設備上運行(如 Jetson Nano)。
- 相比 YOLOv3 的 OpenCV DNN 實現,YOLOv8(基于 Ultralytics)直接輸出檢測結果,無需手動處理 blob 和多層輸出,簡化了代碼并提升了推理速度。
- 卡爾曼濾波的輕量級特性:
- 卡爾曼濾波是一種計算開銷極低的算法,尤其在你的優化版本中(向量化 IoU 和高效匹配),非常適合實時應用。
- SORT 算法本身復雜度低(O(nm) 的匈牙利匹配),結合 YOLOv8 的快速檢測,可以輕松實現每秒 30 幀以上的處理速度。
多目標跟蹤的穩定性
- YOLOv8 的多目標檢測能力:
- YOLOv8 對多目標場景的處理能力更強,能夠同時檢測多個目標并提供準確的邊界框和置信度。
- 支持更高的目標密度,即使在擁擠場景(如人群)中也能提供可靠的檢測結果。
- 卡爾曼濾波 + SORT 的跟蹤能力:
- 卡爾曼濾波通過預測目標的運動軌跡,可以在目標被短暫遮擋或檢測失敗時維持跟蹤狀態。
- SORT 算法通過 IoU 匹配和動態管理跟蹤器(max_age 和 min_hits),有效處理目標的進入、離開和遮擋問題。
- 優化的向量化 IoU 計算和高效的匈牙利匹配進一步提升了多目標關聯的準確性和速度。
代碼
卡爾曼濾波
1. Detections(輸入檢測框)
流程圖對應:流程圖中的 "Detections" 表示當前幀的目標檢測框,通常由目標檢測模型(如 YOLOv8)提供。
代碼實現:
- 在 Sort.update 方法中,dets 參數是輸入的檢測框集合,格式為 [[x1, y1, x2, y2, score], ...],表示當前幀的 N 個檢測框。
def update(self, dets):self.frame_count += 1# dets 是一個 numpy 數組,包含當前幀的檢測框- 代碼會對 dets 進行后續處理,但首先需要確保輸入不為空:
if dets is None or dets.size == 0:return np.empty((0, 5))2. Kalman Filter Predict(卡爾曼濾波預測)
流程圖對應:流程圖中的 "Kalman Filter Predict" 表示對每個現有跟蹤目標(Tracks)使用卡爾曼濾波預測其在當前幀的位置。
代碼實現:
- 在 Sort.update 方法中,遍歷所有跟蹤器(self.trackers),對每個跟蹤器調用 predict 方法
trks = np.zeros((len(self.trackers), 5))  # 存儲跟蹤器的預測
to_del = []   # 存儲要刪除的目標框
for t, trk in enumerate(self.trackers):pos = self.trackers[t].predict()[0]trk[:] = [pos[0], pos[1], pos[2], pos[3], 0]if np.any(np.isnan(pos)):to_del.append(t)- KalmanBoxTracker.predict 方法實現了卡爾曼濾波的預測步驟
def predict(self):if (self.kf.x[6] + self.kf.x[2]) <= 0:self.kf.x[6] *= 0.0self.kf.predict()self.age += 1if self.time_since_update > 0:self.hit_streak = 0self.time_since_update += 1self.history.append(convert_x_to_bbox(self.kf.x))return self.history[-1]- self.kf.predict() 調用 filterpy 的卡爾曼濾波器預測方法,基于狀態轉移矩陣 F 和過程噪聲協方差 Q 預測目標在當前幀的位置。
- convert_x_to_bbox 將卡爾曼濾波的狀態向量 [x, y, s, r] 轉換回邊界框 [x1, y1, x2, y2]:
def convert_x_to_bbox(x, score=None):w = np.sqrt(x[2] * x[3])h = x[2] / wif score is None:return np.array([x[0] - w / 2., x[1] - h / 2., x[0] + w / 2., x[1] + h / 2.]).reshape((1, 4))else:return np.array([x[0] - w / 2., x[1] - h / 2., x[0] + w / 2., x[1] + h / 2., score]).reshape((1, 5))預測結果存儲在 trks 中,用于后續的 IoU 匹配。
?
3. IoU Match(IoU 匹配)
流程圖對應:流程圖中的 "IoU Match" 表示將檢測框(Detections)和預測的跟蹤框(Tracks)進行匹配。
代碼實現:
- 在 Sort.update 中,調用 associate_detections_to_trackers 函數進行匹配
- associate_detections_to_trackers 函數實現 IoU 匹配:
def associate_detections_to_trackers(detections, trackers, iou_threshold=0.3):if (len(trackers) == 0) or (len(detections) == 0):return np.empty((0, 2), dtype=int), np.arange(len(detections)), np.empty((0, 5), dtype=int)iou_matrix = np.zeros((len(detections), len(trackers)), dtype=np.float32)for d, det in enumerate(detections):for t, trk in enumerate(trackers):iou_matrix[d, t] = iou(det, trk)result = linear_sum_assignment(-iou_matrix)matched_indices = np.array(list(zip(*result)))unmatched_detections = []for d, det in enumerate(detections):if d not in matched_indices[:, 0]:unmatched_detections.append(d)unmatched_trackers = []for t, trk in enumerate(trackers):if t not in matched_indices[:, 1]:unmatched_trackers.append(t)matches = []for m in matched_indices:if iou_matrix[m[0], m[1]] < iou_threshold:unmatched_detections.append(m[0])unmatched_trackers.append(m[1])else:matches.append(m.reshape(1, 2))if len(matches) == 0:matches = np.empty((0, 2), dtype=int)else:matches = np.concatenate(matches, axis=0)return matches, np.array(unmatched_detections), np.array(unmatched_trackers)- IoU 計算:iou 函數計算兩個邊界框的交并比,使用 numba.jit 加速:
@jit
def iou(bb_test, bb_gt):xx1 = np.maximum(bb_test[0], bb_gt[0])yy1 = np.maximum(bb_test[1], bb_gt[1])xx2 = np.minimum(bb_test[2], bb_gt[2])yy2 = np.minimum(bb_test[3], bb_gt[3])w = np.maximum(0., xx2 - xx1)h = np.maximum(0., yy2 - yy1)wh = w * ho = wh / ((bb_test[2] - bb_test[0]) * (bb_test[3] - bb_test[1]) + (bb_gt[2] - bb_gt[0]) * (bb_gt[3] - bb_gt[1]) - wh)return o匹配過程:
- 計算 IoU 矩陣(iou_matrix),表示所有檢測框和跟蹤框之間的 IoU。
- 使用 linear_sum_assignment(匈牙利算法)進行最優匹配,matches 存儲匹配成功的對 [d, t]。
- unmatched_detections 和 unmatched_trackers 分別存儲未匹配的檢測框和跟蹤框。
4. Output Tracks(輸出跟蹤結果)
流程圖對應:流程圖中的 "Output Tracks" 表示返回當前幀的跟蹤結果,包括更新后的跟蹤目標和新創建的跟蹤目標。
代碼實現:
- 在 Sort.update 中,篩選并輸出跟蹤結果
ret = []
i = len(self.trackers)
for trk in reversed(self.trackers):d = trk.get_state()[0]if (trk.time_since_update < 1) and (trk.hit_streak >= self.min_hits or self.frame_count <= self.min_hits):ret.append(np.concatenate((d, [trk.id + 1])).reshape(1, -1))i -= 1if trk.time_since_update > self.max_age:self.trackers.pop(i)
if len(ret) > 0:return np.concatenate(ret)
return np.empty((0, 5))
代碼與流程圖的對應總結
| 流程圖步驟 | 代碼實現 | 相關函數/類 |
|---|---|---|
| Detections | Sort.update 的輸入 dets | Sort.update |
| Kalman Filter Predict | KalmanBoxTracker.predict | predict, convert_x_to_bbox |
| IoU Match | associate_detections_to_trackers | iou, linear_sum_assignment |
| Kalman Filter Update | KalmanBoxTracker.update | update, convert_bbox_to_z |
| Unmatched Detections | 創建新 KalmanBoxTracker | KalmanBoxTracker.__init__ |
| Unmatched Tracks | 刪除長時間未匹配的跟蹤器 | Sort.update (max_age) |
| Output Tracks | 輸出當前幀的跟蹤結果 | Sort.update, get_state |
kalman.py 完成代碼
from __future__ import print_function
from typing import Tuple, Optional
from numba import jit
import numpy as np
from scipy.optimize import linear_sum_assignment
from filterpy.kalman import KalmanFilter# 常量定義
STATE_TRANSITION_MATRIX = np.array([[1, 0, 0, 0, 1, 0, 0],[0, 1, 0, 0, 0, 1, 0],[0, 0, 1, 0, 0, 0, 1],[0, 0, 0, 1, 0, 0, 0],[0, 0, 0, 0, 1, 0, 0],[0, 0, 0, 0, 0, 1, 0],[0, 0, 0, 0, 0, 0, 1]
])
OBSERVATION_MATRIX = np.array([[1, 0, 0, 0, 0, 0, 0],[0, 1, 0, 0, 0, 0, 0],[0, 0, 1, 0, 0, 0, 0],[0, 0, 0, 1, 0, 0, 0]
])@jit(nopython=True)
def iou(bb_test: np.ndarray, bb_gt: np.ndarray) -> float:"""計算兩個邊界框的交并比 (IoU)。Args:bb_test (np.ndarray): 測試框,格式 [x1, y1, x2, y2]bb_gt (np.ndarray): 真實框,格式 [x1, y1, x2, y2]Returns:float: 交并比值"""xx1 = max(bb_test[0], bb_gt[0])yy1 = max(bb_test[1], bb_gt[1])xx2 = min(bb_test[2], bb_gt[2])yy2 = min(bb_test[3], bb_gt[3])w = max(0., xx2 - xx1)h = max(0., yy2 - yy1)wh = w * ho = wh / ((bb_test[2] - bb_test[0]) * (bb_test[3] - bb_test[1]) +(bb_gt[2] - bb_gt[0]) * (bb_gt[3] - bb_gt[1]) - wh)return odef iou_batch(detections: np.ndarray, trackers: np.ndarray) -> np.ndarray:"""向量化計算多個檢測框和跟蹤框之間的 IoU。Args:detections (np.ndarray): 檢測框,形狀 (N, 4),格式 [x1, y1, x2, y2]trackers (np.ndarray): 跟蹤框,形狀 (M, 4),格式 [x1, y1, x2, y2]Returns:np.ndarray: IoU 矩陣,形狀 (N, M)"""xx1 = np.maximum(detections[:, 0][:, None], trackers[:, 0])yy1 = np.maximum(detections[:, 1][:, None], trackers[:, 1])xx2 = np.minimum(detections[:, 2][:, None], trackers[:, 2])yy2 = np.minimum(detections[:, 3][:, None], trackers[:, 3])w = np.maximum(0., xx2 - xx1)h = np.maximum(0., yy2 - yy1)wh = w * harea_det = (detections[:, 2] - detections[:, 0]) * (detections[:, 3] - detections[:, 1])area_trk = (trackers[:, 2] - trackers[:, 0]) * (trackers[:, 3] - trackers[:, 1])iou = wh / (area_det[:, None] + area_trk - wh)return ioudef convert_bbox_to_z(bbox: np.ndarray) -> np.ndarray:"""將 [x1, y1, x2, y2] 形式的檢測框轉為濾波器的狀態表示 [x, y, s, r]。Args:bbox (np.ndarray): 檢測框,格式 [x1, y1, x2, y2]Returns:np.ndarray: 狀態向量,格式 [x, y, s, r],形狀 (4, 1)Raises:ValueError: 如果邊界框坐標無效"""if np.any(bbox < 0) or bbox[2] <= bbox[0] or bbox[3] <= bbox[1]:raise ValueError("Invalid bounding box coordinates")w = bbox[2] - bbox[0]h = bbox[3] - bbox[1]x = bbox[0] + w / 2.y = bbox[1] + h / 2.s = w * hr = w / float(h)return np.array([x, y, s, r]).reshape((4, 1))def convert_x_to_bbox(x: np.ndarray, score: Optional[float] = None) -> np.ndarray:"""將 [x, y, s, r] 的狀態轉為 [x1, y1, x2, y2] 的邊界框。Args:x (np.ndarray): 狀態向量,格式 [x, y, s, r]score (Optional[float]): 置信度,可選Returns:np.ndarray: 邊界框,格式 [x1, y1, x2, y2] 或 [x1, y1, x2, y2, score]"""w = np.sqrt(x[2] * x[3])h = x[2] / wif score is None:return np.array([x[0] - w / 2., x[1] - h / 2., x[0] + w / 2., x[1] + h / 2.]).reshape((1, 4))return np.array([x[0] - w / 2., x[1] - h / 2., x[0] + w / 2., x[1] + h / 2., score]).reshape((1, 5))class KalmanBoxTracker:"""單個目標的卡爾曼濾波跟蹤器"""count = 0def __init__(self, bbox: np.ndarray):"""初始化卡爾曼濾波器和跟蹤器。Args:bbox (np.ndarray): 初始檢測框,格式 [x1, y1, x2, y2]"""self.kf = KalmanFilter(dim_x=7, dim_z=4)self.kf.F = STATE_TRANSITION_MATRIXself.kf.H = OBSERVATION_MATRIXself.kf.R[2:, 2:] *= 10.self.kf.P[4:, 4:] *= 1000.  # 高不確定性給初始速度self.kf.P *= 10.self.kf.Q[-1, -1] *= 0.01self.kf.Q[4:, 4:] *= 0.01self.kf.x[:4] = convert_bbox_to_z(bbox)self.time_since_update = 0self.id = KalmanBoxTracker.countKalmanBoxTracker.count += 1self.history = []self.hits = 0self.hit_streak = 0self.age = 0def update(self, bbox: np.ndarray) -> None:"""使用觀測到的邊界框更新狀態。Args:bbox (np.ndarray): 觀測框,格式 [x1, y1, x2, y2]"""self.time_since_update = 0self.history = []self.hits += 1self.hit_streak += 1self.kf.update(convert_bbox_to_z(bbox))def predict(self) -> np.ndarray:"""預測下一幀的狀態并返回邊界框估計。Returns:np.ndarray: 預測的邊界框,格式 [x1, y1, x2, y2]"""if (self.kf.x[6] + self.kf.x[2]) <= 0:self.kf.x[6] *= 0.0self.kf.predict()self.age += 1if self.time_since_update > 0:self.hit_streak = 0self.time_since_update += 1self.history.append(convert_x_to_bbox(self.kf.x))return self.history[-1]def get_state(self) -> np.ndarray:"""獲取當前邊界框估計。Returns:np.ndarray: 當前邊界框,格式 [x1, y1, x2, y2]"""return convert_x_to_bbox(self.kf.x)def associate_detections_to_trackers(detections: np.ndarray,trackers: np.ndarray,iou_threshold: float = 0.3
) -> Tuple[np.ndarray, np.ndarray, np.ndarray]:"""將檢測框與跟蹤框進行關聯匹配。Args:detections (np.ndarray): 檢測框,形狀 (N, 4),格式 [x1, y1, x2, y2]trackers (np.ndarray): 跟蹤框,形狀 (M, 4),格式 [x1, y1, x2, y2]iou_threshold (float): IoU 閾值Returns:Tuple[np.ndarray, np.ndarray, np.ndarray]:- 匹配成功的矩陣,形狀 (K, 2),格式 [det_idx, trk_idx]- 未匹配的檢測框索引,形狀 (L,)- 未匹配的跟蹤框索引,形狀 (M,)"""if len(trackers) == 0 or len(detections) == 0:return (np.empty((0, 2), dtype=int),np.arange(len(detections)),np.arange(len(trackers)))iou_matrix = iou_batch(detections, trackers)result = linear_sum_assignment(-iou_matrix)matched_indices = np.array(list(zip(*result)))unmatched_detections = [d for d in range(len(detections)) if d not in matched_indices[:, 0]]unmatched_trackers = [t for t in range(len(trackers)) if t not in matched_indices[:, 1]]matches = []for m in matched_indices:if iou_matrix[m[0], m[1]] < iou_threshold:unmatched_detections.append(m[0])unmatched_trackers.append(m[1])else:matches.append(m.reshape(1, 2))matches = np.concatenate(matches, axis=0) if matches else np.empty((0, 2), dtype=int)return matches, np.array(unmatched_detections), np.array(unmatched_trackers)class Sort:"""多目標跟蹤器,基于 SORT 算法"""def __init__(self, max_age: int = 1, min_hits: int = 3, iou_threshold: float = 0.3):"""初始化 SORT 跟蹤器。Args:max_age (int): 最大未檢測幀數,超過后刪除跟蹤器min_hits (int): 最小命中次數,低于此值不輸出(除非剛開始)iou_threshold (float): IoU 匹配閾值"""self.max_age = max_ageself.min_hits = min_hitsself.iou_threshold = iou_thresholdself.trackers = []self.frame_count = 0def update(self, dets: np.ndarray) -> np.ndarray:"""更新跟蹤器狀態并返回當前幀的跟蹤結果。Args:dets (np.ndarray): 檢測框,形狀 (N, 5),格式 [x1, y1, x2, y2, score]Returns:np.ndarray: 跟蹤結果,形狀 (M, 5),格式 [x1, y1, x2, y2, id]Raises:ValueError: 如果檢測框格式錯誤"""if dets is None or dets.size == 0:return np.empty((0, 5))if dets.shape[1] != 5:raise ValueError("Detections must have shape (N, 5)")self.frame_count += 1trks = np.zeros((len(self.trackers), 5))to_del = []for t, trk in enumerate(self.trackers):pos = trk.predict()[0]trks[t, :4] = posif np.any(np.isnan(pos)):to_del.append(t)trks = np.ma.compress_rows(np.ma.masked_invalid(trks))matched, unmatched_dets, unmatched_trks = associate_detections_to_trackers(dets[:, :4], trks[:, :4], self.iou_threshold)for t, trk in enumerate(self.trackers):if t not in unmatched_trks:d = matched[matched[:, 1] == t, 0][0]trk.update(dets[d, :4])for i in unmatched_dets:self.trackers.append(KalmanBoxTracker(dets[i, :4]))ret = []i = len(self.trackers) - 1while i >= 0:trk = self.trackers[i]d = trk.get_state()[0]if (trk.time_since_update < 1) and (trk.hit_streak >= self.min_hits or self.frame_count <= self.min_hits):ret.append(np.concatenate((d, [trk.id + 1])))if trk.time_since_update > self.max_age:self.trackers.pop(i)i -= 1return np.array(ret) if ret else np.empty((0, 5))# 示例使用
if __name__ == "__main__":tracker = Sort(max_age=1, min_hits=3, iou_threshold=0.3)dets = np.array([[100, 100, 150, 150, 0.9], [200, 200, 250, 250, 0.8]])tracks = tracker.update(dets)print("Tracks:\n", tracks)
yolov8 追蹤
從視頻中檢測行人(使用 YOLOv8),跟蹤他們的運動軌跡(使用 SORT 算法),并通過一條計數線計算行人穿越的數量和方向。
步驟:
- 加載視頻和 YOLOv8 模型:讀取視頻幀并初始化 YOLOv8 模型。
- 目標檢測:使用 YOLOv8 檢測視頻幀中的行人,獲取檢測框。
- 目標跟蹤:使用 SORT 算法(基于卡爾曼濾波和 IoU 匹配)跟蹤檢測到的行人。
- 軌跡分析:通過軌跡和計數線的碰撞檢測,統計行人穿越數量和方向。
碰撞檢測函數
def ccw(A, B, C):return (C[1] - A[1]) * (B[0] - A[0]) > (B[1] - A[1]) * (C[0] - A[0])def intersect(A, B, C, D):return ccw(A, C, D) != ccw(B, C, D) and ccw(A, B, C) != ccw(A, B, D)- ccw:計算三點 A, B, C 是否按逆時針方向排列,用于判斷線段是否相交。
- intersect:判斷兩條線段 AB 和 CD 是否相交。這里用于檢測目標軌跡(從上一幀位置到當前幀位置的線段)是否與計數線相交。
目標跟蹤(SORT)
np.set_printoptions(formatter={'float': lambda x: "{0:0.3f}".format(x)})
dets = np.asarray(dets)if np.size(dets) == 0:continue
else:tracks = tracker.update(dets)- 格式化:dets 轉換為 NumPy 數組,SORT 算法需要此格式。
- 空檢測處理:如果當前幀沒有檢測到目標,則跳過。
- tracker.update(dets):調用 SORT 算法更新跟蹤器,返回當前幀的跟蹤結果 tracks,格式為 [x1, y1, x2, y2, id]。
跟蹤框處理
boxes = []
indexIDs = []
previous = memory.copy()
memory = {}COLORS = np.random.randint(0, 255, size=(200, 3), dtype='uint8')for track in tracks:boxes.append([track[0], track[1], track[2], track[3]])indexIDs.append(int(track[4]))memory[indexIDs[-1]] = boxes[-1]- boxes 和 indexIDs:從 tracks 中提取邊界框和目標 ID。
- previous 和 memory:memory 存儲當前幀的目標位置,previous 存儲上一幀的目標位置,用于軌跡計算。
- COLORS:生成隨機顏色,用于可視化不同目標的跟蹤框。
碰撞檢測和計數
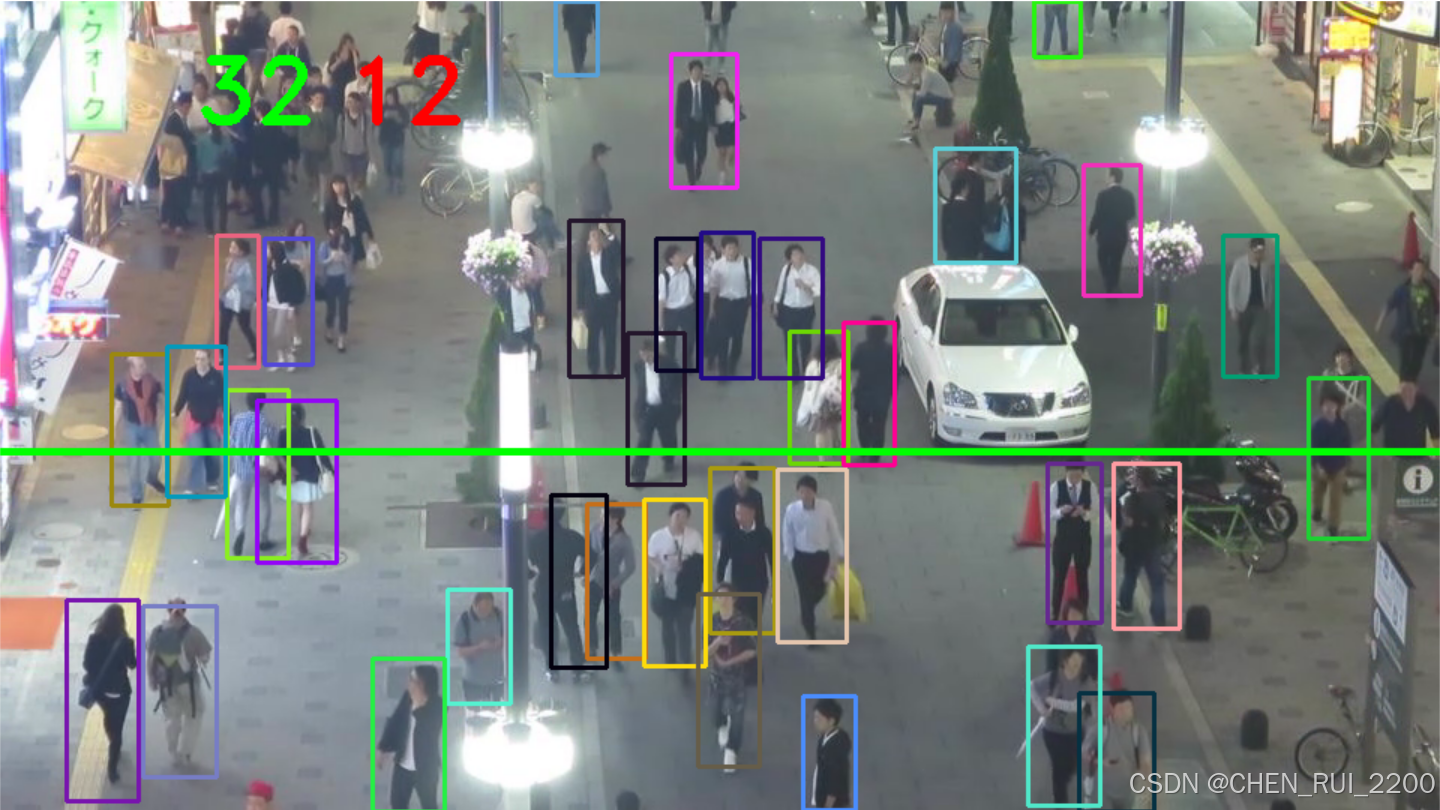
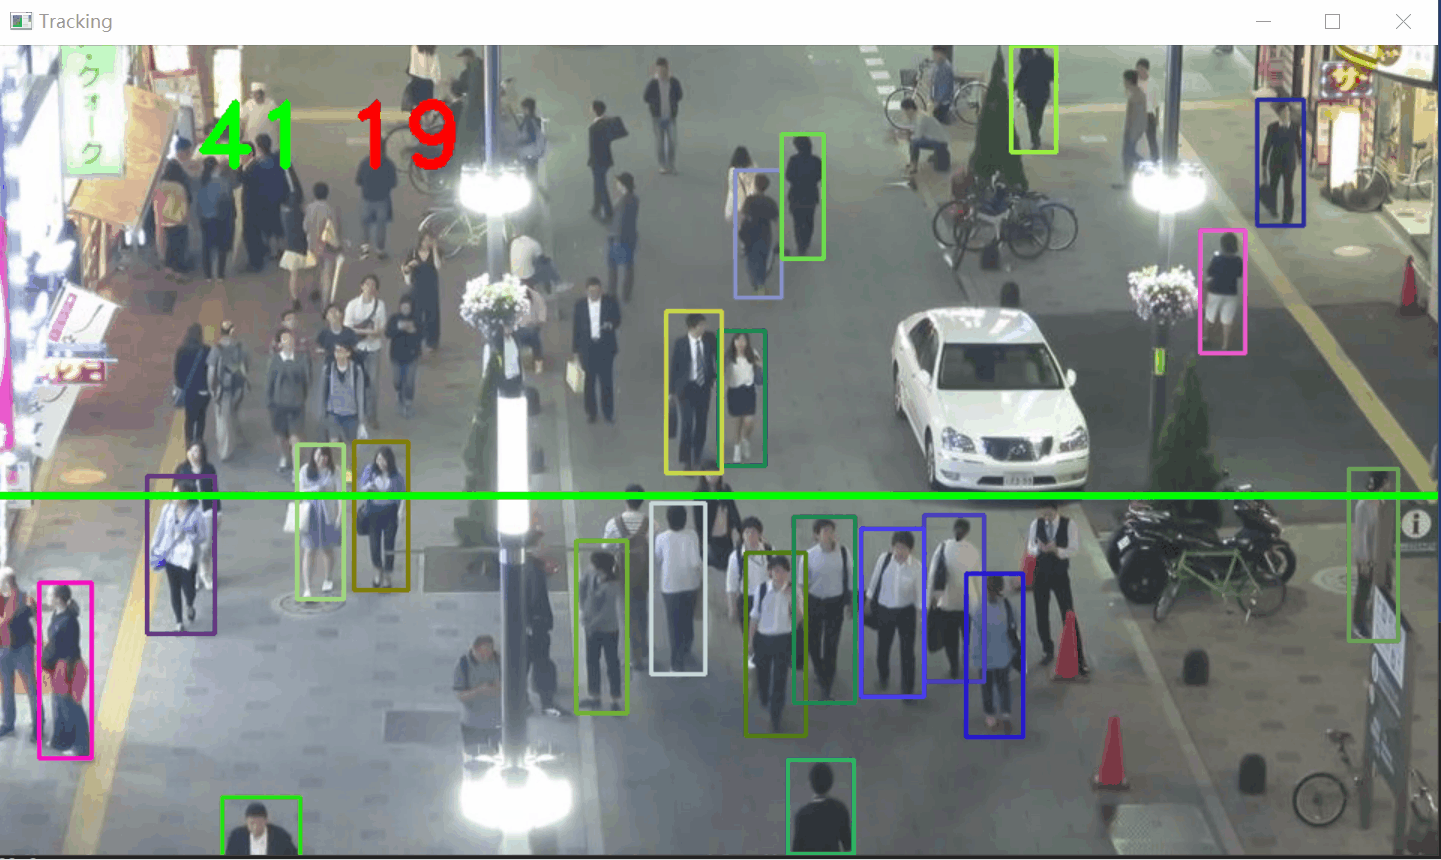
if len(boxes) > 0:i = 0for box in boxes:(x, y) = (int(box[0]), int(box[1]))(w, h) = (int(box[2]), int(box[3]))color = [int(c) for c in COLORS[indexIDs[i] % len(COLORS)]]cv2.rectangle(frame, (x, y), (w, h), color, 2)if indexIDs[i] in previous:previous_box = previous[indexIDs[i]](x2, y2) = (int(previous_box[0]), int(previous_box[1]))(w2, h2) = (int(previous_box[2]), int(previous_box[3]))p1 = (int(x2 + (w2 - x2) / 2), int(y2 + (h2 - y2) / 2))p0 = (int(x + (w - x) / 2), int(y + (h - y) / 2))if intersect(p0, p1, line[0], line[1]):counter += 1if y2 > y:counter_down += 1else:counter_up += 1i += 1- 繪制跟蹤框:為每個目標繪制矩形框,顏色根據目標 ID 分配。
- 軌跡計算:
- p0:當前幀目標的中心點 (x + (w - x) / 2, y + (h - y) / 2)。
- p1:上一幀目標的中心點。
- 碰撞檢測:
- 使用 intersect 函數判斷目標軌跡(p0 到 p1)是否與計數線(line[0] 到 line[1])相交。
- 如果相交,counter 增加 1。
- 方向判斷:
- 如果 y2 > y(上一幀 y 坐標大于當前幀 y 坐標),目標向下移動,counter_down 增加 1。
- 否則,目標向上移動,counter_up 增加 1。
?
yolov8_count.py? 完成代碼
from ultralytics import YOLO
import imutils
import time
import cv2
from kalman8 import *line = [(0, 300), (2560, 300)]
counter = 0
counter_up = 0
counter_down = 0# 創建跟蹤器對象(假設你有 Sort 實現)
tracker = Sort()
memory = {}# 碰撞檢測函數保持不變
def ccw(A, B, C):return (C[1] - A[1]) * (B[0] - A[0]) > (B[1] - A[1]) * (C[0] - A[0])def intersect(A, B, C, D):return ccw(A, C, D) != ccw(B, C, D) and ccw(A, B, C) != ccw(A, B, D)# 加載 YOLOv8 模型
model = YOLO("./yolov8/yolov8n.pt")# 視頻輸入
vs = cv2.VideoCapture('./input/MOT16-03.mp4')
(W, H) = (None, None)
writer = Nonetry:prop = cv2.cv.CV_CAP_PROP_FRAME_COUNT if imutils.is_cv2() else cv2.CAP_PROP_FRAME_COUNTtotal = int(vs.get(prop))print("INFO:{} total Frame in video".format(total))
except:print("[INFO] could not determine frames in video")# 主循環
while True:(grabbed, frame) = vs.read()if not grabbed:breakif W is None or H is None:(H, W) = frame.shape[:2]# 使用 YOLOv8 進行目標檢測start = time.time()results = model(frame)  # YOLOv8 直接接受幀輸入end = time.time()# 處理檢測結果boxes = []confidences = []classIDs = []dets = []# 解析 YOLOv8 的結果for result in results:for box in result.boxes:confidence = box.conf.item()  # 置信度if confidence > 0.3:classID = int(box.cls.item())  # 類別ID# YOLOv8 返回的 xyxy 格式x, y, w, h = box.xyxy[0].tolist()x, y, w, h = int(x), int(y), int(w), int(h)# 只檢測 "person" 類 (COCO 數據集中 person 的 ID 是 0)if model.names[classID] == "person":boxes.append([x, y, w - x, h - y])confidences.append(float(confidence))classIDs.append(classID)dets.append([x, y, w, h, confidence])# 轉換為 numpy 數組np.set_printoptions(formatter={'float': lambda x: "{0:0.3f}".format(x)})dets = np.asarray(dets)# SORT 目標跟蹤if np.size(dets) == 0:continueelse:tracks = tracker.update(dets)# 跟蹤框處理boxes = []indexIDs = []previous = memory.copy()memory = {}COLORS = np.random.randint(0, 255, size=(200, 3), dtype='uint8')for track in tracks:boxes.append([track[0], track[1], track[2], track[3]])indexIDs.append(int(track[4]))memory[indexIDs[-1]] = boxes[-1]# 碰撞檢測if len(boxes) > 0:i = 0for box in boxes:(x, y) = (int(box[0]), int(box[1]))(w, h) = (int(box[2]), int(box[3]))color = [int(c) for c in COLORS[indexIDs[i] % len(COLORS)]]cv2.rectangle(frame, (x, y), (w, h), color, 2)if indexIDs[i] in previous:previous_box = previous[indexIDs[i]](x2, y2) = (int(previous_box[0]), int(previous_box[1]))(w2, h2) = (int(previous_box[2]), int(previous_box[3]))p1 = (int(x2 + (w2 - x2) / 2), int(y2 + (h2 - y2) / 2))p0 = (int(x + (w - x) / 2), int(y + (h - y) / 2))if intersect(p0, p1, line[0], line[1]):counter += 1if y2 > y:counter_down += 1else:counter_up += 1i += 1# 繪制計數線和文本cv2.line(frame, line[0], line[1], (0, 255, 0), 3)cv2.putText(frame, str(counter_up), (130, 80), cv2.FONT_HERSHEY_DUPLEX, 2.0, (0, 255, 0), 3)cv2.putText(frame, str(counter_down), (230, 80), cv2.FONT_HERSHEY_DUPLEX, 2.0, (0, 0, 255), 3)# 保存視頻if writer is None:fourcc = cv2.VideoWriter_fourcc(*"mp4v")writer = cv2.VideoWriter("./output/output.mp4", fourcc, 30, (frame.shape[1], frame.shape[0]), True)writer.write(frame)cv2.imshow("Tracking", frame)if cv2.waitKey(1) & 0xFF == ord('q'):break# 釋放資源
writer.release()
vs.release()
cv2.destroyAllWindows()
?
測試效果
測試下上行人流和下行人流統計
日志輸出
0: 384x640 26 persons, 1 car, 1 motorcycle, 100.7ms
Speed: 2.3ms preprocess, 100.7ms inference, 2.5ms postprocess per image at shape (1, 3, 384, 640)0: 384x640 26 persons, 1 car, 1 motorcycle, 97.7ms
Speed: 2.5ms preprocess, 97.7ms inference, 1.9ms postprocess per image at shape (1, 3, 384, 640)0: 384x640 26 persons, 1 car, 1 motorcycle, 102.8ms
Speed: 2.2ms preprocess, 102.8ms inference, 2.6ms postprocess per image at shape (1, 3, 384, 640)...
?
補充
關于軌跡追蹤和碰線判斷再補充點方便理解
修改下代碼
# 計算中心點center = (int(x + (w - x) / 2), int(y + (h - y) / 2))# 更新軌跡track_id = indexIDs[i]if track_id not in trajectories:trajectories[track_id] = []trajectories[track_id].append(center)# 限制軌跡長度(可選,避免內存過大)if len(trajectories[track_id]) > 50:trajectories[track_id] = trajectories[track_id][-50:]# 繪制矩形框cv2.rectangle(frame, (x, y), (w, h), color, 2)# 繪制軌跡線for j in range(1, len(trajectories[track_id])):if trajectories[track_id][j - 1] is None or trajectories[track_id][j] is None:continuecv2.line(frame, trajectories[track_id][j - 1], trajectories[track_id][j], color, 2)
?
添加繪制軌跡以后
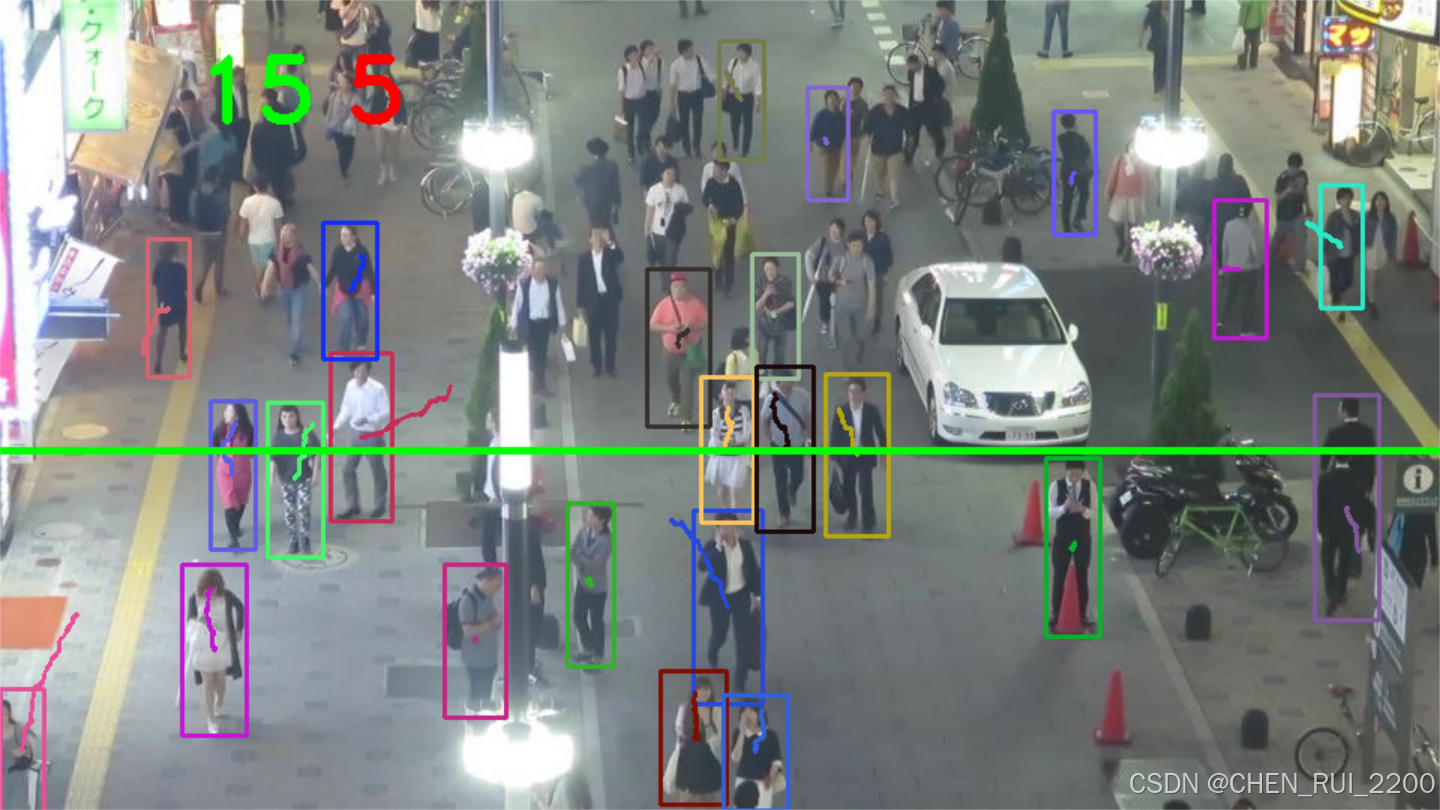
if indexIDs[i] in previous:previous_box = previous[indexIDs[i]](x2, y2) = (int(previous_box[0]), int(previous_box[1]))(w2, h2) = (int(previous_box[2]), int(previous_box[3]))p1 = (int(x2 + (w2 - x2) / 2), int(y2 + (h2 - y2) / 2))p0 = center # 使用當前中心點if intersect(p0, p1, line[0], line[1]):counter += 1if y2 > y:counter_down += 1else:counter_up += 1i += 1-
檢查當前被跟蹤對象的ID(indexIDs[i])是否存在于previous字典中,該字典存儲了前一幀的邊界框坐標。這確保我們可以比較當前和之前的位置。
- 獲取該對象ID在前一幀的邊界框。提取:
- x2, y2:前一幀邊界框的左上角坐標。
- w2, h2:前一幀邊界框的右下角坐標。
-
計算前一幀邊界框的中心點(p1):
X坐標:x2 + (w2 - x2) / 2(左右邊緣的中點)。Y坐標:y2 + (h2 - y2) / 2(上下邊緣的中點)。 - 調用intersect()函數,檢查從p0(當前中心點)到p1(前一幀中心點)的線段是否與預定義的計數線(line[0]到line[1])相交。intersect()函數使用CCW(逆時針)算法來判斷兩條線段是否相交。
-
確定移動方向:
如果y2 > y(前一幀Y位置大于當前Y位置),對象向上移動(朝較小的Y值方向),則counter_down加1。否則,對象向下移動(朝較大的Y值方向),則counter_up加1。
?
想象這是一個二維圖像平面,其中:
- Y軸向下增加(典型的圖像坐標系)。
- X軸向右增加。
- 計數線是位于y=300的水平線(定義為line = [(0, 300), (2560, 300)])。
?
Image Plane:X-axis0 ---------------------------------> 2560| p1 (previous center)| *| |\| | \| ------ | ---- Counting Line (y=300)| | \| | \| * \| p0 (current center)|V Y-axis交叉邏輯:
- intersect()函數檢查移動向量(從p1到p0)是否穿過計數線。
- 它使用CCW(逆時針)測試來判斷:
- p0和p1是否位于計數線的兩側,并且
- 計數線的兩個端點是否位于移動向量的兩側。
方向判斷:
- 如果y1 > y0(p1在p0下方,圖像坐標系中):對象跨線向上移動。
- 如果y1 < y0(p1在p0上方):對象跨線向下移動。
?


![[AI]browser-use + web-ui 大模型實現自動操作瀏覽器](http://pic.xiahunao.cn/[AI]browser-use + web-ui 大模型實現自動操作瀏覽器)
 返回error)
 SSL certificate problem)


)


