Python-MCPServer開發
使用FastMCP開發【SSE模式的MCPServer】,熟悉【McpServer編碼過程】+【McpServer調試方法】
1-核心知識點
- 1-熟悉【SSE模式的MCPServer】開發
- 2-熟悉【stdio模式的MCPServer】開發
- 3-熟悉【啟動MCPServer】的三種方式
- 3.1-直接啟動:python mcp_server.py
- 3.2-代碼中uv使用:subprocess.Popen([“uv”, “run”, server_file])
- 3.3-使用mcpInspector網頁:mcp dev mcp_server.py
- 4-熟悉【Agent增強外部能力】的兩種方式
- 4.1-調用tool:Agent(name=“Assistant”, instructions=“用中文回復”, tools=[get_weather])
- 4.2-調用tool:Agent(name=“Assistant”, instructions=“用中文回復”, mcp_servers=[mcp_server])
2-思路整理
1-McpServer須知
-
1-MCPServer已經可以對外提供服務了,這個不同于傳統的API,雖然也運行在特殊端口了,但是不能通用postman進行調用
-
2-那有人質疑這個說法了,為什么使用mcpInspector網頁調試就可以連通?
- 可以理解為:mcpInspector聯通的是Agent,只是查看Agent上有哪些Resources/Prompts/Tools…并且可以通過Agent和McpServer進行交互,而不是Rest請求
-
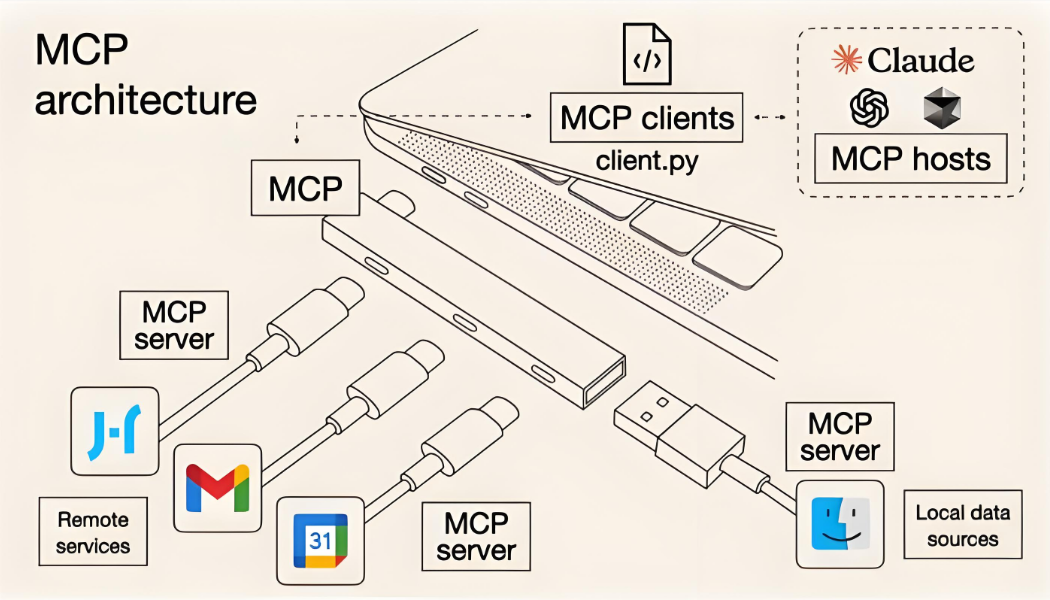
3-MCPServer_SSE和MCPServer_stdio如何進行快速區分:
- 1-stdio-適用于同一臺機器上(進程間通訊,通訊不經過HTTP協議,超級快)->要求:你要有可運行文件【Python文件】或者【Java的Jar包】
- 2-SSE適用于所有環境,通過IP進行HTTP通訊->基本沒有要求,無腦就全部使用這種
-
4-再次澄清:MCPServer_SSE雖然可以部署,有大網IP或者域名,但是依然不能通用postman進行調用
- post調用的接口->要求是@Controller標記或者FastAPI開發的API接口
- agent調用的接口->要求是@mcp.tool標記(可能對外就不是API接口)
- 總結:可以理解@mcp.tool標記后是一種特殊的API,只能被Agent調用
-
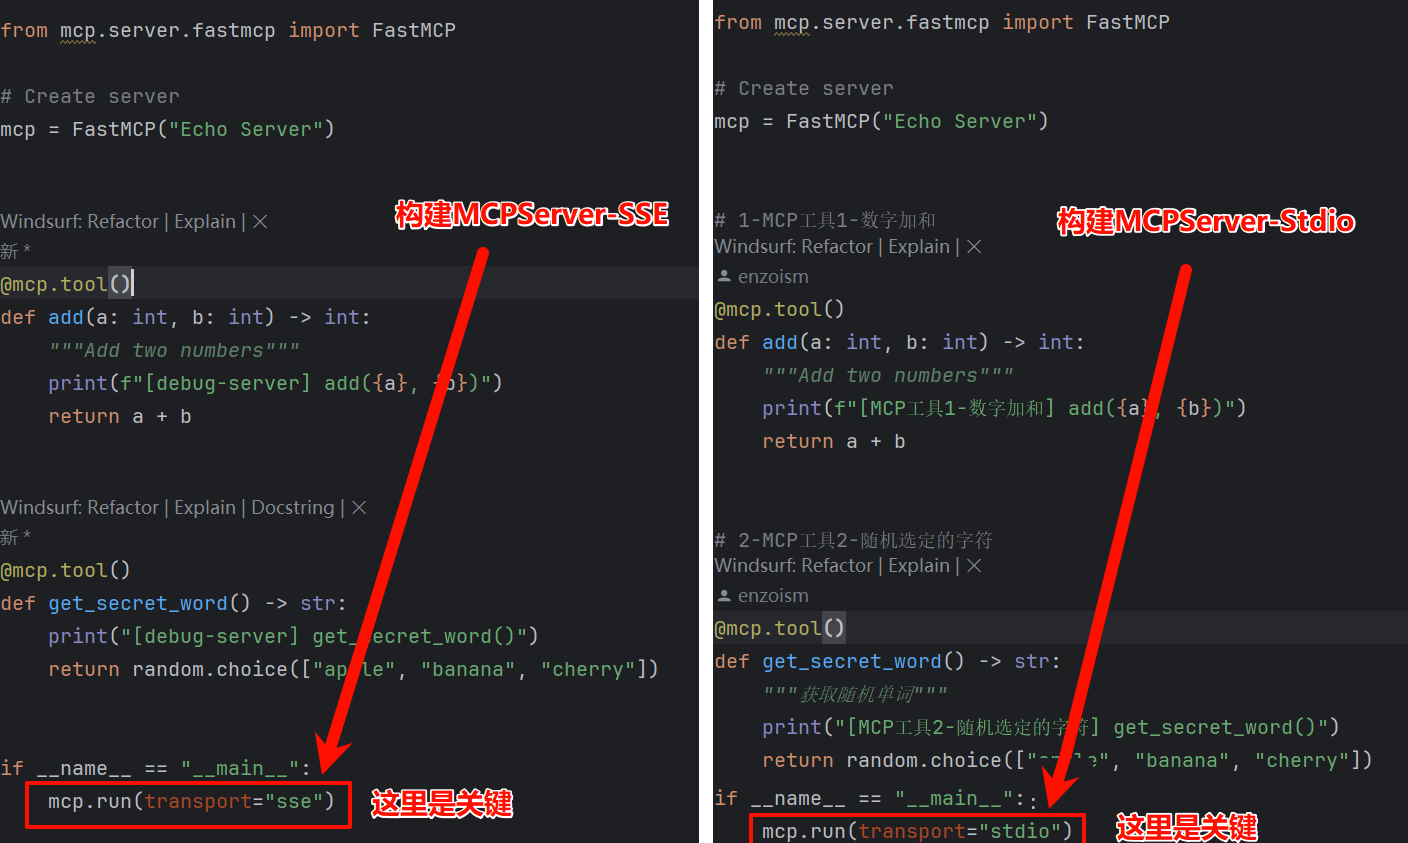
5-SSE和stdio在代碼上有什么區別?
- 1-McpServer的編寫上只有一個區別【mcp.run(transport=“sse/stdio”)】
- 2-Agent在連接的時候使用【McpServerstdio】和【McpServerSSE】進行McpServer構建
- 3-【mcp.run(transport=“sse”)】后,服務【可以被任何遠程】的Agent進行訪問(此時先不談鑒權的問題)
- 4-【mcp.run(transport=“stdio”)】后,服務【只可以被本地進程】的Agent進行訪問(此時先不談鑒權的問題)
2-McpServer核心思路
1-【mcp.run(transport=“sse”)】后,服務【可以被任何遠程】的Agent進行訪問(此時先不談鑒權的問題)
2-【mcp.run(transport=“stdio”)】后,服務【只可以被本地進程】的Agent進行訪問(此時先不談鑒權的問題)
- 1-編寫傳統的Service業務代碼
- 2-在Service業務代碼頭上添加@tool裝飾器,即可實現FastMCP的Tool功能
- 3-在Service業務代碼頭上添加@mcp.tool()裝飾器,即可實現FastMCP的McpServer功能
- 4-主程序指定運行方法-stdio進程啟動(此時MCPServer已經可以對外提供服務了,這個不同于傳統的API,雖然也運行在特殊端口了,但是不能通用postman進行調用)
- 1-直接啟動:python mcp_server.py
- 2-代碼中uv使用:subprocess.Popen([“uv”, “run”, server_file])
- 3-使用mcpInspector網頁:mcp dev mcp_server.py
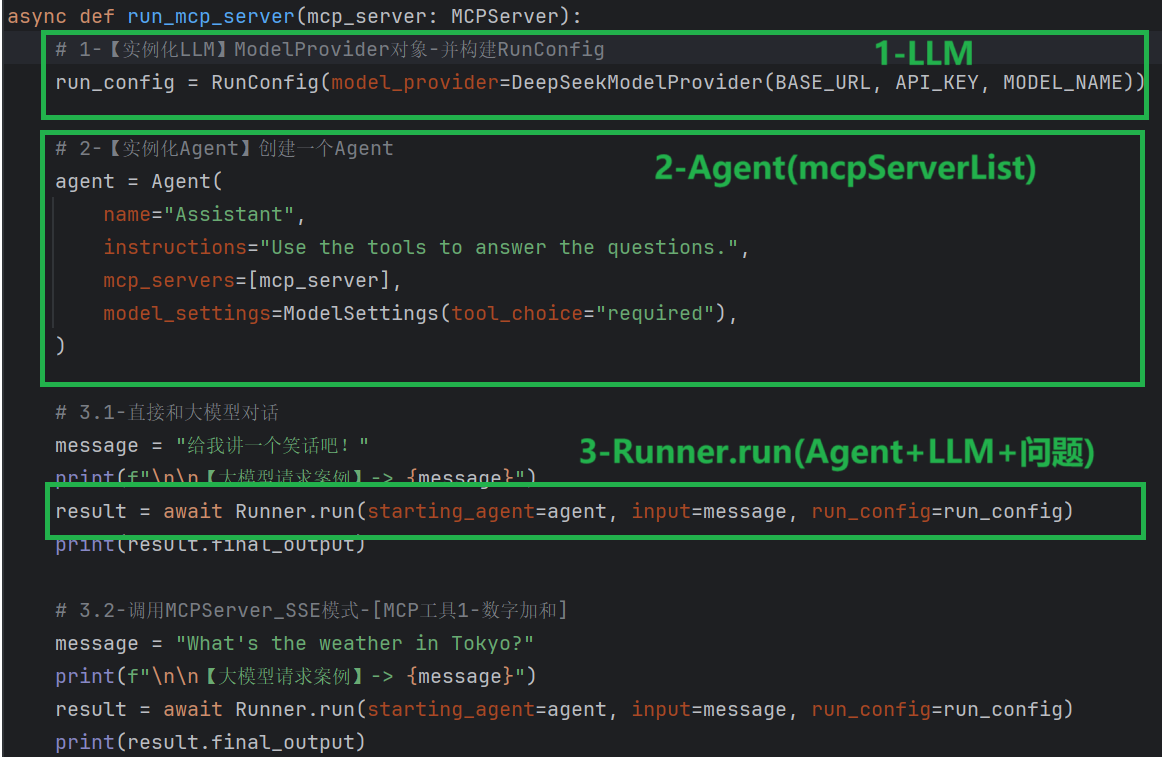
- 5-Agent調試McpServer
- 1-指定LLM
- 2-指定Agent(McpServerList+角色定位)
- 3-Runner.run(Agent+LLM+問題)交互
3-McpServer和McpClient關系
- 1-McpClient只是一個概念,在使用Python進行開發的時候根本就沒有任何關于McpClient的類
- 2-McpClient就是McpServer連接過程的過程
4-Agent+LLM+McpServers
-
1-LLM和Agent最初是獨立創建的,兩者之間沒有關系
- LLM指明用哪家大模型
- Agent指明用哪些McpServerList
-
2-LLM和Agent是通過Runner.run(Agent+LLM+問題)進行關聯
-
3-Agent+LLM如何進行交互(要不要進行最后的總結)是通用(result.output獲取的時候進行邏輯編排的)
-
如果我們自己做MCP編排,可能就是在這個地方進行核心邏輯編寫
-
5-MCPServer核心代碼
- 1-在Service業務代碼頭上添加@tool裝飾器,即可實現FastMCP的Tool功能
# 假設 mcp 已經正確導入
try:from mcp import tool
except ImportError:# 如果 mcp 未找到,模擬一個 tool 裝飾器def tool(func):return func# 在 Service 業務代碼頭上添加 @tool 裝飾器
@tool
async def get_city_list(self) -> list:"""獲取所有的城市信息。返回:str: 所有的城市信息列表"""logging.info(f"獲取所有的城市信息")city_list = []for city in self.CITY_WEATHER_DATA:city_list.append(city)return city_list- 2-在Service業務代碼頭上添加@mcp.tool()裝飾器,即可實現FastMCP的McpServer功能
from mcp.server.fastmcp import FastMCPfrom city_01_service import CityDataServer# 1-初始化 MCP 服務器
mcp = FastMCP("CityDataServer")# 2-初始化城市信息服務器(業務代碼+@tool裝飾器)
city_server = CityDataServer()# 3-在 Service 業務代碼頭上添加@mcp.tool()裝飾器
@mcp.tool()
# 獲取所有城市列表
async def get_city_list():"""獲取所有城市列表。返回:str: 所有城市列表"""city_list = await city_server.get_city_list()return city_list# 4-主程序指定運行方法-stdio/sse進程啟動
if __name__ == "__main__":mcp.run(transport='stdio/sse')
3-參考網址
- MCP官網的開發樣例:https://github.com/openai/openai-agents-python/blob/main/examples/mcp/sse_example/main.py
- 個人代碼實現倉庫:https://gitee.com/enzoism/python_mcp_client_server
4-上手實操
1-空工程初始化環境
mkdir my_project
cd my_project
python -m venv .venv
2-激活環境
# Windows
source .venv/Scripts/activate# Mac
source .venv/bin/activate
3-添加依賴
對應的依賴是在激活的環境中
# uv用于后續MCP Inspector的連接
pip install uv httpx mcp
4-ToolFunction核心代碼
import asyncio
import osfrom agents import (Agent,RunConfig,Runner,function_tool,set_tracing_disabled,
)
from dotenv import load_dotenvfrom model_providers.deepseek import DeepSeekModelProvider# 1-環境變量加載相關
load_dotenv()
BASE_URL = os.getenv("BASE_URL") or ""
API_KEY = os.getenv("API_KEY") or ""
MODEL_NAME = os.getenv("MODEL_NAME") or ""
if not BASE_URL or not API_KEY or not MODEL_NAME:raise ValueError("請通過環境變量或代碼設置EXAMPLE_BASE_URL、EXAMPLE_API_KEY、EXAMPLE_MODEL_NAME。")# 2-跳過大模型的鏈路追蹤
set_tracing_disabled(disabled=True)"""
本例使用自定義提供程序調用Runner.run()的部分,并直接調用OpenAI進行其他操作。
步驟:
1. 【實例化LLM】ModelProvider對象-并構建RunConfig
2. 【實例化Agent】創建一個Agent。
3. 在調用Runner.run()結合【LLM】+【Agent】進行問答
注意,在本例中,我們假設您沒有從platform.openai.com獲取API密鑰,因此禁用了跟蹤。
如果您有API密鑰,您可以選擇設置`OPENAI_API_KEY`環境變量或調用set_tracing_export_api_key()來設置跟蹤特定的密鑰。
"""# 3-定義一個工具函數
@function_tool
def init_weather_tool_function(city: str):print(f"[debug] getting weather for {city}")return f"The weather in {city} is sunny."async def run_mcp_tool_function():# 1-【實例化LLM】ModelProvider對象-并構建RunConfigrun_config = RunConfig(model_provider=DeepSeekModelProvider(BASE_URL, API_KEY, MODEL_NAME))# 2-【實例化Agent】創建一個Agentagent = Agent(name="Assistant",instructions="使用工具回答大模型的問題",tools=[init_weather_tool_function])# 3.1-調用工具回答問題message = "杭州的天氣怎么樣?"print(f"\n\n【大模型請求案例】-> {message}")result = await Runner.run(starting_agent=agent, input=message, run_config=run_config)print(result.final_output)# 3.2-獲取Agent對話的結果-沒有配置RunConfig使用的是OpenAI的默認模型# result = await Runner.run(#     agent,#     "給我講一個笑話吧!",# )# print(result.final_output)if __name__ == "__main__":asyncio.run(run_mcp_tool_function())
5-McpServer核心代碼
1-【mcp.run(transport=“sse”)】后,服務【可以被任何遠程】的Agent進行訪問(此時先不談鑒權的問題)
2-【mcp.run(transport=“stdio”)】后,服務【只可以被本地進程】的Agent進行訪問(此時先不談鑒權的問題)
import random
import randomfrom mcp.server.fastmcp import FastMCP# Create server
mcp = FastMCP("Echo Server")# 1-MCP工具1-數字加和
@mcp.tool()
def add(a: int, b: int) -> int:"""Add two numbers"""print(f"[MCP工具1-數字加和] add({a}, {b})")return a + b# 2-MCP工具2-隨機選定的字符
@mcp.tool()
def get_secret_word() -> str:"""獲取隨機單詞"""print("[MCP工具2-隨機選定的字符] get_secret_word()")return random.choice(["apple", "banana", "cherry"])if __name__ == "__main__":mcp.run(transport="sse/stdio")
6-Agent調試McpServer
hitokoto_02_api.py:API直接調用service對外暴露rest請求
import asyncio
import osfrom agents import Agent, Runner, RunConfig, set_tracing_disabled
from agents.mcp import MCPServer, MCPServerStdio
from agents.model_settings import ModelSettings
from dotenv import load_dotenvfrom model_providers.deepseek import DeepSeekModelProvider# 1-環境變量加載相關
load_dotenv()
BASE_URL = os.getenv("BASE_URL") or ""
API_KEY = os.getenv("API_KEY") or ""
MODEL_NAME = os.getenv("MODEL_NAME") or ""
if not BASE_URL or not API_KEY or not MODEL_NAME:raise ValueError("請通過環境變量或代碼設置EXAMPLE_BASE_URL、EXAMPLE_API_KEY、EXAMPLE_MODEL_NAME。")# 2-跳過大模型的鏈路追蹤
set_tracing_disabled(disabled=True)"""
本例使用自定義提供程序調用Runner.run()的部分,并直接調用OpenAI進行其他操作。
步驟:
1. 【實例化LLM】ModelProvider對象-并構建RunConfig
2. 【實例化Agent】創建一個Agent。
3. 在調用Runner.run()結合【LLM】+【Agent】進行問答
- 1)直接和大模型對話
- 2)調用MCPServer_SSE模式-[MCP工具1-數字加和]
- 3)調用MCPServer_SSE模式-[MCP工具2-隨機選定的字符]
"""async def run_mcp_server(mcp_server: MCPServer):# 1-【實例化LLM】ModelProvider對象-并構建RunConfigrun_config = RunConfig(model_provider=DeepSeekModelProvider(BASE_URL, API_KEY, MODEL_NAME))# 2-【實例化Agent】創建一個Agentagent = Agent(name="Assistant",instructions="使用工具回答大模型的問題",mcp_servers=[mcp_server],model_settings=ModelSettings(tool_choice="required"),)# 3.1-直接和大模型對話message = "給我講一個笑話吧!"print(f"\n\n【大模型請求案例】-> {message}")result = await Runner.run(starting_agent=agent, input=message, run_config=run_config)print(result.final_output)# 3.2-調用MCPServer_SSE模式-[MCP工具1-數字加和]message = "What's the weather in Tokyo?"print(f"\n\n【大模型請求案例】-> {message}")result = await Runner.run(starting_agent=agent, input=message, run_config=run_config)print(result.final_output)# 3.3-調用MCPServer_SSE模式-[MCP工具2-隨機選定的字符]message = "What's the secret word?"print(f"\n\n【大模型請求案例】-> {message}")result = await Runner.run(starting_agent=agent, input=message, run_config=run_config)print(result.final_output)async def init_mcp_server() -> MCPServerStdio:# 1-創建 MCP 服務器連接實例,但不立即運行(python mcp_server_xx.py)this_dir = os.path.dirname(os.path.abspath(__file__))python_exec_path = os.path.join(this_dir, ".venv/Scripts/python.exe")mcp_server_stdio_file = os.path.join(this_dir, "mcp05_stdio.py")weather_server = MCPServerStdio(name="weather",params={"command": python_exec_path,"args": [mcp_server_stdio_file],"env": {},},# 緩存工具列表以減少延遲,不需要每次連接時重新獲取工具列表cache_tools_list=True)# 2-手動連接到MCP服務器print("正在連接到MCP服務器...")await weather_server.connect()print("MCP服務器連接成功!")# 3-等待服務器連接成功并獲取MCP服務可用工具列表tools = await weather_server.list_tools()print("\n可用工具列表: ")for tool in tools:print(f" - {tool.name}: {tool.description}")return weather_serverif __name__ == "__main__":# 1-獲取McpServerserver = asyncio.run(init_mcp_server())# 2-運行McpServerasyncio.run(run_mcp_server(server))


)


