1.使用create-vue創建項目
npm init vue@latest
項目目錄和關鍵文件:
new Vue() 創建一個應用實例 => createApp()、createRouter() createStore() 、將創建實例進行了封裝,保證每個實例的獨立封閉性。
禁用vue2的插件vuter
使用vue3的插件volar
script寫在最前面
不再要求唯一根元素
加上setup允許在script中直接編寫組合式API
將創建的實例往id為app的盒子上掛載
createApp(App).mount('#app')
2.setup選項
- setup應寫在beforeCreate()之前
- setup函數中,獲取不到this (this是undefined)
- 數據 和 函數,需要在 setup 最后 return,才能模板中應用
<script>
export default {setup () {// 數據const message = 'hello Vue3'// 函數const logMessage = () => {console.log(message)}return {message,logMessage}},
}
</script>
<template><div>{{ message }}</div><button @click="logMessage">按鈕</button>
</template>
通過 setup 語法糖簡化代碼
<script setup>
const message = 'this is a message'
const logMessage = () => {console.log(message)
}
</script>
這樣就不用return了
3.reactive和ref函數
reactive作用:接收對象類型傳參并返回一個響應式的對象
對象類型
<script setup>
import {reactive} from 'vue'
const state = reactive({count:100
})
const addCount = () => {state.count++
}</script><template><div><div>{{ state.count }}</div><button @click="addCount">+1</button></div>
</template>
ref: 接收簡單類型 或 復雜類型,返回一個響應式的對象
本質:是在原有傳入數據的基礎上,外層包了一層對象,包成了復雜類型底層,包成復雜類型之后,再借助 reactive 實現的響應式。
注意點:
- 腳本中訪問數據,需要通過 .value
- 在template中,.value不需要加 (幫我們扒了一層)
簡單類型
<script setup>
import { ref } from 'vue'
const name = ref(0)
const setName = () => {name.value++
}
</script><template><div><div>{{ name }}</div><button @click="setName">+1</button></div>
</template>
推薦:以后聲明數據,統一用 ref => 統一了編碼規范
4.computed
const 計算屬性 = computed(() => {return 計算返回的結果
})
<script setup>
import { computed, ref } from 'vue'// 聲明數據
const list = ref([1, 2, 3, 4, 5, 6, 7, 8])// 基于list派生一個計算屬性,從list中過濾出 > 2
const computedList = computed(() => {return list.value.filter(item => item > 2)
})const computedList2 = computed(() => {return list.value.filter(item => item > 3)
})//這時候就不用return
const AddNumber = () => {list.value.push(999)
}
// 定義一個修改數組的方法
const addFn = () => {list.value.push(666)
}
</script><template><div><div>原始數據: {{ list }}</div><div>計算后的數據: {{computedList2 }}</div><div>原始數據: {{ list }}</div><div>計算后的數據: {{ computedList }}</div><button @click="AddNumber" type="button">修改2/</button><button @click="addFn" type="button">修改</button></div>
</template>
5.watch函數
- 監視單個數據的變化
// watch(ref對象, (newValue, oldValue) => { ... })watch(count, (newValue, oldValue) => {console.log(newValue, oldValue)
})
- 監視多個數據的變化
// watch([ref對象1, ref對象2], (newArr, oldArr) => { ... })watch([count, nickname], (newArr, oldArr) => {console.log(newArr, oldArr)
})
- immediate 立刻執行(一進頁面立刻觸發)
watch(count, (newValue, oldValue) => {console.log(newValue, oldValue)
}, {immediate: true
})
- deep 深度監視, 默認 watch 進行的是 淺層監視
const ref1 = ref(簡單類型) 可以直接監視
const ref2 = ref(復雜類型) 監視不到復雜類型內部數據的變化
deep 深度監視
watch(userInfo, (newValue) => {console.log(newValue)
}, {deep: true
})
- 對于對象中的單個屬性,進行精確監視
只監視age不監視name
watch(() => userInfo.value.age, (newValue, oldValue) => {console.log(newValue, oldValue)
})
6.生命周期函數
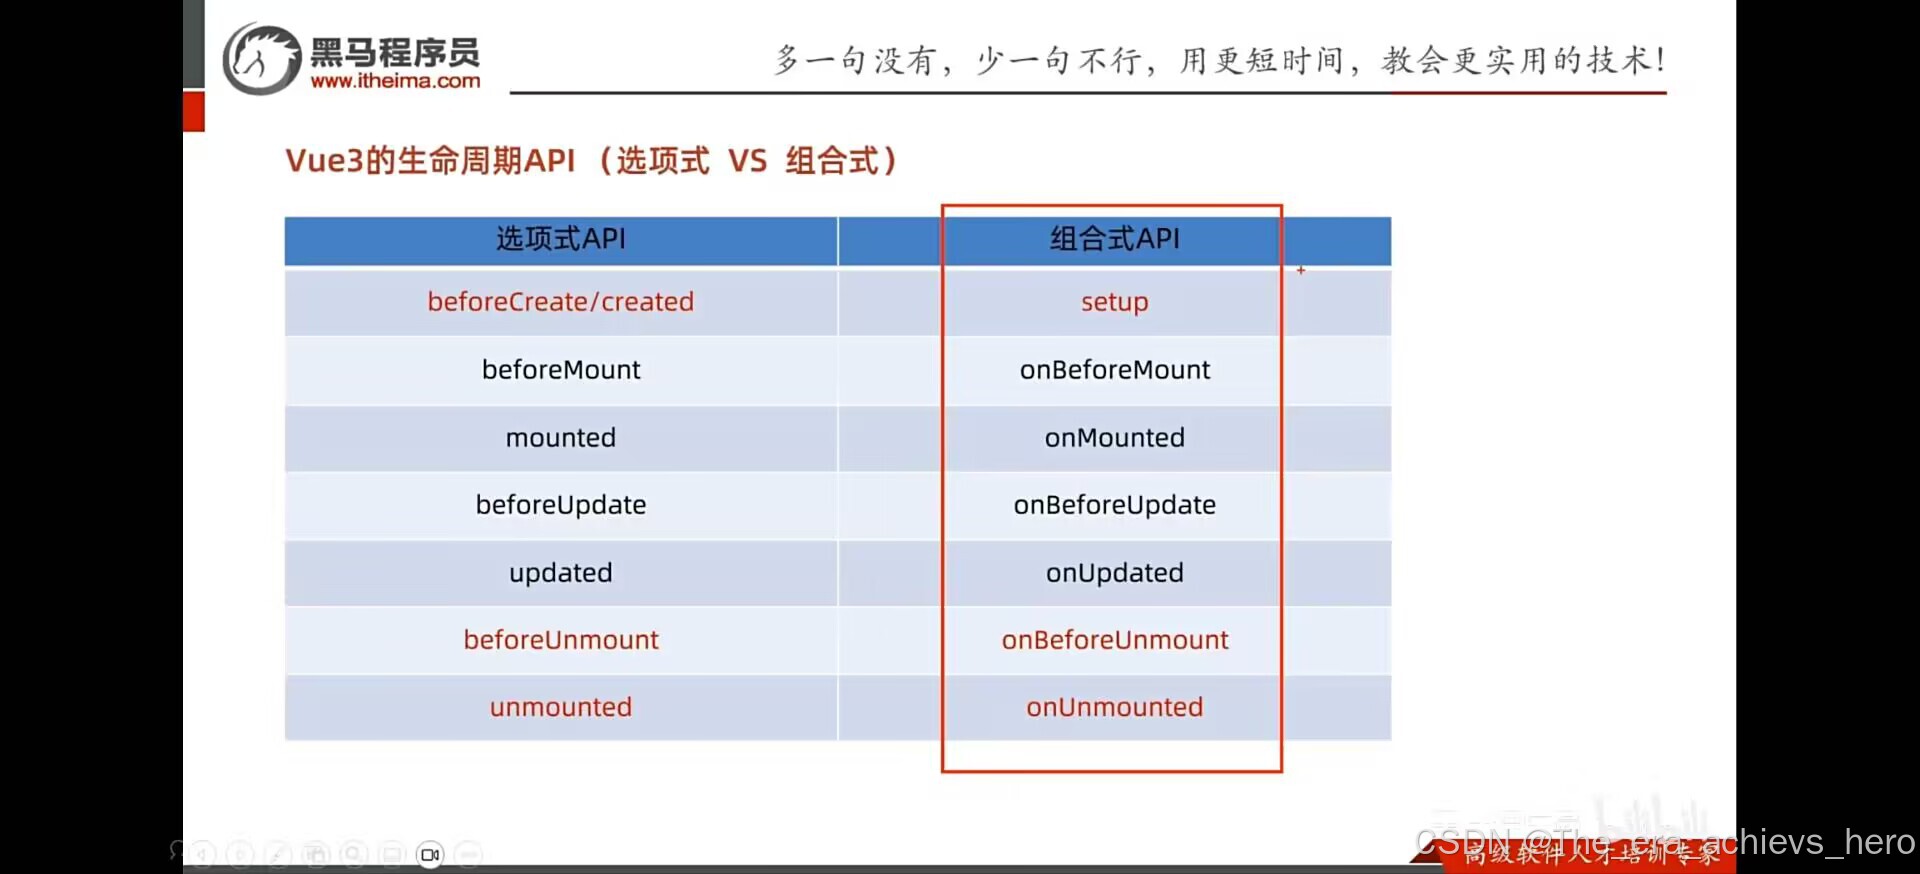
寫成函數的調用方式,可以調用多次,并不會沖突,而是按照順序依次執行
onMounted(() => {console.log('mounted生命周期函數 - 邏輯2')
})
7.組合式下的父子通信
父傳子
子組件中
注意:由于寫了 setup,所以無法直接配置 props 選項
所以:此處需要借助于 “編譯器宏” 函數接收子組件傳遞的數據
<template><!-- 對于props傳遞過來的數據,模板中可以直接使用 --><div class="son">我是子組件 - {{ car }} - {{ money }}<button @click="buy">花錢</button></div>
</template>
父組件
<template><div><h3>父組件 - {{ money }}<button @click="getMoney">掙錢</button></h3><!-- 給子組件,添加屬性的方式傳值 --><SonCom car="寶馬車" :money="money"></SonCom></div>
</template>
子傳父
子組件
const emit = defineEmits(['changeMoney'])
const buy = () => {emit('changeMoney', 5)
}
<template><!-- 對于props傳遞過來的數據,模板中可以直接使用 --><div class="son">我是子組件 - {{ car }} - {{ money }}<button @click="buy">花錢</button></div>
</template>父組件
const changeFn = (newMoney) => {money.value = newMoney
}
<template><div><h3>父組件 - {{ money }}<button @click="getMoney">掙錢</button></h3><!-- 給子組件,添加屬性的方式傳值 --><SonCom@changeMoney="changeFn"car="寶馬車":money="money"></SonCom></div>
</template>
8.模板引用
模板引用(可以獲取dom,也可以獲取組件)
- 調用ref函數,生成一個ref對象
- 通過ref標識,進行綁定
- 通過ref對象.value即可訪問到綁定的元素(必須渲染完成后,才能拿到)
模板引用的時機:組件掛載完畢
defineExpose編譯宏的作用:顯示暴露組件內部的屬性和方法
<script setup>
import TestCom from '@/components/test-com.vue'
import { onMounted, ref } from 'vue'const inp = ref(null)// 生命周期鉤子 onMounted
onMounted(() => {// console.log(inp.value)// inp.value.focus()
})
const clickFn = () => {inp.value.focus()
}// --------------------------------------
const testRef = ref(null)
const getCom = () => {console.log(testRef.value.count)testRef.value.sayHi()
}</script><template><div><input ref="inp" type="text"><button @click="clickFn">點擊讓輸入框聚焦</button></div><TestCom ref="testRef"></TestCom><button @click="getCom">獲取組件</button>
</template>
9.provide和inject
為了跨層級組件通信
- 頂層組件通過provide函數提供數據
- 底層組件通過inject函數獲取數據
頂層組件
<script setup>
import CenterCom from '@/components/center-com.vue'
import { provide, ref } from 'vue'// 1. 跨層傳遞普通數據
provide('theme-color', 'pink')// 2. 跨層傳遞響應式數據
const count = ref(100)
provide('count', count)setTimeout(() => {count.value = 500
}, 2000)// 3. 跨層傳遞函數 => 給子孫后代傳遞可以修改數據的方法
provide('changeCount', (newCount) => {count.value = newCount
})</script><template>
<div><h1>我是頂層組件</h1><CenterCom></CenterCom>
</div>
</template>
底部組件
<script setup>
import { inject } from 'vue'
const themeColor = inject('theme-color')
// const themeColor = inject('theme-color')
const count = inject('count')
const change = inject('change')
const clickFn1 = () => {change(200)
}
const changeCount = inject('changeCount')
const clickFn = () => {changeCount(1000)
}
</script><template>
<div><h3>我是底層組件-{{ themeColor }} - {{ count }}</h3><button @click="clickFn">更新count</button><button @click="clickFn1">更新count</button></div>
</template>
10.defineOptions
可以用defineOptions定義任意的選項,(prop,emit,expose,slots除外)
defineOptions({name: 'IndexPage'
})
11.defineModel
<script setup>
import { defineModel } from 'vue'
const modelValue = defineModel()
</script><template>
<div><input type="text" :value="modelValue"@input="e => modelValue = e.target.value">
</div>
</template>
使用defineModel需要加配置
import { fileURLToPath, URL } from 'node:url'import { defineConfig } from 'vite'
import vue from '@vitejs/plugin-vue'// https://vitejs.dev/config/
export default defineConfig({plugins: [vue({script: {defineModel: true}}),],resolve: {alias: {'@': fileURLToPath(new URL('./src', import.meta.url))}}
})
12.Pinia
是vuex的替代品
- 有更簡單的API
- 與vue3新語法統一
- 去掉了modules的概念,每個store都是獨立的模塊
- 對TypeScript更友好
13.添加Pinia到vue項目
生成
import { defineStore } from 'pinia'
import { computed, ref } from 'vue'// 定義store
// defineStore(倉庫的唯一標識, () => { ... })
export const useCounterStore = defineStore('counter', () => {// 聲明數據 state - countconst count = ref(100)// 聲明操作數據的方法 action (普通函數)const addCount = () => count.value++const subCount = () => count.value--// 聲明基于數據派生的計算屬性 getters (computed)const double = computed(() => count.value * 2)// 聲明數據 state - msgconst msg = ref('hello pinia')return {count,msg,}
}
})
使用(導入后可直接使用)
<script setup>
import { useCounterStore } from '@/store/counter'
const counterStore = useCounterStore()
</script><template><div>我是Son1.vue - {{ counterStore.count }} - {{ counterStore.double }}<button @click="counterStore.addCount">+</button></div>
</template>
14.action異步
import { defineStore } from 'pinia'
import { ref } from 'vue'
import axios from 'axios'export const useChannelStore = defineStore('channel', () => {// 聲明數據const channelList = ref([])// 聲明操作數據的方法const getList = async () => {// 支持異步const { data: { data }} = await axios.get('http://geek.itheima.net/v1_0/channels')channelList.value = data.channels}// 聲明getters相關return {channelList,getList}
})
15.storeToRef方法
import { storeToRefs } from 'pinia'
// 此時,直接解構,不處理,數據會丟失響應式
// 加storeToRefs就不丟失
const { count, msg } = storeToRefs(counterStore)
16.Pinia持久化
安裝插件,導入插件,persist: true就行了
export const useCounterStore = defineStore('counter', () => {// 聲明數據 state - msgconst msg = ref('hello pinia')return {count,double,addCount,subCount,msg,}
}, {// persist: true // 開啟當前模塊的持久化persist: {key: 'hm-counter', // 修改本地存儲的唯一標識paths: ['count'] // 存儲的是哪些數據}
})
17.大事件
createRouter 創建路由實例
配置 history 模式
- history模式:createWebHistory 地址欄不帶 #
- hash模式: createWebHashHistory 地址欄帶 #
console.log(import.meta.env.DEV)
vite 中的環境變量 import.meta.env.BASE_URL 就是 vite.config.js 中的 base 配置項
在 Vue3 CompositionAPI 中
- 獲取路由對象 router useRouter
const router = useRouter() - 獲取路由參數 route useRoute
const route = useRoute()
)


)


)
:解鎖TOGAF ADM)


