🧠 向所有學習者致敬!
“學習不是裝滿一桶水,而是點燃一把火。” —— 葉芝
我的博客主頁: https://lizheng.blog.csdn.net
🌐 歡迎點擊加入AI人工智能社區!
🚀 讓我們一起努力,共創AI未來! 🚀
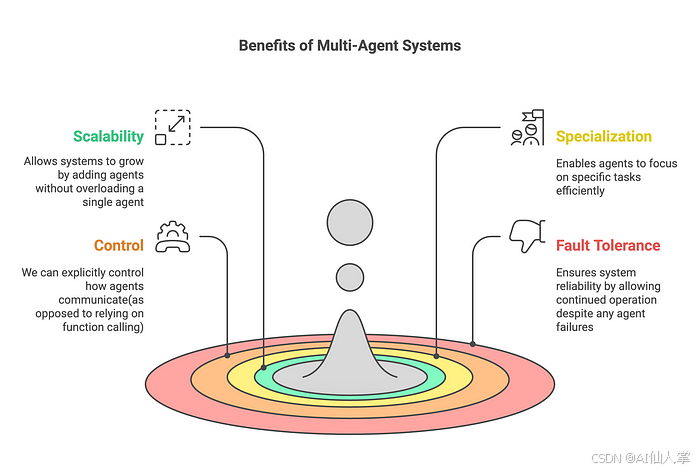
智能體是一個使用大型語言模型(LLM)來決定應用程序控制流程的系統。隨著這些系統的開發,它們可能會隨著時間的推移變得越來越復雜,從而難以管理和擴展。例如,你可能會遇到以下問題:
- 智能體擁有太多工具,卻不知道該調用哪個工具,或者何時調用。
- 上下文變得過于復雜,單個智能體難以跟蹤。
- 系統需要多個專業領域(例如規劃者、研究者、數學專家等)。
為了解決這些問題,你可以考慮將應用程序拆分為多個較小的獨立智能體,并將它們組合成一個多智能體系統。這些獨立智能體可以簡單到只是一個提示和一個LLM調用,也可以復雜到一個ReAct智能體(以及更多)!
文章目錄
- 🧠 向所有學習者致敬!
- 🌐 歡迎[點擊加入AI人工智能社區](https://bbs.csdn.net/forums/b8786ecbbd20451bbd20268ed52c0aad?joinKey=bngoppzm57nz-0m89lk4op0-1-315248b33aafff0ea7b)!
- 1.1 單智能體架構與多智能體架構
- 2\. 多智能體架構
- 2.1 多智能體系統中的模式
- **2.1.1 并行**
- **2.1.2 順序**
- **2.1.3 循環**
- **2.1.4 路由器**
- **2.1.5 聚合器(或合成器)**
- **2.1.6 網絡(或水平)**
- **2.1.7 交接**
- **2.1.8 監督者**
- **2.1.9 監督者(工具調用)**
- **2.1.10 層級(或垂直)**
- **2.1.11 自定義多智能體工作流**
- 3\. 智能體之間的通信
- 3.1 圖狀態與工具調用
- 3.2 不同的狀態模式
- 3.3 共享消息列表
- 4\. 結論
隨著智能體框架的發展,許多公司開始構建自己的多智能體系統,并尋找一種能夠解決所有智能體任務的萬能解決方案。兩年前,研究人員設計了一個名為 ChatDev的多智能體協作系統。ChatDev就像一家虛擬軟件公司,通過各種具有不同角色的智能體(如首席執行官、首席產品官、藝術設計師、編碼員、審查員、測試員等)來運營,就像一家普通的軟件工程公司一樣。

圖片來源:ChatDev
所有這些智能體共同努力并相互溝通,成功創建了一款視頻游戲,他們的努力取得了成功。在這一成就之后,許多人相信任何軟件工程任務都可以通過這種多智能體架構來解決,其中每個AI都有一個獨特的角色。然而,現實世界的實驗表明,并非每個問題都可以用相同的架構來解決。在某些情況下,更簡單的架構可能會提供更有效、更經濟的解決方案。
1.1 單智能體架構與多智能體架構
一開始,單智能體方法似乎很有道理(即一個AI智能體能夠完成從瀏覽器導航到文件操作的所有任務)。然而,隨著時間的推移,隨著任務變得越來越復雜,工具數量不斷增加,我們的單智能體方法將開始面臨挑戰。
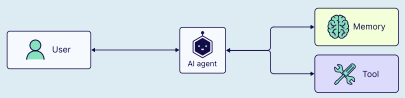
單智能體 | 圖片來源:Weaviate
我們會注意到當智能體開始出現異常行為時,這可能是由于以下原因導致的:
- 工具過多:智能體在使用哪些工具以及何時使用方面變得困惑。
- 上下文過于復雜:智能體的上下文窗口越來越大,包含的工具也越來越多。
- 錯誤過多:由于職責過于廣泛,智能體開始產生次優或錯誤的結果。
當我們開始自動化多個不同的子任務(如數據提取或報告生成)時,可能就是時候開始分離職責了。通過使用多個AI智能體,每個智能體專注于自己的領域和工具集,我們可以提高解決方案的清晰度和質量。這不僅可以讓智能體變得更加高效,還能簡化智能體本身的開發過程。
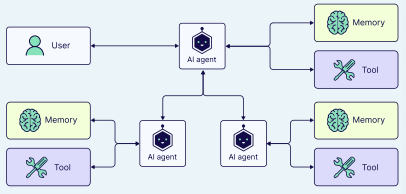
多智能體 | 圖片來源:Weaviate
2. 多智能體架構
正如你所看到的,單智能體和多智能體架構都有各自的優缺點。單智能體架構適用于任務簡單明了、定義明確且沒有特定資源限制的情況。另一方面,多智能體架構在用例復雜且動態、需要更多專業知識和協作,或者有可擴展性和適應性要求時會更有幫助。
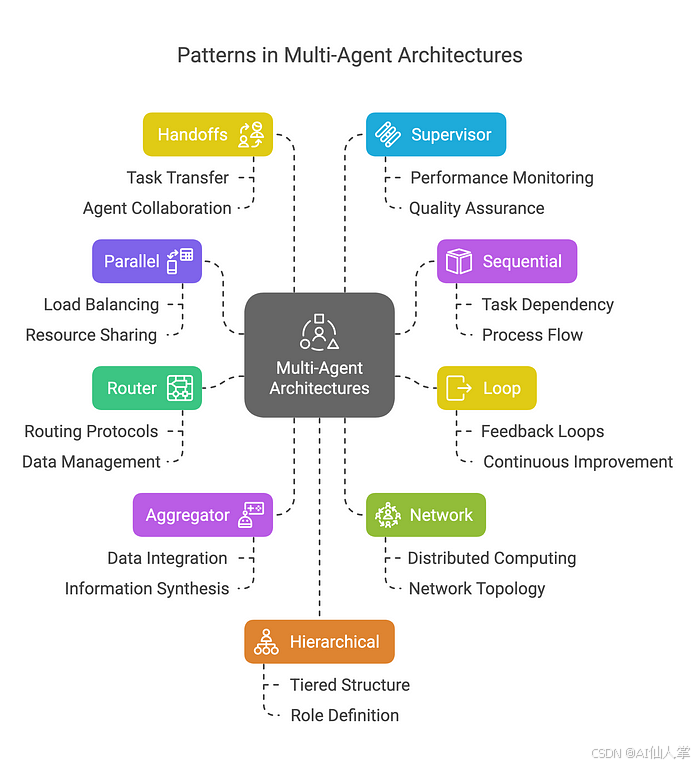
2.1 多智能體系統中的模式
在多智能體系統中,有幾種連接智能體的方式:
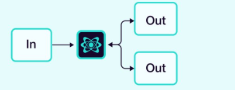
2.1.1 并行
多個智能體同時處理任務的不同部分。
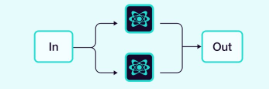
圖片來源:Weaviate
示例:我們希望同時使用3個智能體對給定文本進行總結、翻譯和情感分析。
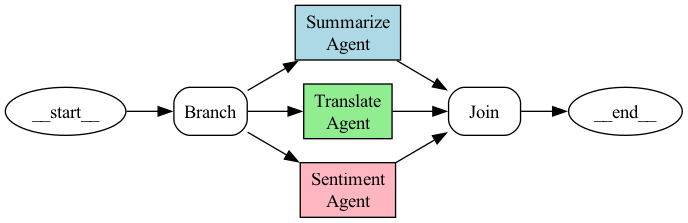
圖由作者提供
代碼:
from typing import Dict, Any, TypedDict
from langgraph.graph import StateGraph, END
from langchain_core.runnables import RunnableConfig
from textblob import TextBlob
import re
import time# 定義狀態
class AgentState(TypedDict):text: strsummary: strtranslation: strsentiment: strsummary_time: floattranslation_time: floatsentiment_time: float# 總結智能體
def summarize_agent(state: AgentState) -> Dict[str, Any]:print("總結智能體:運行中")start_time = time.time()try:text = state["text"]if not text.strip():return {"summary": "未提供用于總結的文本。","summary_time": 0.0}time.sleep(2)sentences = re.split(r'(?<=[.!?]) +', text.strip())scored_sentences = [(s, len(s.split())) for s in sentences if s]top_sentences = [s for s, _ in sorted(scored_sentences, key=lambda x: x[1], reverse=True)[:2]]summary = " ".join(top_sentences) if top_sentences else "文本太短,無法總結。"processing_time = time.time() - start_timeprint(f"總結智能體:完成,耗時 {processing_time:.2f} 秒")return {"summary": summary,"summary_time": processing_time}except Exception as e:return {"summary": f"總結時出錯:{str(e)}","summary_time": 0.0}# 翻譯智能體
def translate_agent(state: AgentState) -> Dict[str, Any]:print("翻譯智能體:運行中")start_time = time.time()try:text = state["text"]if not text.strip():return {"translation": "未提供用于翻譯的文本。","translation_time": 0.0}time.sleep(3)translation = ("El nuevo parque en la ciudad es una maravillosa adición. ""Las familias disfrutan de los espacios abiertos, y a los ni?os les encanta el parque infantil. ""Sin embargo, algunas personas piensan que el área de estacionamiento es demasiado peque?a.")processing_time = time.time() - start_timeprint(f"翻譯智能體:完成,耗時 {processing_time:.2f} 秒")return {"translation": translation,"translation_time": processing_time}except Exception as e:return {"translation": f"翻譯時出錯:{str(e)}","translation_time": 0.0}# 情感分析智能體
def sentiment_agent(state: AgentState) -> Dict[str, Any]:print("情感分析智能體:運行中")start_time = time.time()try:text = state["text"]if not text.strip():return {"sentiment": "未提供用于情感分析的文本。","sentiment_time": 0.0}time.sleep(1.5)blob = TextBlob(text)polarity = blob.sentiment.polaritysubjectivity = blob.sentiment.subjectivitysentiment = "Positive" if polarity > 0 else "Negative" if polarity < 0 else "Neutral"result = f"{sentiment} (Polarity: {polarity:.2f}, Subjectivity: {subjectivity:.2f})"processing_time = time.time() - start_timeprint(f"情感分析智能體:完成,耗時 {processing_time:.2f} 秒")return {"sentiment": result,"sentiment_time": processing_time}except Exception as e:return {"sentiment": f"情感分析時出錯:{str(e)}","sentiment_time": 0.0}# 合并并行結果
def join_parallel_results(state: AgentState) -> AgentState:return state# 構建圖
def build_parallel_graph() -> StateGraph:workflow = StateGraph(AgentState)# 定義并行分支parallel_branches = {"summarize_node": summarize_agent,"translate_node": translate_agent,"sentiment_node": sentiment_agent}# 添加并行處理節點for name, agent in parallel_branches.items():workflow.add_node(name, agent)# 添加分支和合并節點workflow.add_node("branch", lambda state: state)  # 簡化的分支函數workflow.add_node("join", join_parallel_results)# 設置入口點workflow.set_entry_point("branch")# 添加并行執行的邊for name in parallel_branches:workflow.add_edge("branch", name)workflow.add_edge(name, "join")workflow.add_edge("join", END)return workflow.compile()# 主函數
def main():text = ("The new park in the city is a wonderful addition. Families are enjoying the open spaces, ""and children love the playground. However, some people think the parking area is too small.")initial_state: AgentState = {"text": text,"summary": "","translation": "","sentiment": "","summary_time": 0.0,"translation_time": 0.0,"sentiment_time": 0.0}print("\n構建新圖...")app = build_parallel_graph()print("\n開始并行處理...")start_time = time.time()config = RunnableConfig(parallel=True)result = app.invoke(initial_state, config=config)total_time = time.time() - start_timeprint("\n=== 并行任務結果 ===")print(f"輸入文本:\n{text}\n")print(f"總結:\n{result['summary']}\n")print(f"翻譯(西班牙語):\n{result['translation']}\n")print(f"情感分析:\n{result['sentiment']}\n")print("\n=== 處理時間 ===")processing_times = {"summary": result["summary_time"],"translation": result["translation_time"],"sentiment": result["sentiment_time"]}for agent, time_taken in processing_times.items():print(f"{agent.capitalize()}:{time_taken:.2f} 秒")print(f"\n總墻鐘時間:{total_time:.2f} 秒")print(f"各處理時間之和:{sum(processing_times.values()):.2f} 秒")print(f"并行處理節省的時間:{sum(processing_times.values()) - total_time:.2f} 秒")if __name__ == "__main__":main()
輸出:
構建新圖...開始并行處理...
情感分析智能體:運行中
總結智能體:運行中
翻譯智能體:運行中
情感分析智能體:完成,耗時 1.50 秒
總結智能體:完成,耗時 2.00 秒
翻譯智能體:完成,耗時 3.00 秒=== 并行任務結果 ===
輸入文本:
The new park in the city is a wonderful addition. Families are enjoying the open spaces, and children love the playground. However, some people think the parking area is too small.總結:
Families are enjoying the open spaces, and children love the playground. The new park in the city is a wonderful addition.翻譯(西班牙語):
El nuevo parque en la ciudad es una maravillosa adición. Las familias disfrutan de los espacios abiertos, y a los ni?os les encanta el parque infantil. Sin embargo, algunas personas piensan que el área de estacionamiento es demasiado peque?a.情感分析:
Positive (Polarity: 0.31, Subjectivity: 0.59)=== 處理時間 ===
Summary: 2.00 秒
Translation: 3.00 秒
Sentiment: 1.50 秒總墻鐘時間:3.01 秒
各處理時間之和:6.50 秒
并行處理節省的時間:3.50 秒
- 并行性:總結、翻譯和情感分析這三個任務同時運行,減少了總處理時間。
- 獨立性:每個智能體獨立處理輸入文本,在執行過程中不需要智能體之間的通信。
- 協調性:隊列確保結果被安全收集并按順序顯示。
- 實際用例:總結、翻譯和情感分析是常見的自然語言處理任務,從較大的文本中受益于并行處理。
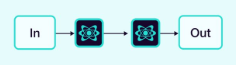
2.1.2 順序
任務按順序處理,一個智能體的輸出成為下一個智能體的輸入。
圖片來源:Weaviate
示例:多步驟審批。
代碼:
from typing import Dict
from langgraph.graph import StateGraph, MessagesState, END
from langchain_core.runnables import RunnableConfig
from langchain_core.messages import HumanMessage, AIMessage
import json# 智能體1:團隊負責人
def team_lead_agent(state: MessagesState, config: RunnableConfig) -> Dict:print("智能體(團隊負責人):開始審批")messages = state["messages"]proposal = json.loads(messages[0].content)title = proposal.get("title", "")amount = proposal.get("amount", 0.0)if not title or amount <= 0:status = "Rejected"comment = "團隊負責人:由于缺少標題或金額無效,提案被拒絕。"goto = ENDelse:status = "Approved by Team Lead"comment = "團隊負責人:提案完整且已批準。"goto = "dept_manager"print(f"智能體(團隊負責人):審批完成 - {status}")messages.append(AIMessage(content=json.dumps({"status": status, "comment": comment}),additional_kwargs={"agent": "team_lead", "goto": goto}))return {"messages": messages}# 智能體2:部門經理
def dept_manager_agent(state: MessagesState, config: RunnableConfig) -> Dict:print("智能體(部門經理):開始審批")messages = state["messages"]team_lead_msg = next((m for m in messages if m.additional_kwargs.get("agent") == "team_lead"), None)proposal = json.loads(messages[0].content)amount = proposal.get("amount", 0.0)if json.loads(team_lead_msg.content)["status"] != "Approved by Team Lead":status = "Rejected"comment = "部門經理:由于團隊負責人拒絕,跳過。"goto = ENDelif amount > 100000:status = "Rejected"comment = "部門經理:預算超出限制。"goto = ENDelse:status = "Approved by Department Manager"comment = "部門經理:預算在限制范圍內。"goto = "finance_director"print(f"智能體(部門經理):審批完成 - {status}")messages.append(AIMessage(content=json.dumps({"status": status, "comment": comment}),additional_kwargs={"agent": "dept_manager", "goto": goto}))return {"messages": messages}# 智能體3:財務總監
def finance_director_agent(state: MessagesState, config: RunnableConfig) -> Dict:print("智能體(財務總監):開始審批")messages = state["messages"]dept_msg = next((m for m in messages if m.additional_kwargs.get("agent") == "dept_manager"), None)proposal = json.loads(messages[0].content)amount = proposal.get("amount", 0.0)if json.loads(dept_msg.content)["status"] != "Approved by Department Manager":status = "Rejected"comment = "財務總監:由于部門經理拒絕,跳過。"elif amount > 50000:status = "Rejected"comment = "財務總監:預算不足。"else:status = "Approved"comment = "財務總監:已批準且可行。"print(f"智能體(財務總監):審批完成 - {status}")messages.append(AIMessage(content=json.dumps({"status": status, "comment": comment}),additional_kwargs={"agent": "finance_director", "goto": END}))return {"messages": messages}# 路由函數
def route_step(state: MessagesState) -> str:for msg in reversed(state["messages"]):goto = msg.additional_kwargs.get("goto")if goto:print(f"路由:智能體 {msg.additional_kwargs.get('agent')} 設置 goto 為 {goto}")return gotoreturn END# 構建 LangGraph
builder = StateGraph(MessagesState)
builder.add_node("team_lead", team_lead_agent)
builder.add_node("dept_manager", dept_manager_agent)
builder.add_node("finance_director", finance_director_agent)builder.set_entry_point("team_lead")builder.add_conditional_edges("team_lead", route_step, {"dept_manager": "dept_manager",END: END
})
builder.add_conditional_edges("dept_manager", route_step, {"finance_director": "finance_director",END: END
})
builder.add_conditional_edges("finance_director", route_step, {END: END
})workflow = builder.compile()# 主運行器
def main():initial_state = {"messages": [HumanMessage(content=json.dumps({"title": "New Equipment Purchase","amount": 40000.0,"department": "Engineering"}))]}result = workflow.invoke(initial_state)messages = result["messages"]proposal = json.loads(messages[0].content)print("\n=== 審批結果 ===")print(f"提案標題:{proposal['title']}")final_status = "Unknown"comments = []for msg in messages[1:]:if isinstance(msg, AIMessage):try:data = json.loads(msg.content)if "status" in data:final_status = data["status"]if "comment" in data:comments.append(data["comment"])except Exception:continueprint(f"最終狀態:{final_status}")print("評論:")for comment in comments:print(f"  - {comment}")if __name__ == "__main__":main()
輸出(金額 = $40,000):
智能體(團隊負責人):開始審批
智能體(團隊負責人):審批完成 - 已由團隊負責人批準
路由:智能體 team_lead 設置 goto 為 dept_manager
智能體(部門經理):開始審批
智能體(部門經理):審批完成 - 已由部門經理批準
路由:智能體 dept_manager 設置 goto 為 finance_director
智能體(財務總監):開始審批
智能體(財務總監):審批完成 - 已批準
路由:智能體 finance_director 設置 goto 為 __end__=== 審批結果 ===
提案標題:New Equipment Purchase
最終狀態:Approved
評論:- 團隊負責人:提案完整且已批準。- 部門經理:預算在限制范圍內。- 財務總監:已批準且可行。
- 順序執行:
- 智能體按順序運行:團隊負責人 → 部門經理 → 財務總監。
- 如果任何智能體拒絕,循環將中斷,跳過剩余的智能體。
- 每個智能體修改共享的 Proposal 對象,更新狀態和評論。
- 協調性:
- 結果存儲在列表中,但 Proposal 對象在智能體之間傳遞狀態。
- 不使用多處理,確保單線程、有序的工作流。
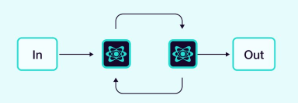
2.1.3 循環
智能體在迭代周期中運行,根據其他智能體的反饋不斷改進其輸出。
圖片來源:Weaviate
示例:評估用例,如代碼編寫和代碼測試。
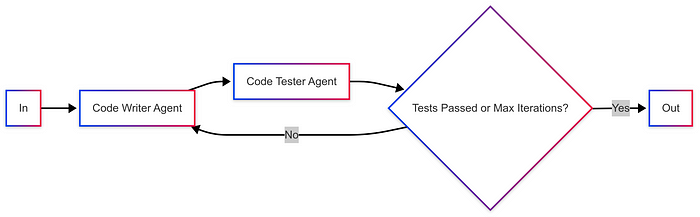
圖由作者提供
代碼:
from typing import Dict, Any, List
from langgraph.graph import StateGraph, END
from langchain_core.runnables import RunnableConfig
import textwrap# 狀態用于跟蹤工作流
class EvaluationState(Dict[str, Any]):code: str = ""feedback: str = ""passed: bool = Falseiteration: int = 0max_iterations: int = 3history: List[Dict] = []def __init__(self, *args, **kwargs):super().__init__(*args, **kwargs)self.setdefault("code", "")self.setdefault("feedback", "")self.setdefault("passed", False)self.setdefault("iteration", 0)self.setdefault("max_iterations", 3)self.setdefault("history", [])# 智能體1:代碼編寫者
def code_writer_agent(state: EvaluationState, config: RunnableConfig) -> Dict[str, Any]:print(f"迭代 {state['iteration'] + 1} - 代碼編寫者:生成代碼")print(f"迭代 {state['iteration'] + 1} - 代碼編寫者:收到反饋:{state['feedback']}")iteration = state["iteration"] + 1feedback = state["feedback"]if iteration == 1:# 初始嘗試:基本階乘(有漏洞,未處理零或負數)code = textwrap.dedent("""def factorial(n):result = 1for i in range(1, n + 1):result *= ireturn result""")writer_feedback = "初始代碼已生成。"elif "factorial(0)" in feedback.lower():# 修復零的情況code = textwrap.dedent("""def factorial(n):if n == 0:return 1result = 1for i in range(1, n + 1):result *= ireturn result""")writer_feedback = "修復了 n=0 的處理。"elif "factorial(-1)" in feedback.lower() or "negative" in feedback.lower():# 修復負數輸入code = textwrap.dedent("""def factorial(n):if n < 0:raise ValueError("階乘對負數未定義")if n == 0:return 1result = 1for i in range(1, n + 1):result *= ireturn result""")writer_feedback = "添加了對負數輸入的錯誤處理。"else:code = state["code"]writer_feedback = "未發現進一步改進。"print(f"迭代 {iteration} - 代碼編寫者:代碼已生成")return {"code": code,"feedback": writer_feedback,"iteration": iteration}# 智能體2:代碼測試者
def code_tester_agent(state: EvaluationState, config: RunnableConfig) -> Dict[str, Any]:print(f"迭代 {state['iteration']} - 代碼測試者:測試代碼")code = state["code"]try:# 定義測試用例test_cases = [(0, 1),      # factorial(0) = 1(1, 1),      # factorial(1) = 1(5, 120),    # factorial(5) = 120(-1, None),  # 應該引發 ValueError]# 在安全命名空間中執行代碼namespace = {}exec(code, namespace)factorial = namespace.get('factorial')if not callable(factorial):return {"passed": False, "feedback": "未找到階乘函數。"}feedback_parts = []passed = True# 運行所有測試用例并收集所有失敗情況for input_val, expected in test_cases:try:result = factorial(input_val)if expected is None:  # 期望出錯passed = Falsefeedback_parts.append(f"測試失敗:factorial({input_val}) 應該引發錯誤。")elif result != expected:passed = Falsefeedback_parts.append(f"測試失敗:factorial({input_val}) 返回 {result},期望 {expected}。")except ValueError as ve:if expected is not None:passed = Falsefeedback_parts.append(f"測試失敗:factorial({input_val}) 意外引發 ValueError:{str(ve)}")except Exception as e:passed = Falsefeedback_parts.append(f"測試失敗:factorial({input_val}) 導致錯誤:{str(e)}")feedback = "所有測試通過!" if passed else "\n".join(feedback_parts)print(f"迭代 {state['iteration']} - 代碼測試者:測試完成 - {'通過' if passed else '失敗'}")# 在歷史記錄中記錄此次嘗試history = state["history"]history.append({"iteration": state["iteration"],"code": code,"feedback": feedback,"passed": passed})return {"passed": passed,"feedback": feedback,"history": history}except Exception as e:print(f"迭代 {state['iteration']} - 代碼測試者:失敗")return {"passed": False, "feedback": f"測試時出錯:{str(e)}"}# 條件邊以決定是否繼續循環
def should_continue(state: EvaluationState) -> str:if state["passed"] or state["iteration"] >= state["max_iterations"]:print(f"迭代 {state['iteration']} - {'循環停止:測試通過' if state['passed'] else '循環停止:達到最大迭代次數'}")return "end"print(f"迭代 {state['iteration']} - 循環繼續:測試失敗")return "code_writer"# 構建 LangGraph 工作流
workflow = StateGraph(EvaluationState)# 添加節點
workflow.add_node("code_writer", code_writer_agent)
workflow.add_node("code_tester", code_tester_agent)# 添加邊
workflow.set_entry_point("code_writer")
workflow.add_edge("code_writer", "code_tester")
workflow.add_conditional_edges("code_tester",should_continue,{"code_writer": "code_writer","end": END}
)# 編譯圖
app = workflow.compile()# 運行工作流
def main():initial_state = EvaluationState()result = app.invoke(initial_state)# 顯示結果print("\n=== 評估結果 ===")print(f"最終狀態:{'通過' if result['passed'] else '失敗'},經過 {result['iteration']} 次迭代")print(f"最終代碼:\n{result['code']}")print(f"最終反饋:\n{result['feedback']}")print("\n迭代歷史:")for attempt in result["history"]:print(f"迭代 {attempt['iteration']}:")print(f"  代碼:\n{attempt['code']}")print(f"  反饋:{attempt['feedback']}")print(f"  通過:{attempt['passed']}\n")if __name__ == "__main__":main()
輸出:
迭代 1 - 代碼編寫者:生成代碼
迭代 1 - 代碼編寫者:收到反饋:
迭代 1 - 代碼編寫者:代碼已生成
迭代 1 - 代碼測試者:測試代碼
迭代 1 - 代碼測試者:測試完成 - 失敗
迭代 1 - 循環繼續:測試失敗
迭代 2 - 代碼編寫者:生成代碼
迭代 2 - 代碼編寫者:收到反饋:測試失敗:factorial(-1) 應該引發錯誤。
迭代 2 - 代碼編寫者:代碼已生成
迭代 2 - 代碼測試者:測試代碼
迭代 2 - 代碼測試者:測試完成 - 通過
迭代 2 - 循環停止:測試通過=== 評估結果 ===
最終狀態:通過,經過 2 次迭代
最終代碼:def factorial(n):if n < 0:raise ValueError("階乘對負數未定義")if n == 0:return 1result = 1for i in range(1, n + 1):result *= ireturn result最終反饋:
所有測試通過!迭代歷史:
迭代 1:代碼:def factorial(n):result = 1for i in range(1, n + 1):result *= ireturn result反饋:測試失敗:factorial(-1) 應該引發錯誤。通過:False迭代 2:代碼:def factorial(n):if n < 0:raise ValueError("階乘對負數未定義")if n == 0:return 1result = 1for i in range(1, n + 1):result *= ireturn result反饋:所有測試通過!通過:True
- 全面反饋:代碼測試者現在報告所有測試失敗情況,確保代碼編寫者能夠逐步修復問題。
- 正確處理反饋:代碼編寫者優先修復問題(先處理零的情況,然后是負數輸入),確保逐步改進。
- 循環終止:當測試通過時,循環正確退出,而不是不必要地運行所有 3 次迭代。
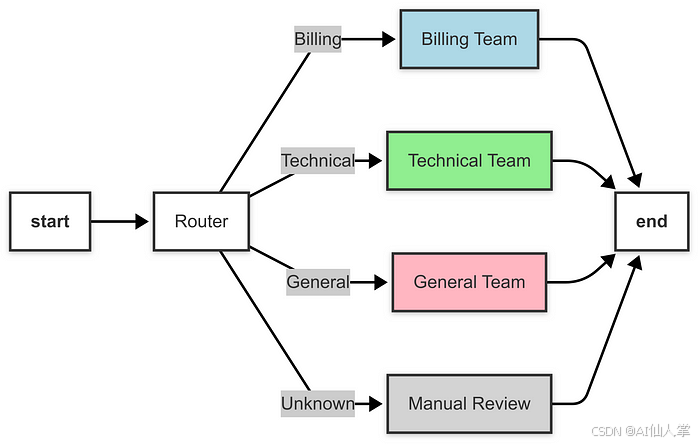
2.1.4 路由器
一個中央路由器根據任務或輸入決定調用哪些智能體。
圖片來源:Weaviate
示例:客戶支持工單路由
代碼:
from typing import Dict, Any, TypedDict, Literal
from langgraph.graph import StateGraph, END
from langchain_core.runnables import RunnableConfig
import re
import time# 第一步:定義狀態
# 狀態保存工單信息和處理結果
class TicketState(TypedDict):ticket_text: str  # 工單內容category: str     # 確定的類別(計費、技術、一般或未知)resolution: str   # 支持團隊提供的解決方案processing_time: float  # 處理工單所用時間# 第二步:定義路由器智能體
# 該智能體分析工單并確定其類別
def router_agent(state: TicketState) -> Dict[str, Any]:print("路由器智能體:分析工單...")start_time = time.time()ticket_text = state["ticket_text"].lower()# 簡單的基于關鍵字的分類(可以用 LLM 或 ML 模型替換)if any(keyword in ticket_text for keyword in ["billing", "payment", "invoice", "charge"]):category = "Billing"elif any(keyword in ticket_text for keyword in ["technical", "bug", "error", "crash"]):category = "Technical"elif any(keyword in ticket_text for keyword in ["general", "question", "inquiry", "info"]):category = "General"else:category = "Unknown"processing_time = time.time() - start_timeprint(f"路由器智能體:在 {processing_time:.2f} 秒內將工單分類為 '{category}'")return {"category": category,"processing_time": processing_time}# 第三步:定義支持團隊智能體
# 每個智能體處理特定類別的工單# 計費團隊智能體
def billing_team_agent(state: TicketState) -> Dict[str, Any]:print("計費團隊智能體:處理工單...")start_time = time.time()ticket_text = state["ticket_text"]resolution = f"計費團隊:已審閱工單 '{ticket_text}'。請檢查您的發票詳情,或聯系我們的計費部門以獲取進一步幫助。"processing_time = time.time() - start_timetime.sleep(1)  # 模擬處理時間print(f"計費團隊智能體:在 {processing_time:.2f} 秒內完成")return {"resolution": resolution,"processing_time": state["processing_time"] + processing_time}# 技術支持團隊智能體
def technical_team_agent(state: TicketState) -> Dict[str, Any]:print("技術支持團隊智能體:處理工單...")start_time = time.time()ticket_text = state["ticket_text"]resolution = f"技術支持團隊:已審閱工單 '{ticket_text}'。請嘗試重新啟動您的設備,或提交詳細的錯誤日志以便進一步調查。"processing_time = time.time() - start_timetime.sleep(1.5)  # 模擬處理時間print(f"技術支持團隊智能體:在 {processing_time:.2f} 秒內完成")return {"resolution": resolution,"processing_time": state["processing_time"] + processing_time}# 一般支持團隊智能體
def general_team_agent(state: TicketState) -> Dict[str, Any]:print("一般團隊智能體:處理工單...")start_time = time.time()ticket_text = state["ticket_text"]resolution = f"一般團隊:已審閱工單 '{ticket_text}'。有關更多信息,請參閱我們的常見問題解答,或通過電子郵件聯系我們。"processing_time = time.time() - start_timetime.sleep(0.8)  # 模擬處理時間print(f"一般團隊智能體:在 {processing_time:.2f} 秒內完成")return {"resolution": resolution,"processing_time": state["processing_time"] + processing_time}# 手動審核智能體(用于未知類別)
def manual_review_agent(state: TicketState) -> Dict[str, Any]:print("手動審核智能體:處理工單...")start_time = time.time()ticket_text = state["ticket_text"]resolution = f"手動審核:工單 '{ticket_text}' 無法分類。標記為人工審核。請手動分配給適當的團隊。"processing_time = time.time() - start_timetime.sleep(0.5)  # 模擬處理時間print(f"手動審核智能體:在 {processing_time:.2f} 秒內完成")return {"resolution": resolution,"processing_time": state["processing_time"] + processing_time}# 第四步:定義路由器函數
# 該函數根據工單類別確定下一個節點
def route_ticket(state: TicketState) -> Literal["billing_team", "technical_team", "general_team", "manual_review"]:category = state["category"]print(f"路由:工單類別為 '{category}'")if category == "Billing":return "billing_team"elif category == "Technical":return "technical_team"elif category == "General":return "general_team"else:return "manual_review"# 第五步:構建帶有路由器模式的圖
def build_router_graph() -> StateGraph:workflow = StateGraph(TicketState)# 添加節點workflow.add_node("router", router_agent)  # 入口點:對工單進行分類workflow.add_node("billing_team", billing_team_agent)  # 處理計費工單workflow.add_node("technical_team", technical_team_agent)  # 處理技術工單workflow.add_node("general_team", general_team_agent)  # 處理一般咨詢workflow.add_node("manual_review", manual_review_agent)  # 處理未分類工單# 設置入口點workflow.set_entry_point("router")# 添加條件邊以進行路由workflow.add_conditional_edges("router",route_ticket,  # 路由器函數,用于確定下一個節點{"billing_team": "billing_team","technical_team": "technical_team","general_team": "general_team","manual_review": "manual_review"})# 從每個團隊添加邊到 ENDworkflow.add_edge("billing_team", END)workflow.add_edge("technical_team", END)workflow.add_edge("general_team", END)workflow.add_edge("manual_review", END)return workflow.compile()# 第六步:運行工作流
def main():# 不同工單類別的測試用例test_tickets = ["我對我的最后一張發票有計費問題。似乎我被多收費了。","我的應用程序不斷出現技術錯誤。請幫忙!","我對您的服務有一個一般性問題。能否提供更多信息?","我需要幫助解決一個與計費或技術問題無關的問題。"]for ticket_text in test_tickets:# 初始化每個工單的狀態initial_state: TicketState = {"ticket_text": ticket_text,"category": "","resolution": "","processing_time": 0.0}print(f"\n=== 正在處理工單:'{ticket_text}' ===")app = build_router_graph()start_time = time.time()result = app.invoke(initial_state, config=RunnableConfig())total_time = time.time() - start_timeprint("\n=== 工單結果 ===")print(f"類別:{result['category']}")print(f"解決方案:{result['resolution']}")print(f"總處理時間:{result['processing_time']:.2f} 秒")print(f"總運行時間:{total_time:.2f} 秒")print("-" * 50)if __name__ == "__main__":main()
輸出:
=== 正在處理工單:'我對我的最后一張發票有計費問題。似乎我被多收費了。' ===
路由器智能體:分析工單...
路由器智能體:在 0.00 秒內將工單分類為 'Billing'
路由:工單類別為 'Billing'
計費團隊智能體:處理工單...
計費團隊智能體:在 0.00 秒內完成=== 工單結果 ===
類別:Billing
解決方案:計費團隊:已審閱工單 '我對我的最后一張發票有計費問題。似乎我被多收費了。'。請檢查您的發票詳情,或聯系我們的計費部門以獲取進一步幫助。
總處理時間:0.00 秒
總運行時間:1.03 秒
--------------------------------------------------=== 正在處理工單:'我的應用程序不斷出現技術錯誤。請幫忙!' ===
路由器智能體:分析工單...
路由器智能體:在 0.00 秒內將工單分類為 'Technical'
路由:工單類別為 'Technical'
技術支持團隊智能體:處理工單...
技術支持團隊智能體:在 0.00 秒內完成=== 工單結果 ===
類別:Technical
解決方案:技術支持團隊:已審閱工單 '我的應用程序不斷出現技術錯誤。請幫忙!'。請嘗試重新啟動您的設備,或提交詳細的錯誤日志以便進一步調查。
總處理時間:0.00 秒
總運行時間:1.50 秒
--------------------------------------------------=== 正在處理工單:'我對您的服務有一個一般性問題。能否提供更多信息?' ===
路由器智能體:分析工單...
路由器智能體:在 0.00 秒內將工單分類為 'General'
路由:工單類別為 'General'
一般團隊智能體:處理工單...
一般團隊智能體:在 0.00 秒內完成=== 工單結果 ===
類別:General
解決方案:一般團隊:已審閱工單 '我對您的服務有一個一般性問題。能否提供更多信息?'。有關更多信息,請參閱我們的常見問題解答,或通過電子郵件聯系我們。
總處理時間:0.00 秒
總運行時間:0.80 秒
--------------------------------------------------=== 正在處理工單:'我需要幫助解決一個與計費或技術問題無關的問題。' ===
路由器智能體:分析工單...
路由器智能體:在 0.00 秒內將工單分類為 'Billing'
路由:工單類別為 'Billing'
計費團隊智能體:處理工單...
計費團隊智能體:在 0.00 秒內完成=== 工單結果 ===
類別:Billing
解決方案:計費團隊:已審閱工單 '我需要幫助解決一個與計費或技術問題無關的問題。'。請檢查您的發票詳情,或聯系我們的計費部門以獲取進一步幫助。
總處理時間:0.00 秒
總運行時間:1.00 秒
--------------------------------------------------
- 動態路由:路由器智能體確定工單類別,route_ticket 函數使用 add_conditional_edges 指導工作流流向適當的節點。
- 基于條件的流程:與并行模式不同(多個節點同時運行),路由器模式僅根據條件(類別)執行一個路徑。
- 可擴展性:通過擴展節點并更新 route_ticket 函數以處理新類別,可以輕松添加更多支持團隊。
2.1.5 聚合器(或合成器)
智能體貢獻輸出,這些輸出由聚合器智能體收集并合成最終結果。
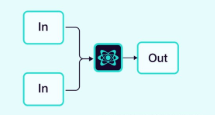
圖片來源:Weaviate
示例:社交媒體情感分析聚合器

圖由作者提供
代碼:
from typing import Dict, Any, TypedDict, List
from langgraph.graph import StateGraph, END
from langchain_core.runnables import RunnableConfig
from textblob import TextBlob
import time
from typing_extensions import Annotated
from operator import add# 第一步:定義狀態
class SocialMediaState(TypedDict):twitter_posts: List[str]instagram_posts: List[str]reddit_posts: List[str]twitter_sentiment: Dict[str, float]instagram_sentiment: Dict[str, float]reddit_sentiment: Dict[str, float]final_report: strprocessing_time: Annotated[float, add]# 第二步:定義帖子收集智能體
def collect_twitter_posts(state: SocialMediaState) -> Dict[str, Any]:print("推特智能體:收集帖子...")start_time = time.time()posts = ["Loving the new product from this brand! Amazing quality.","Terrible customer service from this brand. Very disappointed."]time.sleep(1)  # 模擬處理時間processing_time = time.time() - start_time  # 包括 time.sleep 在處理時間中print(f"推特智能體:在 {processing_time:.2f} 秒內完成")return {"twitter_posts": posts,"processing_time": processing_time}def collect_instagram_posts(state: SocialMediaState) -> Dict[str, Any]:print("Instagram 智能體:收集帖子...")start_time = time.time()posts = ["Beautiful design by this brand! #loveit","Not impressed with the latest release. Expected better."]time.sleep(1.2)  # 模擬處理時間processing_time = time.time() - start_timeprint(f"Instagram 智能體:在 {processing_time:.2f} 秒內完成")return {"instagram_posts": posts,"processing_time": processing_time}def collect_reddit_posts(state: SocialMediaState) -> Dict[str, Any]:print("Reddit 智能體:收集帖子...")start_time = time.time()posts = ["This brand is awesome! Great value for money.","Had a bad experience with their support team. Not happy."]time.sleep(0.8)  # 模擬處理時間processing_time = time.time() - start_timeprint(f"Reddit 智能體:在 {processing_time:.2f} 秒內完成")return {"reddit_posts": posts,"processing_time": processing_time}# 第三步:定義情感分析智能體
def analyze_twitter_sentiment(state: SocialMediaState) -> Dict[str, Any]:print("推特情感分析智能體:分析情感...")start_time = time.time()posts = state["twitter_posts"]polarities = [TextBlob(post).sentiment.polarity for post in posts]avg_polarity = sum(polarities) / len(polarities) if polarities else 0.0time.sleep(0.5)  # 模擬處理時間processing_time = time.time() - start_timeprint(f"推特情感分析智能體:在 {processing_time:.2f} 秒內完成")return {"twitter_sentiment": {"average_polarity": avg_polarity, "num_posts": len(posts)},"processing_time": processing_time}def analyze_instagram_sentiment(state: SocialMediaState) -> Dict[str, Any]:print("Instagram 情感分析智能體:分析情感...")start_time = time.time()posts = state["instagram_posts"]polarities = [TextBlob(post).sentiment.polarity for post in posts]avg_polarity = sum(polarities) / len(polarities) if polarities else 0.0time.sleep(0.6)  # 模擬處理時間processing_time = time.time() - start_timeprint(f"Instagram 情感分析智能體:在 {processing_time:.2f} 秒內完成")return {"instagram_sentiment": {"average_polarity": avg_polarity, "num_posts": len(posts)},"processing_time": processing_time}def analyze_reddit_sentiment(state: SocialMediaState) -> Dict[str, Any]:print("Reddit 情感分析智能體:分析情感...")start_time = time.time()posts = state["reddit_posts"]polarities = [TextBlob(post).sentiment.polarity for post in posts]avg_polarity = sum(polarities) / len(polarities) if polarities else 0.0time.sleep(0.4)  # 模擬處理時間processing_time = time.time() - start_timeprint(f"Reddit 情感分析智能體:在 {processing_time:.2f} 秒內完成")return {"reddit_sentiment": {"average_polarity": avg_polarity, "num_posts": len(posts)},"processing_time": processing_time}# 第四步:定義聚合智能體
def aggregate_results(state: SocialMediaState) -> Dict[str, Any]:print("聚合智能體:生成最終報告...")start_time = time.time()twitter_sentiment = state["twitter_sentiment"]instagram_sentiment = state["instagram_sentiment"]reddit_sentiment = state["reddit_sentiment"]total_posts = (twitter_sentiment["num_posts"] +instagram_sentiment["num_posts"] +reddit_sentiment["num_posts"])weighted_polarity = (twitter_sentiment["average_polarity"] * twitter_sentiment["num_posts"] +instagram_sentiment["average_polarity"] * instagram_sentiment["num_posts"] +reddit_sentiment["average_polarity"] * reddit_sentiment["num_posts"]) / total_posts if total_posts > 0 else 0.0overall_sentiment = ("Positive" if weighted_polarity > 0 else"Negative" if weighted_polarity < 0 else "Neutral")report = (f"Overall Sentiment: {overall_sentiment} (Average Polarity: {weighted_polarity:.2f})\n"f"Twitter Sentiment: {twitter_sentiment['average_polarity']:.2f} (Posts: {twitter_sentiment['num_posts']})\n"f"Instagram Sentiment: {instagram_sentiment['average_polarity']:.2f} (Posts: {instagram_sentiment['num_posts']})\n"f"Reddit Sentiment: {reddit_sentiment['average_polarity']:.2f} (Posts: {reddit_sentiment['num_posts']})")time.sleep(0.3)  # 模擬處理時間processing_time = time.time() - start_timeprint(f"聚合智能體:在 {processing_time:.2f} 秒內完成")return {"final_report": report,"processing_time": processing_time}# 第五步:構建帶有聚合器模式的圖
def build_aggregator_graph() -> StateGraph:workflow = StateGraph(SocialMediaState)# 添加收集帖子的節點workflow.add_node("collect_twitter", collect_twitter_posts)workflow.add_node("collect_instagram", collect_instagram_posts)workflow.add_node("collect_reddit", collect_reddit_posts)# 添加情感分析節點workflow.add_node("analyze_twitter", analyze_twitter_sentiment)workflow.add_node("analyze_instagram", analyze_instagram_sentiment)workflow.add_node("analyze_reddit", analyze_reddit_sentiment)# 添加聚合節點workflow.add_node("aggregate", aggregate_results)# 添加一個分支節點以并行觸發所有收集節點workflow.add_node("branch", lambda state: state)# 將入口點設置為分支節點workflow.set_entry_point("branch")# 添加從分支到收集節點的邊(并行執行)workflow.add_edge("branch", "collect_twitter")workflow.add_edge("branch", "collect_instagram")workflow.add_edge("branch", "collect_reddit")# 添加從收集到情感分析的邊workflow.add_edge("collect_twitter", "analyze_twitter")workflow.add_edge("collect_instagram", "analyze_instagram")workflow.add_edge("collect_reddit", "analyze_reddit")# 添加從情感分析到聚合器的邊workflow.add_edge("analyze_twitter", "aggregate")workflow.add_edge("analyze_instagram", "aggregate")workflow.add_edge("analyze_reddit", "aggregate")# 添加從聚合器到 END 的邊workflow.add_edge("aggregate", END)return workflow.compile()# 第六步:運行工作流
def main():initial_state: SocialMediaState = {"twitter_posts": [],"instagram_posts": [],"reddit_posts": [],"twitter_sentiment": {"average_polarity": 0.0, "num_posts": 0},"instagram_sentiment": {"average_polarity": 0.0, "num_posts": 0},"reddit_sentiment": {"average_polarity": 0.0, "num_posts": 0},"final_report": "","processing_time": 0.0}print("\n開始社交媒體情感分析...")app = build_aggregator_graph()start_time = time.time()config = RunnableConfig(parallel=True)result = app.invoke(initial_state, config=config)total_time = time.time() - start_timeprint("\n=== 情感分析結果 ===")print(result["final_report"])print(f"\n總處理時間:{result['processing_time']:.2f} 秒")print(f"總運行時間:{total_time:.2f} 秒")if __name__ == "__main__":main()
輸出:
開始社交媒體情感分析...
Instagram 智能體:收集帖子...
Reddit 智能體:收集帖子...
推特智能體:收集帖子...
Reddit 智能體:在 0.80 秒內完成
推特智能體:在 1.00 秒內完成
Instagram 智能體:在 1.20 秒內完成
Instagram 情感分析智能體:分析情感...
Reddit 情感分析智能體:分析情感...
推特情感分析智能體:分析情感...
Reddit 情感分析智能體:在 0.40 秒內完成
推特情感分析智能體:在 0.50 秒內完成
Instagram 情感分析智能體:在 0.60 秒內完成
聚合智能體:生成最終報告...
聚合智能體:在 0.30 秒內完成=== 情感分析結果 ===
Overall Sentiment: Positive (Average Polarity: 0.15)
Twitter Sentiment: -0.27 (Posts: 2)
Instagram Sentiment: 0.55 (Posts: 2)
Reddit Sentiment: 0.18 (Posts: 2)總處理時間:4.80 秒
總運行時間:2.13 秒
- 并行執行:收集和分析節點并行運行,減少了總運行時間(2.1 秒),與各個處理時間之和(3.8 秒)相比。
- 聚合:聚合節點將情感分析結果合并為最終報告,計算整體情感,并按平臺提供分解。
2.1.6 網絡(或水平)
智能體以多對多的方式直接相互通信,形成一個去中心化的網絡。
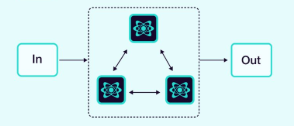
圖片來源:Weaviate
這種架構適用于沒有明確的智能體層級結構或智能體調用順序的問題。
from typing import Literal
from langchain_openai import ChatOpenAI
from langgraph.graph import StateGraph, MessagesState, START, END
model = ChatOpenAI()
def agent_1(state: MessagesState) -> Command[Literal["agent_2", "agent_3", END]]:# 你可以將相關部分的狀態傳遞給 LLM(例如,state["messages"])# 以確定要調用的下一個智能體。一種常見模式是調用模型# 并要求其返回一個結構化輸出(例如,強制其返回一個包含 "next_agent" 字段的輸出)response = model.invoke(...)# 根據 LLM 的決策,路由到其中一個智能體或退出# 如果 LLM 返回 "__end__",圖將結束執行return Command(goto=response["next_agent"],update={"messages": [response["content"]]},)
def agent_2(state: MessagesState) -> Command[Literal["agent_1", "agent_3", END]]:response = model.invoke(...)return Command(goto=response["next_agent"],update={"messages": [response["content"]]},)
def agent_3(state: MessagesState) -> Command[Literal["agent_1", "agent_2", END]]:...return Command(goto=response["next_agent"],update={"messages": [response["content"]]},)
builder = StateGraph(MessagesState)
builder.add_node(agent_1)
builder.add_node(agent_2)
builder.add_node(agent_3)
builder.add_edge(START, "agent_1")
network = builder.compile()
API 參考:ChatOpenAI | StateGraph | START | END
優點:分布式協作和群體驅動的決策制定。即使某些智能體失敗,系統仍然可以正常運行。
缺點:管理智能體之間的通信可能會變得復雜。更多的通信可能會導致效率低下,并且智能體可能會重復工作。
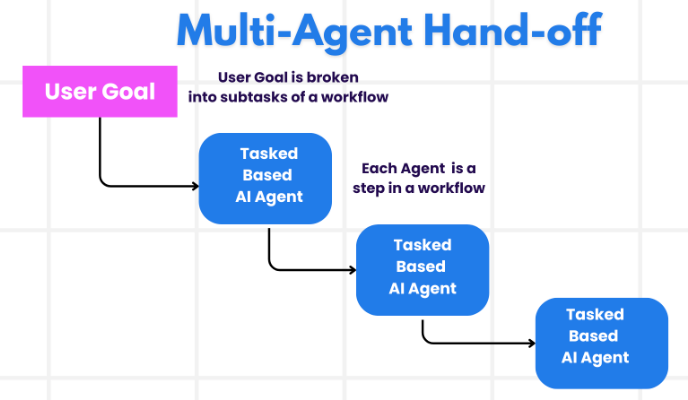
2.1.7 交接
在多智能體架構中,智能體可以表示為圖的節點。每個智能體節點執行其步驟,并決定是結束執行還是路由到另一個智能體,包括可能路由到自身(例如,在循環中運行)。多智能體交互中的一種常見模式是交接,其中一個智能體將控制權移交給另一個智能體。交接允許你指定:
- 目標:目標智能體(例如,要導航到的節點名稱)
- 負載:要傳遞給該智能體的信息(例如,狀態更新)
圖片來源:aka.ms/ai-agents-beginners
要在 LangGraph 中實現交接,智能體節點可以返回一個 Command 對象,該對象允許你同時控制流程和狀態更新:
def agent(state) -> Command[Literal["agent", "another_agent"]]:# 路由/停止的條件可以是任何內容,例如 LLM 工具調用 / 結構化輸出等。goto = get_next_agent(...) # 'agent' / 'another_agent'return Command(# 指定要調用的下一個智能體goto=goto,# 更新圖狀態update={"my_state_key": "my_state_value"})
在一個更復雜的場景中,每個智能體節點本身就是一個圖(即,一個子圖),一個子圖中的節點可能希望導航到另一個智能體。例如,如果你有兩個智能體,alice 和 bob(父圖中的子圖節點),并且 alice 需要導航到 bob,你可以在 Command 對象中設置 graph=Command.PARENT:
def some_node_inside_alice(state)return Command(goto="bob",update={"my_state_key": "my_state_value"},# 指定要導航到的圖(默認為當前圖)graph=Command.PARENT,)
注意
如果你需要為子圖之間的通信使用 Command(graph=Command.PARENT) 提供可視化支持,你需要將它們包裝在一個帶有 Command 注解的節點函數中,例如,而不是這樣:
builder.add_node(alice)
你需要這樣做:
def call_alice(state) -> Command[Literal["bob"]]:return alice.invoke(state)builder.add_node("alice", call_alice)
交接作為工具
最常見的智能體類型之一是 ReAct 風格的工具調用智能體。對于這種類型的智能體,一個常見模式是將交接包裝在一個工具調用中,例如:
def transfer_to_bob(state):"""移交到 bob。"""return Command(goto="bob",update={"my_state_key": "my_state_value"},graph=Command.PARENT,)
這是從工具中更新圖狀態的一個特殊情況,除了狀態更新外,還包括控制流程。
重要
如果你希望使用返回 Command 的工具,你可以使用預構建的 create_react_agent /ToolNode 組件,或者自己實現一個工具執行節點,該節點收集工具返回的 Command 對象并返回一個列表,例如:
def call_tools(state):...commands = [tools_by_name[tool_call["name"]].invoke(tool_call) for tool_call in tool_calls]return commands
讓我們更仔細地看看不同的多智能體架構。
2.1.8 監督者
在這種架構中,我們將智能體定義為節點,并添加一個監督者節點(LLM),該節點決定應該調用哪些智能體節點。我們使用 Command 根據監督者的決策將執行路由到適當的智能體節點。這種架構也非常適合并行運行多個智能體,或者使用Map-Reduce模式。
from typing import Literal
from langchain_openai import ChatOpenAI
from langgraph.graph import StateGraph, MessagesState, START, ENDmodel = ChatOpenAI()def supervisor(state: MessagesState) -> Command[Literal["agent_1", "agent_2", END]]:# 你可以將相關部分的狀態傳遞給 LLM(例如,state["messages"])# 以確定要調用的下一個智能體。一種常見模式是調用模型# 并要求其返回一個結構化輸出(例如,強制其返回一個包含 "next_agent" 字段的輸出)response = model.invoke(...)# 根據監督者的決策,路由到其中一個智能體或退出# 如果監督者返回 "__end__",圖將結束執行return Command(goto=response["next_agent"])def agent_1(state: MessagesState) -> Command[Literal["supervisor"]]:# 你可以將相關部分的狀態傳遞給 LLM(例如,state["messages"])# 并添加任何額外的邏輯(不同的模型、自定義提示、結構化輸出等)response = model.invoke(...)return Command(goto="supervisor",update={"messages": [response]},)def agent_2(state: MessagesState) -> Command[Literal["supervisor"]]:response = model.invoke(...)return Command(goto="supervisor",update={"messages": [response]},)builder = StateGraph(MessagesState)
builder.add_node(supervisor)
builder.add_node(agent_1)
builder.add_node(agent_2)builder.add_edge(START, "supervisor")supervisor = builder.compile()
API 參考:ChatOpenAI | StateGraph | START | END
查看這個 教程,了解監督者多智能體架構的示例。
2.1.9 監督者(工具調用)
這是 監督者 架構的一個變體,我們將單獨的智能體定義為 工具,并在監督者節點中使用工具調用 LLM。這可以實現為一個 ReAct-風格的智能體圖,其中包含兩個節點——一個 LLM 節點(監督者)和一個工具調用節點,用于執行工具(在這種情況下是智能體)。
from typing import Annotated
from langchain_openai import ChatOpenAI
from langgraph.prebuilt import InjectedState, create_react_agentmodel = ChatOpenAI()# 這是將被調用為工具的智能體函數
# 注意,你可以通過 InjectedState 注解將狀態傳遞給工具
def agent_1(state: Annotated[dict, InjectedState]):# 你可以將相關部分的狀態傳遞給 LLM(例如,state["messages"])# 并添加任何額外的邏輯(不同的模型、自定義提示、結構化輸出等)response = model.invoke(...)# 以字符串形式返回 LLM 響應(預期的工具響應格式)# 這將被預構建的 create_react_agent(監督者)自動轉換為 ToolMessagereturn response.contentdef agent_2(state: Annotated[dict, InjectedState]):response = model.invoke(...)return response.contenttools = [agent_1, agent_2]
# 使用預構建的 ReAct 智能體圖來構建帶有工具調用的監督者
# 該圖由一個工具調用 LLM 節點(即監督者)和一個工具執行節點組成
supervisor = create_react_agent(model, tools)
API 參考:ChatOpenAI | InjectedState | create_react_agent
2.1.10 層級(或垂直)
智能體以樹狀結構組織,高層智能體(監督者智能體)管理低層智能體。

圖片來源:Weaviate
隨著你向系統中添加更多智能體,監督者可能難以管理所有智能體。監督者可能開始對調用下一個智能體做出錯誤決策,上下文可能變得過于復雜,以至于單個監督者難以跟蹤。換句話說,你最終會遇到最初促使你采用多智能體架構的相同問題。
為了解決這個問題,你可以設計一個分層的系統。例如,你可以創建由單獨的監督者管理的獨立、專業化的智能體團隊,并由一個頂層監督者來管理這些團隊。
from typing import Literal
from langchain_openai import ChatOpenAI
from langgraph.graph import StateGraph, MessagesState, START, END
from langgraph.types import Command
model = ChatOpenAI()# 定義團隊 1(與上面的單監督者示例相同)def team_1_supervisor(state: MessagesState) -> Command[Literal["team_1_agent_1", "team_1_agent_2", END]]:response = model.invoke(...)return Command(goto=response["next_agent"])def team_1_agent_1(state: MessagesState) -> Command[Literal["team_1_supervisor"]]:response = model.invoke(...)return Command(goto="team_1_supervisor", update={"messages": [response]})def team_1_agent_2(state: MessagesState) -> Command[Literal["team_1_supervisor"]]:response = model.invoke(...)return Command(goto="team_1_supervisor", update={"messages": [response]})team_1_builder = StateGraph(Team1State)
team_1_builder.add_node(team_1_supervisor)
team_1_builder.add_node(team_1_agent_1)
team_1_builder.add_node(team_1_agent_2)
team_1_builder.add_edge(START, "team_1_supervisor")
team_1_graph = team_1_builder.compile()# 定義團隊 2(與上面的單監督者示例相同)
class Team2State(MessagesState):next: Literal["team_2_agent_1", "team_2_agent_2", "__end__"]def team_2_supervisor(state: Team2State):...def team_2_agent_1(state: Team2State):...def team_2_agent_2(state: Team2State):...team_2_builder = StateGraph(Team2State)
...
team_2_graph = team_2_builder.compile()# 定義頂層監督者builder = StateGraph(MessagesState)
def top_level_supervisor(state: MessagesState) -> Command[Literal["team_1_graph", "team_2_graph", END]]:# 你可以將相關部分的狀態傳遞給 LLM(例如,state["messages"])# 以確定要調用的下一個團隊。一種常見模式是調用模型# 并要求其返回一個結構化輸出(例如,強制其返回一個包含 "next_team" 字段的輸出)response = model.invoke(...)# 根據監督者的決策,路由到其中一個團隊或退出# 如果監督者返回 "__end__",圖將結束執行return Command(goto=response["next_team"])builder = StateGraph(MessagesState)
builder.add_node(top_level_supervisor)
builder.add_node("team_1_graph", team_1_graph)
builder.add_node("team_2_graph", team_2_graph)
builder.add_edge(START, "top_level_supervisor")
builder.add_edge("team_1_graph", "top_level_supervisor")
builder.add_edge("team_2_graph", "top_level_supervisor")
graph = builder.compile()
優點:在不同層級的智能體之間有明確的角色和職責劃分。通信順暢。適用于具有結構化決策流程的大型系統。
缺點:上層的失敗可能會破壞整個系統。下層智能體的獨立性有限。
API 參考:ChatOpenAI | StateGraph | START | END | Command
2.1.11 自定義多智能體工作流
每個智能體僅與部分智能體通信。流程的一部分是確定性的,只有部分智能體可以決定接下來調用哪些智能體。
在這種架構中,我們將各個智能體作為圖節點添加,并提前定義智能體被調用的順序,形成一個自定義工作流。在 LangGraph 中,可以通過以下兩種方式定義工作流:
- 顯式控制流(普通邊):LangGraph 允許你通過普通圖邊顯式定義應用程序的控制流(即智能體之間的通信順序)。這是上述架構中最確定性的變體 —— 我們可以提前知道下一個將被調用的智能體。
- 動態控制流(Command):在 LangGraph 中,你可以允許 LLM 決定應用程序控制流的一部分。這可以通過使用
Command來實現。一個特殊情況是帶有工具調用的監督者架構。在這種情況下,為監督者智能體提供支持的工具調用 LLM 將決定工具(智能體)被調用的順序。
from langchain_openai import ChatOpenAI
from langgraph.graph import StateGraph, MessagesState, STARTmodel = ChatOpenAI()def agent_1(state: MessagesState):response = model.invoke(...)return {"messages": [response]}def agent_2(state: MessagesState):response = model.invoke(...)return {"messages": [response]}builder = StateGraph(MessagesState)
builder.add_node(agent_1)
builder.add_node(agent_2)
# 顯式定義流程
builder.add_edge(START, "agent_1")
builder.add_edge("agent_1", "agent_2")
API 參考:ChatOpenAI | StateGraph | START
3. 智能體之間的通信
構建多智能體系統時,最重要的是弄清楚智能體之間如何通信。有以下幾點需要考慮:
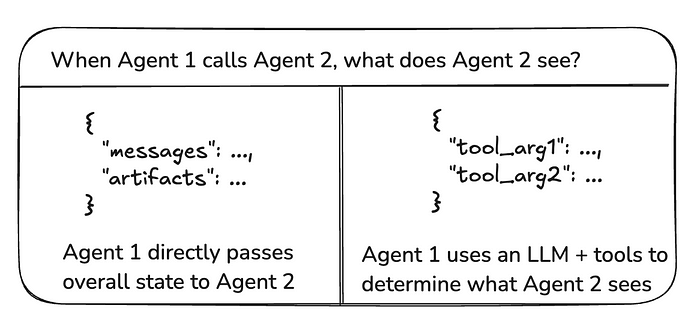
3.1 圖狀態與工具調用
在智能體之間傳遞的“負載”是什么?在上述討論的大多數架構中,智能體通過圖狀態進行通信。在帶有工具調用的監督者的情況下,負載是工具調用參數。
圖片來源:Langchain
圖狀態
為了通過圖狀態進行通信,各個智能體需要被定義為圖節點。這些可以被添加為函數或整個子圖。在圖執行的每一步中,智能體節點接收當前圖狀態,執行智能體代碼,然后將更新后的狀態傳遞給下一個節點。
通常,智能體節點共享一個單一的狀態模式。然而,你可能希望設計具有不同狀態模式的智能體節點。
3.2 不同的狀態模式
一個智能體可能需要擁有與其他智能體不同的狀態模式。例如,一個搜索智能體可能只需要跟蹤查詢和檢索到的文檔。在 LangGraph 中,可以通過以下兩種方式實現:
- 定義具有獨立狀態模式的子圖智能體。如果子圖和父圖之間沒有共享狀態鍵(通道),則需要添加輸入/輸出轉換,以便父圖知道如何與子圖通信。
- 定義具有私有輸入狀態模式的智能體節點函數,該模式與整體圖狀態模式不同。這允許傳遞僅用于執行該特定智能體的信息。
3.3 共享消息列表
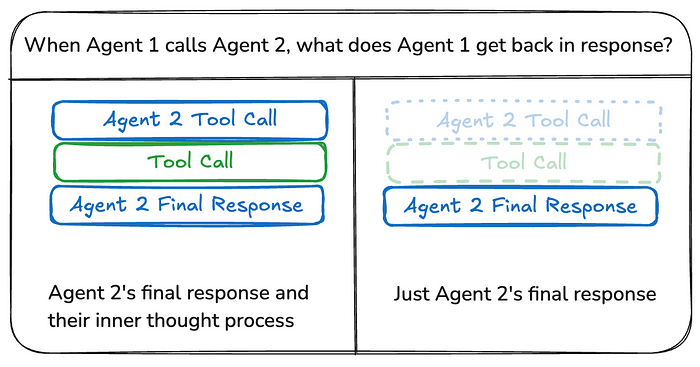
智能體之間通信的最常見方式是通過共享狀態通道,通常是一個消息列表。這假設狀態中至少有一個通道(鍵)被智能體共享。當通過共享消息列表進行通信時,還有一個額外的考慮:智能體是共享完整的對話歷史記錄,還是只共享最終結果?
圖片來源:Langchain
共享完整歷史記錄
智能體可以共享完整的思考過程(即“草稿”)與其他所有智能體。這個“草稿”通常看起來像一個消息列表。共享完整思考過程的好處是,它可能有助于其他智能體做出更好的決策,并提高整個系統的推理能力。缺點是,隨著智能體數量和復雜性的增加,“草稿”會迅速增長,可能需要額外的內存管理策略。
僅共享最終結果
智能體可以有自己的私有“草稿”,并且只共享最終結果與其余智能體。這種方法可能更適合擁有許多智能體或智能體更復雜的系統。在這種情況下,你需要定義具有不同狀態模式的智能體。
對于作為工具被調用的智能體,監督者根據工具模式確定輸入。此外,LangGraph 允許在運行時將狀態傳遞給工具,以便從屬智能體在需要時可以訪問父狀態。
4. 結論
多智能體 LLM 系統提供了一個強大的范式,用于通過利用并行、順序、路由器和聚合器工作流等多種架構模式來解決復雜任務,正如我們在本博客中所探討的那樣。
通過詳細檢查共享狀態、消息列表和工具調用等通信機制,我們看到了智能體如何協作以實現無縫協調。
原作者:vipra_singh-https://medium.com/@vipra_singh/ai-agents-multi-agent-architectures


)


