目錄:
- 一:創建項目
- 二:修改目錄
- 三:添加配置
- 四:創建數據表
- 五:創建實體類
- 六:創建數據接口
- 七:編寫xml文件
- 八:單元測試
- 九:編寫服務層
- 十:編寫控制層
- 十一:創建頁面
- 十二:返回JSON數據
一:創建項目
?
🟢第一步:打開 IDEA,選擇 New Project,選擇 Spring Boot,然后按照下面截圖進行操作…

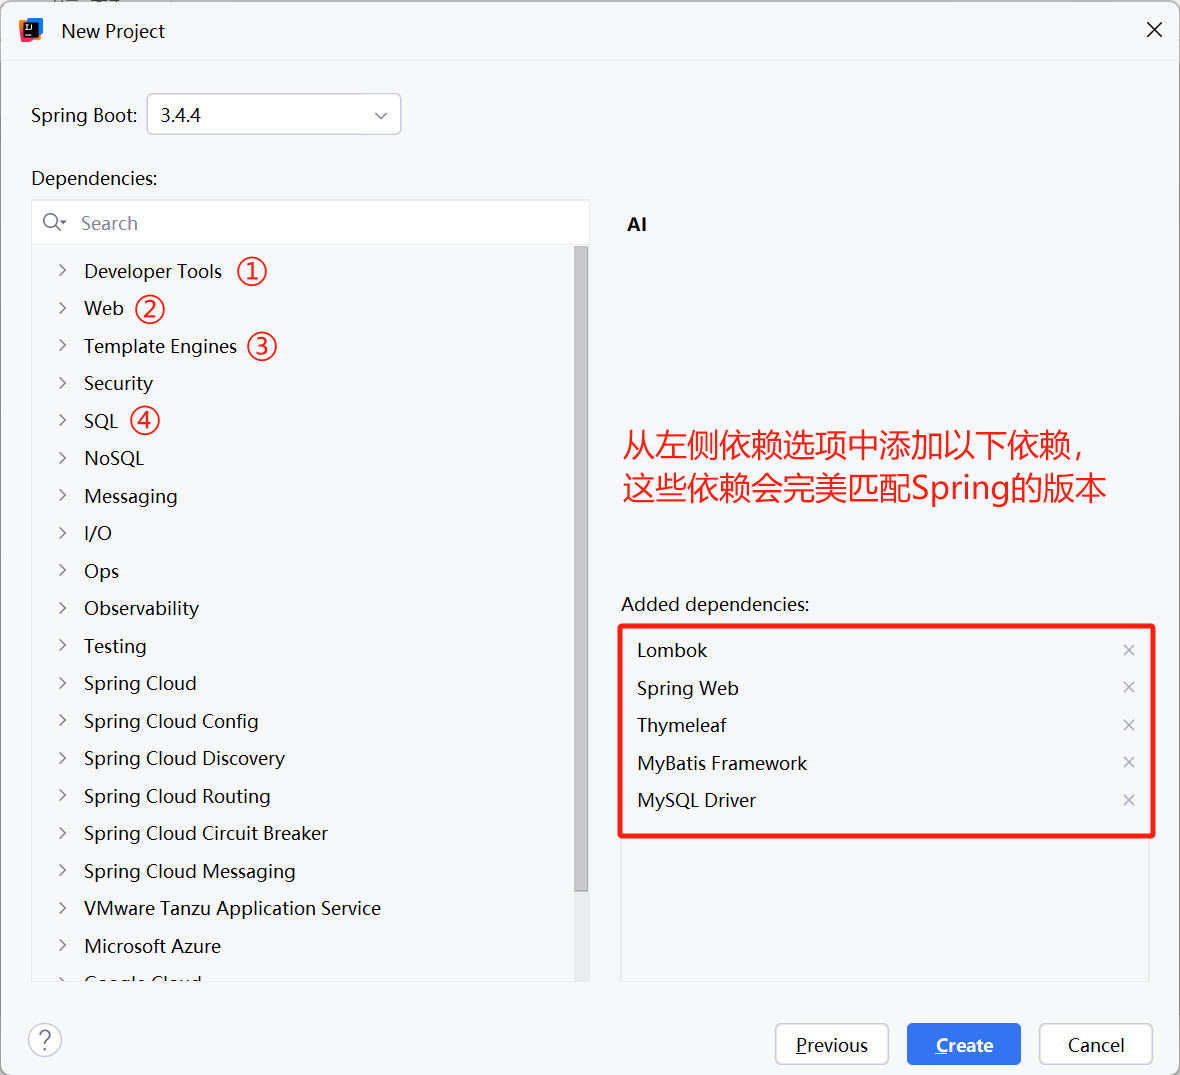
🟢 第二步:添加依賴 (Spring Web場景啟動器、Thymeleaf依賴、MyBatis依賴、MySQL驅動依賴 等)
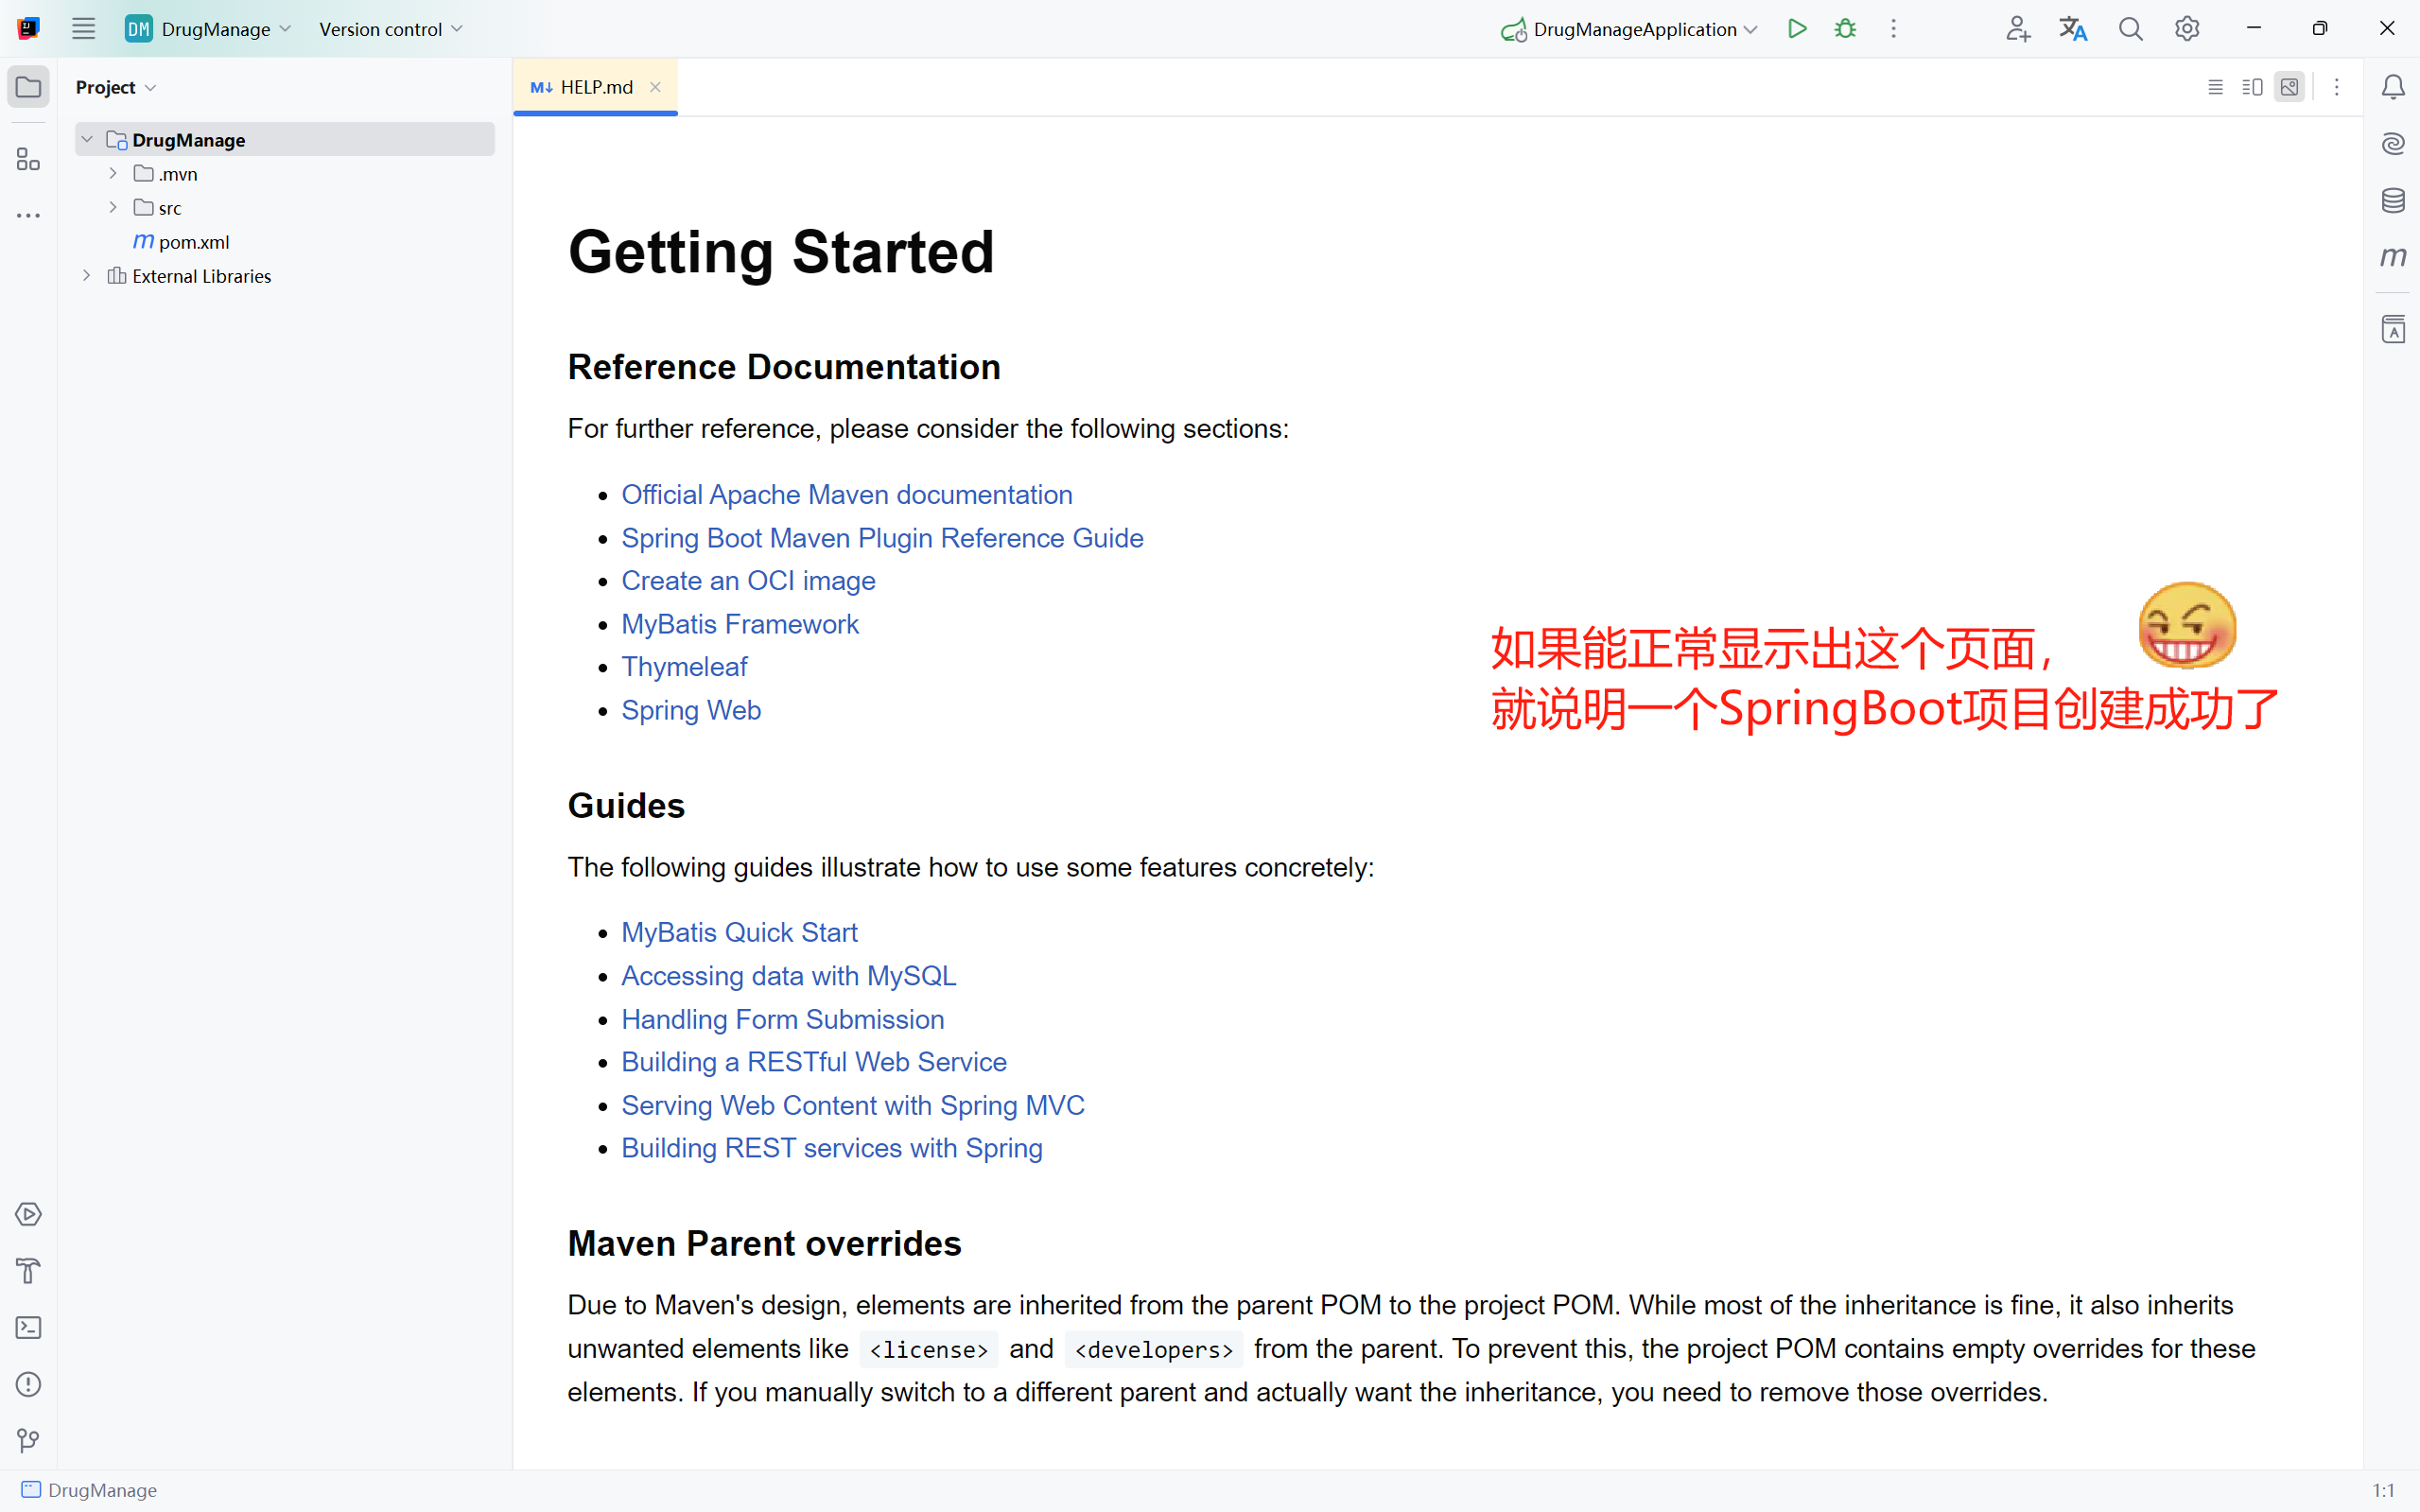
🟢 稍作等待,IDEA正在幫助我們從Spring官網下載SpringBoot項目的框架,并且正在通過Maven進行構建…
🟢在IDEA的右下角會有Maven的下載進度。想了解Maven的使用可以參考:Maven的安裝與配置教程 👈
?
二:修改目錄
?
🟠項目剛創建完的目錄結構大致如下,可能包的路徑名有所區別,一般用自己所在組織的簡拼 👇

🟠 添加一些新包,添加之后的項目結構如下 👇
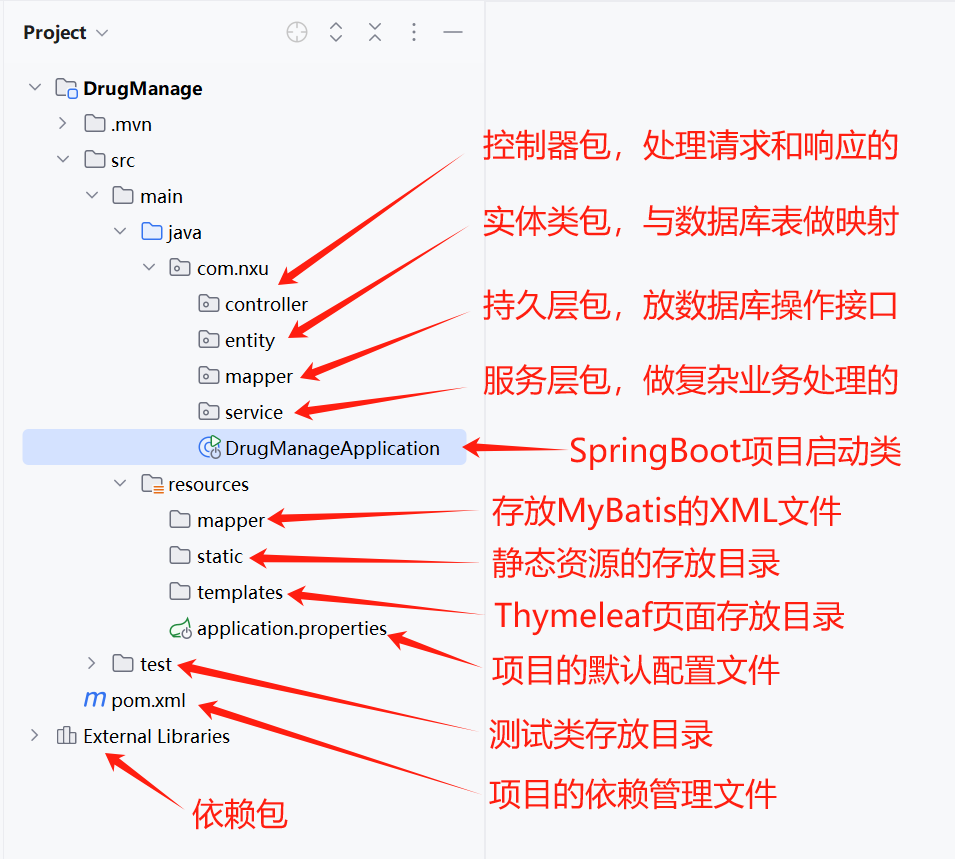
🟠一般情況下,還會創建一些名為 utils 、common 的包,是為了方便管理和存放其他工具類等。
?
三:添加配置
?
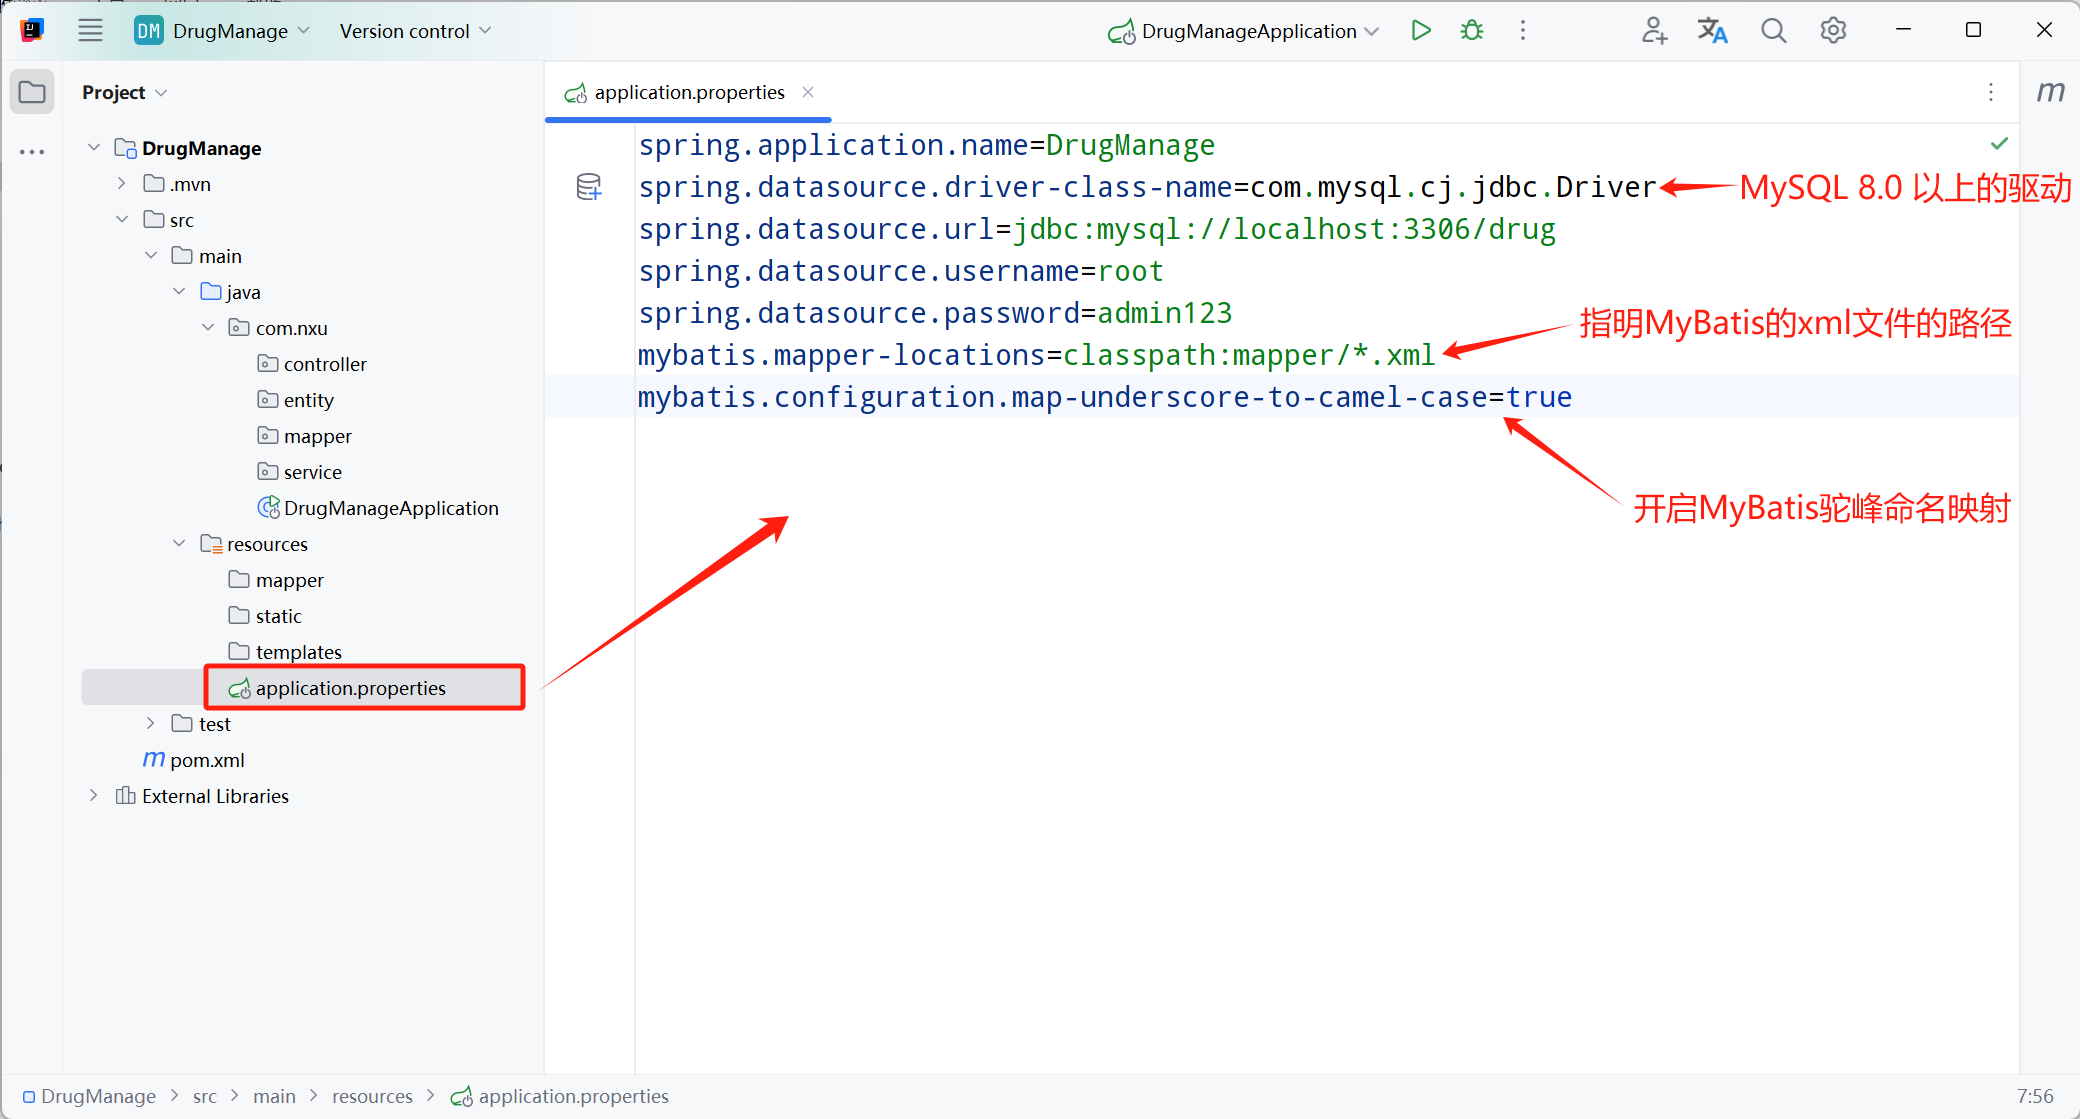
🟣打開項目的默認配置文件 application.properties ,然后復制粘貼以下代碼 👇
spring.datasource.driver-class-name=com.mysql.cj.jdbc.Driver
spring.datasource.url=jdbc:mysql://localhost:3306/數據庫名
spring.datasource.username=數據庫用戶名
spring.datasource.password=數據庫密碼
mybatis.mapper-locations=classpath:mapper/*.xml
mybatis.configuration.map-underscore-to-camel-case=true
🟣粘貼后修改 數據庫名、數據庫用戶名、數據庫密碼 ,修改后的效果如下圖所示👇(第一行是項目名,可忽略)
🟣通常為了結構更加清晰,會將默認配置文件 application.properties 的后綴 改為 .yml 其配置格式如下:
spring:datasource:driver-class-name: com.mysql.cj.jdbc.Driverurl: jdbc:mysql://localhost:3306/數據庫名username: 數據庫用戶名password: 數據庫密碼
mybatis:mapper-locations: classpath:mapper/*.xmlconfiguration:map-underscore-to-camel-case: true

🟣其他配置信息這里就不過多介紹了,大家用到時自會了解~ 😁😁😁
?
接下來,我以
藥品管理為例,簡單演示一下各模塊代碼的編寫~ 😊😊😊
?
四:創建數據表
?
🟡首先,在 MySQL 數據庫中創建一個數據庫,然后在庫中創建一個 藥品表,SQL 如下 👇
CREATE DATABASE `drug`;
USE DATABASE `drug`;
CREATE TABLE `medicine`  (`id` int UNSIGNED NOT NULL AUTO_INCREMENT COMMENT '藥品編號',`name` varchar(50) CHARACTER SET utf8mb4 COLLATE utf8mb4_general_ci NOT NULL COMMENT '藥品名稱',`code` varchar(255) CHARACTER SET utf8mb4 COLLATE utf8mb4_general_ci NOT NULL COMMENT '國藥準字',`compose` varchar(255) CHARACTER SET utf8mb4 COLLATE utf8mb4_general_ci NOT NULL COMMENT '藥品成分',`specs` varchar(255) CHARACTER SET utf8mb4 COLLATE utf8mb4_general_ci NOT NULL COMMENT '藥品規格',`usage` varchar(255) CHARACTER SET utf8mb4 COLLATE utf8mb4_general_ci NOT NULL COMMENT '用法用量',`image` varchar(255) CHARACTER SET utf8mb4 COLLATE utf8mb4_general_ci NOT NULL COMMENT '藥品照片',`origin` varchar(255) CHARACTER SET utf8mb4 COLLATE utf8mb4_general_ci NOT NULL COMMENT '生產廠家',`count` int UNSIGNED NOT NULL COMMENT '庫存數量',PRIMARY KEY (`id`) USING BTREE
) ENGINE = InnoDB AUTO_INCREMENT = 1 CHARACTER SET = utf8mb4 COLLATE = utf8mb4_general_ci ROW_FORMAT = Dynamic;
🟡 然后,在數據表中添加幾條數據 (下面是我使用 Navicat 連接了 本地的 MySQL 數據庫的截圖) 👇

?
五:創建實體類
?
🔵在 entity 包下創建一個名為 Medicine 的 Java類,如下
package com.nxu.entity;import lombok.AllArgsConstructor;
import lombok.Data;
import lombok.NoArgsConstructor;
import lombok.ToString;@Data
@AllArgsConstructor
@NoArgsConstructor
@ToString
public class Medicine {private int id;             // 藥品編號private String name;        // 藥品名稱private String code;        // 國藥準字private String compose;     // 藥品成分private String specs;       // 藥品規格private String usage;       // 用法用量private String image;       // 藥品照片private String origin;      // 生產廠家private int count;          // 庫存數量
}

?
六:創建數據接口
?
🔴在 Java目錄下的 mapper 包中,創建一個名為 MedicineMapper 的 Java接口,如下
package com.nxu.mapper;import com.nxu.entity.Medicine;
import org.apache.ibatis.annotations.Mapper;
import org.apache.ibatis.annotations.Param;import java.util.List;@Mapper
public interface MedicineMapper {List<Medicine> selectAllMedicine();Medicine selectOneMedicine(@Param("id") int id);}

?
七:編寫xml文件
?
接下來我們要使用
Mybatis框架編寫SQL語句。為了以后使用的方便,可以添加一個Mybatis的 模板文件。
Mybatis 模板文件的代碼如下:
<?xml version="1.0" encoding="UTF-8" ?>
<!DOCTYPE mapper PUBLIC "-//mybatis.org//DTD Mapper 3.0//EN" "https://mybatis.org/dtd/mybatis-3-mapper.dtd">
<mapper namespace=""></mapper>
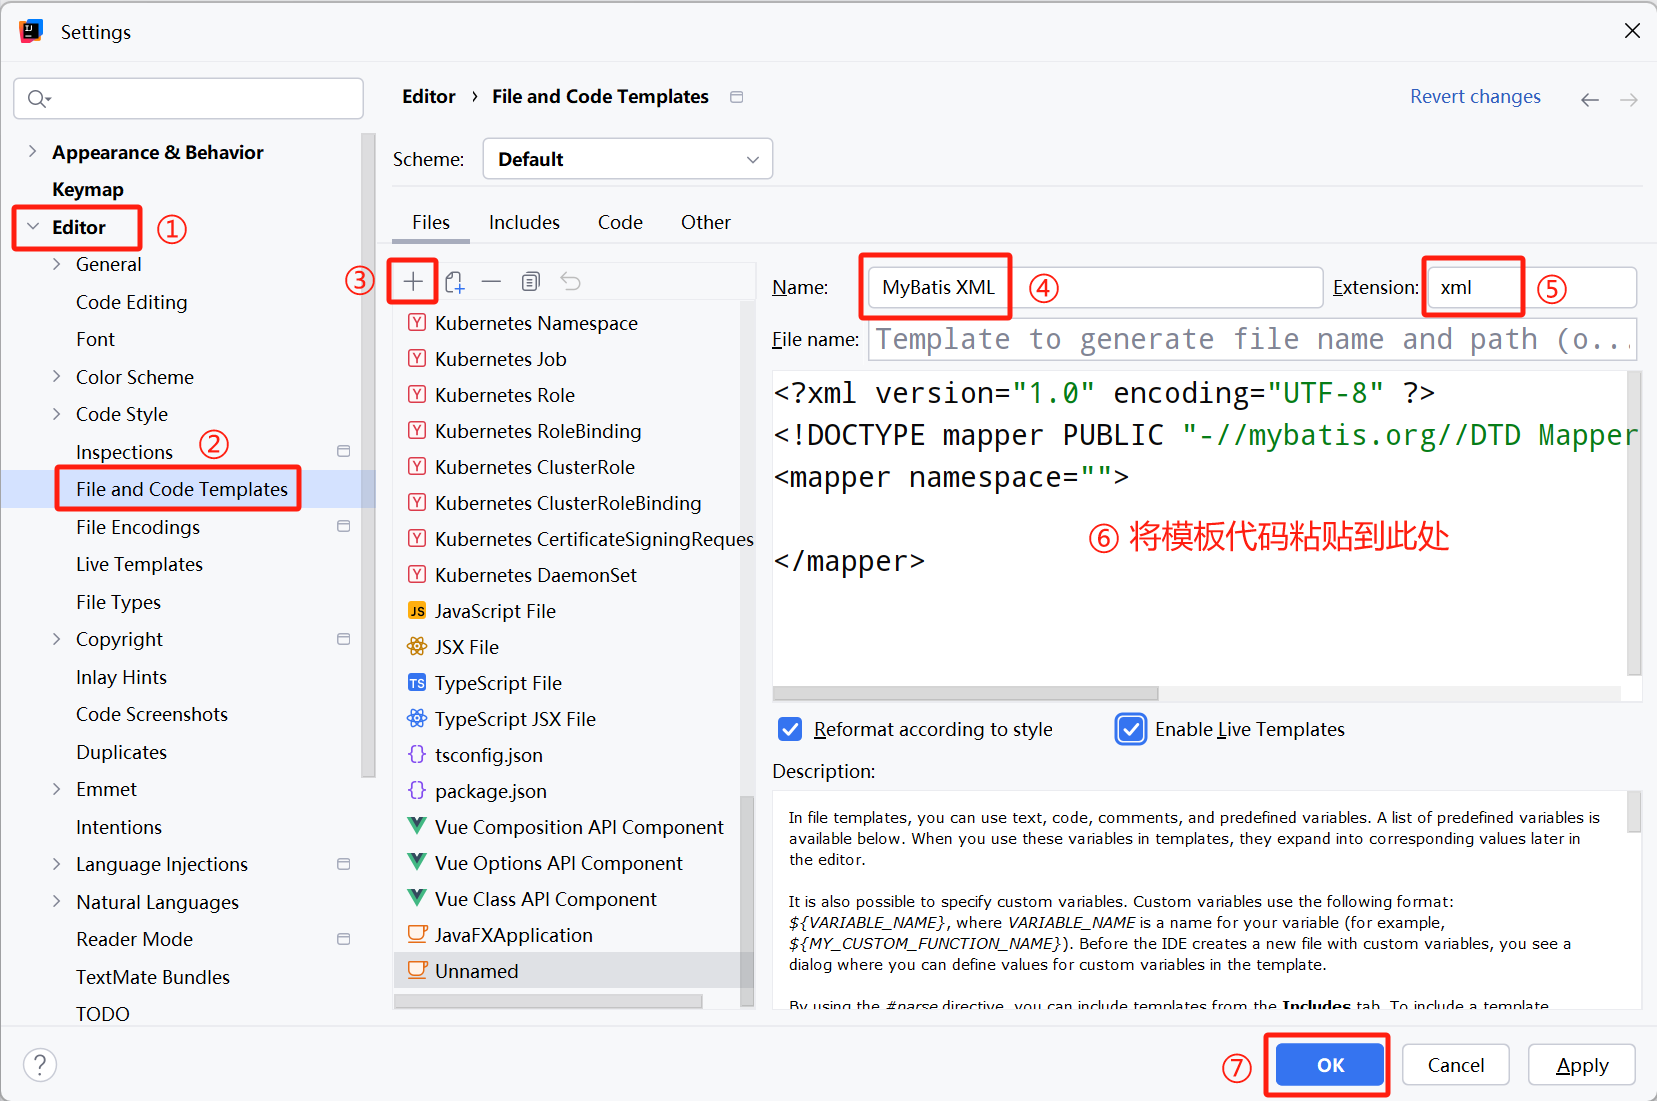
🟤復制上面的模板代碼,然后打開 IDEA 的 File → Settings,然后進行如下操作 👇
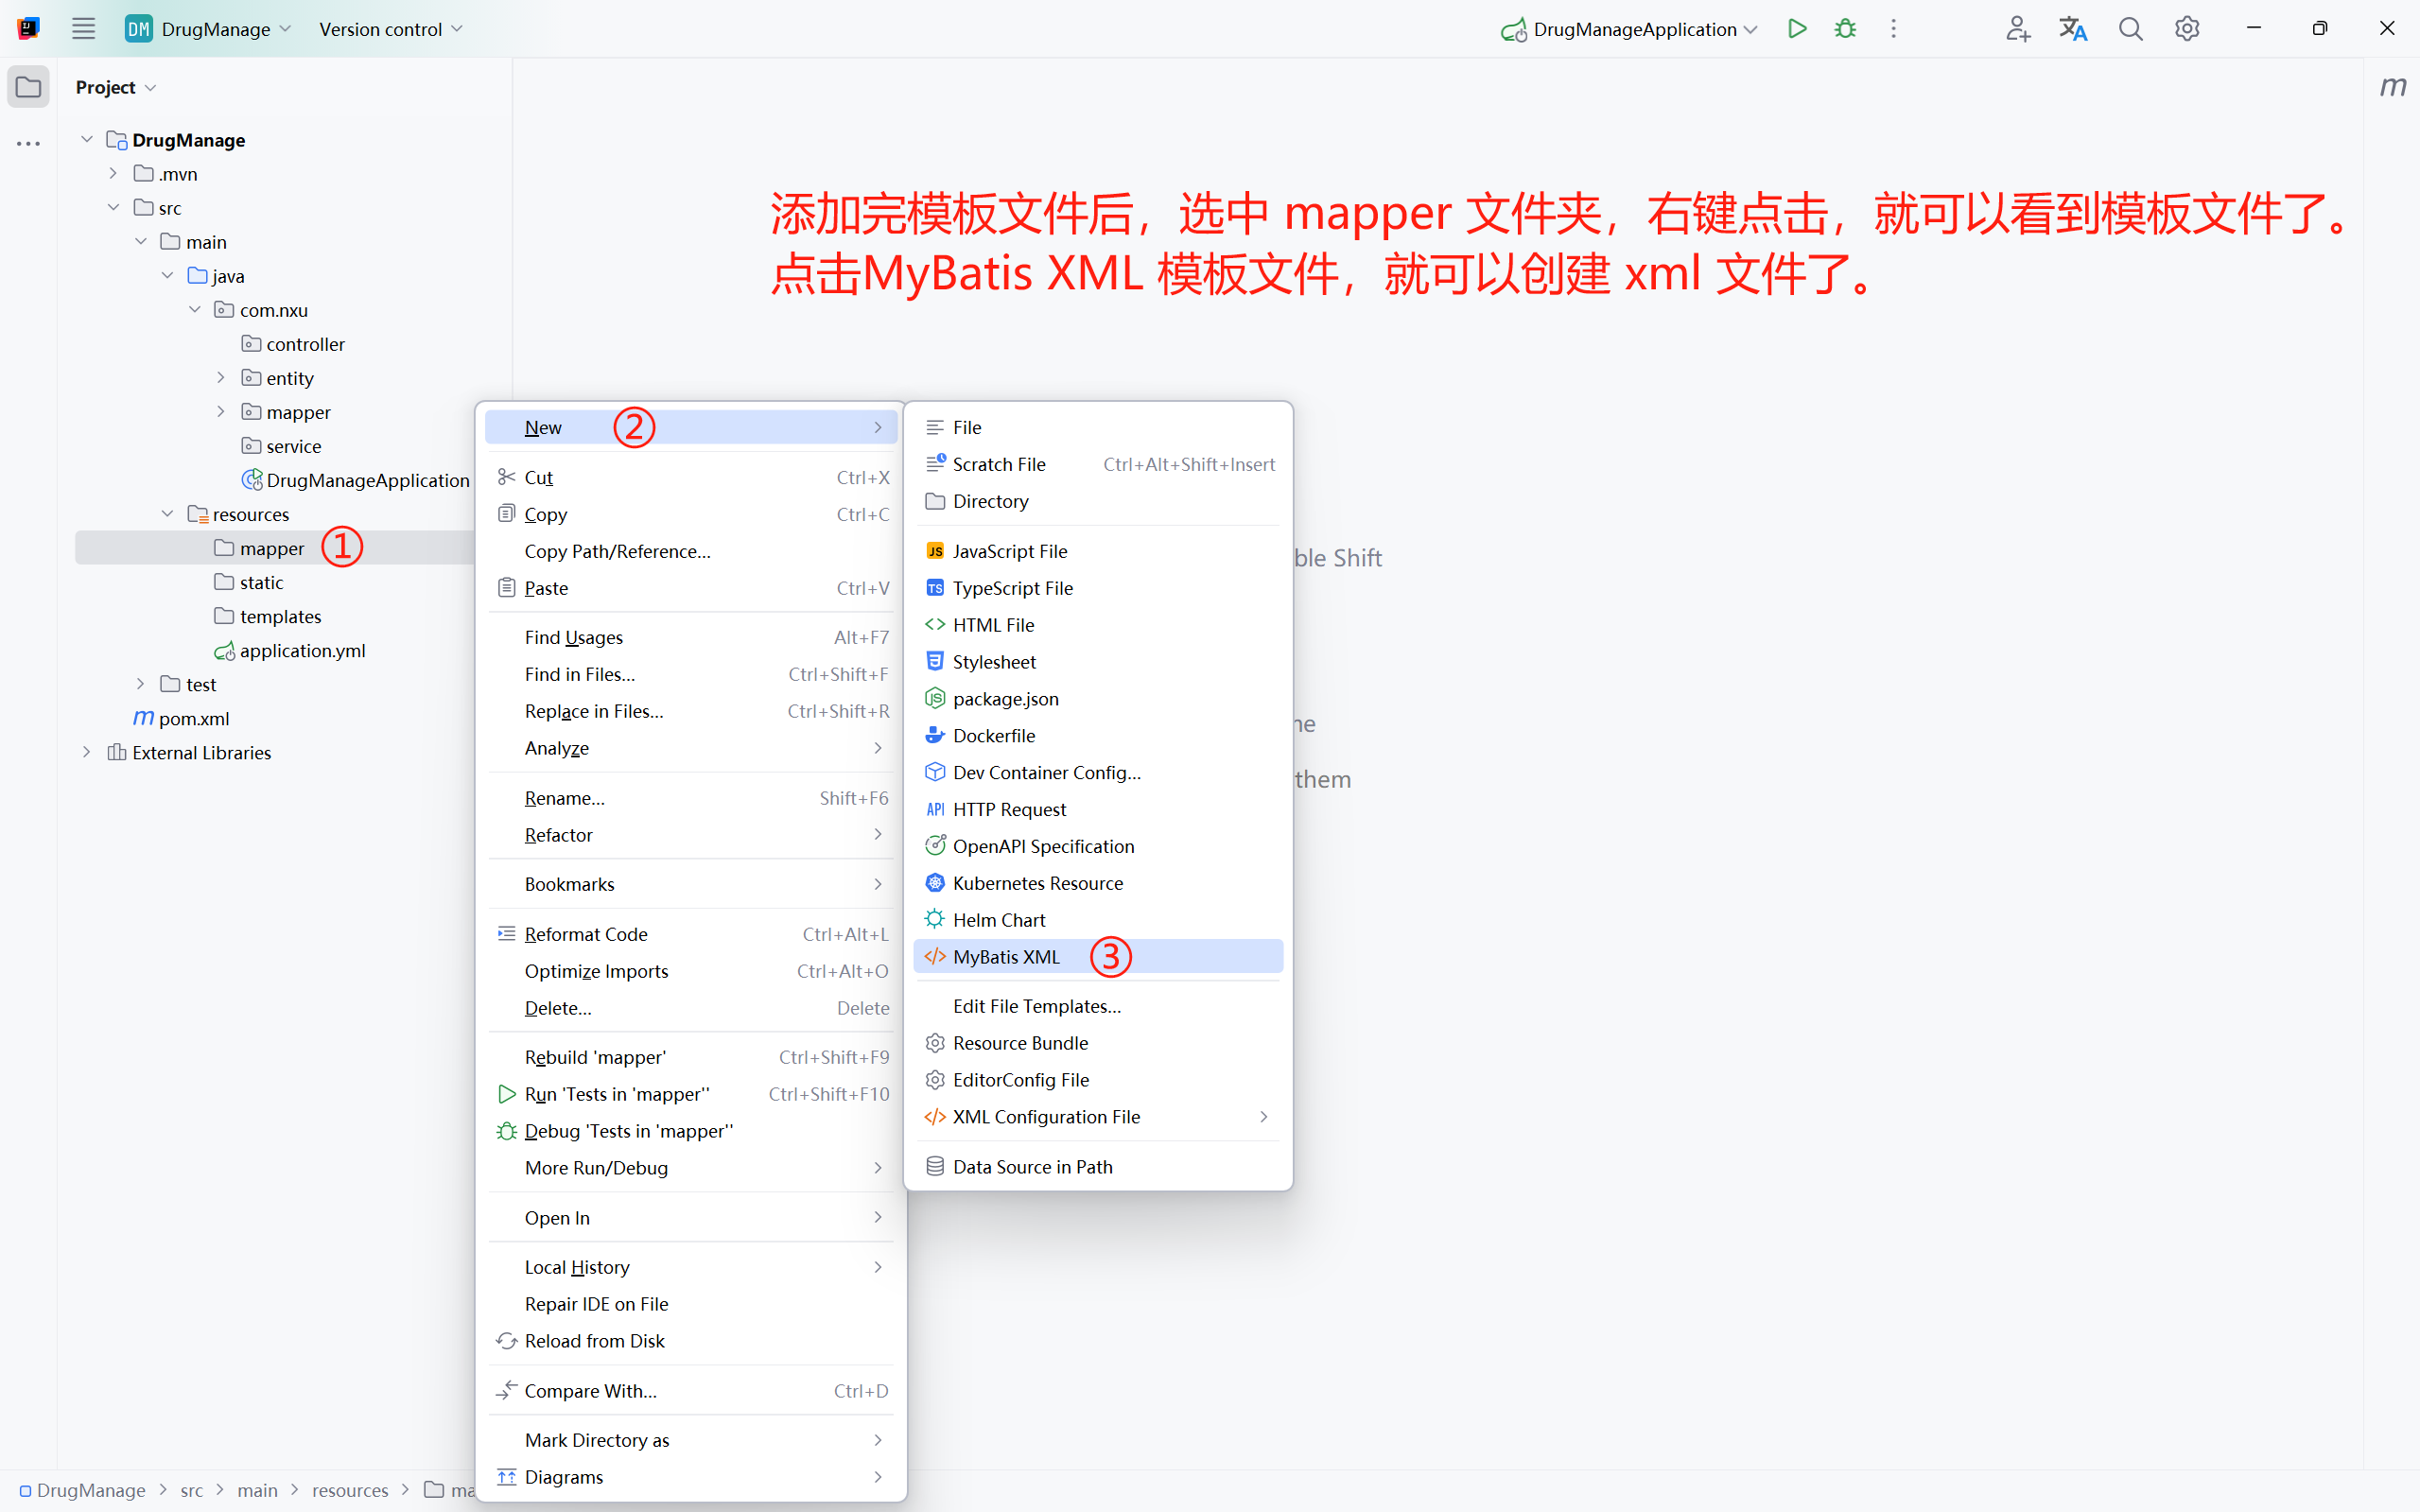
🟤然后 我們在 resources 目錄下的 mapper 文件中 創建一個名為 MedicineMapper 的 MyBatis XML 文件,并添加以下代碼 👇
<?xml version="1.0" encoding="UTF-8" ?>
<!DOCTYPE mapper PUBLIC "-//mybatis.org//DTD Mapper 3.0//EN" "https://mybatis.org/dtd/mybatis-3-mapper.dtd">
<mapper namespace="com.nxu.mapper.MedicineMapper"><select id="selectAllMedicine" resultType="com.nxu.entity.Medicine">select * from medicine</select><select id="selectOneMedicine" resultType="com.nxu.entity.Medicine">select * from medicine where id = #{id}</select></mapper>
🟤這里大家可以安裝一個名為 MyBatisX 的插件,挺好用的,如下 👇

🟤安裝好之后,我們的 MyBatis接口 和 MyBatis 的 xml 文件可以點擊小鳥進行跳轉,還有其他提示功能~

?
八:單元測試
?
寫到這里,我們可以先簡單的做個單元測試,確保數據庫連通,以及測試
MyBatis是否可以正常使用。😀😀😀
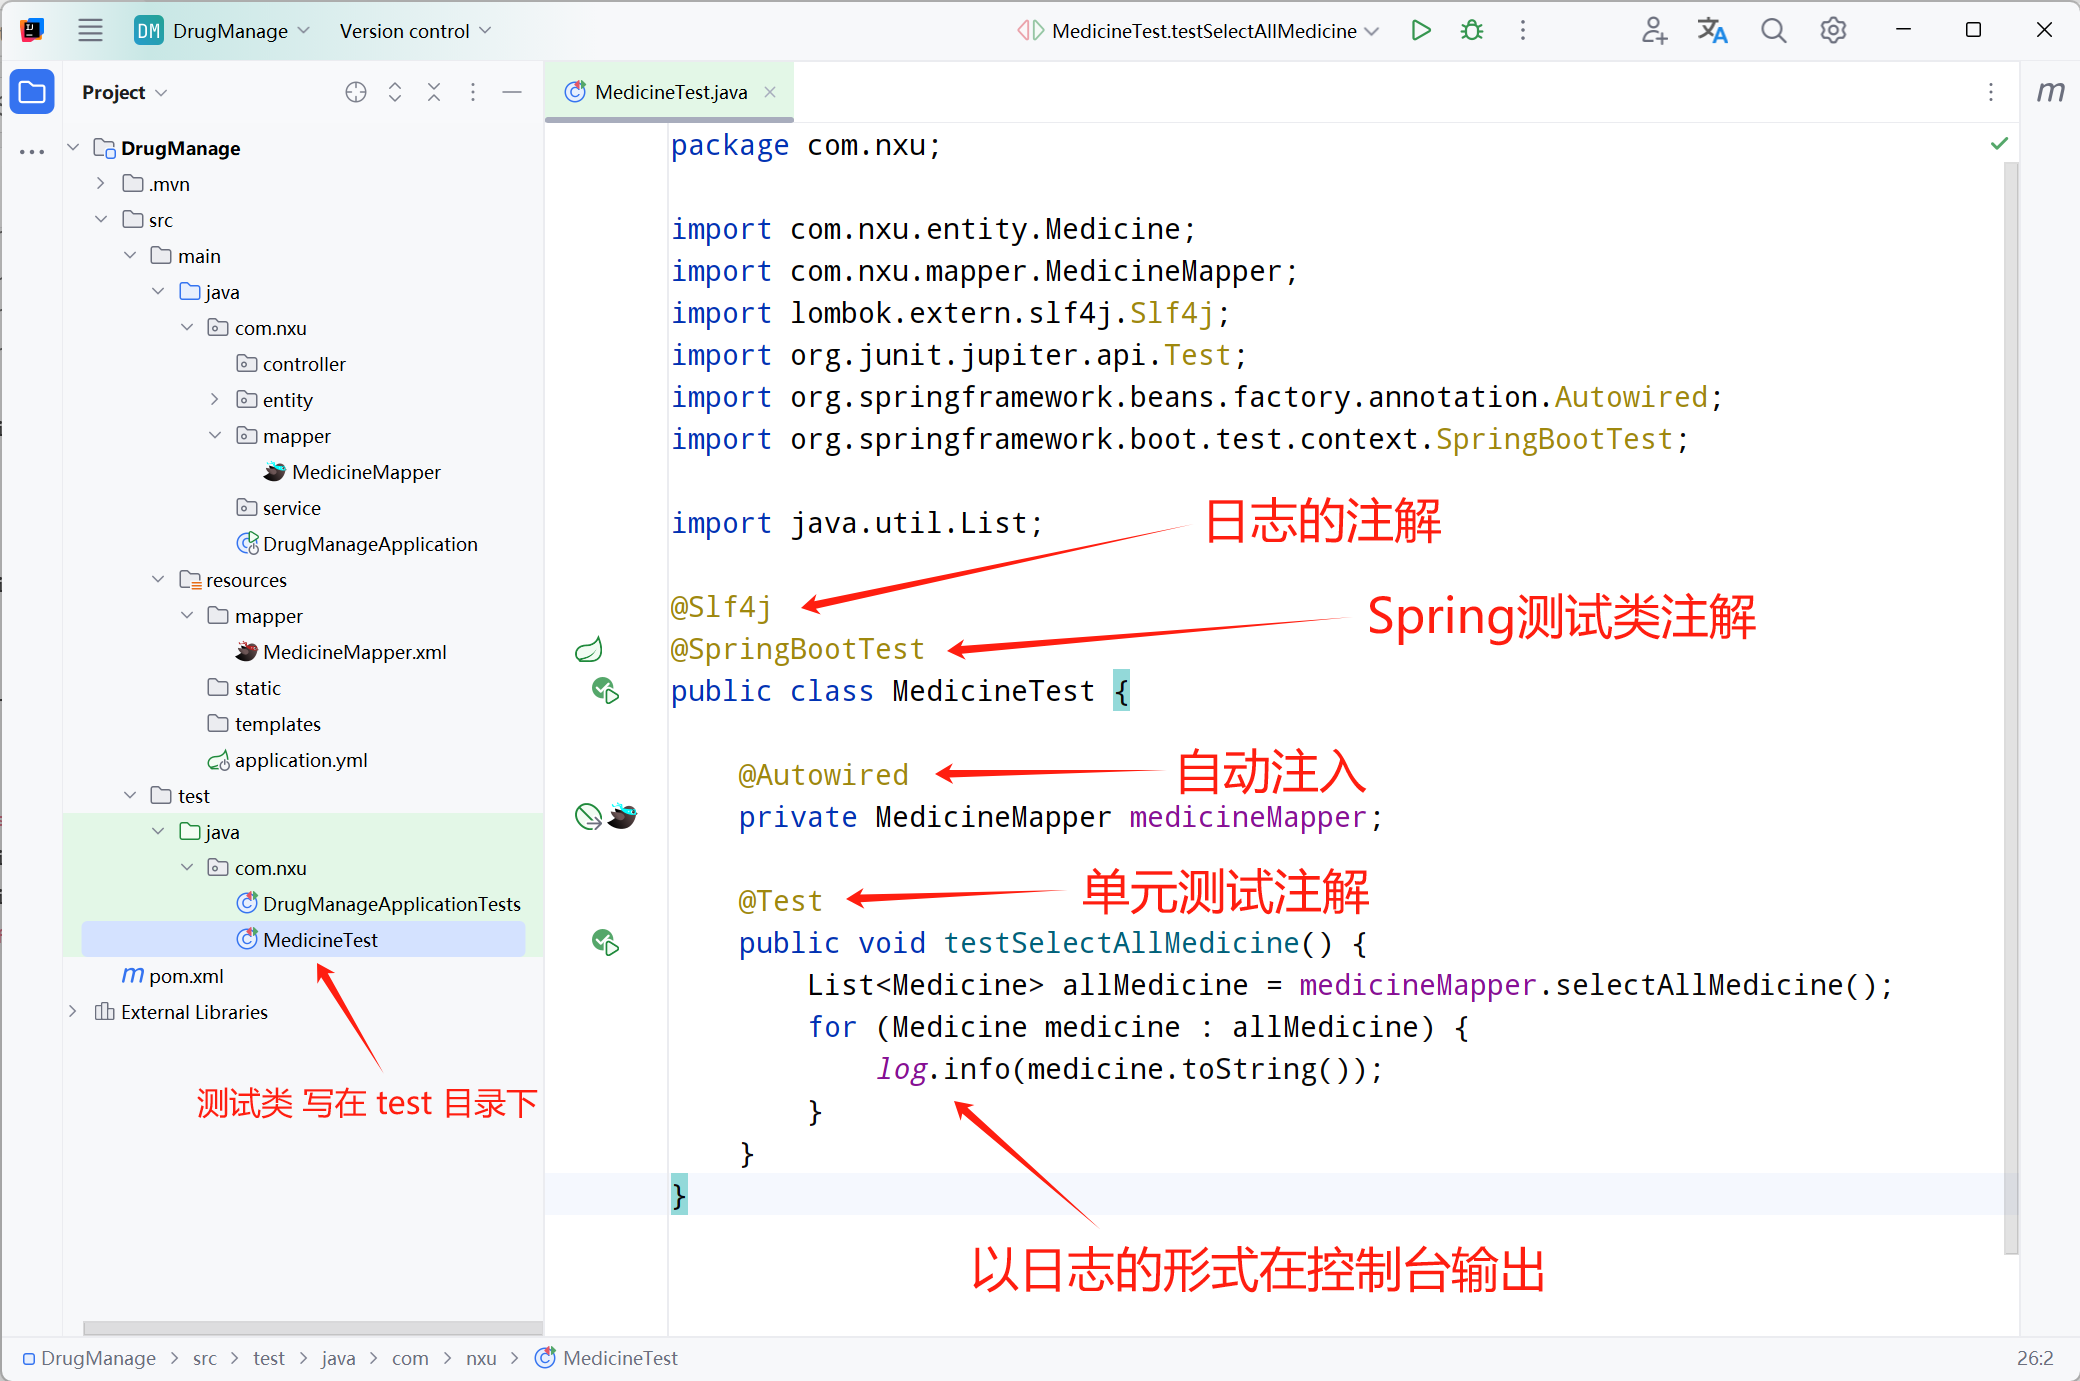
🟢在我們的 test 目錄下,新建一個名為 MedicineTest 的 Java測試類,然后添加以下代碼進行測試 👇
package com.nxu;import com.nxu.entity.Medicine;
import com.nxu.mapper.MedicineMapper;
import lombok.extern.slf4j.Slf4j;
import org.junit.jupiter.api.Test;
import org.springframework.beans.factory.annotation.Autowired;
import org.springframework.boot.test.context.SpringBootTest;import java.util.List;@Slf4j
@SpringBootTest
public class MedicineTest {@Autowiredprivate MedicineMapper medicineMapper;@Testpublic void testSelectAllMedicine() {List<Medicine> allMedicine = medicineMapper.selectAllMedicine();for (Medicine medicine : allMedicine) {log.info(medicine.toString());}}
}
🟢點擊 方法前面的 啟動 按鈕,執行單元測試,控制臺效果如下 👇

?
九:編寫服務層
?
🟠首先,在 java 目錄 下的 service 包中 創建一個名為 MedicineService 的 Java接口,如下 👇
package com.nxu.service;import com.nxu.entity.Medicine;import java.util.List;public interface MedicineService {List<Medicine> getAllMedicine();Medicine getOneMedicine(int id);
}
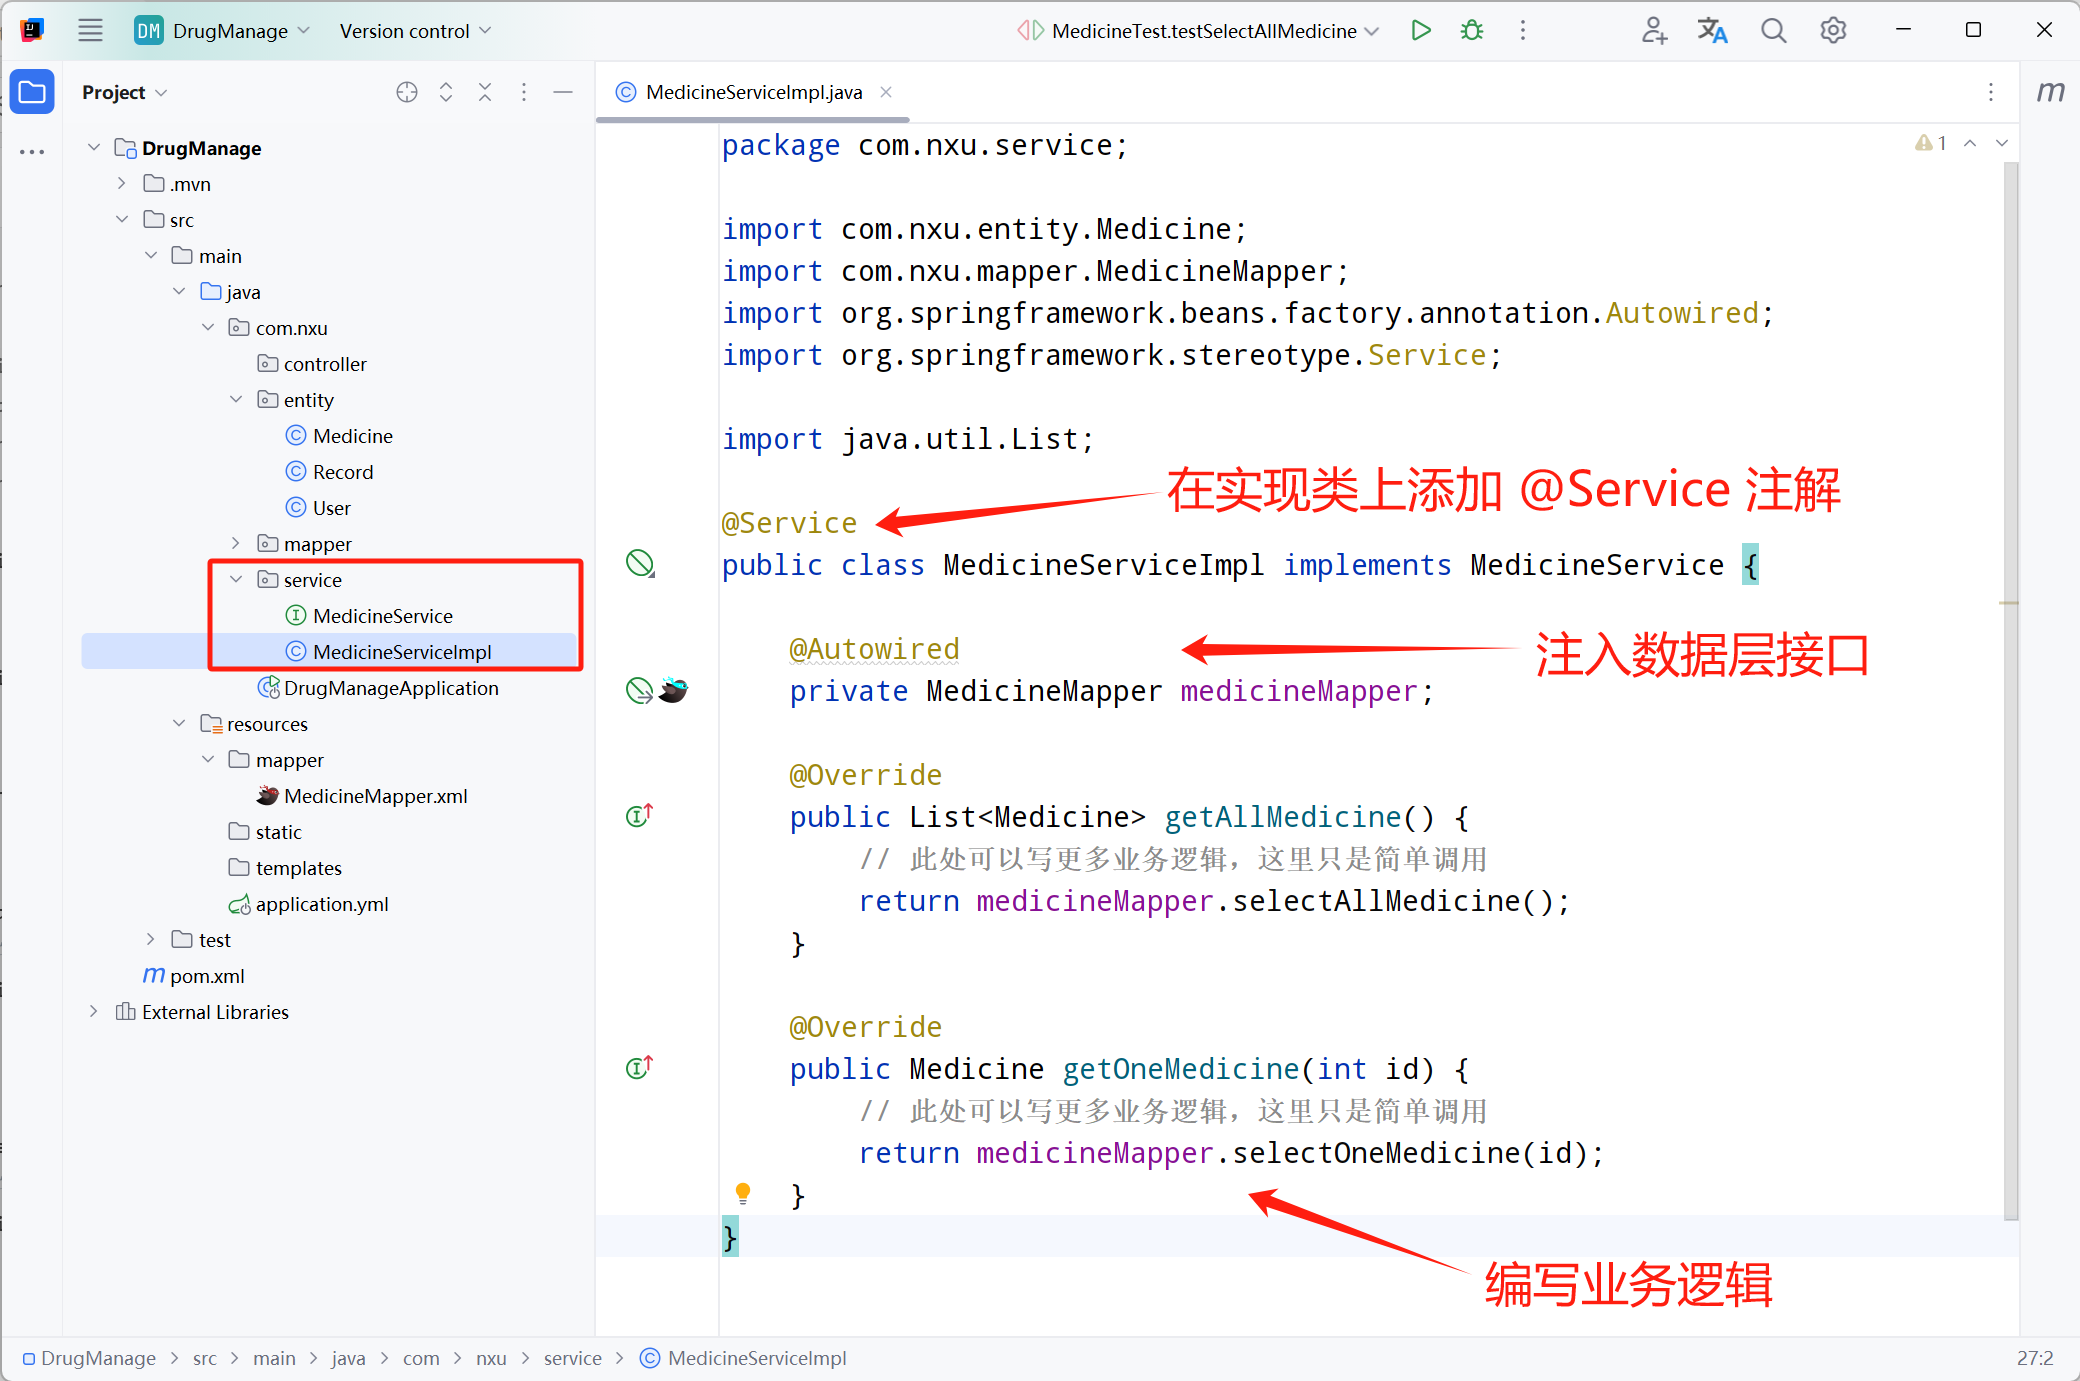
🟠然后,繼續 在 service 包中創建一個名為 MedicineServiceImpl 的 Java類 繼承剛才的接口 👇
package com.nxu.service;import com.nxu.entity.Medicine;
import com.nxu.mapper.MedicineMapper;
import org.springframework.beans.factory.annotation.Autowired;
import org.springframework.stereotype.Service;import java.util.List;@Service
public class MedicineServiceImpl implements MedicineService {@Autowiredprivate MedicineMapper medicineMapper;@Overridepublic List<Medicine> getAllMedicine() {// 此處可以寫更多業務邏輯,這里只是簡單調用return medicineMapper.selectAllMedicine();}@Overridepublic Medicine getOneMedicine(int id) {// 此處可以寫更多業務邏輯,這里只是簡單調用return medicineMapper.selectOneMedicine(id);}
}
?
十:編寫控制層
?
🟣在 java目錄 下的 controller 包中,創建一個名為 MedicineController 的 Java類 👇
package com.nxu.controller;import com.nxu.entity.Medicine;
import com.nxu.service.MedicineService;
import org.springframework.beans.factory.annotation.Autowired;
import org.springframework.stereotype.Controller;
import org.springframework.ui.Model;
import org.springframework.web.bind.annotation.RequestMapping;import java.util.List;@Controller
public class MedicineController {@Autowiredprivate MedicineService medicineService;@RequestMapping("/")public String index(Model model) {model.addAttribute("msg", "我的第N個SpringBoot項目!");List<Medicine> list = medicineService.getAllMedicine();model.addAttribute("list", list);return "index";}}

?
十一:創建頁面
?
🔴在 resources 目錄的 templates 文件下 創建一個名為 index 的 html 文件,然后添加以下代碼 👇
<!DOCTYPE html>
<html lang="en" xmlns:th="http://www.thymeleaf.org">
<head><meta charset="UTF-8"><meta name="viewport" content="width=device-width, initial-scale=1, maximum-scale=1"><title>藥品管理</title><link href="//unpkg.com/layui@2.10.3/dist/css/layui.css" rel="stylesheet">
</head>
<body>
<h1 th:text="${msg}" style="text-align: center;"></h1><table class="layui-table"><thead><tr><th>序號</th><th>藥品編號</th><th>藥品名稱</th><th>國藥準字</th><th>藥品成分</th><th>藥品規格</th><th>用法用量</th><th>藥品照片</th><th>生產廠家</th><th>庫存數量</th></tr></thead><tbody><!--此處演示Thymeleaf的循環,sb是單個數據體的名字,it是迭代器的別名,${medicines}是我們存的集合--><tr th:each="sb,it : ${medicines}"><td th:text="${it.index+1}"></td><td th:utext="|編號${sb.id}|"></td><td th:text="${sb.name}"></td><td th:text="${sb.code}"></td><td th:text="${sb.compose}"></td><td th:text="${sb.specs}"></td><td th:text="${sb.usage}"></td><td><img th:src="${sb.image}" width="30px" height="30px" alt=""></td><td th:text="${sb.origin}"></td><td>[[${sb.count}]]</td></tr></tbody>
</table><script src="//unpkg.com/layui@2.10.3/dist/layui.js"></script>
</body>
</html>
🔴啟動項目
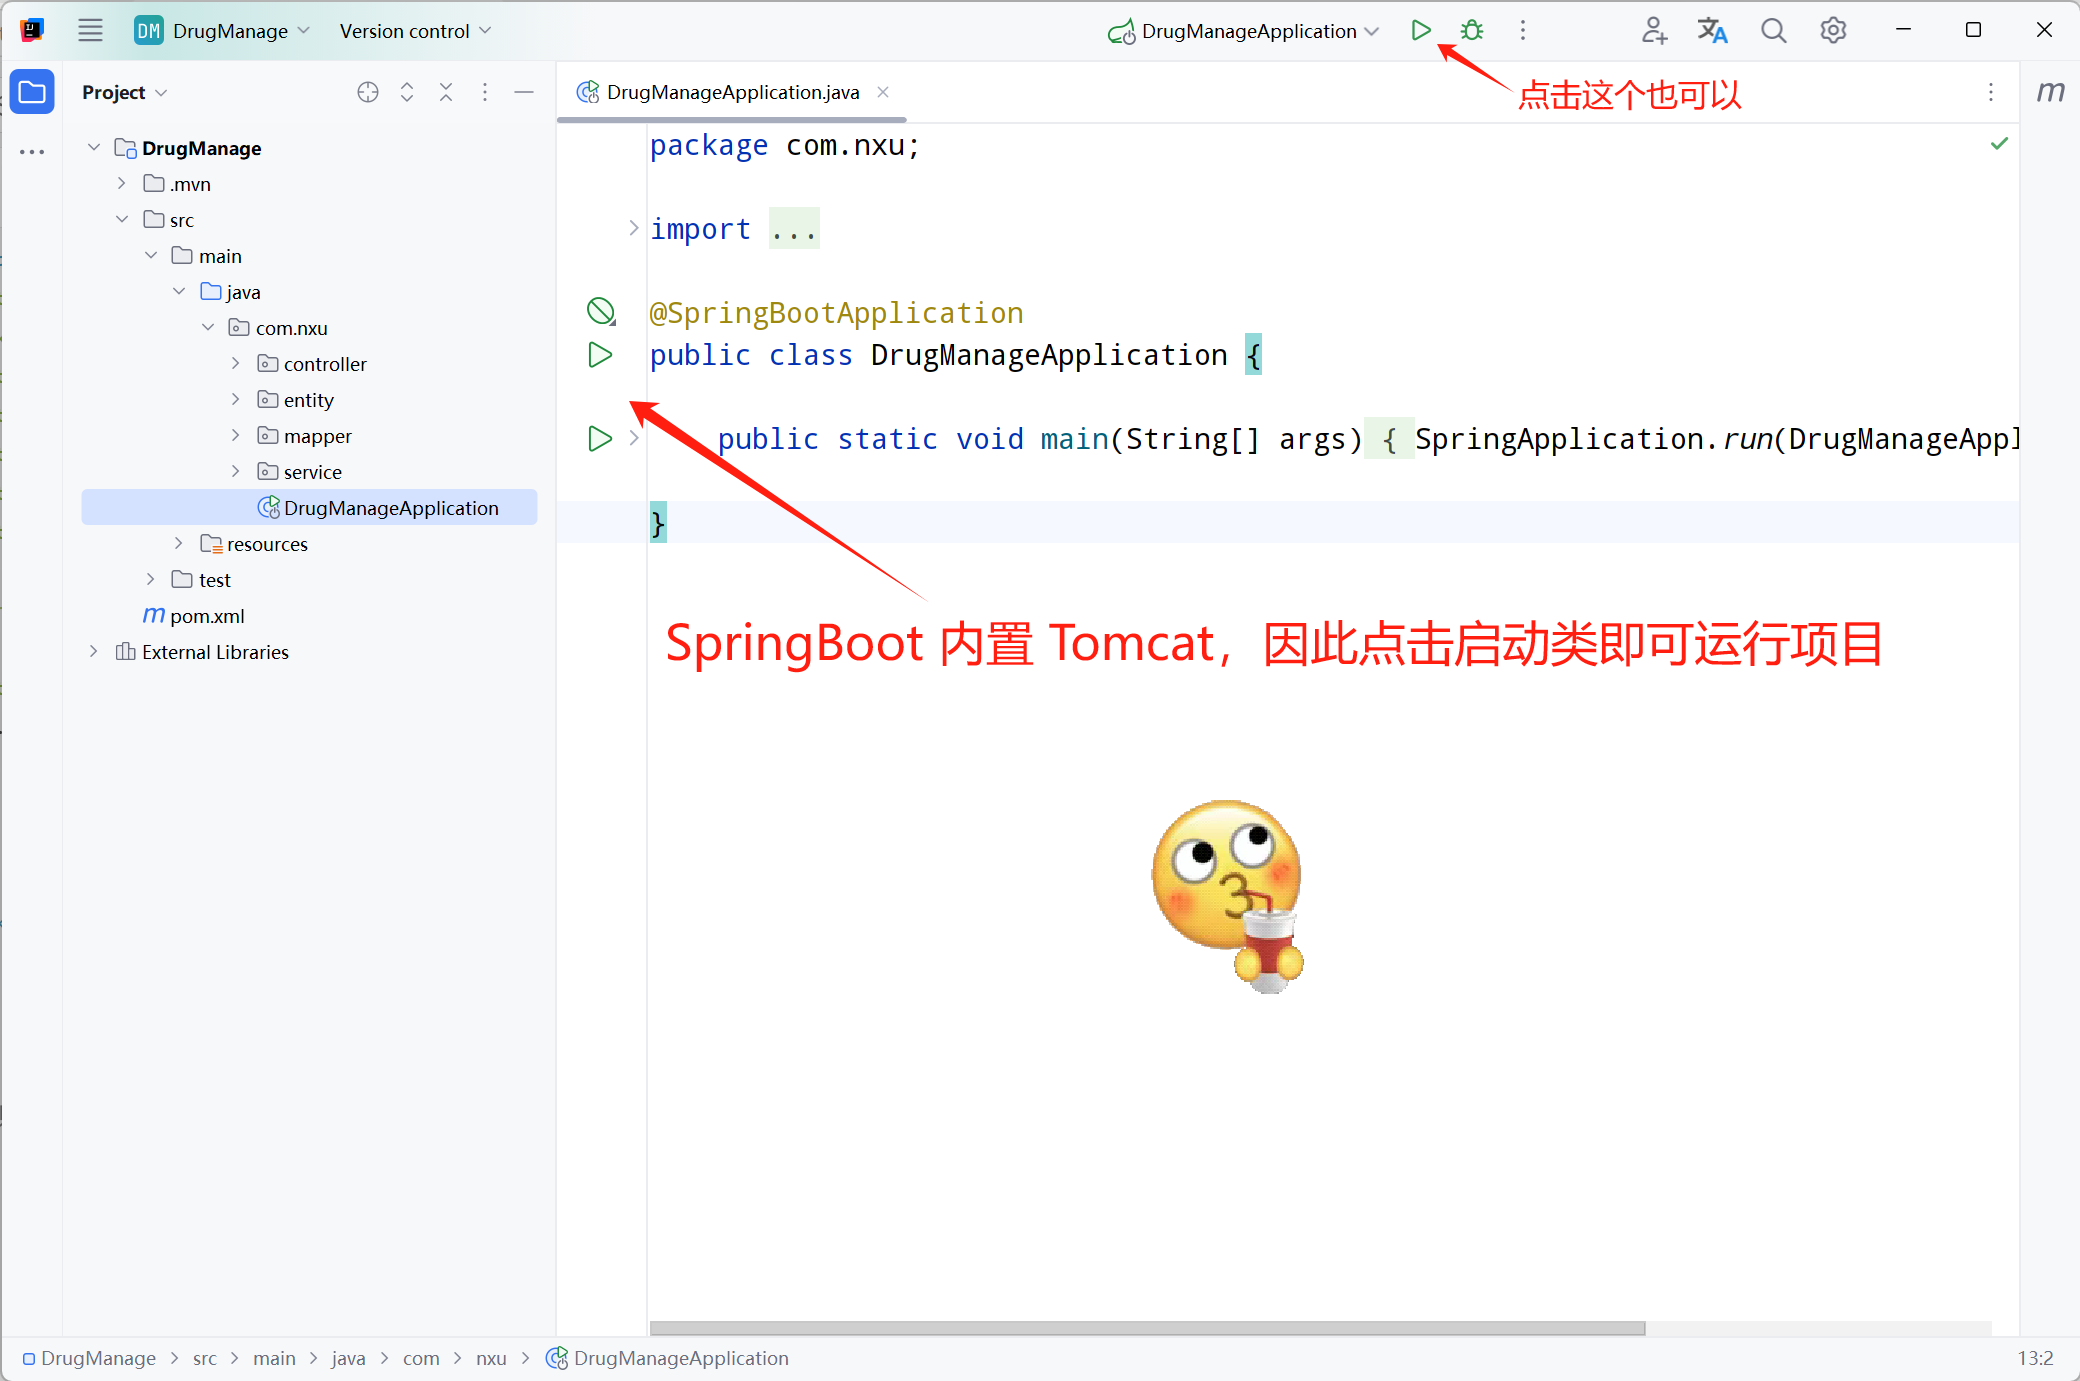
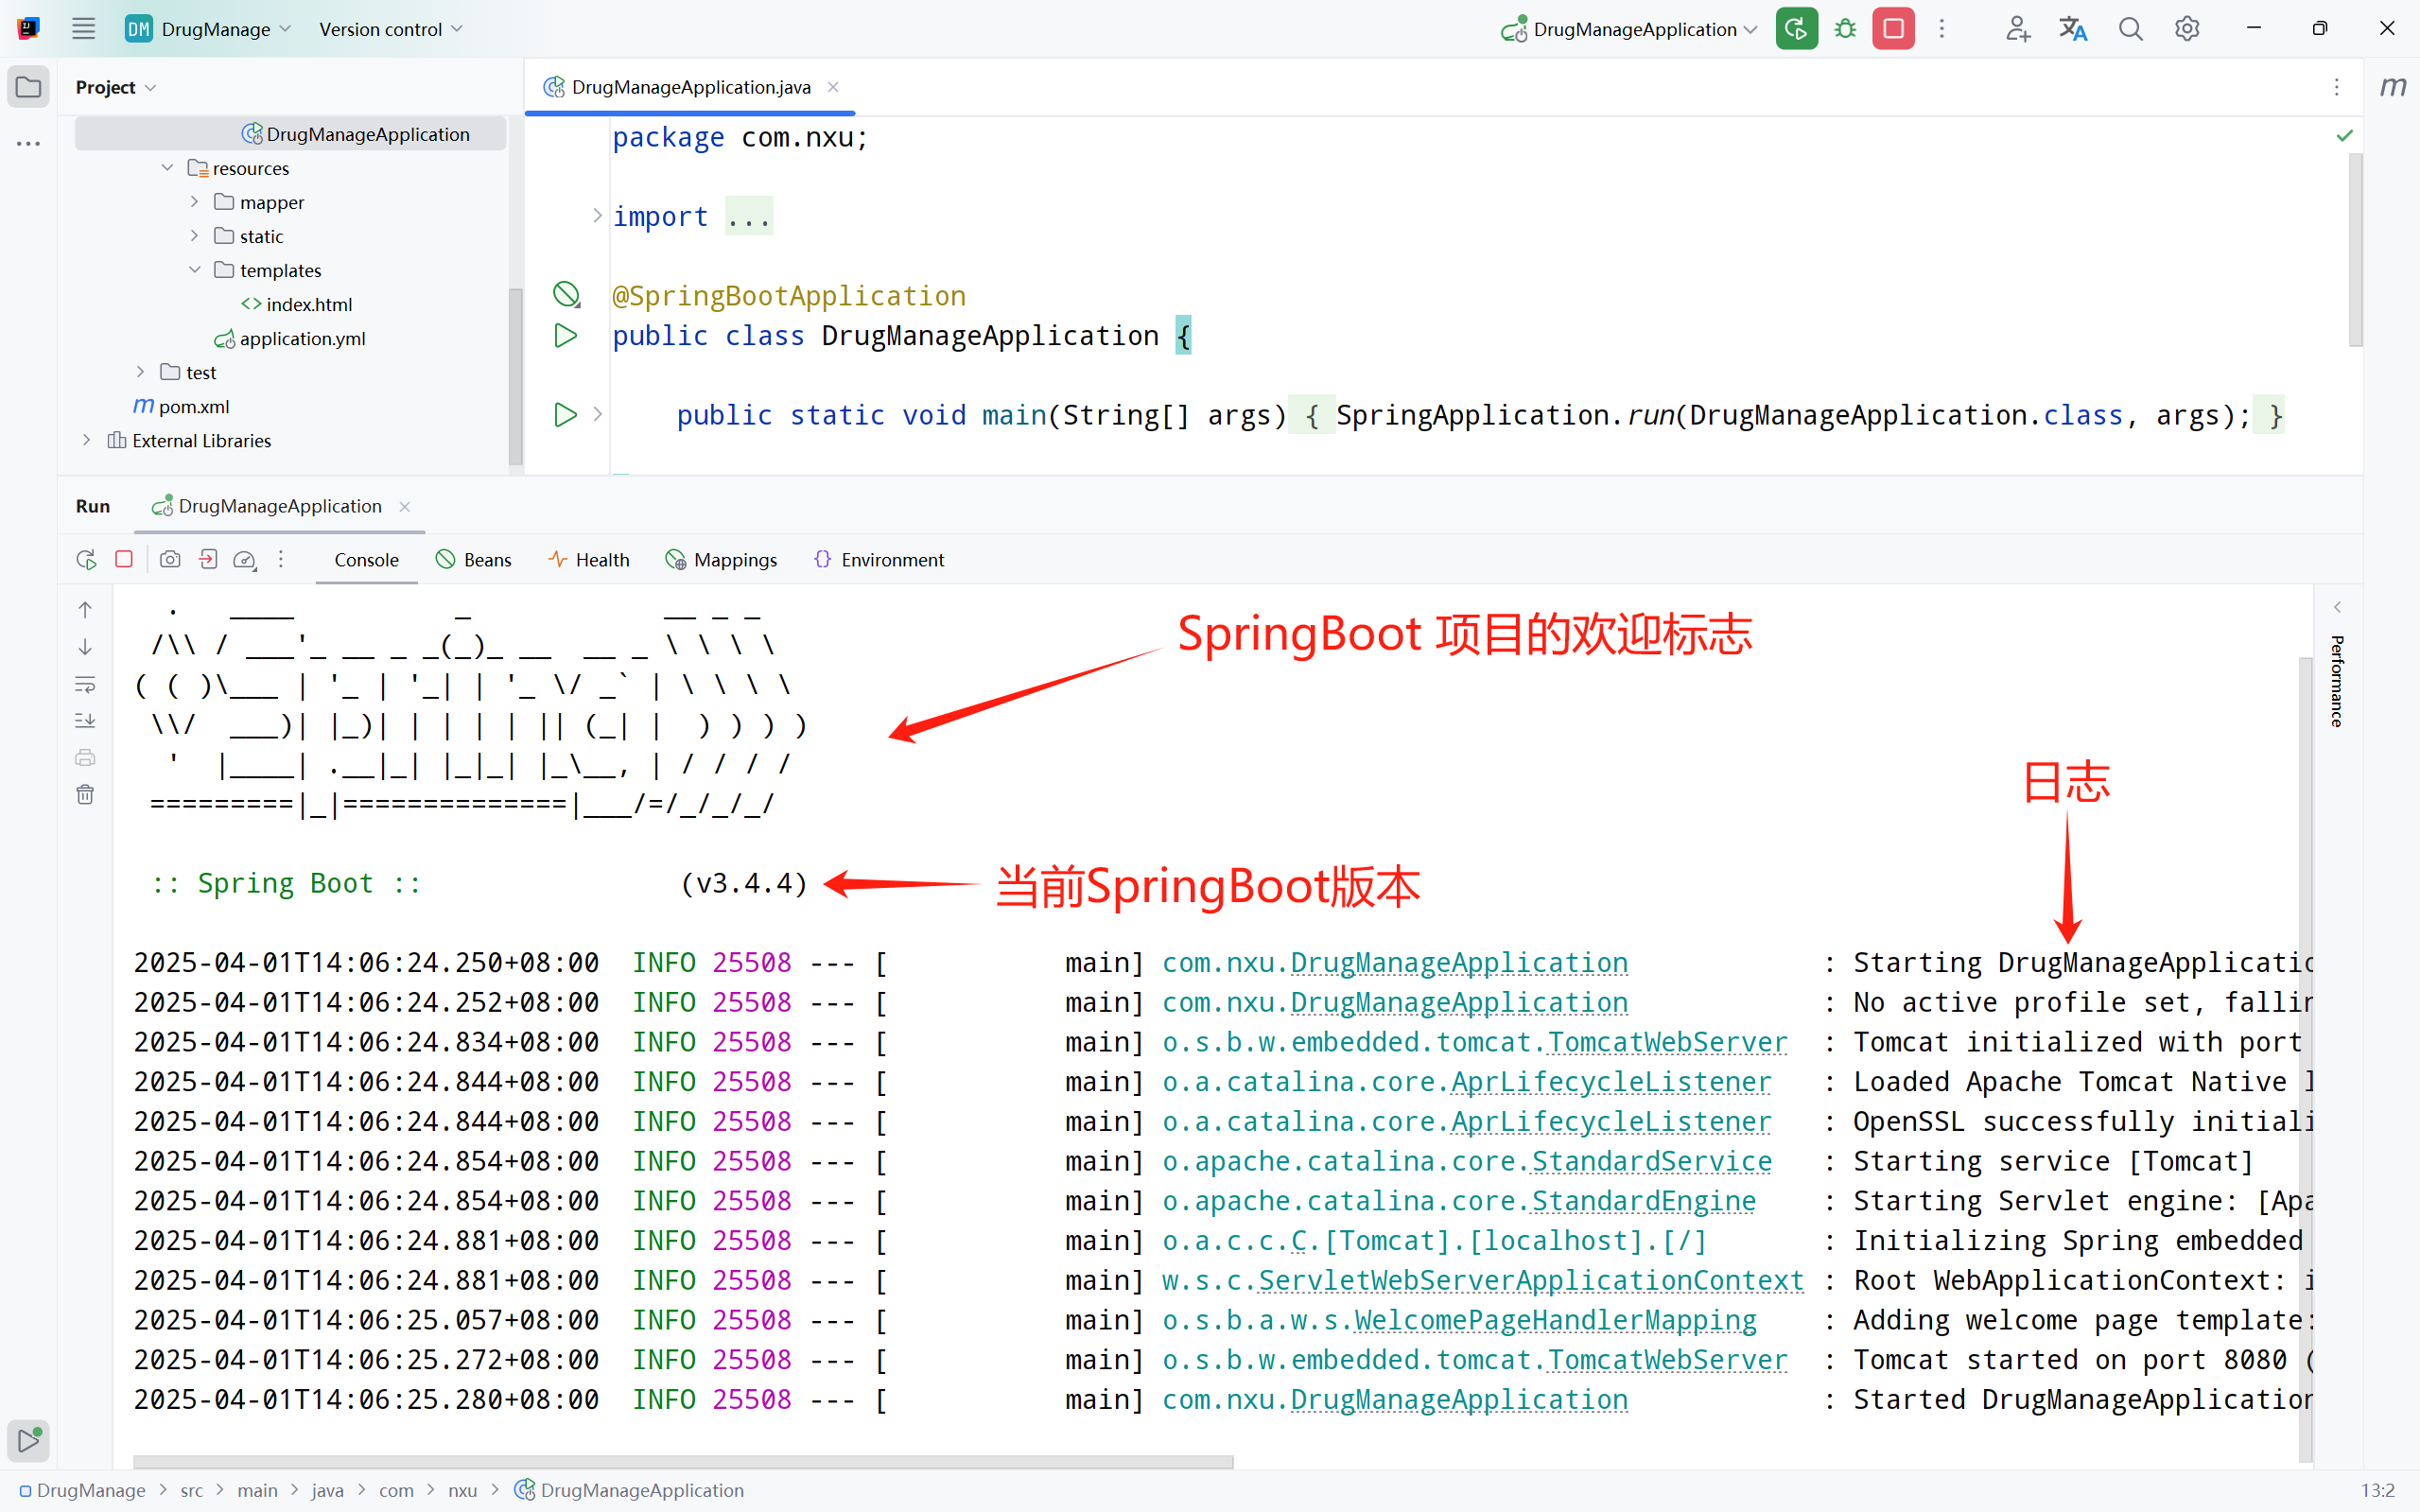
🔴打開瀏覽器,輸入 localhost:8080,回車,即可看到我們的index頁面,以及使用Thymeleaf顯示的數據。

🔴像圖片這些靜態資源,一般放在 resources 目錄下的 static 文件夾中,頁面中通過 / 路徑 的方式引用 👇
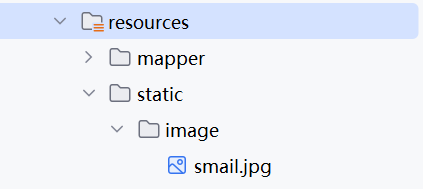
🔴那么在引用 該 照片時的路徑就是 /image/samil.jpg
?
十二:返回JSON數據
?
🟢如果我們寫了一個前后端分離項目,或者本身我需要返回JSON格式的數據,那么我們可以這么寫 👇
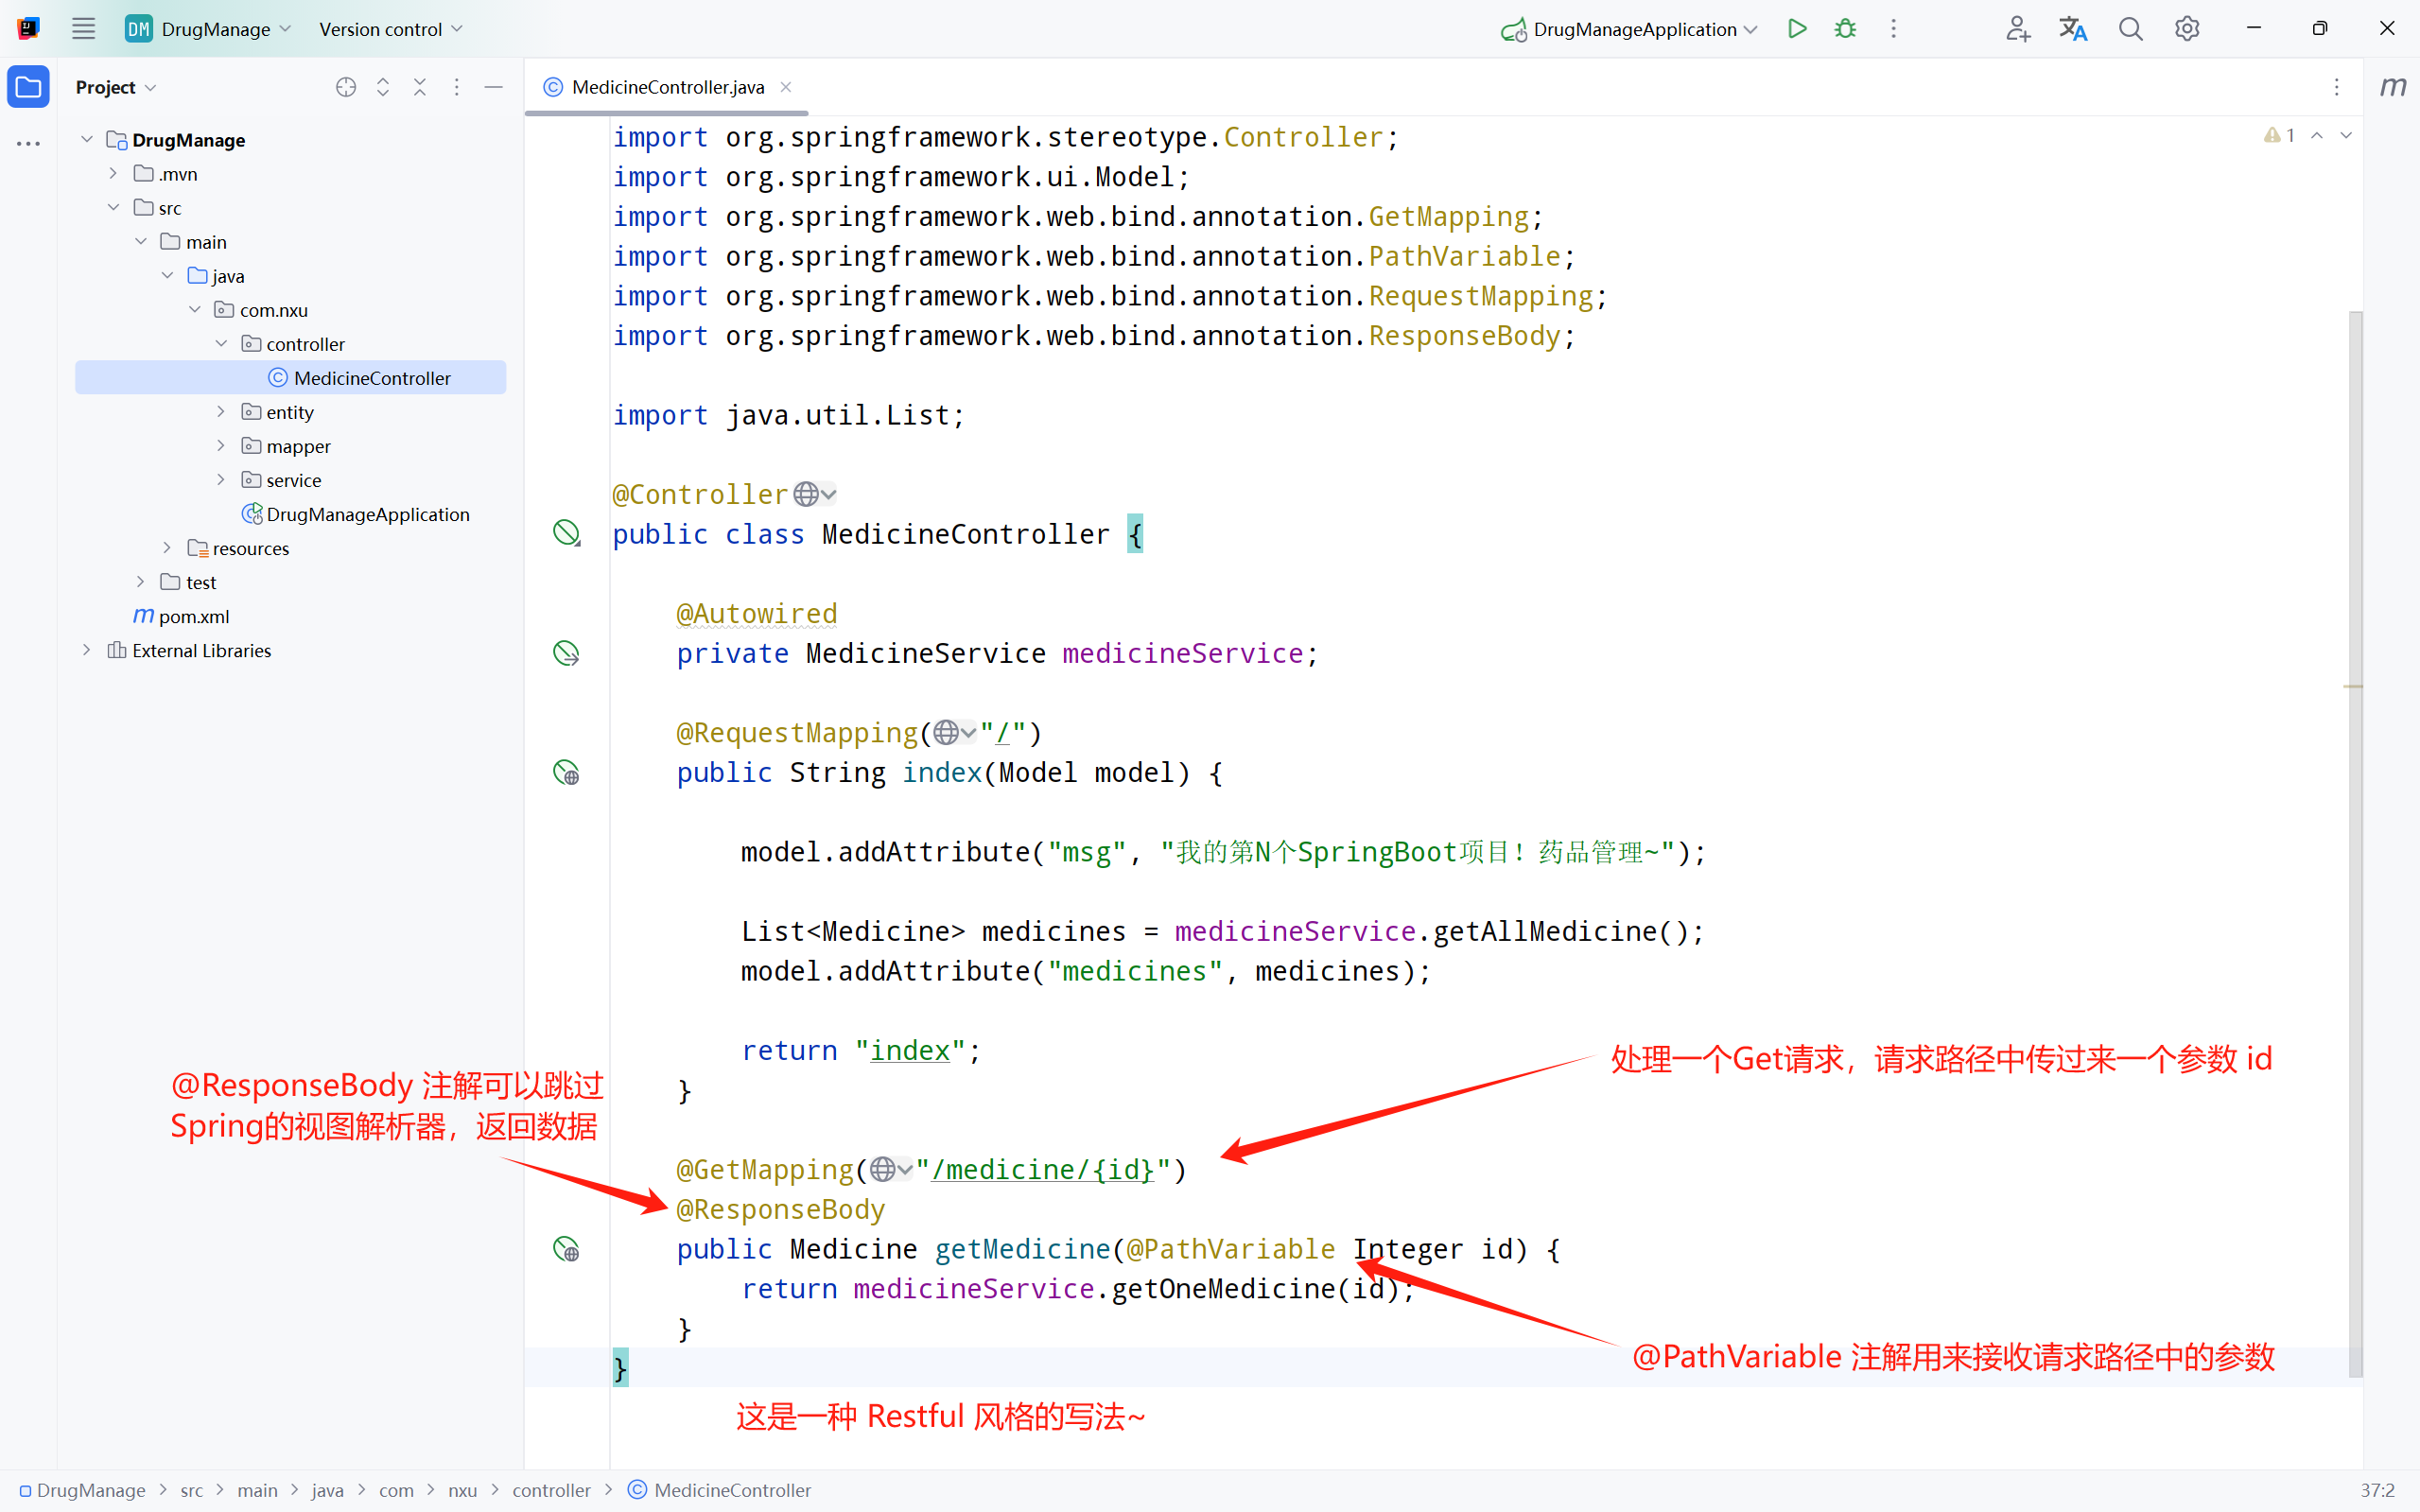
🟡在原來的 MedicineController 中添加以下代碼:
@GetMapping("/medicine/{id}")@ResponseBodypublic Medicine getMedicine(@PathVariable Integer id) {return medicineService.getOneMedicine(id);}
🟢重啟項目,然后瀏覽器中輸入 localhost:8080/medicine/1 然后回車,可以看到返回的數據 👇

🟢如果你的某個 controller 僅作為數據接口,不返回視圖,可以直接用 @RestController ,這個注解相當于 @Controller 和 @ResponseBody 注解的組合,這樣當前整個 controller 中都跳過 Spring 的視圖解析器。
?
至此,關于
SpringBoot的簡單使用就介紹完了。想要了解更多知識或交個朋友,歡迎訪問 👉 作者博客 😁😁😁
?


)
(藍橋杯常考點)—圖論)

)

——大模型解碼常見參數解析)


