文章目錄
- 購物車本地
- 1. 列表購物車基礎數據渲染
- 2. 列表購物車單選功能
- 3. 列表購物車全選功能
- 4. 列表購物車統計列表實現
- 5. 接口-加入購物車
- 6. 接口-刪除購物車
- 7. 退出登錄-清空購物車數據
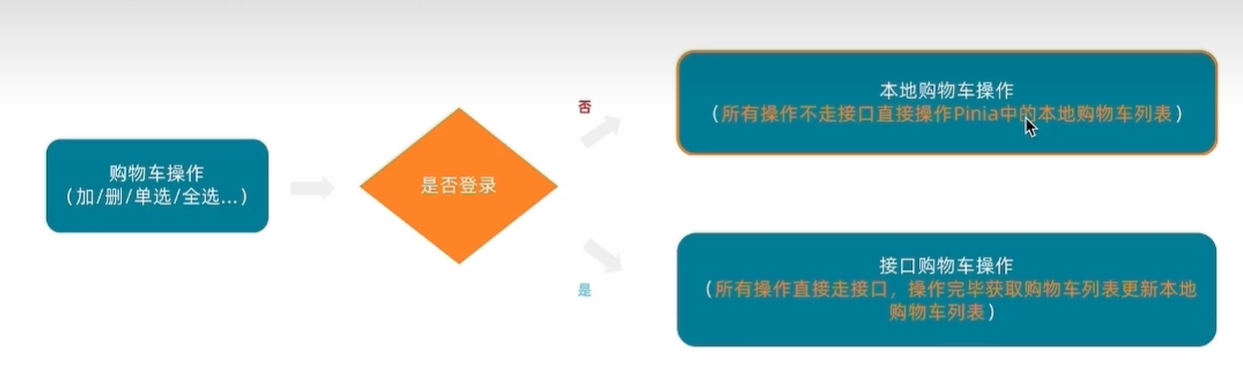
- 8. 合并購物車到服務器(重要)
- 結算
- 1. 路由配置和基礎數據渲染
- 2. 地址切換-打開彈框交互實現
- 3. 切換地址-地址激活交互實現
- 4. 生成訂單功能實現
- 支付
- 1. 渲染基礎數據
- 2. 實現支付功能
- 3. 支付結果展示
- 4. 封裝倒計數函數
- 小結
購物車本地
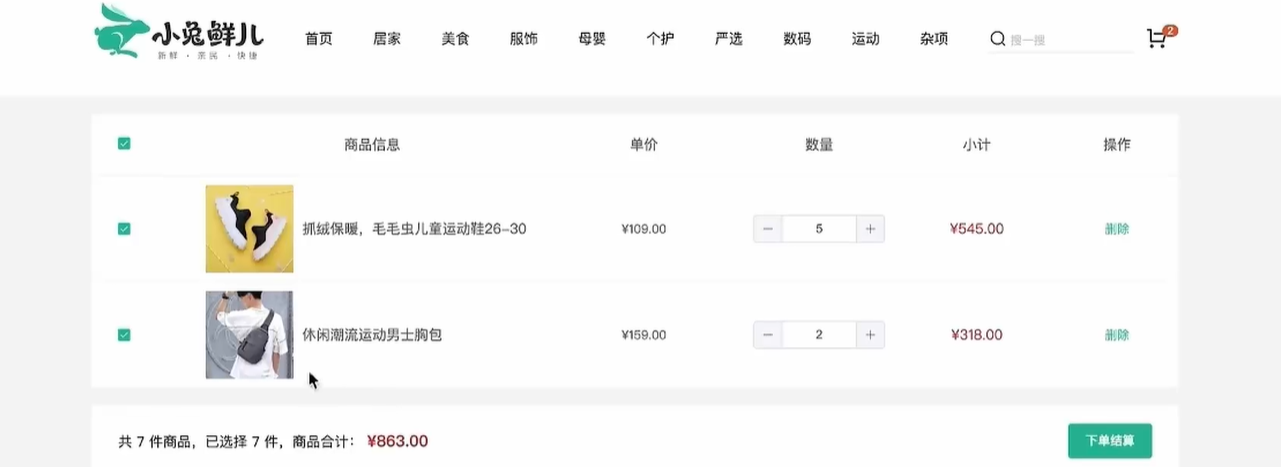
1. 列表購物車基礎數據渲染
- 模板
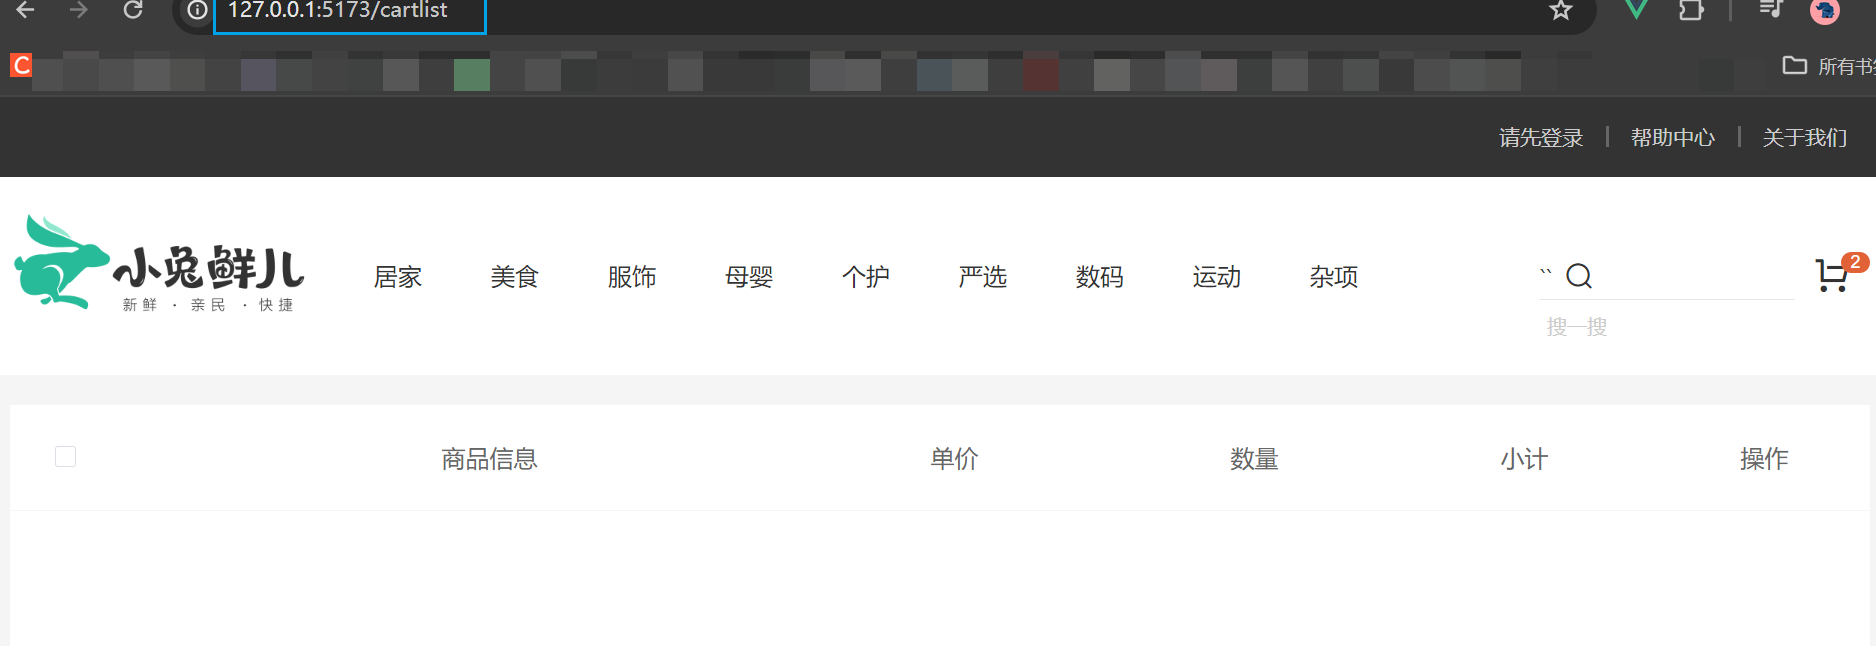
views/CartList/index.vue
<script setup>
const cartList = []
</script><template><div class="xtx-cart-page"><div class="container m-top-20"><div class="cart"><table><thead><tr><th width="120"><el-checkbox/></th><th width="400">商品信息</th><th width="220">單價</th><th width="180">數量</th><th width="180">小計</th><th width="140">操作</th></tr></thead><!-- 商品列表 --><tbody><tr v-for="i in cartList" :key="i.id"><td><el-checkbox /></td><td><div class="goods"><RouterLink to="/"><img :src="i.picture" alt="" /></RouterLink><div><p class="name ellipsis">{{ i.name }}</p></div></div></td><td class="tc"><p>¥{{ i.price }}</p></td><td class="tc"><el-input-number v-model="i.count" /></td><td class="tc"><p class="f16 red">¥{{ (i.price * i.count).toFixed(2) }}</p></td><td class="tc"><p><el-popconfirm title="確認刪除嗎?" confirm-button-text="確認" cancel-button-text="取消" @confirm="delCart(i)"><template #reference><a href="javascript:;">刪除</a></template></el-popconfirm></p></td></tr><tr v-if="cartList.length === 0"><td colspan="6"><div class="cart-none"><el-empty description="購物車列表為空"><el-button type="primary">隨便逛逛</el-button></el-empty></div></td></tr></tbody></table></div><!-- 操作欄 --><div class="action"><div class="batch">共 10 件商品,已選擇 2 件,商品合計:<span class="red">¥ 200.00 </span></div><div class="total"><el-button size="large" type="primary" >下單結算</el-button></div></div></div></div>
</template><style scoped lang="scss">
.xtx-cart-page {margin-top: 20px;.cart {background: #fff;color: #666;table {border-spacing: 0;border-collapse: collapse;line-height: 24px;th,td {padding: 10px;border-bottom: 1px solid #f5f5f5;&:first-child {text-align: left;padding-left: 30px;color: #999;}}th {font-size: 16px;font-weight: normal;line-height: 50px;}}}.cart-none {text-align: center;padding: 120px 0;background: #fff;p {color: #999;padding: 20px 0;}}.tc {text-align: center;a {color: $xtxColor;}.xtx-numbox {margin: 0 auto;width: 120px;}}.red {color: $priceColor;}.green {color: $xtxColor;}.f16 {font-size: 16px;}.goods {display: flex;align-items: center;img {width: 100px;height: 100px;}>div {width: 280px;font-size: 16px;padding-left: 10px;.attr {font-size: 14px;color: #999;}}}.action {display: flex;background: #fff;margin-top: 20px;height: 80px;align-items: center;font-size: 16px;justify-content: space-between;padding: 0 30px;.xtx-checkbox {color: #999;}.batch {a {margin-left: 20px;}}.red {font-size: 18px;margin-right: 20px;font-weight: bold;}}.tit {color: #666;font-size: 16px;font-weight: normal;line-height: 50px;}}
</style>
- 綁定路由,二級路由,測試可用
{path: 'cartlist',component: CartList
}
頭部購物車點擊 購物車結算 按鈕,跳轉到這個頁面
<el-button size="large" type="primary" @click="$router.push('/cartlist')">去購物車結算</el-button>
- 渲染列表
<!--cartLsit/index.vue-->
<script setup>
// const cartList = []
import { useCartStore } from '@/stores/cartStore';
const cartStore = useCartStore()
</script><template><div class="xtx-cart-page"><div class="container m-top-20"><div class="cart"><table><thead><tr><th width="120"><el-checkbox /></th><th width="400">商品信息</th><th width="220">單價</th><th width="180">數量</th><th width="180">小計</th><th width="140">操作</th></tr></thead><!-- 商品列表 --><tbody><tr v-for="i in cartStore.cartList" :key="i.id"><td><el-checkbox /></td><td><div class="goods"><RouterLink to="/"><img :src="i.picture" alt="" /></RouterLink><div><p class="name ellipsis">{{ i.name }}</p></div></div></td><td class="tc"><p>¥{{ i.price }}</p></td><td class="tc"><el-input-number v-model="i.count" /></td><td class="tc"><p class="f16 red">¥{{ (i.price * i.count).toFixed(2) }}</p></td><td class="tc"><p><el-popconfirm title="確認刪除嗎?" confirm-button-text="確認" cancel-button-text="取消"@confirm="delCart(i)"><template #reference><a href="javascript:;">刪除</a></template></el-popconfirm></p></td></tr><tr v-if="cartStore.cartList.length === 0"><td colspan="6"><div class="cart-none"><el-empty description="購物車列表為空"><el-button type="primary">隨便逛逛</el-button></el-empty></div></td></tr></tbody></table></div><!-- 操作欄 --><div class="action"><div class="batch">共 10 件商品,已選擇 2 件,商品合計:<span class="red">¥ 200.00 </span></div><div class="total"><el-button size="large" type="primary">下單結算</el-button></div></div></div></div>
</template><style scoped lang="scss">
.xtx-cart-page {margin-top: 20px;.cart {background: #fff;color: #666;table {border-spacing: 0;border-collapse: collapse;line-height: 24px;th,td {padding: 10px;border-bottom: 1px solid #f5f5f5;&:first-child {text-align: left;padding-left: 30px;color: #999;}}th {font-size: 16px;font-weight: normal;line-height: 50px;}}}.cart-none {text-align: center;padding: 120px 0;background: #fff;p {color: #999;padding: 20px 0;}}.tc {text-align: center;a {color: $xtxColor;}.xtx-numbox {margin: 0 auto;width: 120px;}}.red {color: $priceColor;}.green {color: $xtxColor;}.f16 {font-size: 16px;}.goods {display: flex;align-items: center;img {width: 100px;height: 100px;}>div {width: 280px;font-size: 16px;padding-left: 10px;.attr {font-size: 14px;color: #999;}}}.action {display: flex;background: #fff;margin-top: 20px;height: 80px;align-items: center;font-size: 16px;justify-content: space-between;padding: 0 30px;.xtx-checkbox {color: #999;}.batch {a {margin-left: 20px;}}.red {font-size: 18px;margin-right: 20px;font-weight: bold;}}.tit {color: #666;font-size: 16px;font-weight: normal;line-height: 50px;}}
</style>
2. 列表購物車單選功能
核心思路:單選的核心思路就是始終把單選框的狀態和Pinia中store對應的狀態保持同步
注意事項: v-model雙向綁定指令不方便進行命令式的操作(因為后續還需要調用接口),所以把v-model回退到一般模式,也就是:model-value 和 @change 的配合實現
// 單選功能
const singleCheck = (skuId, selected) => {// 通過skuId找到要修改的那一項 然后把它的selected修改為傳過來的selectedconst item = cartList.value.find((item) => item.skuId === skuId)item.selected = selected
}
<!--cartList/index.vue-->
<script setup>
// 單選回調
const singleCheck = (i, selected) => {console.log(i, selected)// store cartList 數組 無法知道要修改誰的選中狀態?// 除了selected補充一個用來篩選的參數 - skuIdcartStore.singleCheck(i.skuId, selected)
}
</script><template><td><!-- 單選框 --><el-checkbox :model-value="i.selected" @change="(selected) => singleCheck(i, selected)" /></td>
</template>
3. 列表購物車全選功能
基礎思想:
-
全選狀態決定單選框狀態 - 遍歷
cartList把每一項的selected都設置為何全選框狀態一致 -
單選框狀態決定全選狀態 - 只有所有單選框的
selected都為true, 全選框才為true
// 全選功能action
const allCheck = (selected) => {// 把cartList中的每一項的selected都設置為當前的全選框狀態cartList.value.forEach(item => item.selected = selected)
}// 是否全選計算屬性
const isAll = computed(() => cartList.value.every((item) => item.selected))
<script setup>
const allCheck = (selected) => {cartStore.allCheck(selected)
}</script><template><!-- 全選框 --><el-checkbox :model-value="cartStore.isAll" @change="allCheck" />
</template>
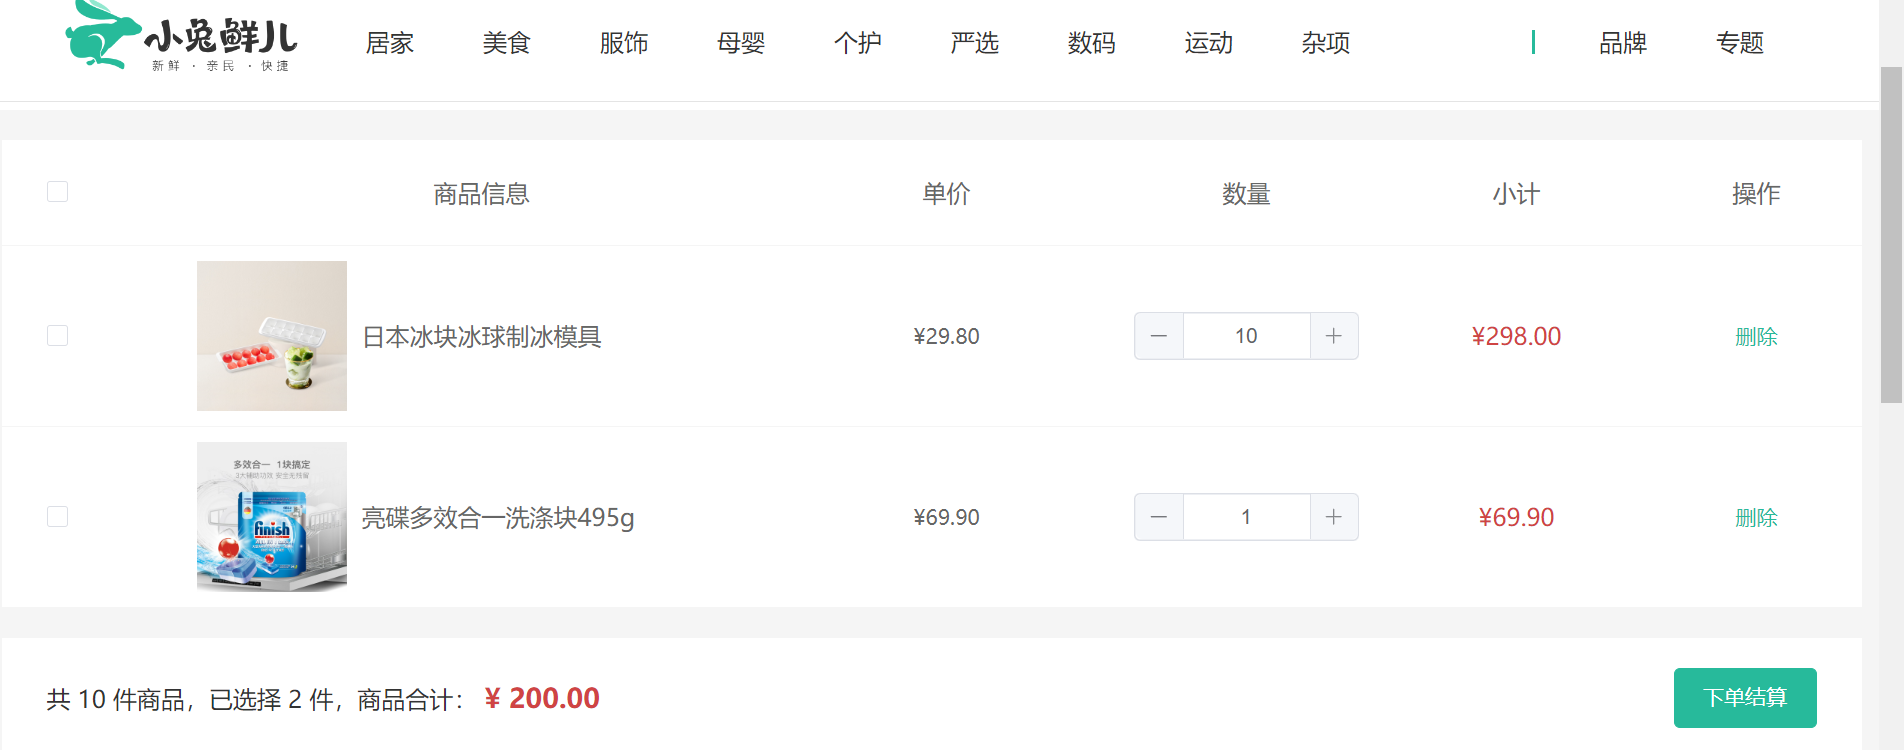
4. 列表購物車統計列表實現
下面的價格/件數,與之前計算的同理同理
// 3. 已選擇數量
const selectedCount = computed(() => cartList.value.filter(item => item.selected).reduce((a, c) => a + c.count, 0))
// 4. 已選擇商品價錢合計
const selectedPrice = computed(() => cartList.value.filter(item => item.selected).reduce((a, c) => a + c.count * c.price, 0))
 <div class="batch">共 {{ cartStore.allCount }} 件商品,已選擇 {{ cartStore.selectedCount }} 件,商品合計:<span class="red">¥ {{ cartStore.selectedPrice }} </span>
</div>
5. 接口-加入購物車
步驟:
- 找到加入購物車
addCart的action,判斷是否是登錄狀態(看token)
- 封裝調用加入購物車接口
? apis新增cart.js、
import httpInstance from "@/utils/http"//加入購物車
export const insertCartAPI = ({ skuId, count }) => {return httpInstance({url: '/member/cart',method: 'POST',data: {skuId,count}})
}//獲取最新的購物車列表
export const findNewCartListAPI = () => {return httpInstance({url: '/member/cart'})
}
-
封裝調用獲取購物車列表接口
-
用接口購物車列表去覆蓋本地購物車列表
// 封裝購物車模塊import { defineStore } from 'pinia'
import { ref } from 'vue'
import { computed } from 'vue'
import { useUserStore } from './user'
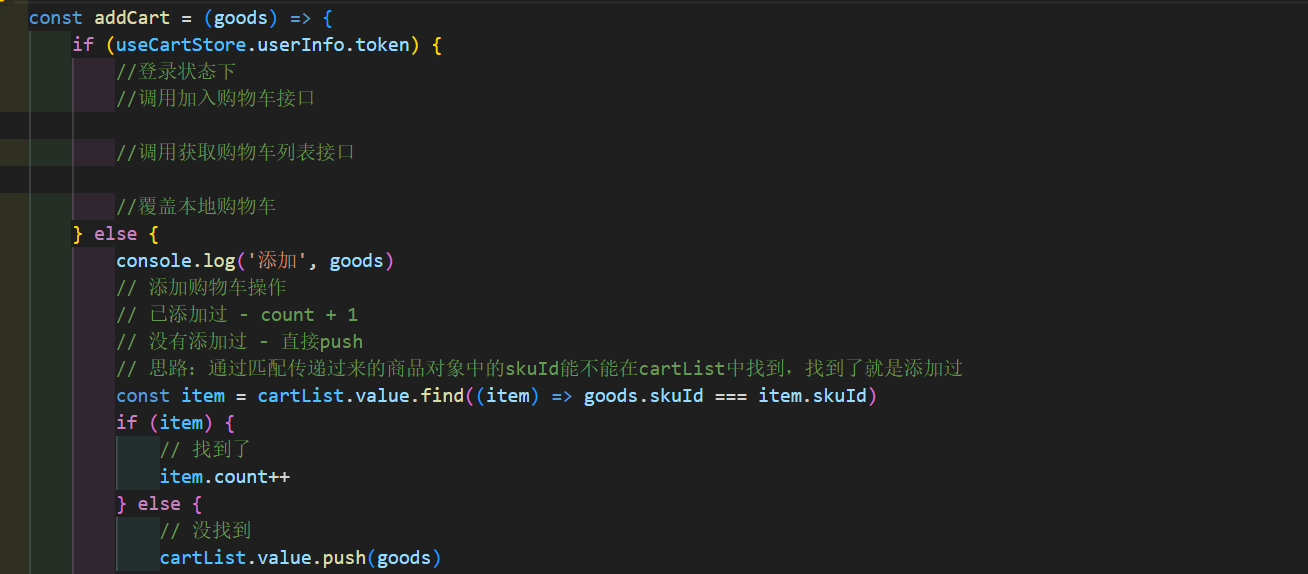
import { insertCartAPI, findNewCartListAPI } from '@/apis/cart.js'export const useCartStore = defineStore('cart', () => {const userStore = useUserStore()//用computed映射一下token,方便數據轉換,響應式更新const isLogin = computed(() => userStore.userInfo.token)// 1. 定義state - cartList購物車列表const cartList = ref([])// 2. 定義action - addCart添加購物車const addCart = async (goods) => {//解構出來const { skuId, count } = goodsif (isLogin.value) {//登錄狀態下//調用加入購物車接口await insertCartAPI({ skuId, count })//調用獲取購物車列表接口const res = await findNewCartListAPI()//覆蓋本地購物車cartList.value = res.result} else {console.log('添加', goods)// 添加購物車操作// 已添加過 - count + 1// 沒有添加過 - 直接push// 思路:通過匹配傳遞過來的商品對象中的skuId能不能在cartList中找到,找到了就是添加過const item = cartList.value.find((item) => goods.skuId === item.skuId)if (item) {// 找到了item.count++} else {// 沒找到cartList.value.push(goods)}}}// 刪除購物車const delCart = async (skuId) => {// 思路:// 1. 找到要刪除項的下標值 - splice// 2. 使用數組的過濾方法 - filterconst idx = cartList.value.findIndex((item) => skuId === item.skuId)cartList.value.splice(idx, 1)}// 單選功能const singleCheck = (skuId, selected) => {// 通過skuId找到要修改的那一項 然后把它的selected修改為傳過來的selectedconst item = cartList.value.find((item) => item.skuId === skuId)item.selected = selected}// 全選功能actionconst allCheck = (selected) => {// 把cartList中的每一項的selected都設置為當前的全選框狀態cartList.value.forEach(item => item.selected = selected)}// 是否全選計算屬性const isAll = computed(() => cartList.value.every((item) => item.selected))//計算購物車件數和總價格//總數const allCount = computed(() => cartList.value.reduce((a, c) => a + c.count, 0))//總價const allPrice = computed(() => cartList.value.reduce((a, c) => a + c.count * c.price, 0))// 3. 已選擇數量const selectedCount = computed(() => cartList.value.filter(item => item.selected).reduce((a, c) => a + c.count, 0))// 4. 已選擇商品價錢合計const selectedPrice = computed(() => cartList.value.filter(item => item.selected).reduce((a, c) => a + c.count * c.price, 0))return {cartList,allCount,allPrice,selectedCount,selectedPrice,addCart,delCart,singleCheck,allCheck}
}, {persist: true,
})
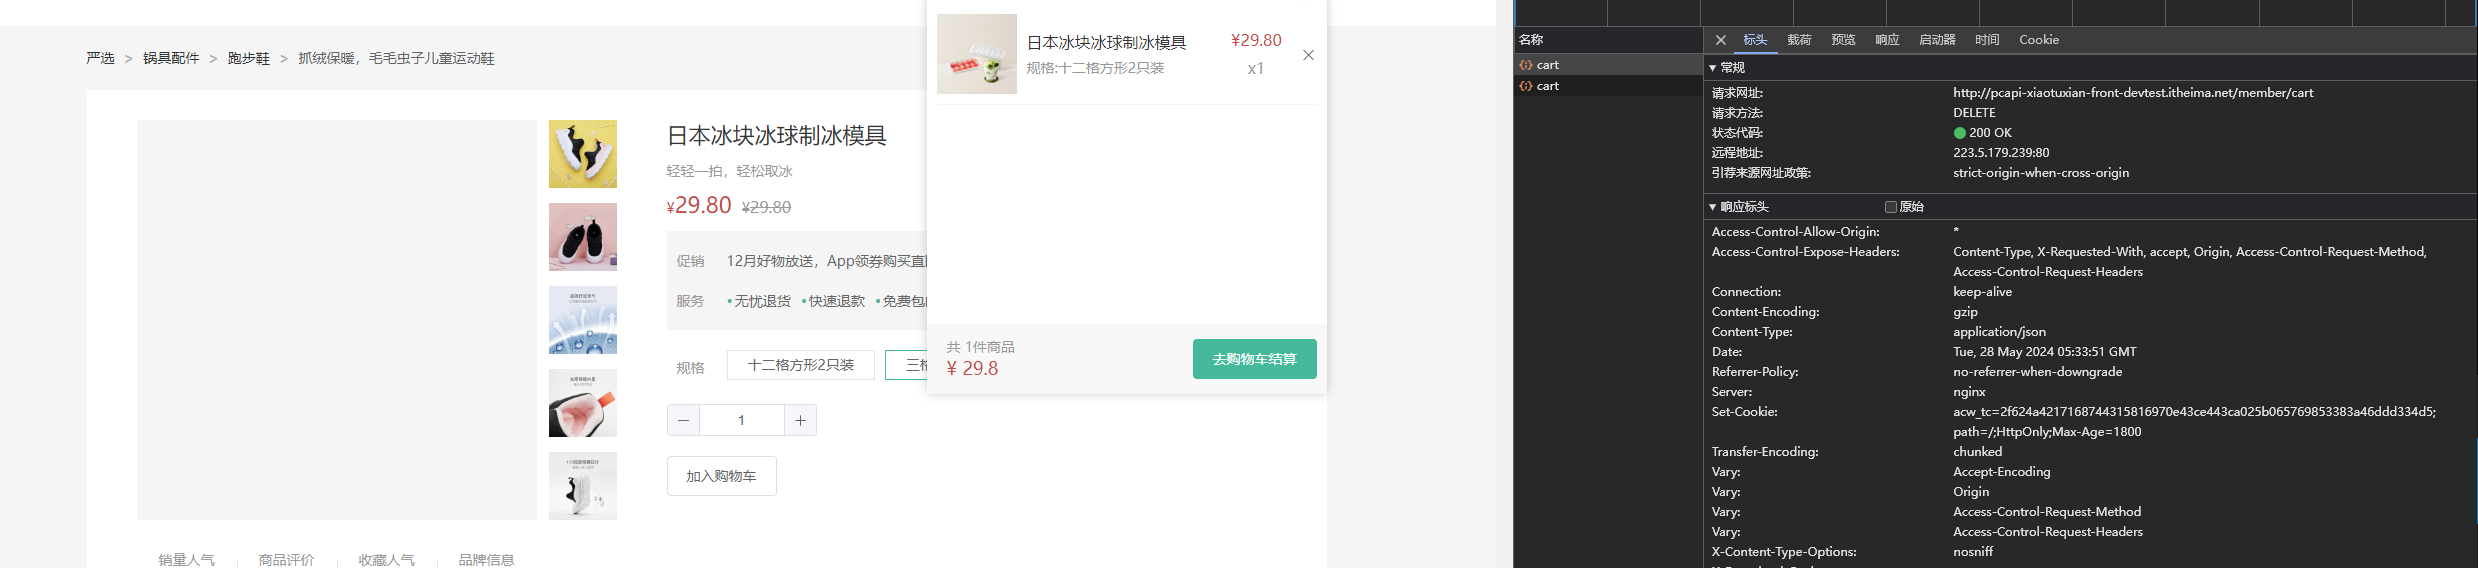
6. 接口-刪除購物車
思路和 加入購物車 類似
封裝接口
// 刪除購物車
export const delCartAPI = (ids) => {return httpInstance({url: '/member/cart',method: 'DELETE',data: {ids}})
}
書寫邏輯
// 刪除購物車const delCart = async (skuId) => {if (isLogin.value) {// 調用接口實現接口購物車中的刪除功能await delCartAPI([skuId])//調用獲取購物車列表接口const res = await findNewCartListAPI()//覆蓋本地購物車cartList.value = res.result} else {// 思路:// 1. 找到要刪除項的下標值 - splice// 2. 使用數組的過濾方法 - filterconst idx = cartList.value.findIndex((item) => skuId === item.skuId)cartList.value.splice(idx, 1)}}
-
優化
由于更新列表都需要重復使用下面兩行代碼,我們抽象成一個
action函數方便使用(雖然就兩行代碼,但我們學習的是這種思想,有些公司就對于代碼的重復度有要求。)
//獲取最新的購物車列表const updateNewList = async () => {//調用獲取購物車列表接口const res = await findNewCartListAPI()//覆蓋本地購物車cartList.value = res.result}
使用的時候調用updateNewList就可以了
7. 退出登錄-清空購物車數據
- 清除購物車
action,記得return出去
//清空購物車 stores/cartStore.jsconst clearCart = () => {cartList = []}
- 退出登錄時清除購物車
//退出登錄,數據清空 stores/user.jsconst clearData = () => {//用戶數據清空userInfo.value = {}//購物車清空cartStore.clearCart()}
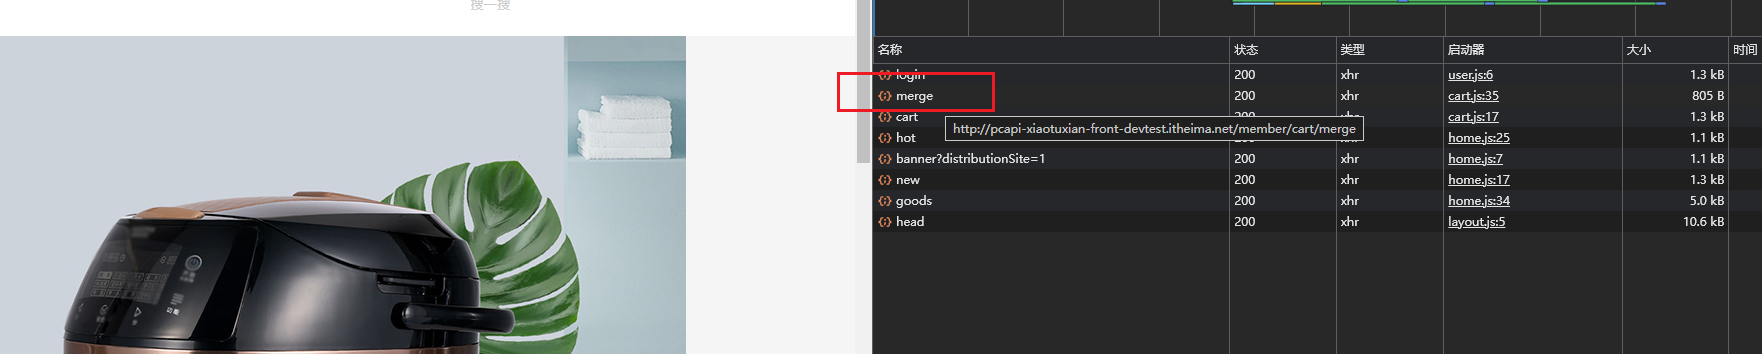
8. 合并購物車到服務器(重要)
目的是讓用戶在非登錄狀態下的行為有效,別白操作一頓
- 登錄時調用合并購物車接口
//合并購物車    apis/cart.js
export const mergeCartAPI = (data) => {return httpInstance({url: '/member/cart/merge',method: 'post',data})
}
//stores/user.js
//合并購物車的操作 根據現有數組經過映射得到一個全新的數組使用mapmergeCartAPI(cartStore.cartList.map(item => {return {skuId: item.skuId,selected: item.selected,count: item.count}}))
-
獲取最新的購物車列表
-
覆蓋本地購物車列表
cartStore.updateNewList()
如何測試?非登錄添加新商品,登錄看network的接口有沒有merge
結算
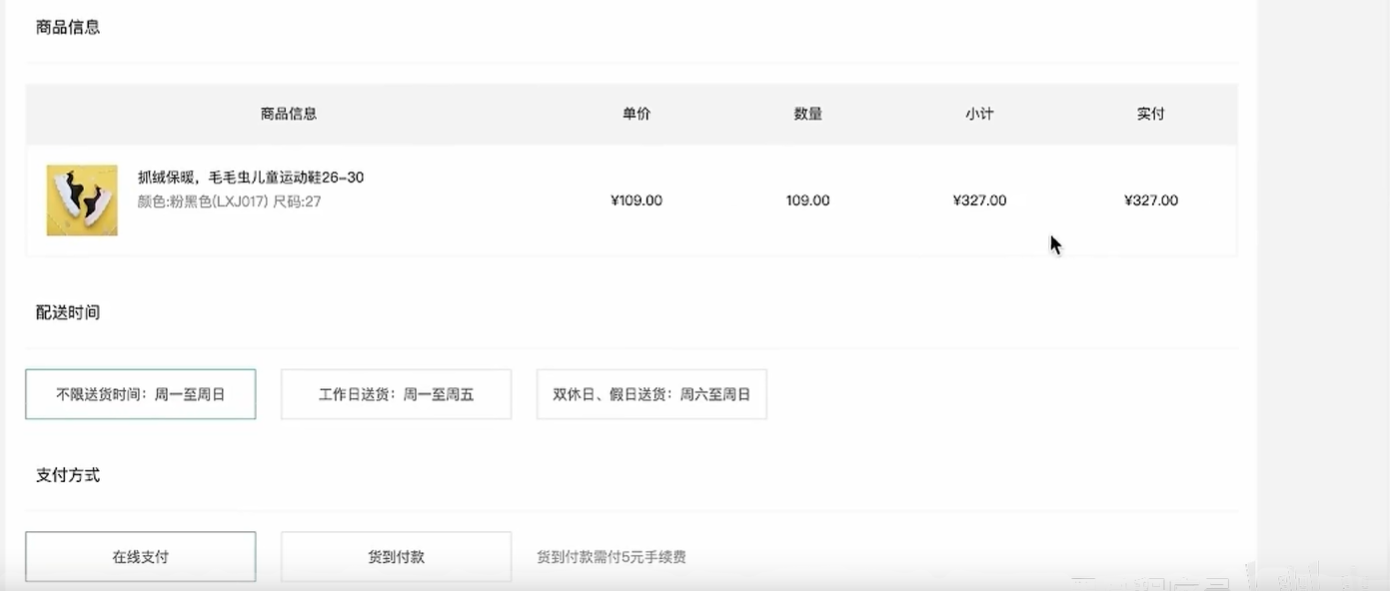
1. 路由配置和基礎數據渲染
views/Cheakout/index.vue組件模板
<script setup>
const checkInfo = {} // 訂單對象
const curAddress = {} // 地址對象</script><template><div class="xtx-pay-checkout-page"><div class="container"><div class="wrapper"><!-- 收貨地址 --><h3 class="box-title">收貨地址</h3><div class="box-body"><div class="address"><div class="text"><div class="none" v-if="!curAddress">您需要先添加收貨地址才可提交訂單。</div><ul v-else><li><span>收<i />貨<i />人:</span>{{ curAddress.receiver }}</li><li><span>聯系方式:</span>{{ curAddress.contact }}</li><li><span>收貨地址:</span>{{ curAddress.fullLocation }} {{ curAddress.address }}</li></ul></div><div class="action"><el-button size="large" @click="toggleFlag = true">切換地址</el-button><el-button size="large" @click="addFlag = true">添加地址</el-button></div></div></div><!-- 商品信息 --><h3 class="box-title">商品信息</h3><div class="box-body"><table class="goods"><thead><tr><th width="520">商品信息</th><th width="170">單價</th><th width="170">數量</th><th width="170">小計</th><th width="170">實付</th></tr></thead><tbody><tr v-for="i in checkInfo.goods" :key="i.id"><td><a href="javascript:;" class="info"><img :src="i.picture" alt=""><div class="right"><p>{{ i.name }}</p><p>{{ i.attrsText }}</p></div></a></td><td>¥{{ i.price }}</td><td>{{ i.price }}</td><td>¥{{ i.totalPrice }}</td><td>¥{{ i.totalPayPrice }}</td></tr></tbody></table></div><!-- 配送時間 --><h3 class="box-title">配送時間</h3><div class="box-body"><a class="my-btn active" href="javascript:;">不限送貨時間:周一至周日</a><a class="my-btn" href="javascript:;">工作日送貨:周一至周五</a><a class="my-btn" href="javascript:;">雙休日、假日送貨:周六至周日</a></div><!-- 支付方式 --><h3 class="box-title">支付方式</h3><div class="box-body"><a class="my-btn active" href="javascript:;">在線支付</a><a class="my-btn" href="javascript:;">貨到付款</a><span style="color:#999">貨到付款需付5元手續費</span></div><!-- 金額明細 --><h3 class="box-title">金額明細</h3><div class="box-body"><div class="total"><dl><dt>商品件數:</dt><dd>{{ checkInfo.summary?.goodsCount }}件</dd></dl><dl><dt>商品總價:</dt><dd>¥{{ checkInfo.summary?.totalPrice.toFixed(2) }}</dd></dl><dl><dt>運<i></i>費:</dt><dd>¥{{ checkInfo.summary?.postFee.toFixed(2) }}</dd></dl><dl><dt>應付總額:</dt><dd class="price">{{ checkInfo.summary?.totalPayPrice.toFixed(2) }}</dd></dl></div></div><!-- 提交訂單 --><div class="submit"><el-button type="primary" size="large" >提交訂單</el-button></div></div></div></div><!-- 切換地址 --><!-- 添加地址 -->
</template><style scoped lang="scss">
.xtx-pay-checkout-page {margin-top: 20px;.wrapper {background: #fff;padding: 0 20px;.box-title {font-size: 16px;font-weight: normal;padding-left: 10px;line-height: 70px;border-bottom: 1px solid #f5f5f5;}.box-body {padding: 20px 0;}}
}.address {border: 1px solid #f5f5f5;display: flex;align-items: center;.text {flex: 1;min-height: 90px;display: flex;align-items: center;.none {line-height: 90px;color: #999;text-align: center;width: 100%;}>ul {flex: 1;padding: 20px;li {line-height: 30px;span {color: #999;margin-right: 5px;>i {width: 0.5em;display: inline-block;}}}}>a {color: $xtxColor;width: 160px;text-align: center;height: 90px;line-height: 90px;border-right: 1px solid #f5f5f5;}}.action {width: 420px;text-align: center;.btn {width: 140px;height: 46px;line-height: 44px;font-size: 14px;&:first-child {margin-right: 10px;}}}
}.goods {width: 100%;border-collapse: collapse;border-spacing: 0;.info {display: flex;text-align: left;img {width: 70px;height: 70px;margin-right: 20px;}.right {line-height: 24px;p {&:last-child {color: #999;}}}}tr {th {background: #f5f5f5;font-weight: normal;}td,th {text-align: center;padding: 20px;border-bottom: 1px solid #f5f5f5;&:first-child {border-left: 1px solid #f5f5f5;}&:last-child {border-right: 1px solid #f5f5f5;}}}
}.my-btn {width: 228px;height: 50px;border: 1px solid #e4e4e4;text-align: center;line-height: 48px;margin-right: 25px;color: #666666;display: inline-block;&.active,&:hover {border-color: $xtxColor;}
}.total {dl {display: flex;justify-content: flex-end;line-height: 50px;dt {i {display: inline-block;width: 2em;}}dd {width: 240px;text-align: right;padding-right: 70px;&.price {font-size: 20px;color: $priceColor;}}}
}.submit {text-align: right;padding: 60px;border-top: 1px solid #f5f5f5;
}.addressWrapper {max-height: 500px;overflow-y: auto;
}.text {flex: 1;min-height: 90px;display: flex;align-items: center;&.item {border: 1px solid #f5f5f5;margin-bottom: 10px;cursor: pointer;&.active,&:hover {border-color: $xtxColor;background: lighten($xtxColor, 50%);}>ul {padding: 10px;font-size: 14px;line-height: 30px;}}
}
</style>
- 配置路由,引入組件配置二級路由
{path: 'checkout',component: Checkout
},
- 給按鈕綁定事件,實現跳轉
<el-button size="large" type="primary" @click="$router.push('/checkout')">下單結算</el-button>
- 封裝接口
apis/checkout.js
import httpInstance from "@/utils/http";//獲取結算信息
export const getCheckoutInfoAPI = () => {return httpInstance({url: '/member/order/pre'})
}
- 獲取數據,渲染數據(默認地址、商品列表、統計數據)
<!-- 訂單頁 -->
<script setup>
import { getCheckoutInfoAPI } from '@/apis/checkout.js'
import { onMounted, ref } from 'vue'
const checkInfo = ref({}) // 訂單對象
const curAddress = ref({}) // 地址對象
const getCheckoutInfo = async () => {//獲取結算數據const res = await getCheckoutInfoAPI()console.log(res)checkInfo.value = res.result//適配默認地址,根據isDefault === 0篩選,使用filter或find篩選都可以const item = checkInfo.value.userAddresses.find(item => item.isDefault === 0)curAddress.value = item
}
onMounted(() => getCheckoutInfo())
</script><template><div class="xtx-pay-checkout-page"><div class="container"><div class="wrapper"><!-- 收貨地址 --><h3 class="box-title">收貨地址</h3><div class="box-body"><div class="address"><div class="text"><div class="none" v-if="!curAddress">您需要先添加收貨地址才可提交訂單。</div><ul v-else><li><span>收<i />貨<i />人:</span>{{ curAddress.receiver }}</li><li><span>聯系方式:</span>{{ curAddress.contact }}</li><li><span>收貨地址:</span>{{ curAddress.fullLocation }} {{ curAddress.address }}</li></ul></div><div class="action"><el-button size="large" @click="toggleFlag = true">切換地址</el-button><el-button size="large" @click="addFlag = true">添加地址</el-button></div></div></div><!-- 商品信息 --><h3 class="box-title">商品信息</h3><div class="box-body"><table class="goods"><thead><tr><th width="520">商品信息</th><th width="170">單價</th><th width="170">數量</th><th width="170">小計</th><th width="170">實付</th></tr></thead><tbody><tr v-for="i in checkInfo.goods" :key="i.id"><td><a href="javascript:;" class="info"><img :src="i.picture" alt=""><div class="right"><p>{{ i.name }}</p><p>{{ i.attrsText }}</p></div></a></td><td>¥{{ i.price }}</td><td>{{ i.price }}</td><td>¥{{ i.totalPrice }}</td><td>¥{{ i.totalPayPrice }}</td></tr></tbody></table></div><!-- 配送時間 --><h3 class="box-title">配送時間</h3><div class="box-body"><a class="my-btn active" href="javascript:;">不限送貨時間:周一至周日</a><a class="my-btn" href="javascript:;">工作日送貨:周一至周五</a><a class="my-btn" href="javascript:;">雙休日、假日送貨:周六至周日</a></div><!-- 支付方式 --><h3 class="box-title">支付方式</h3><div class="box-body"><a class="my-btn active" href="javascript:;">在線支付</a><a class="my-btn" href="javascript:;">貨到付款</a><span style="color:#999">貨到付款需付5元手續費</span></div><!-- 金額明細 --><h3 class="box-title">金額明細</h3><div class="box-body"><div class="total"><dl><dt>商品件數:</dt><dd>{{ checkInfo.summary?.goodsCount }}件</dd></dl><dl><dt>商品總價:</dt><dd>¥{{ checkInfo.summary?.totalPrice.toFixed(2) }}</dd></dl><dl><dt>運<i></i>費:</dt><dd>¥{{ checkInfo.summary?.postFee.toFixed(2) }}</dd></dl><dl><dt>應付總額:</dt><dd class="price">{{ checkInfo.summary?.totalPayPrice.toFixed(2) }}</dd></dl></div></div><!-- 提交訂單 --><div class="submit"><el-button type="primary" size="large">提交訂單</el-button></div></div></div></div><!-- 切換地址 --><!-- 添加地址 -->
</template><style scoped lang="scss">
.xtx-pay-checkout-page {margin-top: 20px;.wrapper {background: #fff;padding: 0 20px;.box-title {font-size: 16px;font-weight: normal;padding-left: 10px;line-height: 70px;border-bottom: 1px solid #f5f5f5;}.box-body {padding: 20px 0;}}
}.address {border: 1px solid #f5f5f5;display: flex;align-items: center;.text {flex: 1;min-height: 90px;display: flex;align-items: center;.none {line-height: 90px;color: #999;text-align: center;width: 100%;}>ul {flex: 1;padding: 20px;li {line-height: 30px;span {color: #999;margin-right: 5px;>i {width: 0.5em;display: inline-block;}}}}>a {color: $xtxColor;width: 160px;text-align: center;height: 90px;line-height: 90px;border-right: 1px solid #f5f5f5;}}.action {width: 420px;text-align: center;.btn {width: 140px;height: 46px;line-height: 44px;font-size: 14px;&:first-child {margin-right: 10px;}}}
}.goods {width: 100%;border-collapse: collapse;border-spacing: 0;.info {display: flex;text-align: left;img {width: 70px;height: 70px;margin-right: 20px;}.right {line-height: 24px;p {&:last-child {color: #999;}}}}tr {th {background: #f5f5f5;font-weight: normal;}td,th {text-align: center;padding: 20px;border-bottom: 1px solid #f5f5f5;&:first-child {border-left: 1px solid #f5f5f5;}&:last-child {border-right: 1px solid #f5f5f5;}}}
}.my-btn {width: 228px;height: 50px;border: 1px solid #e4e4e4;text-align: center;line-height: 48px;margin-right: 25px;color: #666666;display: inline-block;&.active,&:hover {border-color: $xtxColor;}
}.total {dl {display: flex;justify-content: flex-end;line-height: 50px;dt {i {display: inline-block;width: 2em;}}dd {width: 240px;text-align: right;padding-right: 70px;&.price {font-size: 20px;color: $priceColor;}}}
}.submit {text-align: right;padding: 60px;border-top: 1px solid #f5f5f5;
}.addressWrapper {max-height: 500px;overflow-y: auto;
}.text {flex: 1;min-height: 90px;display: flex;align-items: center;&.item {border: 1px solid #f5f5f5;margin-bottom: 10px;cursor: pointer;&.active,&:hover {border-color: $xtxColor;background: lighten($xtxColor, 50%);}>ul {padding: 10px;font-size: 14px;line-height: 30px;}}
}
</style>
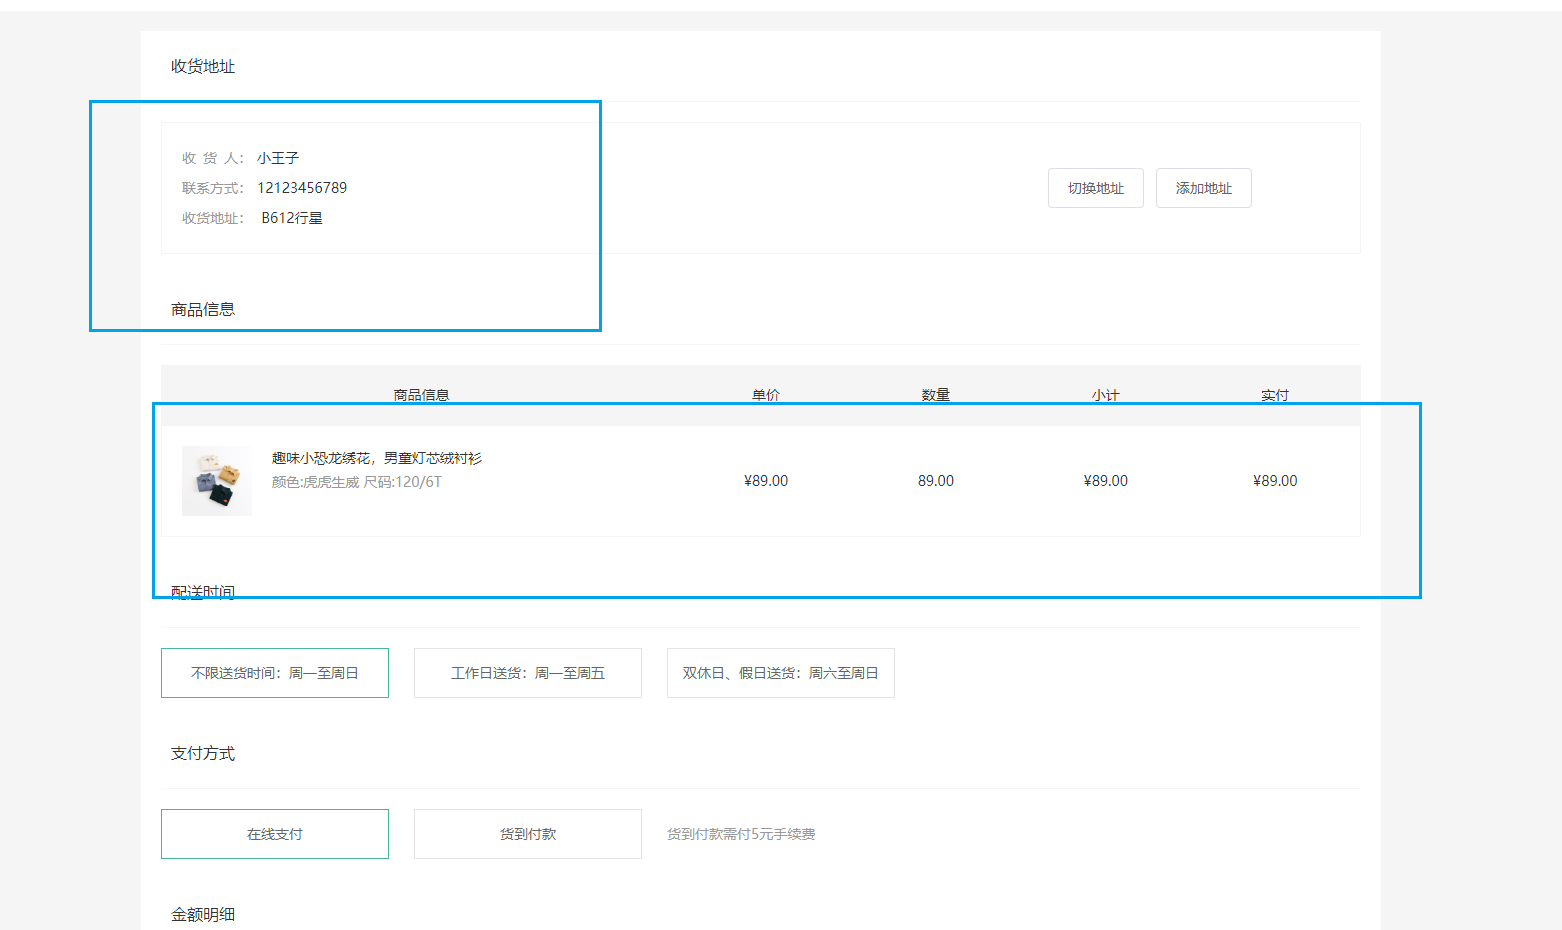
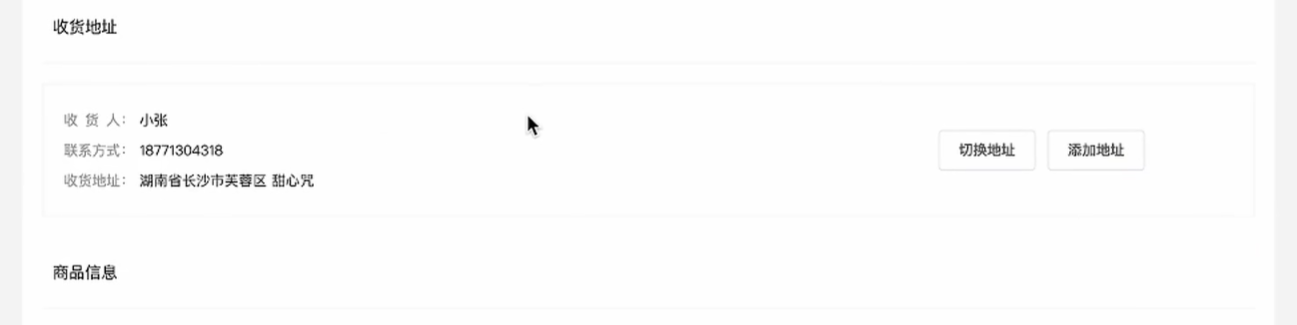
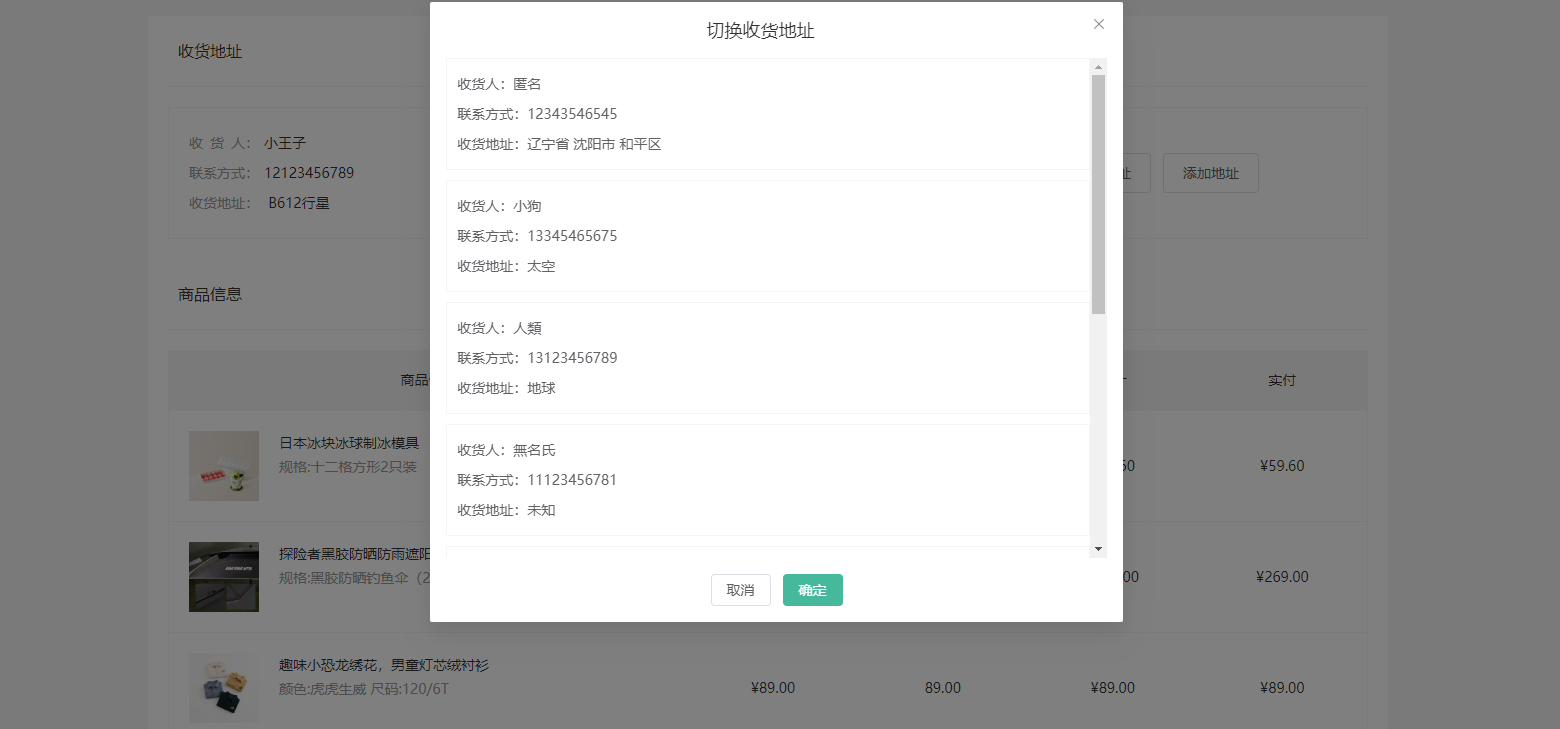
2. 地址切換-打開彈框交互實現
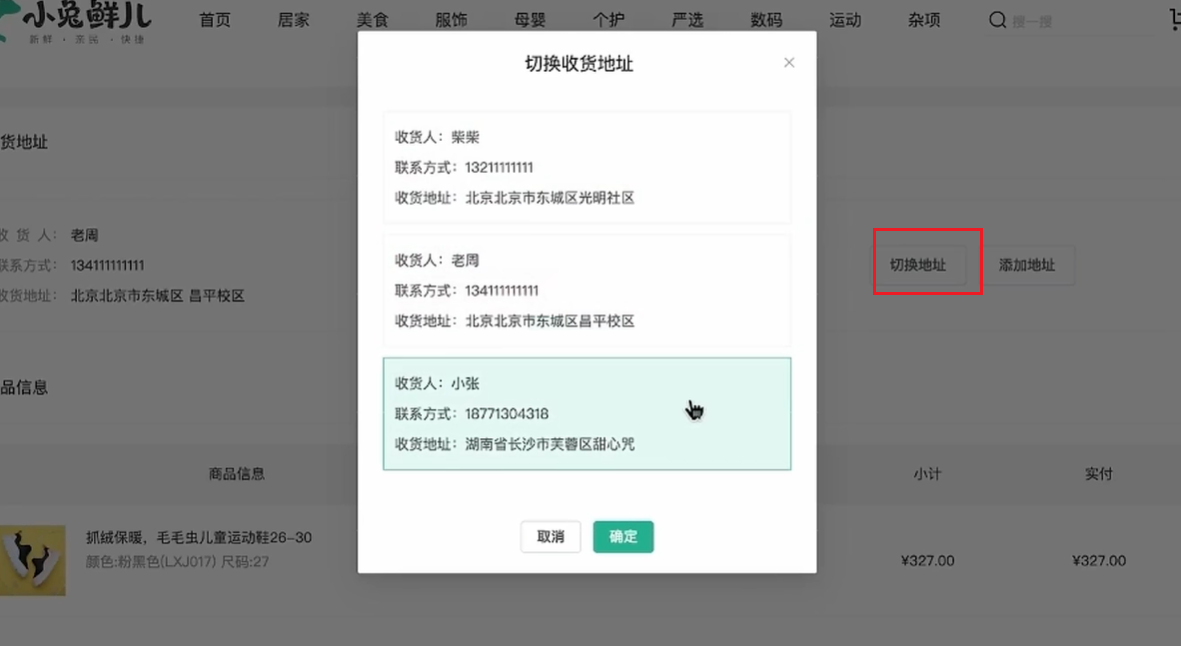
- 打開彈框,回顯用戶可選地址列表
彈框組件:checkout/index.vue
<!-- 切換地址 -->
<el-dialog title="切換收貨地址" width="30%" center><div class="addressWrapper"><div class="text item" v-for="item in checkInfo.userAddresses"  :key="item.id"><ul><li><span>收<i />貨<i />人:</span>{{ item.receiver }} </li><li><span>聯系方式:</span>{{ item.contact }}</li><li><span>收貨地址:</span>{{ item.fullLocation + item.address }}</li></ul></div></div><template #footer><span class="dialog-footer"><el-button>取消</el-button><el-button type="primary">確定</el-button></span></template>
</el-dialog>
綁定數據showDialog,點擊按鈕控制彈框打開關閉,渲染可選地址列表
//控制彈框打開
const showDialog = ref(false)
...
<el-dialog title="切換收貨地址" width="30%" center v-model="showDialog">
...
...
<el-button size="large" @click="showDialog = true">切換地址</el-button>
...
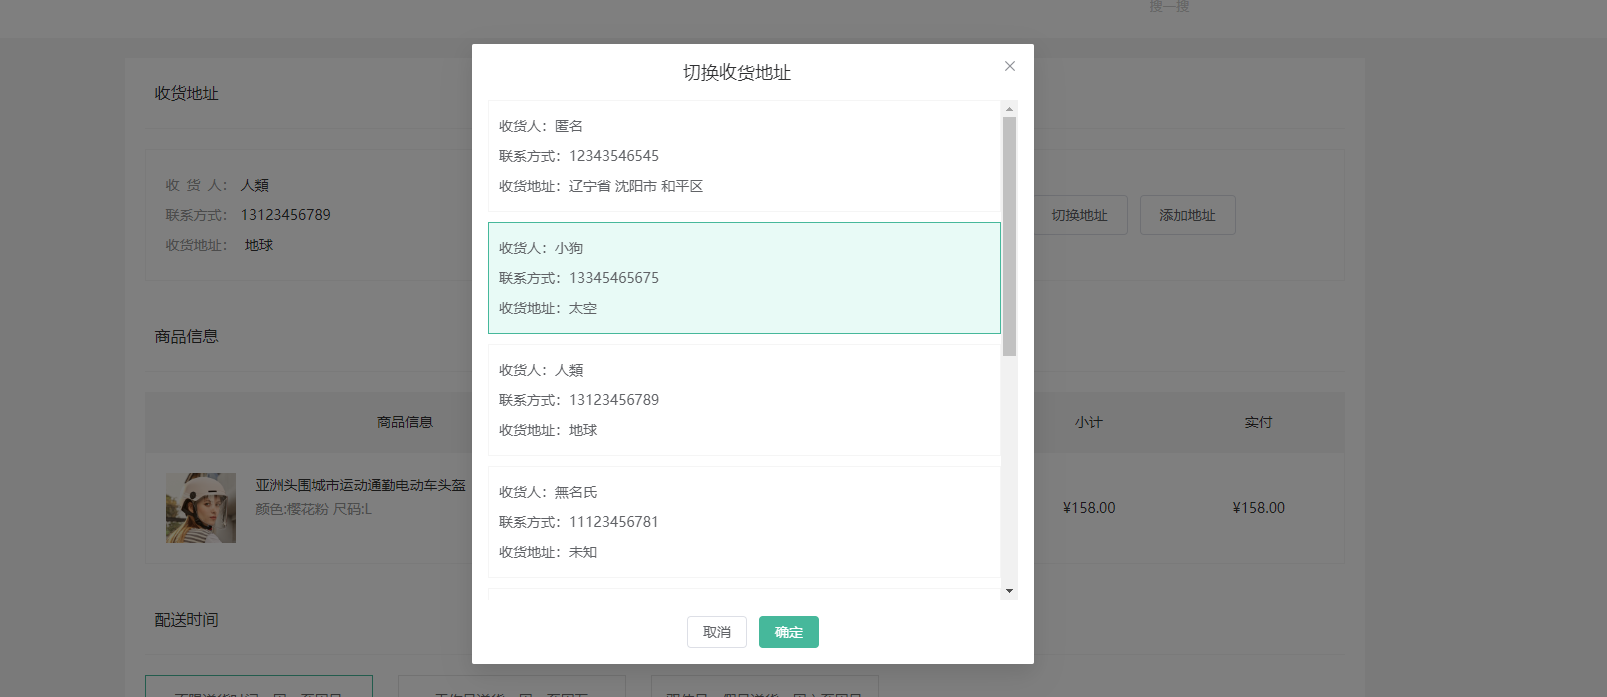
3. 切換地址-地址激活交互實現
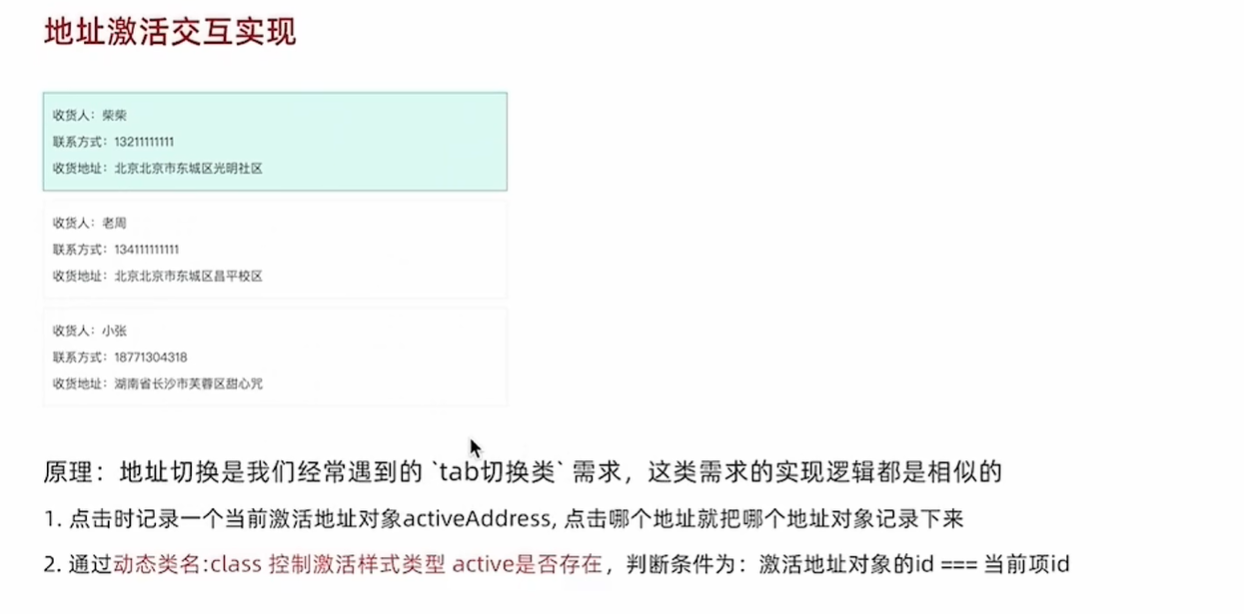
這個需求是通用類需求,學習以后可以多多的用
綁定事件,拿到地址這一項
<div class="text item" @click="switchAddress(item)" v-for="item in checkInfo.userAddresses" :key="item.id">
//激活拿到這個對象
const activeAddress = ref({})
const switchAddress = (item) => {//將拿到的這個對象記錄下來activeAddress.value = item
}
激活樣式,判斷條件是激活對象id===當前項id
:class="{ active: activeAddress.id === item.id }"
給確認按鈕綁定事件,新地址覆蓋原地址
<el-button type="primary" @click="addressConfirm">確定</el-button>
//地址確認
const addressConfirm = () => {//覆蓋當前的地址curAddress.value = activeAddress.value//關閉彈層showDialog.value = false//當前地址置為初始值activeAddress.value = {}
}
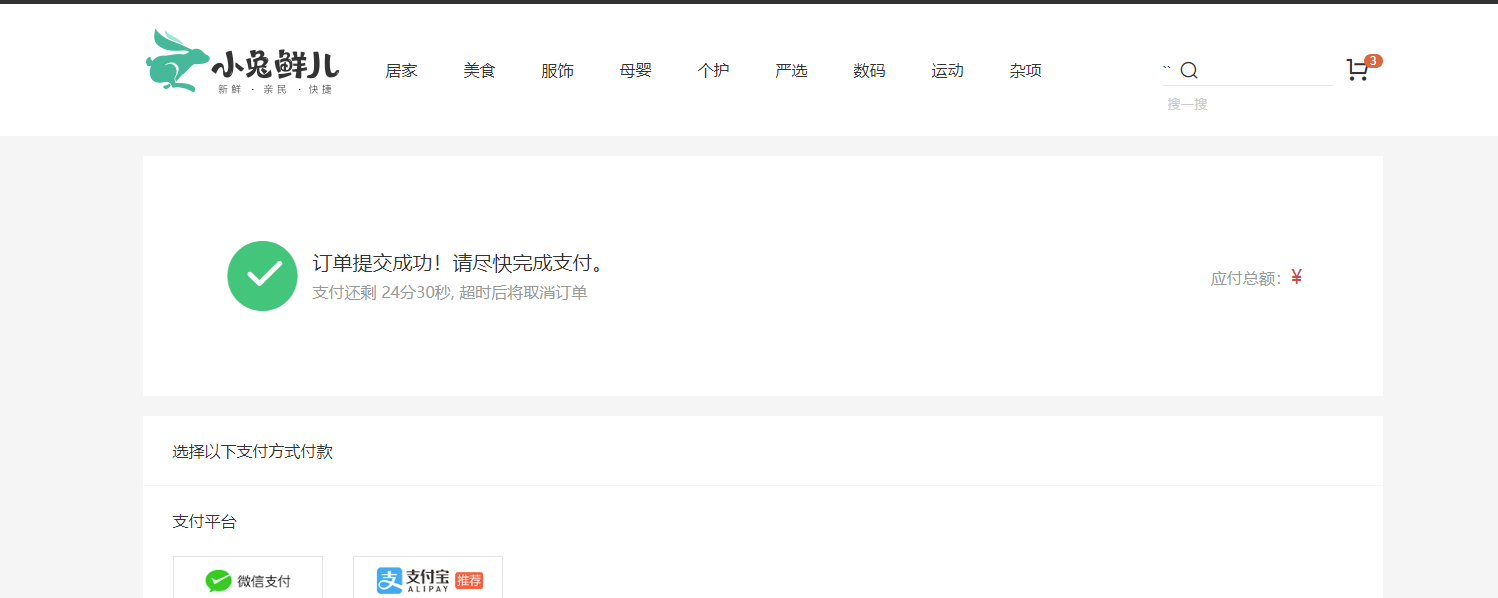
4. 生成訂單功能實現
購物車清空

- 準備 支付 路由
views/Pay/index.vue
<script setup>
const payInfo = {}
</script><template><div class="xtx-pay-page"><div class="container"><!-- 付款信息 --><div class="pay-info"><span class="icon iconfont icon-queren2"></span><div class="tip"><p>訂單提交成功!請盡快完成支付。</p><p>支付還剩 <span>24分30秒</span>, 超時后將取消訂單</p></div><div class="amount"><span>應付總額:</span><span>¥{{ payInfo.payMoney?.toFixed(2) }}</span></div></div><!-- 付款方式 --><div class="pay-type"><p class="head">選擇以下支付方式付款</p><div class="item"><p>支付平臺</p><a class="btn wx" href="javascript:;"></a><a class="btn alipay" :href="payUrl"></a></div><div class="item"><p>支付方式</p><a class="btn" href="javascript:;">招商銀行</a><a class="btn" href="javascript:;">工商銀行</a><a class="btn" href="javascript:;">建設銀行</a><a class="btn" href="javascript:;">農業銀行</a><a class="btn" href="javascript:;">交通銀行</a></div></div></div></div>
</template><style scoped lang="scss">
.xtx-pay-page {margin-top: 20px;
}.pay-info {background: #fff;display: flex;align-items: center;height: 240px;padding: 0 80px;.icon {font-size: 80px;color: #1dc779;}.tip {padding-left: 10px;flex: 1;p {&:first-child {font-size: 20px;margin-bottom: 5px;}&:last-child {color: #999;font-size: 16px;}}}.amount {span {&:first-child {font-size: 16px;color: #999;}&:last-child {color: $priceColor;font-size: 20px;}}}
}.pay-type {margin-top: 20px;background-color: #fff;padding-bottom: 70px;p {line-height: 70px;height: 70px;padding-left: 30px;font-size: 16px;&.head {border-bottom: 1px solid #f5f5f5;}}.btn {width: 150px;height: 50px;border: 1px solid #e4e4e4;text-align: center;line-height: 48px;margin-left: 30px;color: #666666;display: inline-block;&.active,&:hover {border-color: $xtxColor;}&.alipay {background: url(https://cdn.cnbj1.fds.api.mi-img.com/mi-mall/7b6b02396368c9314528c0bbd85a2e06.png) no-repeat center / contain;}&.wx {background: url(https://cdn.cnbj1.fds.api.mi-img.com/mi-mall/c66f98cff8649bd5ba722c2e8067c6ca.jpg) no-repeat center / contain;}}
}
</style>
- 路由,二級
{path: 'pay',component: Pay
}
- 接口封裝
// 創建訂單
export const createOrderAPI = (data) => {return httpInstance({url: '/member/order',method: 'POST',data})
}
checkout/index.vue引入,給 提交訂單 綁定事件,調用接口傳參,從res獲得id,使用orderId記錄,然后路由傳參。
<el-button type="primary" size="large" @click="createOrder">提交訂單</el-button>
// 創建訂單
const createOrder = async () => {const res = await createOrderAPI({deliveryTimeType: 1,payType: 1,payChannel: 1,buyerMessage: '',goods: checkInfo.value.goods.map(item => {return {skuId: item.skuId,count: item.count}}),addressId: curAddress.value.id})const orderId = res.result.idrouter.push({path: '/pay',query: {id: orderId}})
}
更新購物車
支付
1. 渲染基礎數據

支付頁有倆個關鍵數據,一個是要支付的錢數,一個是倒計時數據(超時不支付商品釋放)
- 獲取并調用訂單詳情的接口
apis/pay.js
import httpInstance from '@/utils/http'export const getOrderAPI = (id) => {return httpInstance({url: `/member/order/${id}`})
}
<script setup>
import { getOrderAPI } from '@/apis/pay.js'
import { onMounted, ref } from 'vue'
const payInfo = ref({})  //支付信息
const getPayInfo = async () => {//獲取支付詳情const res = await getOrderAPI(route.query.id)payInfo.value = res.resultonMounted(() => getPayInfo())
}
</script>
2. 實現支付功能
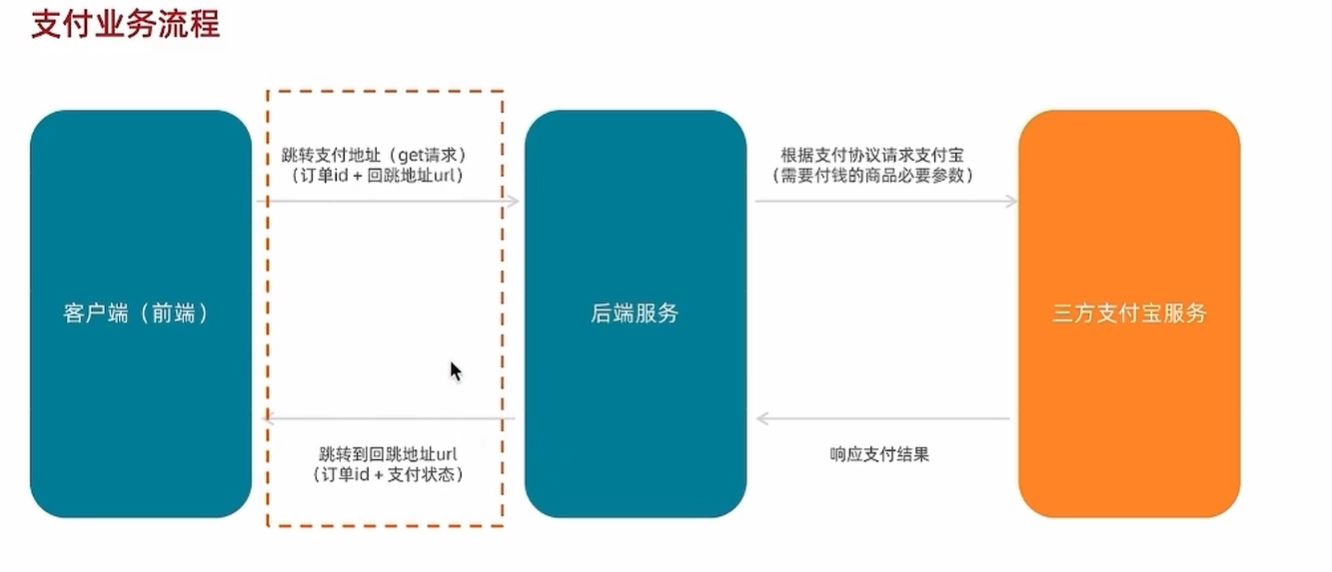
支付攜帶參數:放到Pay/index.vue中,綁定給按鈕即可
// 支付地址
const baseURL = 'http://pcapi-xiaotuxian-front-devtest.itheima.net/'
const backURL = 'http://127.0.0.1:5173/paycallback'
const redirectUrl = encodeURIComponent(backURL)
const payUrl = `${baseURL}pay/aliPay?orderId=${route.query.id}&redirect=${redirectUrl}`
綁定:
<!-- 微信 -->
<a class="btn wx" href="javascript:;"></a>
<!-- 支付寶 -->
<a class="btn alipay" :href="payUrl"></a>

支付寶沙箱賬號信息:
| 賬號 | jfjbwb4477@sandbox.com |
|---|---|
| 登錄密碼 | 111111 |
| 支付密碼 | 111111 |
應該是支付不了,但是正常跳轉沒問題
3. 支付結果展示
沒法支付了,這個模塊沒法驗證了,那我們來看看具體的寫法吧,以后應該會用到
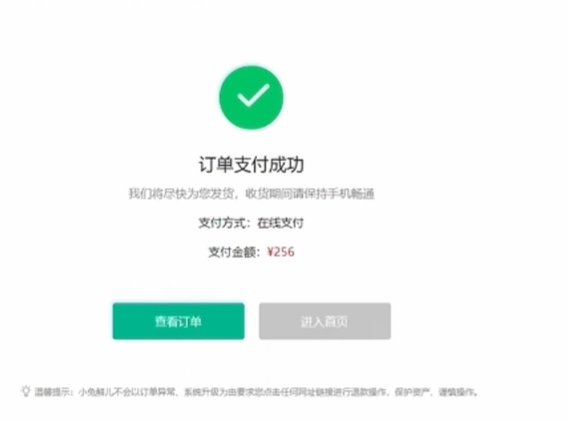
Pay/PayBack.vue
<script setup></script><template><div class="xtx-pay-page"><div class="container"><!-- 支付結果 --><div class="pay-result"><span class="iconfont icon-queren2 green"></span><span class="iconfont icon-shanchu red"></span><p class="tit">支付成功</p><p class="tip">我們將盡快為您發貨,收貨期間請保持手機暢通</p><p>支付方式:<span>支付寶</span></p><p>支付金額:<span>¥200.00</span></p><div class="btn"><el-button type="primary" style="margin-right:20px">查看訂單</el-button><el-button>進入首頁</el-button></div><p class="alert"><span class="iconfont icon-tip"></span>溫馨提示:小兔鮮兒不會以訂單異常、系統升級為由要求您點擊任何網址鏈接進行退款操作,保護資產、謹慎操作。</p></div></div></div>
</template><style scoped lang="scss">
.pay-result {padding: 100px 0;background: #fff;text-align: center;margin-top: 20px;>.iconfont {font-size: 100px;}.green {color: #1dc779;}.red {color: $priceColor;}.tit {font-size: 24px;}.tip {color: #999;}p {line-height: 40px;font-size: 16px;}.btn {margin-top: 50px;}.alert {font-size: 12px;color: #999;margin-top: 50px;}
}
</style>
- 路由配置,二級,path不是隨便寫的昂
{path: 'paycallback',component: PayBack
}
- 根據支付結果
payResult適配支付狀態
 <!-- 支付圖標 -->
<span class="iconfont icon-queren2 green" v-if="$route.query.payResult === 'true'"></span>
<span class="iconfont icon-shanchu red" v-else></span>
<p class="tit">支付{{ $route.query.payResult === 'true' ? '成功' : '失敗' }}</p>
<!--PayBack.vue-->
<script setup>
import { getOrderAPI } from '@/apis/pay'
import { onMounted, ref } from 'vue'
import { useRoute } from 'vue-router'
const route = useRoute()
const orderInfo = ref({})//獲取訂單信息
const getOrderInfo = async () => {const res = await getOrderAPI(route.query.orderId)orderInfo.value = res.result
}onMounted(() => getOrderInfo())
</script><p>支付金額:<span>¥{{ orderInfo.payMoney?.toFixed(2) }}</span></p>
4. 封裝倒計數函數

編寫一個函數 useCountDown 可以把秒數格式化為倒計時的顯示狀態
formatTime為顯示的倒計時時間
start是倒計時啟動函數,調用時可以設置初始值并且開始倒計時
步驟:
- 編寫函數框架,確定參數和返回值
- 編寫核心倒計時邏輯實現基礎倒計時
- 實現格式化
裝一個dayjs插件:npm i dayjs
//comppsables/useCountDown.js
// 封裝倒計時邏輯函數
import { computed, onUnmounted, ref } from 'vue'
import dayjs from 'dayjs'export const useCountDown = () => {// 1. 響應式的數據let timer = nullconst time = ref(0)// 格式化時間 為 xx分xx秒const formatTime = computed(() => dayjs.unix(time.value).format('mm分ss秒'))// 2. 開啟倒計時的函數const start = (currentTime) => {// 開始倒計時的邏輯// 核心邏輯的編寫:每隔1s就減一time.value = currentTimetimer = setInterval(() => {time.value--}, 1000)}// 組件銷毀時清除定時器onUnmounted(() => {timer && clearInterval(timer)})return {formatTime,start}
}
<!--Pay/index.vue-->
<script>
import { useCountDown } from '@/composables/useCountDown.js'
// 倒計時
const { start, formatTime } = useCountDown()// 獲取訂單數據
const route = useRoute()
const payInfo = ref({})
const getPayInfo = async () => {const res = await getOrderAPI(route.query.id)payInfo.value = res.result//初始化倒計數秒數start(res.result.countdown)
}
onMounted(() => getPayInfo())//跳轉支付
// 攜帶訂單id以及回調地址跳轉到支付地址(get)
// 支付地址
const baseURL = 'http://pcapi-xiaotuxian-front-devtest.itheima.net/'
const backURL = 'http://127.0.0.1:5173/paycallback'
const redirectUrl = encodeURIComponent(backURL)
const payUrl = `${baseURL}pay/aliPay?orderId=${route.query.id}&redirect=${redirectUrl}`
</script><p>支付還剩 <span>{{ formatTime }}</span>, 超時后將取消訂單</p>

接口老是崩掉emmm
小結
功能有些雜,代碼書寫的位置要仔細斟酌以便后期維護。
看網絡請求的時候,要記得打開檢查左上角的錄制網絡日志不然不顯示(默認是開的),我不知道點哪了給關了,找這個bug找半天。
祝大家學習順利

和Facebook區別是什么?)


分類代碼 【含Matlab源碼 MX_001期】)


、加權最小二乘估計(WLS)和線性最小方差估計)


