1.首先node.js是12.22版本的,安裝three.js可以參考這篇文章
直接用Threejs入門-安裝教程_安裝three.js-CSDN博客
直接在終端安裝three.js即可
npm install --save three在相同目錄下安裝vite構建工具
npm install --save-dev vite在項目里面看package.json中是否有"three": "^0.164.1",有就安裝好了。
然后就使用吧,這里舉個例子
<template><div><canvas id="three"></canvas></div>
</template><script>
import * as THREE from 'three'
import { GLTFLoader } from 'three/examples/jsm/loaders/GLTFLoader.js'
import { OrbitControls } from 'three/examples/jsm/controls/OrbitControls'export default {mounted() {this.initThree()},methods: {initThree() {const scene = new THREE.Scene()//There are a few different cameras in three.js. For now, let's use a PerspectiveCamera.//three.js 里有幾種不同的相機,在這里,我們使用的是 PerspectiveCamera(透視攝像機)。//第一個參數是視野角度(FOV)。視野角度就是無論在什么時候,你所能在顯示器上看到的場景的范圍,它的單位是角度(與弧度區分開)。//第二個參數是長寬比(aspect ratio)。 也就是你用一個物體的寬除以它的高的值。比如說,當你在一個寬屏電視上播放老電影時,可以看到圖像仿佛是被壓扁的。/** 接下來的兩個參數是近截面(near)和遠截面(far)。* 當物體某些部分比攝像機的遠截面遠或者比近截面近的時候,該這些部分將不會被渲染到場景中。* 或許現在你不用擔心這個值的影響,但未來為了獲得更好的渲染性能,你將可以在你的應用程序里去設置它。* */const camera = new THREE.PerspectiveCamera(75, window.innerWidth / window.innerHeight, 0.1, 1000)const renderer = new THREE.WebGLRenderer()/** 除了創建一個渲染器的實例之外,我們還需要在我們的應用程序里設置一個渲染器的尺寸。* 比如說,我們可以使用所需要的渲染區域的寬高,來讓渲染器渲染出的場景填充滿我們的應用程序。* 因此,我們可以將渲染器寬高設置為瀏覽器窗口寬高。* 對于性能比較敏感的應用程序來說,你可以使用 setSize 傳入一個較小的值,例如 window.innerWidth/2 和 window.innerHeight/2,這將使得應用程序在渲染時,以一半的長寬尺寸渲染場景。* 如果你希望保持你的應用程序的尺寸,是以較低的分辨率來渲染,你可以在調用 setSize 時,將 updateStyle(第三個參數)設為 false。* 例如,假設你的 <canvas> 標簽現在已經具有了 100% 的寬和高,調用 setSize(window.innerWidth/2, window.innerHeight/2, false) 將使得你的應用程序以四分之一的大小來進行渲染。* */renderer.setSize(window.innerWidth, window.innerHeight)document.body.appendChild(renderer.domElement)/** 最后一步很重要,我們將 renderer(渲染器)的dom元素(renderer.domElement)添加到我們的 HTML 文檔中。* 這就是渲染器用來顯示場景給我們看的 <canvas> 元素。* *///To create a cube, we need a BoxGeometry. This is an object that contains all the points (vertices) and fill (faces) of the cube. We'll explore this more in the future.//要創建一個立方體,我們需要一個 BoxGeometry(立方體)對象. 這個對象包含了一個立方體中所有的頂點(vertices)和面(faces)。未來我們將在這方面進行更多的探索。const geometry = new THREE.BoxGeometry(1, 1, 1)//接下來,對于這個立方體,我們需要給它一個材質,來讓它有顏色。//Three.js 自帶了幾種材質,在這里我們使用的是 MeshBasicMaterial。/** 所有的材質都存有應用于他們的屬性的對象。* 在這里為了簡單起見,我們只設置一個color屬性,值為 0x00ff00,也就是綠色。* 這里所做的事情,和在 CSS 或者 Photoshop 中使用十六進制(hex colors)顏色格式來設置顏色的方式一致。* */const material = new THREE.MeshBasicMaterial({ color: 0x00ff00 })/** 第三步,我們需要一個 Mesh(網格)。* 網格包含一個幾何體以及作用在此幾何體上的材質,我們可以直接將網格對象放入到我們的場景中,并讓它在場景中自由移動。* */const cube = new THREE.Mesh(geometry, material)/** 默認情況下,當我們調用 scene.add() 的時候,物體將會被添加到 (0,0,0) 坐標。* 但將使得攝像機和立方體彼此在一起。為了防止這種情況的發生,我們只需要將攝像機稍微向外移動一些即可。* */scene.add(cube)camera.position.z = 5//渲染場景/** 現在,如果將之前寫好的代碼復制到HTML文件中,你不會在頁面中看到任何東西。* 這是因為我們還沒有對它進行真正的渲染。* 為此,我們需要使用一個被叫做“渲染循環”(render loop)或者“動畫循環”(animate loop)的東西。* */function animate() {requestAnimationFrame(animate)//使立方體動起來/** 在開始之前,如果你已經將上面的代碼寫入到了你所創建的文件中,你可以看到一個綠色的方塊。* 讓我們來做一些更加有趣的事 —— 讓它旋轉起來。* 將下列代碼添加到 animate() 函數中 renderer.render 調用的上方:* */cube.rotation.x += 0.01cube.rotation.y += 0.01renderer.render(scene, camera)}animate()function resizeRendererToDisplaySize(renderer) {const canvas = renderer.domElementvar width = window.innerWidthvar height = window.innerHeightvar canvasPixelWidth = canvas.width / window.devicePixelRatiovar canvasPixelHeight = canvas.height / window.devicePixelRatioconst needResize = canvasPixelWidth !== width || canvasPixelHeight !== heightif (needResize) {renderer.setSize(width, height, false)}return needResize}},},
}
</script><style scoped>
#three {width: 100%;height: 100%;position: fixed;left: 0;top: 0;
}
</style>

結果如下: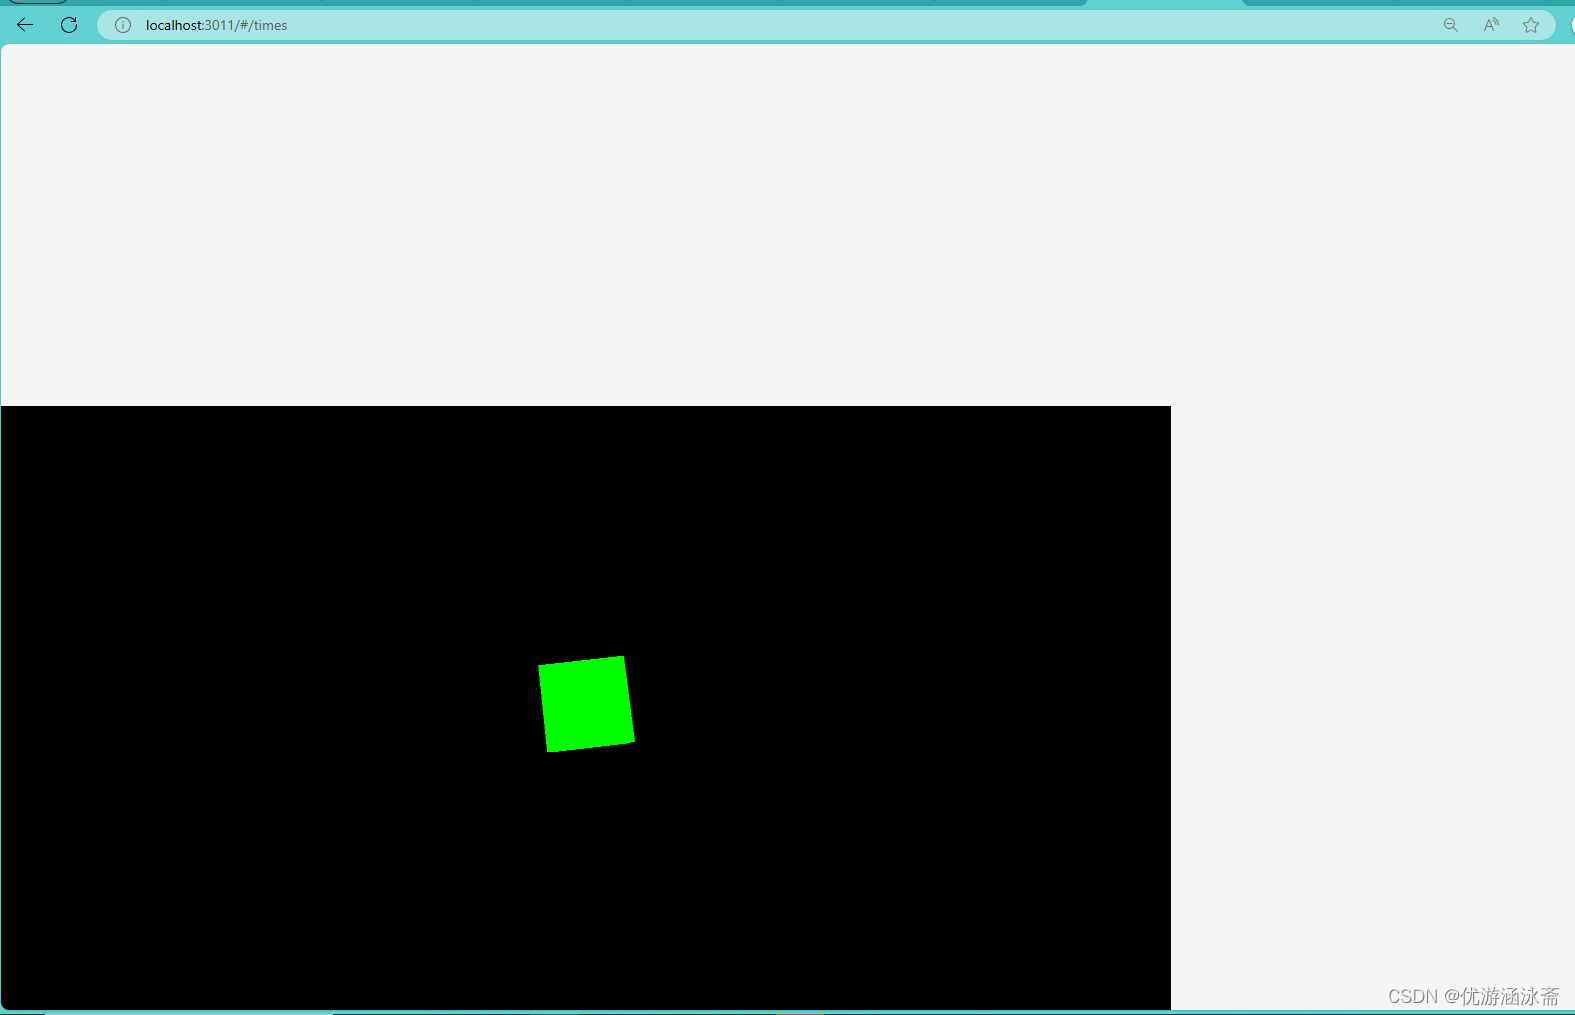
在終端運行
2.2024/5/28
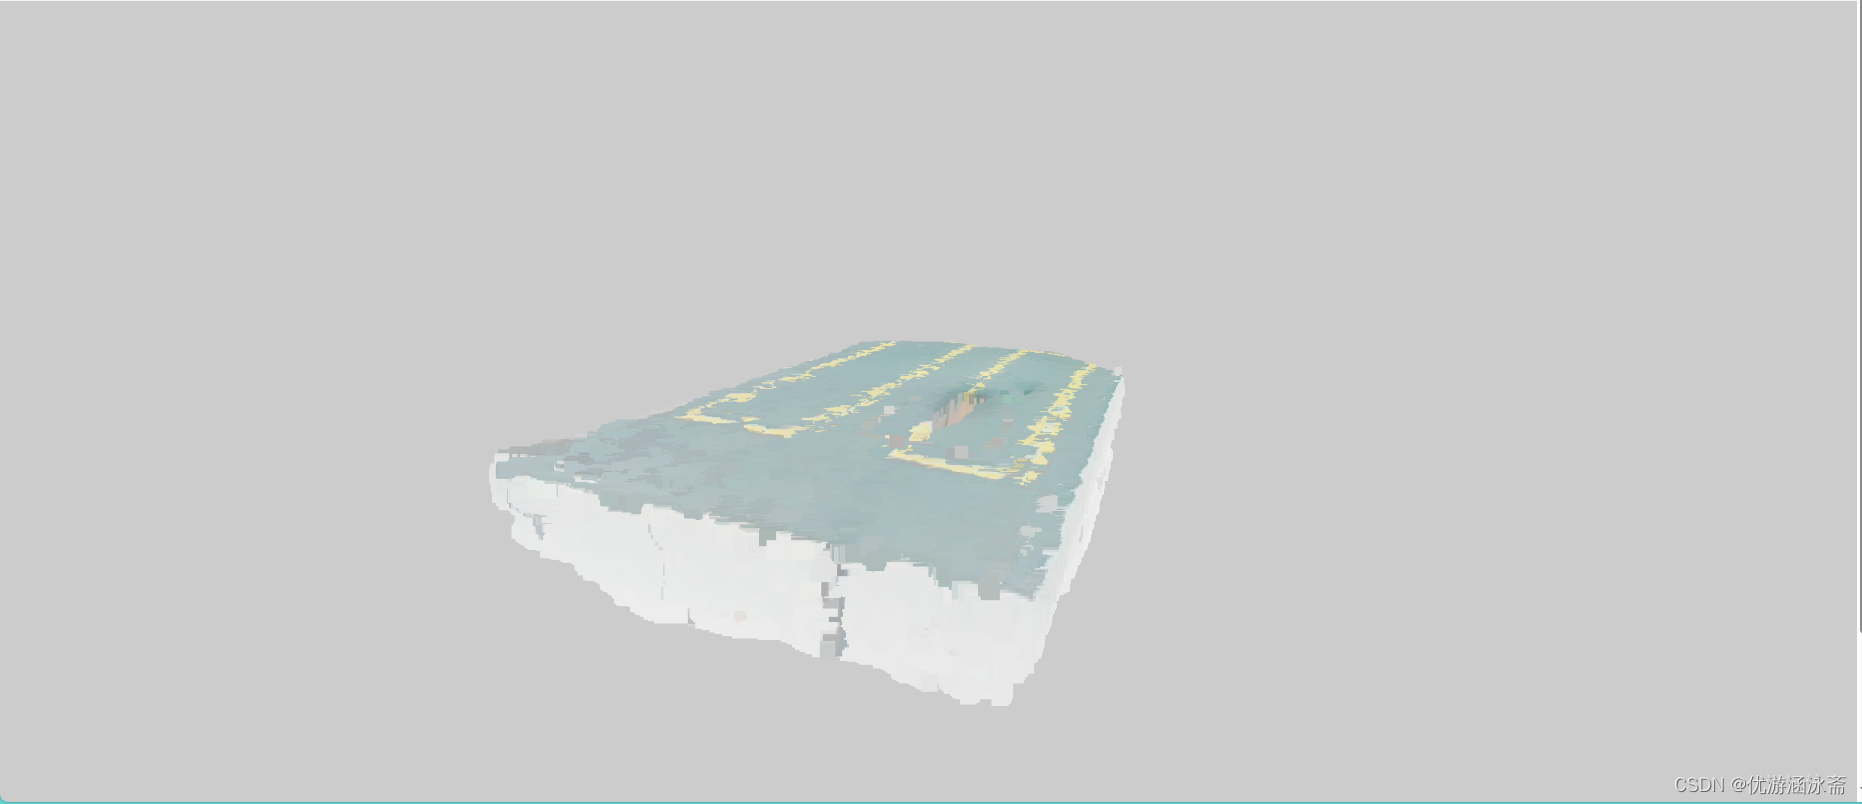
點云數據上傳
<template><div><input type="file" id="csvFile" accept=".csv" @click="handleClick" style="pointer-events: auto" /><div style="width: 100%; height: 100vh; position: relative"><canvas id="three"></canvas><div id="overlay" style="position: absolute; top: 0; left: 0; pointer-events: auto"><div class="button-container"><!-- pointer-events: auto下面的元素相應鼠標觸摸點擊事件,這是默認的     --><!--        <button id="myButton">BUTTON</button>--></div></div></div></div>
</template><script>
import * as THREE from 'three'
import { GLTFLoader } from 'three/examples/jsm/loaders/GLTFLoader.js'
import { OrbitControls } from 'three/examples/jsm/controls/OrbitControls'
import Papa from 'papaparse'export default {mounted() {this.initThree()// 下面 window.addEventListene是添加一個它會添加一個事件監聽器到window對象上,以監聽resize事件。當瀏覽器窗口大小改變時,這個事件會被觸發,并執行this.onWindowResize這個方法。注意,這里的this.onWindowResize應該是一個在Vue組件的methods中定義的方法,用于處理窗口大小改變時的邏輯(例如更新攝像機的縱橫比或重新渲染場景)。// 將onWindowResize組件里面的方塊不會隨著外邊框的放大縮小而發生變化window.addEventListener('resize', this.onWindowResize, false)},beforeDestroy() {window.removeEventListener('resize', this.onWindowResize, false)// 在這里添加其他清理代碼,比如取消動畫等},methods: {handleClick() {console.log('Input clicked!')},initThree() {const canvas = document.getElementById('three')const renderer = new THREE.WebGLRenderer({ canvas })renderer.setSize(window.innerWidth, window.innerHeight)const scene = new THREE.Scene()scene.background = new THREE.Color('#ccc')scene.environment = new THREE.Color('#ccc')// 創建一個光源,因為默認的THREE.Scene是沒有光源的const light = new THREE.AmbientLight(0x404040) // soft white lightscene.add(light)// 初始化相機,設置其位置const camera = new THREE.PerspectiveCamera(75, window.innerWidth / window.innerHeight, 0.1, 1000)camera.position.z = 5 // 把相機向后移動一些,以便能看到場景中的物體const controls = new OrbitControls(camera, renderer.domElement)controls.update()// 設置一下參數const b = 1const geometry = new THREE.BoxGeometry(b, 1, 1)const material = new THREE.MeshBasicMaterial({ color: 0xfff })// const cube = new THREE.Mesh(geometry, material)// cube.position.x += 4// scene.add(cube)// const geometry1 = new THREE.ConeGeometry(1, 1, 32)// const cone = new THREE.Mesh(geometry1, material)// scene.add(cone)const geometry2 = new THREE.SphereGeometry(1, 32, 10)// const sphere = new THREE.Mesh(geometry2, material)// scene.add(sphere)const csvFileInput = document.getElementById('csvFile')csvFileInput.addEventListener('change', function (e) {const file = e.target.files[0]if (file) {const reader = new FileReader()reader.onload = function (e) {const text = e.target.result // 讀取的文件內容const lines = text.split('\n') // 按行分割// 跳過標題行(如果有)let dataLines = lines.slice(1)// 解析點和顏色數據const points = []const colors = []for (let i = 0; i < dataLines.length; i++) {const lineData = dataLines[i].split(',') // 按逗號分割每行數據if (lineData.length === 6) {// 假設每行包含7個元素(x, y, z, r, g, b, a)points.push(parseFloat(lineData[0]), parseFloat(lineData[1]), parseFloat(lineData[2]))colors.push(parseFloat(lineData[3]), parseFloat(lineData[4]), parseFloat(lineData[5]))}}// 創建Float32Arrayconst pointsArray = new Float32Array(points)const colorsArray = new Float32Array(colors)const geometry3 = new THREE.BufferGeometry()geometry3.setAttribute('position', new THREE.BufferAttribute(pointsArray, 3))if (colors) {geometry3.setAttribute('color', new THREE.BufferAttribute(colorsArray, 3)) // 假設每個顏色由 4 個浮點數表示(RGBA)}const material1 = new THREE.PointsMaterial({size: 0.05, // 點的大小vertexColors: true, // 如果使用了顏色數組,則啟用此選項// 其他屬性...})const pointsObject = new THREE.Points(geometry3, material1)scene.add(pointsObject)// 在這里,你可以使用WebGL或其他圖形API來渲染這些數據// ...}reader.readAsText(file) // 以文本格式讀取文件}})// sphere.position.x = -4camera.position.z = 5// 加載模型(這里只是一個示例,你可能需要替換為你的模型)// 渲染循環function animate() {requestAnimationFrame(animate)// cube.rotation.x += 0.01// cube.rotation.y += 0.01// cone.rotation.x += 0.01// cone.rotation.y += 0.01// sphere.rotation.x += 0.01// sphere.rotation.y += 0.01renderer.render(scene, camera)}animate()// 窗口大小變化時的處理函數this.onWindowResize = () => {camera.aspect = window.innerWidth / window.innerHeightcamera.updateProjectionMatrix()renderer.setSize(window.innerWidth, window.innerHeight)}// 如果使用OrbitControls,可以在這里初始化它// const controls = new OrbitControls(camera, renderer.domElement)},},
}
</script>
<style scoped>
#csvFile {width: 100px;height: 100px;z-index: 265; /* 確保按鈕在畫布之上265大于100所以能放在前面 */
}
#three {position: absolute;width: 100%;text-align: center;z-index: 100;display: block;
}
#overlay {width: 100%;height: 100%;display: flex;/*  垂直方向排列column*/flex-direction: column;align-items: center;/*  center意味著子元素將在垂直方向上居中對齊。*//*justify-content: center;*/pointer-events: none;
}
#overlay button {pointer-events: auto; /* 允許按鈕上的點擊事件 */
}
.button-container {margin-top: 1px; /* 使得元素在垂直方向上被推到容器的底部 */align-self: flex-end; /* 在水平方向上對齊到容器的右邊 */pointer-events: none; /* 這個可能不需要,除非你想要防止容器本身接收點擊事件 */z-index: 267;
}
</style>


)


寄存器——內存訪問)
