Spring Security + OAuth2
第一章 Spring Security 快速入門
第二章 Spring Security 自定義配置
第三章 Spring Security 前后端分離配置
第四章 Spring Security 身份認證
第五章 Spring Security 授權
第六章 OAuth2
文章目錄
- Spring Security + OAuth2
- 1、OAuth2簡介
- 1.1、OAuth2是什么
- 1.2、OAuth2的角色
- 1.3、OAuth2的使用場景
- 開放系統間授權
- 社交登錄
- 開放API
- 現代微服務安全
- 微服務安全
- 企業內部應用認證授權
- 1.4、OAuth2的四種授權模式
- 第一種方式:授權碼
- 第二種方式:隱藏式
- 第三種方式:密碼式
- 第四種方式:憑證式
- 2、Spring中的OAuth2
- 2.1、相關角色
- 2.2、Spring 中的實現
- 2.3、相關依賴
- 2.4、授權登錄的實現思路
- 3、Github 社交登錄案例
- 3.1、創建應用
- 3.2、創建測試項目
- 創建項目
- 配置application.yml
- 編寫代碼
- 啟動項目
- 4、案例分析
- 4.1、登錄流程
- 4.2、CommonOAuth2Provider
1、OAuth2簡介
1.1、OAuth2是什么
“Auth”表示“授權”Authorization
"O"是Open的簡稱,表示“開放”
連在一起就表示“開發授權”,OAuth2是一種開放授權協議
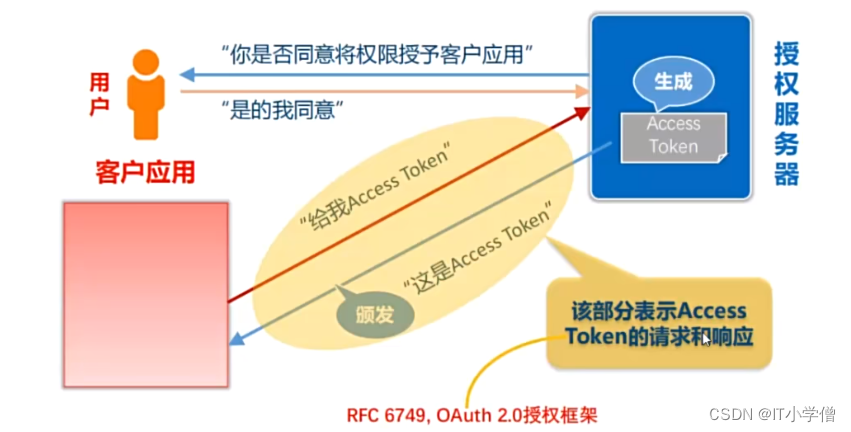
在實際流程中,頒發Token前先要征詢用戶同意
1.2、OAuth2的角色
OAuth2.0 協議包含以下角色:
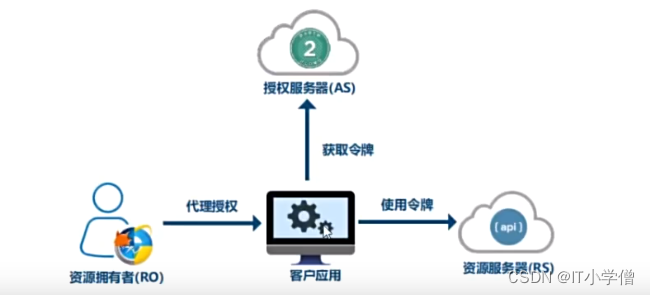
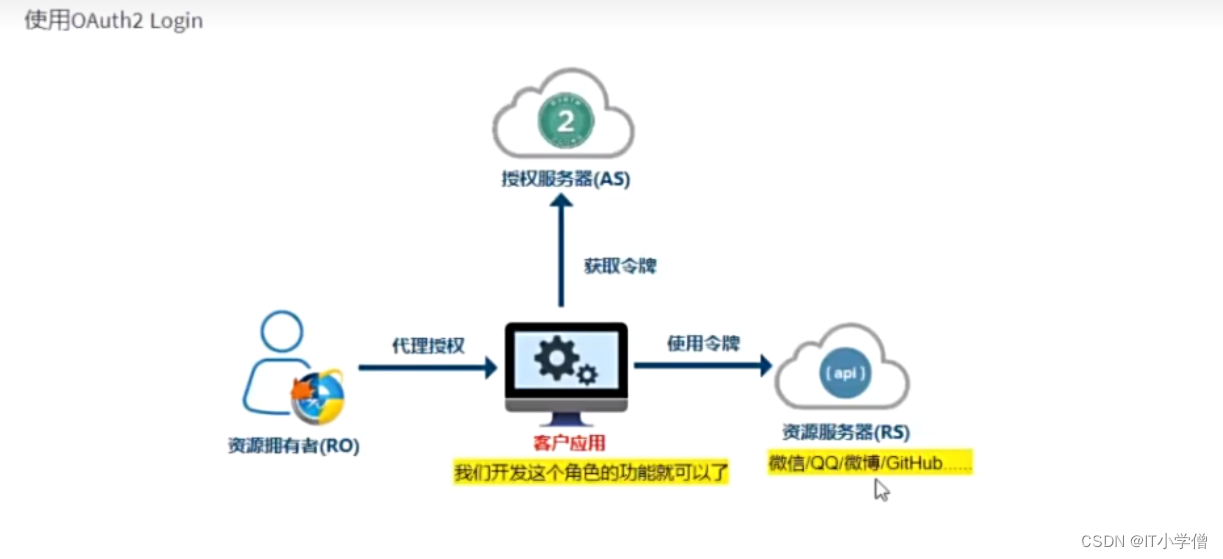
- 資源所有者(Resource Owner):即用戶,資源的擁有人,想要通過客戶應用訪問資源服務器上的資源。
- 客戶應用(Client): 通常一個Web或者無線應用,它需要訪問用戶的受保護資源
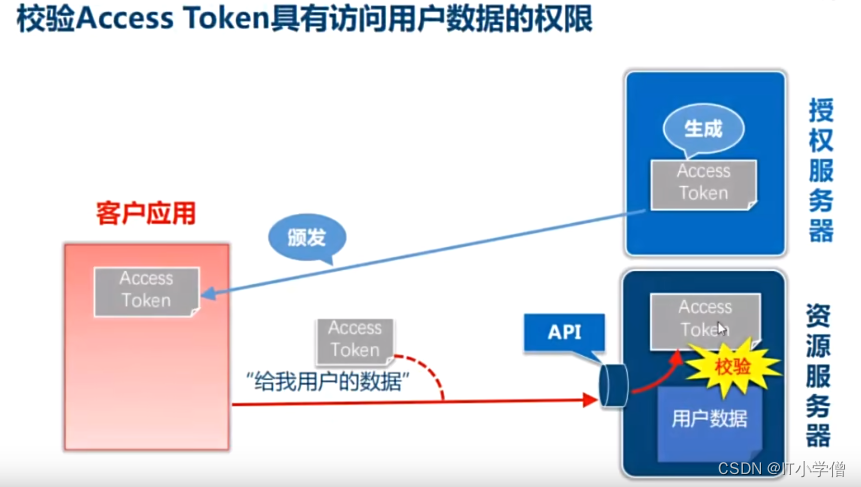
- 資源服務器:(Resource Server):存儲受保護資源的服務器或定義了可以訪問到資源的API,接收并驗證客戶端的訪問令牌,以決定是否授權訪問資源。
- 授權服務器(Authorization Server):負責驗證資源所有者的身份并向客戶端頒發訪問令牌。
1.3、OAuth2的使用場景
開放系統間授權
社交登錄
在傳統的身份驗證中,用戶需要提供用戶名和密碼,還有很多網站登錄時,允許使用第三方網站的身份,這稱為“第三方登錄”。所謂第三方登錄,實質就是OAuth授權。用戶想要登錄A網站,A網站讓用戶提供第三方網站的數據,證明自己的身份。獲取第三方網站的身份數據,就需要OAuth授權。
開放API
例如云沖印服務的實現
現代微服務安全
微服務安全

企業內部應用認證授權
- SSO:Single Sign On 單點登錄
- IAM:Identity and Access Management 身份識別與訪問管理。
1.4、OAuth2的四種授權模式
阮一峰的網絡日志-OAuth 2.0 的四種方式
- 授權碼
- 隱藏式
- 密碼式
- 客戶端憑證
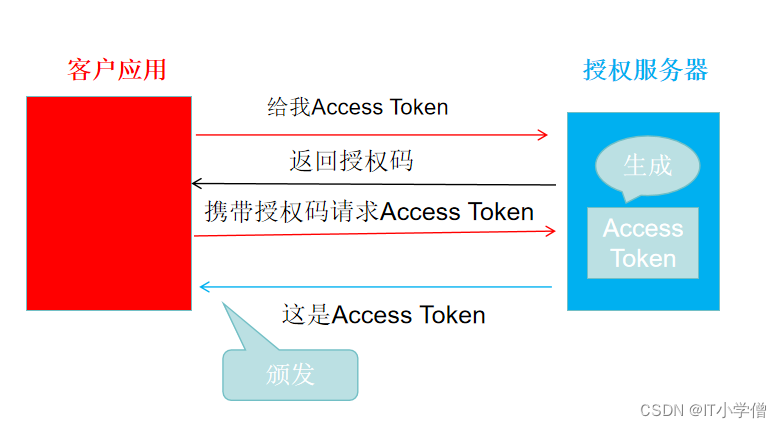
第一種方式:授權碼
授權碼(authorization code),指的是第三方應用先申請一個授權碼,然后再用該碼獲取令牌
這種方式是最常用,最復雜,也是最安全的,它適用于那些有后端的Web應用。授權碼通過前端傳送,令牌則是儲存在后端,而且所有與資源服務器的通信都在后端完成。這樣的前后端分離,可以避免令牌泄露。
第二種方式:隱藏式
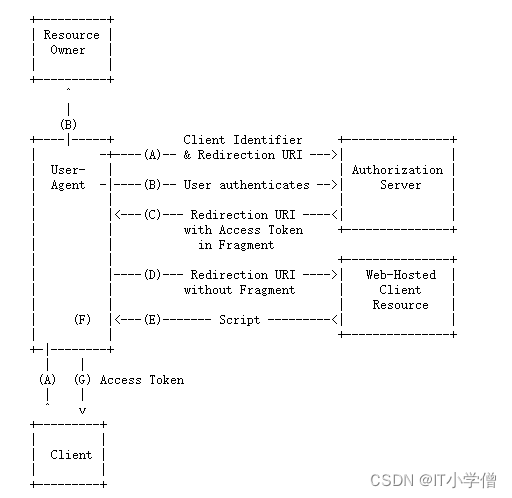
隱藏式,有些web應用是純前端應用,沒有后端。這時就不能用上面的方式了,必須將令牌存在前端。
RFC 6749規定了這種方式,允許直接向前端頒發令牌。這種方式沒有授權碼這個中間步驟,所以稱為隱藏式。

第三種方式:密碼式
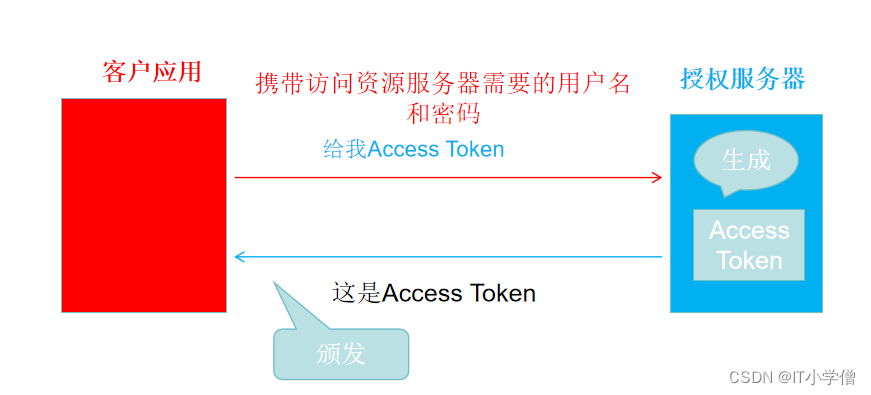
密碼式(password): 如果你高度信任某個應用,RFC 6749也允許用戶名和密碼,直接告訴該應用。該應用就使用你的密碼,申請令牌。
這種方式需要用戶給出自己的用戶名/密碼,顯然風險很大,因此只適用于其他授權方式都無法采用的情況,而且必須是用戶高度信任的應用。
第四種方式:憑證式
憑證式:適用于沒有前端的命令行應用,即在命令行下請求令牌。
這種方式給出的令牌,是針對第三方應用的,而不是針對用戶的,即有可能多個用戶共享同一個令牌。(示意圖和第二種相同)
2、Spring中的OAuth2
2.1、相關角色
回顧:OAuth 2中的角色
- 資源所有者(Resource Owner)
- 客戶應用(Client)
- 資源服務器(Resource Server)
- 授權服務器(Authorization Server)
2.2、Spring 中的實現
Spring Security
- 客戶應用(OAuth2 Client): OAuth2 客戶端功能中包含OAuth2 Login
- 資源服務器(OAuth2 Resource Server)
Spring
- 授權服務器(Spring Authorization Server): 它是在Spring Security 之上的一個單獨的項目。
2.3、相關依賴
<!-- 資源服務器 -->
<dependency><groupId>org.springframework.boot</groupId><artifactId>spring-boot-starter-oauth2-resource-server</artifactId>
</dependency>
<!-- 客戶應用 -->
<dependency><groupId>org.springframework.boot</groupId><artifactId>spring-boot-starter-oauth2-client</artifactId>
</dependency>
<!-- 授權服務器 -->
<dependency><groupId>org.springframework.boot</groupId><artifactId>spring-boot-starter-oauth2-authorization-server</artifactId>
</dependency>
2.4、授權登錄的實現思路
3、Github 社交登錄案例
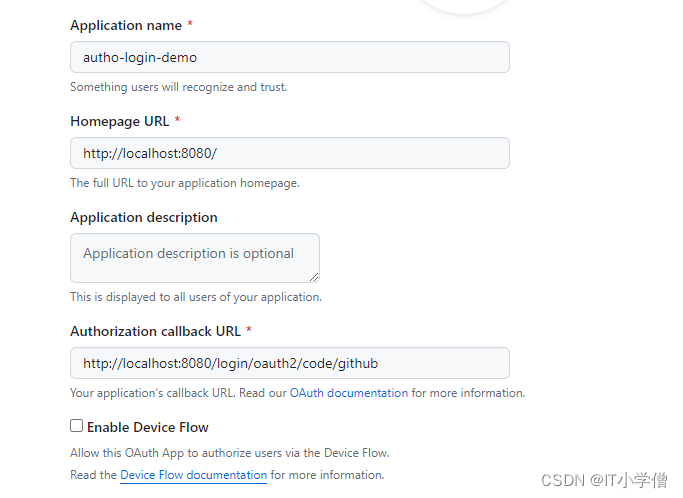
3.1、創建應用
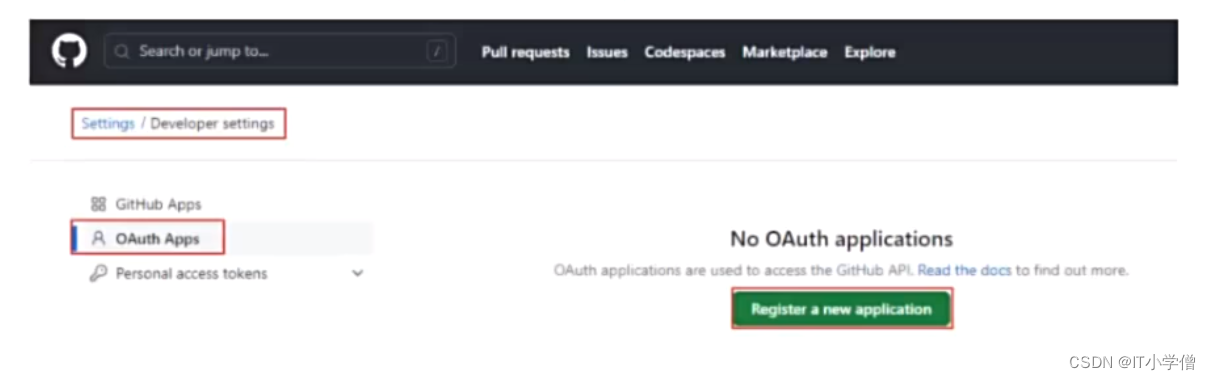
注冊客戶應用
登錄Github,在開發者設置中找到OAuth Apps,創建一個application,為客戶應用創建訪問Github的憑證:
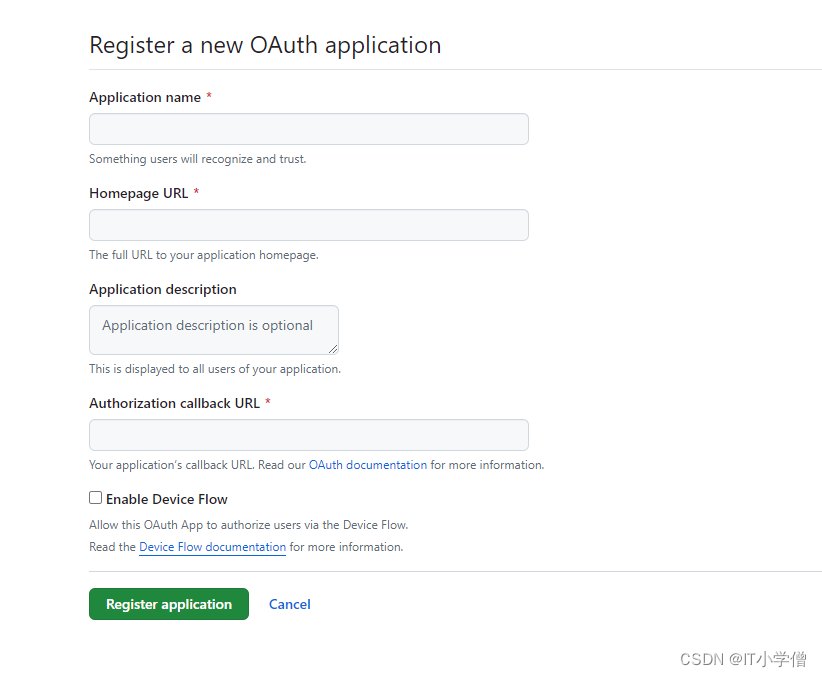
輸入如下信息,點擊注冊。
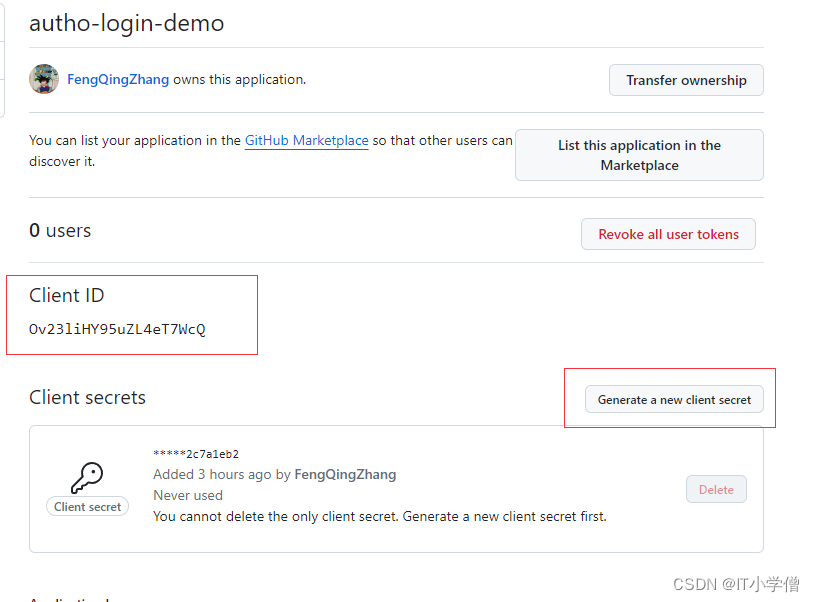
創建完成后,用記事本保存一下Client ID
然后需要創建一個Client secrets,同樣用記事本保存一下Client secrets
3.2、創建測試項目
創建項目
官網例子
創建一個springboot項目oauth2-login-demo,創建時引入如下依賴
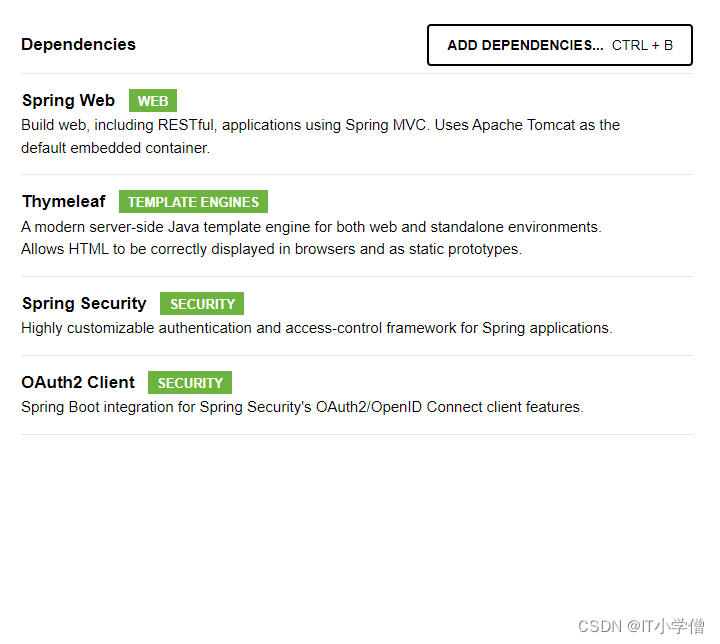
<dependency><groupId>org.springframework.boot</groupId><artifactId>spring-boot-starter-oauth2-client</artifactId></dependency><dependency><groupId>org.springframework.boot</groupId><artifactId>spring-boot-starter-security</artifactId></dependency><dependency><groupId>org.springframework.boot</groupId><artifactId>spring-boot-starter-thymeleaf</artifactId></dependency><dependency><groupId>org.springframework.boot</groupId><artifactId>spring-boot-starter-web</artifactId></dependency><dependency><groupId>org.thymeleaf.extras</groupId><artifactId>thymeleaf-extras-springsecurity6</artifactId></dependency><dependency><groupId>org.springframework.boot</groupId><artifactId>spring-boot-starter-test</artifactId><scope>test</scope></dependency><dependency><groupId>org.springframework.security</groupId><artifactId>spring-security-test</artifactId><scope>test</scope></dependency>
配置application.yml
由官網例子可知Github授權服務的配置方式,按照該格式配置即可。
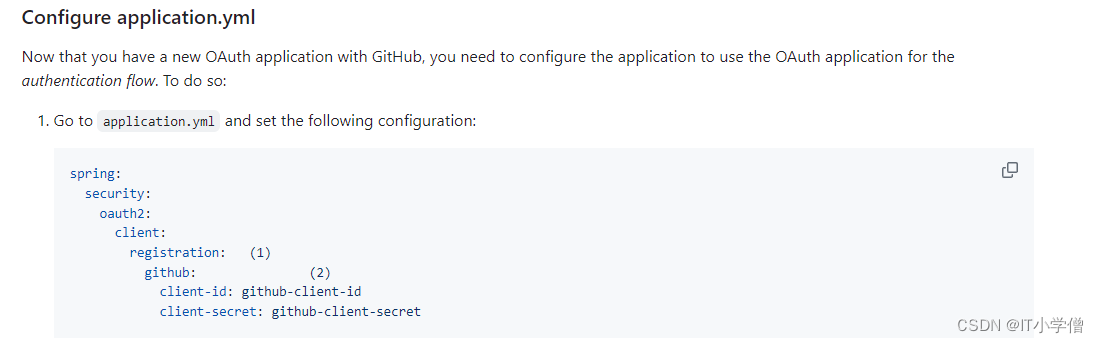
將記事本上保持的Client的id和secret寫到yml。
spring:security:oauth2:client:registration:github:client-id: Ov23liHY95uZL4eT7WcQclient-secret: 805cee30396008806a1b63d35caaabed2c7a1eb2
編寫代碼
該節代碼均來自官網例子
新建Controller
@Controller
public class OAuth2LoginController {@GetMapping("/")public String index(Model model, @RegisteredOAuth2AuthorizedClient OAuth2AuthorizedClient authorizedClient,@AuthenticationPrincipal OAuth2User oauth2User) {model.addAttribute("userName", oauth2User.getName());model.addAttribute("clientName", authorizedClient.getClientRegistration().getClientName());model.addAttribute("userAttributes", oauth2User.getAttributes());return "index";}
}
新建Index
官網代碼
<!DOCTYPE html>
<html xmlns="http://www.w3.org/1999/xhtml" xmlns:th="https://www.thymeleaf.org"xmlns:sec="https://www.thymeleaf.org/thymeleaf-extras-springsecurity5">
<head><title>Spring Security - OAuth 2.0 Login</title><meta charset="utf-8"/>
</head>
<body>
<div style="float: right" th:fragment="logout" sec:authorize="isAuthenticated()"><div style="float:left"><span style="font-weight:bold">User: </span><span sec:authentication="name"></span></div><div style="float:none"> </div><div style="float:right"><form action="#" th:action="@{/logout}" method="post"><input type="submit" value="Logout"/></form></div>
</div>
<h1>OAuth 2.0 Login with Spring Security</h1>
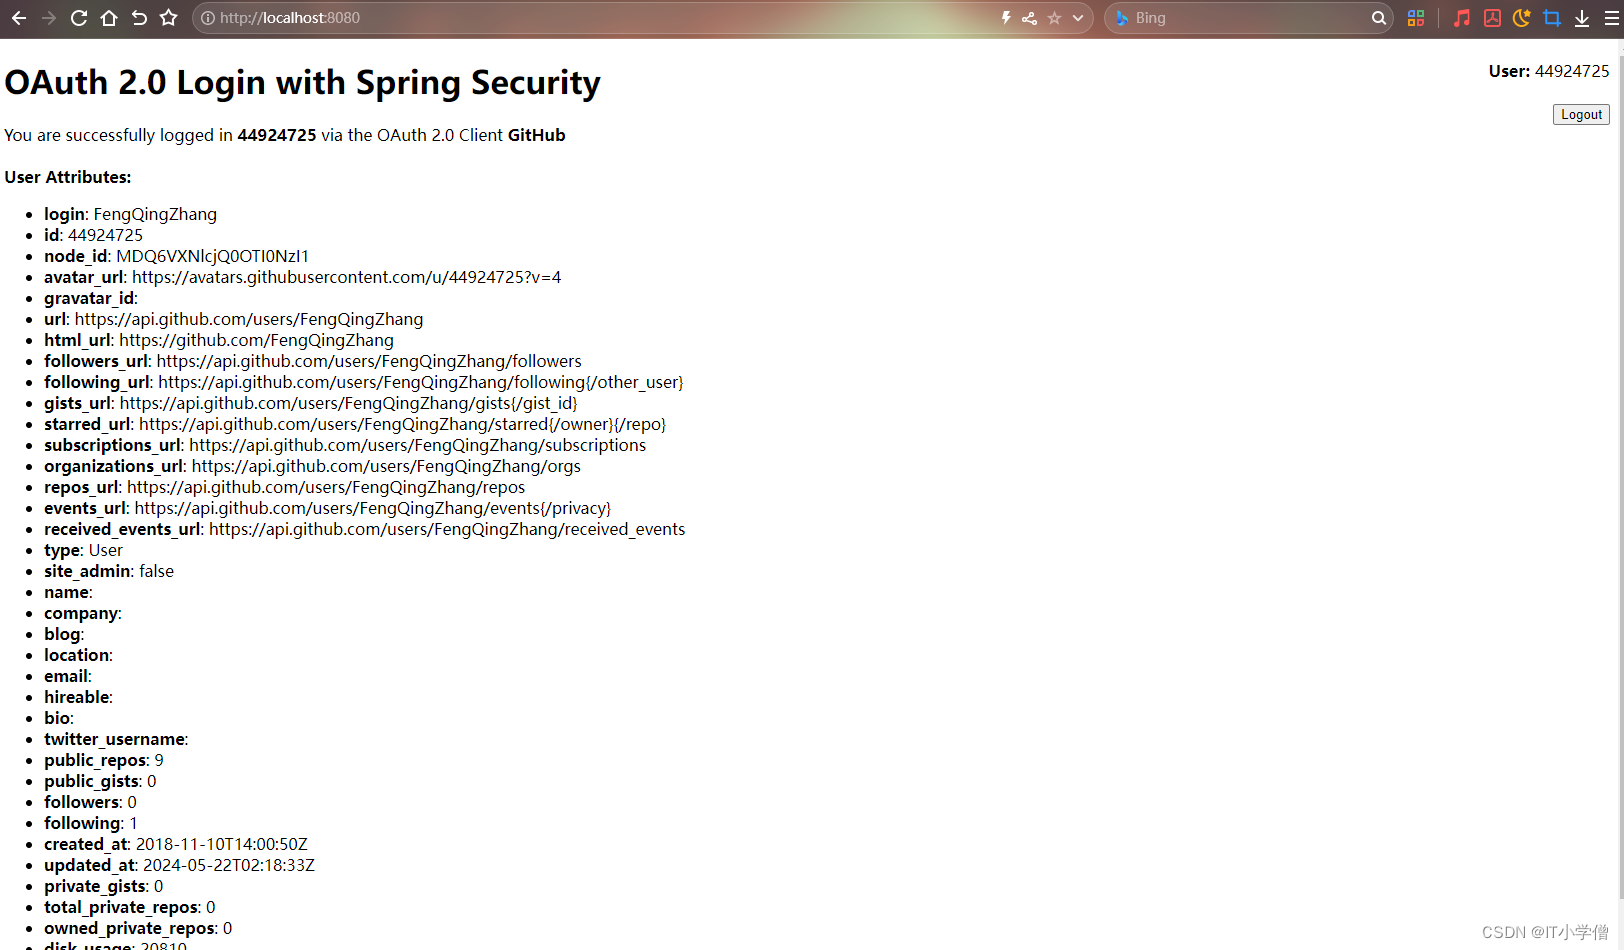
<div>You are successfully logged in <span style="font-weight:bold" th:text="${userName}"></span>via the OAuth 2.0 Client <span style="font-weight:bold" th:text="${clientName}"></span>
</div>
<div> </div>
<div><span style="font-weight:bold">User Attributes:</span><ul><li th:each="userAttribute : ${userAttributes}"><span style="font-weight:bold" th:text="${userAttribute.key}"></span>: <spanth:text="${userAttribute.value}"></span></li></ul>
</div>
</body>
</html>
啟動項目
訪問http://localhost:8080/login
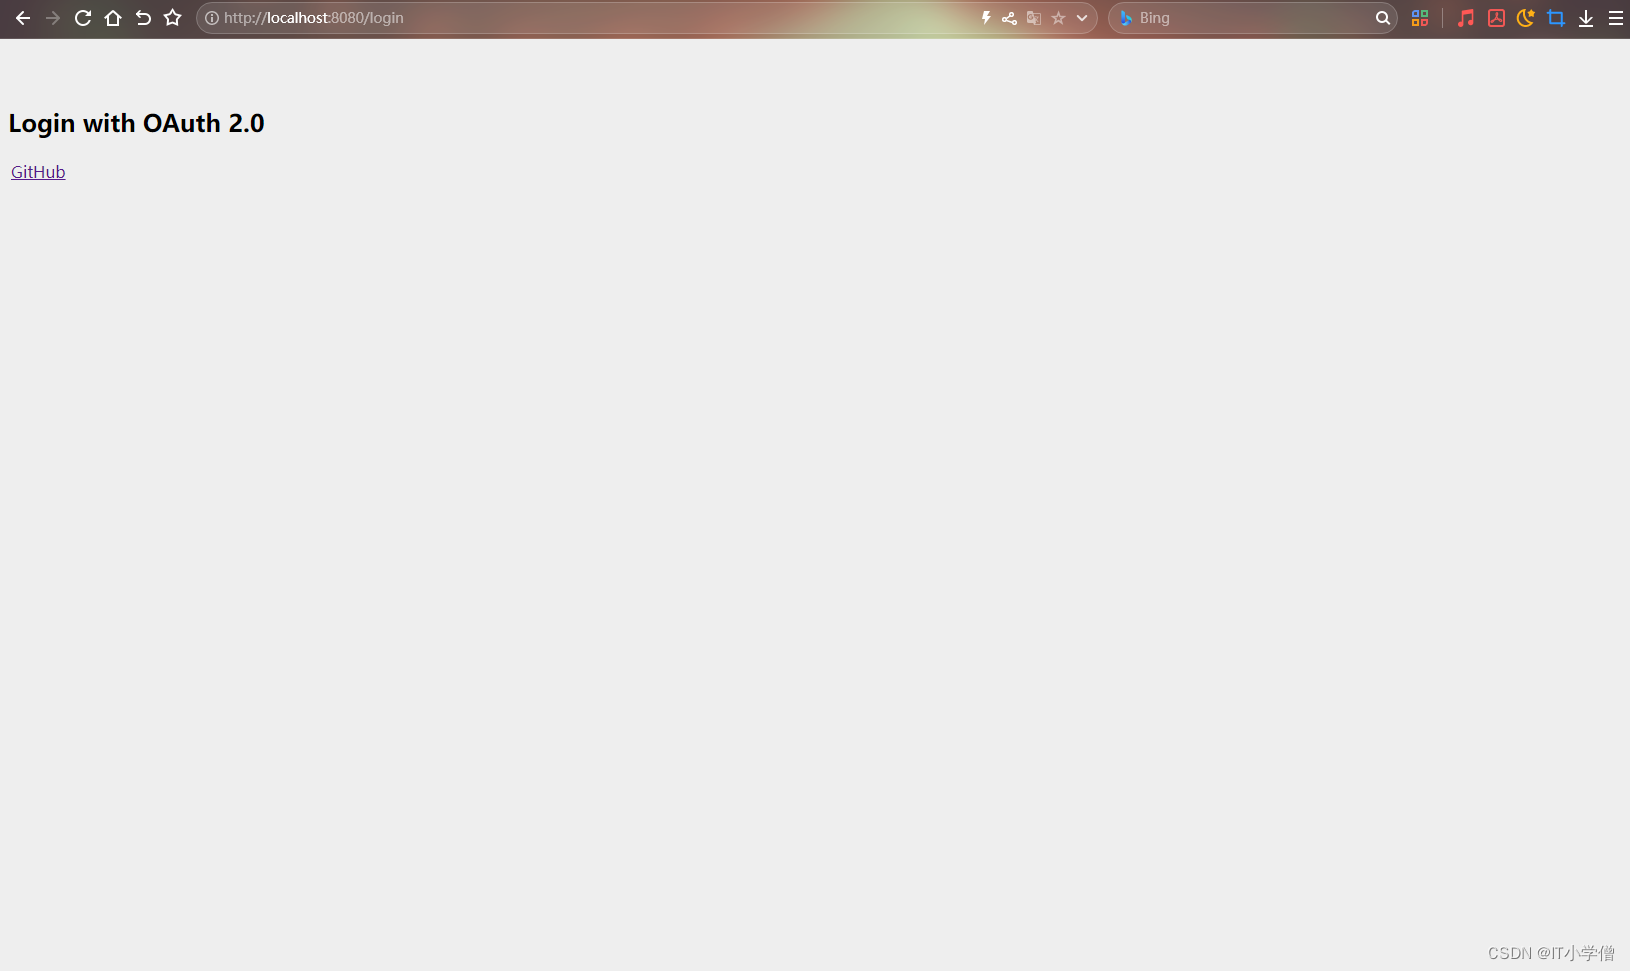
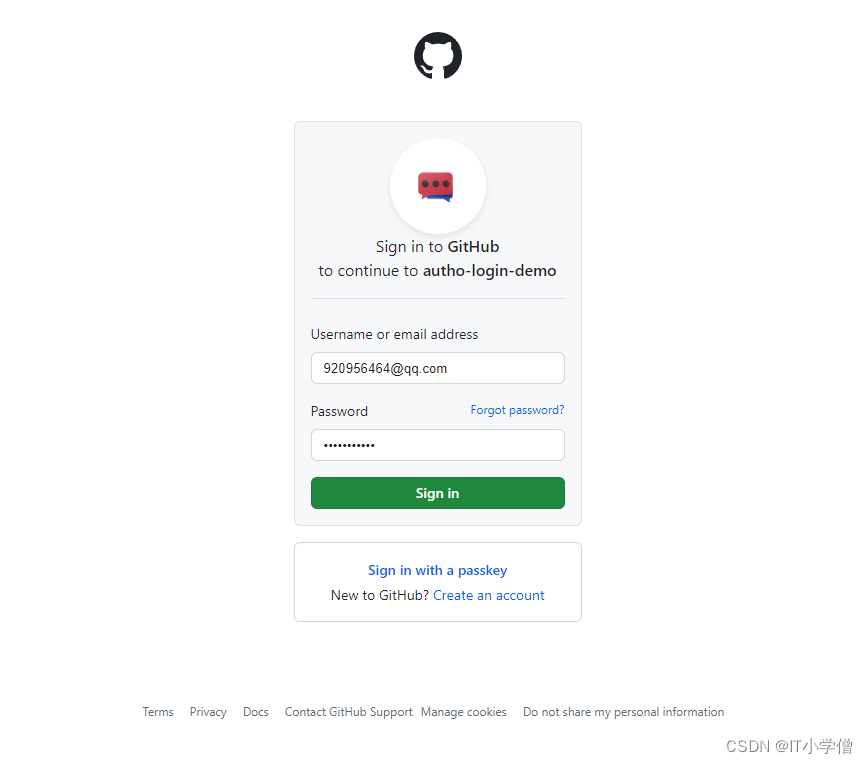
點擊Github。
4、案例分析
4.1、登錄流程
- A網站讓用戶跳轉到GitHub,并攜帶參數ClientID 以及 Redirection URI。
- GitHub要求用戶登錄,然后詢問用戶"A網站要求獲取用戶信息的權限,你是否同意?"
- 用戶同意,GitHub就會重定向回A網站,同時發回一個授權碼。
- A網站使用授權碼,向GitHub 請求令牌。
- GitHub 返回令牌.
- A網站使用令牌,向GitHub 請求用戶數據。
- GitHub返回用戶數據
- A網站使用GitHub用戶數據登錄
4.2、CommonOAuth2Provider
CommonOAuth2Provider是一個預定義的通用OAuth2Provider,為一些知名資源服務API提供商(如Google、GitHub、Facebook)預定義了一組默認的屬性。
例如,授權URI、令牌URI和用戶信息URI通常不經常變化。因此,提供默認值以減少所需的配置。
因此,當我們配置GitHub客戶端時,只需要提供client-id和client-secret屬性。
GITHUB {public ClientRegistration.Builder getBuilder(String registrationId) {ClientRegistration.Builder builder = this.getBuilder(registrationId, ClientAuthenticationMethod.CLIENT_SECRET_BASIC, "{baseUrl}/{action}/oauth2/code/{registrationId}");builder.scope(new String[]{"read:user"});builder.authorizationUri("https://github.com/login/oauth/authorize");builder.tokenUri("https://github.com/login/oauth/access_token");builder.userInfoUri("https://api.github.com/user");builder.userNameAttributeName("id");builder.clientName("GitHub");return builder;}},

 基于字符設備驅動的I/O操作)
 - 三語言AC題解(Python/Java/Cpp))


)

![[數據結構] -- 單鏈表](http://pic.xiahunao.cn/[數據結構] -- 單鏈表)
list)


