1.Vue工程化
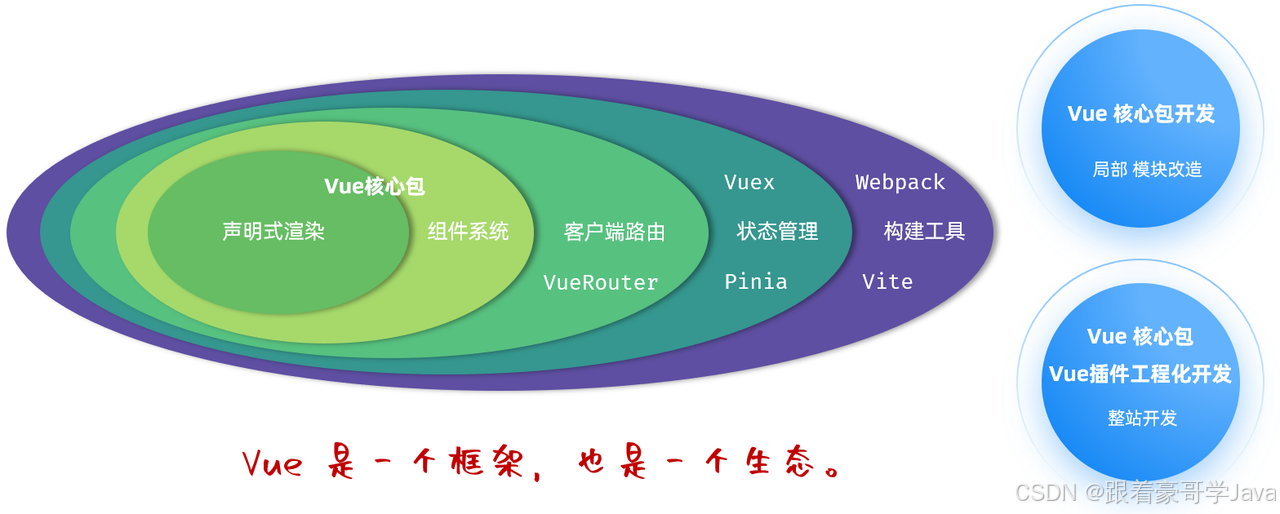
1.1介紹
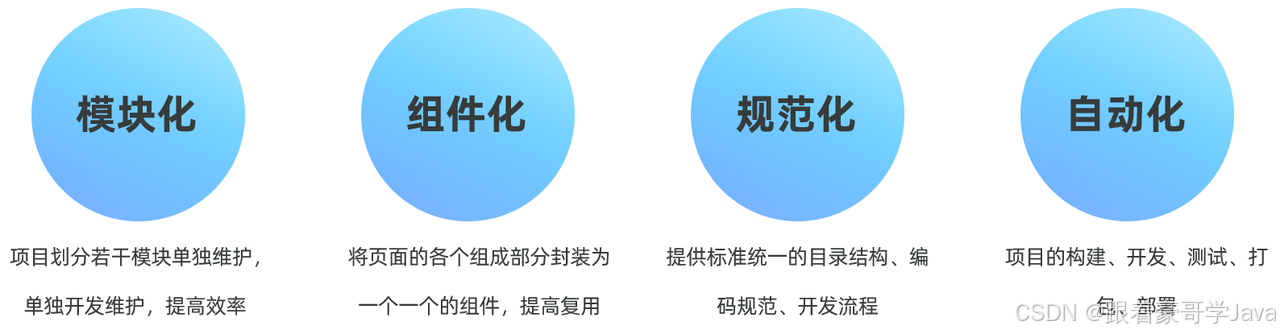
- 模塊化:將js和css等,做成一個個可復用模塊
- 組件化:我們將UI組件,css樣式,js行為封裝成一個個的組件,便于管理
- 規范化:我們提供一套標準的規范的目錄接口和編碼規范,所有開發人員遵循這套規范
- 自動化:項目的構建,測試,部署全部都是自動完成
1.2環境準備
1.2.1 NodeJS安裝
1). 驗證NodeJS的環境變量
NodeJS 安裝完畢后,會自動配置好環境變量,我們驗證一下是否安裝成功,通過: node -v
![[圖片]](https://i-blog.csdnimg.cn/direct/960527c555dc4b579e9998116f79aa9c.png)
2). 配置npm的全局安裝路徑
![[圖片]](https://i-blog.csdnimg.cn/direct/f97d50e23adb443e8f752a8e14946648.png)
使用 管理員身份 運行命令行,在命令行中,執行如下指令:
npm config set prefix "D:\develop\NodeJS"
注意:D:\develop\NodeJS 這個目錄是NodeJS的安裝目錄 !!!
3). 切換為淘寶鏡像,加速下載:
npm config set registry https://registry.npmmirror.com
1.2.3npm介紹
- npm:Node Package Manager,是NodeJS的軟件包管理器。
![[圖片]](https://i-blog.csdnimg.cn/direct/b383b7594fe348fdbcc3404ea7bc213f.png)
在開發前端項目的過程中,我們需要相關的依賴,就可以直接通過 npm install xxx 命令,直接從遠程倉庫中將依賴直接下載到本地了。
1.3 Vue項目創建
1.3.1項目創建
創建一個工程化的Vue項目,執行命令:npm create vue@3.3.4
![[圖片]](https://i-blog.csdnimg.cn/direct/07609eb1128a4b19968f945cf4e34028.png)
項目創建完成以后,進入vue-project01 項目目錄,執行命令安裝當前項目的依賴:npm install
![[圖片]](https://i-blog.csdnimg.cn/direct/182a53fcd8e84568a0c5a431520f337a.png)
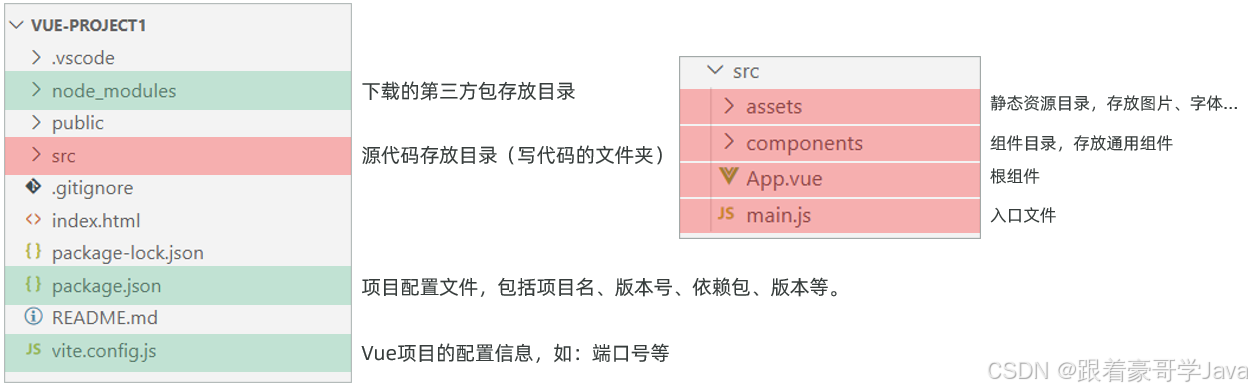
1.3.2項目結構
1.3.3啟動項目
-
方式一:命令行
啟動項目,我們可以在命令行中執行命令:npm run dev,就可以啟動Vue項目了。
![[圖片]](https://i-blog.csdnimg.cn/direct/4060ac90e1e54bfd967bff7e826a78a5.png)
-
方式二:Vscode圖形化界面
點擊NPM腳本中的dev后的運行按鈕,就可以啟動項目。
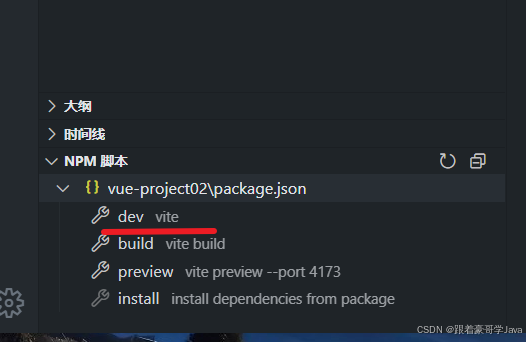
啟動起來之后,我們就可以訪問前端Vue項目了,訪問路徑:http://localhost:5173
1.4Vue項目開發流程
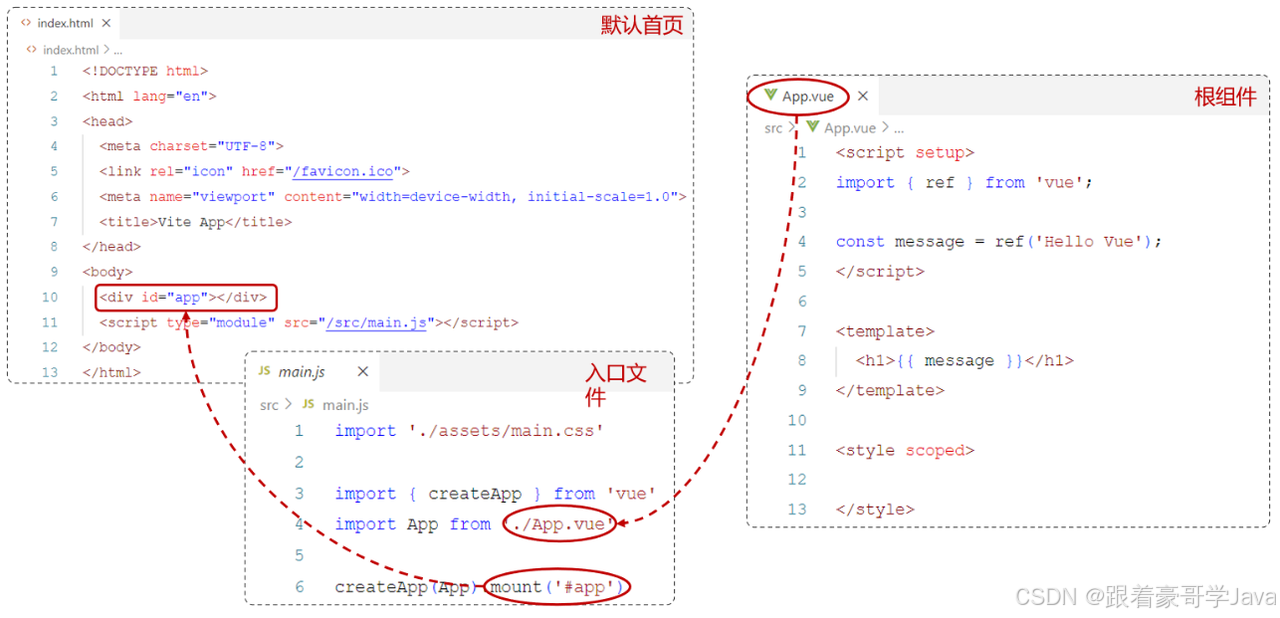
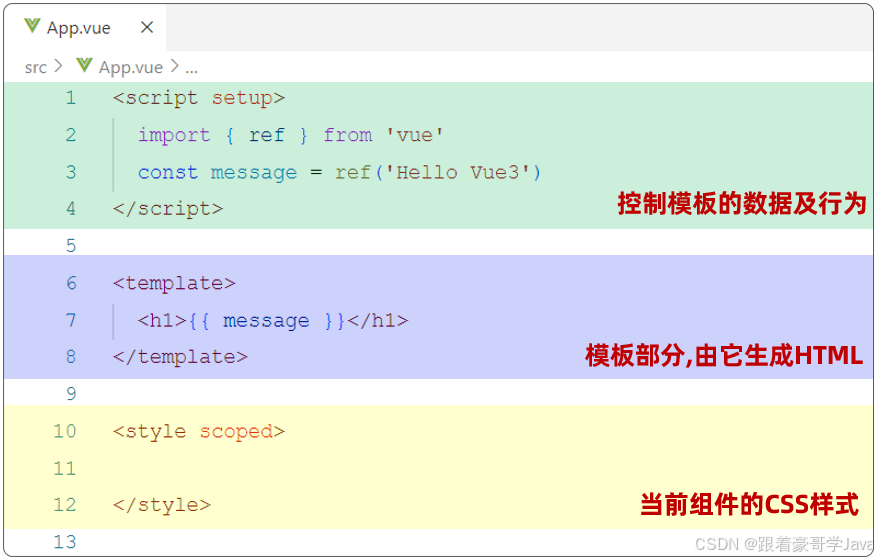
其中*.vue是Vue項目中的組件文件,在Vue項目中也稱為單文件組件(SFC,Single-File Components)。
1.5 API風格
- 組合式API:是Vue3提供的一種基于函數的組件編寫方式,通過使用函數來組織和復用組件的邏輯。它提供了一種更靈活、更可組合的方式來編寫組件。代碼形式如下:
<script setup>
import { ref, onMounted } from 'vue';
const count = ref(0); //聲明響應式變量function increment(){ //聲明函數count.value++;
}onMounted(() => { //聲明鉤子函數console.log('Vue Mounted....');
})
</script><template><input type="button" @click="increment"> Api Demo1 Count : {{ count }}
</template><style scoped></style>
- setup:是一個標識,告訴Vue需要進行一些處理,讓我們可以更簡潔的使用組合式API。
- ref():接收一個內部值,返回一個響應式的ref對象,此對象只有一個指向內部值的屬性 value。
- onMounted():在組合式API中的鉤子方法,注冊一個回調函數,在組件掛載完成后執行。
- 選項式API
選項式API:可以用包含多個選項的對象來描述組件的邏輯,如:data,methods,mounted等。選項定義的屬性都會暴露在函數內部的this上,它會指向當前的組件實例。
<script>
export default{data() {return {count: 0}},methods: {increment: function(){this.count++}},mounted() {console.log('vue mounted.....');}
}
</script><template><input type="button" @click="increment">Api Demo1 Count :  {{ count }}
</template><style scoped></style>
在Vue中的組合式API使用時,是沒有this對象的,this對象是undefined。
2.ElementPlus
2.1介紹
Element:是餓了么公司前端開發團隊提供的一套基于 Vue3 的網站組件庫,用于快速構建網頁。
Element 提供了很多組件(組成網頁的部件)供我們使用。例如 超鏈接、按鈕、圖片、表格等等。
官方網站:https://element-plus.org/zh-CN/#/zh-CN
2.2快速入門
準備工作:
1). 將準備好的文件,使用VSCode將其打開。
![[圖片]](https://i-blog.csdnimg.cn/direct/d8662cfe59244e108f7a781ec09fde87.png)
2). 參照官方文檔,安裝ElementPlus的組件庫(在當前工程的目錄下),執行如下命令:
npm install element-plus@2.4.4 --save
![[圖片]](https://i-blog.csdnimg.cn/direct/99ee903a6a0649468248908e3f4af611.png)
3). 在main.js 中引入ElementPlus組件庫 (參照官方文檔),最終 main.js 中代碼如下:
import { createApp } from 'vue'
import App from './App.vue'import ElementPlus from 'element-plus'
import 'element-plus/dist/index.css'const app = createApp(App)
app.use(ElementPlus)app.mount('#app')
制作組件:
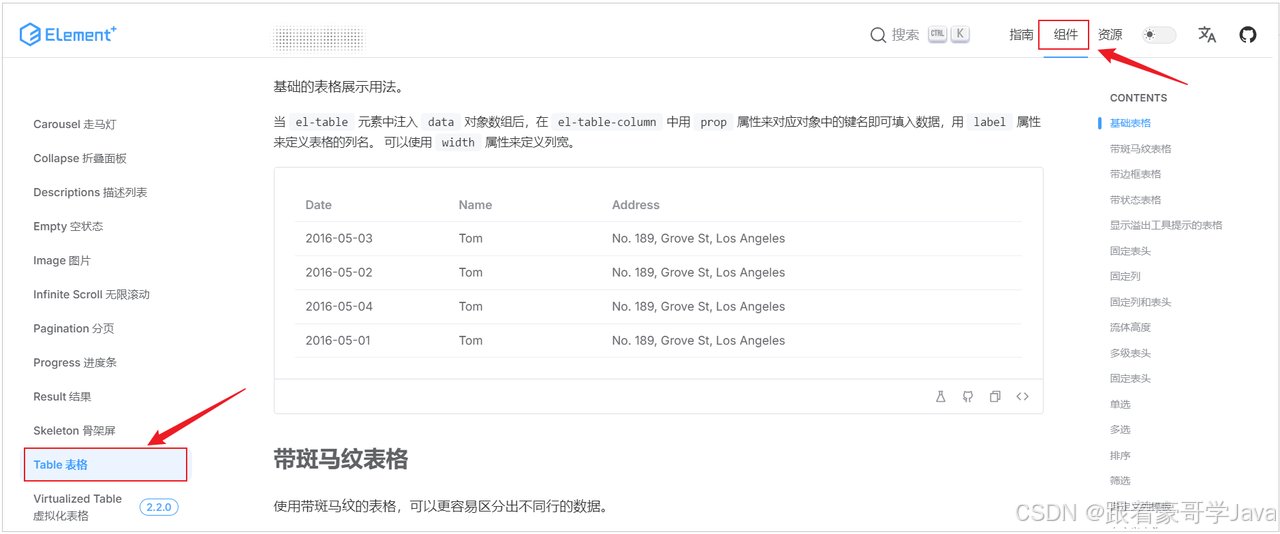
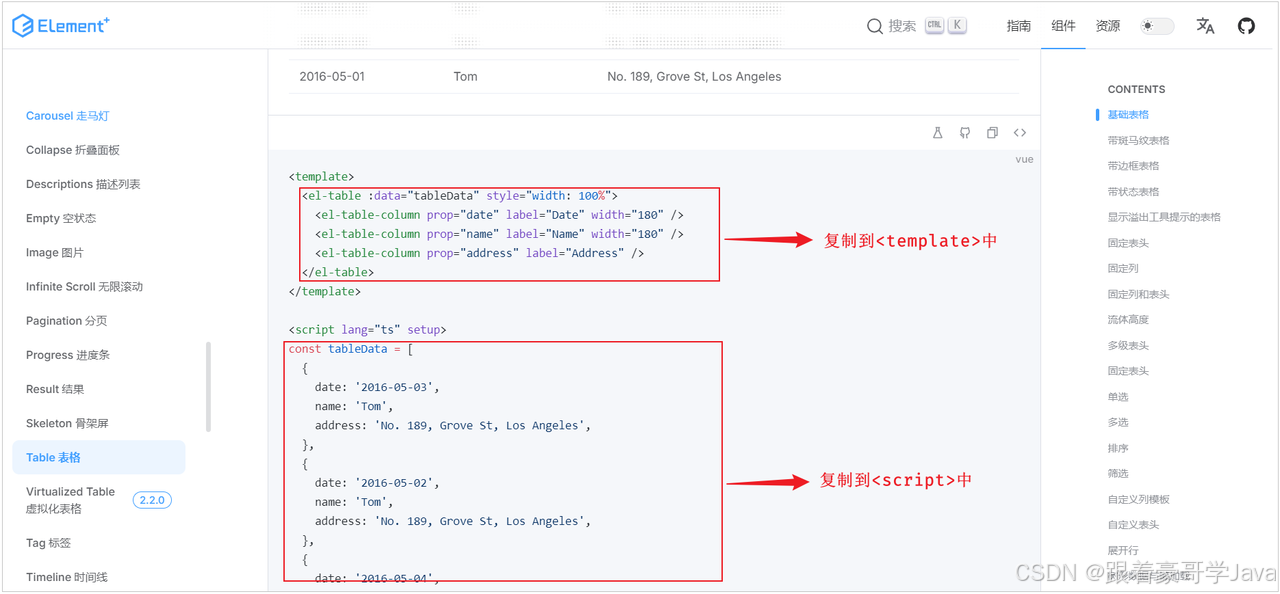
1) 訪問ElementPlus的官方文檔,查看對應的組件源代碼。
![[圖片]](https://i-blog.csdnimg.cn/direct/02463ff5f3474a64a7bb4aa5c98377fa.png)
2). 在 src下創建 views 目錄,在 views 目錄下,創建Element.vue組件文件,復制組件代碼,調整成自己想要的 。
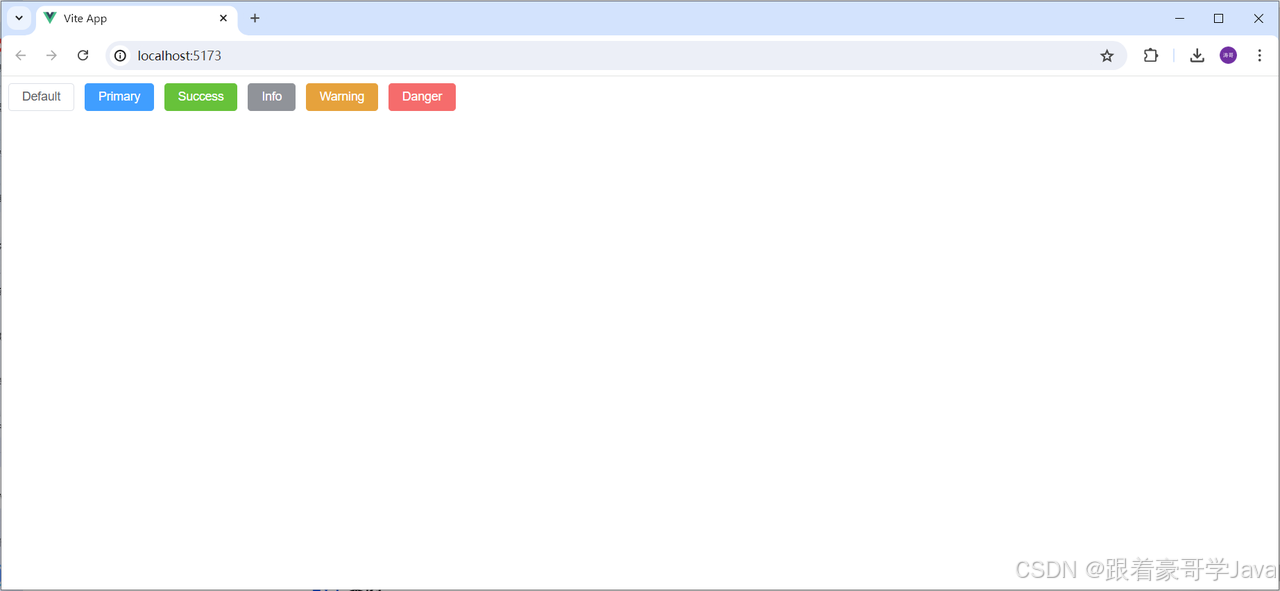
<script setup></script><template><el-row class="mb-4"><el-button>Default</el-button><el-button type="primary">Primary</el-button><el-button type="success">Success</el-button><el-button type="info">Info</el-button><el-button type="warning">Warning</el-button><el-button type="danger">Danger</el-button></el-row>
</template><style scoped></style>
3). 在根組件 app.vue 中引入Element.vue
<script setup>
import Element from './views/Element.vue'
</script><template><Element></Element>
</template><style scoped></style>
4). 啟動項目,訪問 http://localhost:5173
2.3常見組件
2.3.1表格組件
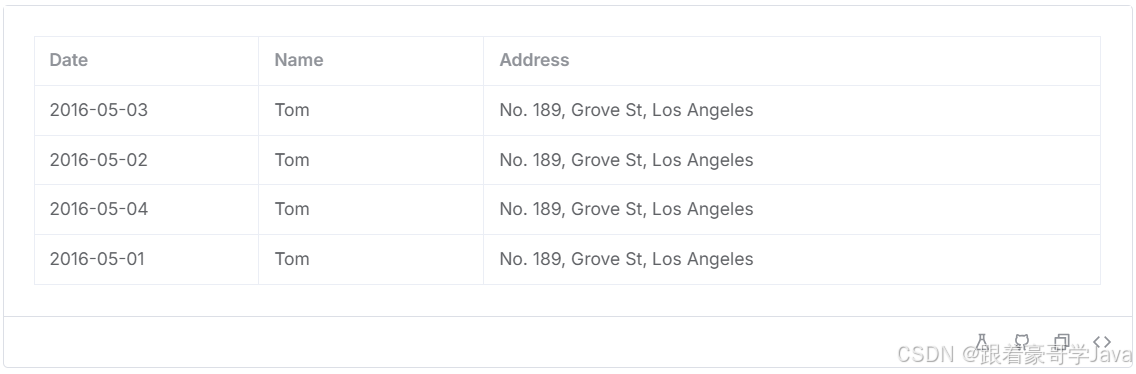
代碼:
<script setup>
const tableData = [{date: '2016-05-03', name: 'Tom', address: 'No. 189, Grove St, Los Angeles'},{date: '2016-05-02', name: 'Tom', address: 'No. 189, Grove St, Los Angeles'},{date: '2016-05-04', name: 'Tom', address: 'No. 189, Grove St, Los Angeles'},{date: '2016-05-01', name: 'Tom', address: 'No. 189, Grove St, Los Angeles'}
]
</script><template><!-- Table表格 --><el-table :data="tableData" border style="width: 100%"><el-table-column prop="date" label="日期" width="180" /><el-table-column prop="name" label="姓名" width="180" /><el-table-column prop="address" label="住址" /></el-table>
</template>
Table表格組件,屬性說明:
data: 主要定義table組件的數據模型prop: 定義列的數據應該綁定data中定義的具體的數據模型label: 定義列的標題width: 定義列的寬度
2.3.2分頁條組件
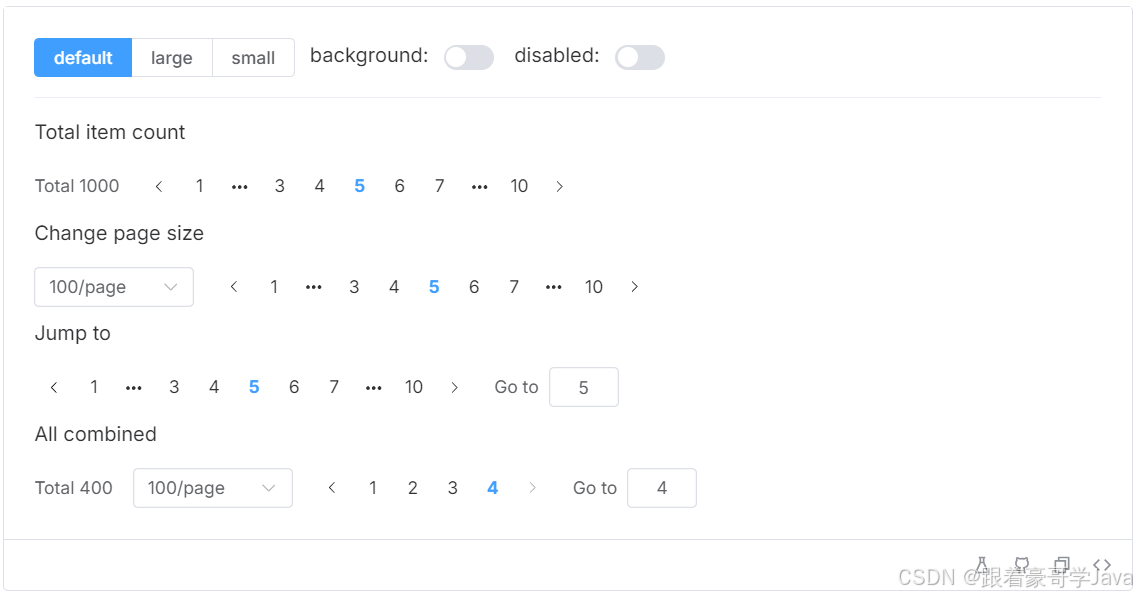
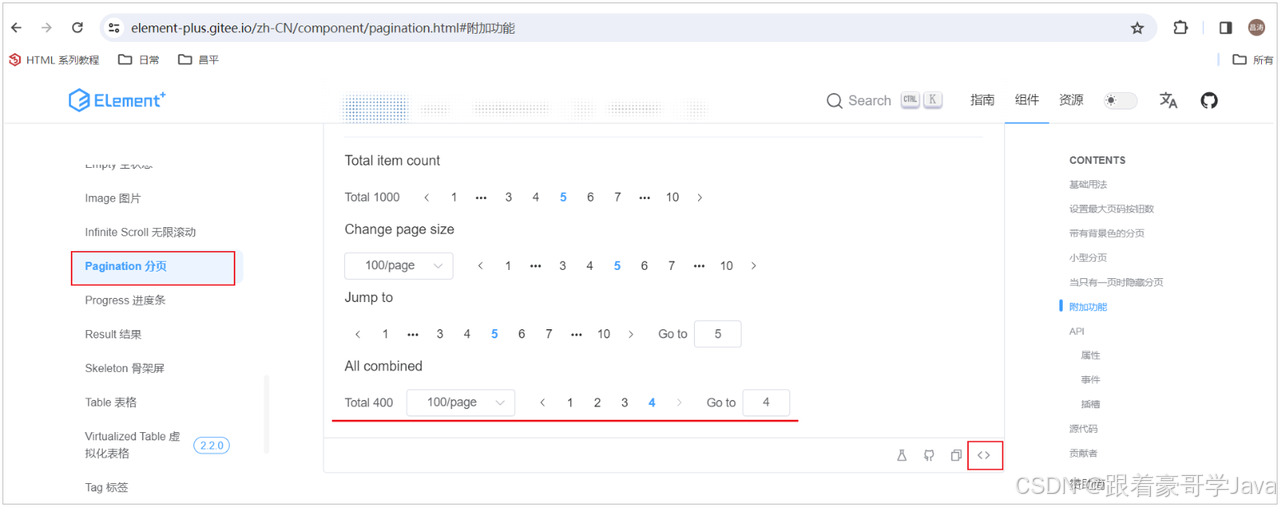
默認情況下,ElementPlus的組件是英文的,如果希望使用中文語言,可以在 main.js 中做如下配置:
import zhCn from 'element-plus/dist/locale/zh-cn.mjs'
app.use(ElementPlus, {locale: zhCn})
代碼:
<script setup>
const currentPage4 = ref(1)
const pageSize4 = ref(10)const handleSizeChange = (val) => {console.log(`設置每頁大小: ${val}`)
}
const handleCurrentChange = (val) => {console.log(`設置當前頁: ${val}`)
}
</script><template><!-- pagination分頁 --><el-paginationv-model:current-page="currentPage4"v-model:page-size="pageSize4":page-sizes="[10, 20, 30, 40]"layout=" sizes, prev, pager, next, jumper,total":total="40"@size-change="handleSizeChange"@current-change="handleCurrentChange"/>
</template>
Pagination 分頁組件的屬性如下:
background: 添加北京顏色,也就是上圖藍色背景色效果。layout: 分頁工具條的布局,其具體值包含sizes, prev, pager, next, jumper, total 這些值total: 數據的總數量size-change: pageSize 改變時會觸發current-change:currentPage 改變時會觸發
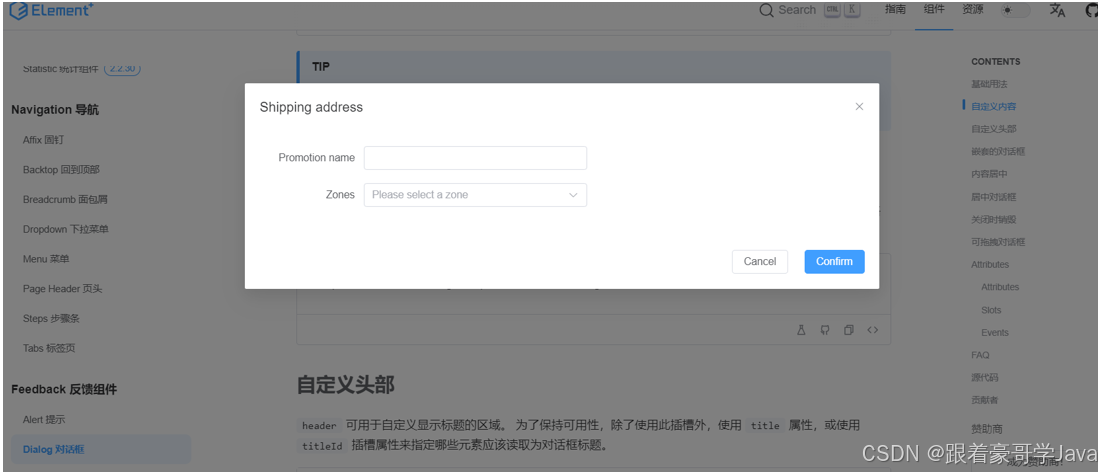
2.3.3對話框組件

<script setup>
// Dialog對話框
const dialogTableVisible = ref(false)
</script><template><!-- Dialog對話框 --><el-button @click="dialogTableVisible = true">打開對話框</el-button><el-dialog v-model="dialogTableVisible" title="Shipping address"><el-table :data="tableData"><el-table-column property="date" label="Date" width="150" /><el-table-column property="name" label="Name" width="200" /><el-table-column property="address" label="Address" /></el-table></el-dialog>
</template>
Dialog對話框組件使用的關鍵點,就是控制其顯示與隱藏。 通過
v-model給定的boolean值,來控制Dialog的顯示與隱藏。
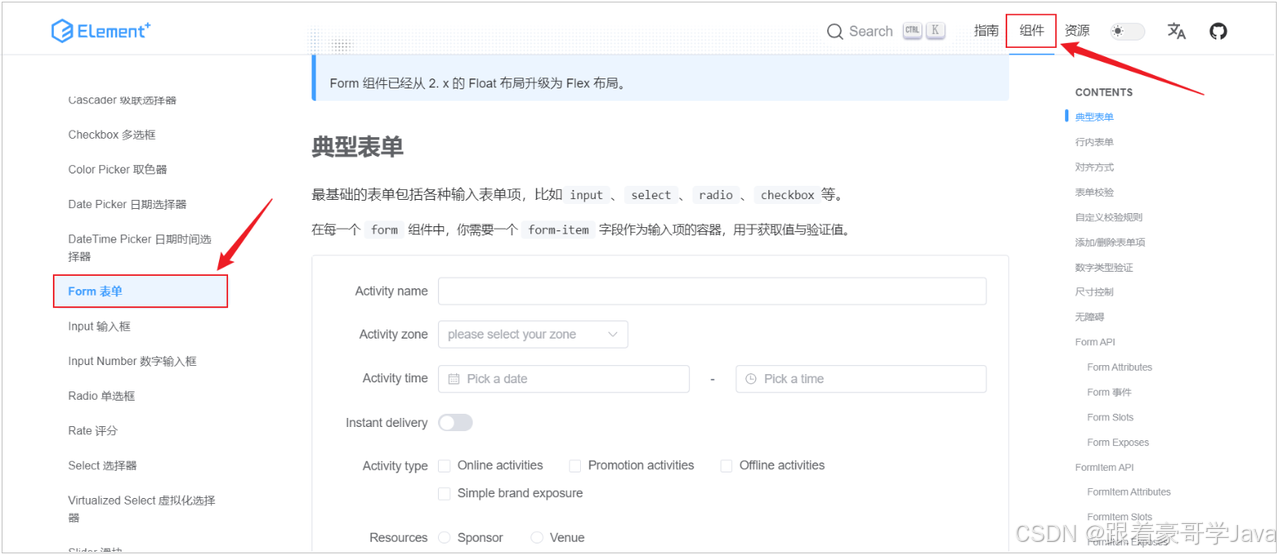
2.3.4表單組件
<script setup>
import { ref } from 'vue'
// Form表單
const formInline = ref({user: '',region: '',date: '',
})
const onSubmit = () => {console.log('提交!')
}
</script><template><!-- Form 表單 --><el-form :inline="true" :model="formInline" class="demo-form-inline"><el-form-item label="姓名"><el-input v-model="formInline.user" placeholder="Approved by" clearable /></el-form-item><el-form-item label="性別"><el-select v-model="formInline.region" placeholder="Activity zone" clearable><el-option label="Zone one" value="shanghai" /><el-option label="Zone two" value="beijing" /></el-select></el-form-item><el-form-item label="日期"><el-date-picker v-model="formInline.date" type="date" placeholder="Pick a date" clearable/></el-form-item><el-form-item><el-button type="primary" @click="onSubmit">提交</el-button></el-form-item></el-form>
</template>
新特性)
)


)


 GPIO輸出demo:LED閃爍)

——vscode + CMAKE + qtcreate的操作方式)


