目錄
一、vue3的pinia
1、什么是pinia?
2、為什么Vue3選擇pinia?
3、使用pinia的好處
4、安裝pinia
?2、項目配置
3、存儲/讀取pinia中的數據
4、修改pinia中的數據
?5、storeToRefs(保持store中數據的響應式)
?6、getters
?7、監聽store中數據的變化:$subscribe
8、store的組合式寫法
?二、【props】傳參
三、【自定義事件】傳參
四、【mitt】傳參
1、認識mitt
2、使用mitt
?五、【v-model】傳參(平常基本不寫)
六、【$attrs】傳參
七、【$refs和$parent】傳參
1、概述
2、原理
3、組件使用實例
4、$refs和$parent使用精髓
?八、provide和inject
九、slot插槽
1、默認插槽
2、具名插槽
?3、作用域插槽
十、Vue3組件通信總結
一、vue3的pinia
1、什么是pinia?
????????pinia 是一個 Vue3 的狀態管理庫,它的 API 設計和 Vuex 有很大的相似之處,但是它的實現方式和 Vuex 完全不同,它是基于 Vue3 的新特性?Composition API?實現的,所以它的使用方式和 Vuex 也有很大的不同。
Pinia | The intuitive store for Vue.js值得你喜歡的 Vue Store![]() https://pinia.vuejs.org/zh/
https://pinia.vuejs.org/zh/
2、為什么Vue3選擇pinia?
????????在構建大型或中型Vue應用時,組件之間的狀態共享和管理是一個不可避免的挑戰。Vue.js的官方狀態管理庫Vuex在過去幾年里一直是解決這個問題的主流方案。但是,Vuex的復雜性和對TypeScript支持的限制促使社區尋找更簡潔、更靈活的解決方案。這就是Pinia應運而生的背景。
????????Pinia是Vue.js的一個全新狀態管理庫庫,由同一個團隊編寫,旨在提供一個更輕量級和用戶友好的狀態管理體驗。它以簡單直觀的API、完全的TypeScript支持和更好的開發體驗而受到歡迎。
3、使用pinia的好處
????????簡化的API、更好的TypeScript集成、開箱即用的DevTools集成、模塊化和靈活性、易于測試、輕量級、持久化和插件支持
????????Pinia提供了一個更加直觀和簡潔的API,使得狀態管理變得更加容易理解和實施。對于開發者來說,這意味著更少的學習曲線和更快的開發速度。由于Pinia自底向上設計了對TypeScript的支持,使用TypeScript的開發者將會享受到無縫的類型推導和更少的類型斷言。Pinia與Vue DevTools的集成提供了更好的調試體驗,允許開發者輕松追蹤和操作狀態,從而提高開發效率。Pinia支持將狀態分割為不同的模塊,使得狀態管理在大型應用中更加清晰和可維護。此外,它的靈活性允許你根據需要輕松地添加插件和中間件。由于Pinia的設計,編寫單元測試變得更加直觀。你可以輕松地模擬actions和測試state的變更。Pinia的代碼庫比Vuex更小,對于注重應用大小的項目來說,這是一個明顯的優勢。Pinia支持通過插件來擴展其功能,例如狀態持久化,這使得在瀏覽器刷新或關閉后恢復用戶狀態變得簡單。
????????綜上所述,Pinia為開發Vue應用的狀態管理提供了一個現代化、高效和靈活的解決方案。隨著Vue 3的推進,Pinia正在成為越來越多Vue開發者的首選狀態管理庫。
4、安裝pinia
1、安裝依賴
安裝pinia依賴:npm i pinia
?2、項目配置
????????目錄:main.ts
// 引入pinia
import { createPinia } from "pinia";
// 創建pinia
const pinia = createPinia()
// 安裝pinia
app.use(pinia)
3、存儲/讀取pinia中的數據
(1)在src下創建store目錄?
(2)在store目錄下創建ts文件(最好能明確地看出屬于哪個組件使用)
????????例如:count.ts
import { defineStore } from "pinia";
// 官方推薦使用Hooks的方式命名
export const useCountStore = defineStore('count',{// 狀態/數據(官方要求必須寫成一個函數)// state: 真正存儲數據的地方(類似于Vue2中的data)state(){return{sum: 6}}
})
(3)讀取pinia中的值
// 類似Hooks的思想
import { useCountStore } from "@/store/count";const countStore = useCountStore()// 以下兩種方式都可以拿到state中的數據
console.log('countStore', countStore.sum)
console.log('countStore', countStore.$state.sum)
4、修改pinia中的數據
?(1)修改單個數據:直接修改
countStore.sum += 1(2)修改多個數據:$patch 批量修改
countStore.$patch({sum:888,address:'陜西',city:'西安'
})(1)和(2)的區別:方法(1)在修改多個數據的時候,會觸發多個mutatuons事件,但是方法(2)在修改數據的時候,只會觸發一個$patch事件
(3)使用action修改數據:處理復雜數據時使用
- 需要在pinia中定義action函數
export const useCountStore = defineStore('count',{// actions里面放置的是一個一個的方法,用于響應組件中的動作actions:{increment(value){console.log('increment被調用了',value)// 修改數據// this是當前的storeconsole.log('this.sum', this.sum)this.sum += value}},// 狀態/數據(官方要求必須寫成一個函數)// state: 真正存儲數據的地方(類似于Vue2中的data)state(){return{sum: 6,city:'山西',address: '未知'}}
})- 使用action中定義的修改數據的函數
// 第三種修改數據的方式:使用action屬性修改數據countStore.increment(n.value)?5、storeToRefs(保持store中數據的響應式)
- toRefs會將所包裹的數據全部變成ref對象,包括數據和方法,在這里不適用(vue3自帶的)
- storeToRefs只會關注store中的數據,不會對方法進行ref包裹(pinia自帶的)
import { storeToRefs } from "pinia";
// 解構賦值countStore中的數據
// 1、為了保證數據的響應式,需要使用storeToRefs
// 2、storeToRefs只會關注store中的數據,不會對方法進行ref包裹
const {sum,city,address} = storeToRefs(countStore)
?6、getters
概念:當state中的數據,需要經過處理后再使用,可以使用getters配置。
????????在store中追加getters配置
export const useCountStore = defineStore('count',{// state: 真正存儲數據的地方(類似于Vue2中的data)state(){return{sum: 6,city:'山西',address: 'chinese'}},// 配置gettersgetters:{// 寫法一:bigSum:(state)=>{return state.sum * 10},// 寫法二:upperaddress(){// this可以拿到當前這個store對象console.log('this', this)return this.address.toUpperCase()}}
})
????????使用getters處理后的數據
<template><div class="count"><h2>當前求和為:{{ sum }},放大10倍后:{{ bigSum }}</h2><h2>當前地址為:{{ address }},轉換成大寫后:{{ upperaddress }}</h2></div>
</template><script setup lang="ts">
import { ref } from "vue";
// Hooks的思想
import { useCountStore } from "@/store/count";
import { storeToRefs } from "pinia";const countStore = useCountStore();// 解構賦值countStore中的數據
// 1、為了保證數據的響應式,需要使用storeToRefs
// 2、storeToRefs只會關注store中的數據,不會對方法進行ref包裹
const { sum, city, address, bigSum, upperaddress } = storeToRefs(countStore);</script>
?7、監聽store中數據的變化:$subscribe
- 訂閱方法的使用:類似watch屬性,可以監聽state及其變化
- 兩個參數:本次修改的信息;真正的數據
talkStore.$subscribe((mutate, state) => {console.log("$subscribe監聽事件的變化", mutate, state);// 實現一個無感刷新數據的方法localStorage.setItem('talkList',JSON.stringify(state.talkList))  // 將數據存到本地存儲
});
8、store的組合式寫法
export const useTalkStore = defineStore('talk', () => {// 直接定義的數據,相當于stateconst talkList = reactive(JSON.parse(localStorage.getItem('talkList') as string) || [])// 直接定義的方法,就相當于actionasync function getATalk() {// 發請求// {data:{content:title}} => 這個寫法的意思是:將返回的結果對象賦值給data,然后再結構data給content,最后再把content賦值給titlelet {data: { content: title },} = await axios.get("https://api.uomg.com/api/rand.qinghua?fromat=json");// 將請求回來的字符串包裝成一個對象let obj = { id: nanoid(), title };console.log("obj", obj);talkList.unshift(obj);}// 注意:最后一定要return,要不然沒法使用return {talkList,getATalk}
})
?二、【props】傳參
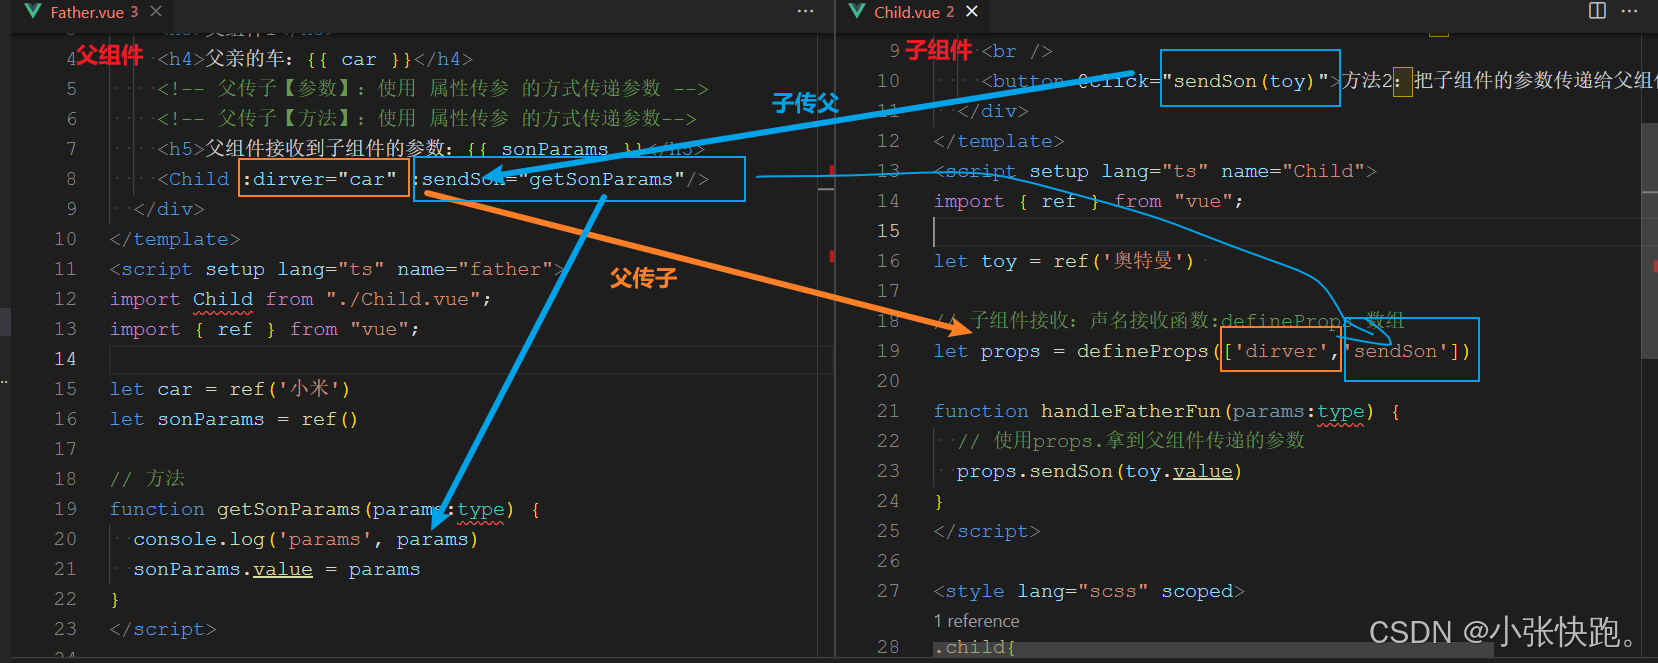
概述:props是使用頻率最高的一種通信方式。作用:父傳子、子傳父
- 若父傳子:屬性值是非函數(變量)
- 若子傳父:屬性值是函數(方法)
父組件:
<template><div class="father"><h3>父組件1</h3><h4>父親的車:{{ car }}</h4><!-- 父傳子【參數】:使用 屬性傳參 的方式傳遞參數 --><!-- 父傳子【方法】:使用 屬性傳參 的方式傳遞參數--><h5>父組件接收到子組件的參數:{{ sonParams }}</h5><Child :dirver="car" :sendSon="getSonParams"/></div>
</template>
<script setup lang="ts" name="father">
import Child from "./Child.vue";
import { ref } from "vue";let car = ref('小米')
let sonParams = ref()// 方法
function getSonParams(params:type) {console.log('params', params)sonParams.value = params
}
</script>
子組件:
<template><div class="child"> <h3>子組件2</h3><h4>兒子的玩具:{{ toy }}</h4><!-- 子組件使用父組件參數 --><h5>子組件拿到父組件的參數:{{ dirver }}</h5><!-- 復雜寫法 --><button @click="handleFatherFun">方法1:觸發父組件的方法實例</button><br /><button @click="sendSon(toy)">方法2:把子組件的參數傳遞給父組件</button></div>
</template>
<script setup lang="ts" name="Child">
import { ref } from "vue";let toy = ref('奧特曼') // 子組件接收:聲名接收函數:defineProps 數組
let props = defineProps(['dirver','sendSon'])function handleFatherFun(params:type) {// 使用props.拿到父組件傳遞的參數props.sendSon(toy.value)
}
</script>
????????圖解代碼:
三、【自定義事件】傳參
????????在 Vue3 中,自定義事件是一種常用的機制,用于在組件之間傳遞數據。通過自定義事件,子組件可以向父組件發送數據,從而實現組件間的通信。
????????父組件:
<template><div><h3>父組件</h3><!-- 給子組件Child綁定事件 --><h4 v-show="toy">子給的玩具:{{ toy }}</h4><!-- 官方推薦:自定義事件使用kabab-case的事件名(a-b) --><Child @send-toy="saveToy"/></div>
</template><script setup lang="ts">
import Child from "./child.vue";
import { ref } from "vue";let toy = ref('')
// 用于處理子組件傳遞過來的數據
function saveToy(value:any) {console.log('saveToy', value)toy.value = value
}
</script>
????????子組件:
<template><div class="child"><h3>子組件</h3><h4>玩具:{{ toy }}</h4><button @click="emit('send-toy',toy)"></button></div>
</template><script setup lang="ts">
import { ref } from "vue";let toy = ref('奧特曼')
// 聲明事件
let emit = defineEmits(['send-toy'])
</script>
????????圖解代碼:

四、【mitt】傳參
1、認識mitt
? ? ? ? mitt是vue3提供的一個工具,能夠實現跨組件通信
下載mitt依賴:npm i mitt
① 創建mitt文件目錄
????????目錄地址:src/utils/emitter.ts
② 創建mitt對象
????????src/utils/emitter.ts
// 引入itt
import mitt from 'mitt'
// 調用mitt,得到emitter,emitter能:綁定事件,觸發事件
const emitter = mitt()
// 暴露emitter
export default emitter
③ 項目引入mitt(例如:main.ts)
// 引入mitt
import emitter from "@/utils/emitter";
④ mitt語法介紹
// 綁定事件
emitter.on('tast1',()=>{console.log('tast1被觸發了')
})emitter.on('tast2',()=>{console.log('tast2被觸發了')
})// 觸發事件
setTimeout(() => {emitter.emit('tast1')emitter.emit('tast2')
}, 1000);// 解除事件
setTimeout(() => {// 清除單個事件emitter.off('tast1')// 清除所有事件emitter.all.clear()
}, 3000);
2、使用mitt
????????組件1:
<template><div class="child1"><h2>子組件1</h2><h3>玩具:{{ toy }}</h3><button @click="emitter.emit('send-toy',toy)">玩具給Childe2玩</button></div>
</template><script setup lang="ts">
import { ref } from "vue";
import emitter from "@/utils/emitter";let toy = ref('奧特曼')
</script>
????????組件2:
<template><div class="child2"><h2>子組件2</h2><h3>電腦:{{ computer }}</h3><h4>Child1傳遞的玩具{{ toy }}</h4></div>
</template><script setup lang="ts">
import { ref,onUnmounted } from "vue";
import emitter from "@/utils/emitter";
// 數據
let computer = ref('聯想')
let toy = ref()// 給emitter綁定send-toy事件
emitter.on('send-toy',(value:any)=>{console.log('send-toy',value)toy.value = value
})
// 在組件卸載時,解綁emitter
onUnmounted(()=>{emitter.all.clear()
})
</script>????????圖解代碼:
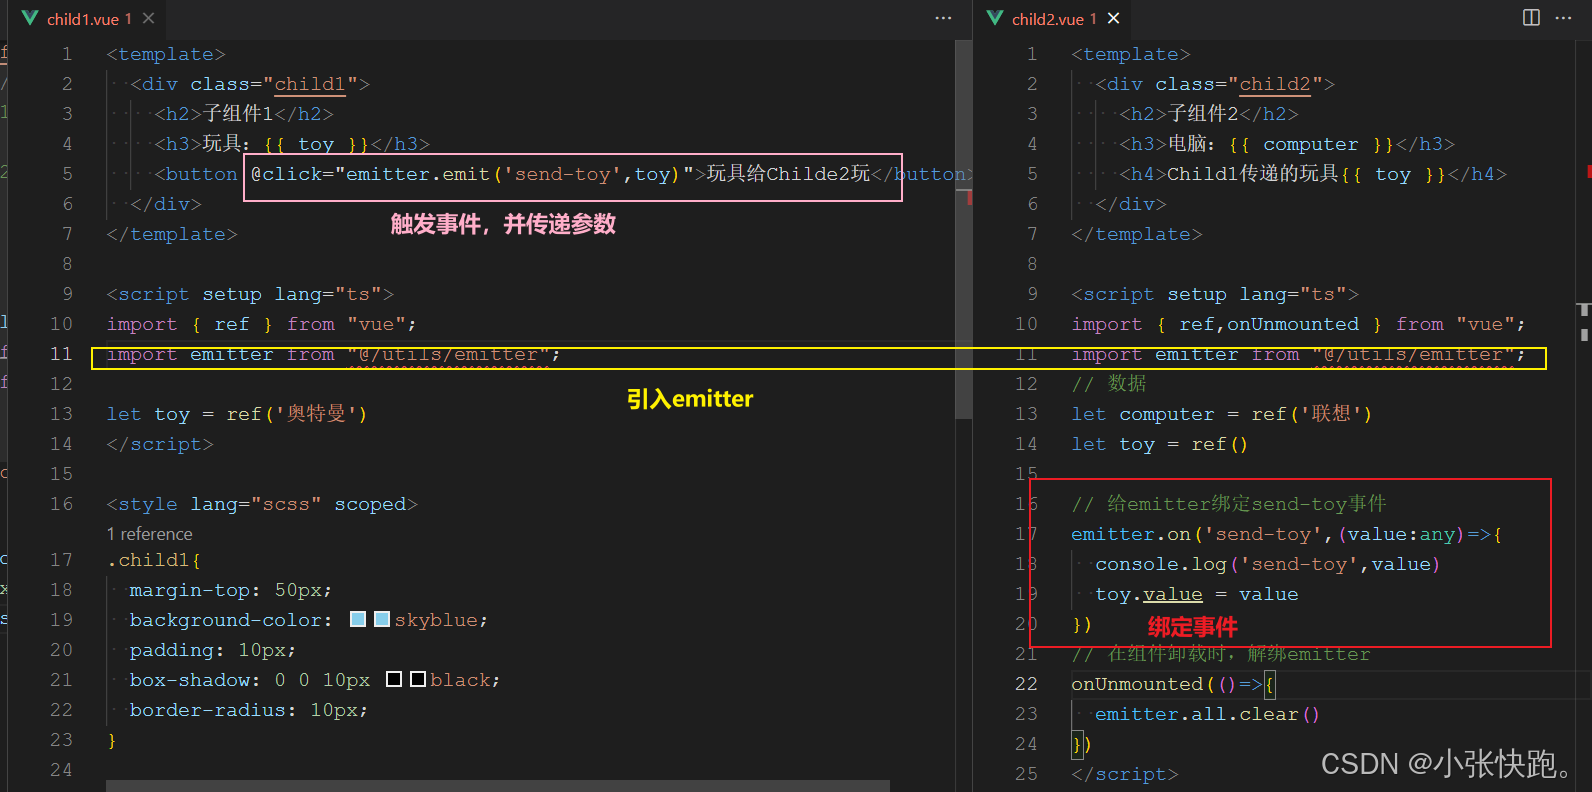
注意:當綁定事件的組件卸載時,最好清除掉emitter綁定的事件,防止內存占用?
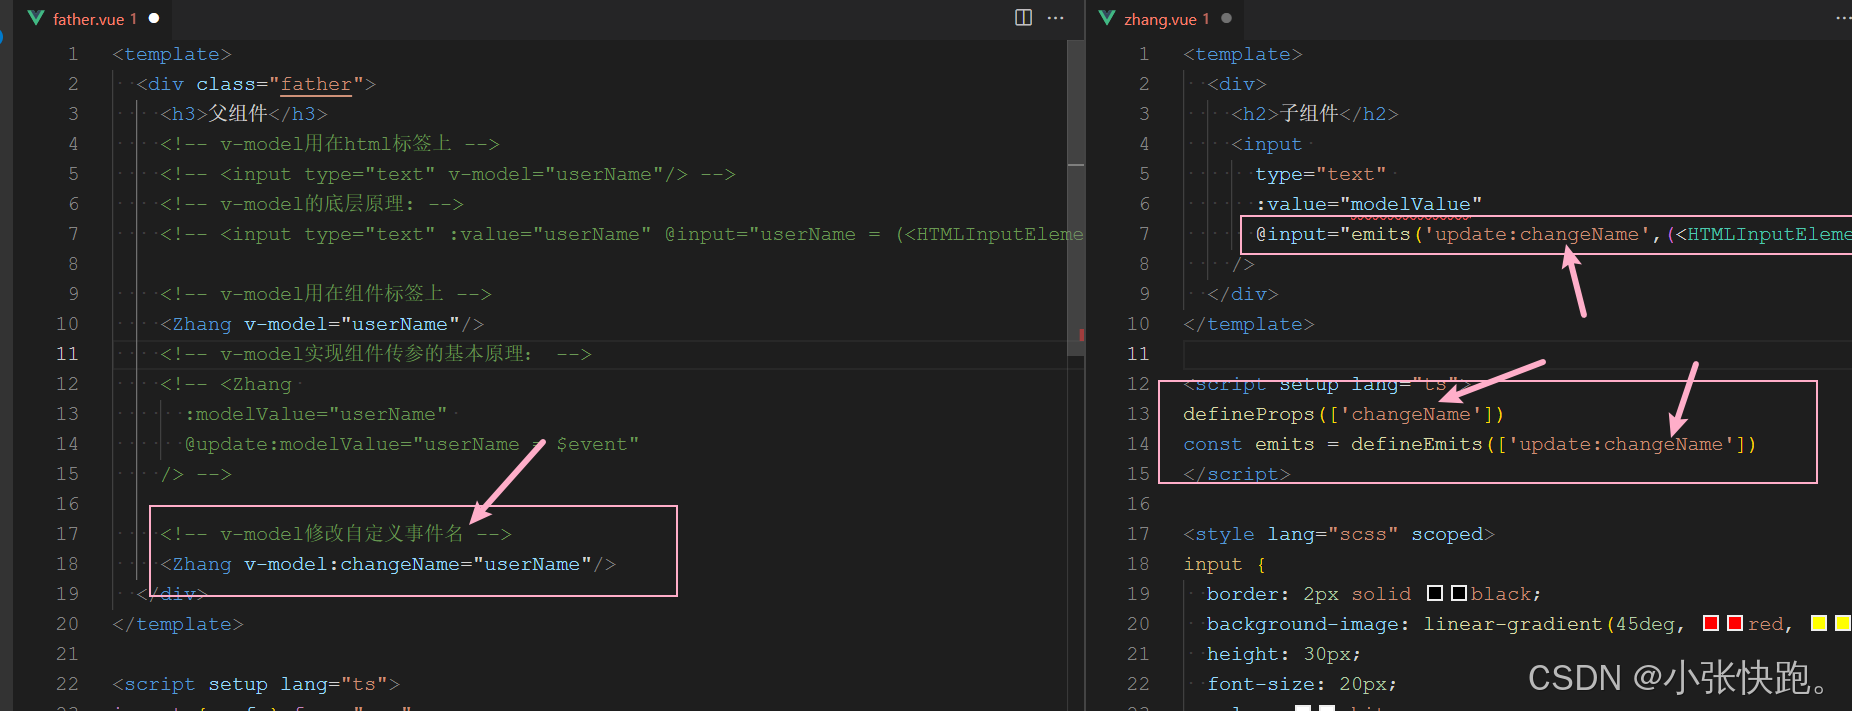
?五、【v-model】傳參(平常基本不寫)
? ? ? ? v-model傳參方式一般適用于UI組件庫底層的傳參使用,所以,這里不做具體介紹,只說明底層原理,平常用的時候還是使用v-model即可
????????父組件:
<template><div class="father"><h3>父組件</h3><!-- v-model用在html標簽上 --><!-- <input type="text" v-model="userName"/> --><!-- v-model的底層原理: --><!-- <input type="text" :value="userName" @input="userName = (<HTMLInputElement>$event.target).value"> --><!-- v-model用在組件標簽上 --><!-- <Zhang v-model="userName"/> --><!-- v-model實現組件傳參的基本原理: --><Zhang :modelValue="userName" @update:modelValue="userName = $event"/></div>
</template><script setup lang="ts">
import { ref } from "vue";
import Zhang from "./zhang.vue";
// 數據
let userName = ref('張三')
</script>
????????子組件:
<template><div><h2>子組件</h2><input type="text" :value="modelValue"@input="emits('update:modelValue',(<HTMLInputElement>$event.target).value)"/></div>
</template><script setup lang="ts">
defineProps(['modelValue'])
const emits = defineEmits(['update:modelValue'])
</script>
拓展:
????????修改v-model的事件名稱
六、【$attrs】傳參
?1、概述:$attrs用于實現當前組件的父組件,向當前組件的子組件通信(祖→孫)
2、具體說明:$attrs是一個對象,包含所有父組件傳入的標簽屬性
????????注意:$attrs會自動排除props中聲明的屬性(可以任務聲明過的props被子組件自己“消費”了),也就是說:當父(祖-父-子)組件中以props的方式使用了某個屬性,在子組件中就不能使用這個屬性了
// 如果在父組件中用defineProps接收了a參數,那么a參數就沒法繼續傳遞了
defineProps(['a'])
????????祖組件:
<template><div class="father"><h2>父組件</h2><h4>a:{{ a }}</h4><h4>b:{{ b }}</h4><h4>c:{{ c }}</h4><h4>d:{{ d }}</h4><Child :a="a":b="b":c="c":d="d"v-bind="{x:200,y:100}":updateA="updateA" /></div>
</template><script setup lang="ts">
import Child from "./child.vue";
import { ref } from "vue";let a = ref(1);
let b = ref(2);
let c = ref(3);
let d = ref(4);function updateA(value) {a.value += value
}
</script>
????????父組件:
<template><div class="child"><h2>子組件</h2><GrandChild v-bind="$attrs"/></div>
</template><script setup lang="ts">
import GrandChild from "./grandChild.vue";
// 如果這里在defineProps接收了a參數,那么a參數就沒法繼續傳遞了
defineProps(['a'])
</script>
? ? ? ? 孫組件:
<template><div class="grand-child"><h2>孫組件</h2><h4>a:{{ a }}</h4><h4>b:{{ b }}</h4><h4>c:{{ c }}</h4><h4>d:{{ d }}</h4><button @click="updateA(6)">點我將爺爺組件中的a更新</button></div>
</template><script setup lang="ts">
defineProps(['a','b','c','d','x','y','updateA'])
</script>
七、【$refs和$parent】傳參
1、概述
- $refs:用于父→子
- $parent:用于子→父
2、原理
| 屬性 | 說明 |
|---|---|
| $refs | 值為對象,包含所有ref屬性標識的DOM元素或組件實例 |
| $parent | 值為對象,當前組件的父組件實例對象 |
3、組件使用實例
? ? ? ? 父組件:
<template><div class="father"><h2>父組件</h2><h4>房產:{{ house }}</h4><button @click="changeToy">修改Child1的玩具</button><button @click="changeComputer">修改Child2的電腦</button><button @click="getAllChild($refs)">所有孩子的書增加</button><Child1 ref="c1" /><Child2 ref="c2" /></div>
</template><script setup lang="ts">
import { ref } from "vue";
import Child1 from "./child1.vue";
import Child2 from "./child2.vue";// 數據
let house = ref(4);
let c1 = ref();
let c2 = ref();function changeToy() {console.log("c1.value", c1.value);c1.value.toy = "小豬佩奇";
}function changeComputer() {console.log("c2.value", c2.value);c2.value.toy = "華為";
}function getAllChild(refs: { [key:string]: any }) {console.log("所有子組件", refs);for (const key in refs) {console.log("refs", refs[key]);refs[key].book += 3;}
}defineExpose({house})
</script>
? ? ? ? 子組件1:
<template><div class="child1"><h2>子組件1</h2><h4>玩具:{{ toy }}</h4><h4>書籍:{{ book }}本</h4><button @click="minusHouse($parent)">干掉父組件的一套房產</button></div>
</template><script setup lang="ts">
import { ref } from "vue";// 數據
let toy = ref('奧特曼')
let book = ref(3)function minusHouse(parent:any) {console.log('parent', parent)parent.house -= 1
}// 把數據交給外部
defineExpose({toy,book})
</script>
? ? ? ? 子組件2:
<template><div class="child2"><h2>子組件2</h2><h4>電腦:{{ computer }}</h4><h4>玩具:{{ book }}</h4></div>
</template><script setup lang="ts">
import { ref } from "vue";// 數據
let computer = ref('聯想')let book = ref('奧特曼')// 把數據交給外部
defineExpose({computer,book})
</script>
4、$refs和$parent使用精髓
- 在父組件中,給子組件綁定ref屬性,通過$refs可以獲取到所有的子組件實例
- 在子組件,只有通過defineExpose宏函數,將想要暴露的數據暴露出去,父組件才能拿到數據

?八、provide和inject
????????能夠完全實現不借助于中間組件跨組件通信
父組件:
<template><div class="father"><h2>父組件</h2><h3>銀子:{{ money }}元</h3><h3>車子:一輛{{car.brand}},價值:{{car.price}}萬元</h3><Child /></div>
</template><script setup lang="ts">
import Child from "./child.vue";
import { ref, reactive, provide } from "vue";let money = ref(100);
let car = reactive({brand: "奔馳",price: 1000,
});
// 孫組件修改祖先組件的money數據
function updateMoney(value: number) {money.value -= value;
}// provide傳參:向后代提供數據
provide("moneyContext", { money, updateMoney });
provide("car", car);
</script>
????????子組件:
<template><div class="grandChild"><h2>孫組件</h2><h3>父組件【銀子】:{{ fatherMoney }}</h3><h3>父組件【車子】:一輛{{fatherCar.brand}},價值:{{fatherCar.price}}萬元</h3><button @click="updateMoney(6)">修改money</button></div>
</template><script setup lang="ts">
import { inject } from "vue";let { fatherMoney, updateMoney } = inject("moneyContext", {fatherMoney: 0,updateMoney: (value:number) => {},
});
let fatherCar = inject("car", { brand: "未知", price: "未知" });
</script>
九、slot插槽
????????插槽的用途就和它的名字一樣:有一個缺槽,我們可以插入一些東西。
????????插槽?slot?通常用于兩個父子組件之間,最常見的應用就是我們使用一些?UI?組件庫中的彈窗組件時,彈窗組件的內容是可以讓我們自定義的,這就是使用了插槽的原理。
1、默認插槽
????????父組件:
<template><div class="father"><h2>父組件</h2><div class="content"><!-- 默認插槽 --><Category title="熱門游戲列表"><ul><li v-for="item in games":key="item.id">{{ item.name }}</li></ul></Category></div></div>
</template><script setup lang="ts">
import Category from "./category.vue";
import { ref, reactive } from "vue";let games = reactive([{ id: "adadada01", name: "英雄聯盟" },{ id: "adadada02", name: "穿越火線" },{ id: "adadada03", name: "紅色警戒" },{ id: "adadada04", name: "王者農藥" },
]);let imgUrl = ref("https://z1.ax1x.com/2023/11/19/piNxLo4.jpg");let videoUrl = ref("http://clips.vorwaerts-gmbh.de/big_buck_bunny.mp4");
</script>
????????子組件:
<template><div class="category"><h2>{{ title }}</h2><!-- 默認插槽 --><slot>默認插槽</slot></div>
</template><script setup lang="ts" name="Category">
defineProps(["title"]);
</script>
2、具名插槽
????????父組件:
<template><div class="father"><h2>父組件</h2><div class="content"><!-- 具名插槽 --><Category title="熱門游戲列表"><template v-slot:s2><ul><li v-for="item in games":key="item.id">{{ item.name }}</li></ul></template><template v-slot:s1><h3>描述信息</h3></template></Category></div></div>
</template><script setup lang="ts">
import Category from "./category.vue";
import { ref, reactive } from "vue";let games = reactive([{ id: "adadada01", name: "英雄聯盟" },{ id: "adadada02", name: "穿越火線" },{ id: "adadada03", name: "紅色警戒" },{ id: "adadada04", name: "王者農藥" },
]);let imgUrl = ref("https://z1.ax1x.com/2023/11/19/piNxLo4.jpg");let videoUrl = ref("http://clips.vorwaerts-gmbh.de/big_buck_bunny.mp4");
</script><style lang="scss" scoped>
? ? ? ? 子組件:
<template><div class="category"><h2>{{ title }}</h2><!-- 具名插槽 --><slot name="s1"></slot><slot name="s2"></slot></div>
</template><script setup lang="ts" name="Category">
defineProps(["title"]);
</script>
?3、作用域插槽

?????????父組件:
<template><div class="father"><h2>父組件</h2><div class="content"><Game><template v-slot="games"><ul><li v-for="g in games.youxi":key="g.id">{{ g.name }}</li></ul></template></Game><Game><template v-slot="games"><ol><li v-for="g in games.youxi":key="g.id">{{ g.name }}</li></ol></template></Game><!-- 簡寫 --><Game><template #default="{youxi}"><div><h3 v-for="g in youxi":key="g.id">{{ g.name }}</h3></div></template></Game></div></div>
</template><script setup lang="ts">
import Game from "./game.vue";
</script>
????????子組件:
<template><div class="game"><h2>游戲列表</h2><!-- 作用域插槽 --><slot :youxi="games"></slot></div>
</template><script setup lang="ts">
import { reactive } from "vue";let games = reactive([{ id: "adadada01", name: "英雄聯盟" },{ id: "adadada02", name: "穿越火線" },{ id: "adadada03", name: "紅色警戒" },{ id: "adadada04", name: "王者農藥" },
]);
</script>
十、Vue3組件通信總結
| 組件關系 | 傳遞方式 |
|---|---|
| 父傳子 | 1、props 2、v-model 3、$refs 4、默認插槽、具名插槽 |
| 子傳父 | 1、props 2、自定義事件 3、v-model 4、$parent 5、作用域插槽 |
| 祖傳孫、孫傳祖 | 1、$attrs 2、provide、inject |
| 兄弟間、任意組件間 | 1、mitt 2、pinia |


)
圖形化桌面黑屏/丟失(開啟VNC服務沖突))


)
