導航控制器和導航工具欄
導航控制器
- UINAvigationController與UIViewController的關系
UIViewController是什么?
- 它是一個普通的視圖控制器,負責管理一個頁面
UINavigationController是什么?
- 它是一個容器控制器,專門用來管理一組UIviewController的堆棧結構
UINavigationController是iOS中用于管理一系列視圖控制器(UIViewController)的容器控制器
它提供了:
- 層級導航:類似于網頁中的前進、后退
- 導航欄:頂部的標題區域,包含返回按鈕、標題、右邊的按鈕
- push/pop動畫
他們之間的關系?
- UINavigationController是一個特殊的UIViewController,內部維護了一個控制器棧
- 在創建一個UIViewController子類的時候,系統會自動聲明一個只讀的UINavigationController屬性
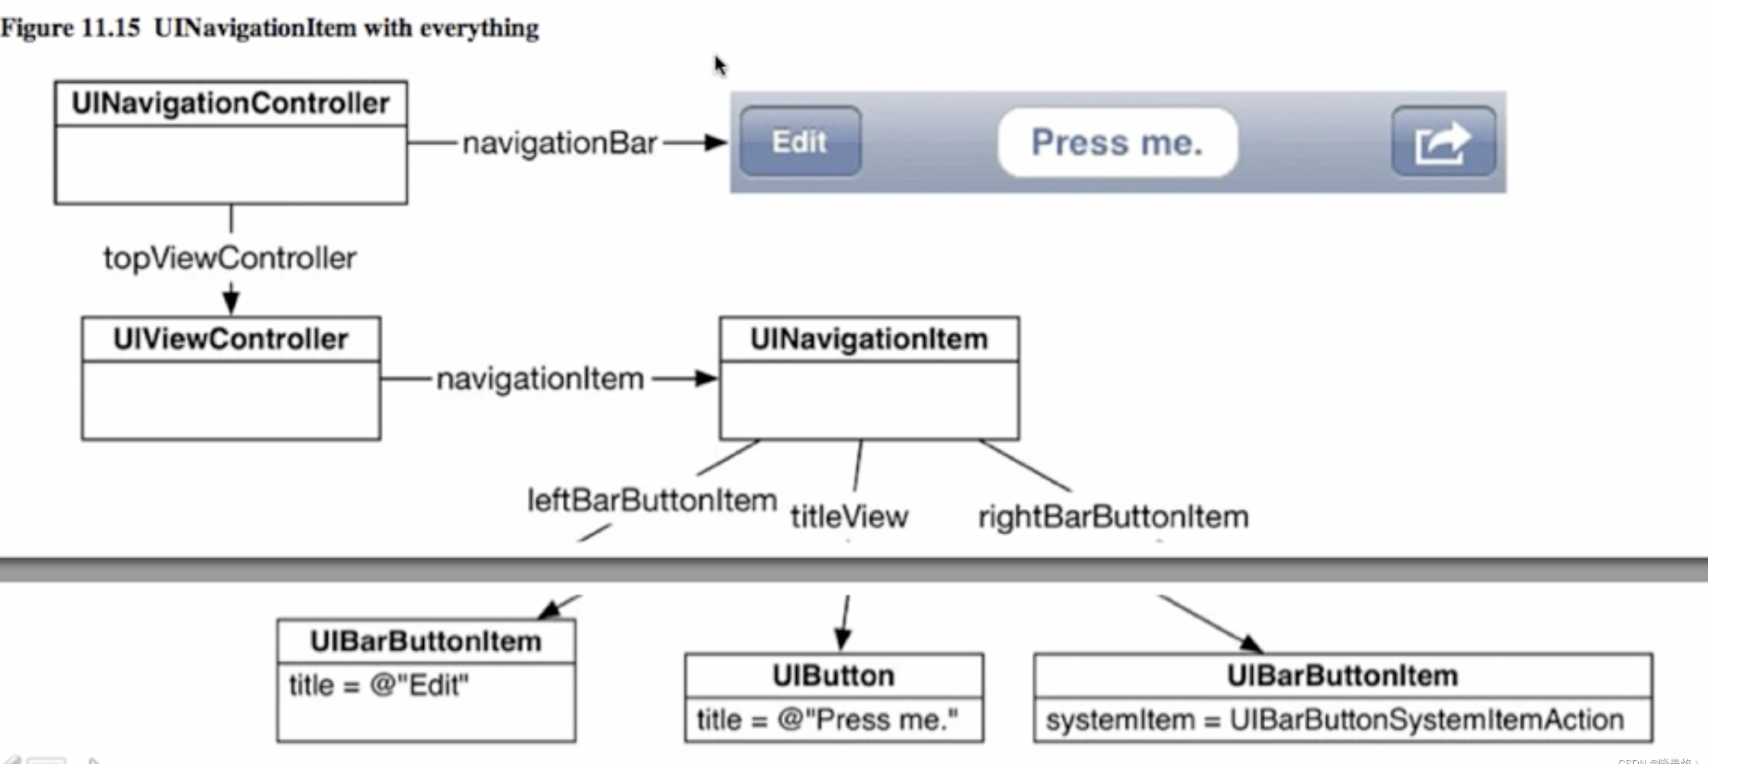
導航控制器:UINavigationController
導航欄:navigationBar
導航欄引入項:UINavigationItem
導航棧:viewControllers
在導航控制器中也控制一個視圖控制器,每個視圖控制器中對應一個導航引入項,導航引入項就是顯示在導航欄上的內容,包括leftBarButton(導航欄左側按鈕)、titleView(導航欄中間標題)、rightBarButton(導航欄右側按鈕)
繼承關系:NSObject -> UIrespounder -> UIViewController -> UINavigationController
-
管理多個視圖的控制器(UIViewController)的棧式導航
-
提供默認的返回按鈕(Back Button )和導航欄 (UINavigationBar)
-
初始化并設置根視圖控制器
//創建視圖控制器
VCRoot* rootVC = [[VCRoot alloc] init];
//將視圖控制器賦給導航控制器
UINavigationController* nav = [[UINavigationController alloc] initWithRootViewController:rootVC];
//將導航控制器設為窗口的根視圖控制器
self.window.rootViewController = nav;- push操作
// 在當前控制器中創建下一級控制器(例如:VCSecond)
VCSecond *secondVC = [[VCSecond alloc] init];
// 設置跳轉時的過渡動畫(默認 YES)
[self.navigationController pushViewController:secondVC animated:YES];
- pop操作
popViewControllerAnimated::返回上一級(當前控制器出棧)
[self.navigationController popViewControllerAnimated:YES];
? 2. popToRootViewControllerAnimated::直接返回根控制器(棧中所有中間控制器出棧)
[self.navigationController popToRootViewControllerAnimated:YES];
? 3. popToViewController:animated::返回指定的控制器(需傳入控制器實例)
VCRoot *rootVC = [self.navigationController.viewControllers firstObject];
[self.navigationController popToViewController:rootVC animated:YES];
VCRoot:
#import <UIKit/UIKit.h>NS_ASSUME_NONNULL_BEGIN@interface VCRoot : UIViewController@endNS_ASSUME_NONNULL_END
#import "VCRoot.h"
#import "VCSecond.h"
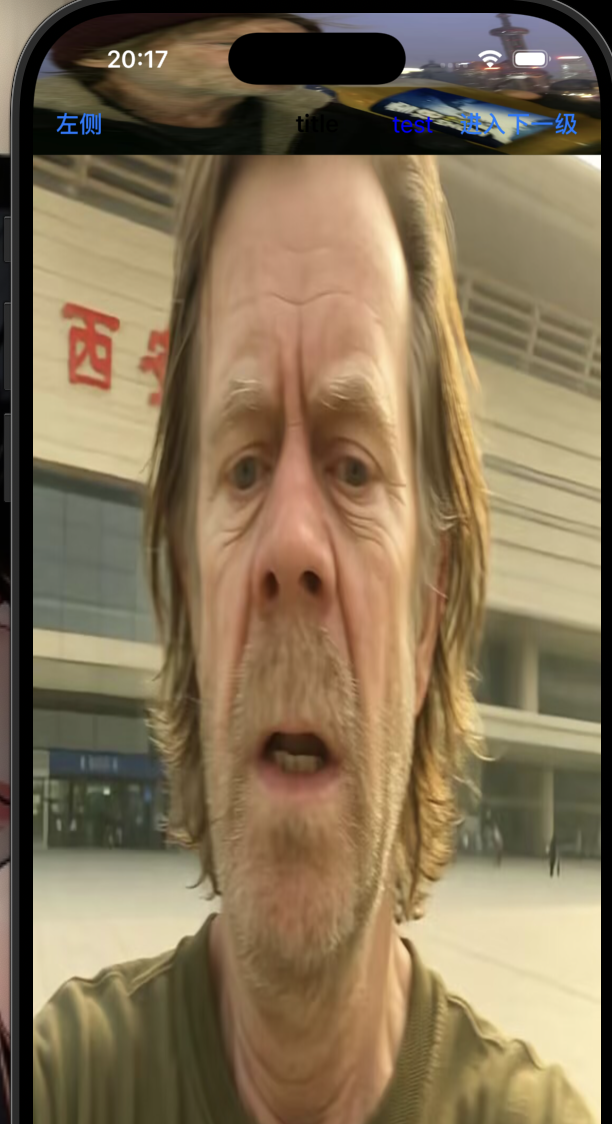
@interface VCRoot ()@end@implementation VCRoot- (void)viewDidLoad {/*barStyle:導航欄風格顏色barTintColor:導航欄顏色tintColor:導航欄風格顏色toolbarItems:工具欄元素數組UIBarItemFlexibleSpace:自動調整按鈕距離*/[super viewDidLoad];// Do any additional setup after loading the view.self.view.backgroundColor = [UIColor yellowColor];/*設置導航欄文字內容*/self.title = @"根視圖";// 創建外觀配置UINavigationBarAppearance *appearance = [[UINavigationBarAppearance alloc] init];// 設置背景圖片UIImage *bgImage = [UIImage imageNamed:@"photo04.jpg"];appearance.backgroundImage = bgImage;// 隱藏陰影線//appearance.shadowImage = [UIImage new];//appearance.shadowColor = nil;// 應用外觀配置self.navigationController.navigationBar.standardAppearance = appearance;self.navigationController.navigationBar.scrollEdgeAppearance = appearance;//appearance.backgroundColor = [UIColor yellowColor];//appearance.shadowImage = [UIImage new];//appearance.shadowColor = nil;/*設置導航元素項的標題,它和上一條的區別是如果沒有設置navigationItem的title,為nil,系統會自動使用self.title作為標題如果兩個都為nil則沒有標題*/self.navigationItem.title = @"title";UIBarButtonItem* leftbutton = [[UIBarButtonItem alloc] initWithTitle:@"左側" style:UIBarButtonItemStyleDone target:self action:@selector(pressleft)];self.navigationItem.leftBarButtonItem = leftbutton;/*UIBarButtonItem* rightbutton = [[UIBarButtonItem alloc] initWithTitle:@"右側" style:UIBarButtonItemStyleDone target:self action:@selector(pressright)];*/UIBarButtonItem* rightbutton = [[UIBarButtonItem alloc] initWithTitle:@"進入下一級" style:UIBarButtonItemStyleDone target:self action:@selector(pressright)];self.navigationItem.rightBarButtonItem = rightbutton;UIImageView* imageview = [[UIImageView alloc] init];imageview.frame = [[UIScreen mainScreen] bounds];imageview.alpha = 1;imageview.image = [UIImage imageNamed:@"photo02.jpg"];[self.view insertSubview:imageview atIndex:0];UILabel* label = [[UILabel alloc] init];label.frame = CGRectMake(10, 10, 50, 40);label.text = @"test";label.textAlignment = NSTextAlignmentCenter;label.textColor = [UIColor blueColor];UIBarButtonItem* item3 = [[UIBarButtonItem alloc] initWithCustomView:label];NSArray* arrayofbutton = [NSArray arrayWithObjects:rightbutton,item3, nil];self.navigationItem.rightBarButtonItems = arrayofbutton;//隱藏導航欄的兩個方法self.navigationController.navigationBar.hidden = NO;//繼承與UIViewself.navigationController.navigationBarHidden = NO;//屬性}- (void)pressleft {NSLog(@"leftbutton is pressed");
}- (void)pressright {NSLog(@"rightbutton is pressed");
}
在SceneDelegate中創建根視圖與導航控制器
#import "SceneDelegate.h"
#import "VCRoot.h"
@interface SceneDelegate ()@end@implementation SceneDelegate- (void)scene:(UIScene *)scene willConnectToSession:(UISceneSession *)session options:(UISceneConnectionOptions *)connectionOptions {// Use this method to optionally configure and attach the UIWindow `window` to the provided UIWindowScene `scene`.// If using a storyboard, the `window` property will automatically be initialized and attached to the scene.// This delegate does not imply the connecting scene or session are new (see `application:configurationForConnectingSceneSession` instead).self.window.frame = [UIScreen mainScreen].bounds;VCRoot* root = [[VCRoot alloc] init];UINavigationController* nav = [[UINavigationController alloc] initWithRootViewController:root];self.window.rootViewController = nav;[self.window makeKeyAndVisible];}- (void)sceneDidDisconnect:(UIScene *)scene {// Called as the scene is being released by the system.// This occurs shortly after the scene enters the background, or when its session is discarded.// Release any resources associated with this scene that can be re-created the next time the scene connects.// The scene may re-connect later, as its session was not necessarily discarded (see `application:didDiscardSceneSessions` instead).
}- (void)sceneDidBecomeActive:(UIScene *)scene {// Called when the scene has moved from an inactive state to an active state.// Use this method to restart any tasks that were paused (or not yet started) when the scene was inactive.
}- (void)sceneWillResignActive:(UIScene *)scene {// Called when the scene will move from an active state to an inactive state.// This may occur due to temporary interruptions (ex. an incoming phone call).
}- (void)sceneWillEnterForeground:(UIScene *)scene {// Called as the scene transitions from the background to the foreground.// Use this method to undo the changes made on entering the background.
}- (void)sceneDidEnterBackground:(UIScene *)scene {// Called as the scene transitions from the foreground to the background.// Use this method to save data, release shared resources, and store enough scene-specific state information// to restore the scene back to its current state.
}@end
導航控制器切換
- navigationBar:導航欄對象
- navigationItem:導航元素項對象
- translucent:導航欄透明度
- pushViewController:推入視圖控制器
- popViewController:彈出視圖控制器
根視圖:
#import "VCRoot.h"
#import "VCSecond.h"
@interface VCRoot ()@end@implementation VCRoot- (void)viewDidLoad {/*barStyle:導航欄風格顏色barTintColor:導航欄顏色tintColor:導航欄風格顏色toolbarItems:工具欄元素數組UIBarItemFlexibleSpace:自動調整按鈕距離*/[super viewDidLoad];// Do any additional setup after loading the view.self.view.backgroundColor = [UIColor yellowColor];/*設置導航欄文字內容*/self.title = @"根視圖";// 創建外觀配置UINavigationBarAppearance *appearance = [[UINavigationBarAppearance alloc] init];// 設置背景圖片UIImage *bgImage = [UIImage imageNamed:@"photo04.jpg"];appearance.backgroundImage = bgImage;// 隱藏陰影線//appearance.shadowImage = [UIImage new];//appearance.shadowColor = nil;// 應用外觀配置self.navigationController.navigationBar.standardAppearance = appearance;self.navigationController.navigationBar.scrollEdgeAppearance = appearance;//appearance.backgroundColor = [UIColor yellowColor];//appearance.shadowImage = [UIImage new];//appearance.shadowColor = nil;/*設置導航元素項的標題,它和上一條的區別是如果沒有設置navigationItem的title,為nil,系統會自動使用self.title作為標題如果兩個都為nil則沒有標題*/self.navigationItem.title = @"title";UIBarButtonItem* leftbutton = [[UIBarButtonItem alloc] initWithTitle:@"左側" style:UIBarButtonItemStyleDone target:self action:@selector(pressleft)];self.navigationItem.leftBarButtonItem = leftbutton;/*UIBarButtonItem* rightbutton = [[UIBarButtonItem alloc] initWithTitle:@"右側" style:UIBarButtonItemStyleDone target:self action:@selector(pressright)];*/UIBarButtonItem* rightbutton = [[UIBarButtonItem alloc] initWithTitle:@"進入下一級" style:UIBarButtonItemStyleDone target:self action:@selector(pressright)];self.navigationItem.rightBarButtonItem = rightbutton;UIImageView* imageview = [[UIImageView alloc] init];imageview.frame = [[UIScreen mainScreen] bounds];imageview.alpha = 1;imageview.image = [UIImage imageNamed:@"photo02.jpg"];[self.view insertSubview:imageview atIndex:0];UILabel* label = [[UILabel alloc] init];label.frame = CGRectMake(10, 10, 50, 40);label.text = @"test";label.textAlignment = NSTextAlignmentCenter;label.textColor = [UIColor blueColor];UIBarButtonItem* item3 = [[UIBarButtonItem alloc] initWithCustomView:label];NSArray* arrayofbutton = [NSArray arrayWithObjects:rightbutton,item3, nil];self.navigationItem.rightBarButtonItems = arrayofbutton;//隱藏導航欄的兩個方法self.navigationController.navigationBar.hidden = NO;//繼承與UIViewself.navigationController.navigationBarHidden = NO;//屬性
}- (void)pressleft {NSLog(@"leftbutton is pressed");
}- (void)pressright {VCSecond* vc2 = [[VCSecond alloc] init];[self.navigationController pushViewController:vc2 animated: YES];
}/*
#pragma mark - Navigation// In a storyboard-based application, you will often want to do a little preparation before navigation
- (void)prepareForSegue:(UIStoryboardSegue *)segue sender:(id)sender {// Get the new view controller using [segue destinationViewController].// Pass the selected object to the new view controller.
}
*/@end
第二個視圖
#import "VCSecond.h"
#import "VCThird.h"
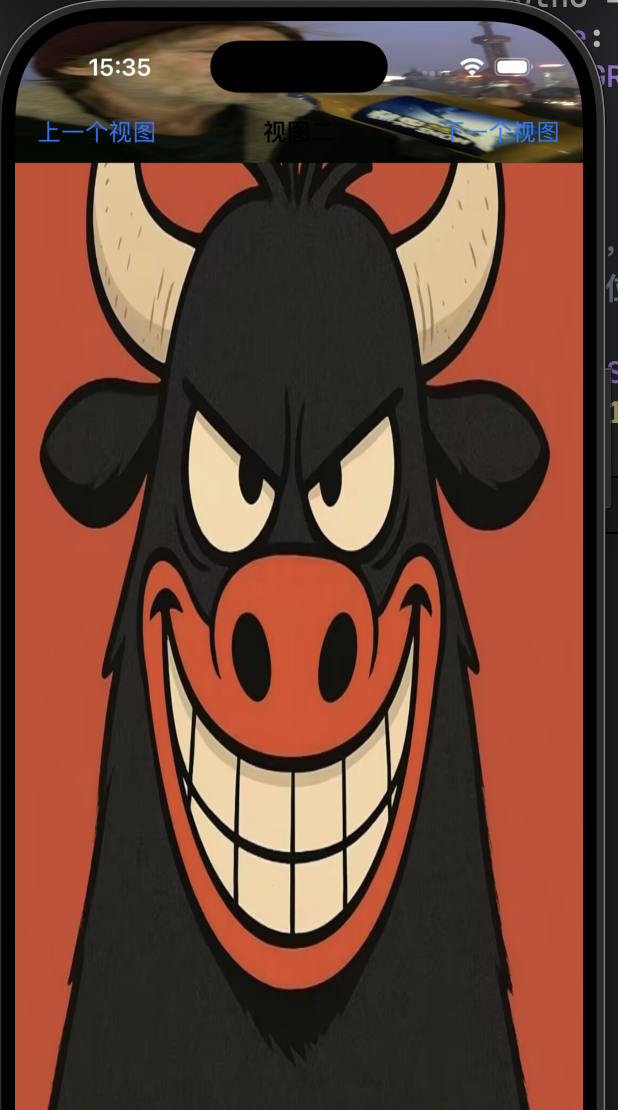
@interface VCSecond ()@end@implementation VCSecond- (void)viewDidLoad {[super viewDidLoad];UIImageView* imageView = [[UIImageView alloc] init];imageView.image = [UIImage imageNamed:@"photo01.jpg"];imageView.frame = [[UIScreen mainScreen] bounds];[self.view insertSubview:imageView atIndex:0];// Do any additional setup after loading the view.//默認透明度為yes:可透明的self.navigationController.navigationBar.translucent = YES;//設置導航控制欄風格,默認為Defaultself.navigationController.navigationBar.barStyle = UIBarStyleDefault;self.title = @"視圖二";self.navigationItem.rightBarButtonItem = [[UIBarButtonItem alloc] initWithTitle:@"下一個視圖" style:UIBarButtonItemStylePlain target:self action:@selector(pressright)];self.navigationItem.leftBarButtonItem = [[UIBarButtonItem alloc] initWithTitle:@"上一個視圖" style:UIBarButtonItemStylePlain target:self action:@selector(pressleft)];
}- (void)pressright {VCThird* vc3 = [[VCThird alloc] init];[self.navigationController pushViewController:vc3 animated:YES];
}- (void)pressleft {[self.navigationController popViewControllerAnimated:YES];
}
/*
#pragma mark - Navigation// In a storyboard-based application, you will often want to do a little preparation before navigation
- (void)prepareForSegue:(UIStoryboardSegue *)segue sender:(id)sender {// Get the new view controller using [segue destinationViewController].// Pass the selected object to the new view controller.
}
*/@end
第三個視圖
#import "VCThird.h"
#import "VCRoot.h"
#import "VCSecond.h"
@interface VCThird ()@end@implementation VCThird- (void)viewDidLoad {[super viewDidLoad];UIImageView* imageview = [UIImageView new];imageview.frame = [[UIScreen mainScreen] bounds];imageview.image = [UIImage imageNamed:@"photo05.jpg"];[self.view insertSubview:imageview atIndex:0];// Do any additional setup after loading the view.self.navigationItem.title = @"視圖三";self.navigationItem.leftBarButtonItem = [[UIBarButtonItem alloc] initWithTitle:@"上一級頁面" style:UIBarButtonItemStylePlain target:self action:@selector(pressleft)];self.navigationItem.rightBarButtonItem = [[UIBarButtonItem alloc] initWithTitle:@"回到主頁面" style:UIBarButtonItemStylePlain target:self action:@selector(pressright)];}- (void)pressleft {[self.navigationController popViewControllerAnimated:YES];
}- (void)pressright {[self.navigationController popToRootViewControllerAnimated:YES];
}
/*
#pragma mark - Navigation// In a storyboard-based application, you will often want to do a little preparation before navigation
- (void)prepareForSegue:(UIStoryboardSegue *)segue sender:(id)sender {// Get the new view controller using [segue destinationViewController].// Pass the selected object to the new view controller.
}
*/@end
SceneDelegate.m:
#import "SceneDelegate.h"
#import "VCRoot.h"
@interface SceneDelegate ()@end@implementation SceneDelegate- (void)scene:(UIScene *)scene willConnectToSession:(UISceneSession *)session options:(UISceneConnectionOptions *)connectionOptions {// Use this method to optionally configure and attach the UIWindow `window` to the provided UIWindowScene `scene`.// If using a storyboard, the `window` property will automatically be initialized and attached to the scene.// This delegate does not imply the connecting scene or session are new (see `application:configurationForConnectingSceneSession` instead).self.window.frame = [UIScreen mainScreen].bounds;VCRoot* root = [[VCRoot alloc] init];UINavigationController* nav = [[UINavigationController alloc] initWithRootViewController:root];self.window.rootViewController = nav;[self.window makeKeyAndVisible];}- (void)sceneDidDisconnect:(UIScene *)scene {// Called as the scene is being released by the system.// This occurs shortly after the scene enters the background, or when its session is discarded.// Release any resources associated with this scene that can be re-created the next time the scene connects.// The scene may re-connect later, as its session was not necessarily discarded (see `application:didDiscardSceneSessions` instead).
}- (void)sceneDidBecomeActive:(UIScene *)scene {// Called when the scene has moved from an inactive state to an active state.// Use this method to restart any tasks that were paused (or not yet started) when the scene was inactive.
}- (void)sceneWillResignActive:(UIScene *)scene {// Called when the scene will move from an active state to an inactive state.// This may occur due to temporary interruptions (ex. an incoming phone call).
}- (void)sceneWillEnterForeground:(UIScene *)scene {// Called as the scene transitions from the background to the foreground.// Use this method to undo the changes made on entering the background.
}- (void)sceneDidEnterBackground:(UIScene *)scene {// Called as the scene transitions from the foreground to the background.// Use this method to save data, release shared resources, and store enough scene-specific state information// to restore the scene back to its current state.
}@end
導航工具欄:
在OC中,設置導航欄的風格顏色等樣式,只要通過UINavigationBar的屬性或UINavigationBarAppearance來實現
- barStyle:導航欄風格
- barTintColor:導航欄顏色
- tintColor:導航欄風格顏色
- toolBarItems:工具欄元素數組
- UIBarItemFlexibleSpace:自動調整距離按鈕
- 設置導航欄背景顏色(通過barTintColor)
// 方式 1:直接修改當前導航欄(推薦在視圖控制器中使用)
self.navigationController.navigationBar.barTintColor = [UIColor yellowColor];// 方式 2:全局設置(所有導航欄生效,推薦在 AppDelegate 中使用)
[[UINavigationBar appearance] setBarTintColor:[UIColor yellowColor]];
- 設置導航欄標題樣式(通過titleTextAttributes配置顏色、字體等)
// 方式 1:修改當前導航欄
NSDictionary *titleAttrs = @{NSForegroundColorAttributeName: [UIColor whiteColor],  // 標題顏色NSFontAttributeName: [UIFont boldSystemFontOfSize:18]  // 標題字體
};
[self.navigationController.navigationBar setTitleTextAttributes:titleAttrs];// 方式 2:全局設置
[[UINavigationBar appearance] setTitleTextAttributes:titleAttrs];
- 設置導航欄按鈕顏色(通過tintColor統一控制導航欄按鈕的顏色
// 方式 1:修改當前導航欄
self.navigationController.navigationBar.tintColor = [UIColor blueColor];// 方式 2:全局設置
[[UINavigationBar appearance] setTintColor:[UIColor blueColor]];
- 隱藏導航欄底部陰影線(默認存在一條分割線)
// 方式 1:使用 shadowImage
[self.navigationController.navigationBar setBackgroundImage:[UIImage new] forBarMetrics:UIBarMetricsDefault];
[self.navigationController.navigationBar setShadowImage:[UIImage new]];// 方式 2:iOS 13+ 推薦用 UINavigationBarAppearance
if (@available(iOS 13.0, *)) {UINavigationBarAppearance *appearance = [[UINavigationBarAppearance alloc] init];appearance.shadowColor = nil;  // 隱藏陰影線self.navigationController.navigationBar.standardAppearance = appearance;
}
- UINavigationBarAppearance可更細粒度控制導航欄樣式,支持標準狀態和滾動狀態的差異化設置
- 全局設置(AppleDelegate中)
- (BOOL)application:(UIApplication *)application didFinishLaunchingWithOptions:(NSDictionary *)launchOptions {if (@available(iOS 13.0, *)) {UINavigationBarAppearance *appearance = [[UINavigationBarAppearance alloc] init];// 1. 設置背景appearance.backgroundColor = [UIColor yellowColor];  // 背景色// 2. 設置標題appearance.titleTextAttributes = @{};// 3. 隱藏陰影線appearance.shadowColor = nil;// 4. 應用到所有導航欄UINavigationBar *navBar = [UINavigationBar appearance];navBar.standardAppearance = appearance;         // 標準狀態navBar.scrollEdgeAppearance = appearance;       // 滾動到頂部時的狀態}return YES;
}
- 局部配置
- (void)viewDidLoad {[super viewDidLoad];   if (@available(iOS 13.0, *)) {UINavigationBarAppearance *appearance = [[UINavigationBarAppearance alloc] init];appearance.backgroundColor = [UIColor orangeColor];appearance.titleTextAttributes = @{NSForegroundColorAttributeName: [UIColor blackColor]};// 應用到當前導航欄self.navigationController.navigationBar.standardAppearance = appearance;self.navigationController.navigationBar.scrollEdgeAppearance = appearance;}
}
- 自定義配置
// 在 viewDidLoad 中
UIView *customTitleView = [[UIView alloc] initWithFrame:CGRectMake(0, 0, 120, 30)];// 添加標題文字
UILabel *titleLabel = [[UILabel alloc] initWithFrame:customTitleView.bounds];
titleLabel.text = @"Custom Title";
titleLabel.font = [UIFont boldSystemFontOfSize:17];
titleLabel.textAlignment = NSTextAlignmentCenter;
[customTitleView addSubview:titleLabel];// 添加標題圖片
UIImageView *titleImageView = [[UIImageView alloc] initWithFrame:CGRectMake(0, 0, 20, 20)];
titleImageView.image = [UIImage imageNamed:@"logo"];
[customTitleView addSubview:titleImageView];// 設置到導航欄
self.navigationItem.titleView = customTitleView;
-
常見問題:
- 導航欄顏色不生效:檢查是否開啟了半透明效果,需要關閉
- 如何讓導航欄延伸到狀態欄?
// 在視圖控制器中self.edgesForExtendedLayout = UIRectEdgeTop; // 視圖延伸到導航欄下方self.extendedLayoutIncludesOpaqueBars = YES; // 包含不透明的導航欄
self.edgesForExtendedLayout = UIRectEdgeTop;
- 控制視圖控制器的根視圖可以延伸到屏幕的哪些邊緣
- 默認是全部,如果導航欄是半透明的,會看到視圖與導航欄重合
self.extendedLayoutIncludesOpaqueBars = YES;
- 決定延伸布局是否包含不透明的導航欄與工具欄
- 默認NO:如果導航欄不透明,根視圖會從導航欄底部開始布局
#import "VCRoot.h"
#import "SecondVC.h"@interface VCRoot ()@end@implementation VCRoot- (void)viewDidLoad {[super viewDidLoad];self.view.backgroundColor = [UIColor orangeColor];self.title = @"根視圖";UIBarButtonItem *btn = [[UIBarButtonItem alloc] initWithTitle: @"右側按鈕" style: UIBarButtonItemStylePlain target: self action: nil];self.navigationItem.rightBarButtonItem = btn;//UIBarAppearance是iOS13后推出的一個對相應空間設置外觀樣式的類,可以統一配置NavigationBar、TabBar、ToolBar等的外觀樣式//UINavigationBarAppearance可以設置導航欄對象的外觀樣式//創建一個UINavigationBarAppearance對象UINavigationBarAppearance *appearance = [[UINavigationBarAppearance alloc] init];//設置該對象的背景顏色appearance.backgroundColor = [UIColor blueColor];//創建該對象的陰影圖像appearance.shadowImage = [[UIImage alloc] init];//設置該對象的陰影顏色appearance.shadowColor = nil;//設置導航欄按鈕的顏色self.navigationController.navigationBar.tintColor = [UIColor purpleColor];//設置普通樣式導航欄self.navigationController.navigationBar.standardAppearance = appearance;//設置滾動樣式導航欄self.navigationController.navigationBar.scrollEdgeAppearance = appearance;//隱藏導航欄的兩個方法//1、下面這一條的hidden是繼承于UIView的self.navigationController.navigationBar.hidden = NO;//2、下面這一條的navigationBarHidden是一個屬性self.navigationController.navigationBarHidden = NO;//顯示工具欄對象//隱藏工具欄,默認為YES:即隱藏;NO:不隱藏self.navigationController.toolbarHidden = NO;//設置工具欄是否透明,默認為YES:半透明self.navigationController.toolbar.translucent = NO;UIBarButtonItem *btn1 = [[UIBarButtonItem alloc] initWithTitle: @"left" style: UIBarButtonItemStylePlain target: nil action: nil];UIBarButtonItem *btn2 = [[UIBarButtonItem alloc] initWithTitle: @"right" style: UIBarButtonItemStylePlain target: self action: @selector(pressBack)];//設置一個自定義類型的button,使用圖片創建UIButton *btnC = [UIButton buttonWithType: UIButtonTypeCustom];[btnC setImage: [UIImage imageNamed: @"btnC.jpg"] forState: UIControlStateNormal];btnC.frame = CGRectMake(0, 0, 60, 60);UIBarButtonItem *btn3 = [[UIBarButtonItem alloc] initWithCustomView: btnC];//設置一個占位按鈕,放到數組中可以用來分隔開各按鈕//設置寬度固定的占位按鈕,注:此處方法名為UIBarButtonSystemItemFixedSpace(FixedSpace!!!!!)UIBarButtonItem *btnF1 = [[UIBarButtonItem alloc] initWithBarButtonSystemItem: UIBarButtonSystemItemFixedSpace target: nil action: nil];btnF1.width = 110;//設置自動計算寬度的占位按鈕,注:此處方法名為UIBarButtonSystemItemFlexibleSpace (FlexibleSpace!!!!!)UIBarButtonItem *btnF2 = [[UIBarButtonItem alloc] initWithBarButtonSystemItem: UIBarButtonSystemItemFlexibleSpace target: nil action: nil];NSArray *arrayBtn = [NSArray arrayWithObjects: btn1, btnF2, btn3, btnF2, btn2, nil];self.toolbarItems = arrayBtn;}- (void)pressBack {SecondVC *vc = [[SecondVC alloc] init];[self.navigationController pushViewController: vc animated: YES];
}/*
#pragma mark - Navigation
// In a storyboard-based application, you will often want to do a little preparation before navigation
- (void)prepareForSegue:(UIStoryboardSegue *)segue sender:(id)sender {// Get the new view controller using [segue destinationViewController].// Pass the selected object to the new view controller.
}
*/@end
分欄控制器
分欄控制器是一種常用的容器視圖控制器,分欄控制器可以包含多個子視圖控制器,并通過底部的分欄菜單UIBar
進行切換
- 在sceneDelegate中創建子視圖控制器,同時創建分欄控制器對象,將子視圖控制器添加到分欄控制器中
#import "SceneDelegate.h"
#import "VCFirst.h"
#import "VCSecond.h"
#import "VCThird.h"
#import "VCFourth.h"
#import "VCFifth.h"
#import "VCSixth.h"
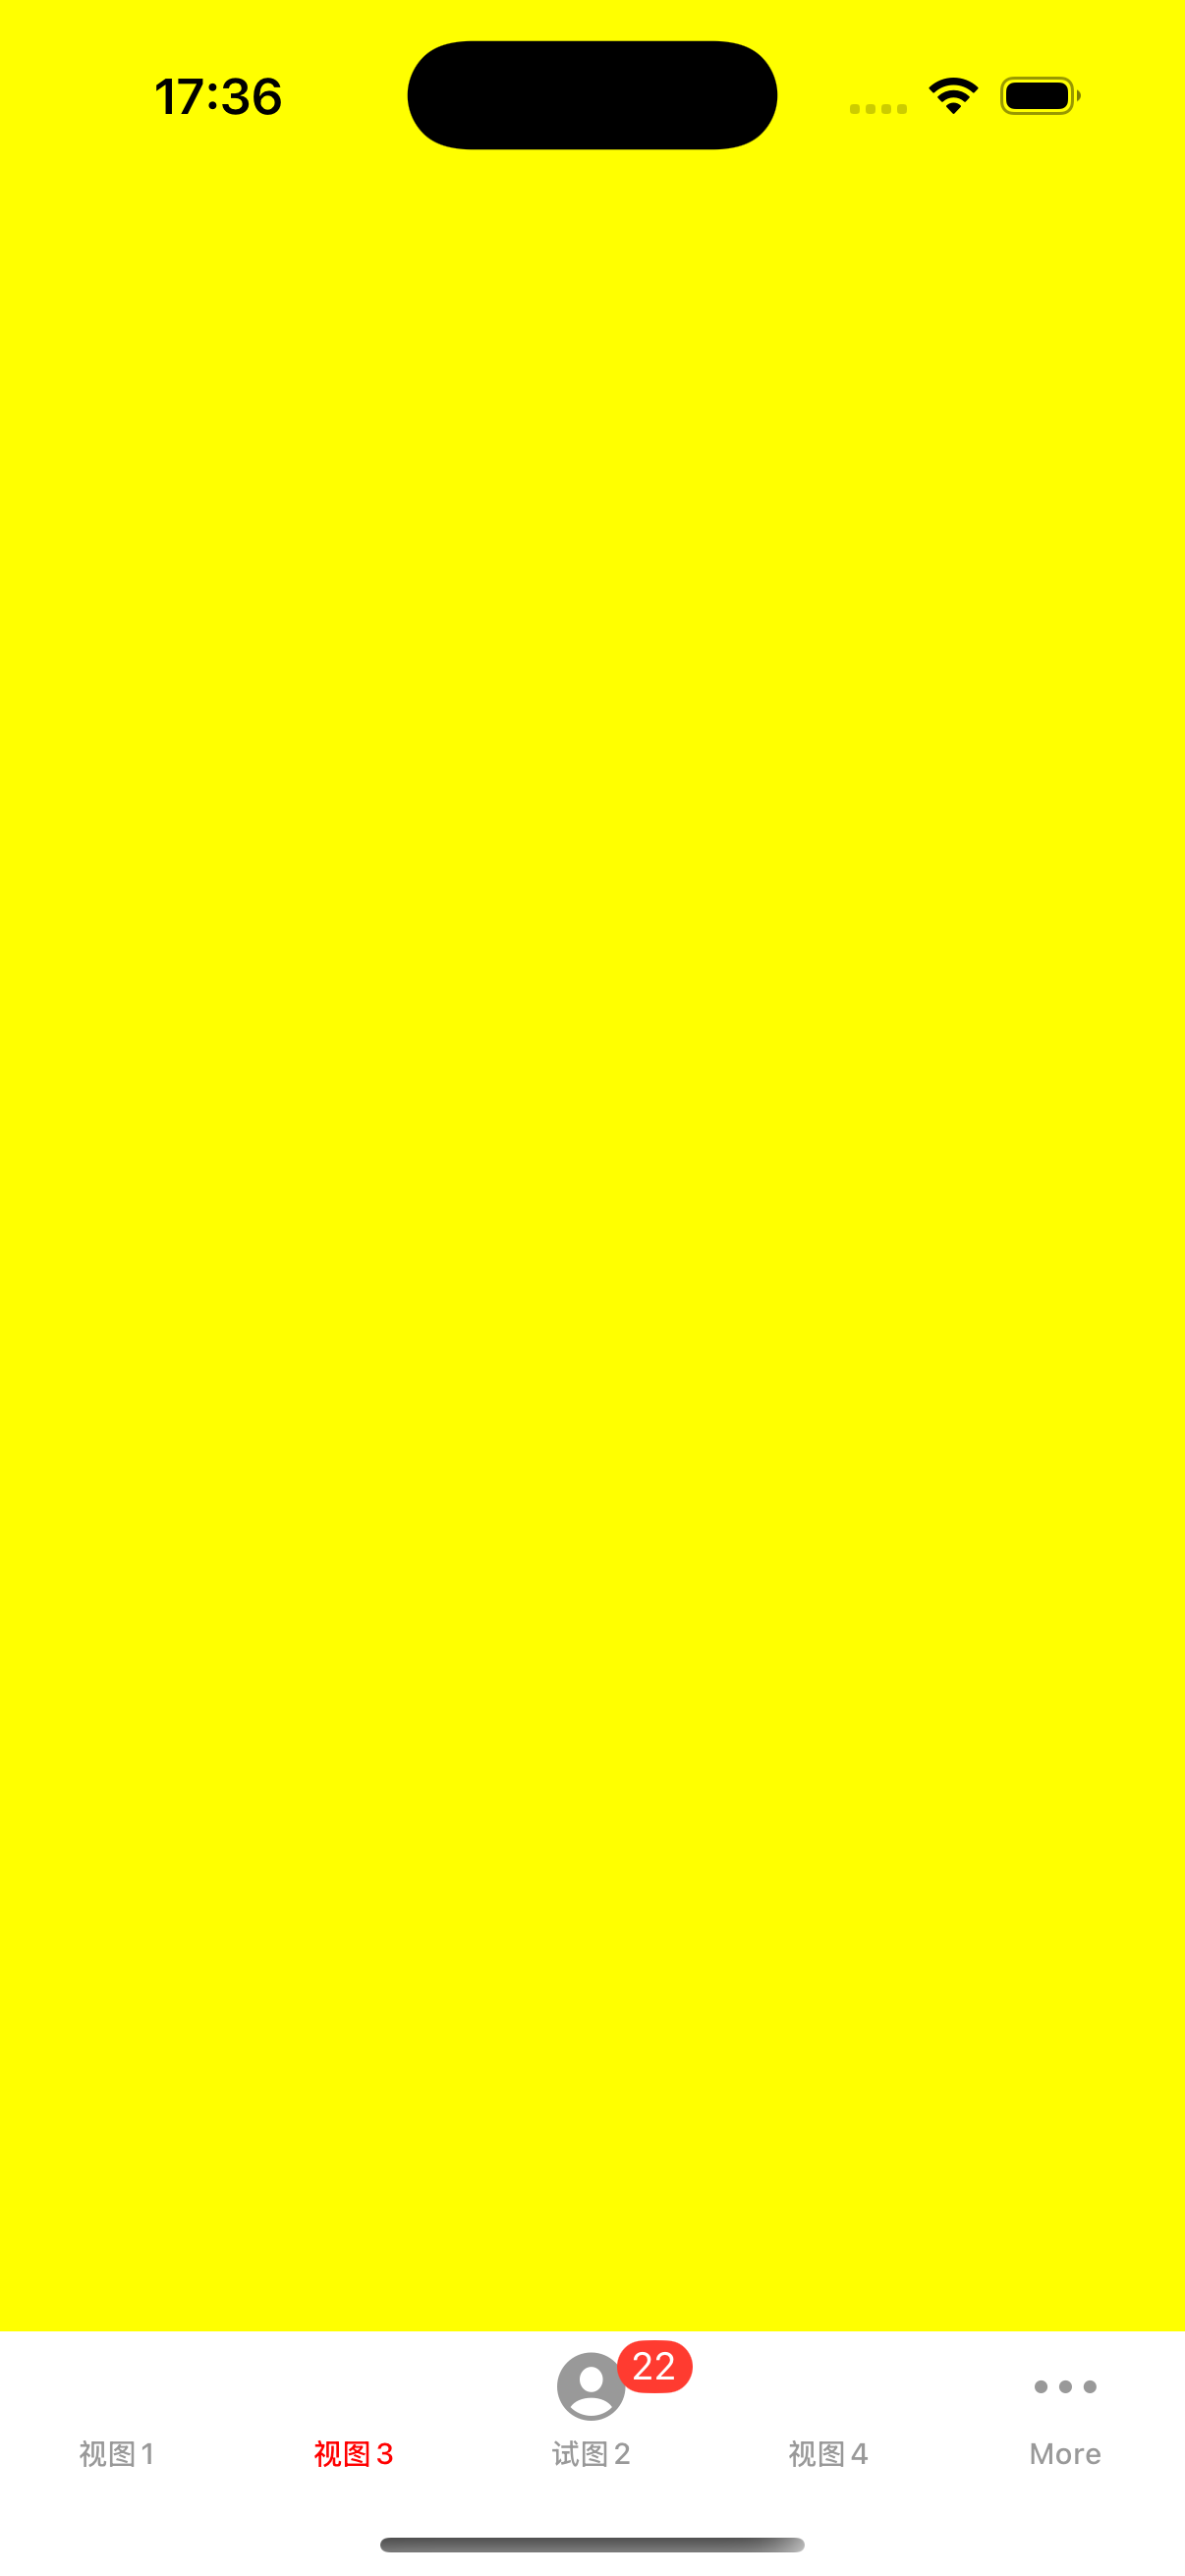
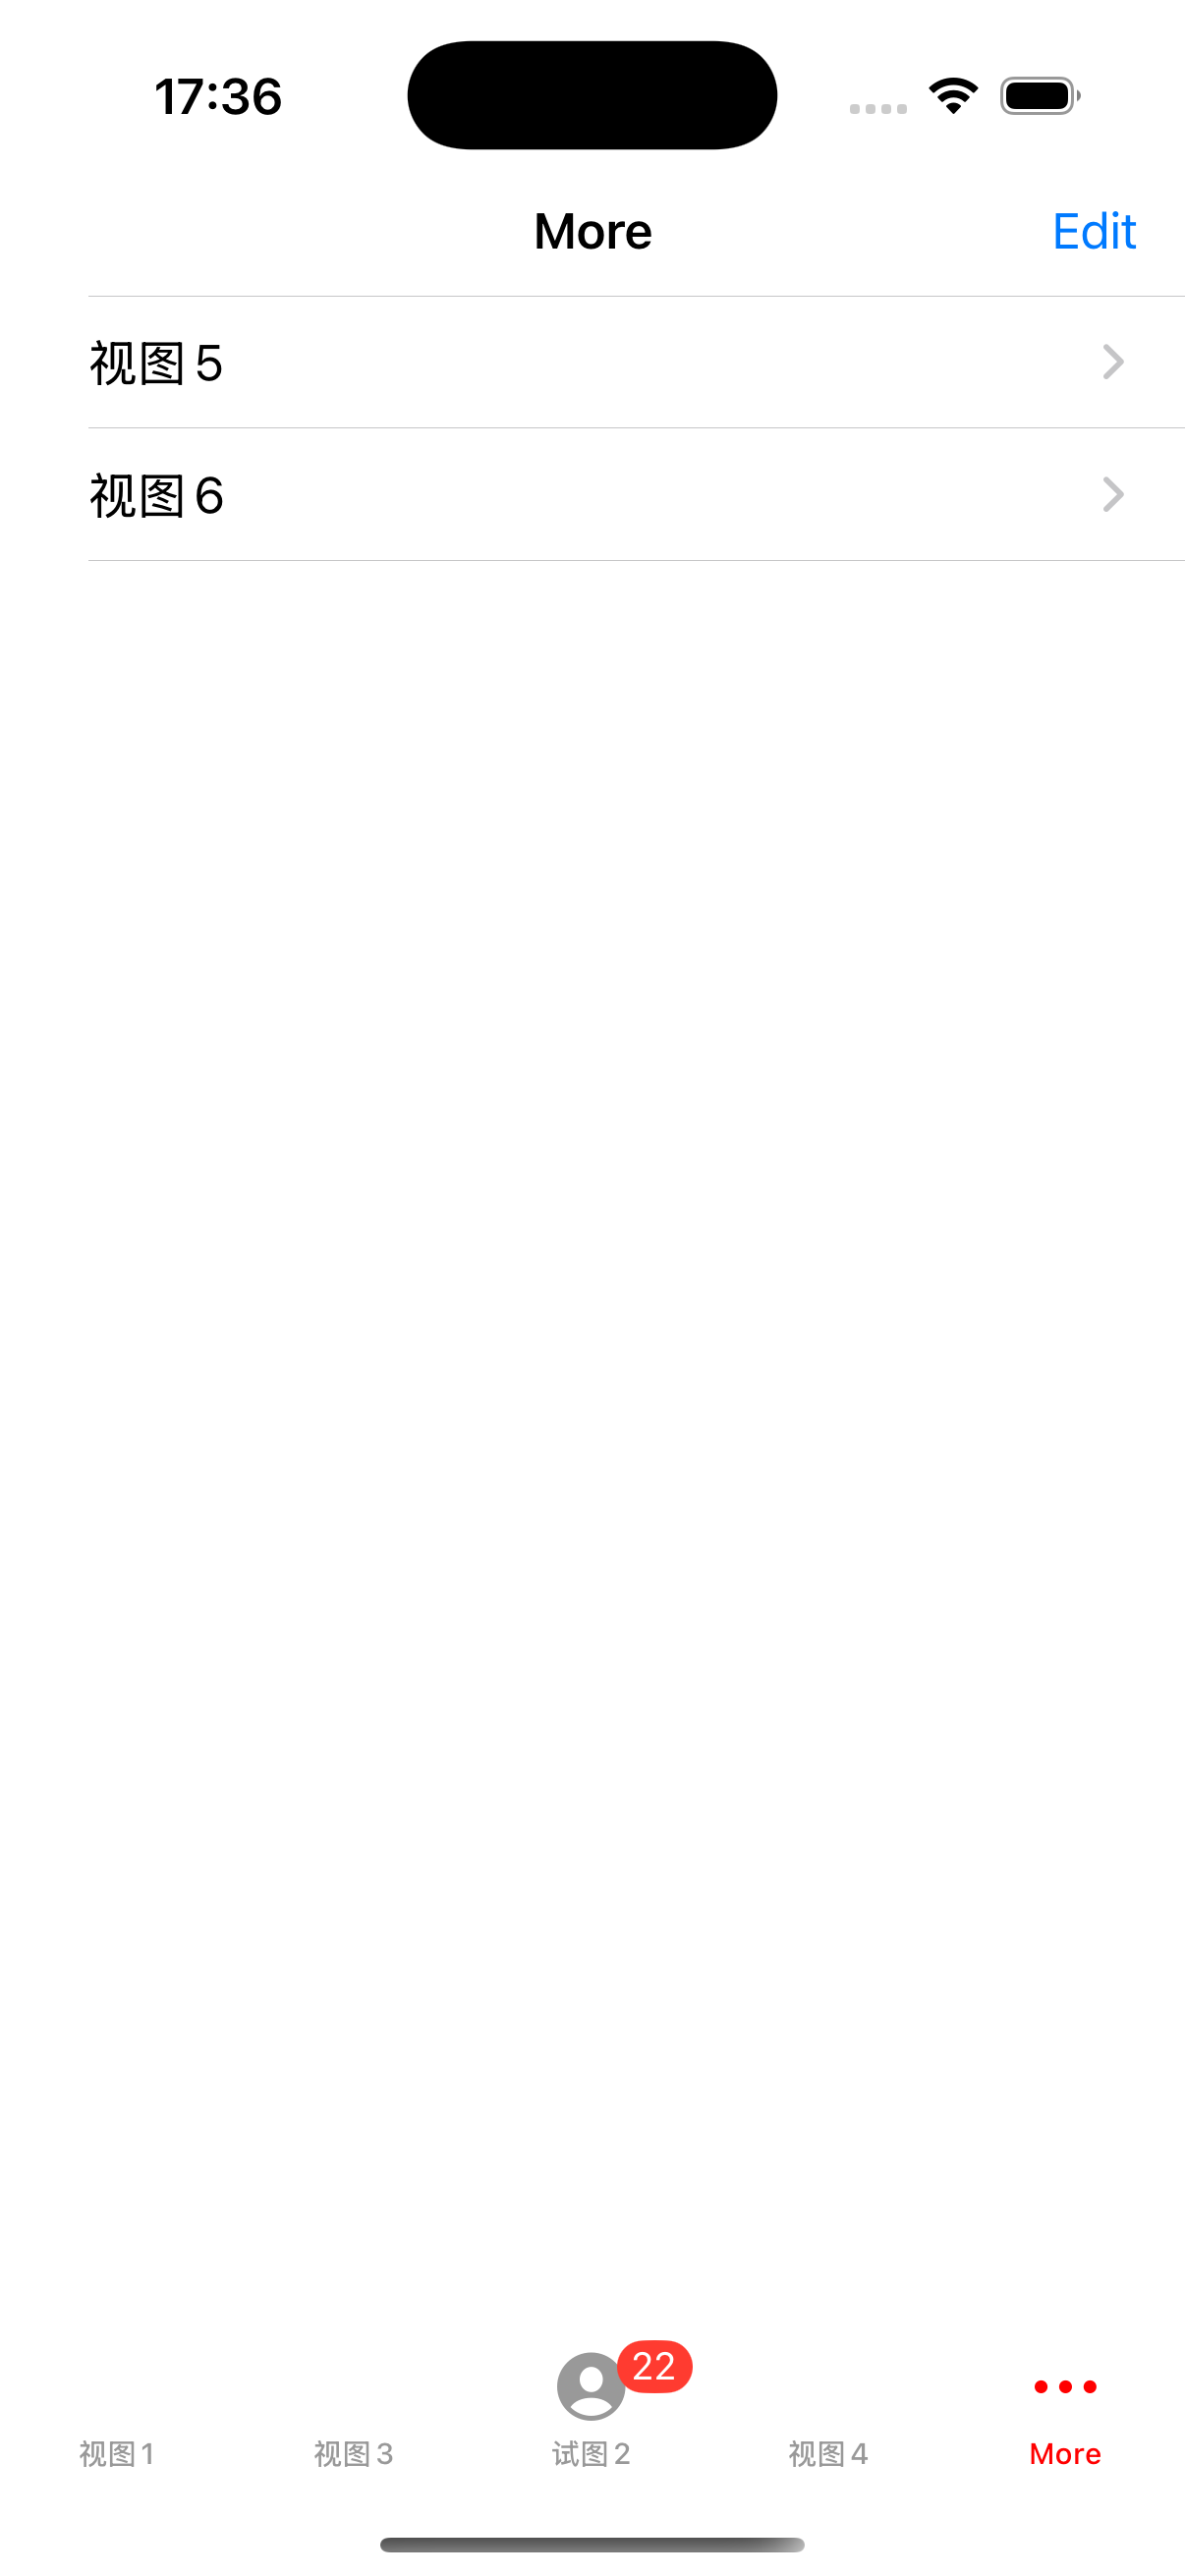
@interface SceneDelegate ()@end@implementation SceneDelegate- (void)scene:(UIScene *)scene willConnectToSession:(UISceneSession *)session options:(UISceneConnectionOptions *)connectionOptions {//創建三個視圖控制器并更改背景顏色和標題VCFirst* vc01 = [VCFirst new];vc01.view.backgroundColor = [UIColor brownColor];vc01.title = @"視圖1";VCSecond* vc02 = [VCSecond new];vc02.view.backgroundColor = [UIColor orangeColor];vc02.title = @"試圖2";VCThird* vc03 = [VCThird new];vc03.view.backgroundColor = [UIColor yellowColor];vc03.title = @"視圖3";VCFourth* vc04 = [VCFourth new];vc04.view.backgroundColor = [UIColor greenColor];vc04.title = @"視圖4";VCFifth* vc05 = [VCFifth new];vc05.view.backgroundColor = [UIColor grayColor];vc05.title = @"視圖5";VCSixth* vc06 = [VCSixth new];vc06.view.backgroundColor = [UIColor purpleColor];vc06.title = @"視圖6";//創建分欄控制器對象UITabBarController* tbc = [UITabBarController new];//創建一個分欄控制器數組對象,并將所有需要被分欄控制器管理的對象添加進數組//分欄控制器的按鈕的位置就取決于在數組中的存放位置NSArray* arrvc = [NSArray arrayWithObjects:vc01, vc02, vc03, nil];//將分欄控制器管理數組賦值tbc.viewControllers = arrvc;//將分欄控制器作為根視圖控制哦self.window.rootViewController = tbc;//設置選中的視圖控制器的索引//通過所以索引來確定打開程序的時候顯示得是哪一個視圖控制器tbc.selectedIndex = 2;if (tbc.selectedViewController == vc03) {NSLog(@"選中的是下標為2的視圖控制器");}//設置分欄控制器透明度tbc.tabBar.translucent = NO;//設置分欄控制器背景顏色tbc.tabBar.backgroundColor = [UIColor whiteColor];//設置分欄控制器工具欄的按鈕選擇時的顏色tbc.tabBar.tintColor = [UIColor redColor];//注意不要忘記設置代理tbc.delegate = self;
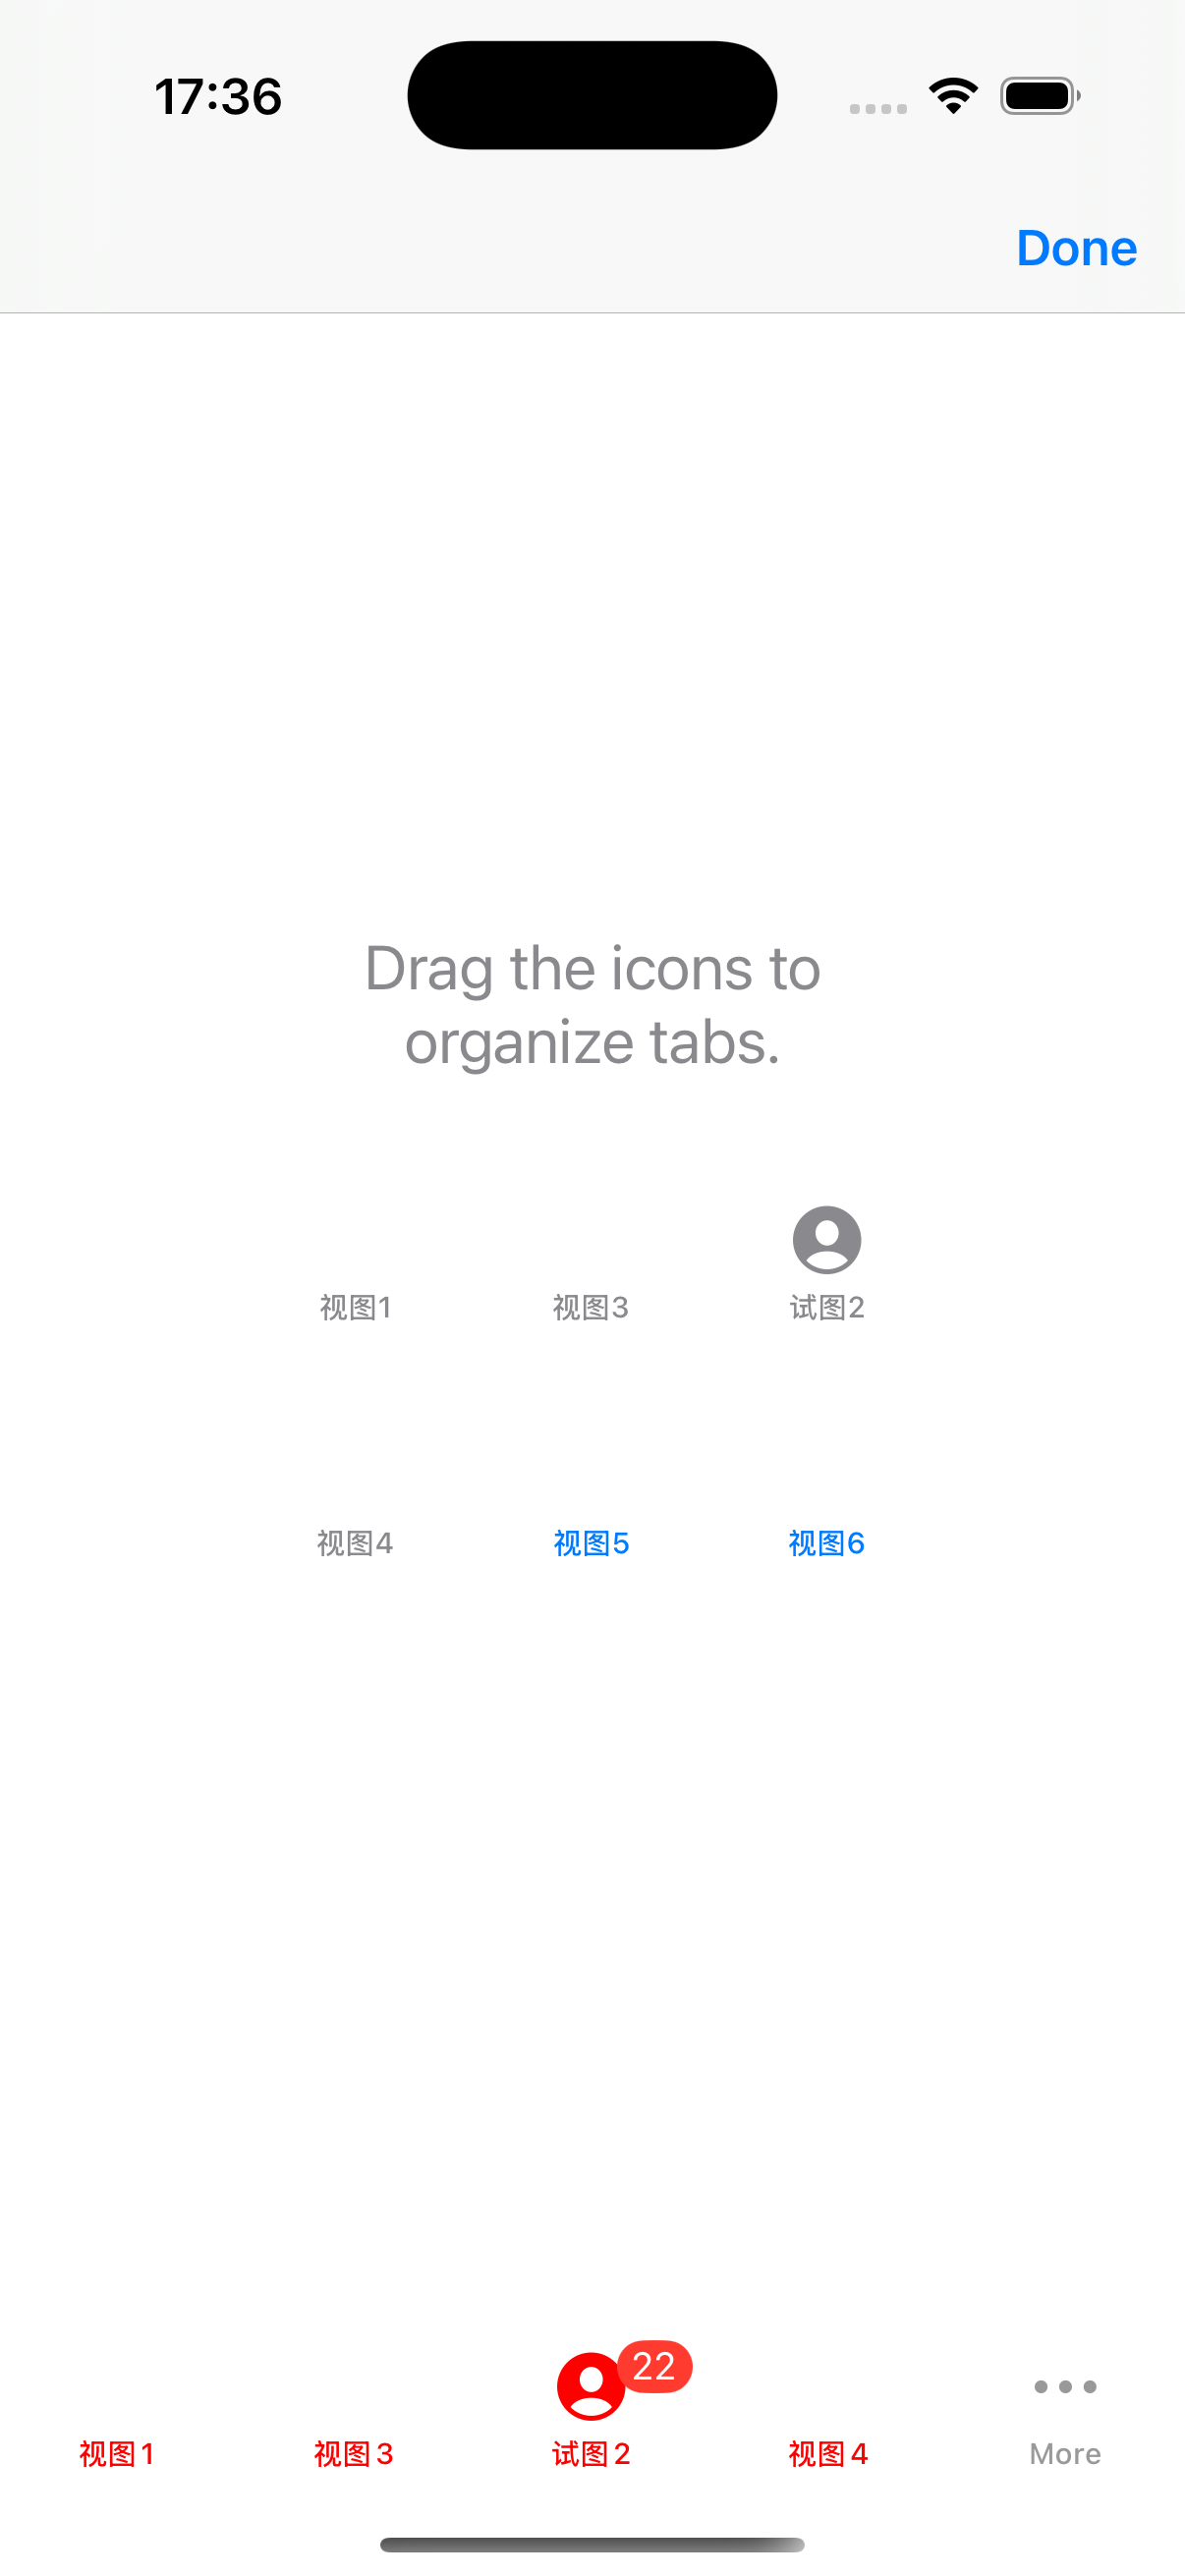
}//以下是協議中函數的用法,其中“編輯”是指在分欄控制器中的more中通過拖動更改和交換顯示和折疊的視圖控制器的操作
//即將開始編輯前會調用此協議函數
- (void)tabBarController:(UITabBarController *)tabBarController willBeginCustomizingViewControllers:(NSArray<__kindof UIViewController *> *)viewControllers {NSLog(@"編輯前");
}//即將結束前調用該協議函數
- (void)tabBarController:(UITabBarController *)tabBarController willEndCustomizingViewControllers:(NSArray<__kindof UIViewController *> *)viewControllers changed:(BOOL)changed {NSLog(@"即將結束前");
}//已經結束編輯時調用該協議函數
- (void)tabBarController:(UITabBarController *)tabBarController didEndCustomizingViewControllers:(NSArray<__kindof UIViewController *> *)viewControllers changed:(BOOL)changed {NSLog(@"%@", viewControllers);if (changed == YES) {NSLog(@"順序發生改變");}NSLog(@"已經結束編輯");
}//選中控制器對象時調用該協議函數
- (void)tabBarController:(UITabBarController *)tabBarController didSelectViewController:(UIViewController *)viewController {
// if (tabBarController.viewControllers[tabBarController.selectedIndex] == viewController) {
// NSLog(@"選中的視圖索引與當前傳入的視圖索引相同");
// }NSLog(@"選中控制器對象");
}- (void)sceneDidDisconnect:(UIScene *)scene {// Called as the scene is being released by the system.// This occurs shortly after the scene enters the background, or when its session is discarded.// Release any resources associated with this scene that can be re-created the next time the scene connects.// The scene may re-connect later, as its session was not necessarily discarded (see `application:didDiscardSceneSessions` instead).
}- (void)sceneDidBecomeActive:(UIScene *)scene {// Called when the scene has moved from an inactive state to an active state.// Use this method to restart any tasks that were paused (or not yet started) when the scene was inactive.
}- (void)sceneWillResignActive:(UIScene *)scene {// Called when the scene will move from an active state to an inactive state.// This may occur due to temporary interruptions (ex. an incoming phone call).
}- (void)sceneWillEnterForeground:(UIScene *)scene {// Called as the scene transitions from the background to the foreground.// Use this method to undo the changes made on entering the background.
}- (void)sceneDidEnterBackground:(UIScene *)scene {// Called as the scene transitions from the foreground to the background.// Use this method to save data, release shared resources, and store enough scene-specific state information// to restore the scene back to its current state.
}@end
VCfirst.m文件中
#import "VCFirst.h"@interface VCFirst ()@end@implementation VCFirst- (void)viewDidLoad {[super viewDidLoad];//創建一個分欄按鈕對象,傳入三個參數//第一個參數表示標題文字內容//第二個參數表示顯示圖片//第三個參數表示對象的標記值UITabBarItem *tabBarItem = [[UITabBarItem alloc] initWithTitle: @"發現" image: nil tag: 101];self.tabBarItem = tabBarItem;
}/*
#pragma mark - Navigation// In a storyboard-based application, you will often want to do a little preparation before navigation
- (void)prepareForSegue:(UIStoryboardSegue *)segue sender:(id)sender {// Get the new view controller using [segue destinationViewController].// Pass the selected object to the new view controller.
}
*/@end
VCSecond.m
#import "VCSecond.h"@interface VCSecond ()@end@implementation VCSecond- (void)viewDidLoad {[super viewDidLoad];//根據系統風格設置分欄控制器按鈕,傳入兩個參數//第一個參數指分欄控制器的按鈕風格,第二個參數是分欄控件對象的標簽值UITabBarItem *tabBarItem = [[UITabBarItem alloc] initWithTabBarSystemItem: UITabBarSystemItemContacts tag: 103];//為分欄按鈕設置提示的標記值信息,是系統的,無法變更//按鈕右上角顯示的提示信息//通常用來提示未讀的信息tabBarItem.badgeValue = @"22";self.tabBarItem = tabBarItem;
}/*
#pragma mark - Navigation// In a storyboard-based application, you will often want to do a little preparation before navigation
- (void)prepareForSegue:(UIStoryboardSegue *)segue sender:(id)sender {// Get the new view controller using [segue destinationViewController].// Pass the selected object to the new view controller.
}
*/@end
VCThird.m
#import "VCThird.h"@interface VCThird ()@end@implementation VCThird- (void)viewDidLoad {[super viewDidLoad];// Do any additional setup after loading the view.
}/*
#pragma mark - Navigation// In a storyboard-based application, you will often want to do a little preparation before navigation
- (void)prepareForSegue:(UIStoryboardSegue *)segue sender:(id)sender {// Get the new view controller using [segue destinationViewController].// Pass the selected object to the new view controller.
}
*/@end
VCForth.m
#import "VCFourth.h"@interface VCFourth ()@end@implementation VCFourth- (void)viewDidLoad {[super viewDidLoad];// Do any additional setup after loading the view.
}/*
#pragma mark - Navigation// In a storyboard-based application, you will often want to do a little preparation before navigation
- (void)prepareForSegue:(UIStoryboardSegue *)segue sender:(id)sender {// Get the new view controller using [segue destinationViewController].// Pass the selected object to the new view controller.
}
*/@end
VCFifth.m
#import "VCFifth.h"@interface VCFifth ()@end@implementation VCFifth- (void)viewDidLoad {[super viewDidLoad];// Do any additional setup after loading the view.
}/*
#pragma mark - Navigation// In a storyboard-based application, you will often want to do a little preparation before navigation
- (void)prepareForSegue:(UIStoryboardSegue *)segue sender:(id)sender {// Get the new view controller using [segue destinationViewController].// Pass the selected object to the new view controller.
}
*/@end
VCSixth.m
#import "VCSixth.h"@interface VCSixth ()@end@implementation VCSixth- (void)viewDidLoad {[super viewDidLoad];// Do any additional setup after loading the view.
}/*
#pragma mark - Navigation// In a storyboard-based application, you will often want to do a little preparation before navigation
- (void)prepareForSegue:(UIStoryboardSegue *)segue sender:(id)sender {// Get the new view controller using [segue destinationViewController].// Pass the selected object to the new view controller.
}
*/@end
分欄控制器協議部分的內容
< UITabBarControllerDelegate>
//以下是協議中函數的用法,其中“編輯”是指在分欄控制器中的more中通過拖動更改和交換顯示和折疊的視圖控制器的操作
//即將開始編輯前會調用此協議函數
- (void)tabBarController:(UITabBarController *)tabBarController willBeginCustomizingViewControllers:(NSArray<__kindof UIViewController *> *)viewControllers {NSLog(@"編輯前");
}//即將結束前調用該協議函數
- (void)tabBarController:(UITabBarController *)tabBarController willEndCustomizingViewControllers:(NSArray<__kindof UIViewController *> *)viewControllers changed:(BOOL)changed {NSLog(@"即將結束前");
}//已經結束編輯時調用該協議函數
- (void)tabBarController:(UITabBarController *)tabBarController didEndCustomizingViewControllers:(NSArray<__kindof UIViewController *> *)viewControllers changed:(BOOL)changed {NSLog(@"%@", viewControllers);if (changed == YES) {NSLog(@"順序發生改變");}NSLog(@"已經結束編輯");
}//選中控制器對象時調用該協議函數
- (void)tabBarController:(UITabBarController *)tabBarController didSelectViewController:(UIViewController *)viewController {
//    if (tabBarController.viewControllers[tabBarController.selectedIndex] == viewController) {
//        NSLog(@"選中的視圖索引與當前傳入的視圖索引相同");
//    }NSLog(@"選中控制器對象");
}
UITabelView
UITabelView是UI組件中 非常重要的一個組件,在實際開發中有非常重要的作用,這里只做簡單介紹,后面筆者會單獨總結一下這部分的內容
在創建UITabelView這個組件的時候,首先需要繼承UITabelViewDelegate,UITabelViewSource
同時需要設置兩個代理:tabelView.delegate、tabelView.dataSource
在協議中必須要實現三個協議函數
- -(NSInteger) tableView:(UITableView *)tableView numberOfRowsInSection:(NSInteger)section(獲取每組元素的個數)
- numberOfSectionsInTableView(設置數據視圖的組數)
- tableView: cellForRowAtIndexPath:(創建單元格對象函數)
//
//  SceneDelegate.m
//  UITableView
//
//  Created by xiaoli pop on 2025/6/4.
//#import "SceneDelegate.h"
#import "ViewController.h"
@interface SceneDelegate ()@end@implementation SceneDelegate- (void)scene:(UIScene *)scene willConnectToSession:(UISceneSession *)session options:(UISceneConnectionOptions *)connectionOptions {self.window.frame = [[UIScreen mainScreen] bounds];ViewController* vc = [ViewController new];UINavigationController* nav = [[UINavigationController alloc] initWithRootViewController:vc];self.window.rootViewController = nav;[self.window makeKeyAndVisible];
}- (void)sceneDidDisconnect:(UIScene *)scene {// Called as the scene is being released by the system.// This occurs shortly after the scene enters the background, or when its session is discarded.// Release any resources associated with this scene that can be re-created the next time the scene connects.// The scene may re-connect later, as its session was not necessarily discarded (see `application:didDiscardSceneSessions` instead).
}- (void)sceneDidBecomeActive:(UIScene *)scene {// Called when the scene has moved from an inactive state to an active state.// Use this method to restart any tasks that were paused (or not yet started) when the scene was inactive.
}- (void)sceneWillResignActive:(UIScene *)scene {// Called when the scene will move from an active state to an inactive state.// This may occur due to temporary interruptions (ex. an incoming phone call).
}- (void)sceneWillEnterForeground:(UIScene *)scene {// Called as the scene transitions from the background to the foreground.// Use this method to undo the changes made on entering the background.
}- (void)sceneDidEnterBackground:(UIScene *)scene {// Called as the scene transitions from the foreground to the background.// Use this method to save data, release shared resources, and store enough scene-specific state information// to restore the scene back to its current state.
}@end
//
// ViewController.m
// UITableView
//
// Created by xiaoli pop on 2025/6/4.
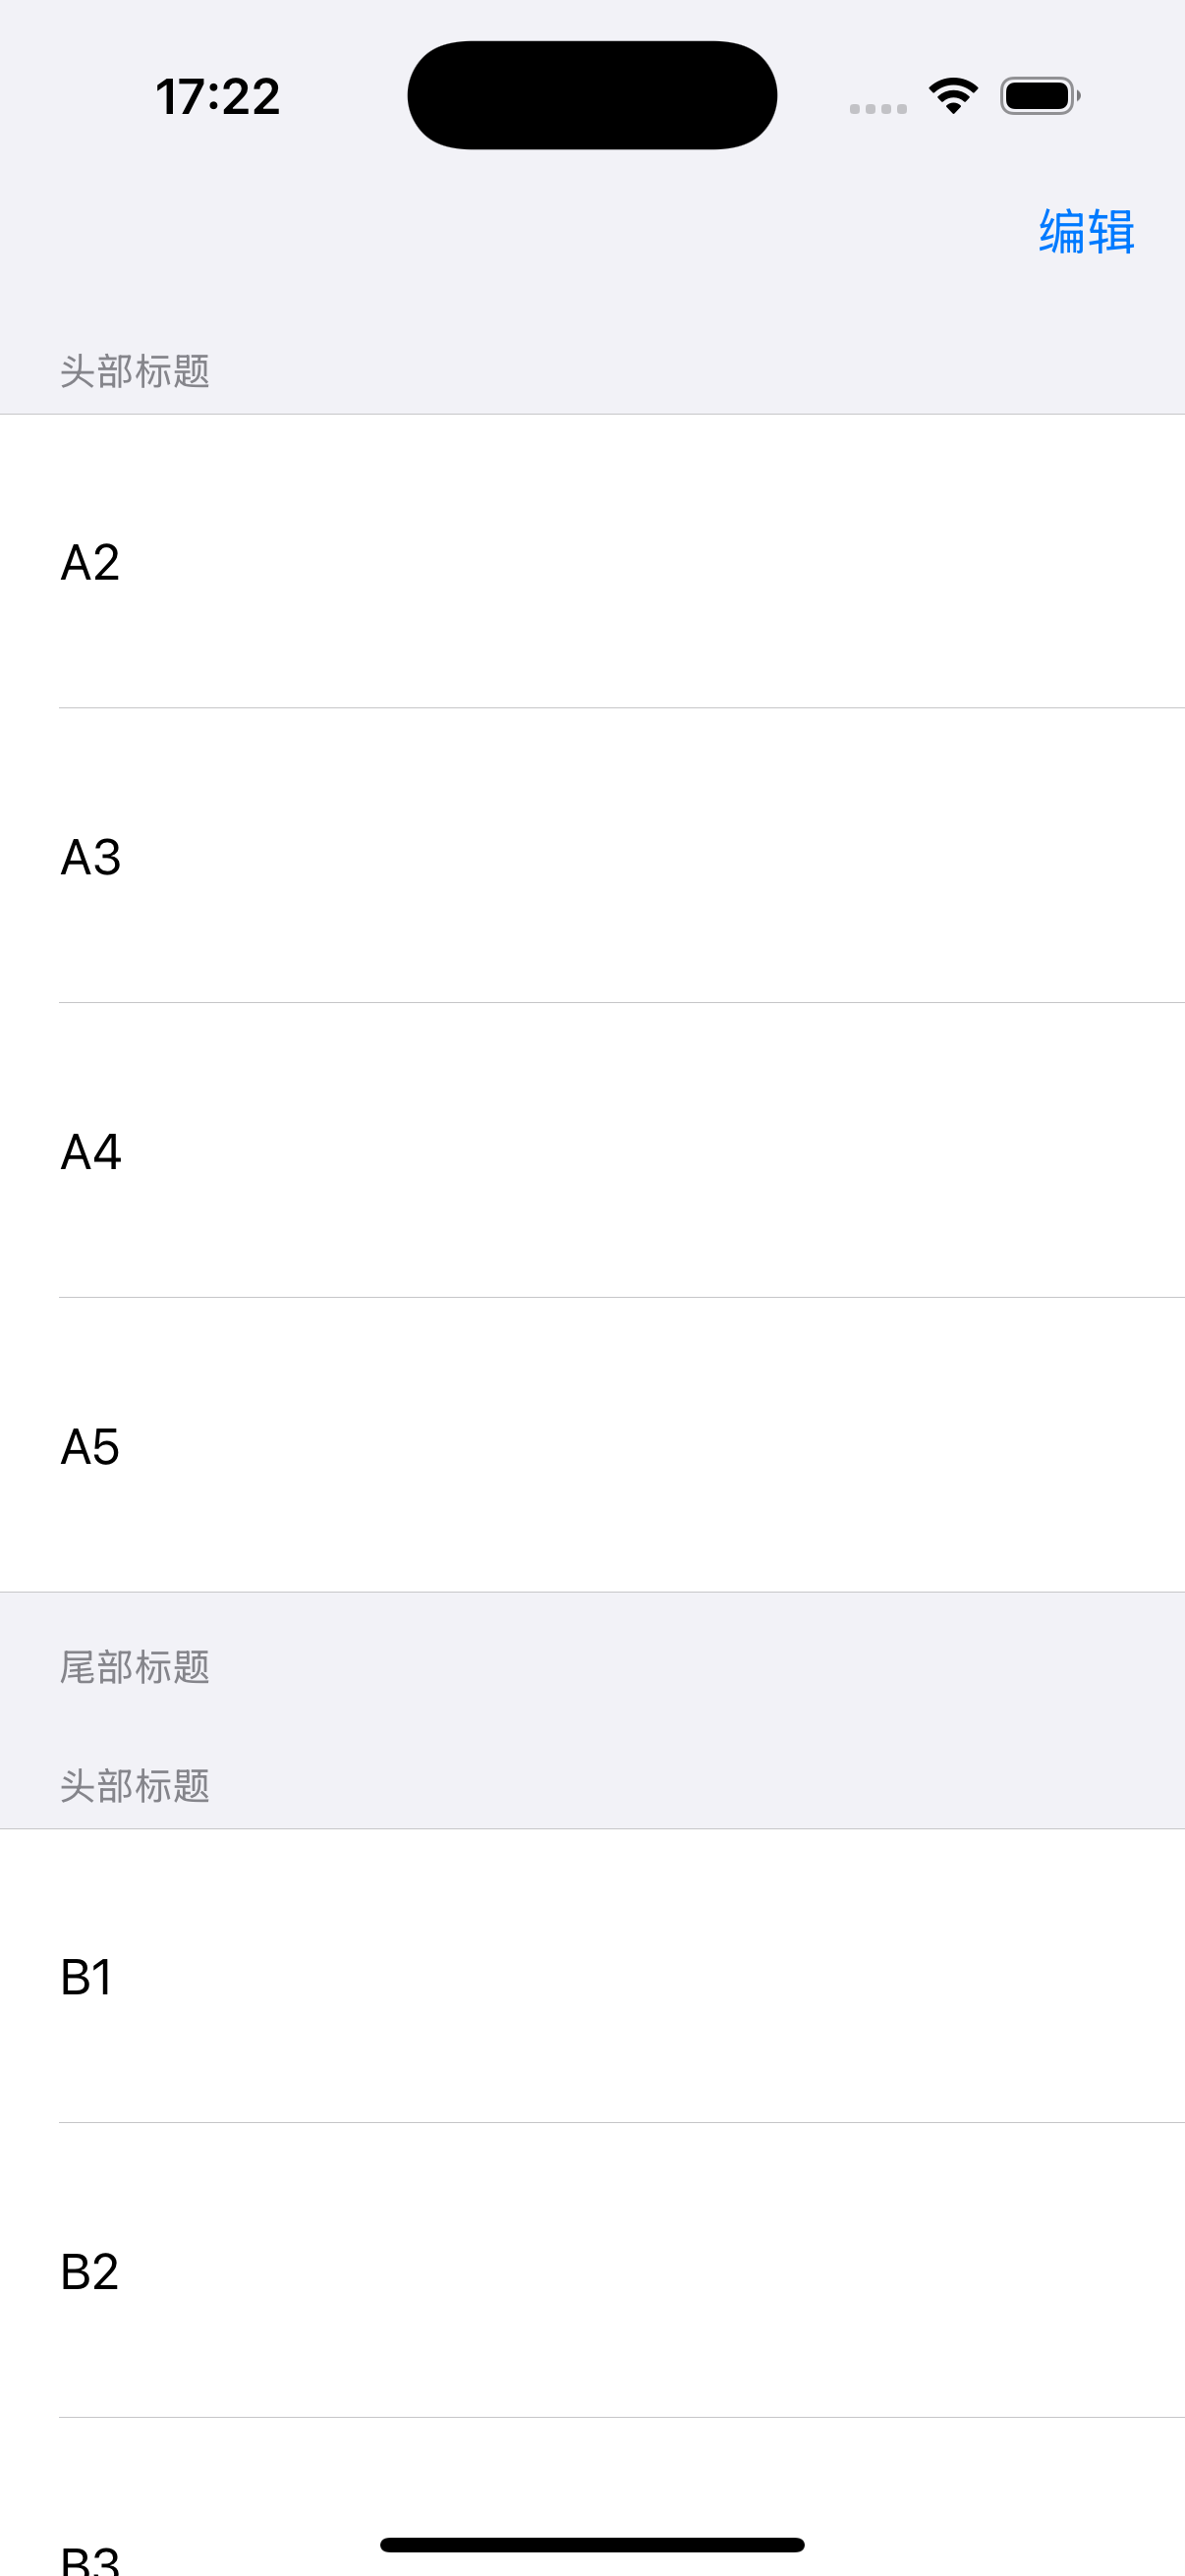
//#import "ViewController.h"@interface ViewController ()@end@implementation ViewController- (void)viewDidLoad {[super viewDidLoad];//創建數據視圖,傳入兩個參數//參數一:數據視圖的位置//參數二:數據視圖的風格-UITableViewStylePlain:普通風格 、 UITableViewStyleGrouped:分組風格self.tableview = [[UITableView alloc] initWithFrame:self.view.bounds style:UITableViewStyleGrouped];//自動調整子視圖大小self.tableview.autoresizingMask = UIViewAutoresizingFlexibleHeight | UIViewAutoresizingFlexibleWidth;//創建數據視圖的代理對象self.tableview.delegate = self;//設置數據視圖的代理源對象self.tableview.dataSource = self;//數據視圖的頭部視圖的設定self.tableview.tableHeaderView = nil;//數據視圖的尾部視圖的設定self.tableview.tableFooterView = nil;[self.view addSubview:self.tableview];//創建一個可變數組self.arrayData = [[NSMutableArray alloc] init];for (int i = 'A'; i <= 'Z'; i++) {//定義小數組NSMutableArray* arraySmall = [[NSMutableArray alloc] init];for (int j = 1; j <= 5; j++) {NSString* str = [NSString stringWithFormat:@"%c%d",i,j];[arraySmall addObject:str];}//這里就相當于一個二維數組[self.arrayData addObject:arraySmall];}//當數據的數據源發生變化時,更新數據視圖,重新加載數據[self.tableview reloadData];}- (void)creatButton {self.isEdit = NO;self.buttonOfEdit = [[UIBarButtonItem alloc] initWithTitle:@"編輯" style:UIBarButtonItemStylePlain target:self action:@selector(pressEdit)];self.buttonOfFinish = [[UIBarButtonItem alloc] initWithTitle:@"完成" style:UIBarButtonItemStylePlain target:self action:@selector(pressFinish)];self.buttonOfDelete = [[UIBarButtonItem alloc] initWithTitle:@"刪除" style:UIBarButtonItemStylePlain target:self action:@selector(pressDelete)];self.navigationItem.rightBarButtonItem = self.buttonOfEdit;}
- (void)pressEdit {self.isEdit = YES;self.navigationItem.rightBarButtonItem = self.buttonOfFinish;[self.tableview setEditing:YES];self.navigationItem.leftBarButtonItem = self.buttonOfDelete;
}- (void)pressFinish {self.isEdit = NO;self.navigationItem.rightBarButtonItem = self.buttonOfEdit;[self.tableview setEditing:NO];self.navigationItem.leftBarButtonItem = nil;
}/*參數講解:參數一:觸發事件的表格視圖對象參數二:用戶對這個單元格執行的編輯類型參數三:表示當前單元格的位置,包含兩個信息:section(第幾組)、row(第幾行)*/
- (void)tableView:(UITableView *)tableView commitEditingStyle:(UITableViewCellEditingStyle)editingStyleforRowAtIndexPath:(NSIndexPath *)indexPath {if (editingStyle == UITableViewCellEditingStyleDelete) {// 1. 先刪除數據源中的數據[self.arrayData[indexPath.section] removeObjectAtIndex:indexPath.row];// 2. 更新表格視圖(動畫刪除這一行)[tableView deleteRowsAtIndexPaths:@[indexPath] withRowAnimation:UITableViewRowAnimationAutomatic];}
}//- (void)tableView:(UITableView *)tableView commitEditingStyle:(UITableViewCellEditingStyle)editingStyle forRowAtIndexPath:(NSIndexPath *)indexPath {
// if (editingStyle == UITableViewCellEditingStyleInsert) {
// // 1. 創建一個新的數據項(你可以替換成你自己的默認值)
// NSString *newItem = @"新添加的內容";
//
// // 2. 往數據源中插入(在指定 section 的對應位置)
// [self.arrayData[indexPath.section] insertObject:newItem atIndex:indexPath.row];
//
// // 3. 更新表格界面(帶動畫插入新行)
// [tableView insertRowsAtIndexPaths:@[indexPath] withRowAnimation:UITableViewRowAnimationAutomatic];
// }
//}/*告訴表格視圖每一行在處于編輯狀態時,應該支持什么操作UITableViewCellEditingStyleDeleteUITableViewCellEditingStyleInsertUITableViewCellEditingStyleNone*/
- (UITableViewCellEditingStyle)tableView:(UITableView *)tableView editingStyleForRowAtIndexPath:(NSIndexPath *)indexPath {return UITableViewCellEditingStyleDelete ;
}- (void)tableView:(UITableView *)tableView didSelectRowAtIndexPath:(NSIndexPath *)indexPath {NSLog(@"選中單元格!%lu %lu", indexPath.section, indexPath.row);
}- (void)tableView:(UITableView *)tableView didDeselectRowAtIndexPath:(NSIndexPath *)indexPath {NSLog(@"取消 選中單元格!%lu %lu", indexPath.section, indexPath.row);
}
//或取每組元素的個數(行數)
//必須要實現的協議函數
//程序在顯示數據視圖時會調用此函數
//p1:數據視圖對象本身
//p2: 那一組需要的行數
- (NSInteger)tableView:(UITableView *)tableView numberOfRowsInSection:(NSInteger)section {NSInteger num = [[self.arrayData objectAtIndex:section] count];return num;
}
//設定數據視圖的組數,默認返回1
- (NSInteger)numberOfSectionsInTableView:(UITableView *)tableView {return self.arrayData.count;
}//創建單元格函數對象
//參數一:調用函數的對象
//參數二:單元格的索引,就是上面的行數與組數
/*//單元格文字賦值cell.textLabel.text = [_arrayData[indexPath.section] objectAtIndex:indexPath.row];//設置子文字標題cell.detailTextLabel.text = @"子標題";//設置圖片NSString* str = [NSString stringWithFormat:@"photo0%ld.jpg",indexPath.row];cell.imageView = [[UIImageView alloc] initWithImage:[UIImage imageNamed:str]];*/
- (UITableViewCell *)tableView:(UITableView *)tableView cellForRowAtIndexPath:(NSIndexPath *)indexPath {NSString* cellstr = @"cell";//嘗試獲得可復用的單元格,如果得不到就返回空/*當滾動表格時,屏幕上的單元格會離開屏幕,已經滾出屏幕的單元格不會被立刻銷毀,而是存入復用遲中,當需要顯示新的cell時,系統會從復用池中獲取一個單元格重新使用,而不是重新創建*/UITableViewCell* cell = [self.tableview dequeueReusableCellWithIdentifier:cellstr];if (!cell) {//創建一個單元格對象//參數一:單元格樣式//參數二:單元格的復用標記cell = [[UITableViewCell alloc] initWithStyle:UITableViewCellStyleDefault reuseIdentifier:cellstr];}//NSString* str = [NSString stringWithFormat:@"第%ld組,第%ld行",indexPath.section,indexPath.row];//單元格內容賦值cell.textLabel.text = self.arrayData[indexPath.section][indexPath.row];//調用創建功能按鈕方法[self creatButton];return cell;
}- (CGFloat)tableView:(UITableView *)tableView heightForRowAtIndexPath:(NSIndexPath *)indexPath {return 100;
}- (NSString *)tableView:(UITableView *)tableView titleForHeaderInSection:(NSInteger)section {return @"頭部標題";
}- (NSString *)tableView:(UITableView *)tableView titleForFooterInSection:(NSInteger)section {return @"尾部標題";
}- (CGFloat)tableView:(UITableView *)tableView heightForHeaderInSection:(NSInteger)section {return 40;
}- (CGFloat)tableView:(UITableView *)tableView heightForFooterInSection:(NSInteger)section {return 40;
}@end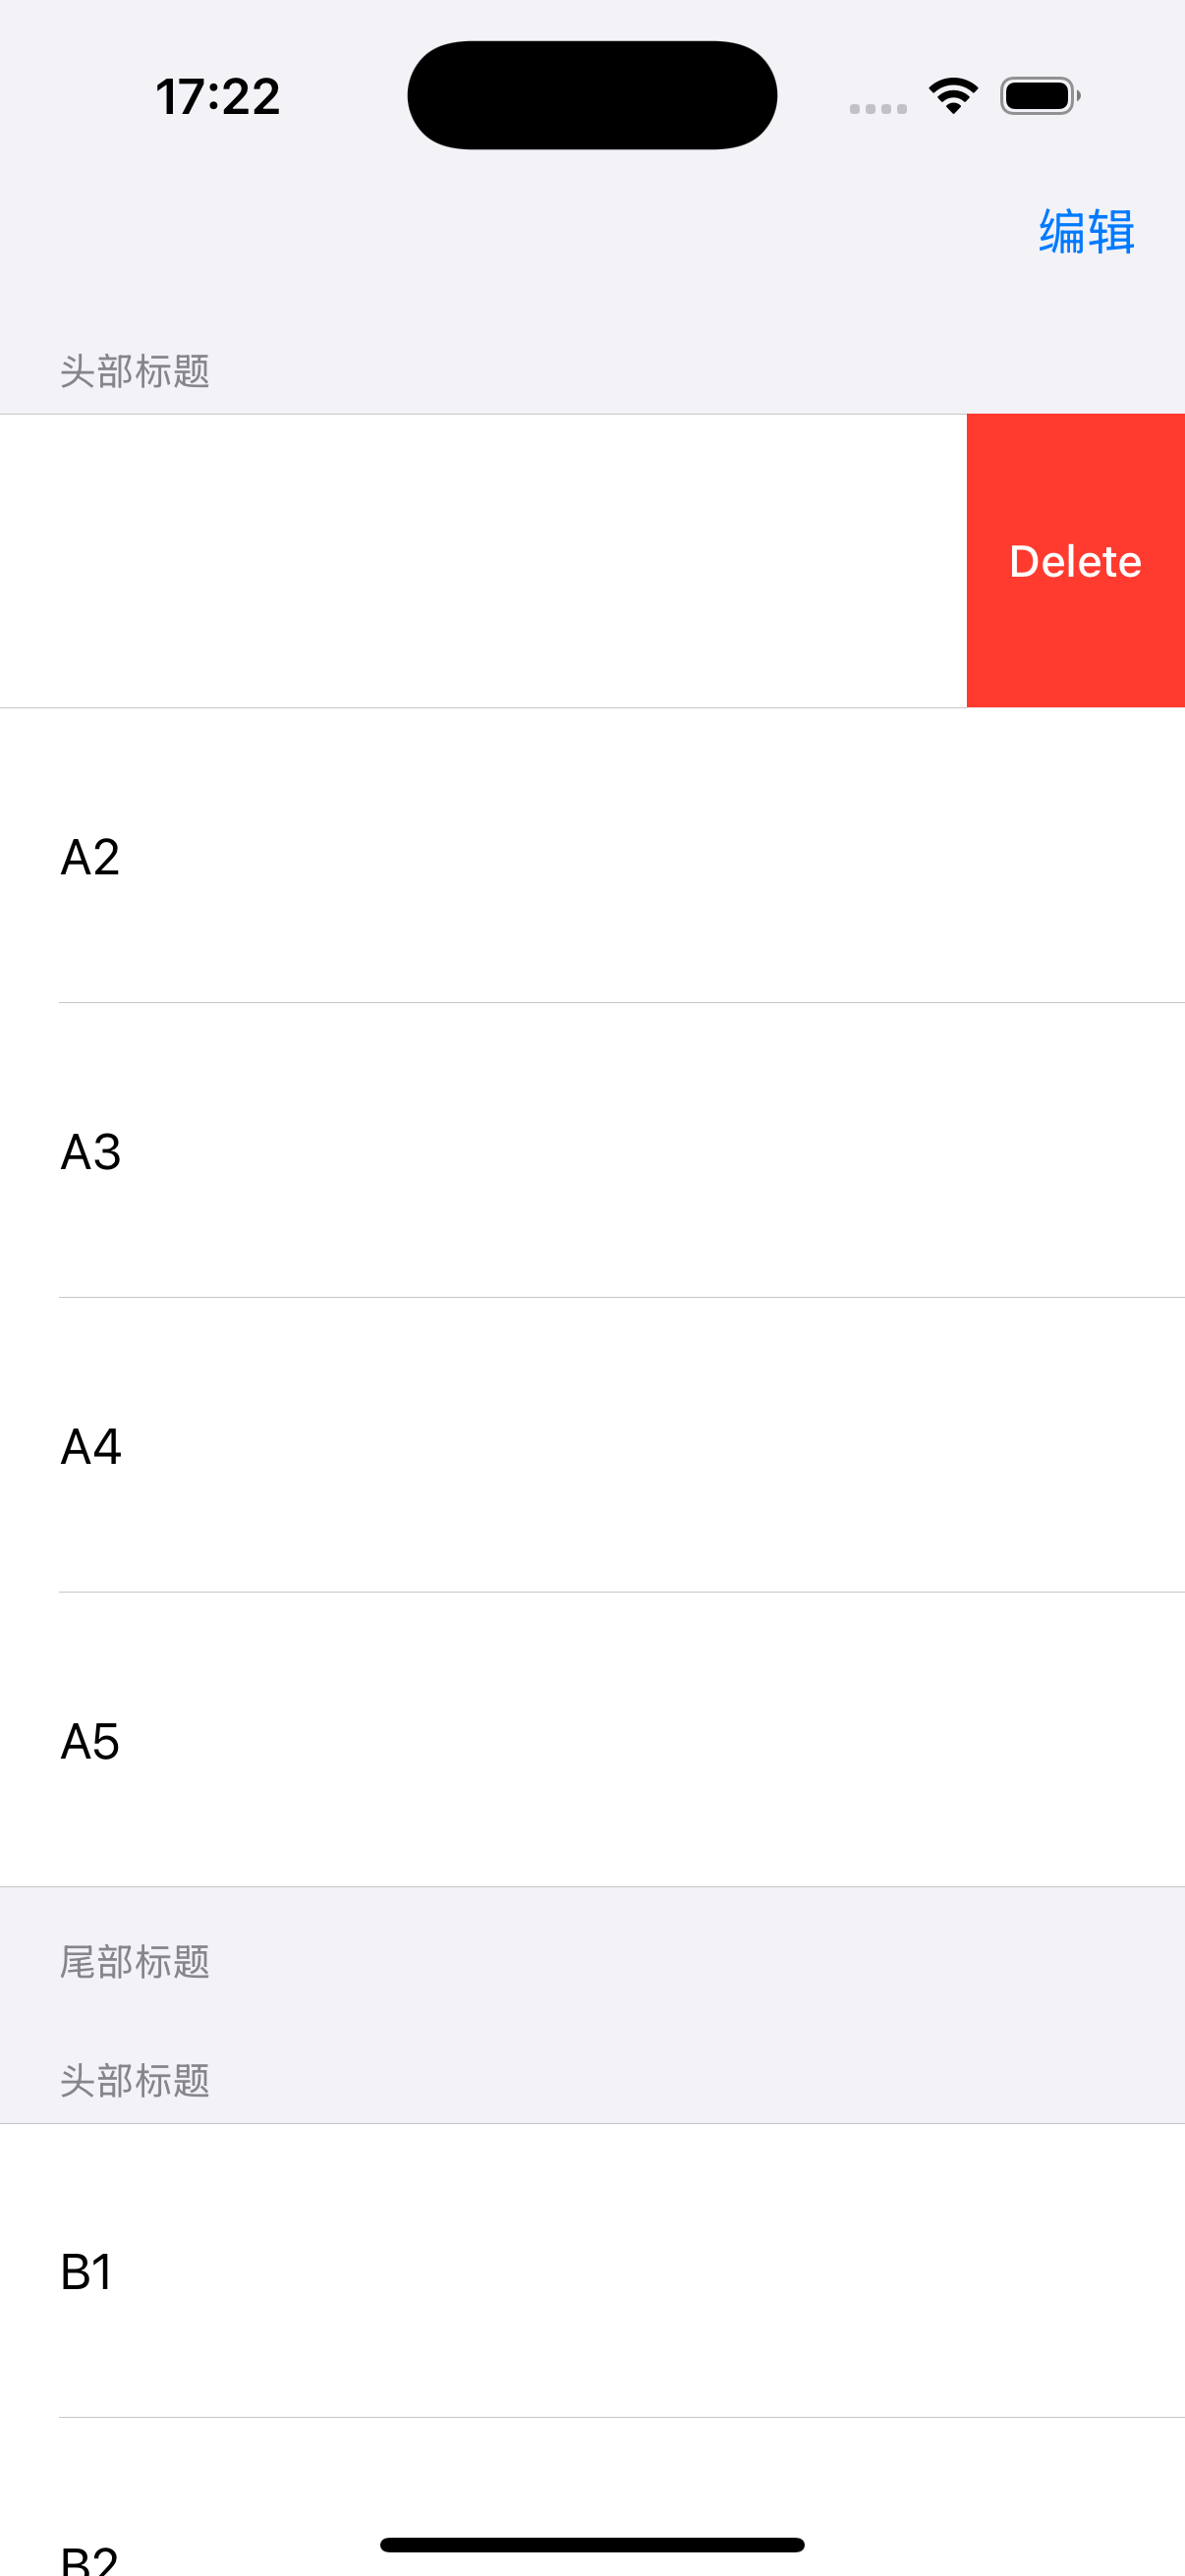
照片墻案例
userInteractionEnable屬性介紹:
userInteractionEnabled是UIView的一個重要屬性,用于控制用戶是否能與該視圖及其子視圖進行交互(如點擊、滑動、手勢等)。在照片墻案,若需要對圖片進行點擊查看、縮放、刪除等操作,必須將相關視圖的該屬性設為 YES(默認值也是 YES,但某些場景下可能被意外修改)。
這個屬性是屬于UIView的,是BOOL類型的,決定UIView是否接受有關touch和keyBoard的相關操作,然后UIView就可以通過相應的一些方法來處理。
其次我們需要創建一個手勢識別器UITapGestureRecognizer
//給每個控件添加手勢
UITapGestureRecognizer* tap = [[UITapGestureRecognizer alloc] initWithTarget:self action:@selector(press:)];//創建一個手勢識別器,并且添加相應的方法
tap.numberOfTapsRequired = 1;//設置觸摸次數
tap.numberOfTouchesRequired = 1;//設置觸摸點個數
[iView addGestureRecognizer:tap];//添加手勢識別器到view中
//觸摸后實現方法函數
- (void) press:(UITapGestureRecognizer*) tap {//強制轉換類型UIImageView* imageView = (UIImageView*) tap.view;//創建即將推出的視圖控制器ShowImage* imageShow = [[ShowImage alloc] init];//點擊的圖像視圖賦值imageShow.imageTag = imageView.tag;imageShow.image = imageView.image;//將控制器推出[self.navigationController pushViewController:imageShow animated:YES];
}
在SceneDelegate文件中,設置導航控制器
#import "SceneDelegate.h"
#import "VCRoot.h"
#import "VCImageShow.h"
@interface SceneDelegate ()@end@implementation SceneDelegate- (void)scene:(UIScene *)scene willConnectToSession:(UISceneSession *)session options:(UISceneConnectionOptions *)connectionOptions {//導航控制器照片結構UINavigationController* nav = [[UINavigationController alloc] initWithRootViewController:[VCRoot new]];self.window.rootViewController = nav;[self.window makeKeyAndVisible];
}- (void)sceneDidDisconnect:(UIScene *)scene {// Called as the scene is being released by the system.// This occurs shortly after the scene enters the background, or when its session is discarded.// Release any resources associated with this scene that can be re-created the next time the scene connects.// The scene may re-connect later, as its session was not necessarily discarded (see `application:didDiscardSceneSessions` instead).
}- (void)sceneDidBecomeActive:(UIScene *)scene {// Called when the scene has moved from an inactive state to an active state.// Use this method to restart any tasks that were paused (or not yet started) when the scene was inactive.
}- (void)sceneWillResignActive:(UIScene *)scene {// Called when the scene will move from an active state to an inactive state.// This may occur due to temporary interruptions (ex. an incoming phone call).
}- (void)sceneWillEnterForeground:(UIScene *)scene {// Called as the scene transitions from the background to the foreground.// Use this method to undo the changes made on entering the background.
}- (void)sceneDidEnterBackground:(UIScene *)scene {// Called as the scene transitions from the foreground to the background.// Use this method to save data, release shared resources, and store enough scene-specific state information// to restore the scene back to its current state.
}@end
在VCRoot中設置照片墻
#import "VCRoot.h"
#import "VCImageShow.h"
@interface VCRoot ()@end@implementation VCRoot- (void)viewDidLoad {[super viewDidLoad];self.title = @"照片墻";self.view.backgroundColor = [UIColor whiteColor];self.navigationController.navigationBar.translucent = YES;self.navigationController.navigationBar.barTintColor = [UIColor yellowColor];//創建一個滾動視圖并設置位置和畫布大小UIScrollView* sv = [UIScrollView new];sv.frame = CGRectMake(5, 10, 394, 852);sv.contentSize = CGSizeMake(394, 852 * 1.5);sv.showsVerticalScrollIndicator = NO;//打開交互事件sv.userInteractionEnabled = YES;//利用循環給根視圖上添加照片對象for (int i = 0; i < 9; i++) {UIImage* image = [UIImage imageNamed:[NSString stringWithFormat:@"photo0%d.jpg",i + 1]];UIImageView* view = [[UIImageView alloc] initWithImage:image];view.frame = CGRectMake(10 + (i % 3) * 125, (i / 3) * 165, 110, 150);[sv addSubview:view];view.userInteractionEnabled = YES;//創建點擊手勢UITapGestureRecognizer* tap = [[UITapGestureRecognizer alloc] initWithTarget:self action:@selector(pressTap:)];//單次點擊tap.numberOfTapsRequired = 1;//單個手指tap.numberOfTouchesRequired = 1;[view addGestureRecognizer:tap];view.tag = 101 + i;}[self.view addSubview: sv];
}//方法3:
- (void)pressTap:(UITapGestureRecognizer* )tap {UIImageView* imageView = (UIImageView*)tap.view;VCImageShow* imageshow = [VCImageShow new];imageshow.imageTag = imageView.tag;[self.navigationController pushViewController:imageshow animated:YES];}//方法2:
//- (void)pressTap:(UITapGestureRecognizer* )tap {
//    UIImageView* imageView = (UIImageView*)tap.view;
//    //創建顯示視圖控制器
//    VCImageShow* imageshow = [[VCImageShow alloc] init];
//    //點擊的圖像視圖賦值
//    //imageshow.imageView = imageView;//不可行
//    imageshow.image = imageView.image;
//    //將視圖控制器推出
//    [self.navigationController pushViewController:imageshow animated:YES];
//
//
//}
/*
#pragma mark - Navigation// In a storyboard-based application, you will often want to do a little preparation before navigation
- (void)prepareForSegue:(UIStoryboardSegue *)segue sender:(id)sender {// Get the new view controller using [segue destinationViewController].// Pass the selected object to the new view controller.
}
*/@end
接下來需要解決如何將被點擊的視圖傳入到展示圖片的頁面,這里要注意,不可以直接傳視圖對象,因為一個人視圖對象只能有一個根視圖,當我們把視圖添加到新的父視圖上時,會從原來的父親視圖刪除掉
//
//  VCImageShow.m
//  PhotoWall
//
//  Created by xiaoli pop on 2025/6/3.
//#import "VCImageShow.h"@interface VCImageShow ()@end@implementation VCImageShow- (void)viewDidLoad {[super viewDidLoad];self.title = @"圖片展示";self.imageView = [[UIImageView alloc] init];self.imageView.frame = [[UIScreen mainScreen] bounds];//方法2://self.imageView.image = self.image;//方法3:self.imageView.image = [UIImage imageNamed:[NSString stringWithFormat:@"photo0%lu.jpg",(unsigned long)(self.imageTag - 100) ]];/*一個視圖對象只能有一個根視圖當我們把視圖添加到新的父視圖上時會從原來的父親視圖刪除掉*/[self.view addSubview:self.imageView];}/*
#pragma mark - Navigation// In a storyboard-based application, you will often want to do a little preparation before navigation
- (void)prepareForSegue:(UIStoryboardSegue *)segue sender:(id)sender {// Get the new view controller using [segue destinationViewController].// Pass the selected object to the new view controller.
}
*/@end
- 實現效果
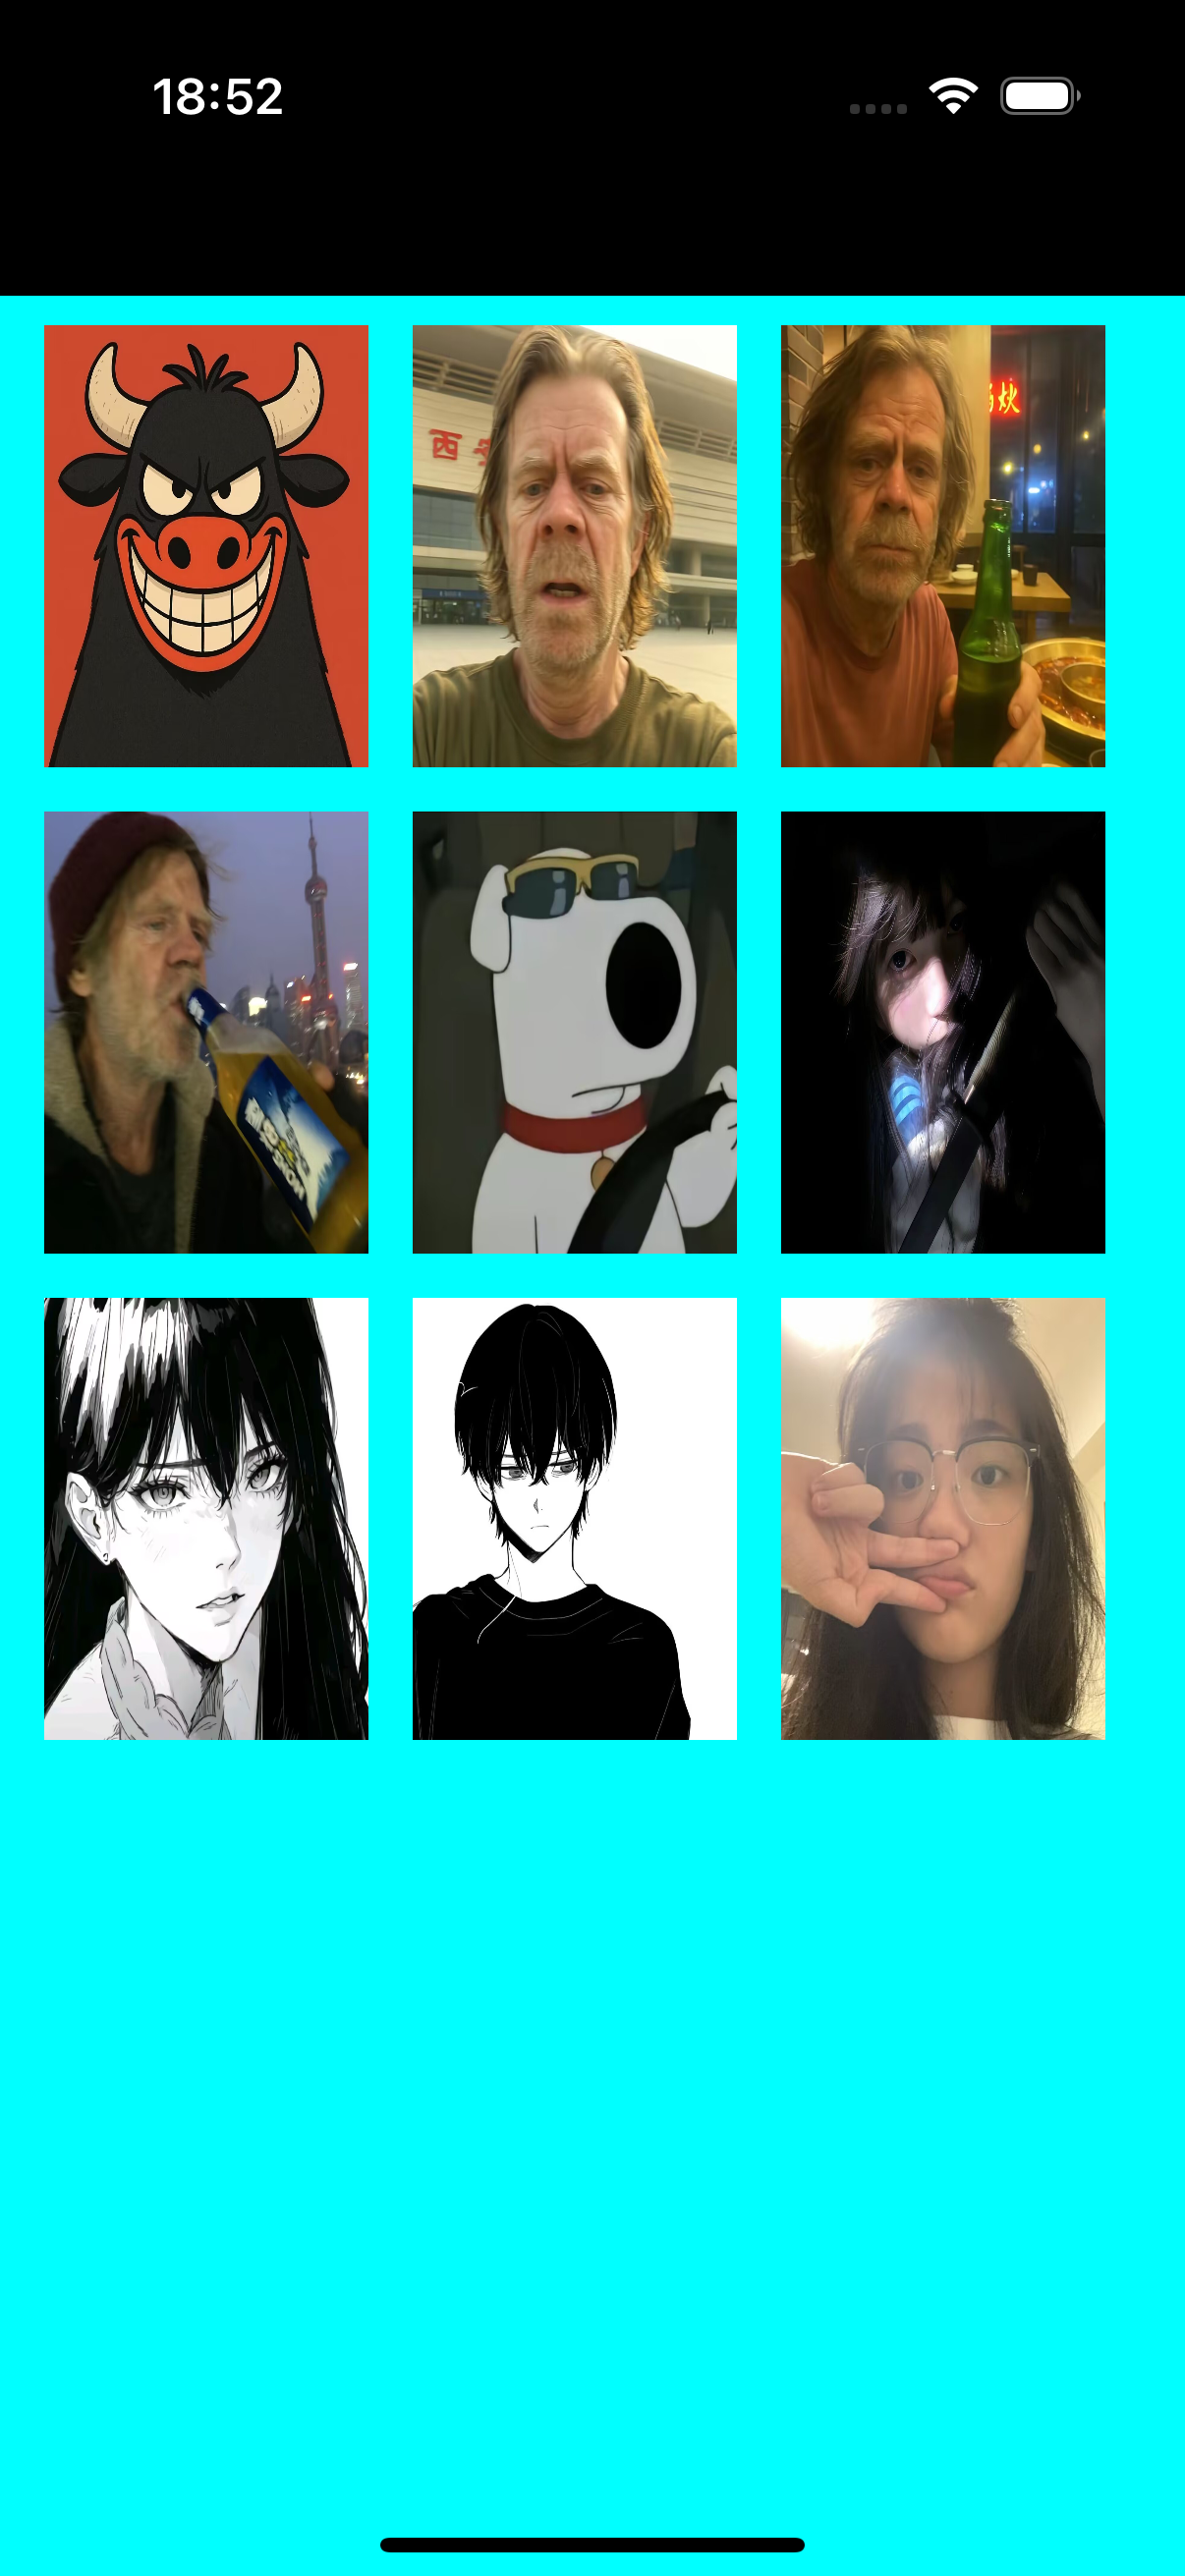
點擊圖片就會跳轉一個新頁面,內容就是選中的圖片


)


![2025年滲透測試面試題總結-天融信[社招]滲透測試工程師(題目+回答)](http://pic.xiahunao.cn/2025年滲透測試面試題總結-天融信[社招]滲透測試工程師(題目+回答))


:微調策略)


)

