代理
- 靜態代理基于繼承實現
- 動態代理是基于接口實現
業務層每次實現轉賬都需要執行,可以把他們拿出來當成一個切面,自己寫出一個代理類,讓業務層只執行業務的邏輯,重復的代碼代理類來完成,然后調用代理類來執行。
代理類
package com.qcby.utils;import com.qcby.service.AccountService;import java.lang.reflect.InvocationHandler;
import java.lang.reflect.Method;
import java.lang.reflect.Proxy;//傳入目標對象,生成該對象的代理對象,返回。對目標對象的方法進行增強
public class ProxyUtils {//獲取代理對象,返回,增強目標對象的方法public static Object getProxy(final AccountService accountService){//使用jdk動態dialing生成代理對象Object proxy = Proxy.newProxyInstance(ProxyUtils.class.getClassLoader(), accountService.getClass().getInterfaces(), new InvocationHandler() {//調用代理對象的方法,invoke方法就會去執行public Object invoke(Object proxy, Method method, Object[] args) throws Throwable {//目標對象的方法Object result = null;try {//開啟事務TxUtils.startTransaction();//目標對象的方法進行增強,作為結果返回result = method.invoke(accountService,args);//事務提交TxUtils.commit();}catch (Exception e){e.printStackTrace();//事務回滾TxUtils.rollback();}finally {//資源關閉TxUtils.close();}return result;}});return proxy;}
}
測試
@RunWith(SpringJUnit4ClassRunner.class)
@ContextConfiguration(locations = "classpath:applicationContext.xml")
public class Demo2 {@Autowiredprivate AccountService accountService;@Testpublic void run1(){Account account1 = new Account();account1.setName("aaa");Account account2 = new Account();account2.setName("bbb");//創建代理對象AccountService proxy = (AccountService) ProxyUtils.getProxy(accountService);proxy.saveAll(account1,account2);}
}
?AOP


配置文件形式:(IOC也是用的配置文件形式)
配置文件
<?xml version="1.0" encoding="UTF-8"?>
<beans xmlns="http://www.springframework.org/schema/beans"xmlns:xsi="http://www.w3.org/2001/XMLSchema-instance"xmlns:aop="http://www.springframework.org/schema/aop"xmlns:context="http://www.springframework.org/schema/context"xsi:schemaLocation="http://www.springframework.org/schema/beanshttp://www.springframework.org/schema/beans/spring-beans.xsdhttp://www.springframework.org/schema/contexthttp://www.springframework.org/schema/context/spring-context.xsdhttp://www.springframework.org/schema/aophttp://www.springframework.org/schema/aop/spring-aop.xsd"><!--將目標類配置到spring中--><bean id="userService" class="com.qcby.demo1.UserServiceImpl"/><!--將切面類配置到spring中--><bean id="myXmlAspect" class="com.qcby.demo1.MyXmlAspect"/><!--配置AOP的增強--><aop:config><!--配置切面 = 通知+切入點組成--><aop:aspect ref="myXmlAspect"><!--通用寫法--><!--<aop:before method="log" pointcut="execution(public * com.qcby.*.*ServiceImpl.*(..))"/>--><!--前置通知:無論方法成功與否都執行--><!--<aop:before method="log" pointcut="execution(public void com.qcby.demo1.UserServiceImpl.save())"/>--><!--最終通知:失敗成功都執行--><!--<aop:after method="log" pointcut="execution(public void com.qcby.demo1.UserServiceImpl.save())"/>--><!--后置通知:方法成功執行之后執行--><!--<aop:after-returning method="log" pointcut="execution(public * com.qcby.*.*ServiceImpl.*(..))"/>--><!--異常通知:有異常才執行--><!--<aop:after-throwing method="log" pointcut="execution(public void com.qcby.demo1.UserServiceImpl.save())"/>--><!--環繞通知:目標方法執行前后都執行  執行方法成功與否對執行前的增強不影響(方法執行不成功也執行前置的)--><aop:around method="aroundLog" pointcut="execution(public * com.qcby.demo1.*ServiceImpl.*(..))"/></aop:aspect></aop:config></beans>
切面類
package com.qcby.demo1;import org.aspectj.lang.ProceedingJoinPoint;/*定義切面類 = 切入點(表達式)+通知*/
//在配置文件里配置成切面類=增強的方法(通知)+需要增強的方法(切入點)
public class MyXmlAspect {/*通知*/public void log(){//發送手機短信//發送郵件、記錄日志、事務管理System.out.println("增強的方法執行了....");}public void log1(){//發送手機短信//發送郵件、記錄日志、事務管理System.out.println("前置增強的方法執行了....");}public void log2(){//發送手機短信//發送郵件、記錄日志、事務管理System.out.println("后置增強的方法執行了....");}/*環繞通知*/public void aroundLog(ProceedingJoinPoint proceedingJoinPoint){try {log1();proceedingJoinPoint.proceed();log2();} catch (Throwable throwable) {throwable.printStackTrace();}}
}
測試類
@RunWith(SpringJUnit4ClassRunner.class)
@ContextConfiguration(locations = "classpath:applicationContext.xml")
public class Demo1 {@Autowiredprivate UserService userService;/*測試*/@Testpublic void run1(){userService.save();}
}
半注解方式
切面類=通知+切入點(現在的切面類已經在通知上添加了切入點)
package com.qcby.demo2;import org.aspectj.lang.ProceedingJoinPoint;
import org.aspectj.lang.annotation.*;
import org.springframework.stereotype.Component;@Component  // 把該類交給 IOC 去管理
@Aspect // 聲明是切面類 == <aop:aspect ref="myXmlAspect">
public class MyAnnoAspect {//@Before(value = "execution(public * com.qcby.*.*ServiceImpl.*(..))")public void log1(){System.out.println("前置通知增強的方法執行...");}//@AfterReturning(value = "execution(public * com.qcby.*.*ServiceImpl.*(..))")public void log2(){System.out.println("后置通知增強的方法執行...");}//@After(value = "execution(public * com.qcby.*.*ServiceImpl.*(..))")public void log3(){System.out.println("最終通知增強的方法執行...");}//@AfterThrowing(value = "execution(public * com.qcby.*.*ServiceImpl.*(..))")public void log4(){System.out.println("異常通知增強的方法執行...");}@Around(value = "execution(public * com.qcby.*.*ServiceImpl.*(..))")public void log5(ProceedingJoinPoint proceedingJoinPoint){try {log1();proceedingJoinPoint.proceed();log2();} catch (Throwable throwable) {throwable.printStackTrace();}}
}
配置文件
<!--配置文件中開啟自動代理-->
<aop:aspectj-autoproxy/>
<!--開啟注解掃描-->
<context:component-scan base-package="com.qcby" />
測試類
@RunWith(SpringJUnit4ClassRunner.class)
@ContextConfiguration(locations = "classpath:applicationContext.xml")
public class Demo2 {@Autowiredprivate AccountService accountService;@Testpublic void run1(){accountService.save();}
}
純注解形式
配置類
@Configuration  // 配置類
@ComponentScan(value = "com.qcby")  // 掃描包
@EnableAspectJAutoProxy  // 開啟自動代理 == <aop:aspectj-autoproxy/>
public class SpringConfig {
}
切面類
與半注解形式一樣
測試類
@RunWith(SpringJUnit4ClassRunner.class)
@ContextConfiguration(classes = SpringConfig.class)
public class Demo2 {@Autowiredprivate AccountService accountService;@Testpublic void run1(){accountService.save();}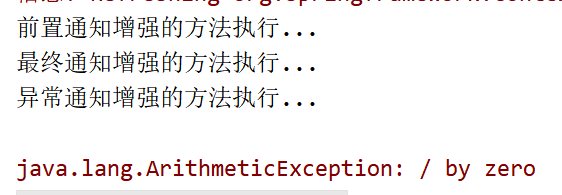
} 出現異常時:前置方法,最終方法,異常方法都會執行

)

)


數字化轉型之生產制造:從通常的離散制造到柔性化生產的全景指南)


:Standalone集群部署)


