目錄
- 試用Qwen2做推理
- 安裝LLaMA-Factory
- 使用自有數據集微調Qwen2
- 驗證微調效果
試用Qwen2做推理
參考:https://qwen.readthedocs.io/en/latest/getting_started/quickstart.html
from transformers import AutoModelForCausalLM, AutoTokenizer
device = "cuda" # the device to load the model onto# Now you do not need to add "trust_remote_code=True"
model = AutoModelForCausalLM.from_pretrained("Qwen/Qwen2-7B-Instruct",torch_dtype="auto",device_map="auto"
)
tokenizer = AutoTokenizer.from_pretrained("Qwen/Qwen2-7B-Instruct")# Instead of using model.chat(), we directly use model.generate()
# But you need to use tokenizer.apply_chat_template() to format your inputs as shown below
prompt = "Give me a short introduction to large language model."
messages = [{"role": "system", "content": "You are a helpful assistant."},{"role": "user", "content": prompt}
]
text = tokenizer.apply_chat_template(messages,tokenize=False,add_generation_prompt=True
)
model_inputs = tokenizer([text], return_tensors="pt").to(device)# Directly use generate() and tokenizer.decode() to get the output.
# Use `max_new_tokens` to control the maximum output length.
generated_ids = model.generate(model_inputs.input_ids,max_new_tokens=512
)
generated_ids = [output_ids[len(input_ids):] for input_ids, output_ids in zip(model_inputs.input_ids, generated_ids)
]response = tokenizer.batch_decode(generated_ids, skip_special_tokens=True)[0]
print(response)
執行此操作后模型會緩存到如下目錄
/root/.cache/huggingface/hub/models–Qwen–Qwen2-7B-Instruct/
安裝LLaMA-Factory
參考:https://github.com/hiyouga/LLaMA-Factory
git clone --depth 1 https://github.com/hiyouga/LLaMA-Factory.git
cd LLaMA-Factory
pip install -e ".[torch,metrics]"
使用自有數據集微調Qwen2
參考:https://qwen.readthedocs.io/en/latest/training/SFT/llama_factory.html
啟動web ui 界面來進行微調
llamafactory-cli webui

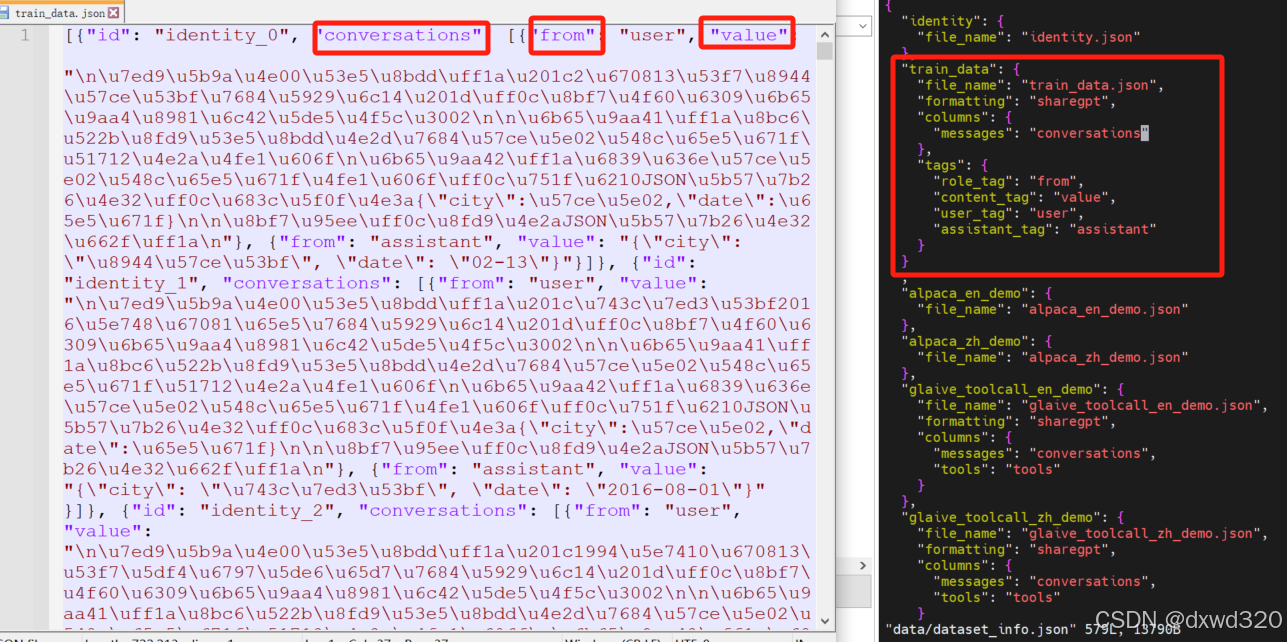
數據集選擇提前準備好的自有數據集train_data.json
編輯LLaMA-Factory/data路徑下的dataset_info.json,把自有數據集加入進去
按照自己需求配置訓練參數,所有的參數都配置好之后,點一下“預覽命令”,確認命令沒有問題之后,就可以點擊“開始”進行訓練了。訓練的過程中可以看到 loss的變化曲線、訓練耗時等。
參考:https://blog.csdn.net/u012505617/article/details/137864437
驗證微調效果
可以直接點擊webui界面中的“chat”選項卡,然后點擊“加載模型”,然后就可以進行對話了,不過使用A100實測非常慢,一次會話花了四十多分鐘。
所以建議在webui 界面訓練好模型之后點擊“Export”選項卡,然后,在“模型路徑”中輸入原始模型路徑,然后在“檢查點路徑”中選擇自己微調得到的 checkpoint路徑,然后在“最大分塊大小(GB)”中設置為4,同時設置一下導出目錄,最后點擊“開始導出”,就可以看到輸出的模型了
本地部署模型,并做推理測試
參考:https://qwen.readthedocs.io/en/latest/run_locally/llama.cpp.html
這里使用的是vLLM
參考:https://qwen.readthedocs.io/en/latest/deployment/vllm.html
from transformers import AutoTokenizer
from vllm import LLM, SamplingParams# Initialize the tokenizer
tokenizer = AutoTokenizer.from_pretrained("Qwen/Qwen2-7B-Instruct")# Pass the default decoding hyperparameters of Qwen2-7B-Instruct
# max_tokens is for the maximum length for generation.
sampling_params = SamplingParams(temperature=0.1, top_p=0.1, repetition_penalty=1.05, max_tokens=512) #這里想要推理的結果跟我們微調的預期嚴格一致,所以調低了前兩個參數的值。# Input the model name or path. Can be GPTQ or AWQ models.
llm = LLM(model="LLaMA-Factory/saves/Qwen2-7B-Chat/sft") #這里填寫前面Export時填寫的Path# Prepare your prompts
prompt = "這里輸入與微調數據集中類似的問題來驗證"
messages = [{"role": "system", "content": "You are a helpful assistant."},{"role": "user", "content": prompt}
]
text = tokenizer.apply_chat_template(messages,tokenize=False,add_generation_prompt=True
)# generate outputs
outputs = llm.generate([text], sampling_params)# Print the outputs.
for output in outputs:prompt = output.promptgenerated_text = output.outputs[0].textprint(f"Prompt: {prompt!r}, Generated text: {generated_text!r}")


)


)


地理數據庫 8 拓撲)


——for語句【互三互三】)

:運行作者demo及自己的數據集)
