文章目錄
- 一、引言
- 二、Spring AOP的使用
- 三、Spring AOP的組件
- 3.1 Pointcut源碼
- 3.2 Advice源碼
- 3.3 Advisor源碼
- 3.4 Aspect源碼
- 四、Spring AOP源碼刨析
- 4.1 configureAutoProxyCreator源碼解析
- 4.2 parsePointcut源碼解析
- 4.3 parseAdvisor源碼解析
- 4.4 parseAspect源碼解析
- 4.5 小總結
- 4.6 代理創建
- 五、總結
一、引言
AOP 是Spring框架的重點之一,AOP全稱為Aspect-Oriented Programming,意思為面向切面編程,這種編程方式是一種編程的范式。
AOP允許開發者將橫向關注點(如日志記錄、事務管理等操作)與業務邏輯分開來,從而提高代碼的模塊化和可維護性。
下面從淺入深徹底搞懂Spring AOP的底層原理!
注意,本篇文章中使用的
Spring框架的版本是4.0.0.RELEASE,不同版本之間源碼會有一點點不同,但是大體邏輯差不多。推薦閱讀者需要對
動態代理以及Spring IOC源碼有一定了解,如果不了解可以閱讀以下文章
- 都2024年了,還有人不懂動態代理么?
- 【Spring成神之路】一次SpringIOC源碼之旅,女朋友也成為了Spring大神!
<dependency><groupId>org.springframework</groupId><artifactId>spring-context</artifactId><version>4.0.0.RELEASE</version>
</dependency><dependency><groupId>org.springframework</groupId><artifactId>spring-aspects</artifactId><version>4.0.0.RELEASE</version>
</dependency>
二、Spring AOP的使用
UserService接口的定義
public interface UserService {String selectList();
}
UserService接口實現類
public class UserServiceImpl implements UserService {@Overridepublic String selectList() {System.out.println("小明, 小紅, 小藍");return "小明, 小紅, 小藍";}
}
AOP前置處理與后置處理
public class AOPUtil {private void before(JoinPoint joinPoint) {//獲取方法簽名Signature signature = joinPoint.getSignature();//獲取參數信息Object[] args = joinPoint.getArgs();System.out.println("log---" + signature.getName() + "I am before");}private void after(JoinPoint joinPoint) {//獲取方法簽名Signature signature = joinPoint.getSignature();//獲取參數信息Object[] args = joinPoint.getArgs();System.out.println("log---" + signature.getName() + "I am after");}
}
XML配置文件
<?xml version="1.0" encoding="UTF-8"?>
<beans xmlns="http://www.springframework.org/schema/beans"xmlns:xsi="http://www.w3.org/2001/XMLSchema-instance"xmlns:aop="http://www.springframework.org/schema/aop"xsi:schemaLocation="http://www.springframework.org/schema/beanshttp://www.springframework.org/schema/beans/spring-beans.xsdhttp://www.springframework.org/schema/aophttp://www.springframework.org/schema/aop/spring-aop.xsd"><bean id="messageService" class="spring.aop.UserServiceImpl"/><bean id="aopUtil" class="spring.aop.AOPUtil"/><aop:config><aop:aspect ref="aopUtil"><aop:pointcut id="myPoint"  expression="execution(* spring.aop.UserService.selectList(..))"/><aop:before method="before" pointcut-ref="myPoint"/><aop:after method="after" pointcut-ref="myPoint"/></aop:aspect></aop:config></beans>
測試類
public class AOPTest {public static void main(String[] args) {ApplicationContext context = new ClassPathXmlApplicationContext("application.xml");System.out.println("context 啟動成功");UserService userService = context.getBean(UserService.class);userService.selectList();}
}
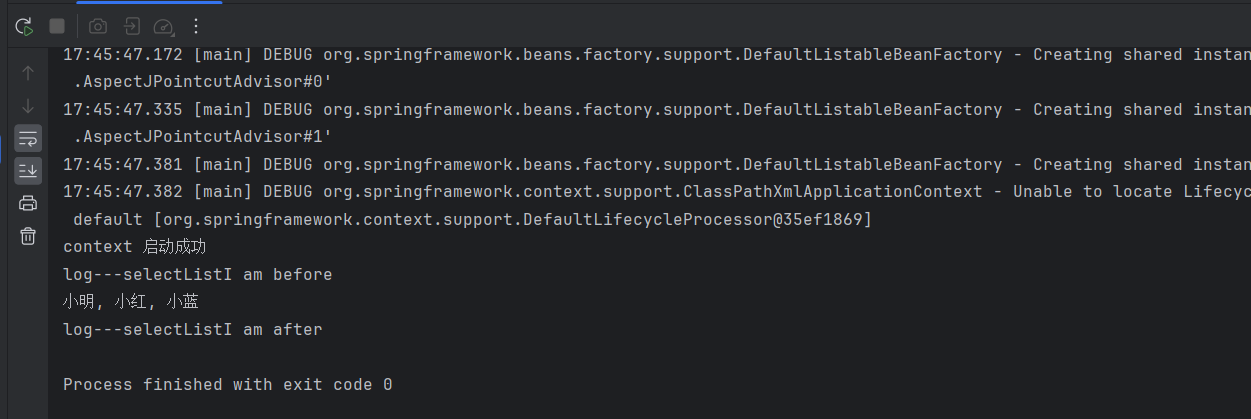
我們只需要編寫好切面的邏輯即可,然后在xml配置文件配置后切面的方法的執行順序即可實現在目標方法的前面或后面運行某個邏輯。
這當中到底發生了什么呢?這些切面方法是何時被調用呢?別急接著往下看!
三、Spring AOP的組件
在閱讀Spring AOP源碼之前,先來看看Spring AOP的幾個組件,這里源碼會采取點到為止的方式,并不深入講解
Pointcut:定義切面的匹配點,主要是類和方法。比如上面例子的spring.aop.UserService.selectList(..)方法就是匹配點。Advice:定義切面的行為,即在匹配點執行的操作。也就是上面例子的aop:before和aop:afterAdvisor:將Pointcut和Advice組合成一個對象,也就是一個完整的切面。Aspect:使用注解或XML配置方式定義的切面,通常包含了多個Advisor
3.1 Pointcut源碼
Pointcut是一個接口,提供了getClassFilter方法和getMethodMatcher方法,用于獲取當前匹配的類和方法
public interface Pointcut {/*** 返回一個ClassFilter對象, 用于確定哪些類被匹配,返回的對象不能為null*/ClassFilter getClassFilter();/*** 返回一個MethodMatcher對象,用于確定哪些方法被匹配*/MethodMatcher getMethodMatcher();/*** Canonical Pointcut instance that always matches.*/Pointcut TRUE = TruePointcut.INSTANCE;}
AspectJExpressionPointcut是Pointcut的實現,除了上面兩個方法,還提供了matches方法,用于判斷是否匹配。
public class AspectJExpressionPointcut extends AbstractExpressionPointcut implements ClassFilter, IntroductionAwareMethodMatcher, BeanFactoryAware {// 類的匹配public boolean matches(Class<?> targetClass) {}// 方法的匹配 public boolean matches(Method method, Class<?> targetClass, boolean hasIntroductions) {}
}
3.2 Advice源碼
Advice接口沒有需要實現的方法,它是用于定義切面的行為的,比如方法前切入、方法后切入、環繞切入等等。
public interface Advice {}
// 前置切入實現
public interface BeforeAdvice extends Advice {}// 后置切入實現
public interface AfterAdvice extends Advice {}
3.3 Advisor源碼
Advisor接口定義了getAdvice方法和isPerInstance方法
public interface Advisor {/*** 返回與該Advisor關聯的Advice*/Advice getAdvice();/*** 返回這個Advice是否與特定的實例關聯。*/boolean isPerInstance();}
3.4 Aspect源碼
Spring AOP并沒有Aspect這個接口,但是Aspect通常指下面這個
<aop:aspect ref="aopUtil">
</aop:aspect>
四、Spring AOP源碼刨析
閱讀Spring AOP源碼和閱讀Spring IOC源碼的步驟一樣,都是從讀取application.xml配置文件開始。
因為AOP的配置信息是寫在XML配置文件的,所以肯定需要讀取XML配置文件獲取AOP相關的信息,那么我們就看看這其中都做了什么吧。
直接定位到org.springframework.beans.factory.xml.DefaultBeanDefinitionDocumentReader#parseBeanDefinitions這個方法,不了解的可以先看看【Spring成神之路】一次SpringIOC源碼之旅,女朋友也成為了Spring大神!
protected void parseBeanDefinitions(Element root, BeanDefinitionParserDelegate delegate) {if (delegate.isDefaultNamespace(root)) {NodeList nl = root.getChildNodes();for (int i = 0; i < nl.getLength(); i++) {Node node = nl.item(i);if (node instanceof Element) {Element ele = (Element) node;if (delegate.isDefaultNamespace(ele)) {// 如果是bean 這些就走這個邏輯parseDefaultElement(ele, delegate);}else {// AOP走這個邏輯delegate.parseCustomElement(ele);}}}}else {delegate.parseCustomElement(root);}
}
既然知道parseCustomElement方法是處理aop標簽的,那么我們就進去看看是怎么個事?
public BeanDefinition parseCustomElement(Element ele) {return parseCustomElement(ele, null);
}public BeanDefinition parseCustomElement(Element ele, @Nullable BeanDefinition containingBd) {// 獲取當前的命名空間String namespaceUri = getNamespaceURI(ele);if (namespaceUri == null) {return null;}// 根據命名空間獲取對應的處理器NamespaceHandler handler = this.readerContext.getNamespaceHandlerResolver().resolve(namespaceUri);if (handler == null) {error("Unable to locate Spring NamespaceHandler for XML schema namespace [" + namespaceUri + "]", ele);return null;}// 用處理器就行解析return handler.parse(ele, new ParserContext(this.readerContext, this, containingBd));
}
parseCustomElement方法干三件事:
- 獲取元素的命名空間
- 根據命名空間獲取對應的處理器
- 調用處理器的
parse方法進行處理
繼續DEBUG,定位到了org.springframework.beans.factory.xml.NamespaceHandlerSupport#parse方法
public BeanDefinition parse(Element element, ParserContext parserContext) {// 獲取適合解析當前元素的BeanDefinitionParserBeanDefinitionParser parser = findParserForElement(element, parserContext);// 進行解析并返回一個BeanDefinitionreturn (parser != null ? parser.parse(element, parserContext) : null);
}private BeanDefinitionParser findParserForElement(Element element, ParserContext parserContext) {// 獲取元素的本地名稱, 比如aop:config,本地名稱就是configString localName = parserContext.getDelegate().getLocalName(element);// 獲取該本地名稱的解析器BeanDefinitionParser parser = this.parsers.get(localName);if (parser == null) {parserContext.getReaderContext().fatal("Cannot locate BeanDefinitionParser for element [" + localName + "]", element);}return parser;
}
public BeanDefinition parse(Element element, ParserContext parserContext) {CompositeComponentDefinition compositeDef =new CompositeComponentDefinition(element.getTagName(), parserContext.extractSource(element));parserContext.pushContainingComponent(compositeDef);// 設置自動代理創建器,這是Spring AOP實現的核心configureAutoProxyCreator(parserContext, element);// 遍歷當前標簽下的標簽不同的標簽進行不同處理List<Element> childElts = DomUtils.getChildElements(element);for (Element elt: childElts) {String localName = parserContext.getDelegate().getLocalName(elt);if (POINTCUT.equals(localName)) {parsePointcut(elt, parserContext);}else if (ADVISOR.equals(localName)) {parseAdvisor(elt, parserContext);}else if (ASPECT.equals(localName)) {parseAspect(elt, parserContext);}}parserContext.popAndRegisterContainingComponent();return null;
}
4.1 configureAutoProxyCreator源碼解析
configureAutoProxyCreator方法是Spring IOC的核心,主要作用是確保 AspectJ 自動代理創建器被正確注冊到 Spring 容器中!
private void configureAutoProxyCreator(ParserContext parserContext, Element element) {AopNamespaceUtils.registerAspectJAutoProxyCreatorIfNecessary(parserContext, element);
}public static void registerAspectJAutoProxyCreatorIfNecessary(ParserContext parserContext, Element sourceElement) {BeanDefinition beanDefinition = AopConfigUtils.registerAspectJAutoProxyCreatorIfNecessary(parserContext.getRegistry(), parserContext.extractSource(sourceElement));useClassProxyingIfNecessary(parserContext.getRegistry(), sourceElement);registerComponentIfNecessary(beanDefinition, parserContext);
}
該方法的目的是往Spring IOC容器中注冊一個AspectjAwareAdvisorAutoProxyCreator,其負責創建代理對象和實現切面編程。
4.2 parsePointcut源碼解析
parsePointcut方法的主要作用是負責解析aop:pointcut標簽
<aop:pointcut id="myPoint" expression="execution(* spring.aop.UserService.selectList(..))"/>
private AbstractBeanDefinition parsePointcut(Element pointcutElement, ParserContext parserContext) {// 獲得String id = pointcutElement.getAttribute(ID);// 獲得切點表達式String expression = pointcutElement.getAttribute(EXPRESSION);// 定義切點存儲AbstractBeanDefinition pointcutDefinition = null;try {// 將當前解析的切點ID壓入解析狀態棧this.parseState.push(new PointcutEntry(id));// 根據切點表達式創建切點定義pointcutDefinition = createPointcutDefinition(expression);// 設置切點的來源pointcutDefinition.setSource(parserContext.extractSource(pointcutElement));// 切點的Bean名稱String pointcutBeanName = id;if (StringUtils.hasText(pointcutBeanName)) {// 如果設置了id, 將切點注冊到spring ioc容器中parserContext.getRegistry().registerBeanDefinition(pointcutBeanName, pointcutDefinition);}else {// 否則也是注入進spring ioc容器中并設置別名pointcutBeanName = parserContext.getReaderContext().registerWithGeneratedName(pointcutDefinition);}// 注冊一個PointcutComponentDefinition組件parserContext.registerComponent(new PointcutComponentDefinition(pointcutBeanName, pointcutDefinition, expression));}finally {// 從棧彈出this.parseState.pop();}return pointcutDefinition;
}
4.3 parseAdvisor源碼解析
parseAdvisor方法負責解析<advisor>標簽
private void parseAdvisor(Element advisorElement, ParserContext parserContext) {AbstractBeanDefinition advisorDef = createAdvisorBeanDefinition(advisorElement, parserContext);String id = advisorElement.getAttribute(ID);try {this.parseState.push(new AdvisorEntry(id));String advisorBeanName = id;// 注冊進容器if (StringUtils.hasText(advisorBeanName)) {parserContext.getRegistry().registerBeanDefinition(advisorBeanName, advisorDef);}else {advisorBeanName = parserContext.getReaderContext().registerWithGeneratedName(advisorDef);}// 解析切點Object pointcut = parsePointcutProperty(advisorElement, parserContext);// 根據pointcut的類型,將其添加到advisorDef的屬性值中,并注冊相關的組件。if (pointcut instanceof BeanDefinition) {advisorDef.getPropertyValues().add(POINTCUT, pointcut);parserContext.registerComponent(new AdvisorComponentDefinition(advisorBeanName, advisorDef, (BeanDefinition) pointcut));}else if (pointcut instanceof String) {advisorDef.getPropertyValues().add(POINTCUT, new RuntimeBeanReference((String) pointcut));parserContext.registerComponent(new AdvisorComponentDefinition(advisorBeanName, advisorDef));}}finally {this.parseState.pop();}
}
4.4 parseAspect源碼解析
parseAspect負責解析aspect標簽
private void parseAspect(Element aspectElement, ParserContext parserContext) {// 獲取ID值String aspectId = aspectElement.getAttribute(ID);// 獲取ref屬性String aspectName = aspectElement.getAttribute(REF);try {this.parseState.push(new AspectEntry(aspectId, aspectName));List<BeanDefinition> beanDefinitions = new ArrayList<>();List<BeanReference> beanReferences = new ArrayList<>();// 獲得當前節點下的所有<declare-parents>子元素List<Element> declareParents = DomUtils.getChildElementsByTagName(aspectElement, DECLARE_PARENTS);for (int i = METHOD_INDEX; i < declareParents.size(); i++) {Element declareParentsElement = declareParents.get(i);// 解析節點并注冊進IOC容器中beanDefinitions.add(parseDeclareParents(declareParentsElement, parserContext));}// 獲取當前節點的子節點NodeList nodeList = aspectElement.getChildNodes();boolean adviceFoundAlready = false;for (int i = 0; i < nodeList.getLength(); i++) {Node node = nodeList.item(i);// 是否是advice節點if (isAdviceNode(node, parserContext)) {// 是否是第一個advice節點if (!adviceFoundAlready) {adviceFoundAlready = true;if (!StringUtils.hasText(aspectName)) {parserContext.getReaderContext().error("<aspect> tag needs aspect bean reference via 'ref' attribute when declaring advices.",aspectElement, this.parseState.snapshot());return;}// 添加一個運行時bean引用到beanReferencesbeanReferences.add(new RuntimeBeanReference(aspectName));}// 如果節點是advice,則調用parseAdvice方法解析它,并創建一個顧問(advisor)的bean定義。AbstractBeanDefinition advisorDefinition = parseAdvice(aspectName, i, aspectElement, (Element) node, parserContext, beanDefinitions, beanReferences);beanDefinitions.add(advisorDefinition);}}// 使用解析得到的信息創建一個切面組件定義AspectComponentDefinition aspectComponentDefinition = createAspectComponentDefinition(aspectElement, aspectId, beanDefinitions, beanReferences, parserContext);// 將切面組件定義推入解析上下文。parserContext.pushContainingComponent(aspectComponentDefinition);// 獲取所有<pointcut>子元素。List<Element> pointcuts = DomUtils.getChildElementsByTagName(aspectElement, POINTCUT);for (Element pointcutElement : pointcuts) {// 解析切點parsePointcut(pointcutElement, parserContext);}// 從解析上下文中彈出并注冊包含的組件。parserContext.popAndRegisterContainingComponent();}finally {this.parseState.pop();}
}
總得來說,就是解析標簽,將標簽的內容包裝成BeanDefinition并注冊進IOC容器。
前面說到Advice就是一個切面的行為,而parseAdvice方法就是負責解析這個切面行為的
private AbstractBeanDefinition parseAdvice(String aspectName, int order, Element aspectElement, Element adviceElement, ParserContext parserContext,List<BeanDefinition> beanDefinitions, List<BeanReference> beanReferences) {try {this.parseState.push(new AdviceEntry(parserContext.getDelegate().getLocalName(adviceElement)));// 解析advice節點中的 method 屬性,將其創建成一個 beanDefinition 對象RootBeanDefinition methodDefinition = new RootBeanDefinition(MethodLocatingFactoryBean.class);methodDefinition.getPropertyValues().add("targetBeanName", aspectName);methodDefinition.getPropertyValues().add("methodName", adviceElement.getAttribute("method"));methodDefinition.setSynthetic(true);// 關聯aspectName(對應的就是案例中的aopUtil),包裝為 SimpleBeanFactoryAwareAspectInstanceFactory 對象RootBeanDefinition aspectFactoryDef =new RootBeanDefinition(SimpleBeanFactoryAwareAspectInstanceFactory.class);aspectFactoryDef.getPropertyValues().add("aspectBeanName", aspectName);aspectFactoryDef.setSynthetic(true);// 解析切點并綜合上面兩個bean包裝成AbstractAspectJAdviceAbstractBeanDefinition adviceDef = createAdviceDefinition(adviceElement, parserContext, aspectName, order, methodDefinition, aspectFactoryDef,beanDefinitions, beanReferences);// 最終包裝成AspectJPointcutAdvisorRootBeanDefinition advisorDefinition = new RootBeanDefinition(AspectJPointcutAdvisor.class);advisorDefinition.setSource(parserContext.extractSource(adviceElement));advisorDefinition.getConstructorArgumentValues().addGenericArgumentValue(adviceDef);if (aspectElement.hasAttribute(ORDER_PROPERTY)) {advisorDefinition.getPropertyValues().add(ORDER_PROPERTY, aspectElement.getAttribute(ORDER_PROPERTY));}// 注冊advisorparserContext.getReaderContext().registerWithGeneratedName(advisorDefinition);return advisorDefinition;}finally {this.parseState.pop();}
}
4.5 小總結
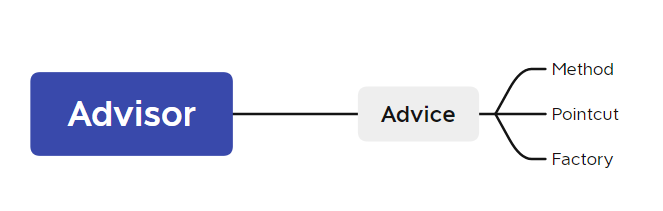
好吧,估計有點繞暈了。就parseAspect方法來說,主要的目的是想組裝一個Advisor,但是得先把把advice初始化,這個時候就需要解析標簽中的method等實例化出來methodDefinition。
有了methodDefinition就知道這個方法是前置增還是后置增強。接著實例化Pointcut等這些,都是實例化完成后,再再按照下圖的組件關系組裝出一個完整的Advisor,這個Advisor有AOP的所有信息,并保存在了IOC容器中。
既然切點、切面等信息以及包裝好了,代理對象是怎么創建返回的呢?接著往下看。不過在此需要先加一點前置知識。
4.6 代理創建
在IOC源碼篇的時候,有講解過org.springframework.context.support.AbstractApplicationContext#finishBeanFactoryInitialization方法。
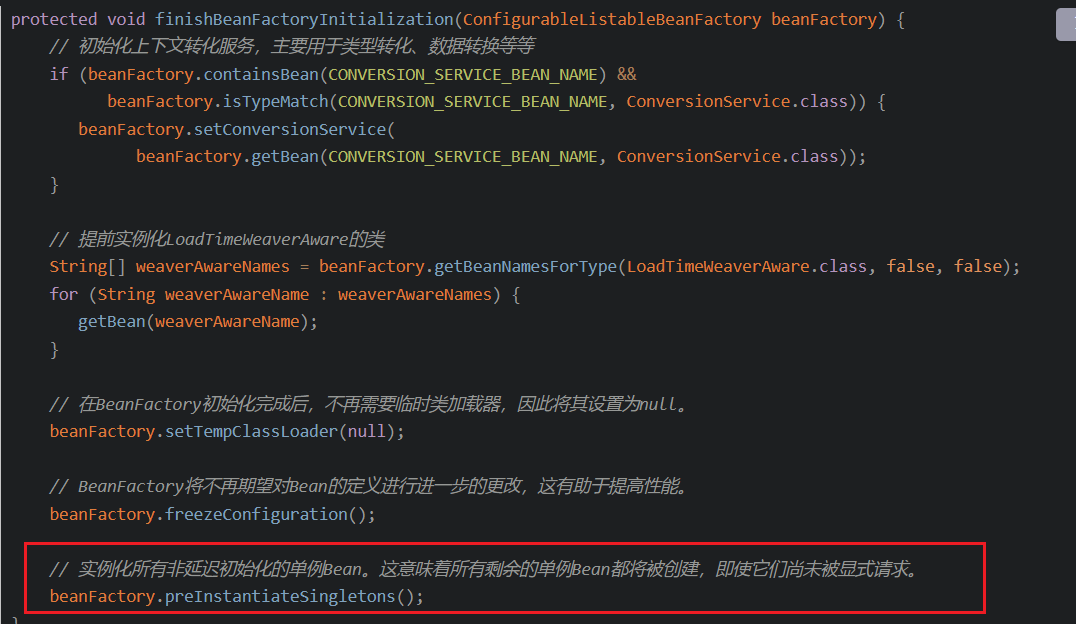
在org.springframework.beans.factory.config.ConfigurableListableBeanFactory#preInstantiateSingletons會實例化所有非延遲初始化的單例Bean
在這個方法中大致內容就是獲取所有beanDefinitionNames,然后進行遍歷,如果是屬于FactoryBean則進行FactoryBean的處理,否則正常處理。
List<String> beanNames = new ArrayList<>(this.beanDefinitionNames);for (String beanName : beanNames) {RootBeanDefinition bd = getMergedLocalBeanDefinition(beanName);if (!bd.isAbstract() && bd.isSingleton() && !bd.isLazyInit()) {if (isFactoryBean(beanName)) {// ....省略}else {getBean(beanName);}}
}
因為AOP包裝的Bean肯定不是FactoryBean,因此直接進入getBean方法
public Object getBean(String name) throws BeansException {return doGetBean(name, null, null, false);
}
protected <T> T doGetBean(String name, @Nullable Class<T> requiredType, @Nullable Object[] args, boolean typeCheckOnly)throws BeansException {// 轉化別名String beanName = transformedBeanName(name);Object bean;// 提前檢查單例緩存中是否有手動注冊的單例對象,這和循環依賴有關聯,以后會講到Object sharedInstance = getSingleton(beanName);if (sharedInstance != null && args == null) {// 省略....}else {// 當對象都是單例的時候會嘗試解決循環依賴的問題,但是原型模式下如果存在循環依賴的情況,那么直接拋出異常if (isPrototypeCurrentlyInCreation(beanName)) {throw new BeanCurrentlyInCreationException(beanName);}// 省略若干行代碼RootBeanDefinition mbd = getMergedLocalBeanDefinition(beanName);String[] dependsOn = mbd.getDependsOn();// 是單例if (mbd.isSingleton()) {sharedInstance = getSingleton(beanName, () -> {try {// 創建單例return createBean(beanName, mbd, args);}catch (BeansException ex) {destroySingleton(beanName);throw ex;}});bean = getObjectForBeanInstance(sharedInstance, name, beanName, mbd);}}return (T) bean;
}
整體代碼比較啰嗦,這里省略一些代碼,大體內容如下:
- 轉化bean的名字
- 是否有循環依賴,有的話解決循環依賴問題
- Bean屬于單例,進行創建單例
protected Object createBean(String beanName, RootBeanDefinition mbd, @Nullable Object[] args)try {Object beanInstance = doCreateBean(beanName, mbdToUse, args);if (logger.isTraceEnabled()) {logger.trace("Finished creating instance of bean '" + beanName + "'");}return beanInstance;}}protected Object doCreateBean(String beanName, RootBeanDefinition mbd, @Nullable Object[] args){// 根據執行bean使用對應的策略創建新的實例,如,工廠方法,構造函數主動注入、簡單初始化BeanWrapper instanceWrapper = createBeanInstance(beanName, mbd, args);// 對bean的屬性進行填充,將各個屬性值注入,其中,可能存在依賴于其他bean的屬性,則會遞歸初始化依賴的beanpopulateBean(beanName, mbd, instanceWrapper);// 執行初始化邏輯exposedObject = initializeBean(beanName, exposedObject, mbd);
}
ok!終于定位到org.springframework.beans.factory.support.AbstractAutowireCapableBeanFactory#initializeBean(java.lang.String, java.lang.Object, org.springframework.beans.factory.support.RootBeanDefinition)這個方法了,這個方法就是負責初始化Bean。
以上的內容屬于IOC源碼知識的補充,下面正式開始AOP代理創建的源碼解析!!!
protected Object initializeBean(String beanName, Object bean, @Nullable RootBeanDefinition mbd) {Object wrappedBean = bean;if (mbd == null || !mbd.isSynthetic()) {// 執行前置通知wrappedBean = applyBeanPostProcessorsBeforeInitialization(wrappedBean, beanName);}try {invokeInitMethods(beanName, wrappedBean, mbd);}catch (Throwable ex) {throw new BeanCreationException((mbd != null ? mbd.getResourceDescription() : null),beanName, "Invocation of init method failed", ex);}if (mbd == null || !mbd.isSynthetic()) {// 執行后置通知wrappedBean = applyBeanPostProcessorsAfterInitialization(wrappedBean, beanName);}return wrappedBean;
}
前置通知和AOP沒半毛錢關系,主要關注執行后置通知
為什么AOP與后置通知有關系?
還記不記得,前面說過會向容器注入
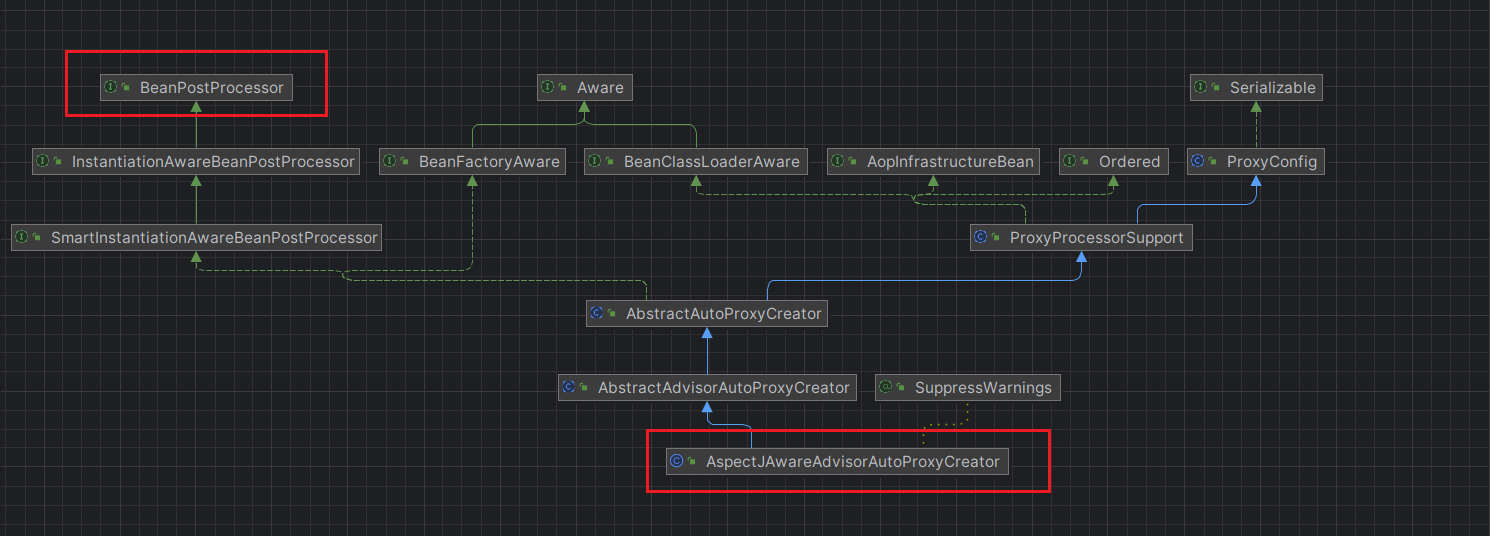
AspectjAwareAdvisorAutoProxyCreator,這是類負責代理的創建
是的,你沒看錯
AspectjAwareAdvisorAutoProxyCreator是一個實現了BeanPostProcessor的類
org.springframework.beans.factory.support.AbstractAutowireCapableBeanFactory#applyBeanPostProcessorsAfterInitialization方法的源碼很簡單,就是調用postProcessAfterInitialization返回一個bean,對當前的bean進行包裝
public Object applyBeanPostProcessorsAfterInitialization(Object existingBean, String beanName)throws BeansException {Object result = existingBean;for (BeanPostProcessor processor : getBeanPostProcessors()) {Object current = processor.postProcessAfterInitialization(result, beanName);if (current == null) {return result;}result = current;}return result;
}
那AspectjAwareAdvisorAutoProxyCreator的postProcessAfterInitialization的實現是怎么樣的?
其實AspectjAwareAdvisorAutoProxyCreator并沒有該方法的實現,而是在其父類實現了org.springframework.aop.framework.autoproxy.AbstractAutoProxyCreator#postProcessAfterInitialization
public Object postProcessAfterInitialization(@Nullable Object bean, String beanName) {if (bean != null) {// 獲取當前bean的key:如果beanName不為空,則以beanName為key,如果為FactoryBean類型,// 前面還會添加&符號,如果beanName為空,則以當前bean對應的class為keyObject cacheKey = getCacheKey(bean.getClass(), beanName);// 判斷這個bean是否正在在被代理,如果正在被代理則不處理if (this.earlyProxyReferences.remove(cacheKey) != bean) {// 進入需要被代理,進行代理處理return wrapIfNecessary(bean, beanName, cacheKey);}}return bean;
}
protected Object wrapIfNecessary(Object bean, String beanName, Object cacheKey) {// 獲取當前Bean的Advices和AdvisorsObject[] specificInterceptors = getAdvicesAndAdvisorsForBean(bean.getClass(), beanName, null);// 對Bean的代理狀態緩存if (specificInterceptors != DO_NOT_PROXY) {this.advisedBeans.put(cacheKey, Boolean.TRUE);// 創建代理Object proxy = createProxy(bean.getClass(), beanName, specificInterceptors, new SingletonTargetSource(bean));、// 緩存代理Bean的類型this.proxyTypes.put(cacheKey, proxy.getClass());return proxy;}this.advisedBeans.put(cacheKey, Boolean.FALSE);return bean;
}
著重關心一下createProxy,看看創建代理是怎么個事
protected Object createProxy(Class<?> beanClass, @Nullable String beanName,@Nullable Object[] specificInterceptors, TargetSource targetSource) {// 給bean定義設置暴露屬性if (this.beanFactory instanceof ConfigurableListableBeanFactory) {AutoProxyUtils.exposeTargetClass((ConfigurableListableBeanFactory) this.beanFactory, beanName, beanClass);}// 創建代理工廠ProxyFactory proxyFactory = new ProxyFactory();// 將當前實例的配置復制到proxyFactoryproxyFactory.copyFrom(this);// 決定對于給定的Bean是否應該試應targetClass而不是接口代理if (!proxyFactory.isProxyTargetClass()) {// 檢查使用JDK代理還是cglib代理if (shouldProxyTargetClass(beanClass, beanName)) {proxyFactory.setProxyTargetClass(true);}else {// 添加代理接口evaluateProxyInterfaces(beanClass, proxyFactory);}}// 構建增強器Advisor[] advisors = buildAdvisors(beanName, specificInterceptors);proxyFactory.addAdvisors(advisors);// 設置要代理的類proxyFactory.setTargetSource(targetSource);// 定制代理customizeProxyFactory(proxyFactory);// 控制代理工程被配置之后,是否還允許修改通知,默認值是falseproxyFactory.setFrozen(this.freezeProxy);if (advisorsPreFiltered()) {proxyFactory.setPreFiltered(true);}// 完成上面這些之后開始創建代理對象return proxyFactory.getProxy(getProxyClassLoader());
}
createAopProxy方法是根據代理目標選擇JDK代理或者是Cglib代理,代碼挺容易看懂的,就不解釋了
public Object getProxy(@Nullable ClassLoader classLoader) {return createAopProxy().getProxy(classLoader);
}
public AopProxy createAopProxy(AdvisedSupport config) throws AopConfigException {if (config.isOptimize() || config.isProxyTargetClass() || hasNoUserSuppliedProxyInterfaces(config)) {Class<?> targetClass = config.getTargetClass();if (targetClass == null) {throw new AopConfigException("TargetSource cannot determine target class: " +"Either an interface or a target is required for proxy creation.");}if (targetClass.isInterface() || Proxy.isProxyClass(targetClass)) {return new JdkDynamicAopProxy(config);}return new ObjenesisCglibAopProxy(config);}else {return new JdkDynamicAopProxy(config);}
}
至于getProxy方法,JDK代理和CGLib代碼都有不同的實現,在都2024年了,還有人不懂動態代理么?有講述過JDK代理和CGLIB代理的實現原理,具體請看這篇文章。
五、總結
經過上面這么一步步過來,這個Bean的代理對象就成功被內放進Spring IOC容器中,當我們下次從容器getBean的時候就可以獲取到代理的對象了。
雖然源碼很復雜,但是其實不需要記住每一步,只需要記住Spring AOP實現的大體步驟思路即可
- 讀取并解析配置文件,將
AOP的四大組件,解析封裝成Bean,存放進IOC中 - 向
IOC注入一個AspectjAwareAdvisorAutoProxyCreator,這是一個實現了BeanPostProcessor接口。這個非常重要,這個是Spring AOP的核心 - 在
Spring IOC完成刷新之后,會進行單例Bean的懶加載,在懶加載的過程中會獲取容器中的所有BeanPostProcessor實現類,然后調用其postProcessAfterInitialization方法 - 在
AspectjAwareAdvisorAutoProxyCreator的實現會判斷當前Bean需要被代理,然后根據目標Bean是否實現接口等條件判斷使用JDK代理還是CGlib代理,然后返回代理類并放進容器
總體核心就這四點,但里面的細節還有很多很多,這篇文章就先寫這吧。明天還要上班呢~


)

![P3110 [USACO14DEC] Piggy Back S](http://pic.xiahunao.cn/P3110 [USACO14DEC] Piggy Back S)


-日志)
