Android EditText+ListPopupWindow實現可編輯的下拉列表
- 📖1. 可編輯的下拉列表
- ?步驟一:準備視圖
- ?步驟二:封裝顯示方法
- ?步驟三:獲取視圖并監聽
- 📖2. 擴展上下箭頭
- ?步驟一:準備上下箭頭icon圖標
- ?步驟二:drawableRight屬性
- ?步驟三:監聽圖標點擊
📖1. 可編輯的下拉列表
效果圖:
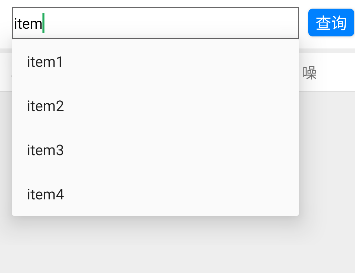
?步驟一:準備視圖
EditText視圖:
<EditTextandroid:id="@+id/edit_text"android:layout_width="0dp"android:layout_weight="1"android:layout_height="35dp"android:layout_marginLeft="0dp"android:layout_marginRight="10dp"android:background="@drawable/shape_edit2"android:inputType="text"android:textColor="@color/black"android:hint="輸入內容"android:textSize="16sp" />
shape_edit2形狀文件
<?xml version="1.0" encoding="utf-8"?>
<shape xmlns:android="http://schemas.android.com/apk/res/android"><!-- 指定了形狀內部的填充顏色 --><solid android:color="#ffffff" /><!-- 指定了形狀輪廓的粗細與顏色 --><strokeandroid:width="1dp"android:color="@color/black_gray" /><!-- 指定了形狀四個圓角的半徑 --><corners android:radius="0dp" /><!-- 指定了形狀四個方向的間距 --><paddingandroid:bottom="2dp"android:left="2dp"android:right="2dp"android:top="2dp" />
</shape>
?步驟二:封裝顯示方法
private ListPopupWindow listPopupWindow;//ListPopupWindowprivate ArrayAdapter<String> adapter;//數組適配private List<String> suggestions;//下拉數據列表private static final int MAX_VISIBLE_ITEMS = 5;//最大顯示數據行//顯示下拉列表方法private void showSuggestions(String query) {if (listPopupWindow == null) {// 初始化 ListPopupWindowlistPopupWindow = new ListPopupWindow(getActivity());// 初始化適配器adapter = new ArrayAdapter<>(getActivity(), android.R.layout.simple_list_item_1, new ArrayList<>());listPopupWindow.setAdapter(adapter);listPopupWindow.setAnchorView(edit_text);listPopupWindow.setModal(false);// 設置下拉列表項點擊事件listPopupWindow.setOnItemClickListener((parent, view, position, id) -> {String selectedItem = adapter.getItem(position);if (selectedItem != null) {// 設置編輯框內容為選中項,并將光標移至文本末尾edit_text.setText(selectedItem);edit_text.setSelection(selectedItem.length());}// 隱藏下拉列表listPopupWindow.dismiss();});}// 過濾并設置下拉列表數據List<String> filteredSuggestions = new ArrayList<>();for (String suggestion : suggestions) {if (suggestion.toLowerCase().contains(query.toLowerCase())) {filteredSuggestions.add(suggestion);}}// 更新適配器數據adapter.clear();adapter.addAll(filteredSuggestions);// 如果過濾后的建議列表不為空,則顯示下拉列表if (!filteredSuggestions.isEmpty()) {// 獲取每行的高度int itemHeight = getResources().getDimensionPixelSize(android.R.dimen.app_icon_size);// 動態計算ListPopupWindow 的高度,最大高度=MAX_VISIBLE_ITEMSint height = Math.min(filteredSuggestions.size(), MAX_VISIBLE_ITEMS) * itemHeight;// 設置 ListPopupWindow 的高度listPopupWindow.setHeight(height);// 顯示下拉列表listPopupWindow.show();} else {// 隱藏下拉列表listPopupWindow.dismiss();}}
?步驟三:獲取視圖并監聽
1.獲取輸入框
EditText edit_text = findViewById(R.id.edit_text);//輸入框
2.生成下拉數據(這里的數據可換成真實的數據庫數據),監聽文本變化
//生成數據suggestions = new ArrayList<>();suggestions.add("item1");suggestions.add("item2");suggestions.add("item3");suggestions.add("item4");//監聽文本變化edit_text.addTextChangedListener(new TextWatcher() {@Overridepublic void beforeTextChanged(CharSequence s, int start, int count, int after) {// No-op}@Overridepublic void onTextChanged(CharSequence s, int start, int before, int count) {showSuggestions(s.toString());//調取顯示下拉列表方法}@Overridepublic void afterTextChanged(Editable s) {// No-op}});
至此實現完成。
📖2. 擴展上下箭頭
效果圖:
?步驟一:準備上下箭頭icon圖標
上箭頭item_icon_up.xml
<?xml version="1.0" encoding="utf-8"?>
<layer-list xmlns:android="http://schemas.android.com/apk/res/android"><itemandroid:width="30dp"android:height="30dp"android:drawable="@drawable/icon_up_selected" />
</layer-list>
下箭頭item_icon_down.xml
<?xml version="1.0" encoding="utf-8"?>
<layer-list xmlns:android="http://schemas.android.com/apk/res/android"><itemandroid:width="30dp"android:height="30dp"android:drawable="@drawable/icon_down_selected" />
</layer-list>
里面的圖片可直接再阿里巴巴圖標庫搜索"上拉"、"下拉"即可
地址:https://www.iconfont.cn/
?步驟二:drawableRight屬性
編輯框添加drawableRight屬性,EditText可以添加上下左右圖片資源,我們添加右邊即可。
<EditTextandroid:id="@+id/edit_text"android:layout_width="0dp"android:layout_height="35dp"android:layout_marginLeft="0dp"android:layout_marginRight="10dp"android:layout_weight="1"android:background="@drawable/shape_edit2"android:drawableRight="@drawable/item_icon_up"android:hint="輸入停點名/車位號/設備號"android:inputType="text"android:textColor="@color/black"android:textSize="16sp" />
?步驟三:監聽圖標點擊
//監聽圖標點擊editText.setOnTouchListener(new View.OnTouchListener() {@Overridepublic boolean onTouch(View view, MotionEvent event) {final int DRAWABLE_RIGHT = 2; // 右側圖標的位置// 檢查觸摸事件是否為抬起事件if (event.getAction() == MotionEvent.ACTION_UP) {// 檢查觸摸位置是否在右側圖標范圍內if (event.getX() >= (editText.getWidth() - editText.getCompoundDrawables()[DRAWABLE_RIGHT].getBounds().width())) {// 切換圖標并處理對應邏輯if (isIconDown) {// 當前圖標是 item_icon_down,切換為 item_icon_upeditText.setCompoundDrawablesWithIntrinsicBounds(null, null, getResources().getDrawable(R.drawable.item_icon_up), null);// 處理 item_icon_up 的邏輯showSuggestions(editText.getText().toString());if (listPopupWindow != null) listPopupWindow.show();} else {// 當前圖標是 item_icon_up,切換為 item_icon_downeditText.setCompoundDrawablesWithIntrinsicBounds(null, null, getResources().getDrawable(R.drawable.item_icon_down), null);// 處理 item_icon_down 的邏輯showSuggestions(editText.getText().toString());if (listPopupWindow != null) listPopupWindow.dismiss();}// 切換圖標狀態isIconDown = !isIconDown;return true;}}return false;}});
setCompoundDrawablesWithIntrinsicBounds方法的參數分別是設置左、上、右、下位置。
setCompoundDrawablesWithIntrinsicBounds(left, top, right, bottom);
另外定義圖標位置的常量如下:
// 定義圖標位置的常量,分別為左、上、右、下final int DRAWABLE_LEFT = 0;final int DRAWABLE_TOP = 1;final int DRAWABLE_RIGHT = 2;final int DRAWABLE_BOTTOM = 3;


,整形與大小端字節序)


:Redis GEO地理信息查詢與管理)


Message的發送詳解)


)

: Gradle 腳本最佳實踐)
