1、Hello,World!
1.1、SpringBoot簡介
回顧什么是Spring
Spring是一個開源框架,2003 年興起的一個輕量級的Java 開發框架,作者:Rod Johnson 。
Spring是為了解決企業級應用開發的復雜性而創建的,簡化開發。
Spring是如何簡化Java開發的
為了降低Java開發的復雜性,Spring采用了以下4種關鍵策略:
-
基于POJO的輕量級和最小侵入性編程,所有東西都是bean;
-
通過IOC,依賴注入(DI)和面向接口實現松耦合;
-
基于切面(AOP)和慣例進行聲明式編程;
-
通過切面和模版減少樣式代碼,RedisTemplate,xxxTemplate;
什么是SpringBoot
學過javaweb的同學就知道,開發一個web應用,從最初開始接觸Servlet結合Tomcat, 跑出一個Hello Wolrld程序,是要經歷特別多的步驟;后來就用了框架Struts,再后來是SpringMVC,到了現在的SpringBoot,過一兩年又會有其他web框架出現;你們有經歷過框架不斷的演進,然后自己開發項目所有的技術也在不斷的變化、改造嗎?建議都可以去經歷一遍;
言歸正傳,什么是SpringBoot呢,就是一個javaweb的開發框架,和SpringMVC類似,對比其他javaweb框架的好處,官方說是簡化開發,約定大于配置, you can "just run",能迅速的開發web應用,幾行代碼開發一個http接口。
所有的技術框架的發展似乎都遵循了一條主線規律:從一個復雜應用場景 衍生 一種規范框架,人們只需要進行各種配置而不需要自己去實現它,這時候強大的配置功能成了優點;發展到一定程度之后,人們根據實際生產應用情況,選取其中實用功能和設計精華,重構出一些輕量級的框架;之后為了提高開發效率,嫌棄原先的各類配置過于麻煩,于是開始提倡“約定大于配置”,進而衍生出一些一站式的解決方案。
是的這就是Java企業級應用->J2EE->spring->springboot的過程。
隨著 Spring 不斷的發展,涉及的領域越來越多,項目整合開發需要配合各種各樣的文件,慢慢變得不那么易用簡單,違背了最初的理念,甚至人稱配置地獄。Spring Boot 正是在這樣的一個背景下被抽象出來的開發框架,目的為了讓大家更容易的使用 Spring 、更容易的集成各種常用的中間件、開源軟件;
Spring Boot 基于 Spring 開發,Spirng Boot 本身并不提供 Spring 框架的核心特性以及擴展功能,只是用于快速、敏捷地開發新一代基于 Spring 框架的應用程序。也就是說,它并不是用來替代 Spring 的解決方案,而是和 Spring 框架緊密結合用于提升 Spring 開發者體驗的工具。Spring Boot 以約定大于配置的核心思想,默認幫我們進行了很多設置,多數 Spring Boot 應用只需要很少的 Spring 配置。同時它集成了大量常用的第三方庫配置(例如 Redis、MongoDB、Jpa、RabbitMQ、Quartz 等等),Spring Boot 應用中這些第三方庫幾乎可以零配置的開箱即用。
簡單來說就是SpringBoot其實不是什么新的框架,它默認配置了很多框架的使用方式,就像maven整合了所有的jar包,spring boot整合了所有的框架 。
Spring Boot 出生名門,從一開始就站在一個比較高的起點,又經過這幾年的發展,生態足夠完善,Spring Boot 已經當之無愧成為 Java 領域最熱門的技術。
Spring Boot的主要優點:
- 為所有Spring開發者更快的入門
- 開箱即用,提供各種默認配置來簡化項目配置
- 內嵌式容器簡化Web項目
- 沒有冗余代碼生成和XML配置的要求
真的很爽,我們快速去體驗開發個接口的感覺吧!
1.2、Hello,World!
準備工作
我們將學習如何快速的創建一個Spring Boot應用,并且實現一個簡單的Http請求處理。通過這個例子對Spring Boot有一個初步的了解,并體驗其結構簡單、開發快速的特性。
我的環境準備:
- java version "1.8.0_181"
- Maven-3.6.1
- SpringBoot 2.x 最新版
開發工具:
- IDEA
創建基礎項目說明
Spring官方提供了非常方便的工具讓我們快速構建應用
Spring Initializr:https://start.spring.io/
項目創建方式一:使用Spring Initializr 的 Web頁面創建項目
-
打開?https://start.spring.io/
-
填寫項目信息
-
點擊”Generate Project“按鈕生成項目;下載此項目
-
解壓項目包,并用IDEA以Maven項目導入,一路下一步即可,直到項目導入完畢。
-
如果是第一次使用,可能速度會比較慢,包比較多、需要耐心等待一切就緒。
項目創建方式二:使用 IDEA 直接創建項目
-
創建一個新項目
-
選擇spring initalizr , 可以看到默認就是去官網的快速構建工具那里實現
-
填寫項目信息
-
選擇初始化的組件(初學勾選 Web 即可)
-
填寫項目路徑
-
等待項目構建成功
項目結構分析:
通過上面步驟完成了基礎項目的創建。就會自動生成以下文件。
-
程序的主啟動類
-
一個 application.properties 配置文件
-
一個 測試類
-
一個 pom.xml
pom.xml分析
打開pom.xml,看看SpringBoot項目的依賴:
<!-- 父依賴 -->
<parent><groupId>org.springframework.boot</groupId><artifactId>spring-boot-starter-parent</artifactId><version>2.6.6</version><relativePath/>
</parent><dependencies><!-- web場景啟動器 --><dependency><groupId>org.springframework.boot</groupId><artifactId>spring-boot-starter-web</artifactId></dependency><!-- springboot單元測試 --><dependency><groupId>org.springframework.boot</groupId><artifactId>spring-boot-starter-test</artifactId><scope>test</scope><!-- 剔除依賴 --><exclusions><exclusion><groupId>org.junit.vintage</groupId><artifactId>junit-vintage-engine</artifactId></exclusion></exclusions></dependency>
</dependencies><build><plugins><!-- 打包插件 --><plugin><groupId>org.springframework.boot</groupId><artifactId>spring-boot-maven-plugin</artifactId></plugin></plugins>
</build>
編寫一個http接口
-
在主程序的同級目錄下,新建一個controller包,一定要在同級目錄下,否則識別不到
-
在包中新建一個HelloController類
@RestController
public class HelloController {@RequestMapping("/hello")public String hello() {return "Hello World";}}
- 編寫完畢后,從主程序啟動項目,瀏覽器發起請求,看頁面返回;控制臺輸出了 Tomcat 訪問的端口號!
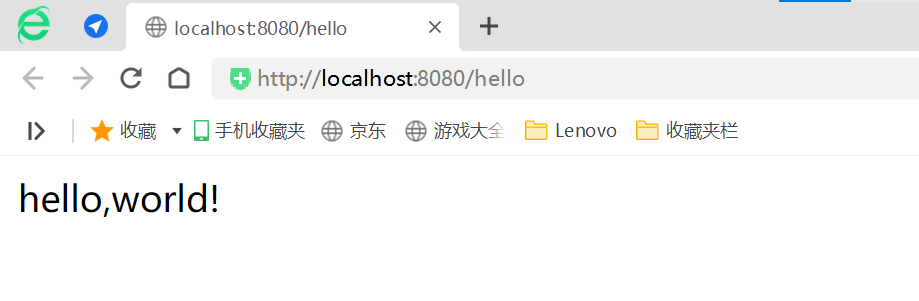
簡單幾步,就完成了一個web接口的開發,SpringBoot就是這么簡單。所以我們常用它來建立我們的微服務項目!
將項目打成jar包,點擊maven的package
如果遇到錯誤,可以嘗試配置打包時,跳過項目運行測試用例
<!--在工作中,很多情況下我們打包是不想執行測試用例的可能是測試用例不完事,或是測試用例會影響數據庫數據跳過測試用例執-->
<plugin><groupId>org.apache.maven.plugins</groupId><artifactId>maven-surefire-plugin</artifactId><configuration><!--跳過項目運行測試用例--><skipTests>true</skipTests></configuration>
</plugin>
如果打包成功,則會在target目錄下生成一個 jar 包
打成了jar包后,就可以在任何地方運行了!OK
彩蛋
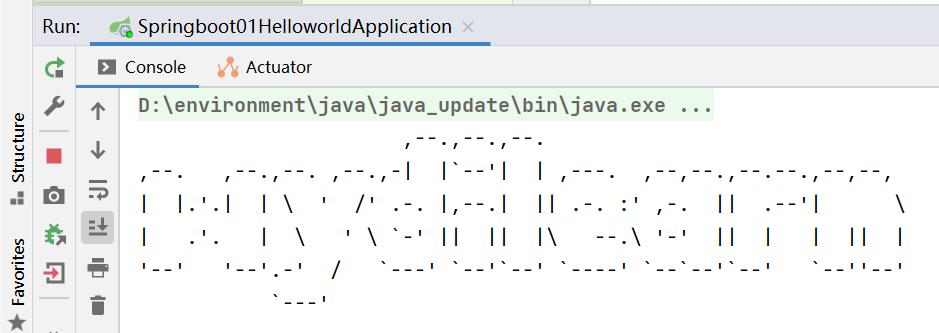
如何更改啟動時顯示的字符拼成的字母,SpringBoot呢?也就是 banner 圖案;
只需一步:到項目下的 resources 目錄下新建一個banner.txt 即可。
圖案可以到:Spring Boot banner在線生成工具,制作下載英文banner.txt,修改替換banner.txt文字實現自定義,個性化啟動banner-bootschool.net?這個網站生成,然后拷貝到文件中即可!
SpringBoot這么簡單的東西背后一定有故事,我們之后去進行一波源碼分析!
2、運行原理探究
2.1、pom.xml
父依賴
其中它主要是依賴一個父項目,主要是管理項目的資源過濾及插件!
<parent><groupId>org.springframework.boot</groupId><artifactId>spring-boot-starter-parent</artifactId><version>2.6.6</version><relativePath/> <!-- lookup parent from repository -->
</parent>
點進去,發現還有一個父依賴
<parent><groupId>org.springframework.boot</groupId><artifactId>spring-boot-dependencies</artifactId><version>2.6.6</version><relativePath>../../spring-boot-dependencies</relativePath>
</parent>
這里才是真正管理SpringBoot應用里面所有依賴版本的地方,SpringBoot的版本控制中心;
以后我們導入依賴默認是不需要寫版本;但是如果導入的包沒有在依賴中管理著就需要手動配置版本了;
啟動器 spring-boot-starter
<dependency><groupId>org.springframework.boot</groupId><artifactId>spring-boot-starter-web</artifactId>
</dependency>
springboot-boot-starter-xxx:就是spring-boot的場景啟動器
spring-boot-starter-web:幫我們導入了web模塊正常運行所依賴的組件;
SpringBoot將所有的功能場景都抽取出來,做成一個個的starter (啟動器),只需要在項目中引入這些starter即可,所有相關的依賴都會導入進來 , 我們要用什么功能就導入什么樣的場景啟動器即可 ;我們未來也可以自己自定義 starter;
- 啟動器:說白了就是SpringBoot的啟動場景;
- 比如spring-boot-starter-web,就會幫我們自動導入web環境所有的依賴!
- SpringBoot會將所有的功能場景,都變成一個個的啟動器
- 我們要使用什么功能,就只需要找到對應的啟動器就可以了
starter
2.2、主啟動類
分析完了 pom.xml 來看看這個啟動類
默認的主啟動類
//@SpringBootApplication 來標注一個主程序類
//說明這是一個Spring Boot應用
@SpringBootApplication
public class SpringbootApplication {public static void main(String[] args) {//以為是啟動了一個方法,沒想到啟動了一個服務SpringApplication.run(SpringbootApplication.class, args);}}
但是一個簡單的啟動類并不簡單!我們來分析一下這些注解都干了什么
@SpringBootApplication
作用:標注在某個類上說明這個類是SpringBoot的主配置類 , SpringBoot就應該運行這個類的main方法來啟動SpringBoot應用;
進入這個注解:可以看到上面還有很多其他注解!
@SpringBootConfiguration
@EnableAutoConfiguration
@ComponentScan(excludeFilters = {@Filter(type = FilterType.CUSTOM,classes = {TypeExcludeFilter.class}), @Filter(type = FilterType.CUSTOM,classes = {AutoConfigurationExcludeFilter.class})}
)
public @interface SpringBootApplication {// ......
}
@ComponentScan
這個注解在Spring中很重要 ,它對應XML配置中的元素。
作用:自動掃描并加載符合條件的組件或者bean , 將這個bean定義加載到IOC容器中
@SpringBootConfiguration
作用:SpringBoot的配置類 ,標注在某個類上 , 表示這是一個SpringBoot的配置類;
我們繼續進去這個注解查看
// 點進去得到下面的 @Component
@Configuration
public @interface SpringBootConfiguration {}@Component
public @interface Configuration {}
這里的 @Configuration,說明這是一個配置類 ,配置類就是對應Spring的xml 配置文件;
里面的 @Component 這就說明,啟動類本身也是Spring中的一個組件而已,負責啟動應用!
我們回到 SpringBootApplication 注解中繼續看。
@EnableAutoConfiguration
@EnableAutoConfiguration :開啟自動配置功能
以前我們需要自己配置的東西,而現在SpringBoot可以自動幫我們配置 ;@EnableAutoConfiguration告訴SpringBoot開啟自動配置功能,這樣自動配置才能生效;
點進注解接續查看:
@AutoConfigurationPackage :自動配置包
@Import({Registrar.class})
public @interface AutoConfigurationPackage {
}
@import?:Spring底層注解@import , 給容器中導入一個組件
Registrar.class 作用:將主啟動類的所在包及包下面所有子包里面的所有組件掃描到Spring容器 ;
這個分析完了,退到上一步,繼續看
@Import({AutoConfigurationImportSelector.class}) :給容器導入組件 ;
AutoConfigurationImportSelector :自動配置導入選擇器,那么它會導入哪些組件的選擇器呢?我們點擊去這個類看源碼:
- 這個類中有一個這樣的方法
// 獲得候選的配置
protected List<String> getCandidateConfigurations(AnnotationMetadata metadata, AnnotationAttributes attributes) {//這里的getSpringFactoriesLoaderFactoryClass()方法//返回的就是我們最開始看的啟動自動導入配置文件的注解類;EnableAutoConfigurationList<String> configurations = SpringFactoriesLoader.loadFactoryNames(this.getSpringFactoriesLoaderFactoryClass(), this.getBeanClassLoader());Assert.notEmpty(configurations, "No auto configuration classes found in META-INF/spring.factories. If you are using a custom packaging, make sure that file is correct.");return configurations;
}
- 這個方法又調用了 SpringFactoriesLoader 類的靜態方法!我們進入SpringFactoriesLoader類loadFactoryNames() 方法
public static List<String> loadFactoryNames(Class<?> factoryClass, @Nullable ClassLoader classLoader) {String factoryClassName = factoryClass.getName();//這里它又調用了 loadSpringFactories 方法return (List)loadSpringFactories(classLoader).getOrDefault(factoryClassName, Collections.emptyList());
}
- 我們繼續點擊查看 loadSpringFactories 方法
private static Map<String, List<String>> loadSpringFactories(@Nullable ClassLoader classLoader) {//獲得classLoader , 我們返回可以看到這里得到的就是EnableAutoConfiguration標注的類本身MultiValueMap<String, String> result = (MultiValueMap)cache.get(classLoader);if (result != null) {return result;} else {try {//去獲取一個資源 "META-INF/spring.factories"Enumeration<URL> urls = classLoader != null ? classLoader.getResources("META-INF/spring.factories") : ClassLoader.getSystemResources("META-INF/spring.factories");LinkedMultiValueMap result = new LinkedMultiValueMap();//將讀取到的資源遍歷,封裝成為一個Propertieswhile(urls.hasMoreElements()) {URL url = (URL)urls.nextElement();UrlResource resource = new UrlResource(url);Properties properties = PropertiesLoaderUtils.loadProperties(resource);Iterator var6 = properties.entrySet().iterator();while(var6.hasNext()) {Entry<?, ?> entry = (Entry)var6.next();String factoryClassName = ((String)entry.getKey()).trim();String[] var9 = StringUtils.commaDelimitedListToStringArray((String)entry.getValue());int var10 = var9.length;for(int var11 = 0; var11 < var10; ++var11) {String factoryName = var9[var11];result.add(factoryClassName, factoryName.trim());}}}cache.put(classLoader, result);return result;} catch (IOException var13) {throw new IllegalArgumentException("Unable to load factories from location [META-INF/spring.factories]", var13);}}
}
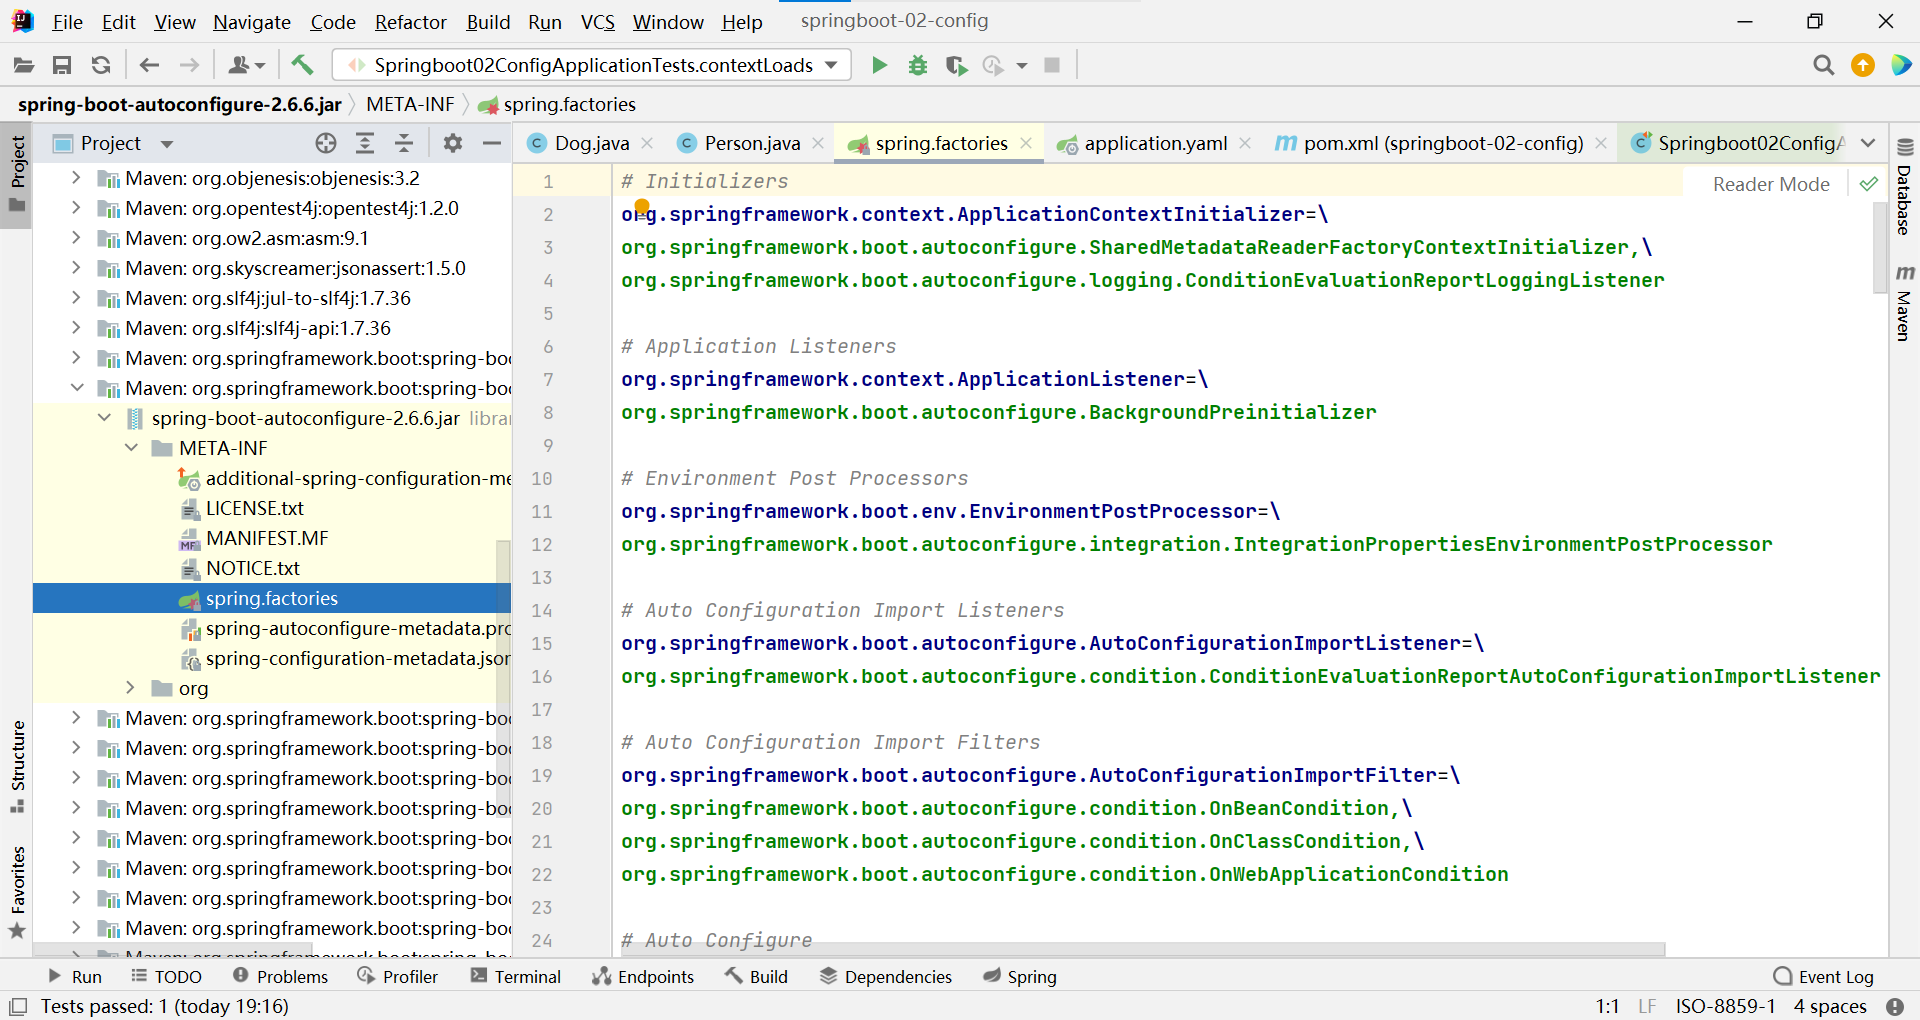
- 發現一個多次出現的文件:spring.factories,全局搜索它
spring.factories
我們根據源頭打開spring.factories , 看到了很多自動配置的文件;這就是自動配置根源所在!
WebMvcAutoConfiguration
我們在上面的自動配置類隨便找一個打開看看,比如 :WebMvcAutoConfiguration

可以看到這些一個個的都是JavaConfig配置類,而且都注入了一些Bean,可以找一些自己認識的類,看著熟悉一下!
所以,自動配置真正實現是從classpath中搜尋所有的META-INF/spring.factories配置文件 ,并將其中對應的 org.springframework.boot.autoconfigure. 包下的配置項,通過反射實例化為對應標注了 @Configuration的JavaConfig形式的IOC容器配置類 , 然后將這些都匯總成為一個實例并加載到IOC容器中。
結論:
- SpringBoot在啟動的時候,從類路徑下/META-INF/
spring.factories?獲取指定的值; - 將這些自動配置的類導入容器,自動配置就會生效,幫我們進行自動配置!
- 以前我們需要自動配置的東西,現在SpringBoot幫我們做了!
- 整合javaEE,解決方案和自動配置的東西都在spring-boot-autoconfigure-2.6.6.jar這個包下
- 它會把所有需要導入的組件,以類名的方式返回,這些組件就會被添加到容器;
- 容器中也會存在非常多的xxxAutoConfiguration的文件(@Bean),就是這些類給容器中導入了這個場景需要的所有組件;并自動配置,@Configuration,JavaConfig!
- 有了自動配置類,免去了我們手動編寫配置文件的工作!
現在大家應該大概的了解了下,SpringBoot的運行原理,后面我們還會深化一次!
2.3、SpringApplication
不簡單的方法
我最初以為就是運行了一個main方法,沒想到卻開啟了一個服務;
@SpringBootApplication
public class SpringbootApplication {public static void main(String[] args) {SpringApplication.run(SpringbootApplication.class, args);}
}
SpringApplication.run分析
分析該方法主要分兩部分,一部分是SpringApplication的實例化,二是run方法的執行;
SpringApplication
這個類主要做了以下四件事情:
-
推斷應用的類型是普通的項目還是Web項目
-
查找并加載所有可用初始化器 , 設置到initializers屬性中
-
找出所有的應用程序監聽器,設置到listeners屬性中
-
推斷并設置main方法的定義類,找到運行的主類
查看構造器:
public SpringApplication(ResourceLoader resourceLoader, Class... primarySources) {// ......this.webApplicationType = WebApplicationType.deduceFromClasspath();this.setInitializers(this.getSpringFactoriesInstances();this.setListeners(this.getSpringFactoriesInstances(ApplicationListener.class));this.mainApplicationClass = this.deduceMainApplicationClass();}
run方法流程分析

跟著源碼和這幅圖就可以一探究竟了!
3、yaml配置注入
3.1、yaml語法學習
配置文件
SpringBoot使用一個全局的配置文件 , 配置文件名稱是固定的
-
application.properties
-
- 語法結構 :key=value
-
application.yml
-
- 語法結構 :key:空格 value
配置文件的作用 :修改SpringBoot自動配置的默認值,因為SpringBoot在底層都給我們自動配置好了;
比如我們可以在配置文件中修改Tomcat 默認啟動的端口號!測試一下!
server:port: 8081
yaml概述
YAML是 "YAML Ain't a Markup Language" (YAML不是一種標記語言)的遞歸縮寫。在開發的這種語言時,YAML 的意思其實是:"Yet Another Markup Language"(仍是一種標記語言)
這種語言以數據作為中心,而不是以標記語言為重點!
以前的配置文件,大多數都是使用xml來配置;比如一個簡單的端口配置,我們來對比下yaml和xml
傳統xml配置:
<server><port>8081<port>
</server>
yaml配置:
server: port: 8080
yaml基礎語法
說明:語法要求嚴格!
-
空格不能省略
-
以縮進來控制層級關系,只要是左邊對齊的一列數據都是同一個層級的。
-
屬性和值的大小寫都是十分敏感的。
字面量:普通的值 [ 數字,布爾值,字符串 ]
字面量直接寫在后面就可以 , 字符串默認不用加上雙引號或者單引號;
k: v
注意:
-
“ ” 雙引號,不會轉義字符串里面的特殊字符 , 特殊字符會作為本身想表示的意思;
比如 :name: "kuang \n shen" 輸出 :kuang 換行 shen
-
'' 單引號,會轉義特殊字符 , 特殊字符最終會變成和普通字符一樣輸出
比如 :name: ‘kuang \n shen’ 輸出 :kuang \n shen
對象、Map(鍵值對)
#對象、Map格式
k: v1:v2:
在下一行來寫對象的屬性和值得關系,注意縮進;比如:
student:name: qinjiangage: 3
行內寫法
student: {name: qinjiang,age: 3}
數組( List、set )
用 - 值表示數組中的一個元素,比如:
pets:- cat- dog- pig
行內寫法
pets: [cat,dog,pig]
修改SpringBoot的默認端口號
配置文件中添加,端口號的參數,就可以切換端口;
server:port: 8082
3.2、注入配置文件
yaml文件更強大的地方在于,他可以給我們的實體類直接注入匹配值!
yaml注入配置文件
-
在springboot項目中的resources目錄下新建一個文件 application.yml
-
編寫一個實體類 Dog;
@Component  //注冊bean到容器中
public class Dog {private String name;private Integer age;//有參無參構造、get、set方法、toString()方法
}
- 思考,我們原來是如何給bean注入屬性值的!@Value,給狗狗類測試一下:
@Component //注冊bean
public class Dog {@Value("阿黃")private String name;@Value("18")private Integer age;
}
- 在SpringBoot的測試類下注入狗狗輸出一下;
@SpringBootTest
class DemoApplicationTests {@Autowired //將狗狗自動注入進來private Dog dog;@Testpublic void contextLoads() {System.out.println(dog); //打印看下狗狗對象}}
結果成功輸出,@Value注入成功,這是我們原來的辦法對吧。

- 我們在編寫一個復雜一點的實體類:Person 類
@Component //注冊bean到容器中
public class Person {private String name;private Integer age;private Boolean happy;private Date birth;private Map<String,Object> maps;private List<Object> lists;private Dog dog;//有參無參構造、get、set方法、toString()方法
}
- 我們來使用yaml配置的方式進行注入,大家寫的時候注意區別和優勢,我們編寫一個yaml配置!
person:name: qinjiangage: 3happy: falsebirth: 2022/04/08maps: {k1: v1,k2: v2}lists:- code- music- girldog:name: 大黃 # ${person.hello:hello}_旺財 如果person.hello有值,則注入person.hello的值,否則注入"hello";之后連接_旺財一起注入age: 3
- 我們剛才已經把person這個對象的所有值都寫好了,我們現在來注入到我們的類中!
/*
@ConfigurationProperties作用:
將配置文件中配置的每一個屬性的值,映射到這個組件中;
告訴SpringBoot將本類中的所有屬性和配置文件中相關的配置進行綁定
參數 prefix = “person” : 將配置文件中的person下面的所有屬性一一對應
*/
@Component //注冊bean
@ConfigurationProperties(prefix = "person")
public class Person {private String name;private Integer age;private Boolean happy;private Date birth;private Map<String,Object> maps;private List<Object> lists;private Dog dog;
}
- IDEA 提示,springboot配置注解處理器沒有找到,讓我們看文檔,我們可以查看文檔,找到一個依賴!
<!-- 導入配置文件處理器,配置文件進行綁定就會有提示,需要重啟 -->
<dependency><groupId>org.springframework.boot</groupId><artifactId>spring-boot-configuration-processor</artifactId><optional>true</optional>
</dependency>
- 確認以上配置都OK之后,我們去測試類中測試一下:
@SpringBootTest
class DemoApplicationTests {@AutowiredPerson person; //將person自動注入進來@Testpublic void contextLoads() {System.out.println(person); //打印person信息}}
結果:所有值全部注入成功!
yaml配置注入到實體類完全OK!
加載指定的配置文件
@PropertySource :加載指定的配置文件;
@configurationProperties:默認從全局配置文件中獲取值;
- 我們去在resources目錄下新建一個person.properties文件
name=qinjiang
- 然后在我們的代碼中指定加載person.properties文件
@PropertySource(value = "classpath:person.properties")
@Component //注冊bean
public class Person {@Value("${name}")private String name;......
}
- 再次輸出測試一下:指定配置文件綁定成功!
配置文件占位符
配置文件還可以編寫占位符生成隨機數
person:name: qinjiang${random.uuid} # 隨機uuidage: ${random.int} # 隨機inthappy: falsebirth: 2000/01/01maps: {k1: v1,k2: v2}lists:- code- girl- musicdog:name: ${person.hello:other}_旺財age: 1
回顧properties
我們上面采用的yaml方法都是最簡單的方式,開發中最常用的;也是springboot所推薦的!那我們來嘮嘮其他的實現方式,道理都是相同的;寫還是那樣寫;配置文件除了yml還有我們之前常用的properties , 我們沒有講,我們來嘮嘮!
【注意】properties配置文件在寫中文的時候,會有亂碼 , 我們需要去IDEA中設置編碼格式為UTF-8;
settings-->FileEncodings 中配置;
測試步驟:
- 新建一個實體類User
@Component //注冊bean
public class User {private String name;private int age;private String sex;
}
- 編輯配置文件 user.properties
user1.name=kuangshen
user1.age=18
user1.sex=男
- 我們在User類上使用@Value來進行注入!
@Component //注冊bean
@PropertySource(value = "classpath:user.properties")
public class User {//直接使用@value@Value("${user.name}") //從配置文件中取值private String name;@Value("#{9*2}")  // #{SPEL} Spring表達式private int age;@Value("男")  // 字面量private String sex;
}
- Springboot測試
@SpringBootTest
class DemoApplicationTests {@AutowiredUser user;@Testpublic void contextLoads() {System.out.println(user);}}
結果正常輸出!
對比小結
@Value這個使用起來并不友好!我們需要為每個屬性單獨注解賦值,比較麻煩;我們來看個功能對比圖
-
@ConfigurationProperties只需要寫一次即可 , @Value則需要每個字段都添加
-
松散綁定:這個什么意思呢? 比如我的yml中寫的last-name,這個和lastName是一樣的, - 后面跟著的字母默認是大寫的。這就是松散綁定。可以測試一下
-
JSR303數據校驗 , 這個就是我們可以在字段是增加一層過濾器驗證 , 可以保證數據的合法性
-
復雜類型封裝,yml中可以封裝對象 , 使用value就不支持
結論:
配置yml和配置properties都可以獲取到值 , 強烈推薦 yml;
如果我們在某個業務中,只需要獲取配置文件中的某個值,可以使用一下 @value;
如果說,我們專門編寫了一個JavaBean來和配置文件進行一一映射,就直接@configurationProperties,不要猶豫!
4、JSR303數據校驗及多環境切換
4.1、JSR303數據校驗
先看看如何使用
在pom.xml中增加依賴
<dependency><groupId>org.springframework.boot</groupId><artifactId>spring-boot-starter-validation</artifactId>
</dependency>
Springboot中可以用@validated來校驗數據,如果數據異常則會統一拋出異常,方便異常中心統一處理。我們這里來寫個注解讓我們的name只能支持Email格式;
@Component //注冊bean
@ConfigurationProperties(prefix = "person")
@Validated  //數據校驗
public class Person {@Email(message="郵箱格式錯誤") //name必須是郵箱格式private String name;
}
運行結果 :default message [不是一個合法的電子郵件地址];
使用數據校驗,可以保證數據的正確性;
常見參數
@NotNull(message="名字不能為空")
private String userName;
@Max(value=120,message="年齡最大不能查過120")
private int age;
@Email(message="郵箱格式錯誤")
private String email;空檢查
@Null       驗證對象是否為null
@NotNull    驗證對象是否不為null, 無法查檢長度為0的字符串
@NotBlank   檢查約束字符串是不是Null還有被Trim的長度是否大于0,只對字符串,且會去掉前后空格.
@NotEmpty   檢查約束元素是否為NULL或者是EMPTY.Booelan檢查
@AssertTrue     驗證 Boolean 對象是否為 true
@AssertFalse    驗證 Boolean 對象是否為 false  長度檢查
@Size(min=, max=) 驗證對象(Array,Collection,Map,String)長度是否在給定的范圍之內
@Length(min=, max=) string is between min and max included.日期檢查
@Past       驗證 Date 和 Calendar 對象是否在當前時間之前
@Future     驗證 Date 和 Calendar 對象是否在當前時間之后
@Pattern    驗證 String 對象是否符合正則表達式的規則.......等等
除此以外,我們還可以自定義一些數據校驗規則
4.2、多環境切換
profile是Spring對不同環境提供不同配置功能的支持,可以通過激活不同的環境版本,實現快速切換環境;
多配置文件
我們在主配置文件編寫的時候,文件名可以是 application-{profile}.properties/yml , 用來指定多個環境版本;
例如:
application-test.properties 代表測試環境配置
application-dev.properties 代表開發環境配置
但是Springboot并不會直接啟動這些配置文件,它默認使用application.properties主配置文件;
我們需要通過一個配置來選擇需要激活的環境:
#比如在配置文件中指定使用dev環境,我們可以通過設置不同的端口號進行測試;
#我們啟動SpringBoot,就可以看到已經切換到dev下的配置了;
spring.profiles.active=dev
yaml的多文檔塊
和properties配置文件中一樣,但是使用yml去實現不需要創建多個配置文件,更加方便了!
server:port: 8081
#選擇要激活那個環境塊
spring:profiles:active: prod---
server:port: 8083
spring:profiles: dev #配置環境的名稱---server:port: 8084
spring:profiles: prod  #配置環境的名稱
注意:如果yml和properties同時都配置了端口,并且沒有激活其他環境 , 默認會使用properties配置文件的!
配置文件加載位置
外部加載配置文件的方式十分多,我們選擇最常用的即可,在開發的資源文件中進行配置!
官方外部配置文件說明參考文檔
springboot 啟動會掃描以下位置的application.properties或者application.yml文件作為Spring boot的默認配置文件:
優先級1:項目路徑下的config文件夾配置文件
優先級2:項目路徑下配置文件
優先級3:資源路徑下的config文件夾配置文件
優先級4:資源路徑下配置文件
優先級由高到底,高優先級的配置會覆蓋低優先級的配置;
SpringBoot會從這四個位置全部加載主配置文件;互補配置;
我們在最低級的配置文件中設置一個項目訪問路徑的配置來測試互補問題;
#配置項目的訪問路徑
server.servlet.context-path=/kuang
拓展,運維小技巧
指定位置加載配置文件
我們還可以通過spring.config.location來改變默認的配置文件位置
項目打包好以后,我們可以使用命令行參數的形式,啟動項目的時候來指定配置文件的新位置;這種情況,一般是后期運維做的多,相同配置,外部指定的配置文件優先級最高
java -jar spring-boot-config.jar --spring.config.location=F:/application.properties
5、自動配置原理
配置文件到底能寫什么?怎么寫?
分析自動配置原理
我們以HttpEncodingAutoConfiguration(Http編碼自動配置)為例解釋自動配置原理;
//表示這是一個配置類,和以前編寫的配置文件一樣,也可以給容器中添加組件;
@Configuration //啟動指定類的ConfigurationProperties功能;
//進入這個HttpProperties查看,將配置文件中對應的值和HttpProperties綁定起來;
//并把HttpProperties加入到ioc容器中
@EnableConfigurationProperties({HttpProperties.class}) //Spring底層@Conditional注解
//根據不同的條件判斷,如果滿足指定的條件,整個配置類里面的配置就會生效;
//這里的意思就是判斷當前應用是否是web應用,如果是,當前配置類生效
@ConditionalOnWebApplication(type = Type.SERVLET
)//判斷當前項目有沒有這個類CharacterEncodingFilter;SpringMVC中進行亂碼解決的過濾器;
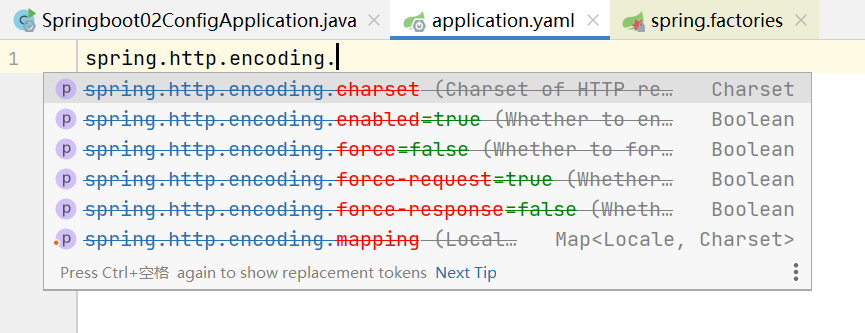
@ConditionalOnClass({CharacterEncodingFilter.class})//判斷配置文件中是否存在某個配置:spring.http.encoding.enabled;
//如果不存在,判斷也是成立的
//即使我們配置文件中不配置pring.http.encoding.enabled=true,也是默認生效的;
@ConditionalOnProperty(prefix = "spring.http.encoding",value = {"enabled"},matchIfMissing = true
)public class HttpEncodingAutoConfiguration {//他已經和SpringBoot的配置文件映射了private final Encoding properties;//只有一個有參構造器的情況下,參數的值就會從容器中拿public HttpEncodingAutoConfiguration(HttpProperties properties) {this.properties = properties.getEncoding();}//給容器中添加一個組件,這個組件的某些值需要從properties中獲取@Bean@ConditionalOnMissingBean //判斷容器沒有這個組件?public CharacterEncodingFilter characterEncodingFilter() {CharacterEncodingFilter filter = new OrderedCharacterEncodingFilter();filter.setEncoding(this.properties.getCharset().name());filter.setForceRequestEncoding(this.properties.shouldForce(org.springframework.boot.autoconfigure.http.HttpProperties.Encoding.Type.REQUEST));filter.setForceResponseEncoding(this.properties.shouldForce(org.springframework.boot.autoconfigure.http.HttpProperties.Encoding.Type.RESPONSE));return filter;}//。。。。。。。
}
一句話總結 :根據當前不同的條件判斷,決定這個配置類是否生效!
- 一但這個配置類生效;這個配置類就會給容器中添加各種組件;
- 這些組件的屬性是從對應的properties類中獲取的,這些類里面的每一個屬性又是和配置文件綁定的;
- 所有在配置文件中能配置的屬性都是在xxxxProperties類中封裝著;
- 配置文件能配置什么就可以參照某個功能對應的這個屬性類
//從配置文件中獲取指定的值和bean的屬性進行綁定
@ConfigurationProperties(prefix = "spring.http")
public class HttpProperties {// .....
}
我們去配置文件里面試試前綴,看提示!
這就是自動裝配的原理!
精髓
1、SpringBoot啟動會加載大量的自動配置類
2、我們看我們需要的功能有沒有在SpringBoot默認寫好的自動配置類當中;
3、我們再來看這個自動配置類中到底配置了哪些組件;(只要我們要用的組件存在在其中,我們就不需要再手動配置了)
4、給容器中自動配置類添加組件的時候,會從properties類中獲取某些屬性。我們只需要在配置文件中指定這些屬性的值即可;
xxxxAutoConfigurartion:自動配置類;給容器中添加組件
xxxxProperties:封裝配置文件中相關屬性;
了解:@Conditional
了解完自動裝配的原理后,我們來關注一個細節問題,自動配置類必須在一定的條件下才能生效;
@Conditional派生注解(Spring注解版原生的@Conditional作用)
作用:必須是@Conditional指定的條件成立,才給容器中添加組件,配置配里面的所有內容才生效;
| @Conditional擴展注解 | 作用(判斷是否滿足當前指定條件) |
|---|---|
| @ConditionalOnJava | 系統的java版本是否符合要求 |
| @ConditionalOnBean | 容器中存在指定Be |
| @ConditionalOnMissingBean | 容器中不存在指定Bean |
| @ConditionalOnExpression | 滿足SpEL表達式指定 |
| @ConditionalOnClass | 系統中有指定的類 |
| @ConditionalOnMissingClass | 系統中沒有指定的類 |
| @ConditionalOnSingleCandidate | 容器中只有一個指定的Bean,或者這個Bean是首選Bean |
| @ConditionalOnProperty | 系統中指定的屬性是否有指定的值 |
| @ConditionalOnResource | 類路徑下是否存在指定資源文件 |
| @ConditionalOnWebApplication | 當前是web環境 |
| @ConditionalOnNotWebApplication | 當前不是web環境 |
| @ConditionalOnJndi | JNDI存在指定項 |
那么多的自動配置類,必須在一定的條件下才能生效;也就是說,我們加載了這么多的配置類,但不是所有的都生效了。
我們怎么知道哪些自動配置類生效?
我們可以通過啟用 debug=true屬性;來讓控制臺打印自動配置報告,這樣我們就可以很方便的知道哪些自動配置類生效;
#開啟springboot的調試類
debug=true
Positive matches:(自動配置類啟用的:正匹配)
Negative matches:(沒有啟動,沒有匹配成功的自動配置類:負匹配)
Unconditional classes: (沒有條件的類)
【演示:查看輸出的日志】
掌握吸收理解原理,即可以不變應萬變!
6、自定義Starter
我們分析完畢了源碼以及自動裝配的過程,我們可以嘗試自定義一個啟動器來玩玩!
說明
啟動器模塊是一個 空 jar 文件,僅提供輔助性依賴管理,這些依賴可能用于自動裝配或者其他類庫;
命名歸約:
官方命名:
- 前綴:spring-boot-starter-xxx
- 比如:spring-boot-starter-web....
自定義命名:
- xxx-spring-boot-starter
- 比如:mybatis-spring-boot-starter
編寫啟動器
1、在IDEA中新建一個空項目 spring-boot-starter-diy
2、新建一個普通Maven模塊:kuang-spring-boot-starter
3、新建一個Springboot模塊:kuang-spring-boot-starter-autoconfigure
4、點擊apply即可,基本結構
5、在我們的 starter 中 導入 autoconfigure 的依賴!
<!-- 啟動器 -->
<dependencies><!--  引入自動配置模塊 --><dependency><groupId>com.kuang</groupId><artifactId>kuang-spring-boot-starter-autoconfigure</artifactId><version>0.0.1-SNAPSHOT</version></dependency>
</dependencies>
6、將 autoconfigure 項目下多余的文件都刪掉,Pom中只留下一個 starter,這是所有的啟動器基本配置!
7、我們編寫一個自己的服務
public class HelloService {HelloProperties helloProperties;public HelloProperties getHelloProperties() {return helloProperties;}public void setHelloProperties(HelloProperties helloProperties) {this.helloProperties = helloProperties;}public String sayHello(String name){return helloProperties.getPrefix() + name + helloProperties.getSuffix();}}
8、編寫HelloProperties 配置類
// 前綴 kuang.hello
@ConfigurationProperties(prefix = "kuang.hello")
public class HelloProperties {private String prefix;private String suffix;public String getPrefix() {return prefix;}public void setPrefix(String prefix) {this.prefix = prefix;}public String getSuffix() {return suffix;}public void setSuffix(String suffix) {this.suffix = suffix;}
}
9、編寫我們的自動配置類并注入bean,測試!
@Configuration
@ConditionalOnWebApplication //web應用生效
@EnableConfigurationProperties(HelloProperties.class)
public class HelloServiceAutoConfiguration {@AutowiredHelloProperties helloProperties;@Beanpublic HelloService helloService(){HelloService service = new HelloService();service.setHelloProperties(helloProperties);return service;}
}
10、在resources編寫一個自己的 META-INF\spring.factories
# Auto Configure
org.springframework.boot.autoconfigure.EnableAutoConfiguration=\
com.kuang.HelloServiceAutoConfiguration
11、編寫完成后,可以安裝到maven倉庫中!
新建項目測試我們自己寫的啟動器
1、新建一個SpringBoot 項目
2、導入我們自己寫的啟動器
<dependency><groupId>com.kuang</groupId><artifactId>kuang-spring-boot-starter</artifactId><version>1.0-SNAPSHOT</version>
</dependency>
3、編寫一個 HelloController 進行測試我們自己的寫的接口!
@RestController
public class HelloController {@AutowiredHelloService helloService;@RequestMapping("/hello")public String hello(){return helloService.sayHello("zxc");}}
4、編寫配置文件 application.properties
kuang.hello.prefix="ppp"
kuang.hello.suffix="sss"
5、啟動項目進行測試,結果成功 !

7、Web開發靜態資源處理
7.1、Web開發探究
簡介
好的,同學們,那么接下來呢,我們開始學習SpringBoot與Web開發,從這一章往后,就屬于我們實戰部分的內容了;
其實SpringBoot的東西用起來非常簡單,因為SpringBoot最大的特點就是自動裝配。
使用SpringBoot的步驟:
1、創建一個SpringBoot應用,選擇我們需要的模塊,SpringBoot就會默認將我們的需要的模塊自動配置好
2、手動在配置文件中配置部分配置項目就可以運行起來了
3、專注編寫業務代碼,不需要考慮以前那樣一大堆的配置了。
要熟悉掌握開發,之前學習的自動配置的原理一定要搞明白!
比如SpringBoot到底幫我們配置了什么?我們能不能修改?我們能修改哪些配置?我們能不能擴展?
- 向容器中自動配置組件 :*** Autoconfiguration
- 自動配置類,封裝配置文件的內容:***Properties
沒事就找找類,看看自動裝配原理!
我們之后來進行一個單體項目的小項目測試,讓大家能夠快速上手開發!
7.2、靜態資源處理
靜態資源映射規則
首先,我們搭建一個普通的SpringBoot項目,回顧一下HelloWorld程序!
寫請求非常簡單,那我們要引入我們前端資源,我們項目中有許多的靜態資源,比如css,js等文件,這個SpringBoot怎么處理呢?
如果我們是一個web應用,我們的main下會有一個webapp,我們以前都是將所有的頁面導在這里面的,對吧!但是我們現在的pom呢,打包方式是為jar的方式,那么這種方式SpringBoot能不能來給我們寫頁面呢?當然是可以的,但是SpringBoot對于靜態資源放置的位置,是有規定的!
我們先來聊聊這個靜態資源映射規則:
SpringBoot中,SpringMVC的web配置都在 WebMvcAutoConfiguration 這個配置類里面;
我們可以去看看 WebMvcAutoConfigurationAdapter 中有很多配置方法;
有一個方法:addResourceHandlers 添加資源處理
@Override
public void addResourceHandlers(ResourceHandlerRegistry registry) {if (!this.resourceProperties.isAddMappings()) {// 已禁用默認資源處理logger.debug("Default resource handling disabled");return;}// 緩存控制Duration cachePeriod = this.resourceProperties.getCache().getPeriod();CacheControl cacheControl = this.resourceProperties.getCache().getCachecontrol().toHttpCacheControl();// webjars 配置if (!registry.hasMappingForPattern("/webjars/**")) {customizeResourceHandlerRegistration(registry.addResourceHandler("/webjars/**").addResourceLocations("classpath:/META-INF/resources/webjars/").setCachePeriod(getSeconds(cachePeriod)).setCacheControl(cacheControl));}// 靜態資源配置String staticPathPattern = this.mvcProperties.getStaticPathPattern();if (!registry.hasMappingForPattern(staticPathPattern)) {customizeResourceHandlerRegistration(registry.addResourceHandler(staticPathPattern).addResourceLocations(getResourceLocations(this.resourceProperties.getStaticLocations())).setCachePeriod(getSeconds(cachePeriod)).setCacheControl(cacheControl));}
}
讀一下源代碼:比如所有的 /webjars/** , 都需要去 classpath:/META-INF/resources/webjars/ 找對應的資源;
什么是webjars呢?
Webjars本質就是以jar包的方式引入我們的靜態資源 , 我們以前要導入一個靜態資源文件,直接導入即可。
使用SpringBoot需要使用Webjars,我們可以去搜索一下:
網站:https://www.webjars.org
要使用jQuery,我們只要要引入jQuery對應版本的pom依賴即可!
<dependency><groupId>org.webjars</groupId><artifactId>jquery</artifactId><version>3.4.1</version>
</dependency>
導入完畢,查看webjars目錄結構,并訪問Jquery.js文件!
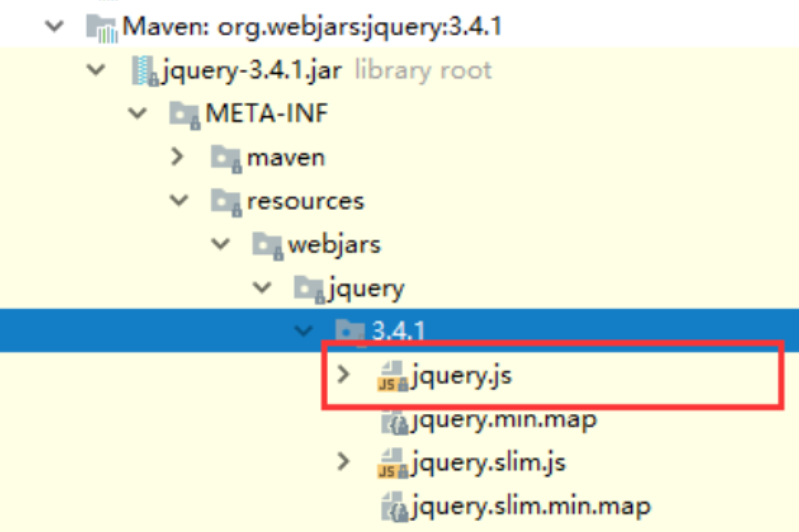
訪問:只要是靜態資源,SpringBoot就會去對應的路徑尋找資源,我們這里訪問:http://localhost:8080/webjars/jquery/3.4.1/jquery.js
第二種靜態資源映射規則
那我們項目中要是使用自己的靜態資源該怎么導入呢?我們看下一行代碼;
我們去找staticPathPattern發現第二種映射規則 :/** , 訪問當前的項目任意資源,它會去找 resourceProperties 這個類,我們可以點進去看一下分析:
// 進入方法
public String[] getStaticLocations() {return this.staticLocations;
}
// 找到對應的值
private String[] staticLocations = CLASSPATH_RESOURCE_LOCATIONS;
// 找到路徑
private static final String[] CLASSPATH_RESOURCE_LOCATIONS = { "classpath:/META-INF/resources/","classpath:/resources/", "classpath:/static/", "classpath:/public/"
};
ResourceProperties 可以設置和我們靜態資源有關的參數;這里面指向了它會去尋找資源的文件夾,即上面數組的內容。
所以得出結論,以下四個目錄存放的靜態資源可以被我們識別:
"classpath:/META-INF/resources/"
"classpath:/resources/"
"classpath:/static/"
"classpath:/public/"
我們可以在resources根目錄下新建對應的文件夾,都可以存放我們的靜態文件;
比如我們訪問?http://localhost:8080/1.js?, 他就會去這些文件夾中尋找對應的靜態資源文件;
自定義靜態資源路徑
我們也可以自己通過配置文件來指定一下,哪些文件夾是需要我們放靜態資源文件的,在application.properties中配置;
spring.resources.static-locations=classpath:/coding/,classpath:/kuang/
一旦自己定義了靜態文件夾的路徑,原來的自動配置就都會失效了!
7.3、首頁處理
靜態資源文件夾說完后,我們繼續向下看源碼!可以看到一個歡迎頁的映射,就是我們的首頁!
@Bean
public WelcomePageHandlerMapping welcomePageHandlerMapping(ApplicationContext applicationContext,FormattingConversionService mvcConversionService,ResourceUrlProvider mvcResourceUrlProvider) {WelcomePageHandlerMapping welcomePageHandlerMapping = new WelcomePageHandlerMapping(new TemplateAvailabilityProviders(applicationContext), applicationContext, getWelcomePage(), // getWelcomePage 獲得歡迎頁this.mvcProperties.getStaticPathPattern());welcomePageHandlerMapping.setInterceptors(getInterceptors(mvcConversionService, mvcResourceUrlProvider));return welcomePageHandlerMapping;
}
點進去繼續看
private Optional<Resource> getWelcomePage() {String[] locations = getResourceLocations(this.resourceProperties.getStaticLocations());// ::是java8 中新引入的運算符// Class::function的時候function是屬于Class的,應該是靜態方法。// this::function的funtion是屬于這個對象的。// 簡而言之,就是一種語法糖而已,是一種簡寫return Arrays.stream(locations).map(this::getIndexHtml).filter(this::isReadable).findFirst();
}
// 歡迎頁就是一個location下的的 index.html 而已
private Resource getIndexHtml(String location) {return this.resourceLoader.getResource(location + "index.html");
}
歡迎頁,靜態資源文件夾下的所有 index.html 頁面;被 /** 映射。
比如我訪問?http://localhost:8080/?,就會找靜態資源文件夾下的 index.html
新建一個 index.html ,在我們上面的3個目錄中任意一個;然后訪問測試?http://localhost:8080/?看結果!
關于網站圖標說明:
與其他靜態資源一樣,Spring Boot在配置的靜態內容位置中查找 favicon.ico。如果存在這樣的文件,它將自動用作應用程序的favicon。
1、關閉SpringBoot默認圖標
#關閉默認圖標
spring.mvc.favicon.enabled=false
2、自己放一個圖標在靜態資源目錄下,我放在 public 目錄下
3、清除瀏覽器緩存!刷新網頁,發現圖標已經變成自己的了!
8、Thymeleaf模板引擎
模板引擎
前端交給我們的頁面,是html頁面。如果是我們以前開發,我們需要把他們轉成jsp頁面,jsp好處就是當我們查出一些數據轉發到JSP頁面以后,我們可以用jsp輕松實現數據的顯示,及交互等。
jsp支持非常強大的功能,包括能寫Java代碼,但是呢,我們現在的這種情況,SpringBoot這個項目首先是以jar的方式,不是war,像第二,我們用的還是嵌入式的Tomcat,所以呢,他現在默認是不支持jsp的。
那不支持jsp,如果我們直接用純靜態頁面的方式,那給我們開發會帶來非常大的麻煩,那怎么辦呢?
SpringBoot推薦你可以來使用模板引擎:
模板引擎,我們其實大家聽到很多,其實jsp就是一個模板引擎,還有用的比較多的freemarker,包括SpringBoot給我們推薦的Thymeleaf,模板引擎有非常多,但再多的模板引擎,他們的思想都是一樣的,什么樣一個思想呢我們來看一下這張圖:

模板引擎的作用就是我們來寫一個頁面模板,比如有些值呢,是動態的,我們寫一些表達式。而這些值,從哪來呢,就是我們在后臺封裝一些數據。然后把這個模板和這個數據交給我們模板引擎,模板引擎按照我們這個數據幫你把這表達式解析、填充到我們指定的位置,然后把這個數據最終生成一個我們想要的內容給我們寫出去,這就是我們這個模板引擎,不管是jsp還是其他模板引擎,都是這個思想。只不過呢,就是說不同模板引擎之間,他們可能這個語法有點不一樣。其他的我就不介紹了,我主要來介紹一下SpringBoot給我們推薦的Thymeleaf模板引擎,這模板引擎呢,是一個高級語言的模板引擎,他的這個語法更簡單。而且呢,功能更強大。
我們呢,就來看一下這個模板引擎,那既然要看這個模板引擎。首先,我們來看SpringBoot里邊怎么用。
引入Thymeleaf
怎么引入呢,對于springboot來說,什么事情不都是一個start的事情嘛,我們去在項目中引入一下。給大家三個網址:
Thymeleaf 官網:Thymeleaf
Thymeleaf 在Github 的主頁:https://github.com/thymeleaf/thymeleaf
Spring官方文檔:找到我們對應的版本
Spring Boot Reference Documentation
找到對應的pom依賴:可以適當點進源碼看下本來的包!
<!--thymeleaf-->
<dependency><groupId>org.springframework.boot</groupId><artifactId>spring-boot-starter-thymeleaf</artifactId>
</dependency>
Maven會自動下載jar包,我們可以去看下下載的東西;
Thymeleaf分析
前面呢,我們已經引入了Thymeleaf,那這個要怎么使用呢?
我們首先得按照SpringBoot的自動配置原理看一下我們這個Thymeleaf的自動配置規則,在按照那個規則,我們進行使用。
我們去找一下Thymeleaf的自動配置類:ThymeleafProperties
@ConfigurationProperties(prefix = "spring.thymeleaf"
)
public class ThymeleafProperties {private static final Charset DEFAULT_ENCODING;public static final String DEFAULT_PREFIX = "classpath:/templates/";public static final String DEFAULT_SUFFIX = ".html";private boolean checkTemplate = true;private boolean checkTemplateLocation = true;private String prefix = "classpath:/templates/";private String suffix = ".html";private String mode = "HTML";private Charset encoding;
}
我們可以在其中看到默認的前綴和后綴!
我們只需要把我們的html頁面放在類路徑下的templates下,thymeleaf就可以幫我們自動渲染了。
使用thymeleaf什么都不需要配置,只需要將他放在指定的文件夾下即可!
測試:
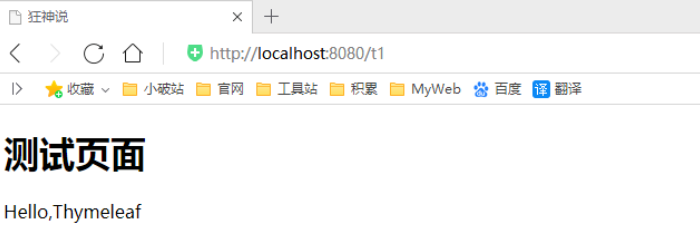
1、編寫一個TestController
@Controller
public class TestController {@RequestMapping("/t1")public String test1(){//classpath:/templates/test.htmlreturn "test";}}
2、編寫一個測試頁面 test.html 放在 templates 目錄下
<!DOCTYPE html>
<html lang="en">
<head><meta charset="UTF-8"><title>Title</title>
</head>
<body>
<h1>測試頁面</h1></body>
</html>
3、啟動項目請求測試
Thymeleaf語法學習
要學習語法,還是參考官網文檔最為準確,我們找到對應的版本看一下;
Thymeleaf 官網:Thymeleaf?, 簡單看一下官網!我們去下載Thymeleaf的官方文檔!
我們做個最簡單的練習 :我們需要查出一些數據,在頁面中展示
1、修改測試請求,增加數據傳輸;
@RequestMapping("/t1")
public String test1(Model model){//存入數據model.addAttribute("msg","Hello,Thymeleaf");//classpath:/templates/test.htmlreturn "test";
}
2、我們要使用thymeleaf,需要在html文件中導入命名空間的約束,方便提示。
我們可以去官方文檔的#3中看一下命名空間拿來過來:
xmlns:th="http://www.thymeleaf.org"
3、我們去編寫下前端頁面
<!DOCTYPE html>
<html lang="en" xmlns:th="http://www.thymeleaf.org">
<head><meta charset="UTF-8"><title>狂神說</title>
</head>
<body>
<h1>測試頁面</h1><!--th:text就是將div中的內容設置為它指定的值,和之前學習的Vue一樣-->
<div th:text="${msg}"></div>
</body>
</html>
4、啟動測試!
OK,入門搞定,我們來認真研習一下Thymeleaf的使用語法!
1、我們可以使用任意的 th:attr 來替換Html中原生屬性的值!
2、我們能寫哪些表達式呢?
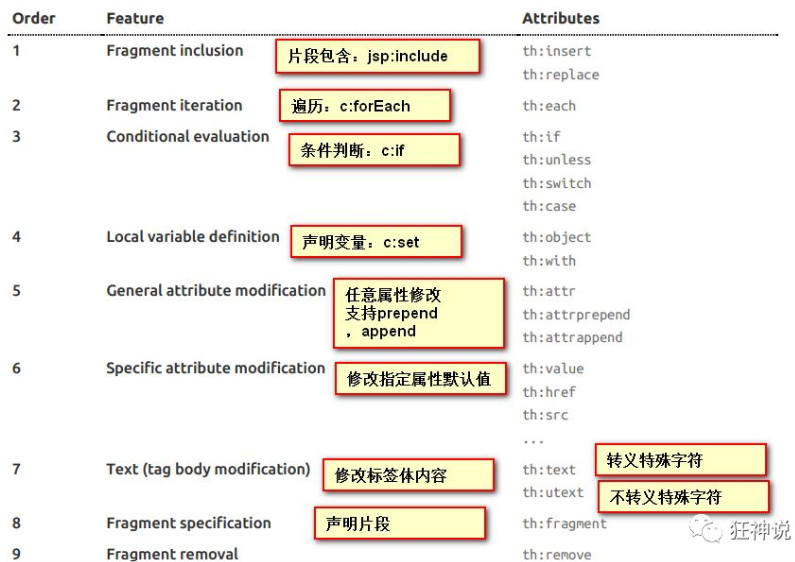
Simple expressions:(表達式語法)
Variable Expressions: ${...}:獲取變量值;OGNL;1)、獲取對象的屬性、調用方法2)、使用內置的基本對象:#18#ctx : the context object.#vars: the context variables.#locale : the context locale.#request : (only in Web Contexts) the HttpServletRequest object.#response : (only in Web Contexts) the HttpServletResponse object.#session : (only in Web Contexts) the HttpSession object.#servletContext : (only in Web Contexts) the ServletContext object.3)、內置的一些工具對象:#execInfo : information about the template being processed.#uris : methods for escaping parts of URLs/URIs#conversions : methods for executing the configured conversion service (if any).#dates : methods for java.util.Date objects: formatting, component extraction, etc.#calendars : analogous to #dates , but for java.util.Calendar objects.#numbers : methods for formatting numeric objects.#strings : methods for String objects: contains, startsWith, prepending/appending, etc.#objects : methods for objects in general.#bools : methods for boolean evaluation.#arrays : methods for arrays.#lists : methods for lists.#sets : methods for sets.#maps : methods for maps.#aggregates : methods for creating aggregates on arrays or collections.
==================================================================================Selection Variable Expressions: *{...}:選擇表達式:和${}在功能上是一樣;Message Expressions: #{...}:獲取國際化內容Link URL Expressions: @{...}:定義URL;Fragment Expressions: ~{...}:片段引用表達式Literals(字面量)Text literals: 'one text' , 'Another one!' ,…Number literals: 0 , 34 , 3.0 , 12.3 ,…Boolean literals: true , falseNull literal: nullLiteral tokens: one , sometext , main ,…Text operations:(文本操作)String concatenation: +Literal substitutions: |The name is ${name}|Arithmetic operations:(數學運算)Binary operators: + , - , * , / , %Minus sign (unary operator): -Boolean operations:(布爾運算)Binary operators: and , orBoolean negation (unary operator): ! , notComparisons and equality:(比較運算)Comparators: > , < , >= , <= ( gt , lt , ge , le )Equality operators: == , != ( eq , ne )Conditional operators:條件運算(三元運算符)If-then: (if) ? (then)If-then-else: (if) ? (then) : (else)Default: (value) ?: (defaultvalue)Special tokens:No-Operation: _
練習測試:
1、 我們編寫一個Controller,放一些數據
@RequestMapping("/t2")
public String test2(Map<String,Object> map){//存入數據map.put("msg","<h1>Hello</h1>");map.put("users", Arrays.asList("qinjiang","kuangshen"));//classpath:/templates/test.htmlreturn "test";
}
2、測試頁面取出數據
<!DOCTYPE html>
<html lang="en" xmlns:th="http://www.thymeleaf.org">
<head><meta charset="UTF-8"><title>狂神說</title>
</head>
<body>
<h1>測試頁面</h1><div th:text="${msg}"></div>
<!--不轉義-->
<div th:utext="${msg}"></div><!--遍歷數據-->
<!--th:each每次遍歷都會生成當前這個標簽:官網#9-->
<h4 th:each="user :${users}" th:text="${user}"></h4><h4><!--行內寫法:官網#12--><span th:each="user:${users}">[[${user}]]</span>
</h4></body>
</html>
3、啟動項目測試!
我們看完語法,很多樣式,我們即使現在學習了,也會忘記,所以我們在學習過程中,需要使用什么,根據官方文檔來查詢,才是最重要的,要熟練使用官方文檔!
9、MVC自動配置原理
官網閱讀
在進行項目編寫前,我們還需要知道一個東西,就是SpringBoot對我們的SpringMVC還做了哪些配置,包括如何擴展,如何定制。
只有把這些都搞清楚了,我們在之后使用才會更加得心應手。途徑一:源碼分析,途徑二:官方文檔!
地址 :Spring Boot Reference Documentation
Spring MVC Auto-configuration
// Spring Boot為Spring MVC提供了自動配置,它可以很好地與大多數應用程序一起工作。
Spring Boot provides auto-configuration for Spring MVC that works well with most applications.
// 自動配置在Spring默認設置的基礎上添加了以下功能:
The auto-configuration adds the following features on top of Spring’s defaults:
// 包含視圖解析器
Inclusion of ContentNegotiatingViewResolver and BeanNameViewResolver beans.
// 支持靜態資源文件夾的路徑,以及webjars
Support for serving static resources, including support for WebJars
// 自動注冊了Converter:
// 轉換器,這就是我們網頁提交數據到后臺自動封裝成為對象的東西,比如把"1"字符串自動轉換為int類型
// Formatter:【格式化器,比如頁面給我們了一個2019-8-10,它會給我們自動格式化為Date對象】
Automatic registration of Converter, GenericConverter, and Formatter beans.
// HttpMessageConverters
// SpringMVC用來轉換Http請求和響應的的,比如我們要把一個User對象轉換為JSON字符串,可以去看官網文檔解釋;
Support for HttpMessageConverters (covered later in this document).
// 定義錯誤代碼生成規則的
Automatic registration of MessageCodesResolver (covered later in this document).
// 首頁定制
Static index.html support.
// 圖標定制
Custom Favicon support (covered later in this document).
// 初始化數據綁定器:幫我們把請求數據綁定到JavaBean中!
Automatic use of a ConfigurableWebBindingInitializer bean (covered later in this document)./*
如果您希望保留Spring Boot MVC功能,并且希望添加其他MVC配置(攔截器、格式化程序、視圖控制器和其他功能),則可以添加自己
的@configuration類,類型為webmvcconfiguer,但不添加@EnableWebMvc。如果希望提供
RequestMappingHandlerMapping、RequestMappingHandlerAdapter或ExceptionHandlerExceptionResolver的自定義
實例,則可以聲明WebMVCregistrationAdapter實例來提供此類組件。
*/
If you want to keep Spring Boot MVC features and you want to add additional MVC configuration
(interceptors, formatters, view controllers, and other features), you can add your own
@Configuration class of type WebMvcConfigurer but without @EnableWebMvc. If you wish to provide
custom instances of RequestMappingHandlerMapping, RequestMappingHandlerAdapter, or
ExceptionHandlerExceptionResolver, you can declare a WebMvcRegistrationsAdapter instance to provide such components.// 如果您想完全控制Spring MVC,可以添加自己的@Configuration,并用@EnableWebMvc進行注釋。
If you want to take complete control of Spring MVC, you can add your own @Configuration annotated with @EnableWebMvc.
我們來仔細對照,看一下它怎么實現的,它告訴我們SpringBoot已經幫我們自動配置好了SpringMVC,然后自動配置了哪些東西呢?
ContentNegotiatingViewResolver 內容協商視圖解析器
自動配置了ViewResolver,就是我們之前學習的SpringMVC的視圖解析器;
即根據方法的返回值取得視圖對象(View),然后由視圖對象決定如何渲染(轉發,重定向)。
我們去看看這里的源碼:我們找到 WebMvcAutoConfiguration , 然后搜索ContentNegotiatingViewResolver。找到如下方法!
@Bean
@ConditionalOnBean(ViewResolver.class)
@ConditionalOnMissingBean(name = "viewResolver", value = ContentNegotiatingViewResolver.class)
public ContentNegotiatingViewResolver viewResolver(BeanFactory beanFactory) {ContentNegotiatingViewResolver resolver = new ContentNegotiatingViewResolver();resolver.setContentNegotiationManager(beanFactory.getBean(ContentNegotiationManager.class));// ContentNegotiatingViewResolver使用所有其他視圖解析器來定位視圖,因此它應該具有較高的優先級resolver.setOrder(Ordered.HIGHEST_PRECEDENCE);return resolver;
}
我們可以點進這類看看!找到對應的解析視圖的代碼;
@Nullable // 注解說明:@Nullable 即參數可為null
public View resolveViewName(String viewName, Locale locale) throws Exception {RequestAttributes attrs = RequestContextHolder.getRequestAttributes();Assert.state(attrs instanceof ServletRequestAttributes, "No current ServletRequestAttributes");List<MediaType> requestedMediaTypes = this.getMediaTypes(((ServletRequestAttributes)attrs).getRequest());if (requestedMediaTypes != null) {// 獲取候選的視圖對象List<View> candidateViews = this.getCandidateViews(viewName, locale, requestedMediaTypes);// 選擇一個最適合的視圖對象,然后把這個對象返回View bestView = this.getBestView(candidateViews, requestedMediaTypes, attrs);if (bestView != null) {return bestView;}}// .....
}
我們繼續點進去看,他是怎么獲得候選的視圖的呢?
getCandidateViews中看到他是把所有的視圖解析器拿來,進行while循環,挨個解析!
Iterator var5 = this.viewResolvers.iterator();
所以得出結論:ContentNegotiatingViewResolver 這個視圖解析器就是用來組合所有的視圖解析器的
我們再去研究下他的組合邏輯,看到有個屬性viewResolvers,看看它是在哪里進行賦值的!
protected void initServletContext(ServletContext servletContext) {// 這里它是從beanFactory工具中獲取容器中的所有視圖解析器// ViewRescolver.class 把所有的視圖解析器來組合的Collection<ViewResolver> matchingBeans = BeanFactoryUtils.beansOfTypeIncludingAncestors(this.obtainApplicationContext(), ViewResolver.class).values();ViewResolver viewResolver;if (this.viewResolvers == null) {this.viewResolvers = new ArrayList(matchingBeans.size());}// ...............
}
既然它是在容器中去找視圖解析器,我們是否可以猜想,我們就可以去實現一個視圖解析器了呢?
我們可以自己給容器中去添加一個視圖解析器;這個類就會幫我們自動的將它組合進來;我們去實現一下
1、我們在我們的主程序中去寫一個視圖解析器來試試;
@Bean //放到bean中
public ViewResolver myViewResolver(){return new MyViewResolver();
}//我們寫一個靜態內部類,視圖解析器就需要實現ViewResolver接口
private static class MyViewResolver implements ViewResolver{@Overridepublic View resolveViewName(String s, Locale locale) throws Exception {return null;}
}
2、怎么看我們自己寫的視圖解析器有沒有起作用呢?
我們給 DispatcherServlet 中的 doDispatch方法 加個斷點進行調試一下,因為所有的請求都會走到這個方法中
3、我們啟動我們的項目,然后隨便訪問一個頁面,看一下Debug信息;
找到this
找到視圖解析器,我們看到我們自己定義的就在這里了;
所以說,我們如果想要使用自己定制化的東西,我們只需要給容器中添加這個組件就好了!剩下的事情SpringBoot就會幫我們做了!
轉換器和格式化器
找到格式化轉換器:
@Bean
@Override
public FormattingConversionService mvcConversionService() {// 拿到配置文件中的格式化規則WebConversionService conversionService = new WebConversionService(this.mvcProperties.getDateFormat());addFormatters(conversionService);return conversionService;
}
點進去:
public String getDateFormat() {return this.dateFormat;
}/**
* Date format to use. For instance, `dd/MM/yyyy`. 默認的*/
private String dateFormat;
可以看到在我們的Properties文件中,我們可以進行自動配置它!
如果配置了自己的格式化方式,就會注冊到Bean中生效,我們可以在配置文件中配置日期格式化的規則:
spring.mvc.date-format=
其余的就不一一舉例了,大家可以下去多研究探討即可!
修改SpringBoot的默認配置
這么多的自動配置,原理都是一樣的,通過這個WebMVC的自動配置原理分析,我們要學會一種學習方式,通過源碼探究,得出結論;這個結論一定是屬于自己的,而且一通百通。
SpringBoot的底層,大量用到了這些設計細節思想,所以,沒事需要多閱讀源碼!得出結論;
SpringBoot在自動配置很多組件的時候,先看容器中有沒有用戶自己配置的(如果用戶自己配置@bean),如果有就用用戶配置的,如果沒有就用自動配置的;
如果有些組件可以存在多個,比如我們的視圖解析器,就將用戶配置的和自己默認的組合起來!
擴展使用SpringMVC?官方文檔如下:
If you want to keep Spring Boot MVC features and you want to add additional MVC configuration (interceptors, formatters, view controllers, and other features), you can add your own @Configuration class of type WebMvcConfigurer but without @EnableWebMvc. If you wish to provide custom instances of RequestMappingHandlerMapping, RequestMappingHandlerAdapter, or ExceptionHandlerExceptionResolver, you can declare a WebMvcRegistrationsAdapter instance to provide such components.
我們要做的就是編寫一個@Configuration注解類,并且類型要為WebMvcConfigurer,還不能標注@EnableWebMvc注解;我們去自己寫一個;我們新建一個包叫config,寫一個類MyMvcConfig;
//應為類型要求為WebMvcConfigurer,所以我們實現其接口
//可以使用自定義類擴展MVC的功能
@Configuration
public class MyMvcConfig implements WebMvcConfigurer {@Overridepublic void addViewControllers(ViewControllerRegistry registry) {// 瀏覽器發送/test , 就會跳轉到test頁面;registry.addViewController("/test").setViewName("test");}
}
我們去瀏覽器訪問一下:
確實也跳轉過來了!所以說,我們要擴展SpringMVC,官方就推薦我們這么去使用,既保SpringBoot留所有的自動配置,也能用我們擴展的配置!
我們可以去分析一下原理:
1、WebMvcAutoConfiguration 是 SpringMVC的自動配置類,里面有一個類WebMvcAutoConfigurationAdapter
2、這個類上有一個注解,在做其他自動配置時會導入:@Import(EnableWebMvcConfiguration.class)
3、我們點進EnableWebMvcConfiguration這個類看一下,它繼承了一個父類:DelegatingWebMvcConfiguration
這個父類中有這樣一段代碼:
public class DelegatingWebMvcConfiguration extends WebMvcConfigurationSupport {private final WebMvcConfigurerComposite configurers = new WebMvcConfigurerComposite();// 從容器中獲取所有的webmvcConfigurer@Autowired(required = false)public void setConfigurers(List<WebMvcConfigurer> configurers) {if (!CollectionUtils.isEmpty(configurers)) {this.configurers.addWebMvcConfigurers(configurers);}}
}
4、我們可以在這個類中去尋找一個我們剛才設置的viewController當做參考,發現它調用了一個
protected void addViewControllers(ViewControllerRegistry registry) {this.configurers.addViewControllers(registry);
}
5、我們點進去看一下
public void addViewControllers(ViewControllerRegistry registry) {Iterator var2 = this.delegates.iterator();while(var2.hasNext()) {// 將所有的WebMvcConfigurer相關配置來一起調用!包括我們自己配置的和Spring給我們配置的WebMvcConfigurer delegate = (WebMvcConfigurer)var2.next();delegate.addViewControllers(registry);}}
所以得出結論:所有的WebMvcConfiguration都會被作用,不止Spring自己的配置類,我們自己的配置類當然也會被調用;
全面接管SpringMVC
官方文檔:
If you want to take complete control of Spring MVC
you can add your own @Configuration annotated with @EnableWebMvc.
全面接管即:SpringBoot對SpringMVC的自動配置不需要了,所有都是我們自己去配置!
只需在我們的配置類中要加一個@EnableWebMvc。
我們看下如果我們全面接管了SpringMVC了,我們之前SpringBoot給我們配置的靜態資源映射一定會無效,我們可以去測試一下;
不加注解之前,訪問首頁:正常訪問
給配置類加上注解:@EnableWebMvc
我們發現所有的SpringMVC自動配置都失效了!回歸到了最初的樣子;
當然,我們開發中,不推薦使用全面接管SpringMVC
思考問題?為什么加了一個注解,自動配置就失效了!我們看下源碼:
1、這里發現它是導入了一個類,我們可以繼續進去看
@Import({DelegatingWebMvcConfiguration.class})
public @interface EnableWebMvc {
}
2、它繼承了一個父類 WebMvcConfigurationSupport
public class DelegatingWebMvcConfiguration extends WebMvcConfigurationSupport {// ......
}
3、我們來回顧一下Webmvc自動配置類
@Configuration(proxyBeanMethods = false)
@ConditionalOnWebApplication(type = Type.SERVLET)
@ConditionalOnClass({ Servlet.class, DispatcherServlet.class, WebMvcConfigurer.class })
// 這個注解的意思就是:容器中沒有這個組件的時候,這個自動配置類才生效
@ConditionalOnMissingBean(WebMvcConfigurationSupport.class)
@AutoConfigureOrder(Ordered.HIGHEST_PRECEDENCE + 10)
@AutoConfigureAfter({ DispatcherServletAutoConfiguration.class, TaskExecutionAutoConfiguration.class,ValidationAutoConfiguration.class })
public class WebMvcAutoConfiguration {}
總結一句話:@EnableWebMvc將WebMvcConfigurationSupport組件導入進來了;
而導入的WebMvcConfigurationSupport只是SpringMVC最基本的功能!
在SpringBoot中會有非常多的擴展配置,只要看見了這個,我們就應該多留心注意~
10、員工管理系統
- 首頁配置:
- 注意點,所有頁面的靜態資源都需要使用thymeleaf接管;
- url:@{}
- 頁面國際化:
- 我們需要配置i18n文件
- 我們如果需要在項目中進行按鈕自動切換,我們需要自定義一個組件
LocaleResolver - 記得將自己寫的組件配置到spring容器中
@Bean -
{}
- 登錄 + 攔截器
- 員工頁面展示
- 提取公共頁面
th:fragment="sidebar"th:replace="~{commons/commons::topbar}"- 如果要傳遞參數,可以直接使用()傳參,接受判斷即可!
- 列表循環展示
- 提取公共頁面
- 添加員工
- 按鈕提交
- 跳轉到添加頁面
- 添加員工成功
- 返回首頁
- CRUD搞定
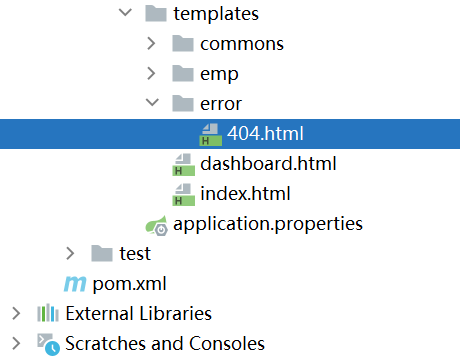
- 404,在templates文件夾下新建error文件夾,命名指定的404頁面為404.html
# 1.前端搞定:頁面長什么樣子:數據
# 2.設計數據庫(數據庫設計難點!)
# 3.前端讓他能夠自動運行,獨立化工程
# 4.數據接口如何對接:json,對象 all in one!
# 5.前后端聯調測試!
1.有一套自己熟悉的后臺模板:工作必要!x-admin
2.前端界面:至少自己能夠通過前端框架,組合出來一個網站頁面- index- about- blog- post- user
3.讓這個網站能夠獨立運行!
一個月!
10.1、首頁實現
首頁配置:注意點,所有頁面的靜態資源都需要使用thymeleaf接管;@{}
-
導入thymeleaf依賴
<dependency><groupId>org.springframework.boot</groupId><artifactId>spring-boot-starter-thymeleaf</artifactId> </dependency> -
設置主頁訪問域名,新建config文件夾
@Configuration public class MyMvcConfig implements WebMvcConfigurer {//設置主頁訪問域名@Overridepublic void addViewControllers(ViewControllerRegistry registry) {registry.addViewController("/").setViewName("index");registry.addViewController("/index.html").setViewName("index");} } -
在properties配置文件中關閉模板引擎緩存,并設置服務器路徑
# 關閉模板引擎的緩存 spring.thymeleaf.cache=false# 設置服務器路徑 server.servlet.context-path=/kuang -
使用thymeleaf模板引擎,設置html靜態資源文件
<!DOCTYPE html>
<html lang="en" xmlns:th="http://www.thymeleaf.org"><head><meta http-equiv="Content-Type" content="text/html; charset=UTF-8"><meta name="viewport" content="width=device-width, initial-scale=1, shrink-to-fit=no"><meta name="description" content=""><meta name="author" content=""><title>Signin Template for Bootstrap</title><!-- Bootstrap core CSS --><link th:href="@{css/bootstrap.min.css}" rel="stylesheet"><!-- Custom styles for this template --><link th:href="@{css/signin.css}" rel="stylesheet"></head><body class="text-center"><form class="form-signin" action="dashboard.html"><img class="mb-4" th:src="@{img/bootstrap-solid.svg}" alt="" width="72" height="72"><h1 class="h3 mb-3 font-weight-normal">Please sign in</h1><label class="sr-only">Username</label><input type="text" class="form-control" placeholder="Username" required="" autofocus=""><label class="sr-only">Password</label><input type="password" class="form-control" placeholder="Password" required=""><div class="checkbox mb-3"><label><input type="checkbox" value="remember-me"> Remember me</label></div><button class="btn btn-lg btn-primary btn-block" type="submit">Sign in</button><p class="mt-5 mb-3 text-muted">? 2017-2018</p><a class="btn btn-sm">中文</a><a class="btn btn-sm">English</a></form></body></html>
<!--===================================================================-->
<!DOCTYPE html>
<!-- saved from url=(0052)http://getbootstrap.com/docs/4.0/examples/dashboard/ -->
<html lang="en" xmlns:th="http://www.thymeleaf.org"><head><meta http-equiv="Content-Type" content="text/html; charset=UTF-8"><meta name="viewport" content="width=device-width, initial-scale=1, shrink-to-fit=no"><meta name="description" content=""><meta name="author" content=""><title>Dashboard Template for Bootstrap</title><!-- Bootstrap core CSS --><link th:href="@{css/bootstrap.min.css}" rel="stylesheet"><!-- Custom styles for this template --><link th:href="@{css/dashboard.css}" rel="stylesheet"><head>
<html>
<!--===================================================================-->
<!--其余文件類似-->
......
10.2、頁面國際化
有的時候,我們的網站會去涉及中英文甚至多語言的切換,這時候我們就需要學習國際化了!
準備工作
先在IDEA中統一設置properties的編碼問題!

編寫國際化配置文件,抽取頁面需要顯示的國際化頁面消息。我們可以去登錄頁面查看一下,哪些內容我們需要編寫國際化的配置!
配置文件編寫
1、我們在resources資源文件下新建一個i18n目錄,存放國際化配置文件
2、建立一個login.properties文件,還有一個login_zh_CN.properties;發現IDEA自動識別了我們要做國際化操作;文件夾變了!
3、我們可以在這上面去新建一個文件;
我們再添加一個英文的;
這樣就快捷多了!
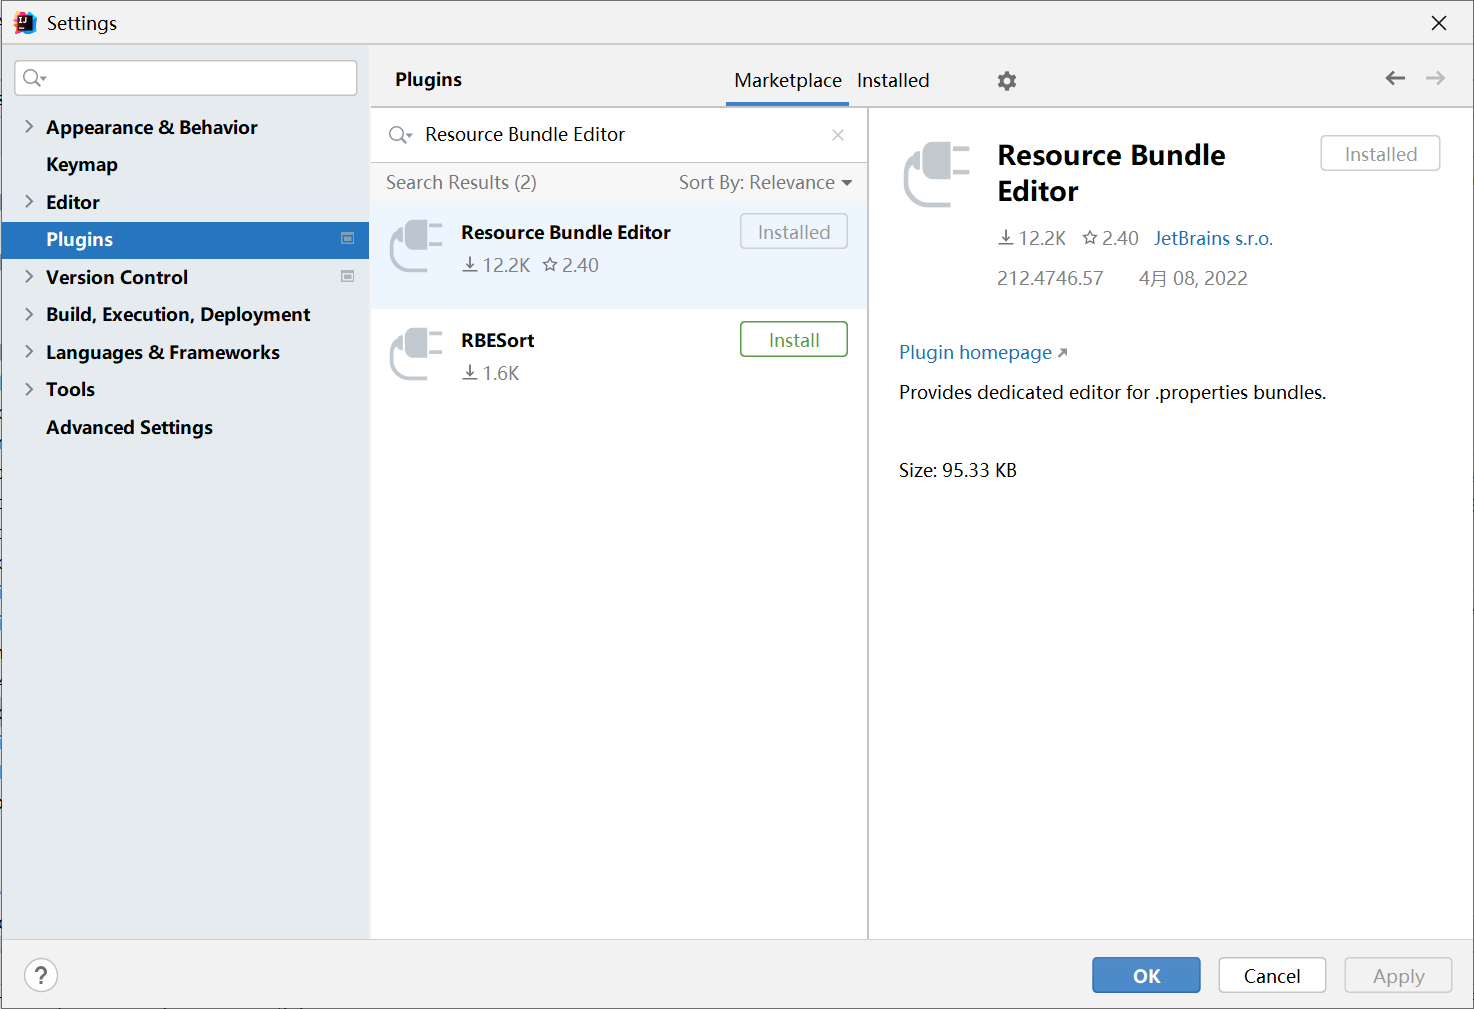
在IDEA插件中搜索Resource Bundle Editor并安裝!
4、接下來,我們就來編寫配置,我們可以看到idea下面有另外一個視圖;
這個視圖我們點擊 + 號就可以直接添加屬性了;我們新建一個login.tip,可以看到邊上有三個文件框可以輸入
我們添加一下首頁的內容!
然后依次添加其他頁面內容即可!
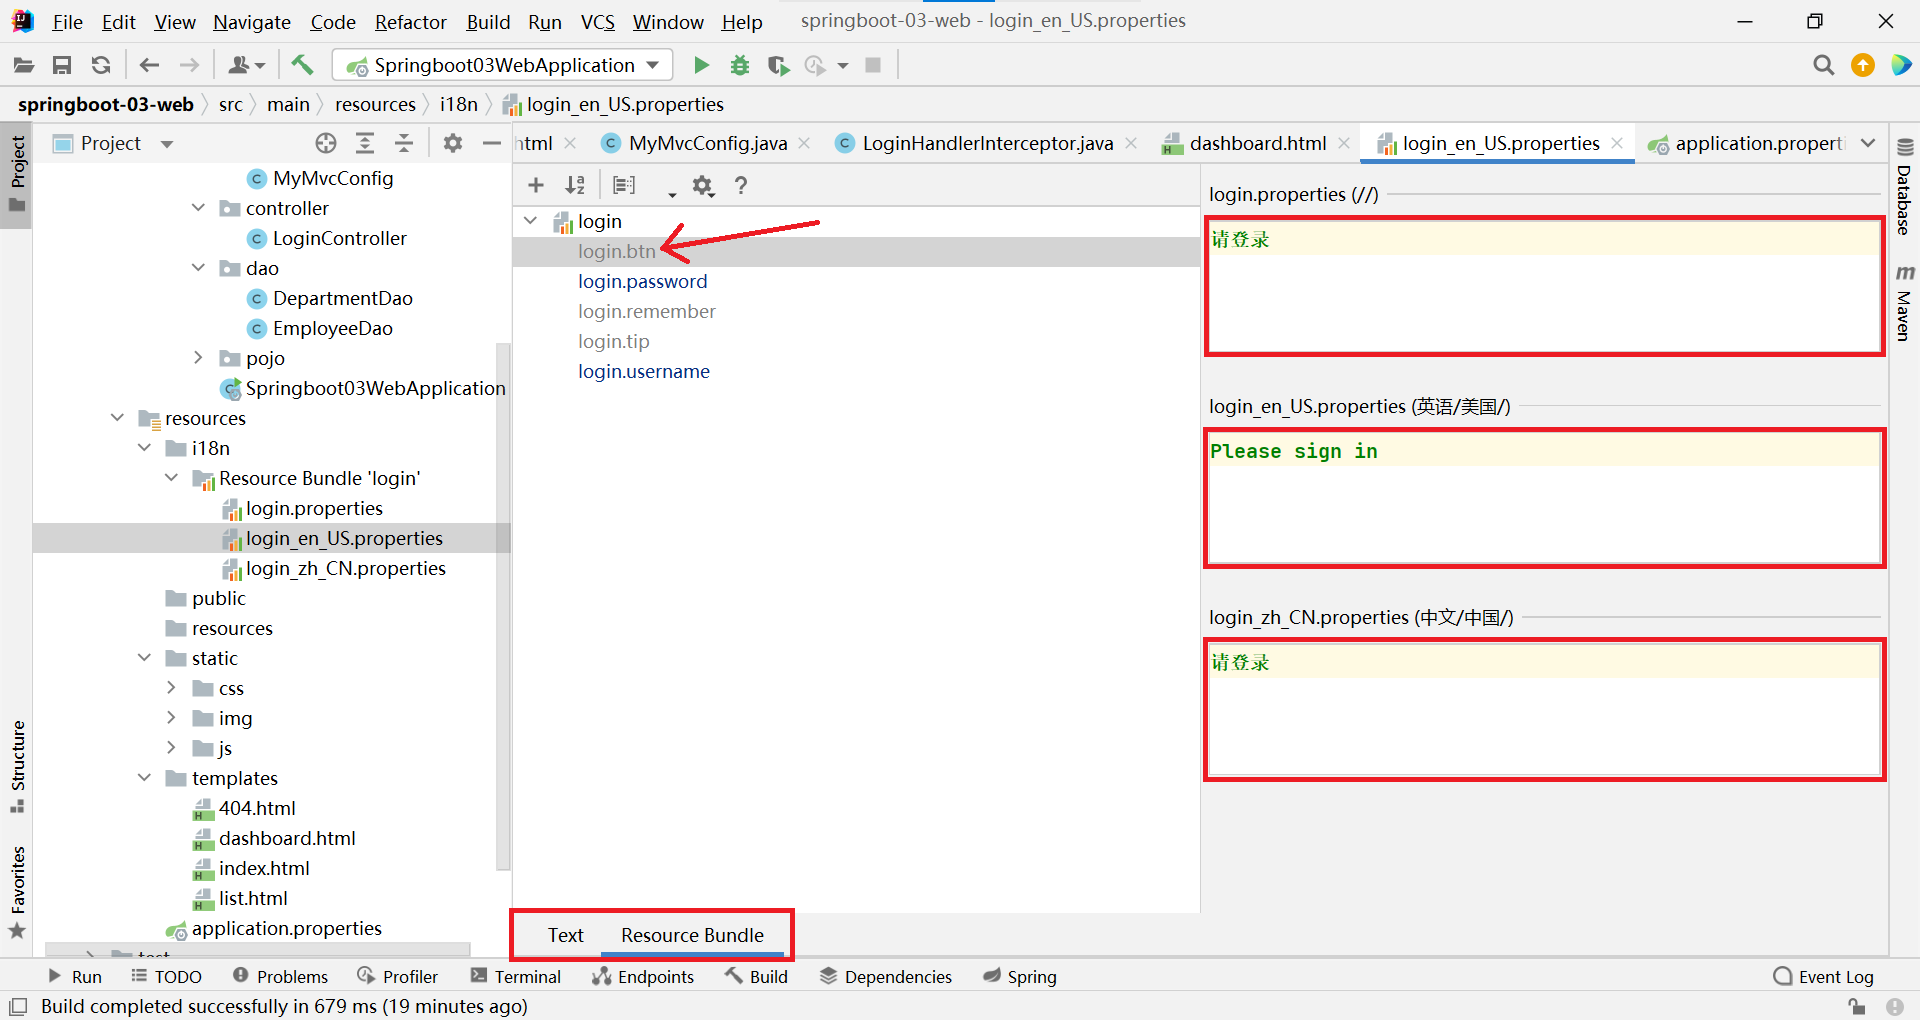
然后去查看我們的配置文件;
login.properties :默認
login.btn=請登錄
login.password=密碼
login.remember=記住我
login.tip=請登錄
login.username=用戶名
英文:
login.btn=Please sign in
login.password=password
login.remember=Remember me
login.tip=Please sign in
login.username=UserName
中文:
login.btn=請登錄
login.password=密碼
login.remember=記住我
login.tip=請登錄
login.username=用戶名
OK,配置文件步驟搞定!
配置文件生效探究
我們去看一下SpringBoot對國際化的自動配置!這里又涉及到一個類:MessageSourceAutoConfiguration
里面有一個方法,這里發現SpringBoot已經自動配置好了管理我們國際化資源文件的組件 ResourceBundleMessageSource;
// 獲取 properties 傳遞過來的值進行判斷
@Bean
public MessageSource messageSource(MessageSourceProperties properties) {ResourceBundleMessageSource messageSource = new ResourceBundleMessageSource();if (StringUtils.hasText(properties.getBasename())) {// 設置國際化文件的基礎名(去掉語言國家代碼的)messageSource.setBasenames(StringUtils.commaDelimitedListToStringArray(StringUtils.trimAllWhitespace(properties.getBasename())));}if (properties.getEncoding() != null) {messageSource.setDefaultEncoding(properties.getEncoding().name());}messageSource.setFallbackToSystemLocale(properties.isFallbackToSystemLocale());Duration cacheDuration = properties.getCacheDuration();if (cacheDuration != null) {messageSource.setCacheMillis(cacheDuration.toMillis());}messageSource.setAlwaysUseMessageFormat(properties.isAlwaysUseMessageFormat());messageSource.setUseCodeAsDefaultMessage(properties.isUseCodeAsDefaultMessage());return messageSource;
}
我們真實 的情況是放在了i18n目錄下,所以我們要去配置這個messages的路徑;
spring.messages.basename=i18n.login
配置頁面國際化值
去頁面獲取國際化的值,查看Thymeleaf的文檔,找到message取值操作為:#{...}。我們去頁面測試下:
IDEA還有提示,非常智能的!
我們可以去啟動項目,訪問一下,發現已經自動識別為中文的了!
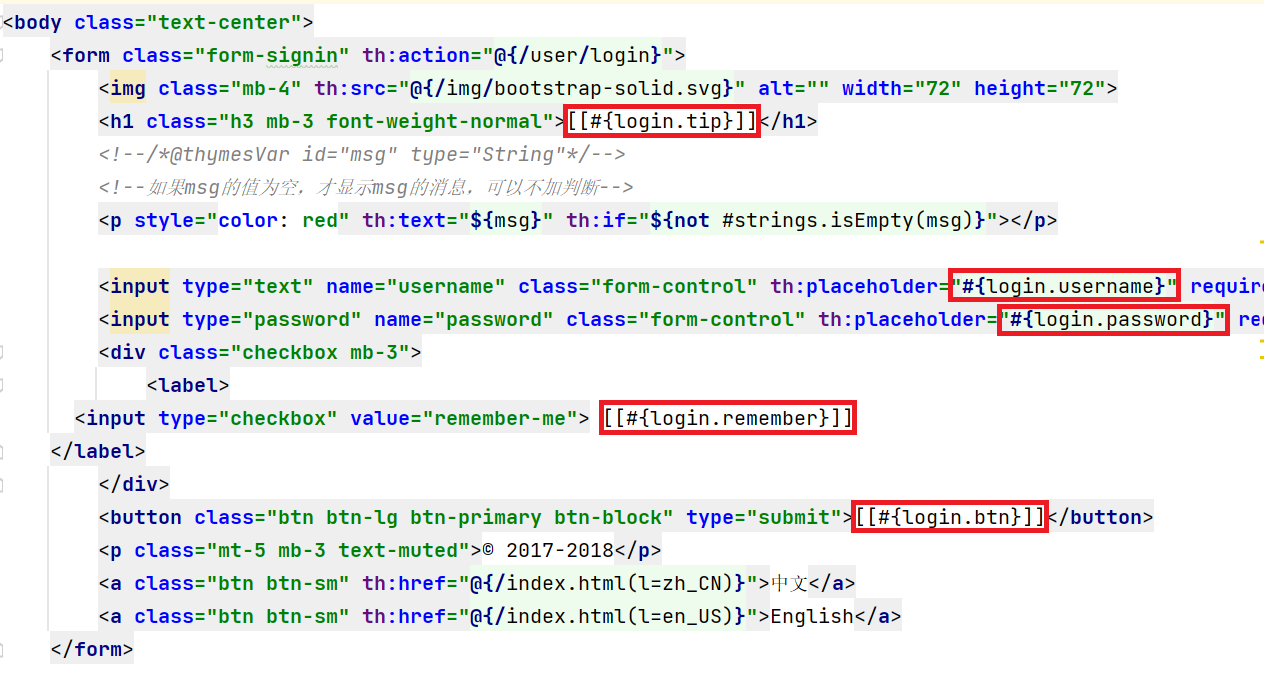
我們可以去啟動項目,訪問一下,發現已經自動識別為中文的了!
但是我們想要更好!可以根據按鈕自動切換中文英文!
配置國際化解析
在Spring中有一個國際化的Locale (區域信息對象);里面有一個叫做LocaleResolver (獲取區域信息對象)的解析器!
我們去我們webmvc自動配置文件,尋找一下!看到SpringBoot默認配置:
@Bean
@ConditionalOnMissingBean
@ConditionalOnProperty(prefix = "spring.mvc", name = "locale")
public LocaleResolver localeResolver() {// 容器中沒有就自己配,有的話就用用戶配置的if (this.mvcProperties.getLocaleResolver() == WebMvcProperties.LocaleResolver.FIXED) {return new FixedLocaleResolver(this.mvcProperties.getLocale());}// 接收頭國際化分解AcceptHeaderLocaleResolver localeResolver = new AcceptHeaderLocaleResolver();localeResolver.setDefaultLocale(this.mvcProperties.getLocale());return localeResolver;
}
AcceptHeaderLocaleResolver 這個類中有一個方法
public Locale resolveLocale(HttpServletRequest request) {Locale defaultLocale = this.getDefaultLocale();// 默認的就是根據請求頭帶來的區域信息獲取Locale進行國際化if (defaultLocale != null && request.getHeader("Accept-Language") == null) {return defaultLocale;} else {Locale requestLocale = request.getLocale();List<Locale> supportedLocales = this.getSupportedLocales();if (!supportedLocales.isEmpty() && !supportedLocales.contains(requestLocale)) {Locale supportedLocale = this.findSupportedLocale(request, supportedLocales);if (supportedLocale != null) {return supportedLocale;} else {return defaultLocale != null ? defaultLocale : requestLocale;}} else {return requestLocale;}}
}
那假如我們現在想點擊鏈接讓我們的國際化資源生效,就需要讓我們自己的Locale生效!
我們去自己寫一個自己的LocaleResolver,可以在鏈接上攜帶區域信息!
修改一下前端頁面的跳轉連接:
<!-- 這里傳入參數不需要使用 ?使用 (key=value)-->
<a class="btn btn-sm" th:href="@{/index.html(l='zh_CN')}">中文</a>
<a class="btn btn-sm" th:href="@{/index.html(l='en_US')}">English</a>
我們去寫一個處理的組件類!
//可以在鏈接上攜帶區域信息
public class MyLocaleResolver implements LocaleResolver {//解析請求@Overridepublic Locale resolveLocale(HttpServletRequest request) {String language = request.getParameter("l");Locale locale = Locale.getDefault(); // 如果沒有獲取到就使用系統默認的//如果請求鏈接不為空if (!StringUtils.isEmpty(language)){//分割請求參數String[] split = language.split("_");//國家,地區locale = new Locale(split[0],split[1]);}return locale;}@Overridepublic void setLocale(HttpServletRequest httpServletRequest, HttpServletResponse httpServletResponse, Locale locale) {}
}
為了讓我們的區域化信息能夠生效,我們需要再配置一下這個組件!在我們自己的MvcConofig下添加bean;
@Bean
public LocaleResolver localeResolver(){return new MyLocaleResolver();
}
我們重啟項目,來訪問一下,發現點擊按鈕可以實現成功切換!搞定收工!
10.3、登錄功能及登錄攔截器實現
-
登錄頁表單提交路徑設置
<form class="form-signin" th:action="@{/user/login}"> -
新建一個Controller來實現控制頁面的跳轉
@Controller public class LoginController {@RequestMapping("/user/login")public String login(@RequestParam("username") String username, @RequestParam("password") String password, Model model, HttpSession session){//具體的業務if (!StringUtils.isEmpty(username) && "123456".equals(password)){session.setAttribute("loginUser",username);return "redirect:/main.html";}else {//告訴用戶,你登陸失敗了model.addAttribute("msg","用戶名或密碼錯誤");return "index";}} } -
使用三元運算符,控制msg內容是否在登錄頁中顯示
<!--/*@thymesVar id="msg" type="String"*/--> <!--如果msg的值為空,才顯示msg的消息,可以不加判斷--> <p style="color: red" th:text="${msg}" th:if="${not #strings.isEmpty(msg)}"></p> -
新建一個攔截器LoginHandlerInterceptor實現HandlerInterceptor接口,在Controller類中已經給session賦值
session.setAttribute("loginUser",username);public class LoginHandlerInterceptor implements HandlerInterceptor {@Overridepublic boolean preHandle(HttpServletRequest request, HttpServletResponse response, Object handler) throws Exception {//登陸成功之后,應該有用戶的session;Object loginUser = request.getSession().getAttribute("loginUser");if (loginUser==null){ //沒有登錄request.setAttribute("msg","沒有權限,請先登錄");request.getRequestDispatcher("/index.html").forward(request,response);return false;}else {return true;}} } -
在MyMvcConfig類中重寫方法,以實現將新建的攔截器加載到配置中
@Configuration public class MyMvcConfig implements WebMvcConfigurer {//設置主頁訪問域名@Overridepublic void addViewControllers(ViewControllerRegistry registry) {registry.addViewController("/").setViewName("index");registry.addViewController("/index.html").setViewName("index");registry.addViewController("/main.html").setViewName("dashboard");}//自定義的國際化組件就生效了!@Beanpublic LocaleResolver localeResolver(){return new MyLocaleResolver();}@Overridepublic void addInterceptors(InterceptorRegistry registry) {registry.addInterceptor(new LoginHandlerInterceptor()).addPathPatterns("/**").excludePathPatterns("/","/index.html","/user/login","/css/**","/img/**","/js/**");} } -
將登錄的用戶名加載到主頁
<a class="navbar-brand col-sm-3 col-md-2 mr-0" th:href="@{http://getbootstrap.com/docs/4.0/examples/dashboard/#}">[[${session.loginUser}]]</a>
10.3、展示員工列表
-
提取頁面公共部分,將頭部導航欄及側邊欄代碼提取到commons.html中;加入側邊欄a標簽判斷
?:,通過其他頁面傳入值,來判斷是否點亮標簽<!DOCTYPE html> <html lang="en" xmlns:th="http://www.thymeleaf.org"><!--頭部導航欄--><nav class="navbar navbar-dark sticky-top bg-dark flex-md-nowrap p-0" th:fragment="topbar"><a class="navbar-brand col-sm-3 col-md-2 mr-0" th:href="@{http://getbootstrap.com/docs/4.0/examples/dashboard/#}">[[${session.loginUser}]]</a><input class="form-control form-control-dark w-100" type="text" placeholder="Search" aria-label="Search"><ul class="navbar-nav px-3"><li class="nav-item text-nowrap"><a class="nav-link" th:href="@{http://getbootstrap.com/docs/4.0/examples/dashboard/#}">注銷</a></li></ul></nav><!--側邊欄--><nav class="col-md-2 d-none d-md-block bg-light sidebar" th:fragment="sidebar"><div class="sidebar-sticky"><ul class="nav flex-column"><li class="nav-item"><a th:class="${active=='main.html'?'nav-link active':'nav-link'}" th:href="@{/index.html}"><svg xmlns="http://www.w3.org/2000/svg" width="24" height="24" viewBox="0 0 24 24" fill="none" stroke="currentColor" stroke-width="2" stroke-linecap="round" stroke-linejoin="round" class="feather feather-home"><path d="M3 9l9-7 9 7v11a2 2 0 0 1-2 2H5a2 2 0 0 1-2-2z"></path><polyline points="9 22 9 12 15 12 15 22"></polyline></svg>首頁 <span class="sr-only">(current)</span></a></li><li class="nav-item"><a th:class="${active=='list.html'?'nav-link active':'nav-link'}" th:href="@{/emps}"><svg xmlns="http://www.w3.org/2000/svg" width="24" height="24" viewBox="0 0 24 24" fill="none" stroke="currentColor" stroke-width="2" stroke-linecap="round" stroke-linejoin="round" class="feather feather-users"><path d="M17 21v-2a4 4 0 0 0-4-4H5a4 4 0 0 0-4 4v2"></path><circle cx="9" cy="7" r="4"></circle><path d="M23 21v-2a4 4 0 0 0-3-3.87"></path><path d="M16 3.13a4 4 0 0 1 0 7.75"></path></svg>員工管理</a></li></ul></div></nav></html> -
主頁鏈接到EmployeeController,完成業務操作后攜帶查詢數據返回list.html頁面
<a th:class="${active=='list.html'?'nav-link active':'nav-link'}" th:href="@{/emps}"><svg xmlns="http://www.w3.org/2000/svg" width="24" height="24" viewBox="0 0 24 24" fill="none" stroke="currentColor" stroke-width="2" stroke-linecap="round" stroke-linejoin="round" class="feather feather-users"><path d="M17 21v-2a4 4 0 0 0-4-4H5a4 4 0 0 0-4 4v2"></path><circle cx="9" cy="7" r="4"></circle><path d="M23 21v-2a4 4 0 0 0-3-3.87"></path><path d="M16 3.13a4 4 0 0 1 0 7.75"></path></svg>員工管理
</a>
@Controller public class EmployeeController {@AutowiredEmployeeDao employeeDao;@RequestMapping("/emps")public String list(Model model){Collection<Employee> employees = employeeDao.getAll();model.addAttribute("emps",employees);return "emp/list";} } -
list.html頁面同樣引入頭部導航欄與標題欄,并將查詢信息遍歷輸出
<!--引入頭部導航欄-->
<div th:insert="~{commons/commons.html::topbar}"></div><!--引入側邊欄-->
<!--傳遞參數給側邊欄組件,使當前標簽高亮-->
<div th:insert="~{commons/commons.html::sidebar(active='list.html')}"></div>
<table class="table table-striped table-sm"><thead><tr><th>id</th><th>lastName</th><th>email</th><th>gender</th><th>department</th><th>birth</th><th>操作</th></tr></thead><tbody><tr th:each="emp:${emps}"><td th:text="${emp.getId()}"></td><td th:text="${emp.getLastName()}"></td><td th:text="${emp.getEmail()}"></td><td th:text="${emp.getGender()==0?'女':'男'}"></td><td th:text="${emp.getDepartment().getDepartmentName()}"></td><td th:text="${#dates.format(emp.getBirth(),'yyyy-MM-dd HH:mm:ss')}"></td><td><button class="btn btn-sm btn-primary">編輯</button><button class="btn btn-sm btn-danger">刪除</button></td></tr></tbody> </table>
10.4、增加員工實現
-
在list.xml頁面中指定位置添加
增加用戶的a標簽,鏈接到controller(a標簽鏈接都以get方法提交)<a class="btn-sm btn-success" th:href="@{/emp}">添加員工</a> -
在controller中添加對應的方法,并返回添加頁面(add.xml)
@GetMapping("/emp") //指定get方法,可實現鏈接使用不同方法復用 public String toAddpage(Model model){//查出所有部門的信息Collection<Department> departments = departmentDao.getDepartments();model.addAttribute("departments",departments);return "emp/add"; } -
新建add.xml頁面,并使用
添加按鈕,再返回controller中的添加方法<!--引入頭部導航欄--> <div th:insert="~{commons/commons::topbar}"></div><div class="container-fluid"><div class="row"><!--引入側邊欄--><div th:insert="~{commons/commons::sidebar}"></div><main role="main" class="col-md-9 ml-sm-auto col-lg-10 pt-3 px-4"><form class="form-control" th:action="@{/emp}" method="post"><div class="form-group"><span class="input-group-addon" id="basic-addon1">LastName</span><input type="text" name="lastName" class="form-control" placeholder="kuangshen" aria-describedby="basic-addon1"></div><div class="form-group"><span class="input-group-addon" id="basic-addon2">Email</span><input type="text" name="email" class="form-control" placeholder="24736743@qq.com" aria-describedby="basic-addon2"></div><div class="form-group"><p>Gender<br><input type="radio" name="gender" value="1">男<input type="radio" name="gender" value="0">女</p></div><div class="form-group"><p>Department<br><!--我們在controller接收的是一個Employee,所以我們需要提交的是其中的一個屬性!--><!--需要傳遞對象的id,可以自動查詢出對應的對象,不能直接傳遞對象--><select name="department.id"><option th:each="dept:${departments}" th:text="${dept.getDepartmentName()}" th:value="${dept.getId()}"></option></select></p></div><div class="form-group"><span class="input-group-addon" id="basic-addon3">Birth</span><input type="text" name="birth" class="form-control" placeholder="2000-01-01" aria-describedby="basic-addon3"></div><div class="form-group"><button type="submit" class="btn btn-sm btn-success">添加</button></div></form></main></div> </div> -
在controller中新建對應的添加方法,實現添加操作并返回list.xml
@PostMapping("/emp")
public String addEmp(Employee employee){employeeDao.save(employee); //調用底層業務方法保存員工信息//添加的操作 forwardreturn "redirect:/emps";
}
10.5、修改員工信息的實現
-
在員工列表每個員工后添加
編輯按鈕,并傳遞當前用戶id,鏈接到controller中的編輯方法<!--一定要完整拼接傳入參數與URL--> <a class="btn btn-sm btn-primary" th:href="@{/update/}+${employee.getId()}">編輯</a> -
在編輯方法中查出該員工詳細信息,并返回給編輯前端頁面
//去員工的修改頁面 //獲取地址欄傳入參數,必須完整拼接url,并使用{}來獲取參數,使用@PathVariable獲取該參數 @GetMapping("/update/{id}") public String toUpdateEmp(@PathVariable("id") int Id, Model model){//查出原來的數據Employee employee = employeeDao.getEmployeeById(Id);model.addAttribute("employee",employee);//查出所有部門的信息Collection<Department> departments = departmentDao.getDepartments();model.addAttribute("departments",departments);return "emp/update"; } -
在編輯的前端頁面中獲取原用戶信息并修改用戶信息,將修改后的用戶信息再傳給后端
<!--引入頭部導航欄--> <div th:insert="~{commons/commons::topbar}"></div><div class="container-fluid"><div class="row"><!--引入側邊欄--><div th:insert="~{commons/commons::sidebar}"></div><main role="main" class="col-md-9 ml-sm-auto col-lg-10 pt-3 px-4"><form class="form-control" th:action="@{/updateEmp}" method="post"><input type="hidden" name="id" th:value="${employee.getId()}"><div class="form-group"><span class="input-group-addon" id="basic-addon1">LastName</span><input type="text" name="lastName" class="form-control" th:value="${employee.getLastName()}" aria-describedby="basic-addon1"></div><div class="form-group"><span class="input-group-addon" id="basic-addon2">Email</span><input type="text" name="email" class="form-control" th:value="${employee.getEmail()}" aria-describedby="basic-addon2"></div><div class="form-group"><p>Gender<br><input th:checked="${employee.getGender()==1}" type="radio" name="gender" value="1">男<input th:checked="${employee.getGender()==0}" type="radio" name="gender" value="0">女</p></div><div class="form-group"><p>Department<br><!--我們在controller接收的是一個Employee,所以我們需要提交的是其中的一個屬性!--><!--需要傳遞對象的id,可以自動查詢出對應的對象,不能直接傳遞對象--><select name="department.id"><option th:selected="${dept.getId()==employee.getDepartment().getId()}"th:each="dept:${departments}"th:text="${dept.getDepartmentName()}"th:value="${dept.getId()}"></option></select></p></div><div class="form-group"><span class="input-group-addon" id="basic-addon3">Birth</span><input type="text" name="birth" class="form-control" th:value="${#dates.format(employee.getBirth(),'yyyy-MM-dd HH:mm:ss')}" aria-describedby="basic-addon3"></div><div class="form-group"><button type="submit" class="btn btn-sm btn-success">保存</button></div></form></main></div> </div> -
在controller方法中將用戶信息保存并返回list.xml頁面
@PostMapping("/updateEmp")
public String updateEmp(Employee employee){employeeDao.save(employee);return "redirect:/emps";
}
10.6、刪除員工及404頁面
-
在list.xml頁面中,每個用戶后的
刪除按鈕,傳送當前用戶id給controller方法,并轉到controller方法中<a class="btn btn-sm btn-danger" th:href="@{/delete/}+${employee.getId()}">刪除</a> -
在controller方法中接收當前用戶id并執行刪除操作,返回list.xml頁面
//刪除員工
@GetMapping("/delete/{id}")
public String deleteEmp(@PathVariable("id") Integer id){employeeDao.delete(id);return "redirect:/emps";
}
設置指定錯誤頁面:可以設置程序錯誤時轉到指定的頁面,只需在templates文件夾下新建error文件夾,再將指定的錯誤頁面命名為指定錯誤類型,例如“404.html”,就會在出現該錯誤時自動轉到指定頁面
10.7、整合JDBC
SpringData簡介:
? 對于數據訪問層,無論是 SQL(關系型數據庫) 還是 NOSQL(非關系型數據庫),Spring Boot 底層都是采用 Spring Data 的方式進行統一處理。Spring Boot 底層都是采用 Spring Data 的方式進行統一處理各種數據庫,Spring Data 也是 Spring 中與 Spring Boot、Spring Cloud 等齊名的知名項目。
整合JDBC:
創建測試項目測試數據源
-
新建一個項目測試:springboot-data-jdbc ; 引入web模塊、JDBC API模塊和MySQL Driver模塊!基礎模塊
-
項目建好后,發現自動幫我們導入了如下的啟動器
<dependency><groupId>org.springframework.boot</groupId><artifactId>spring-boot-starter-jdbc</artifactId> </dependency> <dependency><groupId>mysql</groupId><artifactId>mysql-connector-java</artifactId><scope>runtime</scope> </dependency> -
編寫yaml配置文件連接數據庫
spring:datasource:username: rootpassword: 123456url: jdbc:mysql://localhost:3306/mybatis?useUnicode=true&characterEncoding=utf-8&serverTimezone=GMTdriver-class-name: com.mysql.cj.jdbc.Driver -
配置完這一些東西后,我們就可以直接去使用了,因為SpringBoot已經默認幫我們進行了自動配置;去測試類測試一下
@SpringBootTest
class SpringbootDataJdbcApplicationTests {//DI注入數據源@AutowiredDataSource dataSource;@Testpublic void contextLoads() throws SQLException {//看一下默認數據源System.out.println(dataSource.getClass());//獲得連接Connection connection =   dataSource.getConnection();System.out.println(connection);//關閉連接connection.close();}
}
結果:我們可以看到他默認給我們配置的數據源為 : class com.zaxxer.hikari.HikariDataSource , 我們并沒有手動配置。我們來全局搜索一下,找到數據源的所有自動配置都在DataSourceAutoConfiguration文件:
@Import({Hikari.class, Tomcat.class, Dbcp2.class, Generic.class, DataSourceJmxConfiguration.class}
)
protected static class PooledDataSourceConfiguration {protected PooledDataSourceConfiguration() {}
}
這里導入的類都在 DataSourceConfiguration 配置類下,可以看出 Spring Boot 2.2.5 默認使用HikariDataSource 數據源,而以前版本,如 Spring Boot 1.5 默認使用 org.apache.tomcat.jdbc.pool.DataSource 作為數據源;
HikariDataSource 號稱 Java WEB 當前速度最快的數據源,相比于傳統的 C3P0 、DBCP、Tomcat jdbc 等連接池更加優秀;
可以使用 spring.datasource.type 指定自定義的數據源類型,值為 要使用的連接池實現的完全限定名。
關于數據源我們并不做介紹,有了數據庫連接,顯然就可以 CRUD 操作數據庫了。但是我們需要先了解一個對象 JdbcTemplate
JDBCTemplate
-
有了數據源(com.zaxxer.hikari.HikariDataSource),然后可以拿到數據庫連接(java.sql.Connection),有了連接,就可以使用原生的 JDBC 語句來操作數據庫;
-
即使不使用第三方第數據庫操作框架,如 MyBatis等,Spring 本身也對原生的JDBC 做了輕量級的封裝,即JdbcTemplate。
-
數據庫操作的所有 CRUD 方法都在 JdbcTemplate 中。
-
Spring Boot 不僅提供了默認的數據源,同時默認已經配置好了 JdbcTemplate 放在了容器中,程序員只需自己注入即可使用
-
JdbcTemplate 的自動配置是依賴 org.springframework.boot.autoconfigure.jdbc 包下的 JdbcTemplateConfiguration 類
JdbcTemplate主要提供以下幾類方法:
- execute方法:可以用于執行任何SQL語句,一般用于執行DDL語句;
- update方法及batchUpdate方法:update方法用于執行新增、修改、刪除等語句;batchUpdate方法用于執行批處理相關語句;
- query方法及queryForXXX方法:用于執行查詢相關語句;
- call方法:用于執行存儲過程、函數相關語句。
測試
編寫一個Controller,注入 jdbcTemplate,編寫測試方法進行訪問測試;
@RestController
public class JDBCController {@AutowiredJdbcTemplate jdbcTemplate;//查詢數據庫的所有信息//沒有實體類,數據庫中的東西,怎么獲取? Map@GetMapping("/userList")public List<Map<String,Object>> userList(){String sql = "select * from user";List<Map<String, Object>> list_maps = jdbcTemplate.queryForList(sql);return list_maps;}@GetMapping("/addUser")public String addUser(){String sql = "insert into mybatis.user(id,name,pwd) values (5,'小明','123456')";jdbcTemplate.update(sql);return "addUser-ok";}@GetMapping("/updateUser/{id}")public String updateUser(@PathVariable("id") int id){String sql = "update mybatis.user set name=?,pwd=? where id="+id;//封裝Object[] objects = new Object[2];objects[0] = "小明2";objects[1] = "zzzzzz";jdbcTemplate.update(sql,objects);return "update-ok";}@GetMapping("/deleteUser/{id}")public String deleteUser(@PathVariable("id") int id){String sql = "delete from mybatis.user where id=?";jdbcTemplate.update(sql,id);return "delete-ok";}}
測試請求,結果正常;
到此,CURD的基本操作,使用 JDBC 就搞定了。
10.8、整合Druid
集成Druid
Druid簡介
Java程序很大一部分要操作數據庫,為了提高性能操作數據庫的時候,又不得不使用數據庫連接池。
Druid 是阿里巴巴開源平臺上一個數據庫連接池實現,結合了 C3P0、DBCP 等 DB 池的優點,同時加入了日志監控。
Druid 可以很好的監控 DB 池連接和 SQL 的執行情況,天生就是針對監控而生的 DB 連接池。
Druid已經在阿里巴巴部署了超過600個應用,經過一年多生產環境大規模部署的嚴苛考驗。
Spring Boot 2.0 以上默認使用 Hikari 數據源,可以說 Hikari 與 Driud 都是當前 Java Web 上最優秀的數據源,我們來重點介紹 Spring Boot 如何集成 Druid 數據源,如何實現數據庫監控。
com.alibaba.druid.pool.DruidDataSource 基本配置參數如下:
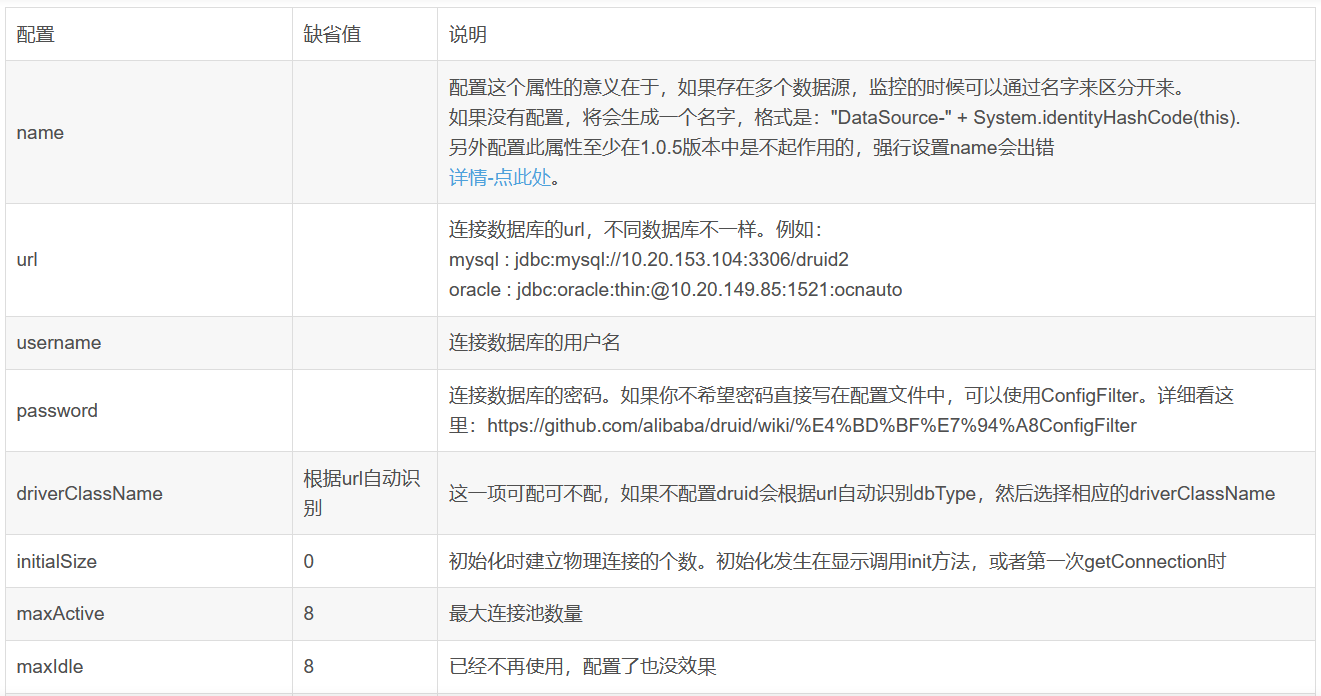

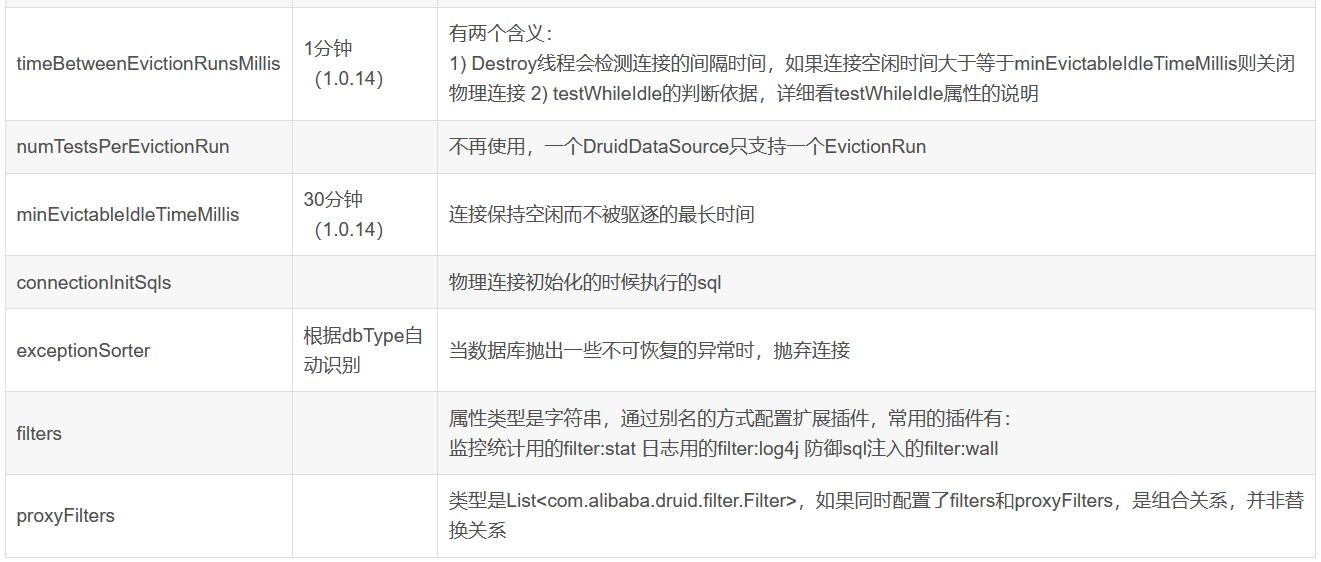
配置數據源
-
添加上Druid數據源,Log4j的依賴
<!--Druid--> <!-- https://mvnrepository.com/artifact/com.alibaba/druid --> <dependency><groupId>com.alibaba</groupId><artifactId>druid</artifactId><version>1.2.9</version> </dependency> <!--log4j--> <dependency><groupId>log4j</groupId><artifactId>log4j</artifactId><version>1.2.17</version> </dependency> -
切換數據源;之前已經說過 Spring Boot 2.0 以上默認使用 com.zaxxer.hikari.HikariDataSource 數據源,但可以 通過 spring.datasource.type 指定數據源。設置數據源連接初始化大小、最大連接數、等待時間、最小連接數 等設置項;可以查看源碼
spring:datasource:username: rootpassword: 123456url: jdbc:mysql://localhost:3306/mybatis?useUnicode=true&characterEncoding=utf-8&serverTimezone=GMTdriver-class-name: com.mysql.cj.jdbc.Drivertype: com.alibaba.druid.pool.DruidDataSource#Spring Boot 默認是不注入這些屬性值的,需要自己綁定#druid 數據源專有配置initialSize: 5minIdle: 5maxActive: 20maxWait: 60000timeBetweenEvictionRunsMillis: 60000minEvictableIdleTimeMillis: 300000validationQuery: SELECT 1 FROM DUALtestWhileIdle: truetestOnBorrow: falsetestOnReturn: falsepoolPreparedStatements: true#配置監控統計攔截的filters,stat:監控統計、log4j:日志記錄、wall:防御sql注入#如果允許時報錯 java.lang.ClassNotFoundException: org.apache.log4j.Priority#則導入 log4j 依賴即可,Maven 地址:https://mvnrepository.com/artifact/log4j/log4jfilters: stat,wall,log4jmaxPoolPreparedStatementPerConnectionSize: 20useGlobalDataSourceStat: trueconnectionProperties: druid.stat.mergeSql=true;druid.stat.slowSqlMillis=500 -
現在需要程序員自己為 DruidDataSource 綁定全局配置文件中的參數,再添加到容器中,而不再使用 Spring Boot 的自動生成了;我們需要 自己添加 DruidDataSource 組件到容器中,并綁定屬性;
@Configuration public class DruidConfig {/*將自定義的 Druid數據源添加到容器中,不再讓 Spring Boot 自動創建綁定全局配置文件中的 druid 數據源屬性到 com.alibaba.druid.pool.DruidDataSource從而讓它們生效@ConfigurationProperties(prefix = "spring.datasource"):作用就是將 全局配置文件中前綴為 spring.datasource的屬性值注入到 com.alibaba.druid.pool.DruidDataSource 的同名參數中*/@ConfigurationProperties(prefix = "spring.datasource")@Beanpublic DataSource druidDataSource(){return new DruidDataSource();} } -
去測試類中測試一下;看是否成功!
@SpringBootTest
class SpringbootDataJdbcApplicationTests {//DI注入數據源@AutowiredDataSource dataSource;@Testpublic void contextLoads() throws SQLException {//看一下默認數據源System.out.println(dataSource.getClass());//獲得連接Connection connection =   dataSource.getConnection();System.out.println(connection);DruidDataSource druidDataSource = (DruidDataSource) dataSource;System.out.println("druidDataSource 數據源最大連接數:" + druidDataSource.getMaxActive());System.out.println("druidDataSource 數據源初始化連接數:" + druidDataSource.getInitialSize());//關閉連接connection.close();}
}
輸出結果:可見配置參數已經生效!
配置Druid數據源監控
Druid 數據源具有監控的功能,并提供了一個 web 界面方便用戶查看,類似安裝 路由器 時,人家也提供了一個默認的 web 頁面。
所以第一步需要設置 Druid 的后臺管理頁面,比如 登錄賬號、密碼 等;配置后臺管理;
//配置 Druid 監控管理后臺的Servlet;
//內置 Servlet 容器時沒有web.xml文件,所以使用 Spring Boot 的注冊 Servlet 方式
@Bean
public ServletRegistrationBean statViewServlet() {ServletRegistrationBean bean = new ServletRegistrationBean(new StatViewServlet(), "/druid/*");// 這些參數可以在 com.alibaba.druid.support.http.StatViewServlet // 的父類 com.alibaba.druid.support.http.ResourceServlet 中找到Map<String, String> initParams = new HashMap<>();initParams.put("loginUsername", "admin"); //后臺管理界面的登錄賬號initParams.put("loginPassword", "123456"); //后臺管理界面的登錄密碼//后臺允許誰可以訪問//initParams.put("allow", "localhost"):表示只有本機可以訪問//initParams.put("allow", ""):為空或者為null時,表示允許所有訪問initParams.put("allow", "");//deny:Druid 后臺拒絕誰訪問//initParams.put("kuangshen", "192.168.1.20");表示禁止此ip訪問//設置初始化參數bean.setInitParameters(initParams);return bean;
}
配置完畢后,我們可以選擇訪問 :http://localhost:8080/druid/login.html
配置 Druid web 監控 filter 過濾器
//配置 Druid 監控 之  web 監控的 filter
//WebStatFilter:用于配置Web和Druid數據源之間的管理關聯監控統計
@Bean
public FilterRegistrationBean webStatFilter() {FilterRegistrationBean bean = new FilterRegistrationBean();bean.setFilter(new WebStatFilter());//exclusions:設置哪些請求進行過濾排除掉,從而不進行統計Map<String, String> initParams = new HashMap<>();initParams.put("exclusions", "*.js,*.css,/druid/*,/jdbc/*");bean.setInitParameters(initParams);//"/*" 表示過濾所有請求bean.setUrlPatterns(Arrays.asList("/*"));return bean;
}
平時在工作中,按需求進行配置即可,主要用作監控!
10.9、整合MyBatis
整合測試
-
導入MyBatis所需要的依賴
<!--mybatis-spring-boot-starter--> <!-- https://mvnrepository.com/artifact/org.mybatis.spring.boot/mybatis-spring-boot-starter --> <dependency><groupId>org.mybatis.spring.boot</groupId><artifactId>mybatis-spring-boot-starter</artifactId><version>2.2.2</version> </dependency> -
配置數據庫連接信息(不變)
spring:datasource:username: rootpassword: 123456url: jdbc:mysql://localhost:3306/mybatis?useUnicode=true&characterEncoding=utf-8&serverTimezone=GMTdriver-class-name: com.mysql.cj.jdbc.Drivertype: com.alibaba.druid.pool.DruidDataSource#Spring Boot 默認是不注入這些屬性值的,需要自己綁定#druid 數據源專有配置initialSize: 5minIdle: 5maxActive: 20maxWait: 60000timeBetweenEvictionRunsMillis: 60000minEvictableIdleTimeMillis: 300000validationQuery: SELECT 1 FROM DUALtestWhileIdle: truetestOnBorrow: falsetestOnReturn: falsepoolPreparedStatements: true#配置監控統計攔截的filters,stat:監控統計、log4j:日志記錄、wall:防御sql注入#如果允許時報錯 java.lang.ClassNotFoundException: org.apache.log4j.Priority#則導入 log4j 依賴即可,Maven 地址:https://mvnrepository.com/artifact/log4j/log4jfilters: stat,wall,log4jmaxPoolPreparedStatementPerConnectionSize: 20useGlobalDataSourceStat: trueconnectionProperties: druid.stat.mergeSql=true;druid.stat.slowSqlMillis=500 -
測試數據庫是否連接成功!
-
創建實體類,導入Lombok!
@Data @NoArgsConstructor @AllArgsConstructor public class User {private int id;private String name;private String pwd; } -
創建mapper目錄以及對應的Mapper接口
//這個注解表示了這是一個mybatis的mapper類; Dao @Mapper @Repository public interface UserMapper {List<User> queryUserList();User queryUserById(int id);int addUser(User user);int deleteUser(int id);int updateUser(User user);} -
對應的Mapper映射文件(resources/mybatis/mapper/UserMapper.xml)
<?xml version="1.0" encoding="UTF-8" ?> <!DOCTYPE mapperPUBLIC "-//mybatis.org//DTD Mapper 3.0//EN""http://mybatis.org/dtd/mybatis-3-mapper.dtd"> <mapper namespace="com.kuang.mapper.UserMapper"><select id="queryUserList" resultType="User">select * from mybatis.user</select><select id="queryUserById" resultType="User">select * from mybatis.user where id=#{id}</select><insert id="addUser" parameterType="User">insert into mybatis.user values name=#{name},pwd=#{pwd}</insert><delete id="deleteUser">delete from mybatis.user where id=#{id}</delete><update id="updateUser" parameterType="User">update mybatis.user set name=#{name},pwd=#{pwd} where id=#{id}</update> </mapper> -
maven配置資源過濾問題
<resources><resource><directory>src/main/java</directory><includes><include>**/*.xml</include></includes><filtering>true</filtering></resource> </resources> -
編寫UserController進行測試!
@RestController
public class UserController {@Autowiredprivate UserMapper userMapper;@GetMapping("/queryUserList")public List<User> queryUserList(){List<User> userList = userMapper.queryUserList();for (User user : userList) {System.out.println(user);}return userList;}@GetMapping("/queryUserById")public User queryUserById(){User user = userMapper.queryUserById(2);System.out.println(user);return user;}@GetMapping("/addUser")public int addUser(){int i = userMapper.addUser(new User(5, "qinjiang", "123456"));return i;}@GetMapping("/updateUser")public int updateUser(){int i = userMapper.updateUser(new User(4, "kuangshne", "123456"));return i;}@GetMapping("/deleteUser")public int deleteUser(){int i = userMapper.deleteUser(5);return i;}
}
啟動項目訪問進行測試!
我們增加一個員工類再測試下,為之后做準備
-
新建一個pojo類Employee
@Data @AllArgsConstructor @NoArgsConstructor public class Employee {private Integer id;private String lastName;private String email;//1 male, 0 femaleprivate Integer gender;private Integer department;private Date birth;} -
新建一個 EmployeeMapper 接口
//@Mapper : 表示本類是一個 MyBatis 的 Mapper @Mapper @Repository public interface EmployeeMapper {// 獲取所有員工信息List<Employee> getEmployees();// 新增一個員工int save(Employee employee);// 通過id獲得員工信息Employee get(Integer id);// 通過id刪除員工int delete(Integer id);} -
編寫EmployeeMapper.xml配置文件
<?xml version="1.0" encoding="UTF-8" ?> <!DOCTYPE mapperPUBLIC "-//mybatis.org//DTD Mapper 3.0//EN""http://mybatis.org/dtd/mybatis-3-mapper.dtd"><mapper namespace="com.kuang.mapper.EmployeeMapper"><resultMap id="EmployeeMap" type="Employee"><id property="id" column="eid"/><result property="lastName" column="last_name"/><result property="email" column="email"/><result property="gender" column="gender"/><result property="birth" column="birth"/><association property="eDepartment" javaType="Department"><id property="id" column="did"/><result property="departmentName" column="dname"/></association></resultMap><select id="getEmployees" resultMap="EmployeeMap">select e.id as eid,last_name,email,gender,birth,d.id as did,d.department_name as dnamefrom department d,employee ewhere d.id = e.department</select><insert id="save" parameterType="Employee">insert into employee (last_name,email,gender,department,birth)values (#{lastName},#{email},#{gender},#{department},#{birth});</insert><select id="get" resultType="Employee">select * from employee where id = #{id}</select><delete id="delete" parameterType="int">delete from employee where id = #{id}</delete></mapper> -
編寫EmployeeController類進行測試
@RestController
public class EmployeeController {@AutowiredEmployeeMapper employeeMapper;// 獲取所有員工信息@GetMapping("/getEmployees")public List<Employee> getEmployees(){return employeeMapper.getEmployees();}@GetMapping("/save")public int save(){Employee employee = new Employee();employee.setLastName("kuangshen");employee.setEmail("qinjiang@qq.com");employee.setGender(1);employee.setDepartment(101);employee.setBirth(new Date());return employeeMapper.save(employee);}// 通過id獲得員工信息@GetMapping("/get/{id}")public Employee get(@PathVariable("id") Integer id){return employeeMapper.get(id);}// 通過id刪除員工@GetMapping("/delete/{id}")public int delete(@PathVariable("id") Integer id){return employeeMapper.delete(id);}}
測試結果完成,搞定收工!
11、SpringSecurity
安全簡介
在 Web 開發中,安全一直是非常重要的一個方面。安全雖然屬于應用的非功能性需求,但是應該在應用開發的初期就考慮進來。如果在應用開發的后期才考慮安全的問題,就可能陷入一個兩難的境地:一方面,應用存在嚴重的安全漏洞,無法滿足用戶的要求,并可能造成用戶的隱私數據被攻擊者竊取;另一方面,應用的基本架構已經確定,要修復安全漏洞,可能需要對系統的架構做出比較重大的調整,因而需要更多的開發時間,影響應用的發布進程。因此,從應用開發的第一天就應該把安全相關的因素考慮進來,并在整個應用的開發過程中。
市面上存在比較有名的:Shiro,Spring Security !
Spring Security是一個功能強大且高度可定制的身份驗證和訪問控制框架。它實際上是保護基于spring的應用程序的標準。
Spring Security是一個框架,側重于為Java應用程序提供身份驗證和授權。與所有Spring項目一樣,Spring安全性的真正強大之處在于它可以輕松地擴展以滿足定制需求
從官網的介紹中可以知道這是一個權限框架。想我們之前做項目是沒有使用框架是怎么控制權限的?對于權限 一般會細分為功能權限,訪問權限,和菜單權限。代碼會寫的非常的繁瑣,冗余。
怎么解決之前寫權限代碼繁瑣,冗余的問題,一些主流框架就應運而生而Spring Scecurity就是其中的一種。
Spring 是一個非常流行和成功的 Java 應用開發框架。Spring Security 基于 Spring 框架,提供了一套 Web 應用安全性的完整解決方案。一般來說,Web 應用的安全性包括用戶認證(Authentication)和用戶授權(Authorization)兩個部分。用戶認證指的是驗證某個用戶是否為系統中的合法主體,也就是說用戶能否訪問該系統。用戶認證一般要求用戶提供用戶名和密碼。系統通過校驗用戶名和密碼來完成認證過程。用戶授權指的是驗證某個用戶是否有權限執行某個操作。在一個系統中,不同用戶所具有的權限是不同的。比如對一個文件來說,有的用戶只能進行讀取,而有的用戶可以進行修改。一般來說,系統會為不同的用戶分配不同的角色,而每個角色則對應一系列的權限。
對于上面提到的兩種應用情景,Spring Security 框架都有很好的支持。在用戶認證方面,Spring Security 框架支持主流的認證方式,包括 HTTP 基本認證、HTTP 表單驗證、HTTP 摘要認證、OpenID 和 LDAP 等。在用戶授權方面,Spring Security 提供了基于角色的訪問控制和訪問控制列表(Access Control List,ACL),可以對應用中的領域對象進行細粒度的控制。
實戰測試
實驗環境搭建
-
新建一個初始的springboot項目web模塊,thymeleaf模塊
-
導入靜態資源
welcome.html |views |level1 1.html 2.html 3.html |level2 1.html 2.html 3.html |level3 1.html 2.html 3.html Login.html -
controller跳轉!
@Controller public class RouterController {@RequestMapping({"/","/index"})public String index(){return "index";}@RequestMapping("/toLogin")public String toLogin(){return "views/login";}@RequestMapping("/level1/{id}")public String level1(@PathVariable("id") int id){return "views/level1/"+id;}@RequestMapping("/level2/{id}")public String level2(@PathVariable("id") int id){return "views/level2/"+id;}@RequestMapping("/level3/{id}")public String level3(@PathVariable("id") int id){return "views/level3/"+id;}} -
測試實驗環境是否OK!
認識SpringSecurity
Spring Security 是針對Spring項目的安全框架,也是Spring Boot底層安全模塊默認的技術選型,他可以實現強大的Web安全控制,對于安全控制,我們僅需要引入 spring-boot-starter-security 模塊,進行少量的配置,即可實現強大的安全管理!
記住幾個類:
- WebSecurityConfigurerAdapter:自定義Security策略
- AuthenticationManagerBuilder:自定義認證策略
- @EnableWebSecurity:開啟WebSecurity模式
Spring Security的兩個主要目標是 “認證” 和 “授權”(訪問控制)。
“認證”(Authentication)
身份驗證是關于驗證您的憑據,如用戶名/用戶ID和密碼,以驗證您的身份。
身份驗證通常通過用戶名和密碼完成,有時與身份驗證因素結合使用。
“授權” (Authorization)
授權發生在系統成功驗證您的身份后,最終會授予您訪問資源(如信息,文件,數據庫,資金,位置,幾乎任何內容)的完全權限。
這個概念是通用的,而不是只在Spring Security 中存在。
認證和授權
目前,我們的測試環境,是誰都可以訪問的,我們使用 Spring Security 增加上認證和授權的功能
-
引入Srping Security模塊
<dependency><groupId>org.springframework.boot</groupId><artifactId>spring-boot-starter-security</artifactId> </dependency> -
編寫Spring Security配置類
參考官網:Spring Security
查看我們自己項目中的版本,找到對應的幫助文檔:
Spring Security Reference?#servlet-applications 8.16.4
-
編寫基礎配置類
@EnableWebSecurity // 開啟WebSecurity模式 public class SecurityConfig extends WebSecurityConfigurerAdapter {@Overrideprotected void configure(HttpSecurity http) throws Exception {} } -
定制請求的授權規則
@Override protected void configure(HttpSecurity http) throws Exception {// 定制請求的授權規則// 首頁所有人可以訪問http.authorizeRequests().antMatchers("/").permitAll().antMatchers("/level1/**").hasRole("vip1").antMatchers("/level2/**").hasRole("vip2").antMatchers("/level3/**").hasRole("vip3"); } -
測試一下:發現除了首頁都進不去了,因為我們目前沒有登錄的角色,因為請求需要登錄的角色擁有對應的權限才可以!
-
在SecurityConfig()方法中加入以下配置,開啟自動配置的登錄功能!
// 開啟自動配置的登錄功能 // /login 請求來到登錄頁 // /login?error 重定向到這里表示登錄失敗 http.formLogin(); -
測試一下:發現,沒有權限的時候,會跳轉到登錄的頁面!
-
查看剛才登錄頁的注釋信息;我們可以定義認證規則,重寫configure(AuthenticationManagerBuilder auth)方法
//定義認證規則 @Override protected void configure(AuthenticationManagerBuilder auth) throws Exception {//在內存中定義,也可以在jdbc中去拿....auth.inMemoryAuthentication().withUser("kuangshen").password("123456").roles("vip2","vip3").and().withUser("root").password("123456").roles("vip1","vip2","vip3").and().withUser("guest").password("123456").roles("vip1","vip2"); } -
測試,我們可以使用這些賬號登錄進行測試!發現會報錯!There is no PasswordEncoder mapped for the id “null”
-
原因,我們要將前端傳過來的密碼進行某種方式加密,否則就無法登錄,修改代碼
@Override protected void configure(AuthenticationManagerBuilder auth) throws Exception {//這些數據正常應該從數據庫中讀auth.inMemoryAuthentication().passwordEncoder(new BCryptPasswordEncoder()).withUser("kuangshen").password(new BCryptPasswordEncoder().encode("123456")).roles("vip2","vip3").and().withUser("root").password(new BCryptPasswordEncoder().encode("123456")).roles("vip1","vip2","vip3").and().withUser("guest").password(new BCryptPasswordEncoder().encode("123456")).roles("vip1"); } -
測試,發現登錄成功,并且每個角色只能訪問自己認證下的規則!搞定
權限控制和注銷
-
開啟自動配置的注銷的功能
//定制請求的授權規則 @Override protected void configure(HttpSecurity http) throws Exception {//....//開啟自動配置的注銷的功能// /logout 注銷請求http.logout(); } -
我們在前端,增加一個注銷的按鈕,index.html導航欄中
<a class="item" th:href="@{/logout}"><i class="address card icon"></i> 注銷 </a> -
我們可以去測試一下,登錄成功后點擊注銷,發現注銷完畢會跳轉到登錄頁面!
-
但是,我們想讓它注銷成功后,依舊可以跳轉到首頁,該怎么處理呢?
// .logoutSuccessUrl("/"); 注銷成功來到首頁 http.logout().logoutSuccessUrl("/"); -
測試,注銷完畢后,發現跳轉到首頁OK
-
我們現在又來一個需求:用戶沒有登錄的時候,導航欄上只顯示登錄按鈕,用戶登錄之后,導航欄可以顯示登錄的用戶信息及注銷按鈕!還有就是,比如kuangshen這個用戶,它只有 vip2,vip3功能,那么登錄則只顯示這兩個功能,而vip1的功能菜單不顯示!這個就是真實的網站情況了!該如何做呢?
我們需要結合thymeleaf中的一些功能
sec:authorize="isAuthenticated()":是否認證登錄!來顯示不同的頁面
Maven依賴:
<!--security-thymeleaf整合包--> <!-- https://mvnrepository.com/artifact/org.thymeleaf.extras/thymeleaf-extras-springsecurity5 --> <dependency><groupId>org.thymeleaf.extras</groupId><artifactId>thymeleaf-extras-springsecurity5</artifactId><version>3.0.4.RELEASE</version> </dependency> -
修改我們的前端頁面,導入命名空間
xmlns:sec="http://www.thymeleaf.org/extra/spring-security"修改導航欄,增加認證判斷
<!--登錄注銷--> <div class="right menu"><!--如果未登錄--><div sec:authorize="!isAuthenticated()"><a class="item" th:href="@{/login}"><i class="address card icon"></i> 登錄</a></div><!--如果已登錄--><div sec:authorize="isAuthenticated()"><a class="item"><i class="address card icon"></i>用戶名:<span sec:authentication="principal.username"></span>角色:<span sec:authentication="principal.authorities"></span></a></div><div sec:authorize="isAuthenticated()"><a class="item" th:href="@{/logout}"><i class="address card icon"></i> 注銷</a></div> </div> -
重啟測試,我們可以登錄試試看,登錄成功后確實顯示了我們想要的頁面;
-
如果注銷404了,就是因為它默認防止csrf跨站請求偽造,因為會產生安全問題,我們可以將請求改為post表單提交,或者在spring security中關閉csrf功能;我們試試:在 配置中增加
http.csrf().disable();http.csrf().disable();//關閉csrf功能:跨站請求偽造,默認只能通過post方式提交logout請求 http.logout().logoutSuccessUrl("/"); -
我們繼續將下面的角色功能塊認證完成!
<!-- sec:authorize="hasRole('vip1')" --> <div class="column" sec:authorize="hasRole('vip1')"><div class="ui raised segment"><div class="ui"><div class="content"><h5 class="content">Level 1</h5><hr><div><a th:href="@{/level1/1}"><i class="bullhorn icon"></i> Level-1-1</a></div><div><a th:href="@{/level1/2}"><i class="bullhorn icon"></i> Level-1-2</a></div><div><a th:href="@{/level1/3}"><i class="bullhorn icon"></i> Level-1-3</a></div></div></div></div> </div><div class="column" sec:authorize="hasRole('vip2')"><div class="ui raised segment"><div class="ui"><div class="content"><h5 class="content">Level 2</h5><hr><div><a th:href="@{/level2/1}"><i class="bullhorn icon"></i> Level-2-1</a></div><div><a th:href="@{/level2/2}"><i class="bullhorn icon"></i> Level-2-2</a></div><div><a th:href="@{/level2/3}"><i class="bullhorn icon"></i> Level-2-3</a></div></div></div></div> </div><div class="column" sec:authorize="hasRole('vip3')"><div class="ui raised segment"><div class="ui"><div class="content"><h5 class="content">Level 3</h5><hr><div><a th:href="@{/level3/1}"><i class="bullhorn icon"></i> Level-3-1</a></div><div><a th:href="@{/level3/2}"><i class="bullhorn icon"></i> Level-3-2</a></div><div><a th:href="@{/level3/3}"><i class="bullhorn icon"></i> Level-3-3</a></div></div></div></div> </div> -
測試一下
-
權限控制和注銷搞定!
記住我
現在的情況,我們只要登錄之后,關閉瀏覽器,再登錄,就會讓我們重新登錄,但是很多網站的情況,就是有一個記住密碼的功能,這個該如何實現呢?很簡單
-
開啟記住我功能
//定制請求的授權規則 @Override protected void configure(HttpSecurity http) throws Exception {//。。。。。。。。。。。//記住我http.rememberMe(); } -
我們再次啟動項目測試一下,發現登錄頁多了一個記住我功能,我們登錄之后關閉 瀏覽器,然后重新打開瀏覽器訪問,發現用戶依舊存在!
思考:如何實現的呢?其實非常簡單
我們可以查看瀏覽器的cookie
-
我們點擊注銷的時候,可以發現,spring security 幫我們自動刪除了這個 cookie
-
結論:登錄成功后,將cookie發送給瀏覽器保存,以后登錄帶上這個cookie,只要通過檢查就可以免登錄了。如果點擊注銷,則會刪除這個cookie,具體的原理我們在JavaWeb階段都講過了,這里就不在多說了!
定制登錄頁
現在這個登錄頁面都是spring security 默認的,怎么樣可以使用我們自己寫的Login界面呢?
-
在剛才的登錄頁配置后面指定 loginpage
http.formLogin().loginPage("/toLogin"); -
然后前端也需要指向我們自己定義的 login請求
<a class="item" th:href="@{/toLogin}"><i class="address card icon"></i> 登錄 </a> -
我們登錄,需要將這些信息發送到哪里,我們也需要配置,login.html配置提交請求及方式,方式必須為post,在loginPage()源碼的注釋上有寫明
<form th:action="@{/login}" method="post"><div class="field"><label>Username</label><div class="ui left icon input"><input type="text" placeholder="Username" name="username"><i class="user icon"></i></div></div><div class="field"><label>Password</label><div class="ui left icon input"><input type="password" name="password"><i class="lock icon"></i></div></div><input type="submit" class="ui blue submit button"/> </form> -
這個請求提交上來,我們還需要驗證處理,怎么做呢?我們可以查看formLogin()方法的源碼!我們配置接受登錄的用戶名和密碼的參數!
http.formLogin().usernameParameter("username").passwordParameter("password").loginPage("/toLogin").loginProcessingUrl("/login"); // 登陸表單提交請求 -
在登錄頁增加記住我的多選框
<input type="checkbox" name="remember"> 記住我 -
后端驗證處理!
//定制記住我的參數! http.rememberMe().rememberMeParameter("remember"); -
測試,OK
完整配置代碼
@EnableWebSecurity
public class SecurityConfig extends WebSecurityConfigurerAdapter {//定制請求的授權規則@Overrideprotected void configure(HttpSecurity http) throws Exception {http.authorizeRequests().antMatchers("/").permitAll().antMatchers("/level1/**").hasRole("vip1").antMatchers("/level2/**").hasRole("vip2").antMatchers("/level3/**").hasRole("vip3");//開啟自動配置的登錄功能:如果沒有權限,就會跳轉到登錄頁面!// /login 請求來到登錄頁// /login?error 重定向到這里表示登錄失敗http.formLogin().usernameParameter("username").passwordParameter("password").loginPage("/toLogin").loginProcessingUrl("/login"); // 登陸表單提交請求//開啟自動配置的注銷的功能// /logout 注銷請求// .logoutSuccessUrl("/"); 注銷成功來到首頁http.csrf().disable();//關閉csrf功能:跨站請求偽造,默認只能通過post方式提交logout請求http.logout().logoutSuccessUrl("/");//記住我http.rememberMe().rememberMeParameter("remember");}//定義認證規則@Overrideprotected void configure(AuthenticationManagerBuilder auth) throws Exception {//在內存中定義,也可以在jdbc中去拿....//Spring security 5.0中新增了多種加密方式,也改變了密碼的格式。//要想我們的項目還能夠正常登陸,需要修改一下configure中的代碼。我們要將前端傳過來的密碼進行某種方式加密//spring security 官方推薦的是使用bcrypt加密方式。auth.inMemoryAuthentication().passwordEncoder(new BCryptPasswordEncoder()).withUser("kuangshen").password(new BCryptPasswordEncoder().encode("123456")).roles("vip2","vip3").and().withUser("root").password(new BCryptPasswordEncoder().encode("123456")).roles("vip1","vip2","vip3").and().withUser("guest").password(new BCryptPasswordEncoder().encode("123456")).roles("vip1","vip2");}
}
12、項目集成Swagger
學習目標:
- 了解Swagger的概念及作用
- 掌握在項目中集成Swagger自動生成API文檔
Swagger簡介
前后端分離
- 前端 -> 前端控制層、視圖層
- 后端 -> 后端控制層、服務層、數據訪問層
- 前后端通過API進行交互
- 前后端相對獨立且松耦合
產生的問題
- 前后端集成,前端或者后端無法做到“及時協商,盡早解決”,最終導致問題集中爆發
解決方案
- 首先定義schema [ 計劃的提綱 ],并實時跟蹤最新的API,降低集成風險
Swagger
- 號稱世界上最流行的API框架
- Restful Api 文檔在線自動生成器 =>?API 文檔 與API 定義同步更新
- 直接運行,在線測試API
- 支持多種語言 (如:Java,PHP等)
- 官網:API Documentation & Design Tools for Teams | Swagger
SpringBoot集成Swagger
SpringBoot集成Swagger?=>?springfox,兩個jar包
- Springfox-swagger2
- swagger-springmvc
使用Swagger
要求:jdk 1.8 + 否則swagger2無法運行
步驟:
-
新建一個SpringBoot-web項目
-
添加Maven依賴
<!-- https://mvnrepository.com/artifact/io.springfox/springfox-swagger2 --> <dependency><groupId>io.springfox</groupId><artifactId>springfox-swagger2</artifactId><version>2.9.2</version> </dependency><!-- https://mvnrepository.com/artifact/io.springfox/springfox-swagger-ui --> <dependency><groupId>io.springfox</groupId><artifactId>springfox-swagger-ui</artifactId><version>2.9.2</version> </dependency> -
編寫HelloController,測試確保運行成功!
-
要使用Swagger,我們需要編寫一個配置類-SwaggerConfig來配置 Swagger
@Configuration //配置類 @EnableSwagger2// 開啟Swagger2的自動配置 public class SwaggerConfig { } -
訪問測試 :http://localhost:8080/swagger-ui.html?,可以看到swagger的界面;
配置Swagger
-
Swagger實例Bean是Docket,所以通過配置Docket實例來配置Swaggger。
@Bean //配置docket以配置Swagger具體參數 public Docket docket() {return new Docket(DocumentationType.SWAGGER_2); } -
可以通過apiInfo()屬性配置文檔信息
//配置文檔信息 private ApiInfo apiInfo() {Contact contact = new Contact("聯系人名字", "http://xxx.xxx.com/聯系人訪問鏈接", "聯系人郵箱");return new ApiInfo("Swagger學習", // 標題"學習演示如何配置Swagger", // 描述"v1.0", // 版本"http://terms.service.url/組織鏈接", // 組織鏈接contact, // 聯系人信息"Apach 2.0 許可", // 許可"許可鏈接", // 許可連接new ArrayList<>()// 擴展); } -
Docket 實例關聯上 apiInfo()
@Bean public Docket docket() {return new Docket(DocumentationType.SWAGGER_2).apiInfo(apiInfo()); } -
重啟項目,訪問測試?http://localhost:8080/swagger-ui.html?看下效果;
配置掃描接口
-
構建Docket時通過select()方法配置怎么掃描接口。
@Bean public Docket docket() {return new Docket(DocumentationType.SWAGGER_2).apiInfo(apiInfo()).select()// 通過.select()方法,去配置掃描接口,RequestHandlerSelectors配置如何掃描接口.apis(RequestHandlerSelectors.basePackage("com.kuang.swagger.controller")).build(); } -
重啟項目測試,由于我們配置根據包的路徑掃描接口,所以我們只能看到一個類
-
除了通過包路徑配置掃描接口外,還可以通過配置其他方式掃描接口,這里注釋一下所有的配置方式:
any() // 掃描所有,項目中的所有接口都會被掃描到 none() // 不掃描接口 // 通過方法上的注解掃描,如withMethodAnnotation(GetMapping.class)只掃描get請求 withMethodAnnotation(final Class<? extends Annotation> annotation) // 通過類上的注解掃描,如.withClassAnnotation(Controller.class)只掃描有controller注解的類中的接口 withClassAnnotation(final Class<? extends Annotation> annotation) basePackage(final String basePackage) // 根據包路徑掃描接口 -
除此之外,我們還可以配置接口掃描過濾:
@Bean public Docket docket() {return new Docket(DocumentationType.SWAGGER_2).apiInfo(apiInfo()).select()// 通過.select()方法,去配置掃描接口,RequestHandlerSelectors配置如何掃描接口.apis(RequestHandlerSelectors.basePackage("com.kuang.swagger.controller"))// 配置如何通過path過濾,即這里只掃描請求以/kuang開頭的接口.paths(PathSelectors.ant("/kuang/**")).build(); } -
這里的可選值還有
any() // 任何請求都掃描
none() // 任何請求都不掃描
regex(final String pathRegex) // 通過正則表達式控制
ant(final String antPattern) // 通過ant()控制
配置Swagger開關
-
通過enable()方法配置是否啟用swagger,如果是false,swagger將不能在瀏覽器中訪問了
@Bean public Docket docket() {return new Docket(DocumentationType.SWAGGER_2).apiInfo(apiInfo()).enable(false) //配置是否啟用Swagger,如果是false,在瀏覽器將無法訪問.select()// 通過.select()方法,去配置掃描接口,RequestHandlerSelectors配置如何掃描接口.apis(RequestHandlerSelectors.basePackage("com.kuang.swagger.controller"))// 配置如何通過path過濾,即這里只掃描請求以/kuang開頭的接口.paths(PathSelectors.ant("/kuang/**")).build(); } -
如何動態配置當項目處于test、dev環境時顯示swagger,處于prod時不顯示?
@Bean public Docket docket(Environment environment) {// 設置要顯示swagger的環境Profiles of = Profiles.of("dev", "test");// 判斷當前是否處于該環境// 通過 enable() 接收此參數判斷是否要顯示boolean b = environment.acceptsProfiles(of);return new Docket(DocumentationType.SWAGGER_2).apiInfo(apiInfo()).enable(b) //配置是否啟用Swagger,如果是false,在瀏覽器將無法訪問.select()// 通過.select()方法,去配置掃描接口,RequestHandlerSelectors配置如何掃描接口.apis(RequestHandlerSelectors.basePackage("com.kuang.swagger.controller"))// 配置如何通過path過濾,即這里只掃描請求以/kuang開頭的接口.paths(PathSelectors.ant("/kuang/**")).build(); } -
可以在項目中增加一個dev的配置文件查看效果!
配置API分組
-
如果沒有配置分組,默認是default。通過groupName()方法即可配置分組:
@Bean public Docket docket(Environment environment) {return new Docket(DocumentationType.SWAGGER_2).apiInfo(apiInfo()).groupName("hello") // 配置分組// 省略配置.... } -
重啟項目查看分組
-
如何配置多個分組?配置多個分組只需要配置多個docket即可:
@Bean public Docket docket1(){return new Docket(DocumentationType.SWAGGER_2).groupName("group1"); } @Bean public Docket docket2(){return new Docket(DocumentationType.SWAGGER_2).groupName("group2"); } @Bean public Docket docket3(){return new Docket(DocumentationType.SWAGGER_2).groupName("group3"); } -
重啟項目查看即可
實體配置
-
新建一個實體類
@ApiModel("用戶實體") public class User {@ApiModelProperty("用戶名")public String username;@ApiModelProperty("密碼")public String password; } -
只要這個實體在請求接口的返回值上(即使是泛型),都能映射到實體項中:
@RequestMapping("/getUser") public User getUser(){return new User(); } -
重啟查看測試
注:并不是因為@ApiModel這個注解讓實體顯示在這里了,而是只要出現在接口方法的返回值上的實體都會顯示在這里,而@ApiModel和@ApiModelProperty這兩個注解只是為實體添加注釋的。
@ApiModel為類添加注釋
@ApiModelProperty為類屬性添加注釋
常用注解
Swagger的所有注解定義在io.swagger.annotations包下
下面列一些經常用到的,未列舉出來的可以另行查閱說明:
| Swagger注解 | 簡單說明 |
|---|---|
| @Api(tags = "xxx模塊說明") | 作用在模塊類上 |
| @ApiOperation("xxx接口說明") | 作用在接口方法上 |
| @ApiModel("xxxPOJO說明") | 作用在模型類上:如VO、BO |
| @ApiModelProperty(value = "xxx屬性說明",hidden = true) | 作用在類方法和屬性上,hidden設置為true可以隱藏該屬性 |
| @ApiParam("xxx參數說明") | 作用在參數、方法和字段上,類似@ApiModelProperty |
我們也可以給請求的接口配置一些注釋
@ApiOperation("狂神的接口")
@PostMapping("/kuang")
@ResponseBody
public String kuang(@ApiParam("這個名字會被返回")String username){return username;
}
這樣的話,可以給一些比較難理解的屬性或者接口,增加一些配置信息,讓人更容易閱讀!
相較于傳統的Postman或Curl方式測試接口,使用swagger簡直就是傻瓜式操作,不需要額外說明文檔(寫得好本身就是文檔)而且更不容易出錯,只需要錄入數據然后點擊Execute,如果再配合自動化框架,可以說基本就不需要人為操作了。
Swagger是個優秀的工具,現在國內已經有很多的中小型互聯網公司都在使用它,相較于傳統的要先出Word接口文檔再測試的方式,顯然這樣也更符合現在的快速迭代開發行情。當然了,提醒下大家在正式環境要記得關閉Swagger,一來出于安全考慮二來也可以節省運行時內存。
拓展:其他皮膚
我們可以導入不同的包實現不同的皮膚定義:
-
默認的?訪問?http://localhost:8080/swagger-ui.html
<dependency><groupId>io.springfox</groupId><artifactId>springfox-swagger-ui</artifactId><version>2.9.2</version> </dependency> -
bootstrap-ui?訪問?http://localhost:8080/doc.html
<!-- 引入swagger-bootstrap-ui包 /doc.html--> <dependency><groupId>com.github.xiaoymin</groupId><artifactId>swagger-bootstrap-ui</artifactId><version>1.9.1</version> </dependency> -
Layui-ui?訪問?http://localhost:8080/docs.html
<!-- 引入swagger-ui-layer包 /docs.html--> <dependency><groupId>com.github.caspar-chen</groupId><artifactId>swagger-ui-layer</artifactId><version>1.1.3</version> </dependency> -
mg-ui?訪問?http://localhost:8080/document.html
<!-- 引入swagger-ui-layer包 /document.html-->
<dependency><groupId>com.zyplayer</groupId><artifactId>swagger-mg-ui</artifactId><version>1.0.6</version>
</dependency>
13、異步、定時、郵件任務
前言:
在我們的工作中,常常會用到異步處理任務,比如我們在網站上發送郵件,后臺會去發送郵件,此時前臺會造成響應不動,直到郵件發送完畢,響應才會成功,所以我們一般會采用多線程的方式去處理這些任務。還有一些定時任務,比如需要在每天凌晨的時候,分析一次前一天的日志信息。
異步任務
-
創建一個service包
-
創建一個類AsyncService
異步處理還是非常常用的,比如我們在網站上發送郵件,后臺會去發送郵件,此時前臺會造成響應不動,直到郵件發送完畢,響應才會成功,所以我們一般會采用多線程的方式去處理這些任務。
編寫方法,假裝正在處理數據,使用線程設置一些延時,模擬同步等待的情況;
@Service public class AsyncService {public void hello(){try {Thread.sleep(3000);} catch (InterruptedException e) {e.printStackTrace();}System.out.println("業務進行中....");} } -
編寫controller包
-
編寫AsyncController類
我們去寫一個Controller測試一下
@RestController
public class AsyncController {@AutowiredAsyncService asyncService;@GetMapping("/hello")public String hello(){asyncService.hello();return "success";}
}
-
訪問http://localhost:8080/hello進行測試,3秒后出現success,這是同步等待的情況。
問題:我們如果想讓用戶直接得到消息,就在后臺使用多線程的方式進行處理即可,但是每次都需要自己手動去編寫多線程的實現的話,太麻煩了,我們只需要用一個簡單的辦法,在我們的方法上加一個簡單的注解即可,如下:
-
給hello方法添加@Async注解;
//告訴Spring這是一個異步方法
@Async
public void hello(){try {Thread.sleep(3000);} catch (InterruptedException e) {e.printStackTrace();}System.out.println("業務進行中....");
}
SpringBoot就會自己開一個線程池,進行調用!但是要讓這個注解生效,我們還需要在主程序上添加一個注解@EnableAsync ,開啟異步注解功能;
@EnableAsync //開啟異步注解功能 @SpringBootApplication public class SpringbootTaskApplication {public static void main(String[] args) {SpringApplication.run(SpringbootTaskApplication.class, args);}} -
重啟測試,網頁瞬間響應,后臺代碼依舊執行!
定時任務
項目開發中經常需要執行一些定時任務,比如需要在每天凌晨的時候,分析一次前一天的日志信息,Spring為我們提供了異步執行任務調度的方式,提供了兩個接口。
- TaskExecutor接口
- TaskScheduler接口
兩個注解:
- @EnableScheduling
- @Scheduled
cron表達式:
測試步驟:
-
創建一個ScheduledService
我們里面存在一個hello方法,他需要定時執行,怎么處理呢?
@Service public class ScheduledService {//秒 分 時 日 月 周幾//0 * * * * MON-FRI//注意cron表達式的用法;@Scheduled(cron = "0 * * * * 0-7")public void hello(){System.out.println("hello.....");} } -
這里寫完定時任務之后,我們需要在主程序上增加@EnableScheduling開啟定時任務功能
@EnableAsync //開啟異步注解功能 @EnableScheduling //開啟基于注解的定時任務 @SpringBootApplication public class SpringbootTaskApplication {public static void main(String[] args) {SpringApplication.run(SpringbootTaskApplication.class, args);}} -
我們來詳細了解下cron表達式;
quartz/Cron/Crontab表達式在線生成工具-BeJSON.com
-
常用的表達式
(1)0/2 * * * * ?   表示每2秒 執行任務
(1)0 0/2 * * * ?   表示每2分鐘 執行任務
(1)0 0 2 1 * ?   表示在每月的1日的凌晨2點調整任務
(2)0 15 10 ? * MON-FRI   表示周一到周五每天上午10:15執行作業
(3)0 15 10 ? 6L 2002-2006   表示2002-2006年的每個月的最后一個星期五上午10:15執行作
(4)0 0 10,14,16 * * ?   每天上午10點,下午2點,4點
(5)0 0/30 9-17 * * ?   朝九晚五工作時間內每半小時
(6)0 0 12 ? * WED   表示每個星期三中午12點
(7)0 0 12 * * ?   每天中午12點觸發
(8)0 15 10 ? * *   每天上午10:15觸發
(9)0 15 10 * * ?     每天上午10:15觸發
(10)0 15 10 * * ?   每天上午10:15觸發
(11)0 15 10 * * ? 2005   2005年的每天上午10:15觸發
(12)0 * 14 * * ?     在每天下午2點到下午2:59期間的每1分鐘觸發
(13)0 0/5 14 * * ?   在每天下午2點到下午2:55期間的每5分鐘觸發
(14)0 0/5 14,18 * * ?     在每天下午2點到2:55期間和下午6點到6:55期間的每5分鐘觸發
(15)0 0-5 14 * * ?   在每天下午2點到下午2:05期間的每1分鐘觸發
(16)0 10,44 14 ? 3 WED   每年三月的星期三的下午2:10和2:44觸發
(17)0 15 10 ? * MON-FRI   周一至周五的上午10:15觸發
(18)0 15 10 15 * ?   每月15日上午10:15觸發
(19)0 15 10 L * ?   每月最后一日的上午10:15觸發
(20)0 15 10 ? * 6L   每月的最后一個星期五上午10:15觸發
(21)0 15 10 ? * 6L 2002-2005   2002年至2005年的每月的最后一個星期五上午10:15觸發
(22)0 15 10 ? * 6#3   每月的第三個星期五上午10:15觸發
郵件任務
郵件發送,在我們的日常開發中,也非常的多,Springboot也幫我們做了支持
- 郵件發送需要引入spring-boot-start-mail
- SpringBoot 自動配置MailSenderAutoConfiguration
- 定義MailProperties內容,配置在application.yml中
- 自動裝配JavaMailSender
- 測試郵件發送
測試:
-
引入pom依賴
<dependency><groupId>org.springframework.boot</groupId><artifactId>spring-boot-starter-mail</artifactId>
</dependency>
看他引入的依賴,可以看到jakarta.mail
<dependency><groupId>com.sun.mail</groupId><artifactId>jakarta.mail</artifactId><version>1.6.7</version><scope>compile</scope> </dependency> -
查看自動配置類:MailSenderAutoConfiguration

這個類中存在bean,JavaMailSenderImpl
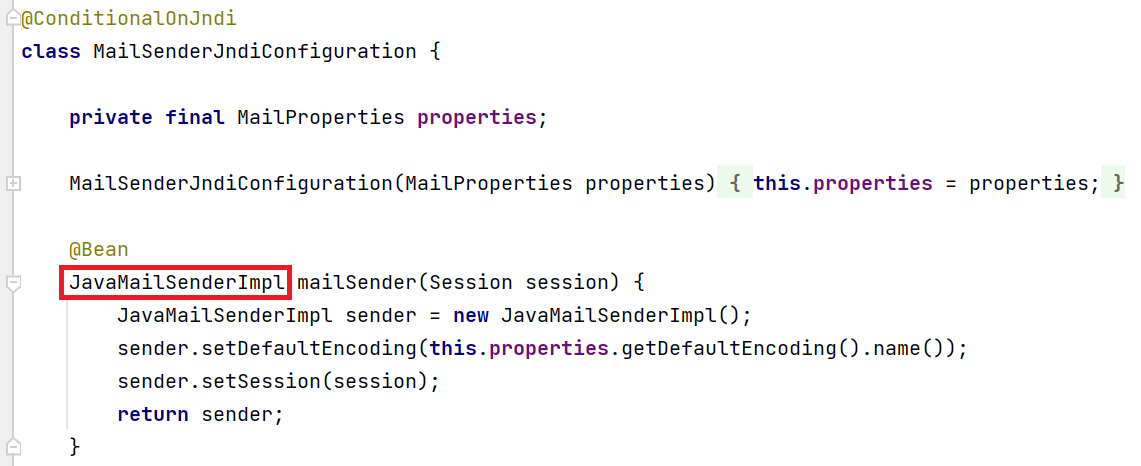
然后我們去看下配置文件
@ConfigurationProperties(prefix = "spring.mail" ) public class MailProperties {private static final Charset DEFAULT_CHARSET;private String host;private Integer port;private String username;private String password;private String protocol = "smtp";private Charset defaultEncoding;private Map<String, String> properties;private String jndiName; } -
配置文件
spring.mail.username=406623380@qq.com
spring.mail.password=你的qq授權碼
spring.mail.host=smtp.qq.com
# QQ需要配置ssl
spring.mail.properties.mail.smtp.ssl.enable=true
獲取授權碼:在QQ郵箱中的設置->賬戶->開啟pop3和smtp服務
-
Spring單元測試
@Autowired
JavaMailSenderImpl mailSender;@Test
public void contextLoads() {//郵件設置1:一個簡單的郵件SimpleMailMessage message = new SimpleMailMessage();message.setSubject("通知-明天來狂神這聽課");message.setText("今晚7:30開會");message.setTo("24736743@qq.com");message.setFrom("24736743@qq.com");mailSender.send(message);
}@Test
public void contextLoads2() throws MessagingException {//郵件設置2:一個復雜的郵件MimeMessage mimeMessage = mailSender.createMimeMessage();MimeMessageHelper helper = new MimeMessageHelper(mimeMessage, true);helper.setSubject("通知-明天來狂神這聽課");helper.setText("<b style='color:red'>今天 7:30來開會</b>",true);//發送附件helper.addAttachment("1.jpg",new File(""));helper.addAttachment("2.jpg",new File(""));helper.setTo("24736743@qq.com");helper.setFrom("24736743@qq.com");mailSender.send(mimeMessage);
}
查看郵箱,郵件接收成功!
我們只需要使用Thymeleaf進行前后端結合即可開發自己網站郵件收發功能了!
14、Dubbo和Zookeeper集成
分布式理論
什么是分布式系統?
在《分布式系統原理與范型》一書中有如下定義:“分布式系統是若干獨立計算機的集合,這些計算機對于用戶來說就像單個相關系統”;
分布式系統是由一組通過網絡進行通信、為了完成共同的任務而協調工作的計算機節點組成的系統。分布式系統的出現是為了用廉價的、普通的機器完成單個計算機無法完成的計算、存儲任務。其目的是利用更多的機器,處理更多的數據。
分布式系統(distributed system)是建立在網絡之上的軟件系統。
首先需要明確的是,只有當單個節點的處理能力無法滿足日益增長的計算、存儲任務的時候,且硬件的提升(加內存、加磁盤、使用更好的CPU)高昂到得不償失的時候,應用程序也不能進一步優化的時候,我們才需要考慮分布式系統。因為,分布式系統要解決的問題本身就是和單機系統一樣的,而由于分布式系統多節點、通過網絡通信的拓撲結構,會引入很多單機系統沒有的問題,為了解決這些問題又會引入更多的機制、協議,帶來更多的問題。。。
Dubbo文檔
隨著互聯網的發展,網站應用的規模不斷擴大,常規的垂直應用架構已無法應對,分布式服務架構以及流動計算架構勢在必行,急需一個治理系統確保架構有條不紊的演進。
在Dubbo的官網文檔有這樣一張圖
單一應用架構
當網站流量很小時,只需一個應用,將所有功能都部署在一起,以減少部署節點和成本。此時,用于簡化增刪改查工作量的數據訪問框架(ORM)是關鍵。
適用于小型網站,小型管理系統,將所有功能都部署到一個功能里,簡單易用。
缺點:
1、性能擴展比較難
2、協同開發問題
3、不利于升級維護
垂直應用架構
當訪問量逐漸增大,單一應用增加機器帶來的加速度越來越小,將應用拆成互不相干的幾個應用,以提升效率。此時,用于加速前端頁面開發的Web框架(MVC)是關鍵。
通過切分業務來實現各個模塊獨立部署,降低了維護和部署的難度,團隊各司其職更易管理,性能擴展也更方便,更有針對性。
缺點:公用模塊無法重復利用,開發性的浪費
分布式服務架構
當垂直應用越來越多,應用之間交互不可避免,將核心業務抽取出來,作為獨立的服務,逐漸形成穩定的服務中心,使前端應用能更快速的響應多變的市場需求。此時,用于提高業務復用及整合的分布式服務框架(RPC)是關鍵。
流動計算架構
當服務越來越多,容量的評估,小服務資源的浪費等問題逐漸顯現,此時需增加一個調度中心基于訪問壓力實時管理集群容量,提高集群利用率。此時,用于提高機器利用率的資源調度和治理中心(SOA)[ Service Oriented Architecture]是關鍵。
什么是RPC
RPC【Remote Procedure Call】是指遠程過程調用,是一種進程間通信方式,他是一種技術的思想,而不是規范。它允許程序調用另一個地址空間(通常是共享網絡的另一臺機器上)的過程或函數,而不用程序員顯式編碼這個遠程調用的細節。即程序員無論是調用本地的還是遠程的函數,本質上編寫的調用代碼基本相同。
也就是說兩臺服務器A,B,一個應用部署在A服務器上,想要調用B服務器上應用提供的函數/方法,由于不在一個內存空間,不能直接調用,需要通過網絡來表達調用的語義和傳達調用的數據。為什么要用RPC呢?就是無法在一個進程內,甚至一個計算機內通過本地調用的方式完成的需求,比如不同的系統間的通訊,甚至不同的組織間的通訊,由于計算能力需要橫向擴展,需要在多臺機器組成的集群上部署應用。RPC就是要像調用本地的函數一樣去調遠程函數;
RPC基本原理

步驟解析:

RPC兩個核心模塊:通訊,序列化。
測試環境搭建
Dubbo
Apache Dubbo |?d?b??| 是一款高性能、輕量級的開源Java RPC框架,它提供了三大核心能力:面向接口的遠程方法調用,智能容錯和負載均衡,以及服務自動注冊和發現。
dubbo官網?Apache Dubbo
- 了解Dubbo的特性
- 查看官方文檔
dubbo基本概念

服務提供者(Provider):暴露服務的服務提供方,服務提供者在啟動時,向注冊中心注冊自己提供的服務。
服務消費者(Consumer):調用遠程服務的服務消費方,服務消費者在啟動時,向注冊中心訂閱自己所需的服務,服務消費者,從提供者地址列表中,基于軟負載均衡算法,選一臺提供者進行調用,如果調用失敗,再選另一臺調用。
注冊中心(Registry):注冊中心返回服務提供者地址列表給消費者,如果有變更,注冊中心將基于長連接推送變更數據給消費者
監控中心(Monitor):服務消費者和提供者,在內存中累計調用次數和調用時間,定時每分鐘發送一次統計數據到監控中心
調用關系說明
-
服務容器負責啟動,加載,運行服務提供者。
-
服務提供者在啟動時,向注冊中心注冊自己提供的服務。
-
服務消費者在啟動時,向注冊中心訂閱自己所需的服務。
-
注冊中心返回服務提供者地址列表給消費者,如果有變更,注冊中心將基于長連接推送變更數據給消費者。
-
服務消費者,從提供者地址列表中,基于軟負載均衡算法,選一臺提供者進行調用,如果調用失敗,再選另一臺調用。
-
服務消費者和提供者,在內存中累計調用次數和調用時間,定時每分鐘發送一次統計數據到監控中心。
Dubbo環境搭建
點進dubbo官方文檔,推薦我們使用Zookeeper?注冊中心
Windows下安裝zookeeper
-
下載zookeeper :地址, 我們下載3.4.14 , 最新版!解壓zookeeper
-
運行/bin/zkServer.cmd ,初次運行會報錯,沒有zoo.cfg配置文件;
可能遇到問題:閃退 !
解決方案:編輯zkServer.cmd文件末尾添加pause 。這樣運行出錯就不會退出,會提示錯誤信息,方便找到原因。
-
修改zoo.cfg配置文件
將conf文件夾下面的zoo_sample.cfg復制一份改名為zoo.cfg即可。
注意幾個重要位置:
dataDir=./ 臨時數據存儲的目錄(可寫相對路徑)
clientPort=2181 zookeeper的端口號
修改完成后再次啟動zookeeper
-
使用zkCli.cmd測試
- ls /:列出zookeeper根下保存的所有節點
[zk: 127.0.0.1:2181(CONNECTED) 4] ls / [zookeeper]-
create –e /kuangshen 123:創建一個kuangshen節點,值為123
-
get /kuangshen:獲取/kuangshen節點的值
我們再來查看一下節點
windows下安裝dubbo-admin
dubbo本身并不是一個服務軟件。它其實就是一個jar包,能夠幫你的java程序連接到zookeeper,并利用zookeeper消費、提供服務。
但是為了讓用戶更好的管理監控眾多的dubbo服務,官方提供了一個可視化的監控程序dubbo-admin,不過這個監控即使不裝也不影響使用。
我們這里來安裝一下:
1、下載dubbo-admin
地址 :https://github.com/apache/dubbo-admin/tree/master
2、解壓進入目錄
修改 dubbo-admin\src\main\resources \application.properties 指定zookeeper地址
server.port=7001
spring.velocity.cache=false
spring.velocity.charset=UTF-8
spring.velocity.layout-url=/templates/default.vm
spring.messages.fallback-to-system-locale=false
spring.messages.basename=i18n/message
spring.root.password=root
spring.guest.password=guestdubbo.registry.address=zookeeper://127.0.0.1:2181
3、在項目目錄下打包dubbo-admin
mvn clean package -Dmaven.test.skip=true
第一次打包的過程有點慢,需要耐心等待!直到成功!
4、執行 dubbo-admin\target 下的dubbo-admin-0.0.1-SNAPSHOT.jar
java -jar dubbo-admin-0.0.1-SNAPSHOT.jar
【注意:zookeeper的服務一定要打開!】
執行完畢,我們去訪問一下?http://localhost:7001/?, 這時候我們需要輸入登錄賬戶和密碼,我們都是默認的root-root;
登錄成功后,查看界面,安裝完成!
SpringBoot + Dubbo + zookeeper
框架搭建
1. 啟動zookeeper !
2. IDEA創建一個空項目;
3.創建一個模塊,實現服務提供者:provider-server , 選擇web依賴即可
4.項目創建完畢,我們寫一個服務,比如賣票的服務;
編寫接口
public interface TicketService {public String getTicket();
}
編寫實現類
public class TicketServiceImpl implements TicketService {@Overridepublic String getTicket() {return "《狂神說Java》";}
}
5.創建一個模塊,實現服務消費者:consumer-server , 選擇web依賴即可
6.項目創建完畢,我們寫一個服務,比如用戶的服務;
編寫service
package com.kuang.consumer.service;public class UserService {//我們需要去拿去注冊中心的服務
}
需求:現在我們的用戶想使用買票的服務,這要怎么弄呢 ?
服務提供者
1、將服務提供者注冊到注冊中心,我們需要整合Dubbo和zookeeper,所以需要導包
我們從dubbo官網進入github,看下方的幫助文檔,找到dubbo-springboot,找到依賴包
<!-- https://mvnrepository.com/artifact/org.apache.dubbo/dubbo-spring-boot-starter -->
<dependency><groupId>org.apache.dubbo</groupId><artifactId>dubbo-spring-boot-starter</artifactId><version>3.0.7</version>
</dependency>
zookeeper的包我們去maven倉庫下載,zkclient;
<!-- https://mvnrepository.com/artifact/com.github.sgroschupf/zkclient -->
<dependency><groupId>com.github.sgroschupf</groupId><artifactId>zkclient</artifactId><version>0.1</version>
</dependency>
【新版的坑】zookeeper及其依賴包,解決日志沖突,還需要剔除日志依賴;
<!-- 引入zookeeper -->
<dependency><groupId>org.apache.curator</groupId><artifactId>curator-framework</artifactId><version>2.12.0</version>
</dependency>
<dependency><groupId>org.apache.curator</groupId><artifactId>curator-recipes</artifactId><version>2.12.0</version>
</dependency>
<dependency><groupId>org.apache.zookeeper</groupId><artifactId>zookeeper</artifactId><version>3.4.14</version><!--排除這個slf4j-log4j12--><exclusions><exclusion><groupId>org.slf4j</groupId><artifactId>slf4j-log4j12</artifactId></exclusion></exclusions>
</dependency>
2、在springboot配置文件中配置dubbo相關屬性!
#當前應用名字
dubbo.application.name=provider-server
#注冊中心地址
dubbo.registry.address=zookeeper://127.0.0.1:2181
#掃描指定包下服務
dubbo.scan.base-packages=com.kuang.provider.service
3、在service的實現類中配置服務注解,發布服務!注意導包問題
@DubboService //將服務發布出去
@Component //放在容器中
public class TicketServiceImpl implements TicketService {@Overridepublic String getTicket() {return "《狂神說Java》";}
}
邏輯理解 :應用啟動起來,dubbo就會掃描指定的包下帶有@component注解的服務,將它發布在指定的注冊中心中!
服務消費者
1、導入依賴,和之前的依賴一樣;
<!--dubbo-->
<!-- Dubbo Spring Boot Starter -->
<dependency><groupId>org.apache.dubbo</groupId><artifactId>dubbo-spring-boot-starter</artifactId><version>3.0.7</version>
</dependency>
<!--zookeeper-->
<!-- https://mvnrepository.com/artifact/com.github.sgroschupf/zkclient -->
<dependency><groupId>com.github.sgroschupf</groupId><artifactId>zkclient</artifactId><version>0.1</version>
</dependency>
<!-- 引入zookeeper -->
<dependency><groupId>org.apache.curator</groupId><artifactId>curator-framework</artifactId><version>2.12.0</version>
</dependency>
<dependency><groupId>org.apache.curator</groupId><artifactId>curator-recipes</artifactId><version>2.12.0</version>
</dependency>
<dependency><groupId>org.apache.zookeeper</groupId><artifactId>zookeeper</artifactId><version>3.4.14</version><!--排除這個slf4j-log4j12--><exclusions><exclusion><groupId>org.slf4j</groupId><artifactId>slf4j-log4j12</artifactId></exclusion></exclusions>
</dependency>
2、配置參數
#當前應用名字
dubbo.application.name=consumer-server
#注冊中心地址
dubbo.registry.address=zookeeper://127.0.0.1:2181
3、本來正常步驟是需要將服務提供者的接口打包,然后用pom文件導入,我們這里使用簡單的方式,直接將服務的接口拿過來,路徑必須保證正確,即和服務提供者相同;
4、完善消費者的服務類
@DubboService //注入到容器中
public class UserService {@Reference //遠程引用指定的服務,他會按照全類名進行匹配,看誰給注冊中心注冊了這個全類名TicketService ticketService;public void bugTicket(){String ticket = ticketService.getTicket();System.out.println("在注冊中心買到"+ticket);}}
5、測試類編寫;
@RunWith(SpringRunner.class)
@SpringBootTest
public class ConsumerServerApplicationTests {@AutowiredUserService userService;@Testpublic void contextLoads() {userService.bugTicket();}}
啟動測試
1. 開啟zookeeper
2. 打開dubbo-admin實現監控【可以不用做】
3. 開啟服務者
4. 消費者消費測試,結果輸出“在注冊中心買到《狂神說Java》”,監控中心可以監控到服務者service
ok , 這就是SpingBoot + dubbo + zookeeper實現分布式開發的應用,其實就是一個服務拆分的思想;
SQL操作)

)


C/C++版本)


工具調用的底層原理!給大模型按上雙手吧!(新手向))


