
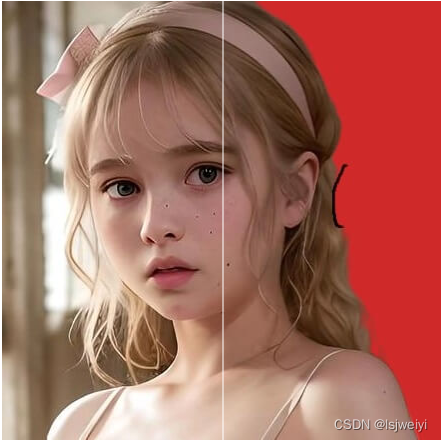
像這種圖片滑動對比的效果,網上還不少見吧,但是網上卻不好找到完整現成的實現代碼,我找到幾個地方有類似的代碼,但是都不好直接移植到代碼里,因為很多都是使用原生html+css+js實現,太復雜了。反而不好應用到vue3中。
于是我借著他們的思路,自己實現了個。
前置條件
- 限制兩張圖片
- 圖片大小必須一致,不一致會導致上層圖片顯示不全
- 底層圖片必須存在,因為窗口的大小由他的大小決定
實現思路
- 將兩張圖片都看做是背景圖,他們屬于不同的層次
- 底層圖片用相對定位,也就可以和其他元素一同正常展示,之后的所有元素都處于其包裹范圍內,并且根據圖片的大小確定整個樣式的大小
- 上層圖片用絕對定位,因為處于底層圖片的包裹中,且大小是一樣的,所以他們是完全重疊的,它的高度是和底層圖片一致,但是寬度是可變的
- 利用input 的滑塊模式
<input type=“range” v-model="width" />來改變上層圖片的寬度,這里也就是利用了vue3的響應式。這是比原生方式實現的簡便之處 - 由于
input的原生樣式無法改變,所以得額外做個滑塊來實現自定義樣式,然后其位置也受width的控制,實際上并不是點擊該滑塊來滑動的 input是出于最上層的,但是將其隱藏了,所以點擊的時候看起來像是點擊那個滑塊,實際上點擊的是input實現的滑動。- 然后再修飾下其他細節,即可
接下來逐步分解出實現的效果,這樣就更好理解文字的意思了
第一步,將兩張圖片分別呈現
<template><div id="bottomImg" class="bottomImg" :style="{ height: imgHeigth, width: imgWidth, backgroundImage: 'url(' + bottomImg + ')' }"><div class="upperImg" :style="{ backgroundImage: 'url(' + upperImg + ')', width: 100 - upperImgWidth + '%' }"></div></div>
</template>
<script lang="ts" setup>import { ref, onMounted } from "vue";const imgHeigth = ref("0px"); // 圖片高度const imgWidth = ref("0px"); // 圖片寬度const bottomImg = ref(new URL("@/images/bottomImg.jpg", import.meta.url).href); // 底圖const upperImg = ref(new URL("@/images/upperImg.jpg", import.meta.url).href); // 上層圖const upperImgWidth = ref(50); // 上層圖寬度// 首次加載時初始化onMounted(() => {getImgSize();});// 獲取圖片尺寸function getImgSize() {//加載圖片獲取圖片真實寬度和高度var image = new Image();image.onload = function () {imgHeigth.value = image.height + "px";imgWidth.value = image.width + "px";};image.src = bottomImg.value; //img.src 應該是放在 onload 方法后邊的, 因為當image的src發生改變,瀏覽器就會跑去加載這個src里的資源,先告訴瀏覽器圖片加載完要怎么處理,再讓它去加載圖片}
</script>
<style>.bottomImg {position: relative; /*  相對定位 */overflow: hidden; /*  隱藏超出部分 */}.upperImg {position: absolute; /*  絕對定位 */top: 0;right: 0; /* 從右邊開始鋪開圖片 */height: 100%;z-index: 1;background-position: right top; /* 改變定位方式,默認是左上角,要改為右上角,這樣才能實現底圖在左邊,上層圖在右邊的效果*/border-left: 2px solid rgb(255, 255, 255, 0.5); /* 顯示左邊框 */background-repeat: no-repeat; /*  不重復 */}
</style>
代碼有詳細注釋,現在兩張圖片分別展示的效果有了,但是還沒法滑動。
第二步,添加滑塊,圖片動起來

就是加了個滑塊,雙向綁定寬度:
<!--滑塊控制上層圖片的寬度 --><input class="inputRange" type="range" v-model="upperImgWidth" min="0" max="100" />
樣式
.inputRange {position: absolute;height: 100%; /* 這樣就能點擊任何位置都能實現移動滑塊,而不僅僅是滑塊所在的位置才有效*/z-index: 3; /* 處于最高層次 */left: -4px; /*因為原始樣式有邊界,為了效果更好而調整的,這些都是實測效果,不重要*/touch-action: auto;width: calc(100% + 4px); /*因為原始樣式有邊界,為了效果更好而調整的,這些都是實測效果,不重要*//* opacity: 0; */ /*隱藏滑塊,這里為了演示,就不隱藏先*/}
到這一步,效果已經有了,接下來就是樣式的優化。
第三步,增加自定義的滑塊

增加一個這樣的滑塊樣式,其實他僅僅是個樣式,它并不具備點擊滑動的能力,他的位置是靠響應width的值來改變的
<!-- 這是對外展示的滑塊樣式,僅僅是展示樣式的,不然原生的樣式不好看 --><span class="spanHandle" :style="{ left: 'calc(' + upperImgWidth + '% - 24px)' }"></span>
下面的樣式不是重點,自己調整都是可以的,只需要注意使用絕對定位,z-index小于input即可。
.spanHandle {position: absolute; /*絕對定位還是一樣的*/z-index: 2; /* 樣式很多,都不是關鍵的,只有這里,需要注意層次要低于inputRange*/height: 48px;width: 48px;position: center;font-size: 24px;border: 1px;border-radius: 50%;top: calc(90% - 24px);background-color: rgb(255, 255, 255, 0.5);}.spanHandle:before {left: 5px;transform: rotate(-45deg);}.spanHandle:after {right: -5px;transform: rotate(135deg);}.spanHandle:after,.spanHandle:before {border-left: 2px solid;border-top: 2px solid;content: "";height: 10px;position: absolute;top: 50%;transform-origin: 0 0;width: 10px;}
然后把上一步的opacity: 0;啟用即可隱藏原始的input滑塊
第四步,添加label和上層圖片為空時的效果,這一步是可選的
效果就不貼了,就跟開頭時差不多
完整代碼
<template><div id="bottomImg" class="bottomImg" :style="{ height: imgHeigth, width: imgWidth, backgroundImage: 'url(' + bottomImg + ')' }"><span class="imgLabel">{{ bottomLabel }}</span><div v-if="upperImg" class="upperImg" :style="{ backgroundImage: 'url(' + upperImg + ')', width: 100 - upperImgWidth + '%' }"><span class="imgLabel">{{ upperLabel }}</span></div><div v-else class="upperUndefined" :style="{ width: 100 - upperImgWidth + '%' }"><span class="undefinedSpan">暫無結果</span></div><!-- 這是對外展示的滑塊樣式,僅僅是展示樣式的,不然原生的樣式不好看 --><span class="spanHandle" :style="{ left: 'calc(' + upperImgWidth + '% - 24px)' }"></span><!--滑塊控制上層圖片的寬度 --><input class="inputRange" type="range" v-model="upperImgWidth" min="0" max="100" /></div>
</template>
<script lang="ts" setup>import { ref, onMounted } from "vue";const imgHeigth = ref("0px"); // 圖片高度const imgWidth = ref("0px"); // 圖片寬度const bottomImg = ref(new URL("@/images/bottomImg.jpg", import.meta.url).href); // 底圖const upperImg = ref(new URL("@/images/upperImg.jpg", import.meta.url).href); // 上層圖const upperImgWidth = ref(50); // 上層圖寬度const bottomLabel = ref("底圖"); // 底圖標簽const upperLabel = ref("上層圖"); // 上層圖標簽// 首次加載時初始化onMounted(() => {getImgSize();});// 獲取圖片尺寸function getImgSize() {//加載圖片獲取圖片真實寬度和高度var image = new Image();image.onload = function () {imgHeigth.value = image.height + "px";imgWidth.value = image.width + "px";};image.src = bottomImg.value; //img.src 應該是放在 onload 方法后邊的, 因為當image的src發生改變,瀏覽器就會跑去加載這個src里的資源,先告訴瀏覽器圖片加載完要怎么處理,再讓它去加載圖片}
</script>
<style>.bottomImg {position: relative; /*  相對定位 */overflow: hidden; /*  隱藏超出部分 */}.upperImg {position: absolute; /*  絕對定位 */top: 0;right: 0; /* 從右邊開始鋪開圖片 */height: 100%;z-index: 1;background-position: right top; /* 改變定位方式,默認是左上角,要改為右上角,這樣才能實現底圖在左邊,上層圖在右邊的效果*/border-left: 2px solid rgb(255, 255, 255, 0.5); /* 顯示左邊框 */background-repeat: no-repeat; /*  不重復 */}.inputRange {position: absolute;height: 100%; /* 這樣就能點擊任何位置都能實現移動滑塊,而不僅僅是滑塊所在的位置才有效*/z-index: 3; /* 處于最高層次 */left: -4px; /*因為原始樣式有邊界,為了效果更好而調整的,這些都是實測效果,不重要*/touch-action: auto;width: calc(100% + 4px); /*因為原始樣式有邊界,為了效果更好而調整的,這些都是實測效果,不重要*/opacity: 0; /*隱藏滑塊,這里為了演示,就不隱藏先*/}.spanHandle {position: absolute; /*決定定位還是一樣的*/z-index: 2; /* 樣式很多,都不是關鍵的,只有這里,需要注意層次要低于inputRange*/height: 48px;width: 48px;position: center;font-size: 24px;border: 1px;border-radius: 50%;top: calc(90% - 24px);background-color: rgb(255, 255, 255, 0.5);}.spanHandle:before {left: 5px;transform: rotate(-45deg);}.spanHandle:after {right: -5px;transform: rotate(135deg);}.spanHandle:after,.spanHandle:before {border-left: 2px solid;border-top: 2px solid;content: "";height: 10px;position: absolute;top: 50%;transform-origin: 0 0;width: 10px;}.imgLabel {font-size: 20px;color: aliceblue;text-shadow: 1px 1px #533d4a, 2px 2px #533d4a;}.upperUndefined {position: absolute;top: 0;right: 0;height: 100%;z-index: 1;font-size: 60px;background-color: rgb(255, 255, 255, 0.8);background-position: right top;border-left: 2px solid rgb(255, 255, 255, 0.5);}
</style>
封裝成組件
上面的示例都是死的,封裝成組件,就可以切換圖片展示:

組件代碼
<template><div id="bottomImg" class="bottomImg" :style="{ height: imgHeigth, width: imgWidth, backgroundImage: 'url(' + props.bottomImg + ')' }"><span class="imgLabel">{{ props.bottomLabel }}</span><div v-if="props.upperImg" class="upperImg" :style="{ backgroundImage: 'url(' + props.upperImg + ')', width: 100 - upperImgWidth + '%' }"><span class="imgLabel">{{ props.upperLabel }}</span></div><div v-else class="upperUndefined" :style="{ width: 100 - upperImgWidth + '%' }"><span class="undefinedSpan">暫無結果</span></div><span class="spanHandle" :style="{ left: 'calc(' + upperImgWidth + '% - 24px)' }"></span><input class="inputRange" type="range" v-model="upperImgWidth" min="0" max="100" /></div>
</template>
<script lang="ts" setup>import { ref, watch, onMounted } from "vue";const imgHeigth = ref("0px");const imgWidth = ref("0px");const upperImgWidth = ref(50);const props = defineProps({bottomImg: {type: String,default: "",},upperImg: {type: String,default: "",},bottomLabel: {type: String,default: "原圖",},upperLabel: {type: String,default: "效果圖",},});// 跟蹤底層圖片的變化,因為底層圖片是基礎watch(() => props.bottomImg,() => {getImgSize();upperImgWidth.value = 50;});// 首次加載時初始化onMounted(() => {getImgSize();});function getImgSize() {//加載圖片獲取圖片真實寬度和高度var image = new Image();image.onload = function () {imgHeigth.value = image.height + "px";imgWidth.value = image.width + "px";};image.src = props.bottomImg; //img.src 應該是放在 onload 方法后邊的, 因為當image的src發生改變,瀏覽器就會跑去加載這個src里的資源,先告訴瀏覽器圖片加載完要怎么處理,再讓它去加載圖片}
</script>
<style>.bottomImg {position: relative;overflow: hidden;}.upperImg {position: absolute;top: 0;right: 0;height: 100%;z-index: 1;background-position: right top;border-left: 2px solid rgb(255, 255, 255, 0.5);}.imgLabel {font-size: 20px;color: aliceblue;text-shadow: 1px 1px #533d4a, 2px 2px #533d4a;}.upperUndefined {position: absolute;top: 0;right: 0;height: 100%;z-index: 1;font-size: 60px;background-color: rgb(255, 255, 255, 0.8);background-position: right top;border-left: 2px solid rgb(255, 255, 255, 0.5);}.undefinedSpan {display: flex;width: 100%;height: 100%;align-items: center;justify-content: center;color: #999;overflow: hidden;}.inputRange {position: absolute;height: 100%;z-index: 3;left: -4px;touch-action: auto;width: calc(100% + 4px);opacity: 0;}.spanHandle {position: absolute;z-index: 2;height: 48px;width: 48px;position: center;font-size: 24px;border: 1px;border-radius: 50%;top: calc(90% - 24px);background-color: rgb(255, 255, 255, 0.5);}.spanHandle:before {left: 5px;transform: rotate(-45deg);}.spanHandle:after {right: -5px;transform: rotate(135deg);}.spanHandle:after,.spanHandle:before {border-left: 2px solid;border-top: 2px solid;content: "";height: 10px;position: absolute;top: 50%;transform-origin: 0 0;width: 10px;}
</style>
調用示例代碼
<template><div><div><button @click="changeBottomImg">切換底圖</button><button @click="removeUpperImg">去除上層圖</button><button @click="changeUpperImg">切換上層圖</button></div><TwoImgCompare :bottom-img="bottomImg" bottom-label="原圖" :upper-img="upperImg" upper-label="結果圖"></TwoImgCompare></div>
</template>
<script lang="ts" setup>import TwoImgCompare from "@/components/twoImgCompare.vue";import { ref } from "vue";const bottomImg = ref(new URL("@/images/bottomImg.jpg", import.meta.url).href); // 底圖const upperImg = ref(new URL("@/images/upperImg.jpg", import.meta.url).href); // 上層圖// 切換底圖const changeBottomImg = () => {bottomImg.value = new URL("@/images/bottomImg2.jpg", import.meta.url).href;};// 去除上層圖const removeUpperImg = () => {upperImg.value = "";};// 切換上層圖const changeUpperImg = () => {upperImg.value = new URL("@/images/upperImg2.jpg", import.meta.url).href;};
</script>
PS:開發該組件是用于自己開發的網站:極簡AI工具箱,歡迎光臨!
)


system()函數與popen()函數)


)


基于RMBG實現生活照生成寸照)
)
