放置物體功能
效果:

功能:
- 自定義物體占用區域的大小
- 一鍵調整占用區域
- 調整旋轉度數,分四個擋位:
- NoRotation:該物體不能調整旋轉。
- MaximumAngle:每次轉動90°。
- NormalAngle:每次轉動45°,效果最好。
- MinimumAngle:每次轉動22.5°,很細的調整,如果想要轉動到某一個想要的角度比較花時間,但也不是不行。
- 禁止垂直旋轉(比如花盆,只能進行水平旋轉,放置在地上時不能倒立在地上對吧~)
- 當物體放置到區域內可自動調整吸附點(六個方位使用的吸附點不同,保證不會出穿模)
- 單獨設置物體的吸附點(比如凳子,可以調整為只能吸附在下方,不能放置在墻上或者天花板)
- 可單獨管理一個物體或者管理一組物體,互不影響
- 直觀可調整的視覺效果
文章中RoomReferenceFrame 的具體功能參考自定義房間區域功能
核心功能——MultiMeshAreaCalculator
計算和處理多個網格的區域,用于房間系統的幾何管理
我們要在編輯器模式下存儲這個物體占用區域的數據,而且至少要保存一個區域數據
- 得到Renderer的bounds
- 獲得bounds的區域并存儲
- 后續手動調整區域大小,包括旋轉矩陣變換

初始化并保存區域數據
如果構造函數的AUTO 為True,就是自動調整區域數據,renderer的bounds數據是以世界坐標得到的,無論當前物體的旋轉是什么,我們都要變為默認旋轉再保存數據,然后再把旋轉重置為最開始的樣子,既保存了標準數據又不影響物體數據🤪
[System.Serializable]public class AreaData{public Vector3[] corners = new Vector3[8];// 構造函數,根據 overallBounds 初始化八個角的位置public AreaData(Renderer renderer , bool AUTO = true){Quaternion _Rotation = Quaternion.identity;if (AUTO){_Rotation = renderer.transform.rotation;renderer.transform.rotation = Quaternion.identity;}Vector3 boundsMin = renderer.bounds.min;Vector3 boundsMax = renderer.bounds.max;// 計算八個角的位置信息corners[0] = new Vector3(boundsMin.x , boundsMin.y , boundsMin.z);corners[1] = new Vector3(boundsMin.x , boundsMin.y , boundsMax.z);corners[2] = new Vector3(boundsMin.x , boundsMax.y , boundsMin.z);corners[3] = new Vector3(boundsMin.x , boundsMax.y , boundsMax.z);corners[4] = new Vector3(boundsMax.x , boundsMin.y , boundsMin.z);corners[5] = new Vector3(boundsMax.x , boundsMin.y , boundsMax.z);corners[6] = new Vector3(boundsMax.x , boundsMax.y , boundsMin.z);corners[7] = new Vector3(boundsMax.x , boundsMax.y , boundsMax.z);if (AUTO)renderer.transform.rotation = _Rotation;}a}
旋轉或縮放時要進行矩陣變換,使用一個數據來保存偏移量并在構造時更新數據,當物體移動或旋轉時調用UpdateAreaData
[HideInInspector]
public Vector3[] cornersInverseTransformPoint = new Vector3[8];
[HideInInspector]
public Transform location;
[HideInInspector]
public Renderer renderer;public AreaData(Renderer renderer , bool AUTO = true)
{//省略this.renderer = renderer;this.location = renderer.transform;for (int i = 0; i < cornersInverseTransformPoint.Length; i++)cornersInverseTransformPoint[i] = location.InverseTransformPoint(corners[i]);UpdateAreaData();
}
public void UpdateAreaData()
{if (renderer == null)return;// 獲取對象的旋轉和縮放Quaternion rotation = location.rotation;Vector3 scale = location.lossyScale;  // 使用 lossyScale 獲取物體在世界空間的縮放for (int i = 0; i < corners.Length; i++){// 對角度偏移應用對象的縮放、旋轉和位置Vector3 scaledOffset = Vector3.Scale(cornersInverseTransformPoint[i] , scale);  // 應用世界空間的縮放corners[i] = ( location.position + rotation * scaledOffset );}
}
OK了,我們只需要在MultiMeshAreaCalculator中保存數據,在需要的時候賦值就行了
[HideInInspector]
public List<AreaData> ListOverallBounds = new List<AreaData>();
[HideInInspector]
public Renderer[] renderers;//渲染器數組。表示當前子物體有多少物體可以占用空間public void AutoFindChildData(bool AUTO = true)
{renderers = GetComponentsInChildren<Renderer>();UpdateChildAreaData(AUTO);UpdateData();
}
void UpdateChildAreaData(bool AUTO = true)
{if (renderers.Length > 0){ListOverallBounds.Clear();foreach (Renderer renderer in renderers){if (renderer.GetComponentInParent<MultiMeshAreaCalculator>() == this)ListOverallBounds.Add(new AreaData(renderer , AUTO));}}
}
void UpdateData()
{foreach (var item in ListOverallBounds){item.UpdateAreaData();}
}
有了區域,我們要找到區域的最邊緣的六個點(相對于某個坐標系的上下左右前后)當作放置點,保證放置時不會穿模
UpdateAreaData() 方法更新當前 MultiMeshAreaCalculator 實例(以及遞歸更新所有子 MultiMeshAreaCalculator 實例)的區域數據。這主要是通過更新各個 AreaData 實例的數據來實現的,包括根據當前的物體變換(位置、旋轉、縮放)重新計算對象的邊界框角點位置。聚合了所有子對象邊界點之后,調用 UpdateBoundary 方法更新整個系統的邊界信息。使用所有子對象的邊界點計算一個總的邊界框。
這樣就實現了無論是放置一個或者是一組物體都不影響邊緣點的更新
[HideInInspector]
public RoomReferenceFrame roomReferenceFrame;//房間參考框架
[HideInInspector]
public MultiMeshAreaCalculator[] childData = null;//子區域數據。子物體是否包含此組件
[HideInInspector]
public bool IsMainArea = false;//是否為主區域。如果父物體有此組件,那么當前組件將不參與管理。
private Vector3 front, back, right, left, top, bottom, center, lastLocation = Vector3.zero, lastDir = Vector3.zero;void Initialize()
{IsMainArea = GetComponentsInParent<MultiMeshAreaCalculator>().Length < 2;if (IsMainArea){childData = GetComponentsInChildren<MultiMeshAreaCalculator>();childData = System.Array.FindAll(childData , r => r.gameObject != gameObject);}
}void UpdateAreaData()
{List<Vector3> centerList = new List<Vector3>();foreach (var multiMeshAreaCalculator in GetComponentsInChildren<MultiMeshAreaCalculator>()){foreach (var item in multiMeshAreaCalculator.ListOverallBounds){centerList.AddRange(item.GetCorners());}}if (centerList.Count > 0&& roomReferenceFrame)UpdateBoundary(roomReferenceFrame.transform , centerList.ToArray());
}
void UpdateBoundary(Transform angle , Vector3[] corners)
{// 初始化累加器Vector3 sum = Vector3.zero;// 遍歷 corners 數組foreach (Vector3 corner in corners){// 將每個角落點的坐標添加到累加器sum += corner;}// 計算平均值,即 corners 數組的中心點Vector3 center = sum / corners.Length;// 獲取 angle 的正前方方向Vector3 forwardDirection = angle.forward;Vector3 rightDirection = angle.right;Vector3 upDirection = angle.up;Vector3 front = Vector3.zero;Vector3 back = Vector3.zero;// 初始化最遠和最近的投影點Vector3 right = Vector3.zero;Vector3 left = Vector3.zero;Vector3 top = Vector3.zero;Vector3 bottom = Vector3.zero;// 初始化投影長度float maxProjectionLengthFront = float.MinValue;float minProjectionLengthFront = float.MaxValue;float maxProjectionLengthRight = float.MinValue;float minProjectionLengthRight = float.MaxValue;float maxProjectionLengthUp = float.MinValue;float minProjectionLengthUp = float.MaxValue;// 遍歷 corners 數組foreach (Vector3 corner in corners){// 將角落點投影到 angle.right 方向線上Vector3 projectedFrontPoint = ProjectPointOntoLine(center , forwardDirection , corner);float projectionLengthFront = Vector3.Dot(projectedFrontPoint - center , forwardDirection);// 更新最遠和最近的右投影點if (projectionLengthFront > maxProjectionLengthFront){maxProjectionLengthFront = projectionLengthFront;front = projectedFrontPoint;}if (projectionLengthFront < minProjectionLengthFront){minProjectionLengthFront = projectionLengthFront;back = projectedFrontPoint;}// 將角落點投影到 angle.right 方向線上Vector3 projectedRightPoint = ProjectPointOntoLine(center , rightDirection , corner);float projectionLengthRight = Vector3.Dot(projectedRightPoint - center , rightDirection);// 更新最遠和最近的右投影點if (projectionLengthRight > maxProjectionLengthRight){maxProjectionLengthRight = projectionLengthRight;right = projectedRightPoint;}if (projectionLengthRight < minProjectionLengthRight){minProjectionLengthRight = projectionLengthRight;left = projectedRightPoint;}// 將角落點投影到 angle.up 方向線上Vector3 projectedUpPoint = ProjectPointOntoLine(center , upDirection , corner);float projectionLengthUp = Vector3.Dot(projectedUpPoint - center , upDirection);// 更新最遠和最近的上投影點if (projectionLengthUp > maxProjectionLengthUp){maxProjectionLengthUp = projectionLengthUp;top = projectedUpPoint;}if (projectionLengthUp < minProjectionLengthUp){minProjectionLengthUp = projectionLengthUp;bottom = projectedUpPoint;}}SetLocalCoordinates(front , back , right , left , top , bottom , center);
}void SetLocalCoordinates(Vector3 front , Vector3 back , Vector3 right , Vector3 left , Vector3 top , Vector3 bottom , Vector3 center)
{this.front = front;this.back = back;this.right = right;this.left = left;this.top = top;this.bottom = bottom;this.center = center;
}
Vector3 ProjectPointOntoLine(Vector3 origin , Vector3 direction , Vector3 point)
{// 計算方向向量的歸一化向量Vector3 normalizedDirection = direction.normalized;// 計算點與線起點之間的向量Vector3 toPoint = point - origin;// 計算點在方向上的投影長度float projectionLength = Vector3.Dot(toPoint , normalizedDirection);// 計算投影點的位置return origin + projectionLength * normalizedDirection;
}
接下來我們要存儲此物體可被使用的方向的功能,此功能是要在編輯器模式下設定并保存,我準備存到字典中,但是字典無法被序列化,只能自己寫一個序列化字典的功能。
- 將字典數據存儲到字符串中
- 序列化這個字符串
- 使用字典時讀取字符串數據并轉化為字典

🤨可真是個好主意!
定義基本屬性
默認狀態下,物體的六個方向都是允許被使用的
[HideInInspector]
public string UsableDirectionJson = "";//可用方向的JSON字符串。主要用于序列化字典
public Dictionary<SnapDirection , bool> UsableDirection = new Dictionary<SnapDirection , bool>{{ SnapDirection.Top , true } ,{ SnapDirection.Bottom , true } ,{ SnapDirection.Front , true } ,{ SnapDirection.Back , true } ,{ SnapDirection.Left , true } ,{ SnapDirection.Right , true }};
序列化字典
[System.Serializable]
public class SerializableDictionary<TKey, TValue>
{public List<TKey> keys = new List<TKey>();public List<TValue> values = new List<TValue>();public SerializableDictionary(Dictionary<TKey , TValue> dict){foreach (var kvp in dict){keys.Add(kvp.Key);values.Add(kvp.Value);}}public Dictionary<TKey , TValue> ToDictionary(){Dictionary<TKey , TValue> dict = new Dictionary<TKey , TValue>();for (int i = 0; i < keys.Count; i++){dict.Add(keys[i] , values[i]);}return dict;}
}
使用這個功能
字典序列化為JSON
UsableDirectionJson = JsonUtility.ToJson(new SerializableDictionary<SnapDirection , bool>(UsableDirection));JSON轉化為字典
SerializableDictionary<SnapDirection , bool> serializedDict = JsonUtility.FromJson<SerializableDictionary<SnapDirection , bool>>(UsableDirectionJson);
if (serializedDict != null)UsableDirection = serializedDict.ToDictionary();
有了區域數據、邊緣數據,有了可使用的方向,我們還缺少放置物體的功能
根據位置和方向向量,結合當前可用的吸附方向,計算并更新位置。
- 計算目標方向以此推斷出要使用哪個方向的吸附點
- 檢查可用方向
- 定位和吸附
[HideInInspector]
public SnapDirection currentSnap = SnapDirection.None;//當前吸附方向。
private Vector3 front, back, right, left, top, bottom, center, lastLocation = Vector3.zero, lastDir = Vector3.zero;
public void SetLocation(Vector3 location , Vector3 dir)
{lastLocation = location;lastDir = dir;UpdateData();Vector3 Dir = CalculateDirection(dir);if (!CheckUsableDirection())return;location = roomReferenceFrame.SnapToGrid(location , currentSnap);transform.position = location + ( transform.position - Dir );
}
public enum SnapDirection
{None,Top,Bottom,Front,Back,Left,Right
}
CalculateDirection - 利用傳入的方向向量,CalculateDirection確定對象應當吸附的方向(前、后、左、右、上、下之一)。它通過計算傳入向量與每個預設方向之間的余弦相似度,選出相似度最高的方向作為目標方向,并更新currentSnap至該方向。
Vector3 CalculateDirection(Vector3 dir)
{// 使用 CalculateCosineSimilarity 方法計算 dir 與每個方向向量之間的余弦相似度float similarityFront = CalculateCosineSimilarity(front - center , dir);float similarityBack = CalculateCosineSimilarity(back - center , dir);float similarityRight = CalculateCosineSimilarity(right - center , dir);float similarityLeft = CalculateCosineSimilarity(left - center , dir);float similarityTop = CalculateCosineSimilarity(top - center , dir);float similarityBottom = CalculateCosineSimilarity(bottom - center , dir);// 初始化最高相似度和目標方向float maxSimilarity = similarityFront;Vector3 targetDirection = back;currentSnap = SnapDirection.Back;// 找到與 dir 最相似的方向if (similarityBack > maxSimilarity){maxSimilarity = similarityBack;targetDirection = front;currentSnap = SnapDirection.Front;}if (similarityRight > maxSimilarity){maxSimilarity = similarityRight;targetDirection = left;currentSnap = SnapDirection.Left;}if (similarityLeft > maxSimilarity){maxSimilarity = similarityLeft;targetDirection = right;currentSnap = SnapDirection.Right;}if (similarityTop > maxSimilarity){maxSimilarity = similarityTop;targetDirection = bottom;currentSnap = SnapDirection.Bottom;}if (similarityBottom > maxSimilarity){maxSimilarity = similarityBottom;targetDirection = top;currentSnap = SnapDirection.Top;}return targetDirection;
}
float CalculateCosineSimilarity(Vector3 vectorA , Vector3 vectorB)
{float dotProduct = Vector3.Dot(vectorA , vectorB); // 計算兩個向量的點積float magnitudeA = vectorA.magnitude; // 計算向量 A 的歐幾里德范數(長度)float magnitudeB = vectorB.magnitude; // 計算向量 B 的歐幾里德范數(長度)// 計算余弦相似度float cosineSimilarity = dotProduct / ( magnitudeA * magnitudeB );return cosineSimilarity;
}
CheckUsableDirection - 確定當前的吸附方向(currentSnap)是否在UsableDirection字典中標記為true(即可用)。
bool CheckUsableDirection()
{bool IsUsable = false;foreach (KeyValuePair<SnapDirection , bool> pair in UsableDirection){if (pair.Key == currentSnap && pair.Value){return true;}}return IsUsable;
}
接下來是旋轉,要保證每次旋轉都會重新更新邊緣位置并重新吸附在正確的位置
思考:
一個物體有三個旋轉軸,操作者應該如何高效的旋轉一個物體?
想實現將物體旋轉到任意角度的話就要控制三個軸,如何既實現這個功能而且把操作簡化?
這讓我想起了一個名字叫“天”的游戲:塞爾達傳說-王國之淚。
游戲里使用究極手來操作物體旋轉,可以說是想旋轉到什么角度就能旋轉到什么角度,而且使用兩個軸就可以了。
我決定復刻究極手的旋轉功能!
通過枚舉RotateDirection接受傳入的旋轉指令,然后基于預設的旋轉角度更新對象的旋轉狀態。完成旋轉后,調用SetLocation設置對象位置。
public enum RotateDirection
{Reset,Top,Bottom,Left,Right
}public bool DisableYAxisRotation = false;//禁用垂直旋轉。public void SetRotate(RotateDirection rotateDirection)
{if (rotateDirection == RotateDirection.Reset)transform.rotation = roomReferenceFrame.transform.rotation;else{if (DisableYAxisRotation && ( rotateDirection == RotateDirection.Top || rotateDirection == RotateDirection.Bottom ) || rotationAngle == RotationAngle.NoRotation)return;int rotateInterval = 4;switch (rotationAngle){case RotationAngle.MaximumAngle:rotateInterval *= 1;break;case RotationAngle.NormalAngle:rotateInterval *= 2;break;case RotationAngle.MinimumAngle:rotateInterval *= 4;break;}// 計算旋轉中心點Vector3 pivot = roomReferenceFrame.transform.position;//根據這個坐標軸,如果是VR模式就是手柄或者人物的坐標軸// 根據不同的方向進行旋轉switch (rotateDirection){case RotateDirection.Top:transform.RotateAround(pivot , roomReferenceFrame.transform.right , -360 / rotateInterval);break;case RotateDirection.Bottom:transform.RotateAround(pivot , roomReferenceFrame.transform.right , 360 / rotateInterval);break;case RotateDirection.Left:transform.RotateAround(pivot , roomReferenceFrame.transform.up , -360 / rotateInterval);break;case RotateDirection.Right:transform.RotateAround(pivot , roomReferenceFrame.transform.up , 360 / rotateInterval);break;}SetLocation(lastLocation , lastDir);}
}
這樣是可以實現旋轉,但是由于旋轉的軸是自身的,而定位的位置卻不是自身的,看起來會卡一下,稍微優化一下
在旋轉前隱藏自己,在下一幀顯示,這樣就沒問題了,這個解決方法有點奇怪🤔,以后再改進吧。
public void SetRotate(RotateDirection rotateDirection)
{if (rotateDirection == RotateDirection.Reset)transform.rotation = roomReferenceFrame.transform.rotation;else{// 隱藏物體foreach (var item in GetItemData()){item.renderer.enabled = false;}StartCoroutine(DelaySetLocation());}
}
IEnumerator DelaySetLocation()
{// 等待直到下一幀yield return null;// 在下一幀執行SetLocation,并恢復顯示SetLocation(lastLocation , lastDir);foreach (var item in GetItemData()){item.renderer.enabled = true;}
}
public List<AreaData> GetItemData()
{List<AreaData> AreaDates = new List<AreaData>();if (ListOverallBounds.Count != 0){AreaDates.AddRange(ListOverallBounds);}if (childData != null){foreach (var item in childData){if (item.ListOverallBounds.Count != 0){AreaDates.AddRange(item.ListOverallBounds);}}}return AreaDates;
}
基本功能已經完成了,目前已經實現基本需求,不過到應用還差很多
視覺效果——網格顯示
根據數據畫線就行了
private void OnDrawGizmosSelected()
{if (renderers == null)return;UpdateData();if (IsMainArea)DrawCenter();foreach (var item in ListOverallBounds){DrawChildArea(item.GetCorners());}
}
void DrawCenter()//繪制哪個方向可以被放置
{Gizmos.color = adsorptionLocation;//繪制吸附點邊框resolution = resolution < 1 ? 1 : resolution;if (UsableDirection[SnapDirection.Front])DrawDirPeripheral(front);if (UsableDirection[SnapDirection.Back])DrawDirPeripheral(back);if (UsableDirection[SnapDirection.Right])DrawDirPeripheral(right);if (UsableDirection[SnapDirection.Left])DrawDirPeripheral(left);if (UsableDirection[SnapDirection.Top])DrawDirPeripheral(top);if (UsableDirection[SnapDirection.Bottom])DrawDirPeripheral(bottom);
}
void DrawDirPeripheral(Vector3 dir)
{Gizmos.DrawLine(dir , center);Gizmos.DrawSphere(dir , 0.02f);DrawPeripheralPoint(dir , dir - center , boundarySize , resolution);
}
void DrawPeripheralPoint(Vector3 origin , Vector3 normal , float radius , int resolution)
{normal.Normalize();Vector3 reference;reference = Mathf.Abs(Vector3.Dot(normal , Vector3.up)) > 0.999f ? Vector3.forward : Vector3.up;Vector3 right = Vector3.Cross(normal , reference).normalized;Vector3 up = Vector3.Cross(right , normal).normalized;Vector3[] circleVertices = new Vector3[resolution];// 修改角度計算方式float angleIncrement = 360f / resolution;for (int i = 0; i < resolution; i++){float angle = i * angleIncrement * Mathf.Deg2Rad; // 弧度制float x = Mathf.Cos(angle) * radius;float y = Mathf.Sin(angle) * radius;circleVertices[i] = origin + right * x + up * y;}// 繪制連接頂點的線來組成圓for (int i = 0; i < resolution; i++){int nextIndex = ( i + 1 ) % resolution;Gizmos.DrawLine(circleVertices[i] , circleVertices[nextIndex]);}
}void DrawChildArea(Vector3[] corners)//繪制子區域
{if (corners.Length != 8)return;// 設置繪制顏色(可根據需求調整顏色)Gizmos.color = areaColor;// 繪制前面正方形Gizmos.DrawLine(corners[0] , corners[1]);Gizmos.DrawLine(corners[1] , corners[3]);Gizmos.DrawLine(corners[3] , corners[2]);Gizmos.DrawLine(corners[2] , corners[0]);// 繪制后面正方形Gizmos.DrawLine(corners[4] , corners[5]);Gizmos.DrawLine(corners[5] , corners[7]);Gizmos.DrawLine(corners[7] , corners[6]);Gizmos.DrawLine(corners[6] , corners[4]);// 連接前后面的相對應的角,形成立方體Gizmos.DrawLine(corners[0] , corners[4]);Gizmos.DrawLine(corners[1] , corners[5]);Gizmos.DrawLine(corners[2] , corners[6]);Gizmos.DrawLine(corners[3] , corners[7]);
}
視覺效果——Editor_MultiMeshAreaCalculator
Editor_MultiMeshAreaCalculator 是一個自定義編輯器類,用于在 Unity 編輯器中擴展 MultiMeshAreaCalculator 組件的功能,使其更易于在場景中調整和可視化。
場景視圖中繪制控制柄
直觀的可視化工具,使用戶可以在場景視圖中通過拖動控制柄來調整區域的大小和位置。

private void OnSceneGUI()
{if (multiMeshAreaCalculator.useHandle){Color color = multiMeshAreaCalculator.areaColor;color.a = 0.5f;Handles.color = color;Handles.CapFunction capFunction = Handles.ConeHandleCap;for (int i = 0; i < multiMeshAreaCalculator.ListOverallBounds.Count; i++){AreaData areaDate = multiMeshAreaCalculator.ListOverallBounds[i];Vector3[] faceCenters = areaDate.GetFaceCenters();for (int j = 0; j < faceCenters.Length; j++){Vector3 SliderOffset = Vector3.Normalize(faceCenters[j] - areaDate.GetCorner()) * (multiMeshAreaCalculator.handleSize / 2);Vector3 newFaceCenter = Handles.Slider(faceCenters[j] + SliderOffset, faceCenters[j] - areaDate.GetCorner(), multiMeshAreaCalculator.handleSize, capFunction, 1f) - SliderOffset;if (newFaceCenter != faceCenters[j]){Vector3 offset = newFaceCenter - faceCenters[j];UpdateCorners(areaDate, j, offset);}}}}
}
void UpdateCorners(AreaData areaDate, int faceIndex, Vector3 offset)
{Vector3[] corners = areaDate.GetCorners();switch (faceIndex){case 0: // 前面corners[0] += offset;corners[1] += offset;corners[2] += offset;corners[3] += offset;break;case 1: // 后面corners[4] += offset;corners[5] += offset;corners[6] += offset;corners[7] += offset;break;case 2: // 左面corners[0] += offset;corners[2] += offset;corners[4] += offset;corners[6] += offset;break;case 3: // 右面corners[1] += offset;corners[3] += offset;corners[5] += offset;corners[7] += offset;break;case 4: // 頂面corners[2] += offset;corners[3] += offset;corners[6] += offset;corners[7] += offset;break;case 5: // 底面corners[0] += offset;corners[1] += offset;corners[4] += offset;corners[5] += offset;break;}areaDate.SetCorners(corners);
}
AreaData類要添加對應的功能
得到點位,設置點位等功能
public void SetCorners(Vector3[] temp)
{if (temp.Length != cornersInverseTransformPoint.Length){Debug.LogError("新的角點數組長度必須與原始角點數組長度相同!");return;}Vector3[] newCornersInverseTransformPoint = new Vector3[temp.Length];// 獲取對象的旋轉的逆矩陣Quaternion rotationInverse = Quaternion.Inverse(location.rotation);Vector3 scale = location.lossyScale;for (int i = 0; i < temp.Length; i++){// 對應角點位置的偏移Vector3 offsetAdjusted = temp[i] + offset - location.position;// 逆向應用對象的縮放、旋轉和位置Vector3 scaledOffset = new Vector3(offsetAdjusted.x / scale.x , offsetAdjusted.y / scale.y , offsetAdjusted.z / scale.z);newCornersInverseTransformPoint[i] = rotationInverse * scaledOffset;}cornersInverseTransformPoint = newCornersInverseTransformPoint;UpdateAreaData();
}
/// <summary>
/// 得到六個面的中心點
/// </summary>
/// <returns></returns>public Vector3[] GetCorners()
{return corners;
}
public Vector3 GetCorner()
{Vector3 Corner = Vector3.zero;foreach (var item in GetCorners()){Corner += item;}return Corner/ GetCorners().Length;
}
public Vector3[] GetFaceCenters()
{Vector3[] faceCenters = new Vector3[6];faceCenters[0] = ( corners[0] + corners[1] + corners[2] + corners[3] ) / 4;faceCenters[1] = ( corners[4] + corners[5] + corners[6] + corners[7] ) / 4;faceCenters[2] = ( corners[0] + corners[2] + corners[4] + corners[6] ) / 4;faceCenters[3] = ( corners[1] + corners[3] + corners[5] + corners[7] ) / 4;faceCenters[4] = ( corners[2] + corners[3] + corners[6] + corners[7] ) / 4;faceCenters[5] = ( corners[0] + corners[1] + corners[4] + corners[5] ) / 4;return faceCenters;
}
美化面板
- 自動查找子物體功能: 通過按鈕觸發,自動查找并保存子物體的渲染器數據。
- 手動調整區域功能: 提供按鈕和滑塊來調整區域的尺寸和位置。
- 視覺效果調整: 提供調整顏色、吸附點分辨率和尺寸的選項。
- 旋轉控制: 允許用戶設置旋轉角度和鎖定 Y 軸旋轉。
- 吸附方向設置: 提供界面來設置和保存吸附方向。
- 區域重置和測試功能: 提供按鈕來重置區域和添加/移除測試區域。
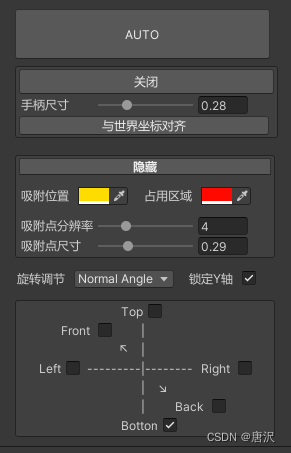
public override void OnInspectorGUI()
{GUILayout.Space(5);if (GUILayout.Button(new GUIContent("AUTO", "尋找子物體的Render并保存邊框數據\n自動情況下的原理是將Render物體的旋轉重置,保存數據后恢復旋轉"), GUILayout.Width(255), GUILayout.Height(50))){multiMeshAreaCalculator.AutoFindChildData();}GUILayout.Space(5);EditorGUILayout.BeginVertical("HelpBox", GUILayout.Width(260));GUILayout.BeginHorizontal();string btnName = multiMeshAreaCalculator.useHandle ? "關閉" : "手動調整占用區域";if (GUILayout.Button(new GUIContent(btnName, "點擊打開調整面板"), GUILayout.Width(255), GUILayout.Height(25))){multiMeshAreaCalculator.useHandle = !multiMeshAreaCalculator.useHandle;}GUILayout.EndHorizontal();if (multiMeshAreaCalculator.useHandle){GUILayout.BeginHorizontal();GUILayout.Label("手柄尺寸", GUILayout.Width(75));multiMeshAreaCalculator.handleSize = EditorGUILayout.Slider(multiMeshAreaCalculator.handleSize, 0, 1, GUILayout.Width(150));GUILayout.EndHorizontal();if (GUILayout.Button(new GUIContent("與世界坐標對齊", "尋找子物體的Render并保存邊框數據\n自動調整對不齊的情況使用,調整Render的邊框直至到合適的邊框大小"), GUILayout.Width(250))){multiMeshAreaCalculator.AutoFindChildData(false);}}EditorGUILayout.EndVertical();GUILayout.Space(15);EditorGUILayout.BeginVertical("HelpBox", GUILayout.Width(260));if (ChangeControl){if (GUILayout.Button("隱藏", "prebutton"))ChangeControl = !ChangeControl;}else{if (GUILayout.Button("調整視覺效果", "prebutton"))ChangeControl = !ChangeControl;}if (ChangeControl){GUILayout.Space(10);GUILayout.BeginHorizontal();GUILayout.Label("吸附位置", GUILayout.Width(55));multiMeshAreaCalculator.adsorptionLocation = EditorGUILayout.ColorField(multiMeshAreaCalculator.adsorptionLocation, GUILayout.Width(50));GUILayout.Space(10);GUILayout.Label("占用區域", GUILayout.Width(55));multiMeshAreaCalculator.areaColor = EditorGUILayout.ColorField(multiMeshAreaCalculator.areaColor, GUILayout.Width(50));GUILayout.EndHorizontal();GUILayout.Space(10);GUILayout.BeginHorizontal();GUILayout.Label("吸附點分辨率", GUILayout.Width(75));multiMeshAreaCalculator.resolution = EditorGUILayout.IntSlider(multiMeshAreaCalculator.resolution, 0, 15, GUILayout.Width(150));GUILayout.EndHorizontal();GUILayout.BeginHorizontal();GUILayout.Label("吸附點尺寸", GUILayout.Width(75));multiMeshAreaCalculator.boundarySize = EditorGUILayout.Slider(multiMeshAreaCalculator.boundarySize, 0, 1, GUILayout.Width(150));GUILayout.EndHorizontal();}EditorGUILayout.EndVertical();GUILayout.Space(10);GUILayout.BeginHorizontal();GUILayout.Label(new GUIContent("旋轉調節", "分為四個擋位:" +"\nNoRotation:該物體不能調整旋轉。" +"\nMaximumAngle:每次轉動90°。" +"\nNormalAngle:每次轉動45°,效果最好。" +"\nMinimumAngle:每次轉動22.5°,很細的調整,如果想要轉動到某一個想要的角度比較花時間,但也不是不行。"), GUILayout.Width(55));multiMeshAreaCalculator.rotationAngle = (RotationAngle)EditorGUILayout.EnumPopup(multiMeshAreaCalculator.rotationAngle, GUILayout.Width(100));GUILayout.Label("   鎖定Y軸", GUILayout.Width(60));multiMeshAreaCalculator.DisableYAxisRotation = GUILayout.Toggle(multiMeshAreaCalculator.DisableYAxisRotation, "", GUILayout.Width(70));GUILayout.EndHorizontal();GUILayout.Space(10);EditorGUILayout.BeginVertical("HelpBox", GUILayout.Width(260));SerializableDictionary<SnapDirection, bool> serializedDict = JsonUtility.FromJson<SerializableDictionary<SnapDirection, bool>>(multiMeshAreaCalculator.UsableDirectionJson);if (serializedDict != null)multiMeshAreaCalculator.UsableDirection = serializedDict.ToDictionary();GUILayout.BeginHorizontal();GUILayout.Space(100);GUILayout.Label("Top", GUILayout.Width(25));multiMeshAreaCalculator.UsableDirection[SnapDirection.Top] = GUILayout.Toggle(multiMeshAreaCalculator.UsableDirection[SnapDirection.Top], "", GUILayout.Width(70));GUILayout.EndHorizontal();GUILayout.BeginHorizontal();GUILayout.Space(40);GUILayout.Label("Front", GUILayout.Width(35));multiMeshAreaCalculator.UsableDirection[SnapDirection.Front] = GUILayout.Toggle(multiMeshAreaCalculator.UsableDirection[SnapDirection.Front], "", GUILayout.Width(37));GUILayout.Label("|", GUILayout.Width(5));GUILayout.Label("Back", GUILayout.Width(35));multiMeshAreaCalculator.UsableDirection[SnapDirection.Back] = GUILayout.Toggle(multiMeshAreaCalculator.UsableDirection[SnapDirection.Back], "", GUILayout.Width(37));GUILayout.EndHorizontal();GUILayout.BeginHorizontal();GUILayout.Label("Left", GUILayout.Width(40));multiMeshAreaCalculator.UsableDirection[SnapDirection.Left] = GUILayout.Toggle(multiMeshAreaCalculator.UsableDirection[SnapDirection.Left], "", GUILayout.Width(40));GUILayout.Label("|", GUILayout.Width(5));GUILayout.Label("Right", GUILayout.Width(40));multiMeshAreaCalculator.UsableDirection[SnapDirection.Right] = GUILayout.Toggle(multiMeshAreaCalculator.UsableDirection[SnapDirection.Right], "", GUILayout.Width(40));GUILayout.EndHorizontal();GUILayout.BeginHorizontal();GUILayout.Space(100);GUILayout.Label("Bottom", GUILayout.Width(45));multiMeshAreaCalculator.UsableDirection[SnapDirection.Bottom] = GUILayout.Toggle(multiMeshAreaCalculator.UsableDirection[SnapDirection.Bottom], "", GUILayout.Width(70));GUILayout.EndHorizontal();if (GUILayout.Button("保存設置", GUILayout.Width(255))){SerializableDictionary<SnapDirection, bool> serializableDictionary = new SerializableDictionary<SnapDirection, bool>(multiMeshAreaCalculator.UsableDirection);multiMeshAreaCalculator.UsableDirectionJson = JsonUtility.ToJson(serializableDictionary);}EditorGUILayout.EndVertical();GUILayout.Space(20);if (GUILayout.Button("Reset Area", GUILayout.Width(255))){multiMeshAreaCalculator.ResetArea();}GUILayout.Space(20);GUILayout.BeginHorizontal();if (GUILayout.Button("TEST AddArea", GUILayout.Width(125))){multiMeshAreaCalculator.AddArea();}if (GUILayout.Button("TEST RemoveArea", GUILayout.Width(125))){multiMeshAreaCalculator.RemoveArea();}GUILayout.EndHorizontal();GUILayout.Space(20);DrawDefaultInspector();
}
MultiMeshAreaCalculator要添加對應的屬性
[HideInInspector]
public TransformChangedEvent transformChangedEvent;//監聽變換事件的組件。當物體移動或者旋轉時觸發
public Color adsorptionLocation = Color.green;//吸附位置顏色。-編輯器擴展使用
public Color areaColor = Color.black;//區域顏色。-編輯器擴展使用
[Range(1 , 36)]
public int resolution = 4;//邊緣顯示框分辨率。-編輯器擴展使用
public float boundarySize = 0.5f;//邊界邊緣顯示框尺寸。-編輯器擴展使用
public float handleSize = 0.5f;//調整區域控制柄的尺寸。-編輯器擴展使用
public bool useHandle = false;//是否使用控制柄。
public RotationAngle rotationAngle = RotationAngle.NormalAngle;//每次旋轉角度。
為什么這么設計?
- 用戶友好性: 提供直觀的 GUI 界面,使得用戶可以輕松調整和配置 MultiMeshAreaCalculator 組件。
- 高效開發: 自動化查找和保存子物體的渲染器數據,減少手動操作,提高開發效率。
- 豐富的功能: 提供多種調整選項,包括手柄調整、視覺效果設置、吸附方向設置等,滿足不同的需求。
- 可維護性強: 代碼結構清晰,邏輯分明,便于維護和擴展。
- 實時反饋: 在場景視圖中提供控制柄,使用戶能夠實時預覽調整效果,提升用戶體驗。
如何使用這個功能
做一個案例來測試
public LayerMask raycastLayers; // 存儲要檢測的層
public RoomReferenceFrame roomReferenceFrame;
MultiMeshAreaCalculator multiMeshAreaCalculator;
bool activate = false;private void OnValidate()
{roomReferenceFrame=roomReferenceFrame==null ? FindObjectOfType<RoomReferenceFrame>() : roomReferenceFrame;
}void Update()
{// 檢查鼠標左鍵是否被按下if(Input.GetMouseButton(0)){Ray ray = Camera.main.ScreenPointToRay(Input.mousePosition);RaycastHit hit;// 使用 LayerMask 來指定要檢測的層if(Physics.Raycast(ray , out hit , Mathf.Infinity , raycastLayers)){activate=true;if(multiMeshAreaCalculator!=null){multiMeshAreaCalculator.SetLocation(hit.point , hit.normal);}}else{// 如果沒有擊中任何物體,則輸出射線未命中Debug.Log("射線未命中");}}if(Input.GetKeyDown(KeyCode.A)){if(multiMeshAreaCalculator)multiMeshAreaCalculator.SetRotate(RotateDirection.Left);}if(Input.GetKeyDown(KeyCode.D)){if(multiMeshAreaCalculator)multiMeshAreaCalculator.SetRotate(RotateDirection.Right);}if(Input.GetKeyDown(KeyCode.W)){if(multiMeshAreaCalculator)multiMeshAreaCalculator.SetRotate(RotateDirection.Top);}if(Input.GetKeyDown(KeyCode.S)){if(multiMeshAreaCalculator)multiMeshAreaCalculator.SetRotate(RotateDirection.Bottom);}if(Input.GetKeyDown(KeyCode.Space)){if(multiMeshAreaCalculator&&activate){if(multiMeshAreaCalculator.Place()){multiMeshAreaCalculator=null;activate=false;}}}if(Input.GetKeyDown(KeyCode.Alpha1)){CreateRoomItem("一盆花");}if(Input.GetKeyDown(KeyCode.Alpha2)){CreateRoomItem("凳子");}if(Input.GetKeyDown(KeyCode.Alpha3)){CreateRoomItem("吊燈");}if(Input.GetKeyDown(KeyCode.Alpha4)){CreateRoomItem("微波爐");}if(Input.GetKeyDown(KeyCode.Alpha5)){CreateRoomItem("毛巾");}if(Input.GetKeyDown(KeyCode.Alpha6)){CreateRoomItem("電視");}if(Input.GetKeyDown(KeyCode.Alpha7)){CreateRoomItem("家具組1");}
}void CreateRoomItem(string path)
{if(multiMeshAreaCalculator)return;GameObject item = Resources.Load<GameObject>(path);multiMeshAreaCalculator=Instantiate(item).GetComponent<MultiMeshAreaCalculator>();multiMeshAreaCalculator.SetRotate( RotateDirection.Reset);
}
MultiMeshAreaCalculator添加對應的功能
public bool Place()
{bool IsPlace = roomReferenceFrame.IsOverlapping(this , out List<Renderer> renders);if (IsPlace)roomReferenceFrame.AddRoomItem(this);return IsPlace;
}


預讀與Mysql改進的LRU策略)
)


(類的基礎詳細講解))


