MiniCPM-Llama3-V-2_5-int4大模型部署使用環境:
python3.8+cuda11.8其它要求,按照安裝文檔要求下載即可
我是在算力平臺用4090跑的,?GPU 顯存(8GB)可以部署推理?int4 量化版本,如果推理非量化版本需要更高顯存
????????MiniCPM-V? ? ? ? 倉庫文件下載
????????openbmb/MiniCPM-Llama3-V-2_5-int4? ? ? ? ? ? ?模型文件下載
????????MiniCPM-Llama3-V-2_5? ? ? ? ? ? ? ? ? ? ? ??????????????非量化模型文件地址
????????
????????AutoDL算力平臺? ?
????????cpolar官方地址?????
????????MiniCPM-V-2.5? ? ? ? ? ? ? ? ? ? ? ? ? ? ? ? ? ? ? ? ? ? ? ? ? ?部署應用等
在算力平臺AutoDL遇到的報錯:
root@autodl-container-cffc47b4c5-4a5f97c0:~/tf-logs# conda activate minicpmv2 CommandNotFoundError: Your shell has not been properly configured to use 'conda activate'. To initialize your shell, run
需要運行:
conda init bash
顯示文件大小
ls -lh example.zipdf -h /root/autodl-tmptar -xvf 解壓rar文件
# 更新包列表
sudo apt-get update# 安裝 unrar
sudo apt-get install unrar# 解壓 MiniCPM-Llama3-V-2_5-int4.rar
unrar x MiniCPM-Llama3-V-2_5-int4.rar# 查看解壓后的文件
ls -l
unrar x xxx.rarunrar x查看磁盤空間大小
df -h /dev/sda1安裝
- 克隆我們的倉庫并跳轉到相應目錄
git clone https://github.com/OpenBMB/MiniCPM-V.git
cd MiniCPM-V
2. 創建 conda 環境
conda create -n minicpmv2.5 python=3.8 -yconda activate minicpmv2.53. 安裝依賴
pip install -r requirements.txt -i https://pypi.mirrors.ustc.edu.cn/simple pip install gradio==3.40.0 -i https://pypi.mirrors.ustc.edu.cn/simple下載模型文件
git clone https://www.modelscope.cn/OpenBMB/MiniCPM-Llama3-V-2_5-int4.git參考以下代碼進行推理

from chat import OmniLMMChat, img2base64
torch.manual_seed(0)chat_model = OmniLMMChat('openbmb/MiniCPM-Llama3-V-2_5')im_64 = img2base64('./assets/airplane.jpeg')# First round chat
msgs = [{"role": "user", "content": "Tell me the model of this aircraft."}]inputs = {"image": im_64, "question": json.dumps(msgs)}
answer = chat_model.chat(inputs)
print(answer)# Second round chat
# pass history context of multi-turn conversation
msgs.append({"role": "assistant", "content": answer})
msgs.append({"role": "user", "content": "Introduce something about Airbus A380."})inputs = {"image": im_64, "question": json.dumps(msgs)}
answer = chat_model.chat(inputs)
print(answer)
python web_demo_2.5.py以下是做內網穿透需要安裝的(如只是部署自己電腦或使用其它方式進入公網則不需要如下)
2.1 安裝cpolar
在Ubuntu上打開終端,執行命令
首先,我們需要安裝curl:
sudo apt-get install curl | sudo bash
- 國內安裝(支持一鍵自動安裝腳本)
curl -L https://www.cpolar.com/static/downloads/install-release-cpolar.sh | sudo bash
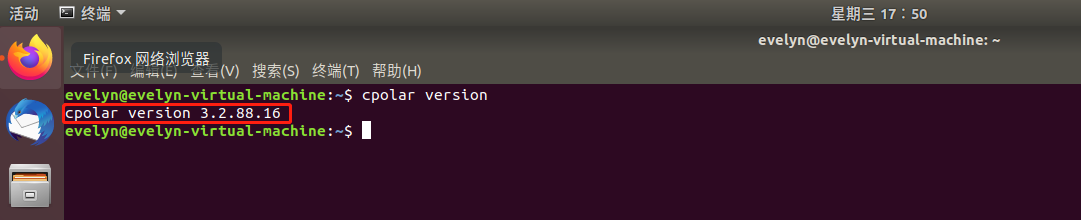
2.2 正常顯示版本號即安裝成功
cpolar version
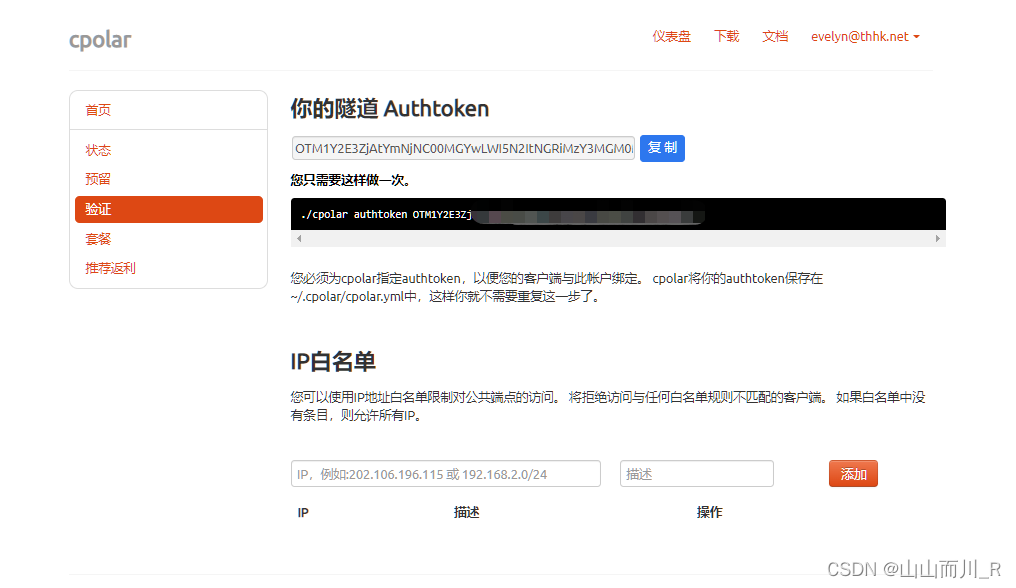
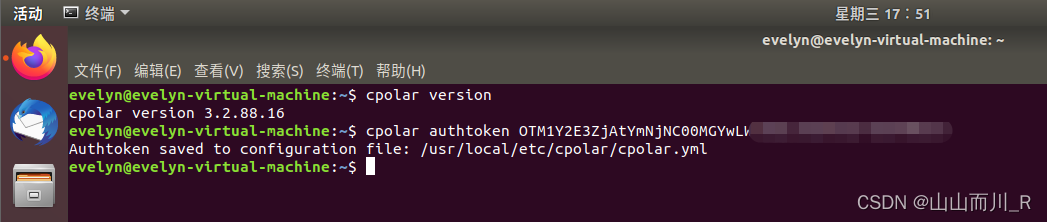
2.3 token認證
登錄cpolar官網后臺,點擊左側的驗證,查看自己的認證token,之后將token貼在命令行里
cpolar authtoken xxxxxxx
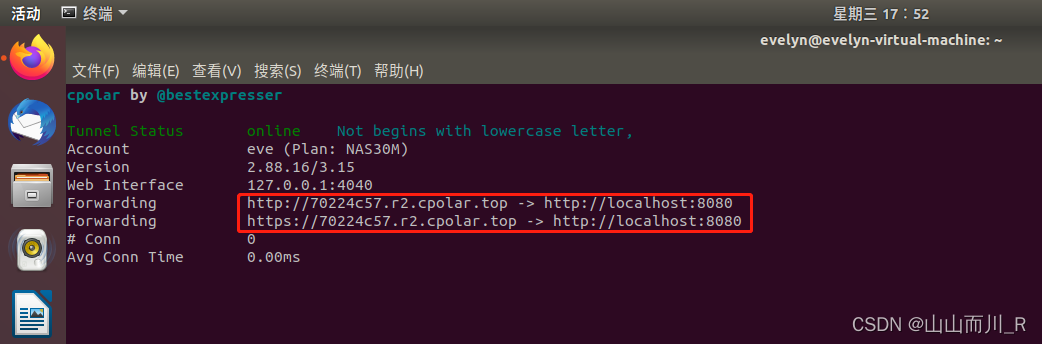
2.4 簡單穿透測試一下
cpolar http 8080
2.5 將cpolar配置為后臺服務并開機自啟動
sudo systemctl enable cpolar
2.6 啟動服務
sudo systemctl start cpolar
2.7 查看服務狀態
sudo systemctl status cpolar
正常顯示為active,為正常在線狀態


)


)
)
![[python]當你認為python字符串的strip()或replace()不能刪除空格或者換行符的時候,看這里](http://pic.xiahunao.cn/[python]當你認為python字符串的strip()或replace()不能刪除空格或者換行符的時候,看這里)


)
