作者:來自 Elastic?Jeffrey Rengifo
學習如何使用 FastAPI WebSockets 和 Elasticsearch 構建實時應用程序。
更多閱讀:使用 FastAPI 構建 Elasticsearch API
想要獲得 Elastic 認證嗎?看看下一次 Elasticsearch Engineer 培訓什么時候開始!
Elasticsearch 擁有許多新功能,可以幫助你為你的使用場景構建最佳搜索解決方案。深入學習我們的示例筆記本,了解更多內容,開始免費的云試用,或者立即在本地機器上嘗試 Elastic。
WebSockets 是一種同時雙向通信協議。它的理念是客戶端和服務器可以保持一個打開的連接,同時互相發送消息,從而盡可能降低延遲。這種方式常見于實時應用,比如聊天、活動通知或交易平臺,在這些場景中延遲是關鍵,并且存在持續的信息交換。
想象一下你創建了一個消息應用,想在用戶收到新消息時通知他們。你可以每隔 5 或 10 秒通過發送 HTTP 請求輪詢服務器,直到有新消息,或者你可以保持一個 WebSockets 連接,讓服務器推送一個事件,客戶端監聽后在消息到達時立即顯示通知標記。
在這種情況下,Elasticsearch 能夠在數據集上實現快速而靈活的搜索,使其非常適合需要即時結果的實時應用。
在這篇文章中,我們將使用 FastAPI 的 WebSockets 功能和 Elasticsearch 創建一個實時應用程序。
先決條件
- Python 版本 3.x
- 一個 Elasticsearch 實例(自托管或 Elastic Cloud 上)
- 一個具有寫權限的 Elasticsearch API key
本文使用的所有代碼可以在這里找到。
使用場景
為了向你展示如何將 WebSockets 與 FastAPI 和 Elasticsearch 一起使用,我們將采用一個使用場景:作為店主的你,想在某個查詢被執行時通知所有用戶,以吸引他們的注意力。這模擬了搜索驅動應用中的實時互動,比如促銷活動或產品興趣提醒。
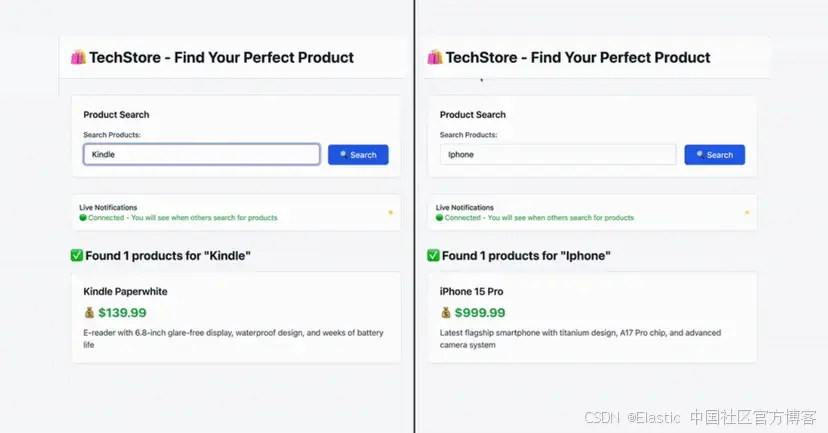
在這個使用場景中,我們將構建一個應用,客戶可以搜索產品,并在其他用戶執行了在監控列表中的搜索時收到通知。

用戶 A 搜索 “Kindle”,用戶 B 會實時收到通知。
數據攝取
在這一部分,我們將創建索引映射,并使用一個 Python 腳本攝取所需的數據。你可以在博客倉庫中找到以下腳本。
攝取腳本
創建一個名為 ingest_data.py 的新文件,其中包含用于處理數據攝取的 Python 邏輯。
安裝 Elasticsearch 庫以處理對 Elasticsearch 的請求:
pip install elasticsearch -q現在導入依賴,并使用 API key 和 Elasticsearch 端點 URL 初始化 Elasticsearch 客戶端。
import json
import osfrom elasticsearch import Elasticsearches_client = Elasticsearch(hosts=[os.environ["ELASTICSEARCH_ENDPOINT"]],api_key=os.environ["ELASTICSEARCH_API_KEY"],
)
創建一個方法,在名為 “products” 的索引下設置索引映射。
PRODUCTS_INDEX = "products"def create_products_index():try:mapping = {"mappings": {"properties": {"product_name": {"type": "text"},"price": {"type": "float"},"description": {"type": "text"},}}}es_client.indices.create(index=PRODUCTS_INDEX, body=mapping)print(f"Index {PRODUCTS_INDEX} created successfully")except Exception as e:print(f"Error creating index: {e}")現在使用 bulk API 加載產品文檔,將它們推送到 Elasticsearch。數據將位于項目倉庫中的 NDJSON 文件中。
def load_products_from_ndjson():try:if not os.path.exists("products.ndjson"):print("Error: products.ndjson file not found!")returnproducts_loaded = 0with open("products.ndjson", "r") as f:for line in f:if line.strip():product_data = json.loads(line.strip())es_client.index(index=PRODUCTS_INDEX, body=product_data)products_loaded += 1print(f"Successfully loaded {products_loaded} products into Elasticsearch")except Exception as e:print(f"Error loading products: {e}")最后,調用已創建的方法。
if __name__ == "__main__":create_products_index()load_products_from_ndjson()在終端中使用以下命令運行腳本。
python ingest_data.py完成后,讓我們繼續構建應用。
Index products created successfully
Successfully loaded 25 products into Elasticsearch
WebSockets 應用
為了提高可讀性,應用的界面將簡化。完整的應用倉庫可以在這里找到。

該圖展示了 WebSocket 應用如何與 Elasticsearch 和多個用戶交互的高級概覽。
應用結構
|-- websockets_elasticsearch_app
|-- ingest_data.py
|-- index.html
|-- main.py
安裝并導入依賴
安裝 FastAPI 和 WebSocket 支持。Uvicorn 將作為本地服務器,Pydantic 用于定義數據模型,Elasticsearch 客戶端允許腳本連接到集群并發送數據。
pip install websockets fastapi pydantic uvicorn -qFastAPI 提供了易用、輕量且高性能的工具來構建 web 應用,而 Uvicorn 作為 ASGI 服務器來運行它。Pydantic 在 FastAPI 內部用于數據驗證和解析,使定義結構化數據更容易。WebSockets 提供了低級協議支持,使服務器和客戶端之間能夠實現實時雙向通信。之前安裝的 Elasticsearch Python 庫將在此應用中用于處理數據檢索。
現在,導入構建后端所需的庫。
import json
import os
import uvicorn
from datetime import datetime
from typing import Dict, Listfrom elasticsearch import Elasticsearch
from fastapi import FastAPI, HTTPException, WebSocket, WebSocketDisconnect
from fastapi.responses import FileResponse
from pydantic import BaseModel, Field
Elasticsearch 客戶端
定義 Elasticsearch 端點和 API key 的環境變量,并實例化一個 Elasticsearch 客戶端來處理與 Elasticsearch 集群的連接。
os.environ["ELASTICSEARCH_ENDPOINT"] = getpass("Insert the Elasticsearch endpoint here: "
)
os.environ["ELASTICSEARCH_API_KEY"] = getpass("Insert the Elasticsearch API key here: ")es_client = Elasticsearch(hosts=[os.environ["ELASTICSEARCH_ENDPOINT"]],api_key=os.environ["ELASTICSEARCH_API_KEY"],
)PRODUCTS_INDEX = "products"
數據模型和應用設置
現在是創建 FastAPI 實例的時候了,它將處理 REST API 和 WebSocket 路由。然后,我們將使用 Pydantic 定義幾個數據模型。
- Product 模型描述每個產品的結構。
- SearchNotification 模型定義我們將發送給其他用戶的消息。
- SearchResponse 模型定義 Elasticsearch 結果的返回方式。
這些模型有助于在整個應用中保持一致性和可讀性,并在代碼 IDE 中提供數據驗證、默認值和自動補全。
app = FastAPI(title="Elasticsearch - FastAPI with websockets")class Product(BaseModel):product_name: strprice: floatdescription: strclass SearchNotification(BaseModel):session_id: strquery: strtimestamp: datetime = Field(default_factory=datetime.now)class SearchResponse(BaseModel):query: strresults: List[Dict]total: intWebSockets 端點設置
當用戶連接到 /ws 端點時,WebSocket 連接會保持打開狀態并添加到全局列表中。這允許服務器即時向所有連接的客戶端廣播消息。如果用戶斷開連接,他們的連接將被移除。
# Store active WebSocket connections
connections: List[WebSocket] = []@app.websocket("/ws")
async def websocket_endpoint(websocket: WebSocket):await websocket.accept()connections.append(websocket)print(f"Client connected. Total connections: {len(connections)}")try:while True:await websocket.receive_text()except WebSocketDisconnect:connections.remove(websocket)print(f"Client disconnected. Total connections: {len(connections)}")
搜索端點
現在讓我們查看發生實時交互的代碼。
當用戶執行搜索時,會查詢 Elasticsearch 并返回結果。同時,如果查詢在全局監控列表中,所有其他已連接用戶會收到通知,提示有人找到了其中的某個產品。通知中包含查詢內容。
session_id 參數用于避免將通知發送回發起搜索的用戶。
@app.get("/search")
async def search_products(q: str, session_id: str = "unknown"):# List of search terms that should trigger a notificationWATCH_LIST = ["iphone", "kindle"]try:query_body = {"query": {"bool": {"should": [{"match": {"product_name": q}},{"match_phrase": {"description": q}},],"minimum_should_match": 1,}},"size": 20,}response = es_client.search(index=PRODUCTS_INDEX, body=query_body)results = []for hit in response["hits"]["hits"]:product = hit["_source"]product["score"] = hit["_score"]results.append(product)results_count = response["hits"]["total"]["value"]# Only send notification if the search term matchesif q.lower() in WATCH_LIST:notification = SearchNotification(session_id=session_id, query=q, results_count=results_count)for connection in connections.copy():try:await connection.send_text(json.dumps({"type": "search","session_id": session_id,"query": q,"timestamp": notification.timestamp.isoformat(),}))except:connections.remove(connection)return SearchResponse(query=q, results=results, total=results_count)except Exception as e:status_code = getattr(e, "status_code", 500)return HTTPException(status_code=status_code, detail=str(e))注意:session_id 僅基于當前時間戳以簡化處理 —— 在生產環境中,你需要使用更可靠的方法。
客戶端
為了展示應用流程,創建一個前端頁面,使用簡單的 HTML,包括搜索輸入框、結果區域和用于通知的對話框。
<!DOCTYPE html>
<html lang="en"><body><h1>🛍? TechStore - Find Your Perfect Product</h1><form onsubmit="event.preventDefault(); searchProducts();"><p><label for="searchQuery">Search Products:</label><br /><inputtype="text"id="searchQuery"placeholder="Search for phones, laptops, headphones..."size="50"required /><button type="submit">🔍 Search</button></p></form><!-- HTML Dialog for notifications --><dialog id="notificationDialog"><div><h2>🔔 Live Search Activity</h2><p id="notificationMessage"></p><p><button onclick="closeNotification()" autofocus>OK</button></p></div></dialog><div id="searchResults"><h2>Search Results</h2></div><script>...</script></body>
</html>
通知使用了 元素用于演示,但在真實應用中,你可能會使用 toast 或小徽章來顯示。在實際場景中,這類通知可用于顯示有多少用戶正在搜索某些產品、提供庫存實時更新,或突出顯示返回成功結果的熱門搜索查詢。
Script 標簽
在 標簽內,包含將前端連接到后端 WebSocket 端點的邏輯。讓我們看看下面的代碼片段。
let ws = null;
let sessionId = null;window.onload = function () {sessionId = "session_" + Date.now();connectWebSocket();
};
頁面加載時,會生成一個唯一的 session ID 并連接到 WebSocket。
function connectWebSocket() {ws = new WebSocket("ws://localhost:8000/ws");ws.onopen = function () {console.log("Connected to WebSocket");};ws.onmessage = function (event) {try {const notification = JSON.parse(event.data);if (notification.type === "search") {showSearchNotification(notification);}} catch (error) {console.error("Error parsing notification:", error);}};ws.onclose = function () {console.log("Disconnected from WebSocket");};ws.onerror = function (error) {console.error("WebSocket error:", error);};
}
函數 connectWebSocket 使用 ws = new WebSocket("ws://localhost:8000/ws") 建立 WebSocket 連接。語句 ws.onopen 通知后端已創建新連接。然后,ws.onmessage 監聽其他用戶在商店中搜索時發送的通知。
function showSearchNotification(notification) {// Skip notifications from the same session (same browser window)if (notification.session_id === sessionId) {return;}const dialog = document.getElementById("notificationDialog");const messageElement = document.getElementById("notificationMessage");messageElement.innerHTML = `<p><strong>Hot search alert!</strong> Other users are looking for <em>"${notification.query}"</em> right now.</p>`;// Show the notification dialogdialog.showModal();
}function closeNotification() {const dialog = document.getElementById("notificationDialog");dialog.close();
}
函數 showSearchNotification 在屏幕上顯示通過 WebSockets 接收到的通知,而 closeNotification 函數用于關閉 showSearchNotification 顯示的消息。
async function searchProducts() {const query = document.getElementById("searchQuery").value.trim();const response = await fetch(`/search?q=${encodeURIComponent(query)}&session_id=${encodeURIComponent(sessionId)}`);const data = await response.json();if (response.ok) {displaySearchResults(data);} else {throw new Error(data.error || "Search failed");}
}function displaySearchResults(data) {const resultsDiv = document.getElementById("searchResults");let html = `<h2>Found ${data.total} products for "${data.query}"</h2>`;data.results.forEach((product) => {html += `<ul><li><strong>${product.product_name}</strong></li><li>💰 $${product.price.toFixed(2)}</li><li>${product.description}</li>
</ul>`;});resultsDiv.innerHTML = html;
}
searchProducts() 函數將用戶的查詢發送到后端,并通過調用 displaySearchResults 函數更新結果區域中匹配的產品。
渲染視圖和主方法
最后,在瀏覽器訪問應用時渲染 HTML 頁面并啟動服務器。
@app.get("/")
async def get_main_page():return FileResponse("index.html")if __name__ == "__main__":uvicorn.run(app, host="0.0.0.0", port=8000)
運行應用
使用 uvicorn 運行 FastAPI 應用。
uvicorn main:app --host 0.0.0.0 --port 8000現在應用已上線!
INFO:     Started server process [61820]
INFO:     Waiting for application startup.
INFO:     Application startup complete.
測試應用
訪問 localhost:8000/ 渲染應用視圖,并觀察控制臺的情況:
INFO:     127.0.0.1:53422 - "GET / HTTP/1.1" 200 OK
INFO:     ('127.0.0.1', 53425) - "WebSocket /ws" [accepted]
Client connected. Total connections: 1
INFO:     connection open
當視圖被打開時,服務器會收到一個 WebSocket 連接。每打開一個新頁面,都會增加一個連接。例如,如果你在三個不同的瀏覽器標簽中打開頁面,你將在控制臺看到三個連接:
INFO:     ('127.0.0.1', 53503) - "WebSocket /ws" [accepted]
Client connected. Total connections: 2
INFO:     connection open
INFO:     ('127.0.0.1', 53511) - "WebSocket /ws" [accepted]
Client connected. Total connections: 3
INFO:     connection open
如果關閉一個標簽,對應的連接也會關閉:
Client disconnected. Total connections: 2
INFO:     connection closed
當有多個活躍客戶端連接時,如果一個用戶搜索了某個產品,并且該搜索詞在監控列表中,其他已連接的客戶端將實時收到通知。
可選步驟是使用 Tailwind 應用一些樣式。這可以改善 UI,使其看起來現代且視覺上更吸引人。完整的帶有更新 UI 的代碼可以在這里找到。
結論
在本文中,我們學習了如何使用 Elasticsearch 和 FastAPI 基于搜索創建實時通知。我們選擇了一個固定的產品列表來發送通知,但你可以探索更多自定義流程,讓用戶選擇自己想要接收通知的產品或查詢,甚至使用 Elasticsearch 的 percolate 查詢根據產品規格配置通知。
我們還嘗試了一個接收通知的單用戶池。使用 WebSockets,你可以選擇向所有用戶廣播,或者選擇特定用戶。一個常見的模式是定義用戶可以訂閱的 “消息組”,就像群聊一樣。
原文:Using FastAPI’s WebSockets and Elasticsearch to build a real-time app - Elasticsearch Labs


,上傳文件,后端插入數據,將文件保存到數據庫)
)
——pinctrl GPIO)


)


)