本文參考文章:https://blog.csdn.net/qq_41630102/article/details/108306720
參考文章有些地方描述的有疏漏,導致筆者學習過程中,編譯的.a文件無法在RK3568平臺運行,故寫本文做了修正,以下僅是自我學習的筆記,沒有寫的很詳細。
一:下載軟件包
https://download.csdn.net/download/qq_41630102/12781129
二:編譯
2.1編譯zlib
參考文章:https://blog.csdn.net/qq_41630102/article/details/108306720
2.2編譯 libpng
export CROSS_COMPILE=aarch64-buildroot-linux-gnu-
export CC= C R O S S C O M P I L E g c c e x p o r t A R = {CROSS_COMPILE}gcc export AR= CROSSC?OMPILEgccexportAR={CROSS_COMPILE}ar
export PATH=/opt/atk-dlrk356x-toolchain/usr/bin:$PATH
./configure --prefix=/home/alientek/QT_PRO/QRCODE/b/libpng-1.6.17/compile_dir/ --host=aarch64-buildroot-linux-gnu CC=aarch64-buildroot-linux-gnu-gcc AR=aarch64-buildroot-linux-gnu-ar LIBS=-L/home/alientek/QT_PRO/QRCODE/zlib-1.2.11/compile CPPFLAGS=-I/home/alientek/QT_PRO/QRCODE/zlib-1.2.11/compile
make && make install
2.3編譯 libqrencode
export CROSS_COMPILE=aarch64-buildroot-linux-gnu-
export CC= C R O S S C O M P I L E g c c e x p o r t A R = {CROSS_COMPILE}gcc export AR= CROSSC?OMPILEgccexportAR={CROSS_COMPILE}ar
export PATH=/opt/atk-dlrk356x-toolchain/usr/bin:$PATH
./configure --prefix=/home/alientek/QT_PRO/QRCODE/qrencode-3.4.4/compile_dir/ --host=aarch64-buildroot-linux-gnu CC=aarch64-buildroot-linux-gnu-gcc AR=aarch64-buildroot-linux-gnu-ar --enable-static --disable-shared CPPFLAGS=-I/home/alientek/QT_PRO/QRCODE/b/libpng-1.6.17/compile_dir/include LDFLAGS=-L/home/alientek/QT_PRO/QRCODE/b/libpng-1.6.17/compile_dir/lib
make && make install
三、QT中使用
3.1將.a文件和.h文件放在QT目錄中

3.2修改QT 的 .pro文件
加入
INCLUDEPATH += $$PWD/qrencode_rk
DEPENDPATH += $$PWD/qrencode_rk
LIBS += -L$$PWD/qrencode_rk -lqrencode

3.3 使用qrencode庫(代碼示例)
#include "w004_choose_auth_mode.h"
#include "ui_w004_choose_auth_mode.h"
#include <qrencode.h>
#include <QPainter>
#include <QPixmap>w004_choose_auth_mode::w004_choose_auth_mode(QWidget *parent): QWidget(parent), ui(new Ui::w004_choose_auth_mode)
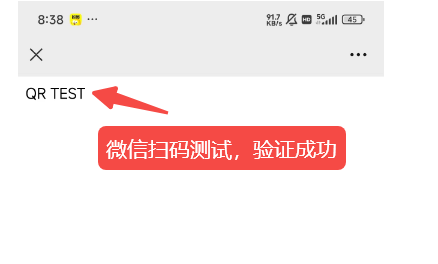
{ui->setupUi(this);QLabel *bgLabel = new QLabel(this);bgLabel->setPixmap(QPixmap(":/image/background/004.png"));bgLabel->setScaledContents(true); // 圖片自適應縮放bgLabel->lower(); // 置于底層generateQR("QR TEST");
}w004_choose_auth_mode::~w004_choose_auth_mode()
{delete ui;
}void w004_choose_auth_mode::on_pushButton_language_clicked()
{emit btnpush(4,100); // 發射返回信號
}void w004_choose_auth_mode::generateQR(QString text )
{if (text.isEmpty()) return;// 生成二維碼數據QRcode *qrCode = QRcode_encodeString(text.toUtf8(), 2, QR_ECLEVEL_Q, QR_MODE_8, 1);if (!qrCode) return;// 轉換為 QImageint scale = 5; // 縮放因子int imgSize = qrCode->width * scale;QImage image(imgSize, imgSize, QImage::Format_RGB32);image.fill(Qt::white);QPainter painter(&image);painter.setPen(Qt::NoPen);painter.setBrush(Qt::black);// 繪制二維碼模塊for (int y = 0; y < qrCode->width; y++) {for (int x = 0; x < qrCode->width; x++) {if (qrCode->data[y * qrCode->width + x] & 1) {painter.drawRect(x * scale, y * scale, scale, scale);}}}// 顯示到 QLabelui->label_qrcode->setPixmap(QPixmap::fromImage(image));QRcode_free(qrCode); // 釋放內存
}
3.4 測試結果


)


)
)


)


