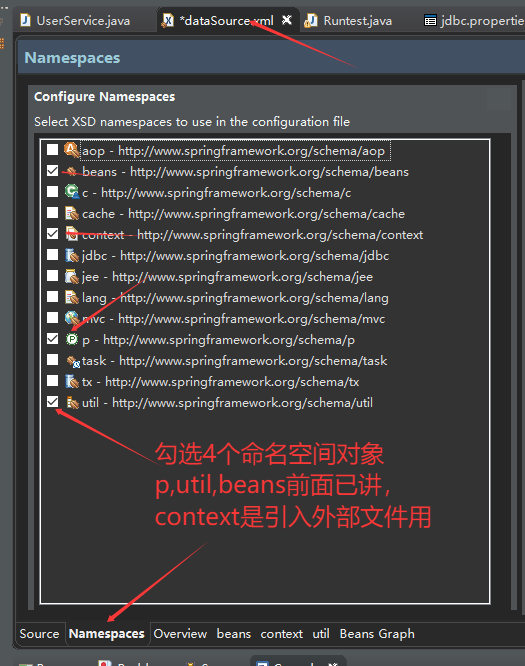
spring配外部文件
我們先在Spring里配置一個數據源
1.導c3p0包,這里我們先學一下hibernate持久化框架,以后用mybites.
<dependency><groupId>org.hibernate</groupId><artifactId>hibernate-core</artifactId><version>5.2.17.Final</version></dependency><dependency><groupId>org.hibernate</groupId><artifactId>hibernate-c3p0</artifactId><version>5.3.0.Final</version></dependency>
2.安裝mysql 8.x數據庫(參考相關資料),導入驅動包
<dependency><groupId>mysql</groupId><artifactId>mysql-connector-java</artifactId><version>8.0.16</version></dependency>
3.看具體代碼:
<!-- 配置c3p0,ComboPooledDataSource對象,它指向一個數據源 --><bean id="dataSource" class="com.mchange.v2.c3p0.ComboPooledDataSource"><property name="user" value="root"></property><property name="password" value="xiong"></property><property name="jdbcUrl" value="jdbc:mysql://124.220.60.104:3306/spring5"></property><property name="driverClass" value="com.mysql.cj.jdbc.Driver"></property></bean>
測試數據庫連接
	@Testpublic void dataSourcetest() throws SQLException{ApplicationContext ct = new ClassPathXmlApplicationContext("dataSource.xml");DataSource dataSource = (DataSource)ct.getBean("dataSource");System.out.println(dataSource.getConnection());}
-----------------------------------------------------------------
com.mchange.v2.c3p0.impl.NewProxyConnection@45c7e403 [wrapping: com.mysql.cj.jdbc.ConnectionImpl@2925bf5b]   //連接成功,產生一個代理數據庫服務器
??????????????上面這樣配置,寫死了數據是相對以后轉生產環境中修改是十分不方便的,生產環境中,我們極有可能會把dao層打jar包,又分成多模塊開發,所以修改起來是十分麻煩,所以我們會把值寫成鍵值對的形式單獨保存到一個文件中
使用外部文件保存數據值,再配spring配置文件
jdbc.properties
jdbc.user=root
jdbc.password=xiong
jdbc.url=jdbc:mysql://124.220.60.104:3306/spring5
jdbc.driverClass=com.mysql.cj.jdbc.Driver
dataSouce.xml–spring配置文件
<!-- 配置c3p0,ComboPooledDataSource對象,它指向一個數據源 --><context:property-placeholder location="classpath:jdbc.properties"/><bean id="dataSource" class="com.mchange.v2.c3p0.ComboPooledDataSource"><property name="user" value="${jdbc.user}"></property><property name="password" value="${jdbc.password}"></property><property name="jdbcUrl" value="${jdbc.url}"></property><property name="driverClass" value="${jdbc.driverClass}"></property></bean>
Spring的表達式語言spEL
???????Spring表達式語言(SpEL):是一個支持運行時查詢和操作對象圖的強大表示是語言,是一種可以與一個基于spring的應用程序中的運行時對象交互的東西。總得來說SpEL表達式是一種簡化開發的表達式,通過使用表達式來簡化開發,減少一些邏輯、配置的編寫。
???????語法類似于 EL:SpEL 使用 #{…} 作為定界符 , 所有在大括號中的字符都將被認為是 SpEL , SpEL 為 bean 的屬性進行動態賦值提供了便利。
通過 SpEL 可以實現:
通過 bean 的 id 對 bean 進行引用,用了SpEL在bean標簽中可以用value代替ref。
可以像EL一樣用點運算符調用方法以及對象中的屬性。
計算表達式的值
正則表達式的匹配。
SpEL 字面量,意義不大,spring內部本身有數據類型的自動轉換機制,直接寫值就好了,不必用SqEL,了解:
整數:#{8}   實際上,直接寫成“8”即可,如前面講的:p:id="1",就表示1
小數:#{8.8}
科學計數法:#{1e4}
String:可以使用單引號或者雙引號作為字符串的定界符號。
Boolean:#{true}
SpEL引用bean , 調用它屬性和方法:
引用其他對象:#{car}
引用其他對象的屬性:#{car.price}
調用其它方法 , 還可以鏈式操作:#{person.pet.toString()}
調用靜態方法靜態屬性:#{T(java.lang.Math).PI}
Spring EL 操作List、Map集合取值//SpEL支持的運算符號:算術運算符:+,-,*,/,%,^(加號還可以用作字符串連接)
比較運算符:< , > , == , >= , <= , lt , gt , eg , le , ge
邏輯運算符:and , or , not , |
if-else 運算符(類似三目運算符):?:(temary), ?:(Elvis)
正則表達式:#{admin.email matches '[a-zA-Z0-9._%+-]+@[a-zA-Z0-9.-]+\\.[a-zA-Z]{2,4}'}
例:引用對象舉例
???????為了測試,我在Pet類中,添加成員屬性private double price及get/set方法,在Person類中添屬性成員private double petPrice,private double pi及get/set方法,petPrice屬性在spring創建對象時,引用Pet對象中定義的值,pi屬性引用lang包中的靜態成員常量。
<!-- springEL,測試 --><bean id="cat1" class="cn.ybzy.springdemo.model.Pet" p:id="1" p:type="cat" p:price="1000.0"></bean><bean id="person" class="cn.ybzy.springdemo.model.Person"><property name="id" value="1"></property><property name="pet" value="#{cat1}"></property><property name="petPrice" value="#{cat1.price}"></property><property name="pi" value="#{T(java.lang.Math).PI}"></property></bean>
	/** spring EL 測試*/@Testpublic void springEltest() {ApplicationContext ct = new ClassPathXmlApplicationContext("springEL.xml");Person person=(Person)ct.getBean("person");System.out.println(person);System.out.println(person.getPi());}
--------------------------------------------------------------------
Person [id=1, pet=Pet [id=1, type=cat, price=1000.0], cars=null, petPrice=1000.0]
3.141592653589793
例:springEL運算符演示,這里我只舉,三目運算會和正則表達式匹配運算
???????為了測試,我在Person類中添加test屬性,private String test及get/set方法,它會根根價格來作兩個判 斷,大于800元,是土豪,小于100元是普通人養寵物。
<property name="test" value="#{cat1.price > 800 ? '土豪' : '普通人'}"></property>
   System.out.println(person.getTest());
---------------------------------------------------------------------
土豪
正則表達式測試,字符串 ''aaaa98734"不全是數字,所以匹配0-9多個數字是錯的
<property name="test" value="#{'aaa98734' matches '[0-9]+'}"></property>
  System.out.println(person.getTest());
---------------------------------------------------------------------
false
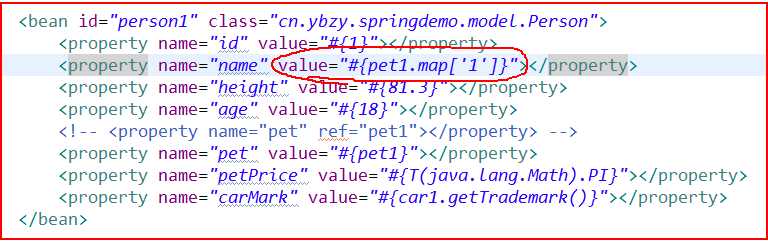
例:引用List,Map

map[‘1’]中的1是KEY
Spring通過工廠方法進行配置
???????在Spring的世界中, 我們通常會利用 xml配置文件 或者 annotation注解方式來配置bean實例!
在第一種利用 xml配置文件 方式中, 還包括如下三小類
- 反射模式(我們前面的所有配置都是這種模式)
- 工廠方法模式
- Factory Bean模式
工廠方法進行配置
???????靜態工廠方法方式是非常適用于作為1個bean容器, 只不過bean集合定義在工廠類里面而不是項目xml配置文件里面。
???????缺點也比較明顯, 把數據寫在class里面而不是配置文件中違反了我們程序猿的常識和spring的初衷。當然優點就是令人惡心的xml配置文件更加簡潔。所以,工廠方法的配置,了解一下就行了,個人建議不要在項目中使用,但要了解,以后看到項目中有這樣的方式,能看得懂。
FactoryBean 來配置Bean
???????spring通過FactoryBean配置,比前面的工廠方法配置Bean要重要些,因為我們整合很多第三方的框架的時候,需要用到FactoryBean來配置第三方框架中的bean 對象,從而把第三方框架整合到spring中來!當然在整合這些第三方框架的時候,這個FactoryBean一般都是我們引入的jar包中,人家給寫好了的,我們會用就行,但知道原理也是好的!
例:通過FactoryBean接口的實現類CarFactoryBean,spring中配Car的bean:id="bwn"是CarFactoryBean的bean名,再通過構造方法注入Car的bean,則試:輸出Car對象的toString()中的內容
CarFactoryBean.java
public class CarFactoryBean implements FactoryBean<Car>{private String type;public CarFactoryBean(String type) {this.type=type;}//返回我們要配置的Bean 對象@Overridepublic Car getObject() throws Exception {return new Car(101,type);}//返回我們配置的Bean 對象的類型@Overridepublic Class<?> getObjectType() {return Car.class;}Car.java
public class Car {private int id;private String mark;   //品牌//get/set/toString,方法
}
factoryBean.xml
<!-- 通過FactoryBean實現類CarFactoryBean,來注入一個寶碼的Car實例對象 --><bean id="bwm" class="cn.ybzy.springdemo.model.CarFactoryBean"><constructor-arg value="BWM"></constructor-arg><!-- 構造方法注入,當然也可屬性注入,但我沒有寫type的set方法 --></bean>
測試類中:
@Testpublic void FactoryBeantest() {ConfigurableApplicationContext ct = new ClassPathXmlApplicationContext("factoryBean.xml");Car baomaCar = (Car) ct.getBean("bwm");System.out.println(baomaCar);}
----------------------------------------------------------------------------------------------------------------
Car [id=101, mark=BWM]
通過整合Quartz框架-定時做事用的,來演示看看,實際項目應用中,是怎么用FactoryBean來將第三方框架整合進入spring的!
1、導入spring-context-support,quartz等相關jar包
<dependency><groupId>org.quartz-scheduler</groupId><artifactId>quartz</artifactId><version>2.2.1</version></dependency><dependency><groupId>org.springframework</groupId><artifactId>spring-context-support</artifactId><version>5.0.6.RELEASE</version></dependency><dependency><groupId>org.slf4j</groupId><artifactId>slf4j-api</artifactId><version>1.7.35</version></dependency><!-- https://mvnrepository.com/artifact/org.slf4j/slf4j-nop --><dependency><groupId>org.slf4j</groupId><artifactId>slf4j-nop</artifactId><version>1.7.35</version><scope>test</scope>
</dependency>
2、定義一個工作任務job
public class MyJob implements Job{@Overridepublic void execute(JobExecutionContext context) throws JobExecutionException {System.out.println("quartz我的具體的每次工作任務");}}
3、Spring配置文件中整合配置:
1)定義工作任務的Job
2)定義觸發器Trigger,并將觸發器與工作任務綁定
3)定義調度器,并將Trigger注冊到Scheduler
!-- 定義工作任務的Job bean --><bean id="myJob" class="org.springframework.scheduling.quartz.JobDetailFactoryBean"><!-- 指定job的名稱 --><property name="name" value="myQuartzJob"></property><!-- 指定job的分組 --><property name="group" value="myJobGroup"></property><!-- 指定具體的job類 --><property name="jobClass" value="cn.ybzy.springdemo.model.MyJob"></property><!-- 必須置為true,如果為false ,當沒有活動的觸發器與之關聯時會在調度器中會刪除該任務 --><property name="durability" value="true"></property><!--springIOC容器的KEY --><property name="applicationContextJobDataKey" value="factoryBean"></property></bean><!-- 定義觸發器Trigger,并將觸發器與工作任務綁定 --><bean id="trigger" class="org.springframework.scheduling.quartz.CronTriggerFactoryBean"><property name="name" value="myTrigger"></property><property name="group" value="myGroup"></property><!-- 指定Trigger綁定的job --><property name="jobDetail" ref="myJob"></property><!-- 指定Cron的表達式,當前是每隔3秒運行一次 --><property name="cronExpression" value="0/3 * * * * ?"></property></bean><!-- 調度器,并把Trigger注冊到Scheduler --><bean id="scheduler" class="org.springframework.scheduling.quartz.SchedulerFactoryBean"><property name="triggers"><list><ref bean="trigger"/></list></property></bean>
一個cron表達式有至少6個(也可能7個)有空格分隔的時間元素。
CronTrigger配置完整格式為: [秒] [分] [小時] [日] [月] [周] [年]*表示所有值. 例如:在分的字段上設置 "*",表示每一分鐘都會觸發。? 表示不指定值。使用的場景為不需要關心當前設置這個字段的值。例如:要在每月的10號觸發一個操作,但不關心是周幾,所以需要周位置的那個字段設置為"?" 具體設置為 0 0 0 10 * ?- 表示區間。例如 在小時上設置 "10-12",表示 10,11,12點都會觸發。, 表示指定多個值,例如在周字段上設置 "MON,WED,FRI" 表示周一,周三和周五觸發/ 用于遞增觸發。如在秒上面設置"5/15" 表示從5秒開始,每增15秒觸發(5,20,35,50)。
測試
	//FactoryBean測試,FactoryBean quartz定時任框架測試,但在junit不支持多線程,所以看不到每三秒執行的效果,我//另在model層中寫一個類MyJob.java,用了main方法@Testpublic void FactoryBeantest() {
//		ConfigurableApplicationContext ct = new ClassPathXmlApplicationContext("factoryBean.xml");
//		Car baomaCar = (Car) ct.getBean("bwm");
//		System.out.println(baomaCar);ConfigurableApplicationContext ct = new ClassPathXmlApplicationContext("factoryBean.xml");SchedulerFactoryBean scheduler=(SchedulerFactoryBean)ct.getBean("scheduler");scheduler.start();}
MyJobTest.java—model層中(無所謂那層了)
public class MyJobTest {public static void main(String[] args) {ConfigurableApplicationContext ct = new ClassPathXmlApplicationContext("factoryBean.xml");SchedulerFactoryBean scheduler=(SchedulerFactoryBean)ct.getBean("scheduler");scheduler.start();}}
----------------------------------------------------------------------------------------------------------------
quartz我的具體的每次工作任務
quartz我的具體的每次工作任務
quartz我的具體的每次工作任務
。。。。。。。。。
注解配bean
???????Spring引入了注解,通過"@XXX"的方式,讓注解與Java Bean緊密結合,既大大減少了配置文件的體積,又增加了Java Bean的可讀性與內聚性。
Spring注解配置初始化對象(<bean>):
spring中使用注解配置對象前,要在配置文件中配置<context:component-scan >標簽告訴spring框架,配置了注解的類的位置配置文件applicationContext.xml:
<!--告訴sping,要創建的bean在springdemo包下及子包中所有類的bean-->
<context:component-scan  base-package="cn.ybzy.springdemo">
</context:component-scan>
注解說明:
???????Component是最初spring框架設計的,后來為了標識不同代碼層,衍生出Controller,Service,Repository三個注解 作用相當于配置文件的bean標簽,被注解的類,spring始化時,就會創建該對象
@Component("user")  給類注解
@Service("user") // service層
@Controller("user") // web業務層
@Repository("user")//dao層
@Scope(scopeName="singleton") 等同于配置文件的scope屬性@Value(value="188") //給值屬性賦值,可以用在方法上或者屬性上
@Resource(name="car") //給對象賦值,該值car必須要已經聲明(在配置文件中已經配置,或者在類對應中已經注解)
@PostConstruct //指定該方法在對象被創建后馬上調用 相當于配置文件中的init-method屬性
@PreDestroy //指定該方法在對象銷毀之前調用 相當于配置文件中的destory-method屬性
@Autowired 用的非常多//自動裝配對象賦值@Qualifier("car2") 一起使用 告訴spring容器自動裝配哪個對象
例:Tiger.java,Monkey.java,Zoo.java,zhujieBean.xml,RunTest.java
@Component("tiger")
public class Tiger {@Value(value="東南虎")private String name;public String getName() {return name;}public void setName(String name) {this.name = name;}@Overridepublic String toString() {return "Tiger [name=" + name + "]";}
}@Component("monkey")
public class Monkey {@Value("金絲猴")private String name;public String getName() {return name;}public void setName(String name) {this.name = name;}@Overridepublic String toString() {return "Monkey [name=" + name + "]";}}
@Component
public class Zoo {@Resource(name="tiger")private Tiger tiger;@Resource(type=Monkey.class)private Monkey monkey;public Tiger getTiger() {return tiger;}public void setTiger(Tiger tiger) {this.tiger = tiger;}public Monkey getMonkey() {return monkey;}public void setMonkey(Monkey monkey) {this.monkey = monkey;}@Overridepublic String toString() {return "Zoo [tiger=" + tiger.getName() + ", monkey=" + monkey.getName() + "]";}}
<!-- 注解配bean --><!-- 1.先非注解配bean(對象),讓我們作個比較 --><!-- <bean name="tiger" class="cn.ybzy.springdemo.model.Tiger" p:name="東南虎"></bean><bean name="monkey" class="cn.ybzy.springdemo.model.Monkey" p:name="金絲猴"></bean><bean name="nanchangzoo" class="cn.ybzy.springdemo.model.Zoo" p:monkey-ref="monkey" p:tiger-ref="tiger"></bean> --><!-- 2.注解配bean(對象),讓我們作個比較 --><context:component-scan base-package="cn.ybzy.springdemo.model"></context:component-scan>
測試
//注解配bean測試@Testpublic void zhujieBeantest() {ApplicationContext ct = new ClassPathXmlApplicationContext("zhujieBean.xml");Tiger tiger=(Tiger)ct.getBean("tiger");System.out.println(tiger);//Zoo zoo = (Zoo)ct.getBean("nanchangzoo");Zoo zoo = (Zoo)ct.getBean("zoo");System.out.println(zoo);}
----------------------------------------------------------------------------------------------------------------
Tiger [name=東南虎]
Zoo [tiger=東南虎, monkey=金絲猴]
說一下@Resource的裝配順序:
1、@Resource后面沒有任何內容,默認通過name屬性去匹配bean,找不到再按type去匹配
2、指定了name或者type則根據指定的類型去匹配bean
3、指定了name和type則根據指定的name和type去匹配bean,任何一個不匹配都將報錯
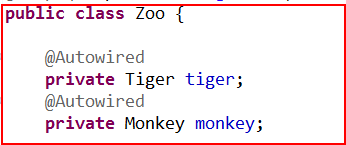
@Autowired
???????@Autowired顧名思義,就是自動裝配,其作用是為了消除代碼Java代碼里面的getter/setter與bean屬性中的property,(如:Zoo,可以不用setTiger,setMonkey方法)。當然,getter看個人需求,如果私有屬性需要對外提供的話,應當予以保留。
因此,引入@Autowired注解,不要忘記配置文件要寫:
<context:component-scan  base-package="cn.ybzy.springdemo">
</context:component-scan>
然后才是在JavaBean的屬性上加注解:
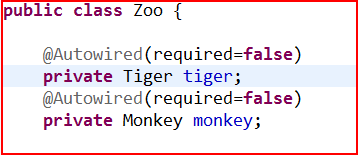
???????如果屬性找不到對應的對象我不想讓Spring容器拋 出異常,而就是顯示null,可以嗎?可以的,就是將@Autowired注解的required屬性設置為false 即可:
@Autowired接口注入
???????上面的比較簡單,我們只是簡單注入一個Java類,那么如果有一個接口,有多個實現,Bean里引用的是接口名,又該怎么做呢?比如有一個Car接口:
???????Car接口有兩個實現類,Spring并不知道應當引用哪個實現類。這種情況通常有兩個解決辦法:
- 刪除其中一個實現類,Spring會自動去base-package下尋找Car接口的實現類,發現Car接口只有一個實現類,便會直接引用這個實現類
- 實現類就是有多個該怎么辦?此時可以使用@Qualifier注解,指明你要spring裝載那個對象:

最后提一下,還有一個功能和@Autowired差不多的一個注解@inject,它是jsr330規范的注解,用它的話要導入相應的jar包,我們推薦使用@Autowired
<dependency><groupId>javax.inject</groupId><artifactId>javax.inject</artifactId><version>1</version>
</dependency>


)


——應用層)


)

)


