QT的軟鍵盤設計
- 1.軟鍵盤制作步驟
- 2.介紹有關函數的使用
- 3.出現的編譯錯誤及解決辦法
- 示例代碼1:按鍵事件實現軟鍵盤
- 現象:
- 示例代碼2:按鍵事件實現軟鍵盤(加特殊按鍵)
- 現象:
- 軟鍵盤移植到新的工程的步驟:
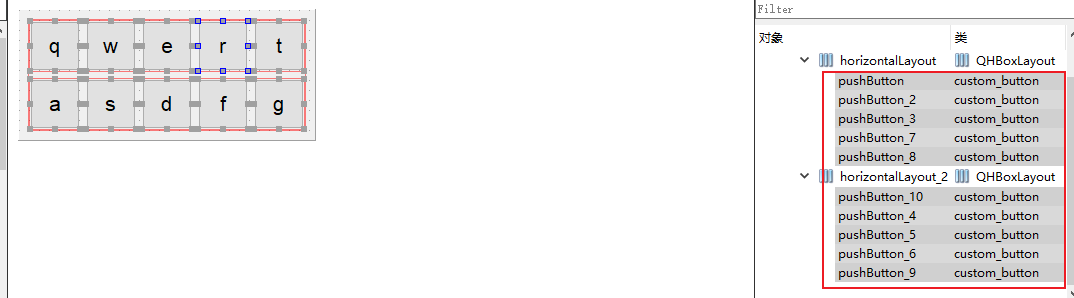
- 自定義軟鍵盤設計步驟:圖示
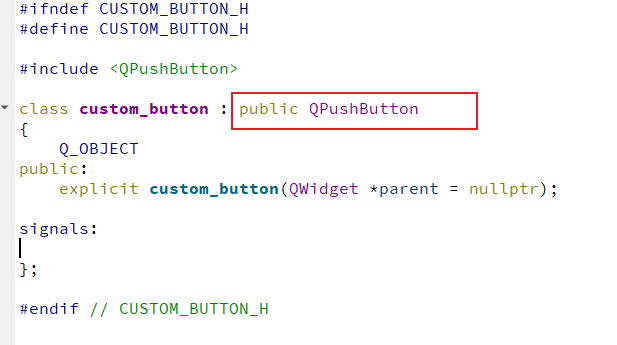
QT中右鍵提升一個組件:作用就是把這個組件的類型變成提升之后的新類型,若程序員自己想要自定義實現某個控件的功能,就可用該功能
1.軟鍵盤制作步驟
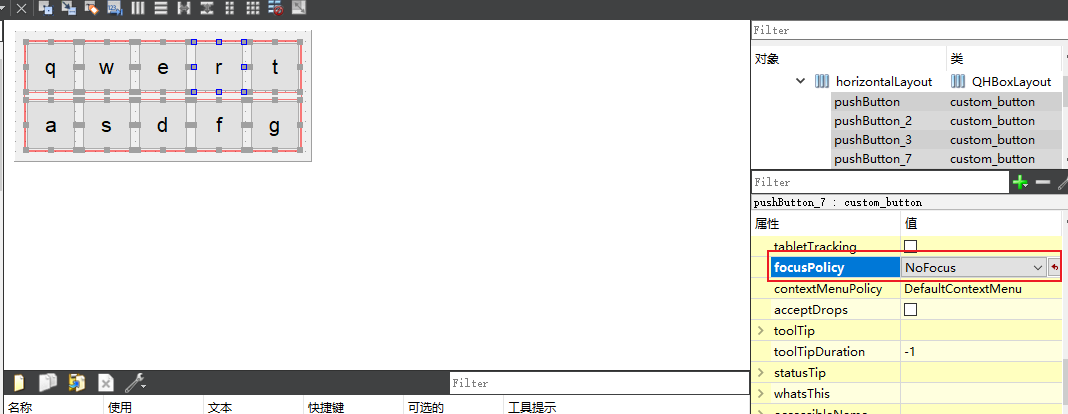
第一步:在QT工程中新添加一個軟鍵盤的ui(模板選擇QWidget),并布局好軟鍵盤的ui順便把按鈕的focusPolicy這個屬性改成noFocus(沒有鼠標焦點,鼠標光標不會在按鈕上停留)
第二步:在你的主窗口中拖一個widget(等一會軟鍵盤嵌套到這個widget中來顯示的),右鍵點擊widget,選擇提升為剛才新建的軟鍵盤類
第三步:實現軟鍵盤的代碼邏輯(讓軟鍵盤可以使用)思路一:使用傳統的方法,信號與槽(很麻煩)思路二:使用QT中的按鍵事件來實現軟鍵盤在QT工程新增一個mybutton的類繼承QPushButton(按鈕類),關聯信號與槽函數,在槽函數中實現按鍵的邏輯
第四步:mybutton里面的槽函數代碼如下//獲取信號的發送者QPushButton *p=qobject_cast<QPushButton *>(sender());QString str=p->text(); // 獲取按鈕的字面值//按照事件產生的流程去寫代碼//自定義一個按鍵事件QKeyEvent *keyevent=new QKeyEvent(QEvent::KeyPress,str.toInt()-32,Qt::NoModifier,str);//把這個按鍵事件發送出去--》發送個鼠標光標聚集的組件QCoreApplication::postEvent(QApplication::focusWidget(),keyevent);
2.介紹有關函數的使用
QKeyEvent::QKeyEvent(Type type, int key, Qt::KeyboardModifiers modifiers, const QString &text = QString())參數: type --》事件類型  QEvent::KeyPresskey --》按鍵的鍵值 摸索規律:字母按鍵(無論大小寫)鍵值  A/a   65B/b   66modifiers --》你是否使用了某個組合鍵Qt::NoModifier  //沒有使用組合鍵Qt::ShiftModifier  //使用了shift按鍵text --》點擊的按鍵的字面值
//把指定的事件發送出去
[static] void QCoreApplication::postEvent(QObject *receiver, QEvent *event)參數:receiver --》事件的接收者event --》要發送的某種事件
//鼠標的光標停留在哪個組件上,該函數立馬返回這個組件的地址
[static] QWidget *QApplication::focusWidget()  //返回鼠標光標聚集的組件
3.出現的編譯錯誤及解決辦法
第一個:QObject::connect: No such slot QPushButton::fun() in ..\solfkeydemo\mybutton.cpp:6原因:你的mybutton這個類中使用了信號與槽,忘記添加Q_OBJECT這個宏定義了解決方法:在mybutton的頭文件中把Q_OBJECT這個宏定義加上即可
第二個:C:\Users\PC\Desktop\share\solfkeydemo\mybutton.cpp:3: error: undefined reference to `vtable for mybutton'解決方法:把編譯產生的臨時文件全部刪除,重新打開工程,再次編譯
示例代碼1:按鍵事件實現軟鍵盤
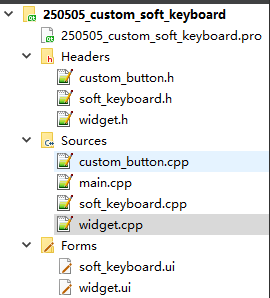
當前目錄結構:
// widget.h
#ifndef WIDGET_H
#define WIDGET_H#include <QWidget>
#include <QDebug>QT_BEGIN_NAMESPACE
namespace Ui { class Widget; }
QT_END_NAMESPACEclass Widget : public QWidget
{Q_OBJECTpublic:Widget(QWidget *parent = nullptr);~Widget();private:Ui::Widget *ui;
};
#endif // WIDGET_H// widget.cpp
#include "widget.h"
#include "ui_widget.h"Widget::Widget(QWidget *parent): QWidget(parent), ui(new Ui::Widget)
{ui->setupUi(this);qDebug()<<"Widget::Widget 構造";
}Widget::~Widget()
{delete ui;
}
//=======================================================//
// soft_keyboard.h
#ifndef SOFT_KEYBOARD_H
#define SOFT_KEYBOARD_H#include <QWidget>
#include <QDebug>namespace Ui {
class soft_keyboard;
}class soft_keyboard : public QWidget
{Q_OBJECTpublic:explicit soft_keyboard(QWidget *parent = nullptr);~soft_keyboard();private:Ui::soft_keyboard *ui;
};#endif // SOFT_KEYBOARD_H// soft_keyboard.cpp
#include "soft_keyboard.h"
#include "ui_soft_keyboard.h"soft_keyboard::soft_keyboard(QWidget *parent) :QWidget(parent),ui(new Ui::soft_keyboard)
{ui->setupUi(this);qDebug()<<"soft_keyboard::soft_keyboard 構造";
}soft_keyboard::~soft_keyboard()
{delete ui;
}
//=======================================================//
// custom_button.h
#ifndef CUSTOM_BUTTON_H
#define CUSTOM_BUTTON_H#include <QPushButton>
#include <QDebug>
#include <QCoreApplication>
#include <QKeyEvent>
#include <QApplication>class custom_button : public QPushButton
{Q_OBJECT
public:explicit custom_button(QWidget *parent = nullptr);private slots:void func();
};#endif // CUSTOM_BUTTON_H// custom_button.cpp
#include "custom_button.h"custom_button::custom_button(QWidget *parent) : QPushButton(parent)
{qDebug()<<"custom_button 構造";connect(this, &QPushButton::clicked, this, &custom_button::func);
//    connect(this, SIGNAL(clicked()), this, SLOT(func()));
}void custom_button::func()
{//獲取信號的發送者QPushButton *p=qobject_cast<QPushButton *>(sender());QString str=p->text(); // 獲取按鈕的字面值
#if 0if (!str.isEmpty()) {QChar ch = str.at(0);int key = ch.toUpper().unicode(); // 獲取大寫字符的鍵值QKeyEvent *keyevent = new QKeyEvent(QEvent::KeyPress,key,Qt::NoModifier,QString(ch));QCoreApplication::postEvent(QApplication::focusWidget(), keyevent);}
#else//按照事件產生的流程寫代碼//自定義一個按鍵事件QKeyEvent *keyevent=new QKeyEvent(QEvent::KeyPress,str.toInt() - 32,Qt::NoModifier,str);//把這個按鍵事件發送出去--》發送給鼠標光標聚集的組件QCoreApplication::postEvent(QApplication::focusWidget(),keyevent);
#endif
}
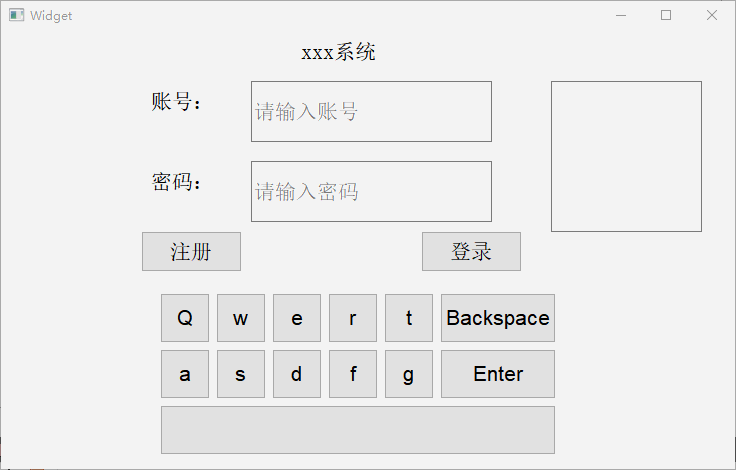
現象:

示例代碼2:按鍵事件實現軟鍵盤(加特殊按鍵)
與示例代碼1的差別是在槽函數中增加了特殊按鍵的判斷
// custom_button.h
#ifndef CUSTOM_BUTTON_H
#define CUSTOM_BUTTON_H#include <QPushButton>
#include <QDebug>
#include <QCoreApplication>
#include <QKeyEvent>
#include <QApplication>class custom_button : public QPushButton
{Q_OBJECT
public:explicit custom_button(QWidget *parent = nullptr);private slots:void func();
};#endif // CUSTOM_BUTTON_H// custom_button.cpp
#include "custom_button.h"custom_button::custom_button(QWidget *parent) : QPushButton(parent)
{qDebug()<<"custom_button 構造";connect(this, &QPushButton::clicked, this, &custom_button::func);
//    connect(this, SIGNAL(clicked()), this, SLOT(func()));
}void custom_button::func()
{//獲取信號的發送者QPushButton *p=qobject_cast<QPushButton *>(sender());QString str=p->text(); // 獲取按鈕的字面值
#if 0if (!str.isEmpty()) {QChar ch = str.at(0);int key = ch.toUpper().unicode(); // 獲取大寫字符的鍵值QKeyEvent *keyevent = new QKeyEvent(QEvent::KeyPress,key,Qt::NoModifier,QString(ch));QCoreApplication::postEvent(QApplication::focusWidget(), keyevent);}
#else//按照事件產生的流程寫代碼QKeyEvent *keyevent;//判斷特殊按鍵if(str=="Backspace") //退格鍵{//自定義一個按鍵事件keyevent=new QKeyEvent(QEvent::KeyPress,Qt::Key_Backspace,Qt::NoModifier,str);}else if(str=="Enter"){//自定義一個按鍵事件keyevent=new QKeyEvent(QEvent::KeyPress,Qt::Key_Enter,Qt::NoModifier,str);}else if(str==""){//自定義一個按鍵事件keyevent=new QKeyEvent(QEvent::KeyPress,Qt::Key_Space,Qt::NoModifier," ");}else //字母按鍵{//自定義一個按鍵事件keyevent=new QKeyEvent(QEvent::KeyPress,str.toInt()-32,Qt::NoModifier,str);}//把這個按鍵事件發送出去--》發送給鼠標光標聚集的組件QCoreApplication::postEvent(QApplication::focusWidget(),keyevent);
#endif
}
現象:
軟鍵盤移植到新的工程的步驟:
1.將已實現的功能代碼copy到新工程目錄下
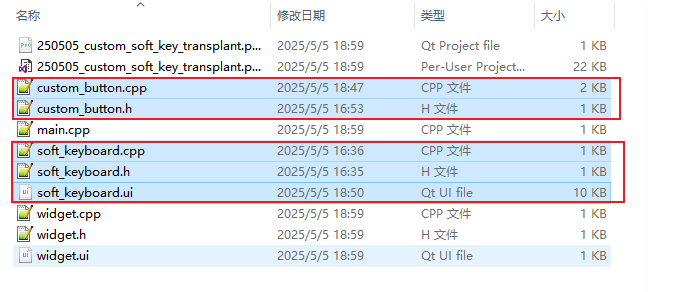
2.在工程文件名下右鍵—》添加現有文件
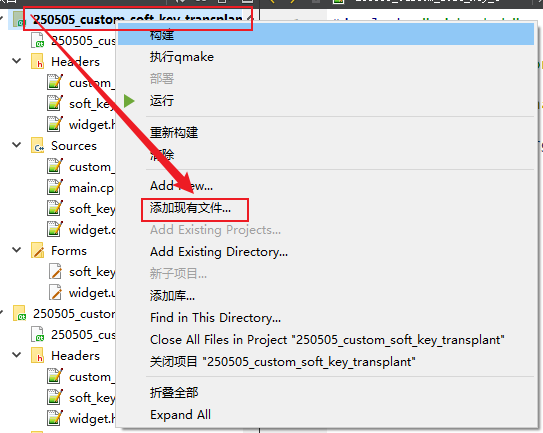
3.選擇第一步copy過去的文件進行添加
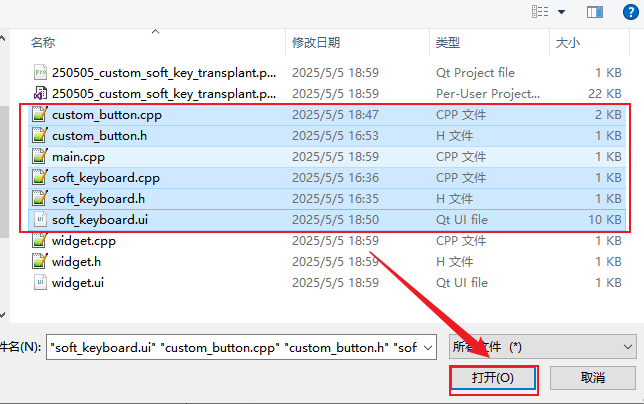 4.在新工程中設計界面,將widget類提升為自定義的軟鍵盤類
5.編譯后即可使用
自定義軟鍵盤設計步驟:圖示
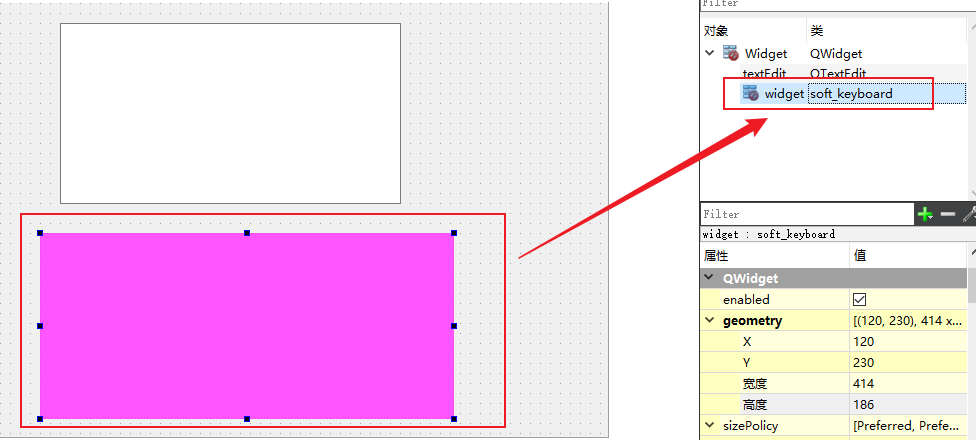
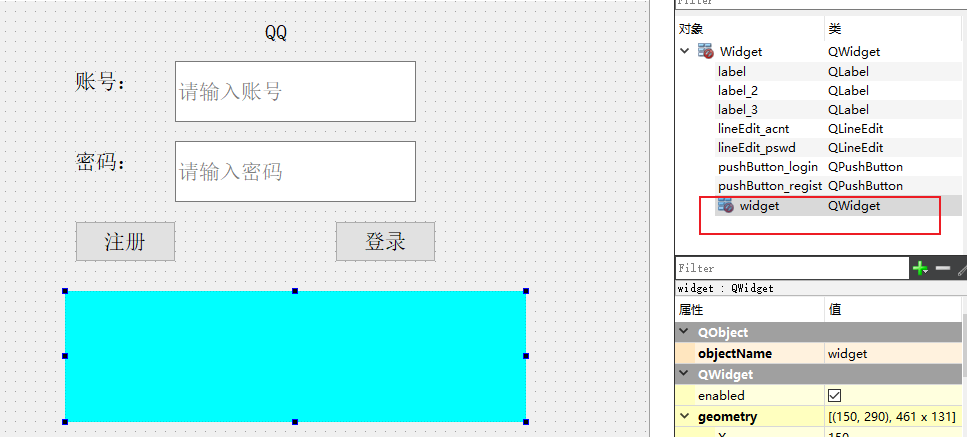
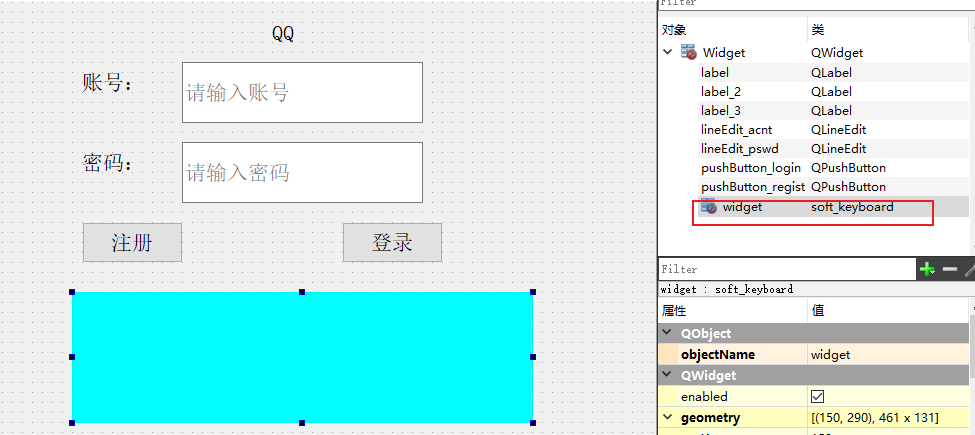
1.先在主窗口設計好界面,此時可以看到widget的類為QWidget(這個widget就是用來存放軟件的)
2.新建一個UI界面用來設計軟鍵盤(添加新的設計師界面類)
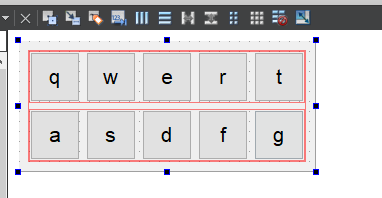
3.右鍵widget控件,選擇提升為…,將該widget提升為上一步自定義的軟鍵盤界面類
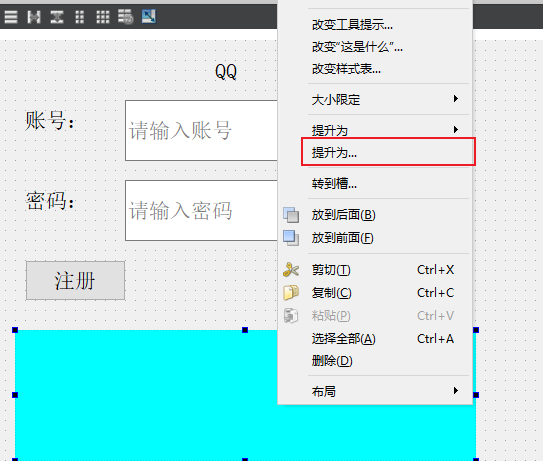
4.填寫提升的類名稱,如下

5.此時可以看到已將widget提升為自定義的軟鍵盤類
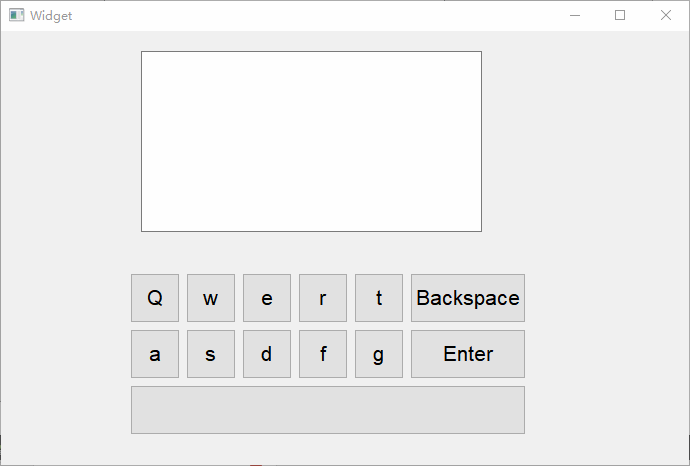
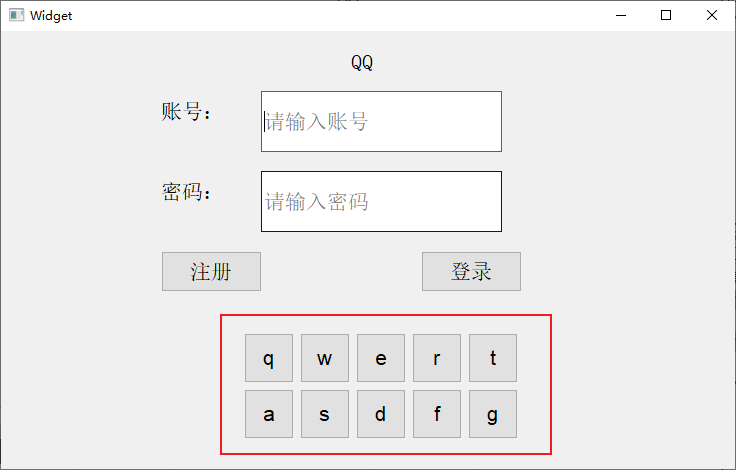
7.編譯后也可以看到已經顯示到主窗口
7.新建一個C++類,使其繼承自QPushButton (用來實現軟鍵盤的功能)
8.將軟鍵盤界面的按鈕類提升為新建的C++類,此時該軟鍵盤界面使用的就是該類寫好的功能
9.將焦點策略改為不聚焦,這樣在點擊按鈕時,此時的焦點就不是是按鈕,而是單行輸入框,這樣就可以根據新建的C++類寫好的事件進行處理
9.在新建的custom_button類(這里是上邊提到的新建的C++類)中關聯信號與槽函數,在槽函數中實現按鍵的邏輯
#include "custom_button.h"custom_button::custom_button(QWidget *parent) : QPushButton(parent)
{qDebug()<<"custom_button 構造";connect(this, &QPushButton::clicked, this, &custom_button::func);
//    connect(this, SIGNAL(clicked()), this, SLOT(func()));
}void custom_button::func()
{//獲取信號的發送者QPushButton *p=qobject_cast<QPushButton *>(sender());QString str=p->text(); // 獲取按鈕的字面值qDebug()<<"str.toInt():"<<str.toInt();//按照事件產生的流程寫代碼//自定義一個按鍵事件  str.toInt()-32 :輸入按鈕字面值的ASCII 值 -32 如輸入a:即鍵值是97-32QKeyEvent *keyevent=new QKeyEvent(QEvent::KeyPress,str.toInt() - 32,Qt::NoModifier,str);//把這個按鍵事件發送出去--》發送個鼠標光標聚集的組件QCoreApplication::postEvent(QApplication::focusWidget(),keyevent);
}
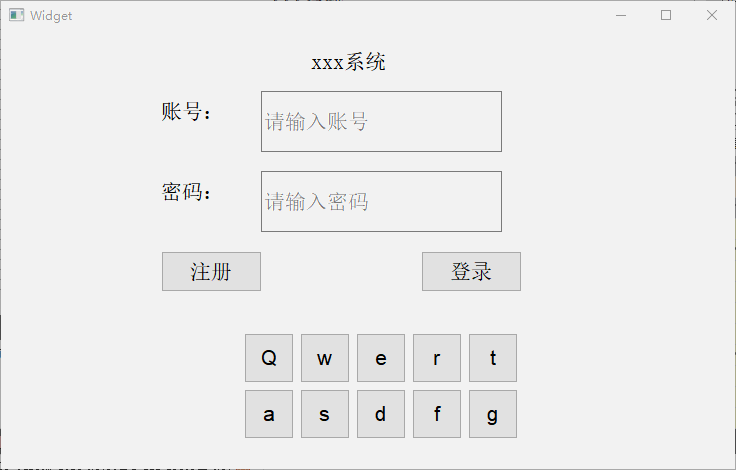
11.現象如下


)


——繼承)
反爬攻防戰:動態IP池構建與代理IP實戰指南(突破95%反爬封禁率))


)


