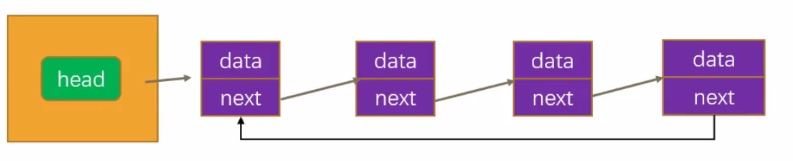
循環鏈表
介紹
在單選鏈表基礎上,下一個節點指向前一個節點,最后一個節點指向起點
封裝循環鏈表
為了讓循環鏈表可以繼承自單向鏈表,對其進行重構
給其增加一個tail屬性(尾節點),對各方法進行重寫整理
import ILinkedList from "./ILinkedList";
// 1.創建Node節點類
class Node<T> {value:T;next:Node<T> | null = null;constructor(value:T) {this.value = value}
}// 2.創建LinkedList類
class LinkedList<T> implements ILinkedList<T> {protected  head:Node<T> | null = null;protected size:number = 0;// 新增屬性:尾結點protected tail:Node<T> | null = null;get length() {return this.size}// 封裝私有方法// 根據position獲取當前的節點protected getNode(position:number): Node<T> | null{let current = this.headlet index = 0while(index++ < position && current) {current = current.next}return current}// 判斷是否為最后一個節點private isTail(node:Node<T>): boolean {return node === this.tail}// 1.追加節點append(value:T) {// 1.根據value創建一個新節點const newNode = new Node(value)// 2.判斷this.head是否為nulif(this.head === null) {this.head = newNode}else {this.tail!.next = newNode}this.tail = newNodethis.size++}// 2.遍歷鏈表traverse() {const values:T[] = []let current = this.headwhile(current) {values.push(current.value)if(this.isTail(current)){//已經遍歷到最后一個節點current = null}else{current = current.next}}if(this.head && this.tail?.next === this.head) {values.push(this.head.value)}console.log(values.join('->'));//aaa->bbb->ccc->ddd}// 3.插入方法insert(value: T, position: number): boolean {// 1. 邊界條件判斷if (position < 0 || position > this.size) return false;// 2. 根據 value 創建新的節點const newNode = new Node(value);// 3. 判斷是否需要插入頭部if (position === 0) {newNode.next = this.head;this.head = newNode;} else {// 4.找到插入位置的前一個節點/* let current = this.head;let previous: Node<T> | null = null;let index = 0;while(current && index < position ){previous = currentcurrent = current.next;index++}previous!.next = newNode;newNode.next = current; */// 重構代碼const previous = this.getNode(position - 1);newNode.next = previous?.next ?? null;previous!.next = newNode;if(position === this.length) {this.tail = newNode;}}// 6. 更新鏈表大小this.size++;return true;}// 4.刪除方法removeAt(position:number): T | null {// 1.越界判斷if(position < 0 || position >= this.size) return null;// 2.判斷是否刪除第一個節點let current = this.head;if(position === 0) {this.head = current?.next ?? null;if(this.length === 1){this.tail = null;}}else{/* let previous: Node<T> | null = null;let index = 0;while(index++ < position && current) {previous = current;current = current.next}// 找到需要的節點previous!.next = current?.next ?? null; */// 重構為如下代碼const previous = this.getNode(position - 1)previous!.next = previous?.next?.next ?? null;current = previous!.next;if(position === this.length - 1) {this.tail = previous;}}this.size--;return current?.value  ?? null;}// 5.獲取方法get(position:number): T | null {// 5.1越界命題if(position < 0 || position >= this.size) return null;// 5.2查找元素return this.getNode(position)?.value  ?? null;}// 7.更新方法update(value:T,position:number): boolean {if(position < 0 || position >= this.size) return false;const currentNode = this.getNode(position)currentNode!.value = value;return true;}// 8.根據值獲取對應位置的索引indexOf(value:T): number {// 從第一個節點開始,向后遍歷let current = this.head;let index = 0;while(current) {if(current.value === value) {return index}if(this.isTail(current)){current = null}else{index++current = current.next}}return -1;}// 9.根據value刪除節點remove(value:T): T | null {const index = this.indexOf(value)return this.removeAt(index)}// 10.判斷鏈表是否為空isEmpty(): boolean {return this.size === 0}
}const linkedList = new LinkedList<string>()export default LinkedList
封裝CircularLinkedList
import LinkedList from "./01-實現單選LinkedList"class CircularLinkedList<T> extends LinkedList<T> {// 重新實現的方法: append方法append(value:T) {super.append(value)this.tail!.next = this.head}// traverse方法// insert方法insert(value: T, position: number): boolean {const isSuccess = super.insert(value, position)if(isSuccess && (position === this.length || position === 0)){this.tail!.next = this.head}return isSuccess}// removeAt方法removeAt(position: number): T | null {const value = super.removeAt(position)if(value && this.tail &&(position === 0 || position === this.length-1)){this.tail.next = this.head}return value}// indexOf方法
}const cLinkedList = new CircularLinkedList<string>()
cLinkedList.append('aaa')
cLinkedList.append('bbb')
cLinkedList.append('ccc')
cLinkedList.append('ddd')
cLinkedList.insert('eee', 0)
cLinkedList.insert('fff', 5)cLinkedList.removeAt(5)
cLinkedList.traverse()console.log('--------測試get----------');
console.log(cLinkedList.get(0));
console.log(cLinkedList.get(1));
console.log(cLinkedList.get(4));console.log('--------測試update----------');
cLinkedList.update('hhh', 0)
cLinkedList.update('iii', 2)
cLinkedList.traverse()
雙向鏈表
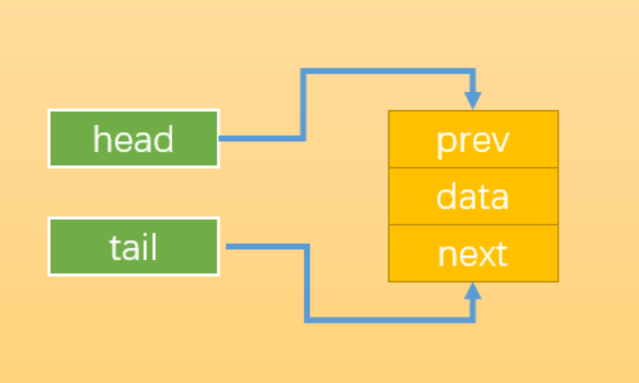
介紹
既可以從頭遍歷到尾,也可以從尾遍歷到頭。

封裝雙向鏈表
import LinkedList from "./01-實現單選LinkedList"; class DoublyNode<T> extends LinkedList<T> {
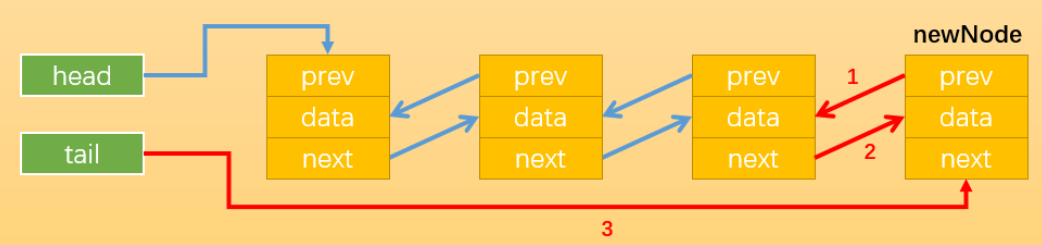
}2.append方法
情況一:當添加的是第一個節點時→讓head和tail都指向新節點
情況二:當添加的是其它節點時,需改變相關節點的指引關系
代碼實現:
  protected head: DoublyNode<T> | null = null;protected tail: DoublyNode<T> | null = null;
// append方法append(value: T): void {const newNode = new DoublyNode(value)// 情況一:鏈表為空if(!this.head) {this.head = newNodethis.tail = newNode}else{// 情況二:鏈表不為空this.tail!.next = newNode// 不能將父類的類型賦值給子類;可以將子類的類型賦值給父類newNode.prev = this.tailthis.tail = newNode}this.size++}
測試代碼:
dLinkedList.append("aaa")
dLinkedList.append("bbb")
dLinkedList.append("ccc")
dLinkedList.append("ddd")
dLinkedList.traverse()
3.prepend方法-從頭部插入
情況一:鏈表本身為空
情況二:鏈表有值
prepend(value:T):void {const newNode = new DoublyNode(value)if(!this.head) {this.head = newNodethis.tail = newNode}else{newNode.next = this.headthis.head.prev = newNodethis.head = newNode}this.size++}4.反向遍歷-從尾到頭
postTraverse() {const values:T[] = []let current = this.tailwhile(current) {values.push(current.value)current = current.prev}console.log(values.join('->'));//ddd->ccc->bbb->aaa->zzz
}
5.insert插入節點
情況一:插入位置為0時
情況二:插入位置為末尾時
情況三:鏈表中間位置時
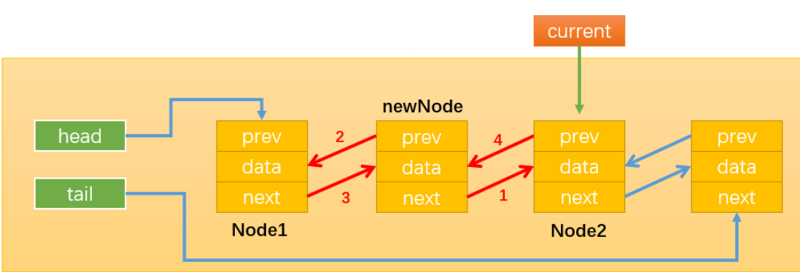
insert(value: T, position: number): boolean {if(position < 0 || position > this.length) return false;if(position === 0) {this.prepend(value)}else if(position === this.length){this.append(value)}else{const newNode = new DoublyNode(value)const current = this.getNode(position)! as DoublyNode<T>current!.prev!.next = newNodenewNode.next = currentnewNode.prev = current!.prevcurrent!.prev = newNodethis.size++}return true}6.removeAt(position)
情況一:當刪除0位置時:
1.當鏈表長度為1時:
2.鏈表長度不為1時:
情況二:刪除末尾位置:
情況三:刪除中間位置:
// 索引刪除removeAt(position: number): T | null {if(position < 0 || position >= this.length) return nulllet current = this.headif(position === 0) {if(this.length === 1){this.head = nullthis.tail = null}else {this.head = this.head!.nextthis.head!.prev = null}}else if(position === this.length - 1){current = this.tailthis.tail= this.tail!.prevthis.tail!.next = null}else {current = this.getNode(position)! as DoublyNode<T>current.prev!.next = current.nextcurrent.next!.prev = current.prev}this.size--;return current?.value?? null;}
方法)
)


))


之旅——程序邏輯控制④)

:Shader實現圓形、橢圓、菱形等頭像)
)